
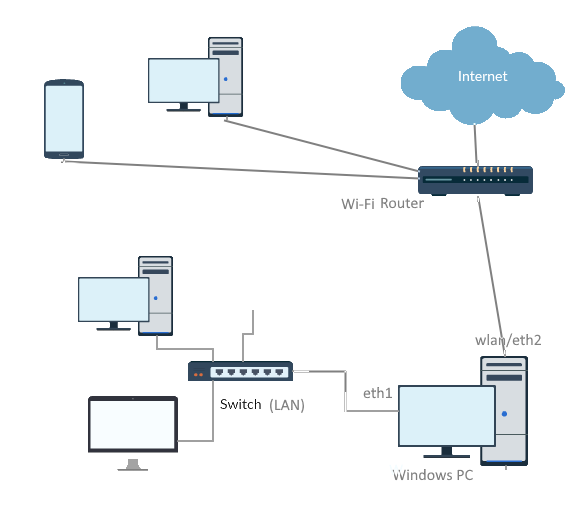
В этой статье, мы рассмотрим, как настроить сетевой мост на компьютере под управлением Windows. Такой сетевой мост, работающий на канальном уровне модели OSI (L2), используется для прозрачного объединения двух и более сетей в одну общую сеть. Все версии Windows поддерживают объединение сетевых адаптеров в мост, никакое дополнительное ПО не потребуется.
В нашем примере у нас есть компьютер Windows с двумя сетевыми картами, подключенными в два разных сетевых сегмента. WLAN адаптер подключен к Wi-Fi сети (роутер с доступом в интернет), и Ethernet адаптер подключен к изолированной проводной локальной сети (LAN), построенной на коммутаторе. С помощью сетевого моста на Windows-компьютере вы прозрачно объединить две сети и все клиенты из изолированной сети (LAN) смогут получать доступ к ресурсам в основной сети и выходить в интернет через маршрутизатор.
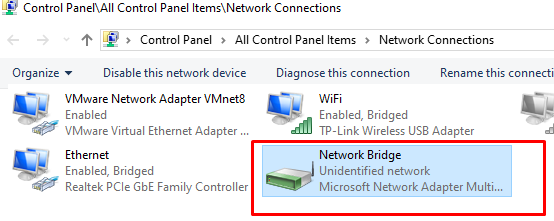
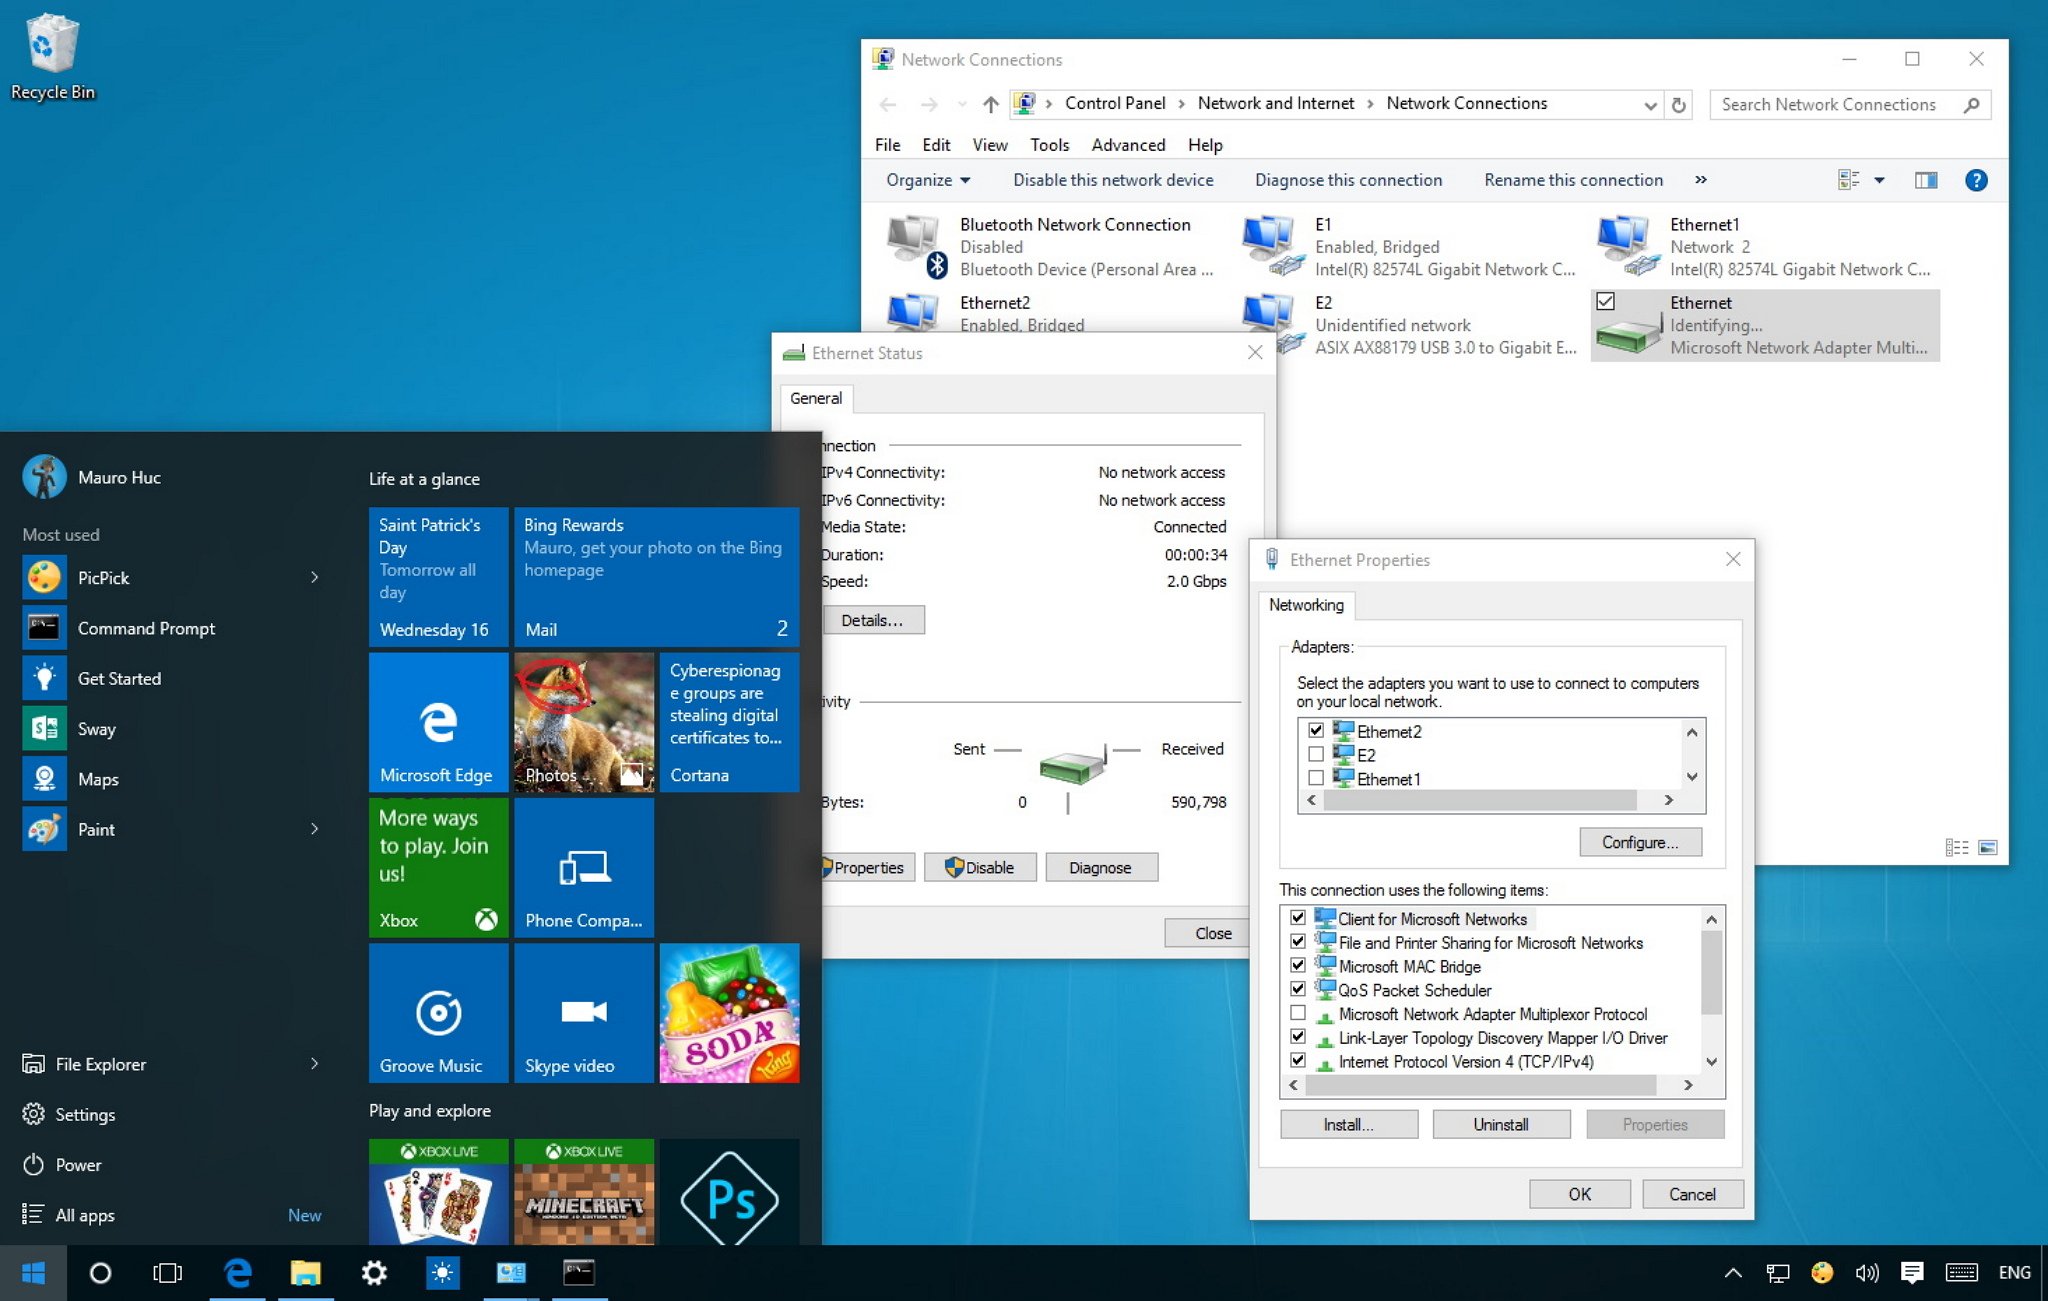
Создать сетевой мост в Windows можно из стандартной панели управления сетевыми подключениями (
ncpa.cpl
). Выберите два (или) более сетевых адаптера, которые вы хотите объединить мост, и в меню выберите Bridge Connections.

Через некоторое время в списке сетевых адаптеров появится новый сетевой адаптер типа Microsoft Network Adapter Multiplexor Driver с именем Network Bridge.
При создании моста может появится ошибка:
An unexpected error occurred while configuring the Network Bridge.
В этом случае откройте свойства бриджа и отметьте сетевые адаптеры, которые должны объединяться вашим мостом.
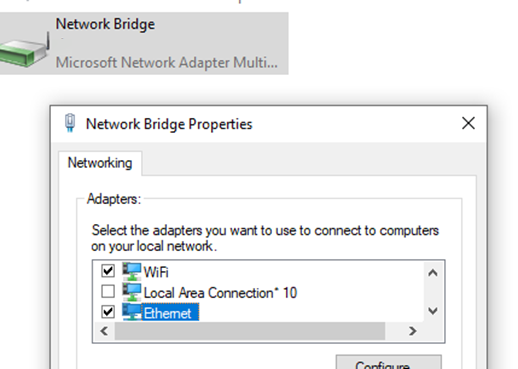
После этого любые участвующих в мосте сетевых адаптеров, включая TCP/IP, станут недоступны для редактирования, а в описании адаптеров появится статус Bridged. Сетевой мост может включать в себя более двух сетевых адаптеров.
Теперь, если на роутере включен DHCP сервер, все клиенты в LAN получат IP адреса из внешней сети (на клиентских компьютерах должно быть включено автоматическое получение IP адресов от DHCP, либо IP адреса из одного сегмента нужно задать вручную). Таким образом вы прозрачно объедините две сети с помощью сетевого моста.
Если в сети отсутствует DHCP сервер, статические IP адреса для интерфейса bridge и на устройствах в объединенной сети можно назначить вручную.
Чтобы удалить сетевой мост, щелкните по немы и выберите Delete.
В старых версиях Windows сетевое подключение типа мост можно было только из графического интерфейса. При попытке выполнить команду
netsh bridge install
появлялась ошибка:
Not supported.
Please go to the Network Connections folder to install.

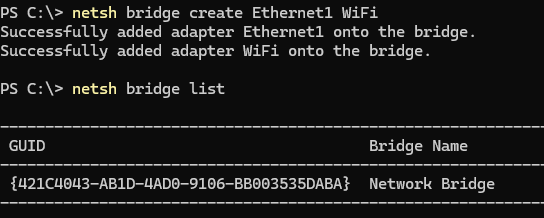
В Windows 11 22H2 после установки кумулятивного обновления от 2023-09, можно создать сетевое подключение типа мост из командной строки с помощью утилиты netsh.
Выведите с помощью PowerShell имена сетевых интерфейсов в Windows:
Get-NetAdapter
Вывести доступные для добавления в мост сетевые адаптеры:
netsh bridge show adapter

Чтобы создать мост из двух интерфейсов, укажите из имена в следующей команде:
netsh bridge create Ethernet1 WiFi
После того как мост создан, получите его GUID:
netsh bridge list
Добавить или удалить сетевой адаптер в бридж:
netsh bridge add <Adapter_Name> to <bridge_guid>
netsh bridge remove <Adapter_Name> from <bridge_guid>
Удалить мост:
netsh bridge destroy <bridge_guid>
При объединении в мост Ethernet и Wi-Fi адаптеров, в Windows бридж работает некорректно, если одновременно оба устройства были отключены от сети, а потом подключены. В качестве обходного решения можно добавить в сетевой мост отдельное устройство, которое никогда не отключается. Проще всего это сделать, создав фиктивный Microsoft loopback adapter (в современных версиях Windows это устройство
Microsoft KM-TEST Loopback Adapter
). Можно создать адаптер из Device Manager или с помощью утилиты devcon:
./devcon.exe -r install $env:windir\Inf\Netloop.inf *MSLOOP
Для организации общего доступа к интернет-подключению в Windows можно использовать службу Internet Connection Sharing (ICS). В этом случае Windows компьютера будет выступать в качестве роутера (уровень L3/L4 OSI), а адреса клиентов буду скрываться за NAT. См. как создать точку доступа Wi-Fi и раздать интернет в Windows.
Network Bridge is a feature that has been part of Windows for a long time. A bridge allows you to connect two or more network segments together allowing devices to join the network when it’s not possible to connect them directly to a router or switch.
For example, on an Xbox 360 without a wireless adapter, an Xbox One that no longer connects to Wi-Fi, or when a computer is far away from the router, you can use Network Bridge to share your computer’s connection (e.g., Ethernet or Wireless) with these devices to allow access the network. Once devices connect using a bridge, they will appear as if they were physically connected to the router.
In this Windows 10 guide, we’ll walk you through the steps to properly set up a bridge connection on your desktop or laptop to allow other devices to join your local network and to access the internet.
Before you begin
Before you start setting up a bridge connection on Windows 10, you will need at least two network adapters. One that is connected to the internet and a second adapter that will be used to connect another computer.
Additionally, as a result of setting up a bridge on Windows 10 (or on previous versions of the operating system), the primary network adapter on the host computer will lose internet connectivity.
To regain access to the internet, you will need to set a static IP address to your computer manually. The first thing you want to do is to save to a text file the current IP address information assigned by the DHCP server on your local network.
To get the IP address information from your computer follow these steps:
All the latest news, reviews, and guides for Windows and Xbox diehards.
- Use the Windows key + X keyboard shortcut to open the Power User menu and select Command Prompt.
- Type the following command and press Enter:
ipconfig /all - Make note of the IP address configuration of the network adapter connected to the internet. You need to record the following information: IPV4, subnet mask, default gateway, and DNS servers addresses.
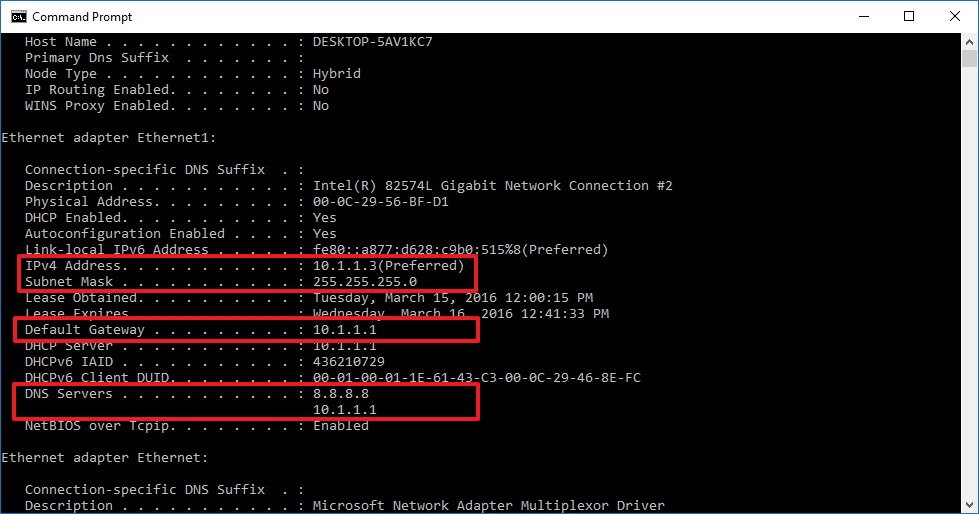
Note: You can use an IP address dynamically assigned by the DHCP server as static only as a temporary solution. On best practice you should assign an IP address in the range that doesn’t belong to the DHCP address pool on your router. For more information on how to find the DHCP server configuration make sure to check your router’s manufacturer support website.
How to create a Network Bridge on Windows 10
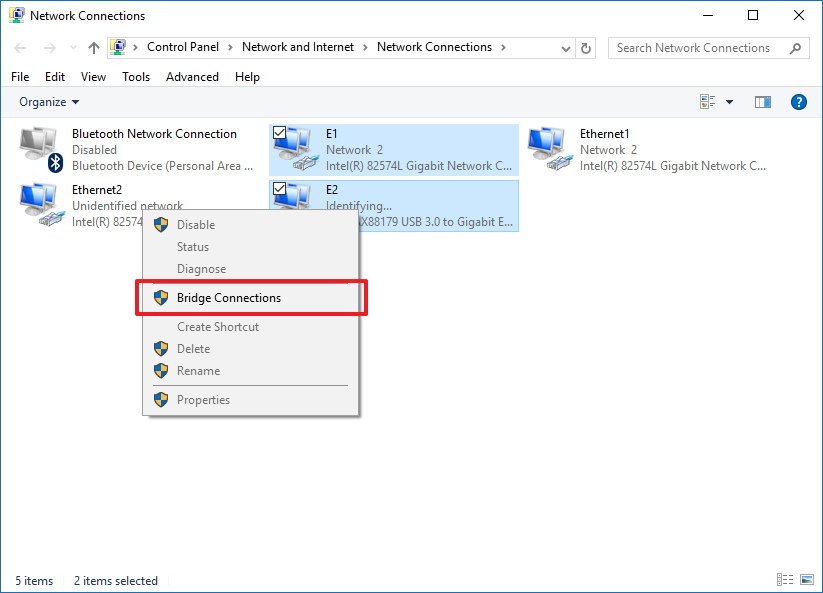
- Use the Windows key + X to open the Power User menu and select Network Connections.
- Select both, the network adapter that connects to the internet and the adapter you want to use in the bridge connection.
- Right-click the selection and click Bridge Connections.
At this point, the device connected to the bridge port should have access to the network and internet with the IP address information coming from the router, but the computer hosting the bridge won’t be able to access the internet unless you have a third network adapter that is also connected to the network or a static IP address .
How to regain internet access after setting up a bridge connection
To regain access to the internet from the host computer do the following:
- Use the Windows key + X to open the Power User menu and select Network Connections.
- Right-click the bridge adapter and select Properties.
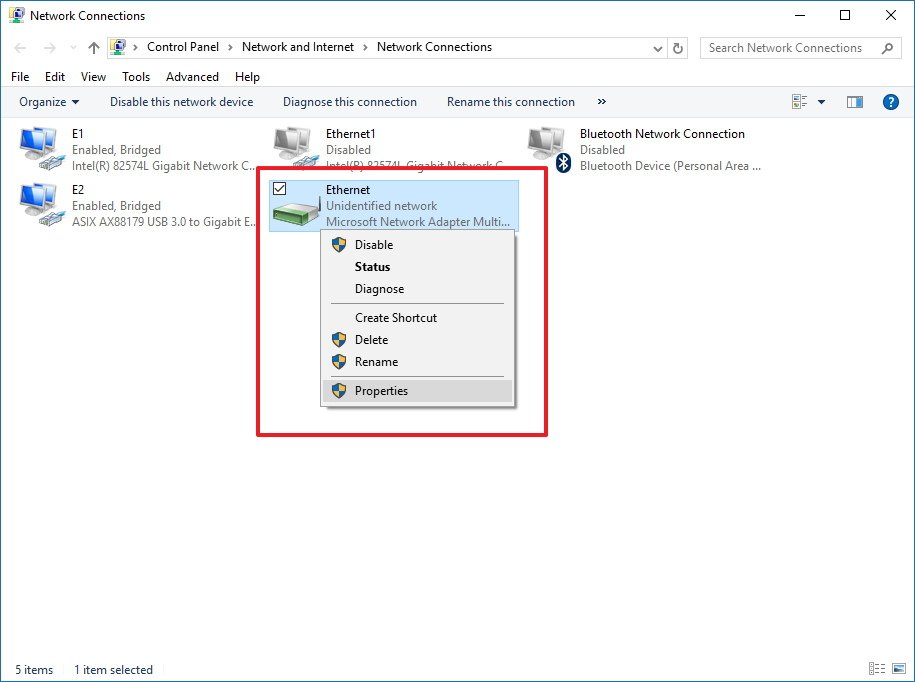
- Select the network adapter that connects to the internet.
- Select Internet Protocol Version 4 (TCP/IPv4).
- Click Properties.
- Select the Use the following IP address option.
- Use the IP address information you collected at the beginning of this guide to assign a static IP address like is shown in the screenshot below.
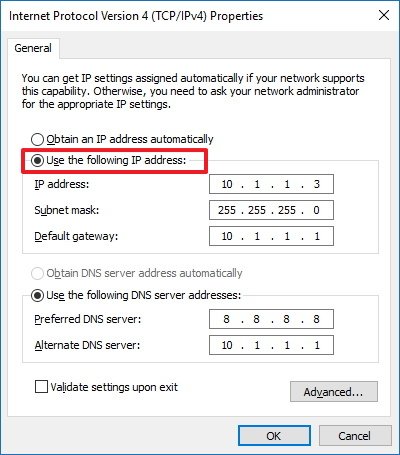
- Click OK.
- Click Close to complete the task.
How to add more network adapters to a bridge connection
You’re not limited only to offer bridge connectivity to a single network adapter. At any time, you can add multiple adapters.
- Right-click the network adapter and select Add to Bridge.
- Connect a game console or another computer and the device will automatically acquire the network settings from the local router.

How to remove a bridge connection from your computer
When you no longer need a bridge connection, select one or all the participating network adapters, and select Remove from Bridge.
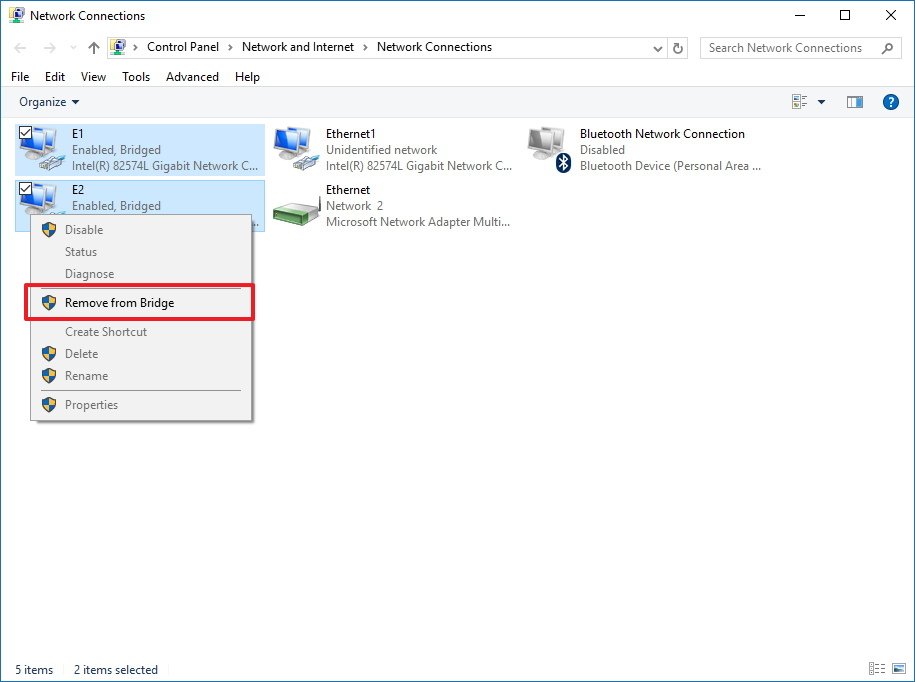
At this point, the bridge adapter should disappear from Network Connections, but if it doesn’t, simply reboot your computer.
The last thing left to do is to remove the IP address static settings and let your PC once again get this information automatically from the router.
- Right-click the network adapter and select Properties.
- Select Internet Protocol Version 4 (TCP/IPv4).
- Click Properties.
- Select the Obtain an IP address automatically option.
- Select the Obtain DNS server address automatically option.
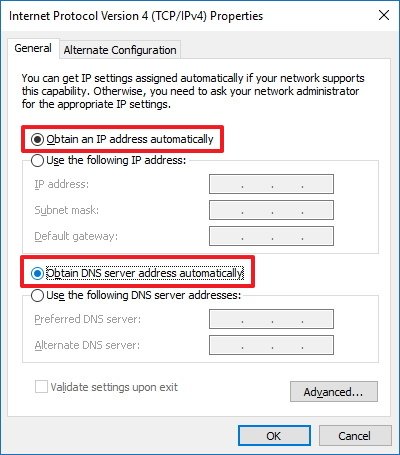
- Click OK.
- Click Close to complete the task.
Network Bridge or Internet Connection Sharing?
It’s important to note that Network Bridge is very similar to the Internet Connection Sharing (ICS) feature, but they’re not the same.
When you use Internet Connection Sharing (ICS), you will convert your computer into a router, which uses a built-in DHCP server to assign IP addresses to computers participating in ICS. It also offers Network Address Translation (NAT) that allows multiple devices to connect to the network using the ICS host as the middle man.
On the other hand, Network Bridge doesn’t turn the host computer into a router and you won’t get Network Address Translation. It only provides a medium (bridge) in which other devices can connect directly to the network and obtain the same IP address scheme every other computer connected to the network is using.
Which feature you should use? The answer to the question is: «depends». Both features offer similar benefits. If your local network already includes a router connected to the internet and you want a seamless network integration where all devices share the same network addressing scheme, then you should consider using Network Bridge.
If you need a router-like feature, and you want to keep the network segments separated while taking advantage of the security benefits of Network Address Translation, then you’ll be better suited using Internet Connection Sharing.
In theory, a bridge connection is more efficient, because the host is only a pass-through, and all the routing process will occur in the local router and not on the host computer.
Remember that Network Bridge and Internet Connection Sharing have been designed only for home and small office networks, and for scenarios, where a wireless connection can’t be established, or a cable run to the main router or switch is not possible. These features are not recommended as networking solutions for businesses. In addition, there can only be one Network Bridge or one Internet Connection Sharing per-computer.
Windows 10 resources
For more tips, coverage, and answers on Windows 10, you can visit the following resources:
- Windows 10 on Windows Central – All you need to know
- Windows 10 help, tips, and tricks
- Windows 10 forums on Windows Central
Mauro Huculak has been a Windows How-To Expert contributor for WindowsCentral.com for nearly a decade and has over 15 years of experience writing comprehensive guides. He also has an IT background and has achieved different professional certifications from Microsoft, Cisco, VMware, and CompTIA. He has been recognized as a Microsoft MVP for many years.
Windows provides the capability to connect or bridge two different network types through software. This can eliminate the need to buy a hardware device to connect two disparate networks. This has been a part of Windows since XP and still works just fine in Windows 10.
Here’s an example. Let’s say you have two networks: in one, the computers are connected with cables; and in the other, the computers are connected using wireless technology.
The wired computers can only communicate with other wired computers, and the wireless computers can only communicate with other wireless computers. With a network bridge, all of the computers can communicate with each other.
Note that you need to physically have more than one network adapter on your computer to actually create a network bridge. Also, when you create a network bridge, the primary network adapter loses Internet connectivity unless you setup a static IP address for it.
To bridge connections, go to Control Panel then click Network and Sharing Center. On this window, click Change adapter settings:

Select the adapters that you want to bridge, right-click and then select Bridge Connections:

That’s it! The two separate networks should now appear as a single network. This is also useful when you don’t have enough ports on a router and WiFi connectivity isn’t possible.
Take note that for security purposes, you shouldn’t create a bridge between an Internet connection and a local network connection because it creates an unprotected link between your network and the Internet, which makes your local network accessible to anyone on the Internet.
People with home or small office networks typically use a bridge when they have different types of networks, but they want to exchange information or share files with all of the computers on those networks. The easiest way to do this without having to buy hardware is by using the network bridge feature in Windows.
Network Bridge and Internet Connection Sharing are similar, but don’t work exactly the same. If you want to learn more, check out this Microsoft article that explains the features in more detail. Enjoy!
Related Posts
- How to Use Event Viewer to Troubleshoot Windows Problems
- How to Boot into Safe Mode in All Versions of Windows
- How to Reset Your Computer Password If You Lock Yourself Out
- 14 Command Prompt (CMD) Commands Windows Users Should Know
- Change from Public to Private Network in Windows
Ready for the best newsletter in tech?
Get daily tips, tricks, guides, and special offers delivered right to your inbox.
When you are working in a small home or office networks, the exchange of data and sharing of information amongst all the machines on those networks becomes quite a tedious task. Bridge Connection is a significant solution for these circumstances.
In Windows 10, bridging an internet connection is done so that you can connect two or more networks and make it workable for the machines under those networks to exchange data with one and all. For example, let us consider you have two networks – in one, the machines A, B, and C are connected with cables whereas, in the other one, machines D, E, and F are operating on wireless. So, by building a bridge connection you make it possible for all the five machines A, B, C, D, and E to work on the same network channel. So let us now head towards the steps and see How to Setup Bridge Connections on Windows 10 to attach the PCs functioning on multiple unassociated home or office networks for inter-exchanging information.
How to Setup Bridge Connections on Windows 10
- First of all, on the right end of the taskbar look for the Network symbol and move on with a right click on it and thereon opt for Network and Sharing Center.
- In the next window, pick up the link that is described as Change adapter options in right flank.
- In the emerged window, press and hold the Ctrl key and hit those two or more networks simultaneously that you would wish to Setup in the Bridge connections.
- Perform a right click on either of the networks and hit Bridge Connections option.
- A pop up will inform about the progress in the bridge connections.
- Bridge connection will thus be set up.
There are many other users who confront yellow warning signal with a note that is written as “To create a network bridge, you must select at least two LAN or High-Speed Internet connections that are not being used by Internet Connection Sharing”. Pursue the below steps to get a proper connection –
- Be in the window where you can see all the adapters (see the below screenshot), do a right-click on the wireless adapter and from the arrived contextual menu, select Properties.
- Shift yourself to the Sharing tab and untick the first square cell that is expressed as “Allow other network users to connect through this computer’s Internet Connection” and thereupon click Ok button.
- Attempt the steps mentioned above and the bridge connection will be done.
Microsoft clearly stated that the bridge between internet and network connection should never be attempted as it will generate an unsafe link between the internet and your network and anyone can get through your network which is definitely not a great thing in terms of security.
A network bridge in Windows 10 is a software or hardware component that connects two separate networks together, allowing devices from both networks to communicate with each other seamlessly. It acts as a mediator between different network segments, enabling devices on each network to share resources and access services.
Here are a few key points to consider when explaining what a network bridge is in Windows 10:
1. Purpose: The main purpose of a network bridge is to extend connectivity and facilitate communication between different networks, effectively creating a single unified network. It enables devices in one network segment to communicate with devices in another network segment as if they are part of the same network.
2. Functionality: In Windows 10, a network bridge combines multiple network interfaces or connections, such as Ethernet or Wi-Fi, into a single virtual network interface. This can be done through either software-based bridging or using a physical device such as a network switch.
3. Benefits: Network bridges offer several advantages, including eliminating the need for multiple IP subnets, simplifying network configuration, and enabling easier integration of different network protocols. It improves network performance by reducing broadcast traffic and increasing the overall bandwidth available to connected devices.
4. Setup: To create a network bridge in Windows 10, you need to access the «Network and Sharing Center» from the Control Panel. From there, you can select the network connections you want to bridge and create the bridge. It’s important to note that creating a bridge requires administrative privileges on the computer.
5. Considerations: When setting up a network bridge, it’s essential to ensure that the networks being bridged have compatible IP addressing schemes and network protocols. Additionally, bridging networks may require configuring appropriate firewall rules and security measures to maintain network integrity and protect against unauthorized access.
In conclusion, a network bridge in Windows 10 is a mechanism that connects multiple networks together, allowing devices from different segments to communicate seamlessly. It simplifies network configuration, enhances performance, and facilitates resource sharing between network segments.
Video Tutorial:What does network bridge do?
How do I use network bridge in Windows 10?
In Windows 10, you can use the network bridge feature to connect multiple networks together. Here’s a step-by-step guide on how to use network bridge:
Step 1: Open the Network Connections window by right-clicking on the Start button and selecting «Network Connections» from the context menu.
Step 2: In the Network Connections window, select the first network adapter or connection that you want to include in the bridge. Right-click on it and choose «Add to Bridge» or «Bridge Connections» from the options.
Step 3: Repeat the previous step for all the network adapters or connections that you want to include in the bridge.
Step 4: Once you have selected all the desired network adapters, right-click on one of them and choose «Bridge Connections» from the options. Windows will then create a network bridge and connect the selected networks together.
Step 5: Wait for Windows to create the bridge and establish the connections. This process may take a few moments.
Step 6: Once the bridge is created, you can access its properties by right-clicking on it and selecting «Properties» from the context menu. In the properties window, you can configure various settings such as IP addressing, protocols, and more.
Step 7: To remove the network bridge, simply right-click on it and choose «Delete» or «Remove from Bridge» from the options.
Using the network bridge feature in Windows 10 can be useful in scenarios where you need to combine multiple network connections, such as connecting your PC to both Wi-Fi and Ethernet networks simultaneously or sharing an internet connection between multiple devices. It allows for seamless communication between the connected networks, enabling data transfer and sharing resources across the bridge.
It’s worth noting that creating a network bridge requires administrative privileges, and it’s important to ensure compatibility and proper configuration of the networks and devices involved to avoid any potential conflicts or connectivity issues.
What is an example of a network bridge?
An example of a network bridge is a wired Ethernet bridge. A network bridge is a networking device that connects two separate networks and allows them to communicate with each other. It operates at the data link layer (Layer 2) of the OSI model and is typically used to extend a local area network (LAN) or connect LANs in separate physical locations.
Here’s a step-by-step explanation of how a wired Ethernet bridge works:
1. Identify the two networks you want to connect. These networks can be in different physical locations or segments, such as two separate buildings within a campus or two different floors in the same building.
2. Obtain a network bridge device, commonly known as a bridge or a bridge router. This device should have at least two Ethernet ports to connect the networks.
3. Connect one Ethernet port of the bridge device to the first network. This can be done by plugging an Ethernet cable from the bridge to a switch or a router on that network.
4. Connect the other Ethernet port of the bridge device to the second network in the same manner.
5. Configure the bridge device with appropriate settings. This may involve assigning IP addresses, subnet masks, and gateway information to the ports connected to each network.
6. Ensure that both networks have unique IP address ranges and don’t overlap. For example, if the first network uses the IP range 192.168.1.0/24, ensure that the second network uses a different range like 192.168.2.0/24.
7. Test the connectivity by connecting devices from each network to the bridge device. Verify that devices on one network can communicate with devices on the other network seamlessly.
By using a network bridge, you can effectively extend your LAN or connect separate LANs without the need for complex routing or additional equipment. This can be particularly useful in scenarios where running new network cabling is not feasible, but wired connectivity is required for reliable and high-speed network communication.
How do I remove a network bridge in Windows 10?
To remove a network bridge in Windows 10, follow these steps:
1. Open the Control Panel by searching for it in the Windows search bar.
2. In the Control Panel, click on «Network and Internet» or «Network and Sharing Center,» depending on your view settings.
3. Under the «Network and Sharing Center,» click on «Change adapter settings» located in the left sidebar.
4. You will see a list of network adapters. Look for the network bridge adapter. It is usually named «Network Bridge» or «Bridge Connections.«
5. Right-click on the network bridge adapter and select «Delete» or «Remove.» You may be prompted to provide administrator permissions.
6. Confirm the deletion of the network bridge when prompted.
By following these steps, you should be able to remove a network bridge in Windows 10 effectively.
What is the difference between network bridge and router?
Network Bridge and Router serve different purposes in a network environment. Here are the key differences between the two:
1. Function: A network bridge operates at Layer 2 of the OSI model and connects two separate networks, allowing them to communicate as one. It simply extends the network by forwarding data between two physical or virtual network segments without modification. On the other hand, a router operates at Layer 3 and connects different networks (LANs, WANs, or the Internet) by choosing the best path for data packets to reach their destination.
2. Addressing: A bridge works with MAC addresses, which are unique identifiers assigned to network interfaces, to forward traffic between connected networks. It doesn’t modify the source or destination addresses of the data packets. In contrast, a router uses IP addresses to direct traffic. It examines the IP header of a packet and determines the optimal path to forward the packet based on the destination IP address.
3. Decision Making: Bridges make forwarding decisions based on the destination MAC address present in the frame’s header. They maintain a MAC address table to keep track of which devices are connected to each network segment. Routers, on the other hand, utilize routing tables, which store information about networks and their associated IP addresses, to make intelligent decisions regarding the path of data packets.
4. Network Segmentation: Bridges are commonly used to segment large networks into smaller parts to improve performance and security, such as dividing a LAN into multiple smaller LANs. Routers, on the other hand, connect different networks and enable communication between them.
5. Broadcast Domain: Bridges extend the broadcast domain, meaning that broadcasts sent on one side of the bridge will be received by devices on the other side. Routers, however, do not propagate broadcast messages. They use techniques like network address translation (NAT) to allow multiple devices on a network to share a single public IP address.
6. Network Layer Functions: Routers provide additional functionalities at the network layer, such as network address translation (NAT), port forwarding, firewall capabilities, and traffic shaping. These features give routers more control over network traffic and enhance network security.
In summary, network bridges primarily extend networks and connect two separate networks as one, while routers connect different networks and make intelligent decisions about routing data packets between them. Routers offer more advanced functionalities at the network layer and are commonly used for connecting networks and providing access to the Internet.
As a tech blogger, I can provide a professional perspective on the safety of bridge networks.
1. Definition of bridge networks: A bridge network is a type of network that connects two separate networks together, allowing them to communicate with each other. It operates at the data link layer (Layer 2) of the OSI model.
2. Isolation and security: One of the main advantages of bridge networks is the isolation they provide. By connecting different networks, bridge networks can separate traffic and increase security by limiting access between networks. This isolation can help prevent unauthorized access and reduce the risk of potential security breaches.
3. Enhanced security protocols: Bridge networks generally support various security protocols, such as MAC filtering, VLAN tagging, and port security features. These protocols add an extra layer of security by controlling access to the network, ensuring that only authorized devices or users can connect.
4. Monitoring and management tools: Bridge networks often come with monitoring and management tools that allow network administrators to track and analyze network traffic. These tools can help detect and respond to any unusual or suspicious activities, further enhancing network security.
5. Vulnerabilities and considerations: While bridge networks offer increased security, it’s important to note that no network is entirely immune to vulnerabilities. It’s crucial to regularly update and patch network devices, maintain strong authentication methods, and conduct security audits to identify and address any potential weaknesses.
6. Network architecture and design: The overall security of bridge networks also depends on how they are architected and designed. Implementing best practices, such as segmenting the network into smaller subnets, using firewalls, and employing secure configurations, can further enhance the safety of bridge networks.
In conclusion, bridge networks can be considered safe when implemented correctly and coupled with appropriate security measures. However, it’s important to continually monitor, update, and maintain the network’s security to mitigate potential risks.
What does bridging Wi-Fi and Ethernet do?
Bridging Wi-Fi and Ethernet allows you to connect devices on Wi-Fi and Ethernet networks together, creating a unified network. This can be useful in several scenarios:
1. Expanding Wi-Fi coverage: If you have a Wi-Fi router in one part of your home or office and want to extend the network’s coverage to another area, you can use a bridge to connect an additional Wi-Fi access point via Ethernet. This setup enables a seamless Wi-Fi experience throughout the entire space.
2. Connecting wired devices to a wireless network: A bridge allows you to connect devices that only have Ethernet connectivity to a Wi-Fi network. This is especially useful for devices such as gaming consoles, smart TVs, or network-enabled printers that lack built-in Wi-Fi capabilities. By connecting them to a bridge, you can access the wireless network without needing to run Ethernet cables to each device.
3. Enhanced network performance: In certain situations, bridging Wi-Fi and Ethernet can improve network performance. For example, if you have multiple Wi-Fi access points in a large home or office, connecting them via Ethernet can help create a more reliable and robust network, reducing interference and ensuring faster connectivity.
Here’s a step-by-step guide to bridging Wi-Fi and Ethernet:
1. Connect your Wi-Fi router to your modem or internet source and ensure it is functioning correctly.
2. Choose a suitable Wi-Fi access point or Wi-Fi bridge device that supports Ethernet connectivity.
3. Connect the Ethernet cable from the Wi-Fi bridge device to an available Ethernet port on your router.
4. Follow the manufacturer’s instructions to configure the Wi-Fi bridge device. This generally involves connecting to the device’s management interface via a web browser.
5. Set up the bridge device to connect to your existing Wi-Fi network. Provide the necessary credentials such as the network name (SSID) and password.
6. Once configured, the Wi-Fi bridge device will connect to your Wi-Fi network and establish a bridge between the Wi-Fi and Ethernet networks.
7. Connect devices that need Ethernet connectivity to the Ethernet ports on the bridge device. These devices will now be able to access the Wi-Fi network as if they were directly connected.
Remember to configure and secure your Wi-Fi network appropriately to ensure a safe and reliable connection for all your connected devices.