
Справка (FAQ) → Общие вопросы
Нужно открыть командную строку.
Для Windows XP и ранее:
Для этого нажмите меню «Пуск», там выберите «Выполнить» и введите там слово cmd (английскими буквами) после чего нажмите Enter.
У вас откроется командная строка Windows. Введите там следующую фразу: ipconfig /flushdns и нажмите Enter (можно скопировать, чтобы не писать руками — тут копируете, в командной строке правой кнопкой мышки вставляете).
Если вы увидите следующее:
Настройка протокола IP для Windows

Успешно сброшен кэш распознавателя DNS.
то значит кэш DNS очищен. Можно закрыть командную строку.
Для Windows Vista, Windows 7, 8, 8.1, 10:
Для этого нажмите меню «Пуск», там в строке Поиска внизу введите слово cmd (английскими буквами) после чего нажмите Enter (если строки поиска нет, то в меню зайдите в Поиск). У Вас найдется программа cmd, запустите её.
У вас откроется командная строка Windows. Введите там следующую фразу: ipconfig /flushdns и нажмите Enter (можно скопировать, чтобы не писать руками — тут копируете, в командной строке правой кнопкой мышки вставляете).
Если вы увидите следующее:
Настройка протокола IP для Windows

Успешно сброшен кэш распознавателя DNS.
то значит кэш DNS очищен. Можно закрыть командную строку.
Для Mac OS
Для этого нужно ввести в Терминал одну команду. Найти Терминал можно по пути: Программы/Утилиты.
Пользователям OS X 10.6 Snow Leopard или более ранних версий необходимо ввести следующую команду:
sudo dscacheutil -flushcache
Пользователям OS X 10.7, 10.8 Mountain Lion и 10.9 Mavericks необходимо ввести следующую команду:
sudo killall -HUP mDNSResponder
Вопросы по теме:
Как сделать nslookup или tracert? →
назад в категорию «Общие вопросы»
Если у вас есть вопросы, вы всегда можете обратиться в нашу службу поддержки
Обновлен: 1 год назад
Номер статьи (ID) 82450
В данной статье вы найдете инструкции для обновления IP адреса и DNS. Эта процедура помогает решить распространенные затруднения соединения.
- Выберите операционную систему
В данной статье вы найдете инструкции для обновления IP адреса и DNS. Эта процедура помогает решить распространенные затруднения соединения.
- Откройте меню Сеть: меню Apple > Системные настройки > Сеть.
- Выберите активное подключение в меню Сеть и нажмите кнопку Дополнительно.
- Нажмите TCP/IP, далее нажмите Запросить адрес DHCP. Данная процедура может занять несколько минут.
- Закройте окно Сеть.
Чтобы сбросить кэш DNS:
- Откройте Терминал: Переход > Утилиты > Терминал.
- В зависимости от версии macOS воспользуйтесь одной из приведенных ниже команд, чтобы сбросить DNS:
- macOS High Sierra (10.13), macOS Sierra (10.12) и OS X El Capitan (10.11): sudo dscacheutil -flushcache
- macOS Yosemite (10.10.4+): sudo killall -HUP mDNSResponder
- macOS Yosemite (10.10 вплоть до 10.10.3): sudo discoveryutil mdnsflushcache
- Повторите попытку подключения.
Примечание: Терминал не выдаст никакого сообщения, если процедура прошла успешно.
To quickly renew the DNS settings on your Windows machine using the Command Prompt, you can use the following command:
ipconfig /flushdns
Understanding DNS
What is DNS?
The Domain Name System (DNS) plays a crucial role in the functionality of the internet. It serves as the phonebook for the internet by converting human-readable domain names, like www.example.com, into machine-readable IP addresses, such as 192.0.2.1. This translation process enables users to easily navigate to websites without needing to remember complex numerical addresses.
Why Renew DNS?
Renewing your DNS settings can be vital for several reasons:
- IP Address Changes: When transitioning to a different network or if your ISP changes your IP address, renewing the DNS ensures that your system recognizes these changes.
- Network Issues: If you are experiencing sluggish or inconsistent internet connectivity, renewing your DNS can clear outdated entries causing these problems.
- Updated DNS Records: Many websites often make changes to their DNS records. Renewing DNS helps ensure you are using the most current versions, which is critical for both performance and security.
Cmd Reset Network Adapter: A Simple Guide to Connectivity
Getting Started with CMD
Accessing Command Prompt
To run commands for DNS management, you need to access the Command Prompt (CMD). Here’s how to do it:
- Step 1: Press `Windows Key + R` on your keyboard.
- Step 2: Type `cmd` and press `Enter`.
For administrative tasks, it’s advisable to run CMD as an Administrator:
- Right-click the Command Prompt icon and select Run as Administrator.
Basic CMD Commands Related to DNS
Before diving into renewing DNS, it’s helpful to familiarize yourself with essential commands. Here are a few relevant ones:
- `ipconfig`: Displays current network configuration and allows you to manage various aspects of your network connection.
- `nslookup`: Used to query DNS records and troubleshoot issues by viewing detailed information about how DNS resolves names.
- `ping`: Verifies the reachability of a host and can be used to test if DNS lookup is working correctly.

Cmd Show Disk: Quick Command for Disk Information
Renewing DNS via CMD
Using the `ipconfig` Command
The primary command for renewing DNS settings is `ipconfig`. Here are the detailed steps to follow:
Step 1: Open CMD as an Administrator. This is crucial because changing network settings often requires elevated permissions.
Step 2: Once in CMD, release your current IP address with the following command:
ipconfig /release
This command tells Windows to drop the current IP address assigned to your device, essentially «letting go» of your prior connection.
Step 3: Now, renew your IP address and, consequently, your DNS settings by typing:
ipconfig /renew
This command initiates the process of obtaining new configuration parameters from a DHCP server, including a new IP address and refreshed DNS settings.
Step 4: To clear any cached DNS information on your device, run:
ipconfig /flushdns
This essential command clears the DNS resolver cache, which helps resolve issues related to outdated or corrupt DNS records.
Example Scenario
Imagine you’ve just connected to a new Wi-Fi network at a café. You might find that your device cannot access certain websites. By using the commands above:
- Open CMD as an Administrator.
- Release your current IP:
ipconfig /release - Renew your connection:
ipconfig /renew - Flush the DNS cache:
ipconfig /flushdns
After executing these commands, you should be able to connect to the new network and access websites successfully.
Mastering Cmd Net Share for Quick File Sharing
Troubleshooting DNS Issues
Common Errors
While working with DNS, you may encounter some error messages. Here are a few common ones:
- “DNS server unavailable”: This indicates a potential issue with the DNS server settings.
- “Network path was not found”: Typically indicates a connectivity issue or incorrect network configuration.
For each error, consider checking your network connection, verifying DNS server addresses, or renewing your DNS as described earlier.
Advanced Troubleshooting Commands
If simple renewals don’t resolve your issues, consider using more advanced commands for deeper insights:
-
`nslookup`: This command can be invaluable for checking if the DNS server is responding. For example, entering:
nslookup www.example.comThis will display the associated IP address and confirm if your DNS is functioning correctly.
-
`tracert`: This tool allows you to trace the path your data takes to reach a specific server. Running:
tracert www.example.comwill show you each hop along the way, helping identify where a breakdown in the connection may be occurring.

Mastering Cmd Line Syntax: A Quick Guide
Verification and Confirmation
Checking DNS Configuration
After completing the renewal process, it’s important to verify your settings. Use the following command to display your current DNS configuration:
ipconfig /displaydns
This command will show you the contents of your DNS resolver cache. You should look for valid entries related to websites you access frequently.
Testing Your Connection
To test your newly renewed DNS settings, you can issue a simple ping command to a known domain:
ping www.example.com
A successful response indicates that your connection is solid and your DNS is properly configured, while failed responses may require further troubleshooting.

Mastering Cmd Net Start for Quick Service Management
Conclusion
Renewing your DNS settings using CMD is a straightforward yet powerful solution for maintaining a stable internet connection. By following the outlined commands and processes, you can quickly resolve IP address changes, networking issues, and ensure you’re using the latest DNS records. Mastering these commands will ultimately enhance your networking experience and give you confidence in managing your system’s DNS lifecycle.

Mastering Cmd Run As: A Quick Guide to Elevated Commands
Additional Resources
For more in-depth information, consider referring to the official Microsoft documentation on CMD commands. Visual learners can benefit from video tutorials that walk through various CMD scenarios.
Mastering Cmd Net Send: Quick Tips and Tricks
Call to Action
We encourage you to share your own experiences with renewing DNS using CMD in the comments below. Don’t forget to subscribe for more tips and tricks on mastering CMD commands!
Are you facing issues while surfing the internet? Does the website you are trying to reach doesn’t open? If you’re unable to access the website then the reason behind this issue might be because of the DNS server and its resolving cache.
DNS or Domain Name System is your best friend while you are online. It converts the domain name of the website you visited into IP addresses so that the machine can understand it. Suppose you visited a website, and you used its domain name for doing this. The browser will redirect you to a DNS server and it will store the IP address of the website you are visiting. Locally, inside your device, there is a record of all the IP addresses, meaning the websites you have visited. Whenever you try to re-access the website again, it will help you gather all the information faster than before.
All the IP addresses are present in the form of a cache in DNS Resolver Cache. Sometimes, when you try to access the site, instead of getting faster results, you get no result at all. Therefore, you need to flush the reset DNS resolver cache for getting the positive output. There are some common reasons which cause the DNS cache to fail over time. The website may have changed their IP address and since your records have the old records. And hence, you may have the old IP address, causing problems while you are trying to establish a connection.
Another reason is the storing of bad results in the form of a cache. Sometimes these results get saved due to DNS spoofing and poisoning, ending up in unstable online connections. Maybe the site is fine, and the problem is in the DNS cache on your device. The DNS cache can get corrupt or outdated and you may not be able to access the site. If any of this has happened, then you may need to flush and reset your DNS resolve cache for better results.
Just like DNS resolver cache, there are two other caches present on your device, which you can flush and reset if needed. These are the Memory cache and the Thumbnail cache. Memory cache comprises a cache of data from your system memory. Thumbnail cache contains the thumbnails of the images and videos on your device, it includes the thumbnails of deleted ones also. Clearing the memory cache frees some system memory. While clearing the thumbnail cache can create some free room on your hard disks.
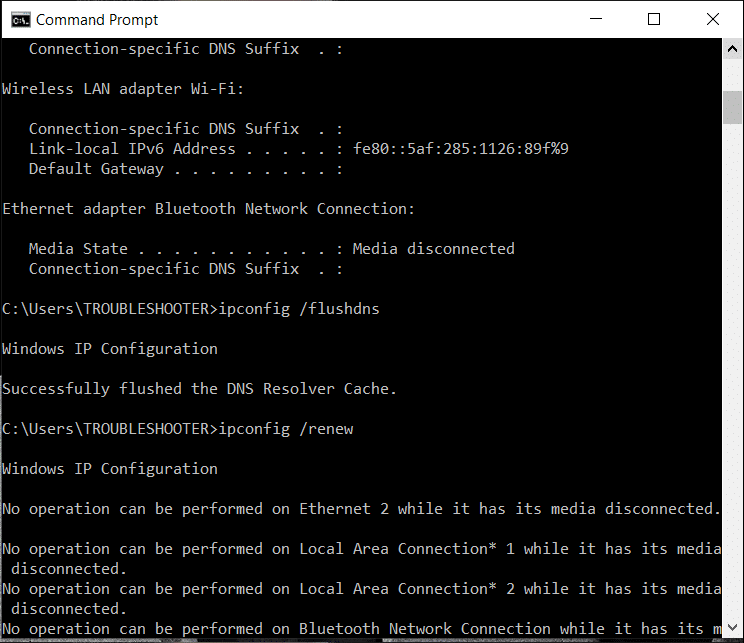
Table of Contents
There are three methods applicable for flushing your DNS resolver cache in Windows 10. These methods will fix your internet problems and help you with a stable and working connection.
Method 1: Use the Run Dialog Box
1. Open the Run dialog box using the shortcut key Windows Key + R.
2. Type ipconfig /flushdns in the box and hit the OK button or the Enter box.

3. A cmd box will appear on the screen for a moment and will confirm that the DNS cache will get successfully cleared.

Method 2: Using Command Prompt
If you don’t use an administrative account to login to the Windows, then make sure you have access to one or you create a new administrative account as you will require admin rights to clear the DNS cache. Else, the command line will show System 5 error and your request will get denied.
Using Command Prompt you can perform various other functions related to DNS cache and your IP address. These include viewing the current DNS cache, registering your DNS cache on host files, releasing the current IP address settings and also requesting & resetting the IP address. You can also enable or disable DNS cache with only one line of code.
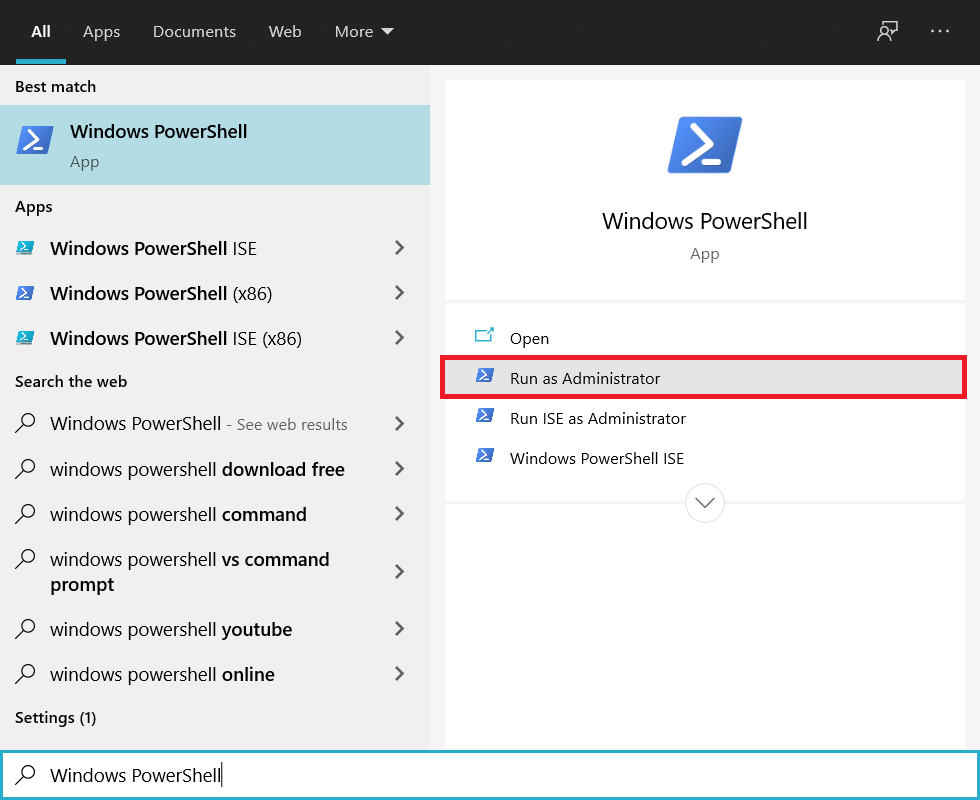
1. Type cmd in Windows Search bar then click on “Run as administrator” to open the elevated Command Prompt. Remember to run the command line as an administrator for making these commands work.

2. Once the command screen appears, enter the command ipconfig /flushdns and hit the Enter key. Once you hit Enter, you will see a confirmation window appear, confirming the successful DNS cache flushing.
3. Once done, verify if the DNS cache is cleared or not. Enter the command ipconfig /displaydns and hit the Enter key. If there are any DNS entries left, they will get displayed on the screen. Also, you can use this command anytime to check the DNS entries.

4. If you want to turn off the DNS cache, type in the command net stop dns cache in the command line and press the Enter key.

5. Next, if you want to turn on the DNS cache, type the command net start dnscache in the Command Prompt and press the Enter key.
Note: If you turn off the DNS cache and forget to turn it on again, then it will automatically start after you restart your system.

You can use ipconfig /registerdns for registering the DNS cache present on your Hosts file. Another one is ipconfig /renew which will reset and request a new IP address. For releasing the current IP address settings, use ipconfig /release.
Method 3: Using Windows Powershell
Windows Powershell is the most powerful command line present on the Windows OS. You can do much more with PowerShell than you can do with the Command Prompt. Another advantage of Windows Powershell is you can clear client-side DNS cache while you could only clear local DNS cache in Command Prompt.
1. Open Windows Powershell using the Run dialog box or the Windows search bar.
2. If you want to clear the client-side cache, enter the command Clear-DnsClientCache in Powershell and hit the Enter button.

3. If you want to clear just the DNS cache on your desktop, enter Clear-DnsServerCache and hit the Enter key.

What if the DNS Cache is not getting cleared or flushed?
Sometimes, you may not be able to clear or reset DNS Cache using the Command Prompt, it may happen because the DNS cache is disabled. So, you need to first enable it before clearing the cache again.
1. Open the Run dialog box and enter services.msc and hit Enter.

2. Search for DNS Client Service in the list and right-click on it and select Properties.

4. In the Properties window, switch to the General tab.
5. Set the Startup type option to Automatic, and then click on OK to confirm the changes.

Now, try to clear the DNS cache and you will see that the command is running successfully. Similarly, if you want to disable the DNS cache for some reason, change the startup type to Disable.
Recommended:
- Quickly Clear All Cache in Windows 10 [The Ultimate Guide]
- 10 Best Public DNS Servers in 2021: Comparison & Review
- 3 Ways to change DNS settings on Windows 10
We hope this article was helpful and you were able to flush & reset the DNS cache in Windows 10. If you still have any questions then feel free to ask them in the comment section.
Updating DNS records on a Windows Server 2008 R2 is a crucial task for maintaining a well-functioning and secure network infrastructure. DNS (Domain Name System) is responsible for translating domain names into IP addresses, allowing computers to communicate with each other over a network. In this tutorial, we will guide you through the steps to update DNS records on a Windows Server 2008 R2.
Step 1: Open the DNS Manager by clicking on the Start menu and selecting «Administrative Tools.» From the list of tools, choose «DNS Manager.«
Step 2: In the DNS Manager window, expand the server’s name to reveal the list of Forward Lookup Zones. Select the zone where you want to update the DNS records.
Step 3: Right-click on the record you want to update, and select «Properties» from the context menu.
Step 4: The record’s properties window will open. Here, you can make the necessary changes to the record, such as the IP address or other attributes. Modify the required fields according to your needs.
Step 5: After making the necessary changes, click on the «Apply» button to save the updated DNS record.
Step 6: To verify that the DNS record has been successfully updated, you can run a DNS lookup using the command prompt. Open the command prompt by clicking on the Start menu and typing «cmd» in the search field. In the command prompt, type the following command: nslookup domain_name (replace «domain_name» with the actual domain you updated). If the correct IP address is displayed, the DNS record update was successful.
Pros Cons
1. Easy and straightforward process. 1. Requires administrative access to Windows Server.
2. Allows for precise control over DNS records. 2. May cause network disruption if not done correctly.
3. Provides flexibility in managing network resources. 3. Mistakes in updating DNS records can lead to service outages.
Updating DNS records on Windows Server 2008 R2 is a critical task to ensure accurate domain name resolution. By following these steps, you can effectively update the DNS records and maintain a reliable network infrastructure. Remember to double-check all changes before applying them to prevent any unintended consequences or disruptions.
Video Tutorial: What is the command to update DNS record?
How do I refresh my DNS?
Refreshing your DNS can help resolve network issues and improve internet connectivity. Here are the steps to refresh your DNS on various operating systems:
Windows:
1. Open the Command Prompt by typing «cmd» in the search bar and clicking on the Command Prompt app.
2. In the Command Prompt window, type «ipconfig /flushdns» and press Enter.
3. Wait for the DNS Resolver Cache to clear. You will see a message saying, «Windows IP configuration successfully flushed the DNS Resolver Cache.«
4. Close the Command Prompt window.
macOS:
1. Open the Terminal app. You can find it in the Utilities folder within the Applications folder or by using Spotlight Search.
2. In the Terminal window, type «sudo killall -HUP mDNSResponder» and press Enter.
3. Enter your administrator password when prompted, which won’t be visible as you type.
4. Wait for the command to execute and refresh your DNS cache.
5. Close the Terminal window.
Linux (Ubuntu):
1. Open the Terminal application.
2. In the Terminal window, type «sudo systemd-resolve –flush-caches» and press Enter.
3. Provide your user’s password when prompted.
4. Wait for the command to complete and refresh the DNS cache.
5. Close the Terminal window.
Android:
1. Open the Settings app on your Android device.
2. Depending on your device and Android version, navigate to the Wi-Fi or Network & Internet settings.
3. Tap on your currently active Wi-Fi network.
4. On the Wi-Fi’s details page, tap and hold on the network name until a menu appears.
5. Select the option «Forget network» or «Disconnect.«
6. After disconnecting, reconnect to the Wi-Fi network.
7. This will trigger a refresh of your DNS settings.
iOS:
1. Open the Settings app on your iPhone or iPad.
2. Tap on Wi-Fi, and then tap the (i) icon next to your currently connected Wi-Fi network.
3. Scroll down to find the option «Renew Lease.«
4. Tap on «Renew Lease» to refresh your DNS settings.
These steps should help you refresh your DNS cache on different operating systems. By doing so, you can resolve issues related to domain name resolution and potentially improve your internet browsing experience.
How do I manually update DNS records?
To manually update DNS records, you would typically need to access the control panel or management interface provided by your domain registrar or hosting provider. The specific steps may vary depending on the provider, but here is a general outline of the process involved:
1. Log in to your domain registrar or hosting provider account. This is where you initially registered your domain name or where your website is hosted.
2. Navigate to the DNS management section. This might be labeled as «DNS settings,» «Domain settings,» or something similar. Look for an option that allows you to manage your DNS records.
3. Identify the DNS record you want to update. Common types of DNS records include the A record (for mapping a domain to an IP address), CNAME record (for aliasing one domain to another), MX record (for email routing), and TXT record (for additional information like SPF records).
4. Make the necessary changes to the DNS record. This can involve editing existing records, adding new records, or deleting unwanted records. Ensure that you input the correct information based on your requirements. For example, if you want to update the IP address that your domain points to, modify the A record accordingly.
5. Save your changes. Depending on the interface, you may need to click on a «Save» or «Apply» button to confirm the modifications you made to the DNS records.
6. Wait for DNS propagation. DNS changes can take some time to propagate across the internet, typically ranging from a few minutes to several hours. During this period, some users may still see the old DNS information, while others will see the updated version, based on their ISP’s DNS caching.
7. Verify the changes. Once the DNS propagation is complete, you can verify if the DNS records accurately reflect your updates by using online DNS propagation checkers or by performing manual tests.
Remember, the process may slightly differ depending on your specific domain registrar or hosting provider. It’s always advisable to consult their documentation or support resources for detailed instructions tailored to their platform.
How do I flush and renew my DNS?
To flush and renew your DNS, follow these steps:
1. Open the command prompt: Press the Windows key, type «cmd,» and select the Command Prompt app.
2. In the command prompt, type «ipconfig /flushdns» and press Enter. This command will clear your DNS resolver cache.
3. Wait for the process to complete, which usually takes a few seconds.
4. Once the cache is flushed, type «ipconfig /registerdns» and press Enter. This command will refresh and update your DNS records with the DNS server.
5. Wait for the process to complete and verify that the registration is successful.
6. Close the command prompt and restart your computer to ensure the changes take effect.
By following these steps, you will successfully flush and renew your DNS, which can help resolve issues related to DNS cache, outdated records, or network connectivity problems.
Updating DNS records in Windows Server involves several steps. Here’s a guide on how to do it:
1. Open the DNS Manager: Press the Windows key, type «DNS» and select «DNS Manager» from the search results.
2. Connect to the DNS server: Right-click on the DNS server name in the DNS Manager console and select «Connect to DNS Server.» Choose «The following computer» and enter the server’s IP address or host name. Click OK to connect.
3. Navigate to the desired zone: Expand the DNS server folder and locate the Forward Lookup Zones or Reverse Lookup Zones folder depending on the type of DNS record you want to update. Find the specific zone containing the record you wish to modify.
4. Edit the DNS record: Double-click on the record you want to edit. In the record’s properties window, make the necessary changes in the appropriate fields. This could include updating the IP address, name, or other relevant information associated with the record.
5. Save the changes: Once you have made the required modifications, click OK to save the changes to the DNS record.
6. Verify the updated record: To ensure that the DNS record update has propagated, you can use various methods such as running nslookup commands or using online DNS lookup tools.
It’s important to note that the steps above assume familiarity with Windows Server and DNS management. It’s recommended to have a solid understanding of DNS and backup any critical DNS records before making changes to avoid potential issues.
How do I force DNS to refresh?
To force DNS (Domain Name System) to refresh, you can follow these steps:
1. Clear the DNS cache:
– On Windows:
– Open Command Prompt as an administrator.
– Run the command «ipconfig /flushdns» to clear the DNS cache.
– On macOS:
– Open Terminal.
– Execute the command «sudo killall -HUP mDNSResponder» to flush the DNS cache.
2. Change your DNS server:
– On Windows:
– Go to the Control Panel.
– Select «Network and Internet» > «Network and Sharing Center.«
– Click on your network connection.
– Go to «Properties» > «Internet Protocol Version 4 (TCP/IPv4).«
– Choose «Use the following DNS server addresses» and enter new DNS server addresses such as Google DNS (8.8.8.8, 8.8.4.4) or Cloudflare DNS (1.1.1.1, 1.0.0.1).
– On macOS:
– Open System Preferences.
– Select «Network» > your network connection.
– Click on «Advanced» > «DNS» tab.
– Remove existing DNS servers and click the «+» button to add new DNS server addresses like Google DNS (8.8.8.8, 8.8.4.4) or Cloudflare DNS (1.1.1.1, 1.0.0.1).
3. Restart your network devices:
– Power off your modem, router, or any other network devices you have.
– Wait for a few minutes and power them back on.
– This will restart the network and can sometimes resolve DNS issues.
4. Restart or flush your device’s DNS cache:
– On Windows or macOS:
– Restart your computer or device.
– Alternatively, you can also open Command Prompt or Terminal and execute the respective commands mentioned in step 1 to flush the DNS cache again.
By following these steps, you can force the DNS to refresh, potentially resolving any DNS-related issues and ensuring that your device can access the latest DNS records for websites and domains you visit.
How do I add records to DNS settings?
To add records to DNS settings, you would typically follow these steps:
1. Access your DNS management dashboard: This can usually be done through your domain registrar or web hosting provider. Look for a section or option related to DNS management.
2. Identify the DNS zone: Once you are in the DNS management dashboard, locate the DNS zone for the domain you want to modify. The DNS zone contains the DNS records that determine how your domain functions.
3. Choose the record type: Determine the type of DNS record you want to add. The most common types include A records, CNAME records, MX records, TXT records, and AAAA records. Each record type serves a different purpose, so choose the one that aligns with your specific needs.
4. Input the record details: For each record, you will need to provide specific details based on the record type. This can include the hostname (subdomain or domain), the IP address for A records, the target domain for CNAME records, the preference and mail server address for MX records, and any additional text for TXT records.
5. Save the changes: Once you have entered the record details, save your changes. The process of saving may vary depending on the DNS management interface you are using, but it is typically a button or option labeled «Save» or «Update DNS.«
6. Verify the changes: After saving the changes, it is recommended to verify the new DNS records to ensure they have propagated successfully. DNS propagation can take some time, usually a few hours or up to 48 hours, so it’s crucial to allow for this propagation period.
It’s important to note that the precise steps and options may differ depending on your specific DNS provider or hosting platform. Always refer to the documentation provided by your service provider for detailed instructions tailored to their system.