

Источник изображения
Сегодня быстрым ростом количества устройств сети Интернет и интернета вещей уже никого не удивишь. Существует множество различных протоколов и технологий, на которых основана обработка и обмен информацией между устройствами и, собственно, сама связь этих устройств.
Некоторые технологии являются своеобразными канонами: используются уже не один десяток лет и постоянно совершенствуются. А есть и такие, которые либо уже вымерли, либо родились, но так и не попали в массы ввиду своего несовершенства, низкой релевантности в отношении требований рынка и прочего.
В этой статье речь пойдет о технологии, не относящейся ни к одной, ни к другой группе — USB over IP. Без нее компьютерные сети существовали бы без особых проблем, но она способна значительно упростить работу и снизить затраты на эксплуатацию у крупных предприятий, небольших организаций и даже обычных пользователей. К примеру, с помощью нее можно пробросить аппаратный USB-ключ защиты ПО внутрь облачной платформы или облака на базе VMware и использовать его так, словно он установлен на локальной машине. Но обо всем по порядку.
История появления технологии USB over IP
Сложно сказать, когда именно появилась технология проброса USB-девайсов через сеть в том виде, в каком ее используют сейчас. Вероятнее всего, с развитием возможностей программных компонентов Linux, ростом потребностей рынка и изобретательности энтузиастов.
В наши дни существуют два популярных инструмента для трассировки USB-устройств: usbip и usbip-win. Оба нацелены на совместное использование USB-устройств через IP-сеть за счет обработки USB I/O сообщений, их инкапсуляции в TCP/IP и последующей передачи между устройствами сети типа «клиент-сервер». В такой схеме устройства подключаются к серверу, и на нем же запускается необходимый демон.
На машине клиента, как правило, запускается любое приложение, которое не умеет работать с сетью, зато прекрасно справляется с USB-девайсами. Технология проброса как раз позволяет эмулировать локальное подключение USB-устройств на клиентской машине.
- usbip был разработан проектом «USB/IP» еще в 2009 году. Технология была успешной: ее добавили в сборки Linux-ветки операционных систем, и она все еще развивается. Поддержка же Windows клиента была остановлена в 2013 году на выпущенной двоичной цифровой подписи драйвера.
- usbip-win является аналогичным проектом, умеющим работать с Windows 10. Более того, он позволяет поднимать на Windows 10 не только клиентскую, но и серверную часть. Также он совместим с Linux-версией.
Кому это интересно и где применяется
Преимущества сетевого проброса USB-устройств:
- Безопасность. Возможность изолированного размещения USB-девайсов от их конечного пользователя, шифрование и контроль доступа к устройствам, защита от человеческого фактора (кражи или утраты устройства).
- Мониторинг. Использование протокола SMTP и сценариев SNTP для отслеживания состояния устройств.
- Доступность и мультитенантность. USB-устройства доступны для неограниченного числа пользователей (с возможностью создавать групповые политики и уровни доступа) без необходимости физического переключения из любой точки мира.
- Централизованное администрирование. Удобство в управлении каждым USB-устройством, подключенным в концентратор.
Недостатки:
- Работоспособность полностью зависит от стабильной работы сети.
- Высокая стоимость аппаратных решений (управляемых USB-хабов с большим количеством портов).
- Не все USB-устройства могут работать через сеть штатно по причине увеличенного времени отклика.
Используемые технологии и оборудование
Способ обмена информацией у локальных и удаленных устройств отличается лишь тем, что для удаленных девайсов будет использоваться виртуальный драйвер шины: набор инструкций и данных, осуществляющий преобразование логической информации или данных в физические сигналы.

Подключение локальных и удаленных устройств
Когда приложения отправляют запрос на конечное устройство, USB PDD (USB Personal Device Driver) преобразует запросы ввода-вывода в серию команд понятных для USB, а затем отправляет их через драйвер шины (связующее звено между драйвером устройства и конечным устройством) в виде блоков USB-запросов на конечное устройство.
Способы проброса аппаратных ключей
Персональный драйвер устройства (PDD), как ни странно, отвечает за управление отдельными USB-устройствами. PDD отправляет запросы в виде специальных блоков запросов URB (USB Request Block), которыми он обменивается данными с ядром USB (USB Core) — отдельной подсистемой внутри ОС, выполняющей роль поддержки USB-устройств и контроллеров.

Модель обмена данными между USB-устройствами и конечным пользователем
Для реализации проброса протокола USB через IP-сеть была разработана сущность, называемая виртуальным интерфейсом хост-контроллера, или Virtual Host Controller Interface (VHCI). VHCI относится к виртуальному контроллеру и способен экспортировать виртуальные USB-устройства, не поддерживаемые физическими устройствами. В Linux контроллеры VHCI используются для доступа к USB-устройствам с удаленных машин, подключенных по уже известному нам протоколу USBIP.
VHCI является эквивалентом драйвера хост-контроллера (HCD) и отвечает за обработку URB-запросов. И VHCI, и HCD отвечают за обработку URB-запросов, полученных от ядра, и делят их на более простые запросы, именуемые Transfer Descriptions (дескрипторы передачи TD) для их дальнейшей передачи на хост-контроллер интерфейса, он же USB-контроллер (Host Controller Interface HCI). Данный интерфейс работает на уровне физических регистровых передач и обеспечивает коммуникацию с периферийными устройствами, подключенными к USB.
Теперь о том, как USB попадает в сеть. Блок запросов URB преобразуется в блок запроса USB / IP драйвером VHCI и отправляется на удаленный компьютер. Драйвер заглушки также добавлен как новый тип USB PDD. Драйвер-заглушка отвечает за декодирование входящих USB / IP-пакетов с удаленных машин, извлечение URB и последующую отправку их на локальные USB-устройства.

Модуль ядра vhci-hcd — это только виртуальный хост-контроллер, к которому вы можете подключить виртуальные устройства.
Как это устроено в Selectel

Рассмотрим работу с USB-концентратором на примере устройства DistKontrolUSB-16. Для того, чтобы пробросить USB-устройство с порта концентратора, необходимо:
- Создать USB-устройство, указав его Vendor/ProductID (VID/PID) и серийный номер. Именно по нему концентратор будет проводить отбор подключенных устройств:

- Указать внешний IP-адрес клиента, который будет подключаться к USB-концентратору и указать разрешенные для подключения порты:
- В клиентском приложении найти необходимое устройство и отправить команду на его использование. После этого девайс будет доступен словно физически подключенное устройство.


Заключение
Описанная технология способна обеспечить необходимую масштабируемость и гибкость в современной, постоянно изменяющейся среде. Проброс USB-устройств через сеть также обеспечивает надежность за счет ограничения физического доступа к устройствам.
Отсутствует необходимость перемещать оборудование, а безопасность сети повышается за счет возможности использования алгоритмов шифрования и настройки прав доступа. Доступна планировка сценариев для каждого отдельно взятого устройства.
Снижение рисков и затрат на обслуживание, удобство совместного использования ресурсов между рабочими станциями — все это делает технологию usbip конкурентоспособной в отношении безопасной авторизации и передачи данных (с TOTP/HOTP, OCRA) и применимой для решения широкого спектра задач IT.

In the age of wireless everything, the reliable old USB port still powers many of our essential devices. But what if you need to access a USB device that’s not exactly within reach? With USB over IP for Windows, you can make your USB devices accessible from another computer on the network, without needing to install expensive software or buy additional hardware. And yes, you can do this entirely with free, open-source tools!
Let’s dive into setting up USB over IP using free and open-source software on Windows, so you can access printers, sensors, and other peripherals from any device, wherever they are on your network. Get ready for a low-cost, high-reward way to share USB devices!
What is USB over IP, and Why Do You Need It?
USB over IP lets you share USB devices over a network so that other computers can access them as if they’re plugged in directly. Think of it as giving your USB devices the freedom to roam (virtually, anyway) without needing long cables or complicated setups. It’s especially useful if you’re working with devices like 3D printers, scanners, or Zigbee hubs that would typically require a dedicated USB port on each computer.
| USB over IP Benefits | Why It’s Useful |
|---|---|
| Remote Device Access | Lets you control a USB device on another machine across the network. |
| No Extra Hardware Needed | Free open-source solutions eliminate the need for dedicated USB hubs or cables. |
| Cost-Effective | Use open-source software without licensing fees or subscriptions. |
| Centralized Device Control | Manage shared devices like printers or scanners from a single, central location. |
In short, USB over IP lets you access USB devices without all the cords and clutter, and best of all, you can do it without spending a penny.
Free and Open-Source Software for USB over IP on Windows
Several open-source tools can help you set up USB over IP. Here are the most popular options:
| Software | Main Features | Platform |
|---|---|---|
| USB/IP | Fully open-source, supports USB-over-IP sharing across various platforms | Windows, Linux |
| RemoteFX (Hyper-V) | Built-in Windows feature for USB redirection on virtual machines | Windows only |
| Linux as a Host | Using a Linux server as the host for USB/IP, allowing Windows clients to connect over the network | Linux (Host), Windows (Client) |
Method 1: Setting Up USB/IP on Windows
USB/IP is an open-source project that lets you share USB devices over IP. Although originally designed for Linux, USB/IP can be installed on Windows, allowing you to share USB devices across the network. Let’s go through the setup.
Step 1: Install USB/IP on Your Windows Host
- Download USB/IP: Since USB/IP isn’t officially supported on Windows, you’ll need a Windows-compatible version. You can find it on GitHub—look for the latest USB/IP Windows binaries.
- Install the USB/IP Driver: Unzip the download, right-click
usbip.inf, and select Install. This installs the USB/IP driver on your Windows machine. - Run USB/IP as Administrator: Open the Command Prompt as an Administrator and navigate to the USB/IP directory.
Step 2: Share the USB Device on the Host
- List USB Devices: In the Command Prompt, type:
usbip.exe list --localThis will list all USB devices connected to your machine, along with their USB IDs. - Bind the USB Device: Find the USB ID of the device you want to share. Then, type:
usbip.exe bind --busid <device-id>Replace<device-id>with the actual ID (for example,1-1). - Start USB/IP Sharing: Your USB device is now shared over IP and can be accessed by other devices on the network.
Step 3: Install USB/IP on the Client Machine
On the computer where you want to access the shared USB device:
- Install USB/IP as Above: Follow the same installation steps on the client machine.
- Attach to the Shared Device: In the Command Prompt, type:
usbip.exe attach --host <host-ip> --busid <device-id>Replace<host-ip>with the IP address of the machine hosting the USB device, and<device-id>with the USB device’s ID.
Once you’ve done this, the USB device should appear on the client computer as though it’s plugged in locally.
Pro Tip: If your connection drops or the device stops appearing, try reattaching by repeating the usbip.exe attach command.
Method 2: Using RemoteFX USB Redirection with Hyper-V (Windows VMs Only)
If you’re using Hyper-V on a Windows Pro or Server machine, RemoteFX USB Redirection can allow USB-over-IP functionality within virtual machines. This is a built-in feature for USB redirection, but it’s limited to Hyper-V environments.
Step 1: Enable Enhanced Session Mode
- Open Hyper-V Manager: Go to Hyper-V Settings in the right-hand pane.
- Enable Enhanced Session Mode: Under Enhanced Session Mode Policy, check Allow Enhanced Session Mode.
- Allow Local Resources: When connecting to the VM, select Show Options > Local Resources and select the USB devices you want to make available in the VM.
Step 2: Connect to the VM
- Start the VM in Enhanced Session Mode.
- Select USB Devices: When prompted, choose the USB devices you want to pass through to the VM.
The USB device should now be accessible within the Hyper-V virtual machine. Although this feature doesn’t work for all USB devices, it can be useful for basic peripherals like printers or thumb drives.
Method 3: Use a Linux Host with USB/IP to Share with Windows Clients
If you have a Linux server available, it can act as the host for USB/IP, allowing you to connect Windows machines to any USB device plugged into the server. This setup works well if you already have a Linux box running on your network.
Step 1: Set Up USB/IP on the Linux Host
- Install USB/IP on Linux:
sudo apt-get install usbip sudo modprobe usbip-core sudo modprobe usbip-host - List Available USB Devices:
usbip list --local - Bind the USB Device:
sudo usbip bind --busid=<device-id>
Step 2: Connect from the Windows Client
Once the Linux host is set up, follow the USB/IP installation steps for Windows as described earlier to connect to the shared USB device. Just specify the Linux server’s IP address as the host when attaching the device.
Why Use Linux as a Host?
For setups where you have a central server (like a Raspberry Pi), this allows you to use USB/IP without relying entirely on Windows, which can be finicky with USB/IP. Plus, it’s a solid option if you’re running Home Assistant or another service on a Linux box and want USB access.
Comparing Open-Source USB over IP Solutions
Here’s a quick look at the pros and cons of each open-source solution for USB over IP on Windows:
| Method | Best For | Ease of Setup | Cost | Compatibility |
|---|---|---|---|---|
| USB/IP on Windows | General USB devices on Windows-to-Windows setups | Moderate | Free | Good, works on most devices |
| RemoteFX in Hyper-V | USB redirection for Windows VMs only | Easy | Free | Limited to Hyper-V |
| Linux Host with USB/IP | Mixed environments with Linux server as host | Moderate | Free | Broad compatibility across OS types |
Takeaway: USB/IP is the most versatile option, working with a wide variety of devices. RemoteFX, though limited, can be helpful if you’re working specifically within Windows VMs on Hyper-V.
Security Tips for USB over IP
When sharing USB devices over the network, keep these security tips in mind:
- Network Security: Ensure devices are on a secure network to prevent unauthorized access.
- Limit Access: Only share devices with trusted machines and restrict usage where possible.
- Use Firewalls: If possible, use firewalls to protect the IP ports used by USB/IP traffic.
Final Thought on Security: Open-source solutions like USB/IP are powerful but don’t come with the same built-in security features as paid software, so securing your network is key.
The Verdict on USB over IP with Free and Open-Source Tools
USB over IP doesn’t have to break the bank! With USB/IP and other open-source solutions, you can set up reliable, remote USB access on Windows without spending a dime. Whether you’re connecting devices across the office or setting up a remote workstation, these tools provide flexible, budget-friendly options.
Enjoy the freedom of moving USBs across the network—no extra cables required.
USB/IP for Windows
- This project aims to support both a USB/IP server and a client on Windows platform.
Build
Notes
- Build is tested on Windows 10 x64 and the projects are configured for this target by default.
- x86/x64 platforms should be supported. However, we don’t have an x86 setup for testing at the moment.
- For Windows 7 users, change
usbip_stubandusbip_vhciprojects’ Target OS version toWindows 7.- Right-click on the
Project > Properties > Driver Settings > Target OS version > Windows 7 - The recent tag version which supports is v0.1.0. All versions after v0.1.0 do not support Windows 7 or 8 because usbip-win started to use kernel libraries of Windows 10.
- Right-click on the
Build Tools
- Visual Studio 2019 Community (v142)
- Build with VS 2017 (v141) is also possible if Platform Toolset in Setting is configured to v141.
- Windows SDK 10.0.18362.0 (recommended)
- VS 2019 (v142): requires >= 10.0.18xxx
- VS 2017 (v141): requires >= 10.0.17xxx
- Windows Driver Kit Windows 10, version 1903 (10.0.18362)
- WDK 10.0.17134 (1803), 10.0.17763 (1809) and 10.0.18346 are also tested.
Build Process
- Open
usbip_win.sln - If VS 2017 is used, SDK version for userspace projects (
usbip,usbip_common,usbipd,stubctl) should be adjusted. - Set certificate driver signing for
usbip_stubandusbip_vhciprojects- Right-click on the
Project > Properties > Driver Signing > Test Certificate - Browse to
driver/usbip_test.pfx(password: usbip)
- Right-click on the
- Build solution or desired project
- All output files are created under {Debug,Release}/{x64,x86} folder.
Install
Windows USB/IP server
- Prepare a Linux machine as a USB/IP client or Windows usbip-win VHCI client (tested on Ubuntu 16.04 with kernel 4.15.0-29 — USB/IP kernel module crash was observed on some other versions)
# modprobe vhci-hcd
- Install USB/IP test certificate
- Install
driver/usbip_test.pfx(password: usbip) - Certificate should be installed into
- «Trusted Root Certification Authority» in «Local Computer» (not current user) and
- «Trusted Publishers» in «Local Computer» (not current user)
- Install
- Enable test signing
> bcdedit.exe /set TESTSIGNING ON- reboot the system to apply
- Copy
usbip.exe,usbipd.exe,usb.ids,usbip_stub.sys,usbip_stub.inxinto a folder in target machine- You can find
usbip.exe,usbipd.exe,usbip_stub.sysin the output folder after build or on release page. userspace/usb.idsdriver/stub/usbip_stub.inx
- You can find
- Find USB Device ID
- You can get id from usbip listing
> usbip.exe list -l
- Bus id is always 1. So output from
usbip.exelisting is shown as:
- You can get id from usbip listing
usbip.exe list -l
 - busid 1-59 (045e:00cb)
   Microsoft Corp. : Basic Optical Mouse v2.0 (045e:00cb)
 - busid 1-30 (80ee:0021)
   VirtualBox : USB Tablet (80ee:0021)
- Bind USB device to usbip stub
- The next command replaces the existing function driver with usbip stub driver
- This should be executed using administrator privilege
usbip_stub.inxandusbip_stub.sysfiles should be in the same folder asusbip.exe
> usbip.exe bind -b 1-59
- The next command replaces the existing function driver with usbip stub driver
- Run
usbipd.exe> usbipd.exe -d -4- TCP port
3240should be allowed by firewall
- Attach USB/IP device on Linux machine
# usbip attach -r <usbip server ip> -b 1-59
Windows USB/IP client
- Currently, there are 2 versions for a VHCI driver with different installation procedures:
vhci(wdm): original version, implemented via WDM (Windows Driver Model);vhci(ude): newly developed version to fully support USB applications and implemented via UDE (USB Device Emulation) which is MS provided USB virtualization framework over KMDF (Kernel-Model Driver Framework).
- Prepare a Linux machine as a USB/IP server or Windows usbip-win stub server — (tested on Ubuntu 16.04 (kernel 4.15.0-29), 18.04, 20.04)
# modprobe usbip-host- You can use virtual usbip-vstub as a stub server
- Run usbipd on a USB/IP server (Linux)
# usbipd -4 -d
- Install USB/IP test certificate
- Install
driver/usbip_test.pfx(password: usbip) - Certificate should be installed into
- «Trusted Root Certification Authority» in «Local Computer» (not current user) and
- «Trusted Publishers» in «Local Computer» (not current user)
- Install
- Enable test signing
> bcdedit.exe /set TESTSIGNING ON- reboot the system to apply
- Copy VHCI driver files into a folder in target machine
- If you’re testing
vhci(ude), copyusbip.exe,usbip_vhci_ude.sys,usbip_vhci_ude.inf,usbip_vhci_ude.catinto a folder in target machine; - If you’re testing
vhci(wdm), copyusbip.exe,usbip_vhci.sys,usbip_vhci.inf,usbip_root.inf,usbip_vhci.catinto a folder in target machine; - You can find all files in output folder after build or on release page.
- If you’re testing
- Install USB/IP VHCI driver
- You can install using
usbip.exeor manually - Using
usbip.exeinstall command- Run PowerShell or CMD as an Administrator
PS> usbip.exe install- The previous command will install a UDE driver or a WDM driver depending on the available files
- (UDE version first)
PS> usbip.exe install -uif UDE driver onlyPS> usbip.exe install -wif WDM driver only
- Manual Installation for vhci(ude)
- Run PowerShell or CMD as an Administrator
PS> pnputil /add-driver usbip_vhci_ude.inf- Start Device manager
- Choose «Add Legacy Hardware» from the «Action» menu.
- Select «Install the hardware that I manually select from the list».
- Click «Next».
- Click «Have Disk», click «Browse», choose the copied folder, and click «OK».
- Click on the «usbip-win VHCI(ude)», and then click «Next».
- Click Finish at «Completing the Add/Remove Hardware Wizard».
- Manual Installation for vhci(wdm)
- Run PowerShell or CMD as an Administrator
PS> pnputil /add-driver usbip_vhci.inf- Start Device manager
- Choose «Add Legacy Hardware» from the «Action» menu.
- Select «Install the hardware that I manually select from the list».
- Click «Next».
- Click «Have Disk», click «Browse», choose the copied folder, and click «OK».
- Click on the «USB/IP VHCI Root», and then click «Next».
- Click Finish at «Completing the Add/Remove Hardware Wizard».
- You can install using
- Attach a remote USB device
PS> usbip.exe attach -r <usbip server ip> -b 2-2
- Uninstall driver
PS> usbip.exe uninstall
- Disable test signing
> bcdedit.exe /set TESTSIGNING OFF- reboot the system to apply
Reporting Bugs
usbip-winis not yet ready for production use. We could find the problems with detailed logs.
How to get Windows kernel log for vhci(wdm)
- Set registry key to enable a debug filter
usbip-winuses DbgPrintEx API for kernel logging.- save following as
.regfile and run or manually insert the registry key - reboot the system to apply
Windows Registry Editor Version 5.00

[HKEY_LOCAL_MACHINE\SYSTEM\CurrentControlSet\Control\Session Manager\Debug Print Filter]
"IHVDRIVER"=dword:ffffffff
- Run a debugging log viewer program before you test.
- DebugView is a good tool to view the logs.
- If your testing machine suffer from BSOD (Blue Screen of Death), you should get it via remote debugging.
WinDbgon virtual machines would be good to get logs.
How to get Windows kernel log for vhci(ude)
- A new vhci(ude) implementation uses WPP SW tracing instead of DbgPrintEx.
DebugView.execannot catch a VHCI debug messageTraceView.exeis a good utility for a new approach, which is included in WDK.
usbip_vhci_ude.pdbfile is required to add a trace provider easily.- Create a new session log in
TraceView.exe- Choose PDB file radio button in «Provider Control GUID Setup» popup dialog
- Specify
usbip_vhci_ude.pdbas a PDB file
- You can send real-time trace messages to WinDbg by modifying in «Advanced Log Session Options«.
- If your testing machine suffer from BSOD (Blue Screen of Death), you should get it via remote debugging.
WinDbgon virtual machines would be good to get logs
How to get usbip forwarder log
- usbip-win transmits usbip packets via a userland forwarder.
- forwarder log is the best to look into usbip packet internals.
- edit
usbip_forward.cto defineDEBUG_PDUat the head of the file - compile
usbip.exeorusbipd.exe debug_pdu.logis created at the path where an executable runs.
How to get linux kernel log
- Sometimes Linux kernel log is required
# dmesg --follow | tee kernel_log.txt
This project was supported by Basic Science Research Program through the National Research Foundation of Korea(NRF) funded by the Ministry of Education(2020R1I1A1A01066121).
Understanding USB over IP Technology
USB over IP software works by employing a combination of virtualization and encapsulation. This enables computers without physical USB ports to access USB devices. Data from a USB device is encapsulated so it can be transferred across a TCP/IP network. The information is then de-encapsulated by a virtual USB port implemented by the USB over TCP/IP software.
A USB to IP implementation requires the software to be installed on the computer that is physically connected to a USB device that will be shared over the network. The same software is also installed on all remote machines that will access the peripheral over the network.
It lets an organization share USB equipment over IP networks without needing to install device drivers on the remote machines. The tool creates secure communication channels through which USB data can be transmitted over the Internet or a private internal network.
The types of equipment that can be shared and accessed remotely with FlexiHub include:
- • Printers, scanners, and smart card readers;
- • Cameras and other audio/video devices;
- • Personal healthcare and diagnostic equipment;
- • HID devices, USB hubs, and game controllers;
- • Mass storage devices and USB security dongles.
Maximizing business efficiency with USB over IP
Case Study in Retail and Office Integration
Businesses can enjoy significant benefits by implementing USB over Internet functionality. Companies can extract the maximum value from their investment in remote access to USB devices by using the equipment more efficiently throughout the organization.
Let’s look at an example that illustrates the many ways USB over IP software can help a business. We will look at how the technology helps a company with brick-and-mortar retail establishments and a diverse office structure.
The USB equipment used to support the retail component of the business can be network-connected so the information on all transactions is communicated to the databases at the home office. Data from devices such as credit card readers, barcode scanners, and cash registers is made available to network-connected office computers.
Productivity is increased in the company’s home office by implementing a USB over IP software solution to facilitate sharing and remote access of its USB equipment. The specific ways productivity is enhanced with an IP over network solution include:
- ❑ Saving time by eliminating the need to swap cables and move equipment to make it available to multiple users;
- ❑ Enabling remote employees to access office equipment from their home office or any network-connected location;
- ❑ Allowing devices such as a USB storage device to be used efficiently by everyone in the office.
Невозможность пробросить подключенное USB устройство с хоста Hyper-V в виртуальную машину является одним из существенных недостатков гипервизора Microsoft. Для решения этой проблемы можно использовать open-source проект usbipd-win (https://github.com/dorssel/usbipd-win). Утилита usbipd-win позволяет пробросить по сети любое USB устройство или ключ (в том числе HASP) с хоста Windows в любую виртуальную машину Hyper-V, удаленный компьютер с Linux, Windows или в WSL2.
Утилита usbipd-win реализует протокол USB over IP для перенаправления USB устройств по сети.
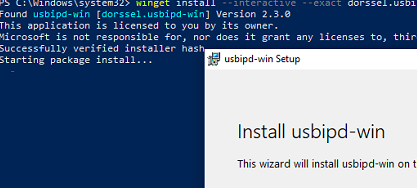
Вы можете установить серверную часть usbipd-win на компьютере Windows с помощью менджера пакетов WinGet:
winget install --id=dorssel.usbipd-win -e
Также можно скачать и установить MSI пакет вручную. Например, usbipd-win_2.4.1.msi (https://github.com/dorssel/usbipd-win/releases).
После установки в Windows появится служба usbipd (USBIP Device Host).
Откройте командную строку и выведите список доступных USB устройств:
usbipd list
Чтобы предоставить общий доступ к USB устройству, выполните команду:
usbipd bind --busid <busid>
Например:
usbipd bind --busid=7-1
Теперь вы можете получить доступ к этому USB устройству по сети с другого Linux или Windows хоста. Для подключения используется порт TCP 3240 (проверьте, что он открыт в Windows Defender Firewall).
Если вы хотите пробросить USB устройства с Windows хоста на Linux, нужно установить пакеты: ():
$ sudo apt install usbip hwdata usbutils (для Ubuntu и Debian)$ sudo yum install kmod-usbip usbip-utils hwdata (для RPM дистрибутивов CentOS/RHEL/Oracle Linux)
Теперь вы можете вывести список USB устройств, опубликованных на удаленном компьютере:
$ usbip list --remote=192.168.0.10
Чтобы подключить (пробросить) определенное устройство USB устройство по сети на ваш хост, выполните:
$ sudo usbip attach -remote=192.168.0.10 --busid=7-1
Если вам нужно пробросить USB устройство в WSL 2, сначала установите необходимые пакеты в вашем дистрибутиве WSL (например для Ubuntu):
$ sudo apt install linux-tools-5.4.0-77-generic hwdata
$ sudo update-alternatives --install /usr/local/bin/usbip usbip /usr/lib/linux-tools/5.4.0-77-generic/usbip 20
используйте команды:
usbipd wsl list
usbipd wsl attach --busid 7-1
Проверьте, что USB устройство доступно:
$ lsusb
Чтобы отключить USB устройство:
usbipd wsl detach --busid 7-1
Если нужно пробросить USB устройство по сети на другой Windows хост, нужно установить на нем специальный агент usbip.exe (https://github.com/cezanne/usbip-win)
Для автоматического подключение USB устройства по сети при загрузке Windows, добавьте в планировщик Windows Scheduler команду:
usbip.exe attach -r 192.168.0.10 -b 7-1