
== Introduction ==

Wubi is the Windows Linux Mint Installer. Wubi installs Linux Mint inside a file
within a Windows partition, and thus it does not require CD burning or
dedicated partitions, yet the installation is a dual boot setup identical
to a normal installation.

For more information see:

http://wubi-installer.org
https://wiki.ubuntu.com/WubiGuide

== Compiling ==

 * make: builds wubi.exe, note that the first time you run it, you will have
to install python inside of wine, this is performed automatically, just
confirm all the default choices in the installation screens that will appear.
 * make runpy: runs wubi under wine directly from source
 * make runbin: builds wubi and runs the packaged binary under wine
 * make wubizip: creates a special zip file conatining python.exe and non
   byte compiled python files that is convenient for debugging purposes.
   Inside of Windows, unzip the archive, then run
   "python.exe main.py --verbose". You can edit any file inside of ./lib.
 * make pot: generates a gettext template (po/wubi.pot)

== Code overview ==

 * src/winui: thin ctypes wrapper around win32 native graphical user
interface
 * src/pylauncher: makes python code into an executable, the python
script is examined and all the dependencies are added to an lzma
archive, then an executable header is concatenated to the archive that
decompresses it and runs the script using the python dll
 * src/wubi: the main wubi application, the code is split between backend
and frontend, where each runs in its own thread. The two interact via a
tasklist object, where the frontend usually runs a tasklist which is a set
of backend tasks. Backends and frontends are platform specific. For
now only the Windows platform is supported.
 * data: settings for wubi branding and customization
 * po: translations
 * bin: other binary files required at runtime (will be compiled at a later
stage)

== Wubi tasks ==

Wubi performs the following tasks

 * feteches information about the running system which will be used
during installation
 * checks that the minimum installation requirements are met
 * retrieves required user information via a GUI
 * looks for available local CDs and ISO files
 * downloads the ISO if one is required, using bittorrent and an http
download manager
 * checks the ISO/CD md5 sums and the md5 signature
 * extracts the kernel and initrd from the ISO
 * adds a new boot entry to the existing windows bootloader
 * prepares a preseed file to be used during the linux-side installation
 * allocates space for the virtual disk files

The actual installation is performed within linux after rebooting the
machine.

== Customizations ==

 * edit the files in data as appropriate and build your image
 * you will need to provide an ISO that is similar to the Linux Mint ISO and in
particular it must have .disk/info formatted like .disk/info in the Linux Mint ISO
 * you must provide a webserver with metalink file, metalink file md5
checksums and signatures for the md5 sums
 * add your signing key to data/trustedkeys.gpg
 * on the linux side, the distribution must be capable of booting and
rebooting off a loop file, perform an automatic installation and accept
the special boot parameters that indicate the local preseed file and ISO
image to boot from.

== License ==

GPL v2

See LICENSE
Contents
-
Installing Ubuntu from within Windows
- Download Wubi
- Install Ubuntu
-
Windows-based Un-installation
- Uninstall from Windows XP
- Uninstall from Windows Vista or Windows 7
- Uninstall from Windows 8
- Selecting Windows or Ubuntu
- External Links
Installing Ubuntu from within Windows
The Windows-based Ubuntu Installer (Wubi) allows you to install and uninstall Ubuntu from within Microsoft Windows. It lets a Microsoft Windows user try Ubuntu without risking any data loss due to disk formatting or partitioning.
Wubi requires Windows 98, ME, 2000, XP, Vista, Windows 7.
NOTE: Hibernation is not supported when installing Ubuntu via Wubi.
Download Wubi
Download Wubi from the WubiUEFI Installer Download page, this will download the latest version by default. You can download other versions of Ubuntu
Install Ubuntu
- Within Microsoft Windows, place your downloaded ISO in the same directory as the Wubi, and run the installer.

- In the Installation Drive list, select the drive that you want to install Ubuntu.
- In the Installation Size list, select the amount of space that you want to allocate to Ubuntu.
-
In the Desktop Environment list, select Ubuntu. If you wish to install Kubuntu, Xubuntu or another official derivative of Ubuntu, select your preferred one from the drop-down list.
- In the Language list, select your preferred language.
- In the Username box, enter a username for your Ubuntu account.
- In the Password box, enter a password for your Ubuntu account. Repeat this password on the second line.
-
Select Install. The Ubuntu Setup progress window appears. When Ubuntu has finished installing, the Completing the Ubuntu Setup Wizard window appears.
-
Select Reboot now and click Finish. Your computer restarts and the Windows Boot Manager appears.
- Using your keyboard’s up and down arrow keys, select Ubuntu and press Enter. Ubuntu loads and the Checking the installation wizard appears. Ubuntu is now installed.


NOTE: Since Wubi installs Ubuntu on the same file partition as Windows, there may be a slight degradation in Ubuntu’s performance over time due to file fragmentation.
Windows-based Un-installation
When installed from Microsoft Windows, Ubuntu can be uninstalled using Microsoft Window’s standard Add or Remove Programs/Uninstall a program option.
Uninstall from Windows XP
-
From the Start menu, select Control Panel. The Control Panel appears.

-
Select Add or Remove Programs. Add or Remove Programs appears.
-
Select Ubuntu and click Remove. The Wubi Uninstall window appears.
-
Click Uninstall. Ubuntu uninstalls. The Completing the Wubi Uninstall Wizard appears.
-
Click Finish. Ubuntu is uninstalled.
Uninstall from Windows Vista or Windows 7
Removing Ubuntu in Windows Vista or Windows 7 follows the standard Uninstall a program option in Microsoft Windows.
-
From the Start menu, select Control Panel. The Control Panel appears.

-
Under Programs, select Uninstall a program. The Uninstall or change a program window appears.

-
Select Ubuntu and then click Uninstall/Change. The Wubi Uninstall window appears.

-
Click Uninstall. The progress wizard appears. The Completing the Wubi Uninstall Wizard appears.

-
Click Finish. Ubuntu is uninstalled.
Uninstall from Windows 8

Removing Ubuntu from Windows 8 is done in a similar manner to Windows Vista and Windows 7, however there is a different procedure for accessing the Programs and Features.
- Select any tile by right-clicking any non-store application in your Start screen.
- On the bar that opens at the bottom, select Uninstall. This will open the Programs and Features dialog on your desktop.
- Note: This will not uninstall that application.
-
Select Ubuntu and then click Uninstall/Change. The Wubi Uninstall window appears.
-
Click Uninstall. The progress wizard appears. The Completing the Wubi Uninstall Wizard appears.
-
Click Finish. Ubuntu has been successfully removed from your computer.
Selecting Windows or Ubuntu
If you installed Ubuntu via the Wubi installer, the Windows (NT) Boot Loader (ntldr) loads. You can choose which operating system to «boot-up» into.
To Choose Which Operating System Boots-Up
- Turn on or restart your system. The Windows Boot Manager appears.
- Using your keyboard’s up and down arrow keys, select the operating system that you want to load. Press Enter. The desired operating system loads.
NOTE: The default operating system is Microsoft Windows. If you do not choose an operating system, Microsoft Windows will automatically load.
External Links
Active project to install Wubi on UEFI systems https://github.com/hakuna-m/wubiuefi
Wubi installer http://www.ubuntu.com/download/desktop/windows-installer
Wubi http://en.wikipedia.org/wiki/Wubi_(Ubuntu)
CategoryInstallation
Время на прочтение6 мин
Количество просмотров106K
Раньше моей рабочей машиной был ноутбук, созданный Apple. Я мог делать на нём практически всё что угодно: разрабатывать программы, писать тексты, сочинять музыку, да и много чего ещё. Но мне не давали покоя мысли о том, что я привязан к экосистеме Apple, о том, что я зависим от прихотей этой компании. Поэтому я приступил к поискам чего-то нового.
Я начал собирать рабочую станцию под задачи машинного обучения. Поставил в неё, кроме прочего, отличный процессор, много памяти, достойную видеокарту. Практически все мои задачи я решал в Ubuntu. Правда, для работы с текстами мне нужен был Microsoft Office. Онлайновый Office тогда ещё не появился, и, давайте называть вещи своими именами, LibreOffice — это просто ужас какой-то. Для меня решением стала двойная загрузка в конфигурации Ubuntu — Windows 10. Мне невероятно понравилось то ощущение свободы, которое испытываешь, переходя с ОС от Apple на Ubuntu. А возможности, которые открываются перед тем, кто сам собирает свой компьютер, практически бесконечны.

Двойная загрузка в течение долгого времени полностью меня устраивала. А когда я миллион раз ей воспользовался, появилась технология WSL (Windows Subsystem for Linux, подсистема Windows для Linux). Когда это случилось, я начал решать некоторые свои Linux-задачи в Windows. Правда, даже так, многого для полноценной работы мне ещё не хватало. Но теперь, с выходом WSL 2, у меня возникает такое ощущение, что новая версия WSL способна кардинальным образом изменить ситуацию. Сегодня я предлагаю поговорить о том, как, с помощью WSL 2, перенести задачи по разработке программ из Linux в Windows 10. Я расскажу о новых возможностях WSL 2, и о том, что можно ожидать от этой подсистемы в будущем.
Обзор WSL 2
WSL 2 — это новая версия подсистемы Windows для Linux. В этой версии имеются некоторые изменения, определяющие то, как Linux-дистрибутивы взаимодействуют с Windows.

Microsoft любит Linux
В этом релизе WSL в распоряжении пользователя оказывается улучшенная производительность файловой системы и полная совместимость с системными вызовами. Конечно, у нас есть возможность запускать Linux либо на WSL 1, либо на WSL 2, и, более того, переключаться между разными версиями WSL можно в любое время. WSL 2 — это результат серьёзного усовершенствования базовой архитектуры системы, её новые возможности основаны на технологии виртуализации и на функционале ядра Linux. При этом Microsoft берёт на себя заботу о мелких деталях, поэтому пользователь WSL может просто заниматься своими делами, ни на что не отвлекаясь.
Установка
Microsoft обещает, что в ближайшем будущем установка WSL 2 будет выполняться очень просто, и что Linux можно будет обновлять с использованием механизма обновлений Windows. Пока же процесс установки WSL 2 требует некоторых усилий, но, на самом деле, ничего страшного тут нет.
В этом примере мы установим на Windows 10 Ubuntu 20.04. Надо отметить, что процесс установки будет одним и тем же для всех дистрибутивов Linux, доступных в Microsoft Store. Для начала нужно включить компонент Windows Subsystem for Linux. Для этого надо открыть PowerShell от имени администратора и выполнить следующую команду:
dism.exe /online /enable-feature /featurename:Microsoft-Windows-Subsystem-Linux /all /norestart
Далее, нужно обновить WSL до WSL 2. Для этого Windows 10 должна быть обновлена до версии 2004. В BIOS должна быть включена технология виртуализации Intel. Снова воспользуемся PowerShell с административными привилегиями и выполним такую команду:
dism.exe /online /enable-feature /featurename:VirtualMachinePlatform /all /norestart
Для завершения установки WSL и обновления до WSL 2 перезагрузите компьютер. Затем нужно установить WSL 2 в качестве версии WSL, используемой по умолчанию при установке новых дистрибутивов Linux. Для этого, всё так же, пользуясь PowerShell с правами администратора, выполним эту команду:
wsl --set-default-version 2
После того, как вы выполните эту команду, может появиться такое сообщение:
WSL 2 requires an update to its kernel component. For information please visit https://aka.ms/wsl2kernel

Сообщение, выдаваемое при попытке установки WSL 2 как подсистемы Windows для Linux, используемой по умолчанию
Перейдите по указанной ссылке и установите соответствующий MSI-файл, благодаря которому на вашу машину будет установлено ядро Linux для WSL 2. После того, как ядро будет установлено, выполните вышеприведённую команду снова. Теперь она должна завершиться успешно, не выдавая подобного сообщения.
Теперь осталось лишь установить нужный дистрибутив Linux. Для этого надо открыть Microsoft Store и поискать там Ubuntu 20.04 LTS. После установки дистрибутива в меню Пуск должен появиться ярлык для запуска Ubuntu. Запустите систему и следуйте инструкциям для завершения установки (в целом, завершение установки заключается в создании нового пользователя).
Для того чтобы проверить, действительно ли дистрибутив установлен на WSL 2, выполните такую команду:
wsl --list --verbose
Если оказалось, что используется WSL 1, то переключиться на WSL 2 можно, воспользовавшись командой такого вида:
wsl --set-version <distribution name> <versionNumber>
Вот и всё. Теперь в вашем распоряжении имеется полноценный дистрибутив Ubuntu, работающий в Windows 10.
Настройка рабочей среды для программиста
Теперь, когда в вашем распоряжении оказалась рабочая Ubuntu, вы можете устанавливать всё, что вам может понадобиться. Например, если вы — дата-сайентист, вы можете установить самый свежий дистрибутив Anaconda. Если вы — фронтенд-разработчик, то вас, например, могут заинтересовать Angular, npm и многое другое. Здесь же мне хотелось бы сосредоточиться на двух инструментах. Это — Visual Studio Code и связка Docker + Kubernetes.
▍Visual Studio Code
VS Code — это редактор кода, которому отдаёт предпочтение множество разработчиков. Одна из сильных сторон этого редактора заключается в поддержке бесконечного множества расширений. А теперь, когда мы включили WSL 2, совершенно необходимым расширением для VS Code можно назвать Remote Development.
Это расширение позволяет удалённо работать над кодом, который имеется в среде, создаваемой средствами WSL 2, в контейнере, или даже на удалённой виртуальной машине, доступ к которой осуществляется по SSH. Данное расширение позволяет, например, создать проект в ОС Linux, работающей в WSL 2, и использовать для работы над этим проектом редактор VS Code, установленный в Windows 10.
Собственно говоря, VS Code отличается огромными возможностями. Это и интеллектуальная система IntelliSense, и интеграция с git, и отладчик, и терминал, и очень много чего ещё. Полагаю, с настройкой VS Code вы справитесь и очень скоро сможете сделать из этого редактора именно то, что нужно вам.
▍Docker + Kubernetes
Docker для Windows сделан на «хорошо», но не на «отлично». На самом деле, именно Docker заставлял меня постоянно «прыгать» между Windows и Ubuntu. Например, мне приходилось делать это тогда, когда нужно было создать новый образ Docker. А вот WSL 2 отличается полной поддержкой Docker. Это, полагаю, такая возможность новой подсистемы, которая делает работу с Docker даже удобнее, чем в Linux.
Для того чтобы включить эту возможность, нужно перейти в настройки Docker Desktop и включить опцию Use the WSL 2 based engine.

Включение поддержки Docker для WSL 2
Более того, перейдя в раздел настроек Kubernetes, можно включить возможность запуска локального кластера Kubernetes, просто установив соответствующий флажок.

Включение Kubernetes
Теперь можно перезапустить Ubuntu в WSL 2 и выполнить следующие команды:
docker version
kubectl version
Результаты выполнения подобных команд покажут, что в вашем распоряжении теперь есть Docker и Kubernetes.
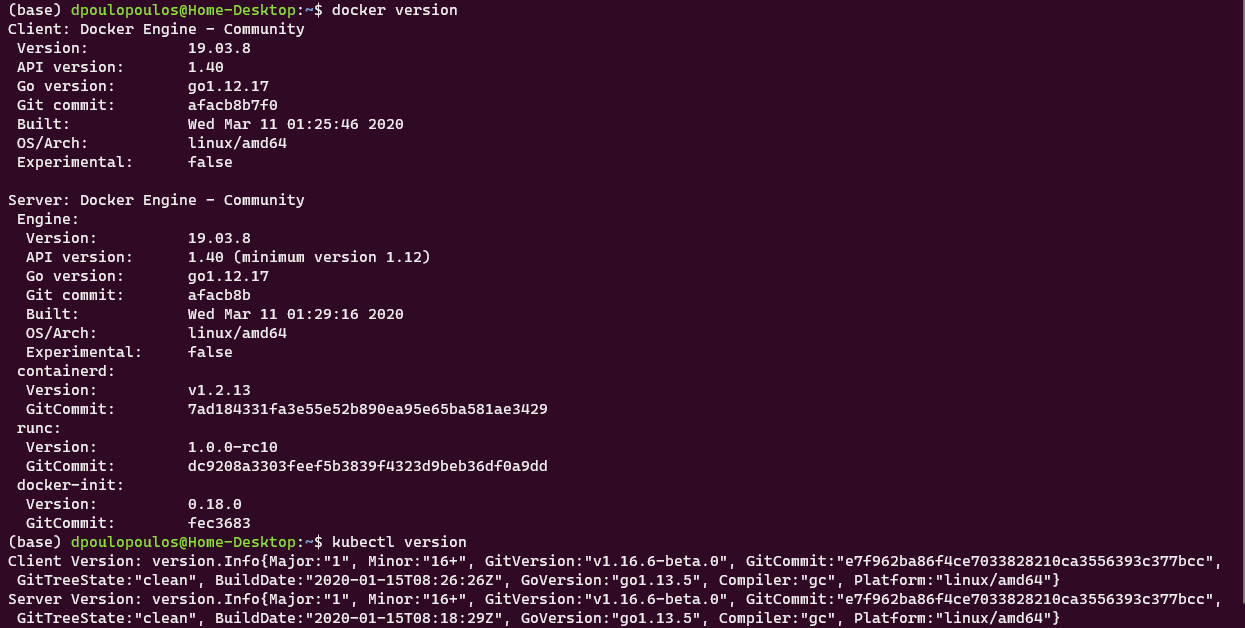
Docker и Kubernetes работают в среде WSL 2
Бонус: новый терминал Windows
В качестве дополнительной полезной программы вы можете установить из Microsoft Store новый терминал Windows. В описании к нему сказано, что перед нами новое современное приложение — быстрое, эффективное и мощное. Оно предназначено для пользователей, работающих с инструментами командной строки и с соответствующими средами, наподобие PowerShell. Среди его главных возможностей можно отметить следующие: поддержка вкладок и панелей, поддержка Unicode и UTF-8, ускорение вывода текста средствами GPU, поддержка пользовательских тем, стилей и настроек.
Вот видео про новый терминал Windows.
Более того, новый терминал очень хорошо выглядит, а его внешний вид поддаётся настройке. Настройки можно выполнять, пользуясь особым JSON-файлом. Здесь можно найти темы для терминала. Вот материал, в котором можно почитать подробности о терминале.
Планы развития WSL
В WSL 2 ещё недостаёт некоторых возможностей, но подсистема Windows для Linux развивается в правильном направлении. В ближайшее время установить WSL можно будет с помощью одной команды. Для этого достаточно будет открыть терминал Windows и выполнить в нём следующее:
wsl.exe --install
Кроме того, WSL 2 будет той версией подсистемы, которая, при первой установке WSL, устанавливается по умолчанию.
Надо отметить, что разработчики очень ждут от WSL следующих возможностей: поддержка видеокарт и поддержка приложений с графическим интерфейсом.
С момента выхода WSL 1 команду разработчиков этой подсистемы чаще всего просили о внедрении в WSL поддержки CUDA или GPU Compute. В последний код команды разработчиков WSL, систем виртуализации, DirectX, Windows Driver работают над этой возможностью. Поэтому — следите за новостями.
Обучение модели, использующей технологии глубокого обучения, в WSL 2 (с использованием CUDA)
Более того, на подходе и поддержка графических приложений для Linux. Например, в Linux-системах, установленных на WSL, можно будет пользоваться текстовыми редакторами или IDE. На Windows-машине можно будет даже разрабатывать GUI-приложения для Linux!
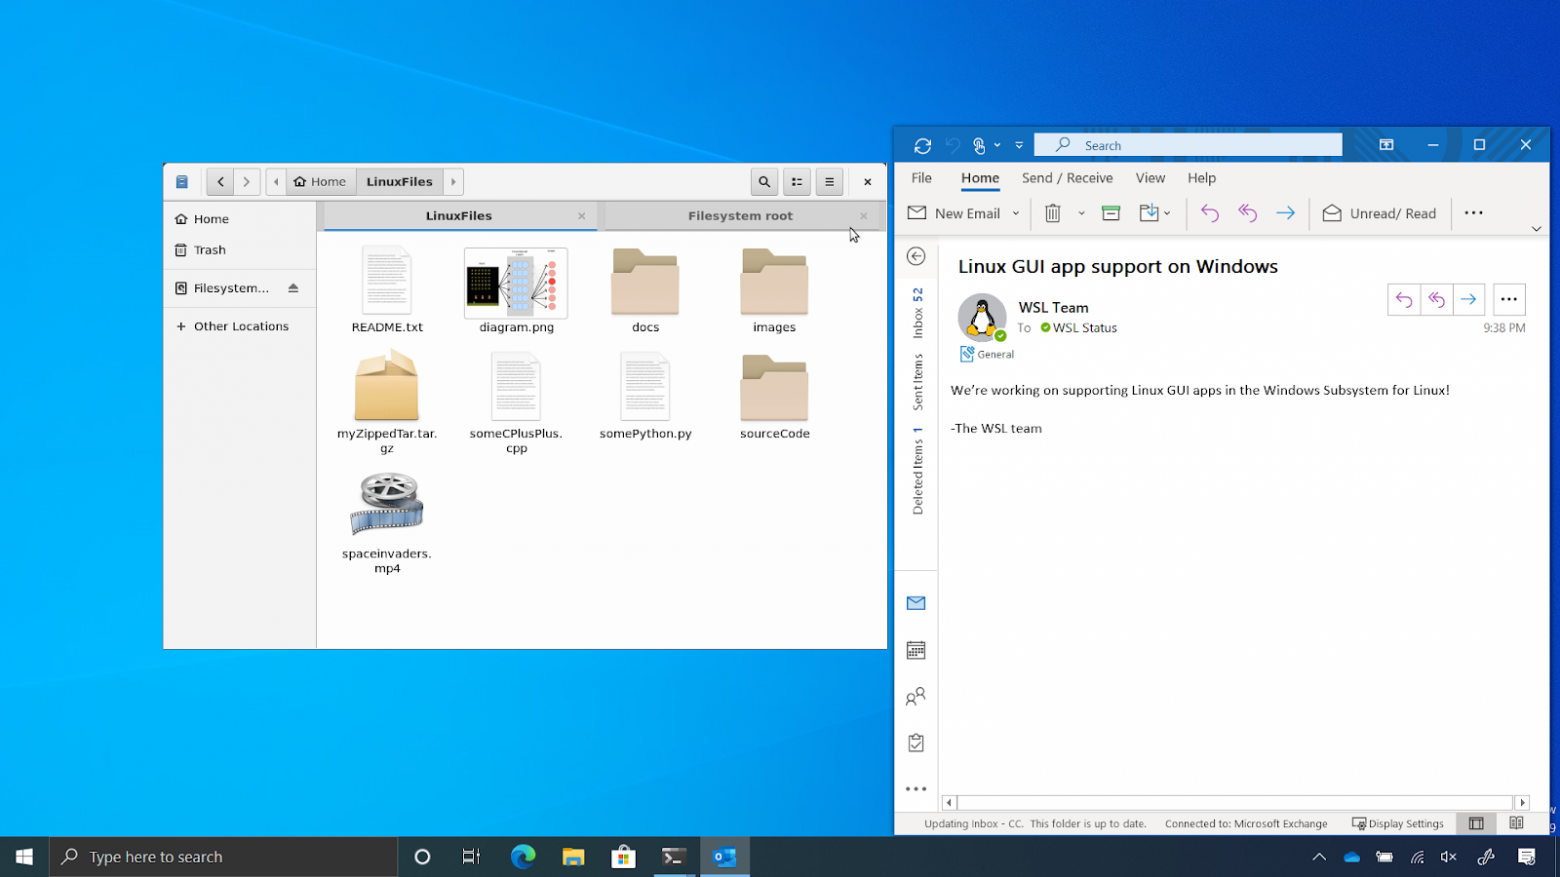
Поддержка графического интерфейса Linux в WSL 2
Итоги
Сегодня мы поговорили о том, как, пользуясь WSL 2 можно превратить Windows-компьютер в рабочую станцию программиста, пользующегося Linux. В распоряжении такого программиста оказывается высокая производительность и множество полезных возможностей, набор которых, со временем, пополнится. Поэтому я и могу говорить о том, что двойная загрузка умерла.
А вы пользуетесь WSL 2?


There is no single operating system that can satisfy all the needs. All of them have their own pros and cons. Windows is most loved by gamers, whereas Linux is perfect for running services. Well, on the other hand, Windows attracts more cyberattacks than Linux because of its flaws. Linux is more stable than Windows. Despite that, Windows has a large user base and a large set of applications than Linux. Neither is perfect for everything. It is a debatable topic. Let’s not get into it now. It’s time to combine both the platform and make them work together to reap the maximum out of it. Yes, there are ways to run Windows apps on Linux. We have decided to help our readers to run Windows apps on Ubuntu, one of the most popular Linux distributions in the Linux world.
In this post, we have chosen Ubuntu Linux to show the step-by-step procedure to run Windows apps on Linux. but, of course, you can try this out on other Debian-based distributions as well.
Why Do Users Want To Run Windows Apps On Ubuntu (Linux)?
There could be many reasons to run Windows apps on Linux. However, the most common reasons are:
-
Some programs and games have been developed only for the Windows platform. This may stop users to migrate Linux, or, in other words, Linux users can’t enjoy those apps and games on the Linux platform.
-
This opportunity will give a chance for Windows users to migrate Linux as they can run their favorite Windows programs on the Linux of their choice.
-
Linux is more stable and robust, but Windows has a large set of programs. This will give more flexibility for users to run both Windows and Linux apps on a single platform.
What Do You Need To Run Windows Apps On Ubuntu (Linux)?
Just you need a Ubuntu running system with WINE on your Ubuntu. Well, you can use this method on other Linux distributions like Fedora, Debian, Linux Mint, and macOS.
What Is Wine?
“Wine (originally an acronym for “Wine Is Not an Emulator”) is a compatibility layer capable of running Windows applications on several POSIX-compliant operating systems, such as Linux, macOS, & BSD. Instead of simulating internal Windows logic like a virtual machine or emulator, Wine translates Windows API calls into POSIX calls on the fly, eliminating the performance and memory penalties of other methods and allowing you to cleanly integrate Windows applications into your desktop.“
How To Run Windows Apps On Ubuntu Linux?
The procedure to run Windows apps on Ubuntu Linux is quite simple. We have segregated this procedure into six sub sections. Let’s see all these sections in practical.
-
Install Wine on Ubuntu Linux.
-
Configure Wine on Ubuntu Linux.
-
Install Windows applications on Ubuntu Linux.
-
Set up Wine as the default program to load Windows applications.
-
Install Winetricks.
-
Use Winetricks to install Windows programs.
Step 1. Check the Ubuntu release version on the command line
Let’s start this by checking the version of Ubuntu we have, We are running Ubuntu 20.04.2 LTS on our machine. The command to check the Linux version:$ cat /etc/os-release
Step 2. Install wine on command line
Let’s start the process by installing the Wine on Ubuntu Linux. The command to install Wine on Ubuntu:$ sudo apt install wine
Step 3. Wine installation is in progress…
Wine installation in progress
Step 4. Wine installation completed
Wine installation completeed.
Step 5. Install 32-bit architecture package of wine
If your system architecture is 64-bit. You can’t run 32-bit Windows programs. However, you can install 32-bit programs as well. For that, you should install 32-bit architecture to run 32-bit programs.
Install 32-bit architcture:
$ sudo dpkg –add-architecture i386
Download and add the repository key:
$ wget -nc https://dl.winehq.org/wine-builds/winehq.key
Add the repository:
$ sudo add-apt-repository ‘deb https://dl.winehq.org/wine-builds/ubuntu/ focal main’
Step 6. Update repository on Ubuntu
Update the repository:
$ sudo apt update
Step 7. Install wine32
Install Wine32 to run 32-bit Windows packages:$ sudo apt install wine32
In our case, it’s already installed on our machine.
Step 8. Check the wine installation
Confirm the Wine installation on Ubuntu Linux:Issue the command to confirm the wine installation.$ wine
Step 9. How to configure Wine?
Issue the ‘winecfg’ command to open the configuration window of Wine. Many directories and files will create when you initiate Wine configuration for the first time. You can configure Windows Libraries, Graphics, Drivers, Audio, and Windows version environment.$ winecfg
Step 10. How to install Windows applications on Ubuntu Linux?
We are going to download and install the Notepad++ exe on Ubuntu Linux for demonstration.Download Notepad++.$ wget https://github.com/notepad-plus-plus/notepad-plus-plus/releases/download/v8/npp.8.0.Installer.x64.ex
Step 11. Installation of notepad++.exe
Use the wine command to run the Notepad++ exe file.$ wine npp.8.0.Installer.x64.exe
The installer will launch like a Windows installer.
Step 12. Begin the installation of notepad++
Just install the app like a windows app. Click Next.
Step 13. Browse the installation directory
Browse the location and click Next like in Windows installation.
Step 14. Create the Desktop icon
Check on ‘Create a desktop icon’.
Step 15. Finish the installation of Notepad++
Finish Installation.
Step 16. Run Notepad++ application on Ubuntu Linux as in Windows
You can run the Notepad++ application on Ubuntu Linux as in Windows. You can notice the Notepad++ icon has appeared on the Ubuntu Desktop.
Step 17. See the Notepad++ inside the menu apps
You can see the Notepad++ inside the menu apps. You can run the app from the Ubuntu Apps either.
Step 18. How to set up Wine as the default program to load Windows applications?
You can’t execute the Windows installers by double-clicking until you configure Wine as the default Windows program loader. You can do this by creating the Wine program’s symbolic link under the application directory.$ sudo ln -s /usr/share/doc/wine/examples//wine.desktop /usr/share/applications
Step 19. Create symbolic link of the application under the application directory
Step 20. Add application to the default program’s list
Right-click on the file. Select Properties. Go to the ‘Open With’ tab. You will find the ‘Wine Windows Program Loader’ at the end of the list. Select the Wine program loader then click on ‘set as default‘.
Step 21. Run application as the default program
Now, you can launch any Windows installer files by double click or right-clicking and selecting ‘Open with Wine Windows Program Loader‘.
Step 22. How to install Winetricks?
Winetricks is an on-top application that can be used to install additional Windows applications, games, DLL libraries, fonts, Windows components, Visual C++, Dotnet framework, and many more things. Use this command to install ‘Winetricks’ on Ubuntu Linux.$ sudo apt install winetricks
Step 23. Run Winetricks in GUI mode
You can run Winetricks in GUI mode to install applications. Use this command to run Winetricks in GUI mode:$ winetricks
You can install any application, game, Windows components, and many more in GUI mode. The installation procedure is quite simple. Follow the instructions.
Step 24. List of applications available on Winetricks
List of applications available on Winetricks:
Step 25. List of games available on Winetricks
List of games available on Winetricks:
Overview of Wine Windows environment in Linux:
Wine creates the Windows environment inside .wine directory under the user’s home directory. The .wine directory will be hidden by default. Unhide the directory and explore the file system. You will find the complete Windows C drive inside the .wine directory. You will also get the user’s directories, Download folder, Documents folder, System32, Program Files, including regedit option to create, edit, and delete the Windows registries. We urge you to explore the Windows file system inside the Wine.
Wine Windows environment in Linux
That’s all about Wine. This is how you can install and run Windows apps on Ubuntu Linux.We tried to cover most of the information which need for beginners to run Windows apps on Ubuntu Linux. Please share this post with your contacts and help share the valuable information.
You may also like these articles:
Новая ОС может стать отличной альтернативой Windows 10, которая завершит свой жизненный цикл в 2025 году
В настоящее время самой популярной операционной системой считается Windows 10. «Десятка» вышла в 2015 году и порядком устарела. Существует более новая ОС под названием Windows 11, но она не смогла стать полноценной альтернативой по целому ряду причин. Прежде всего новая ОС не принесла существенных изменений, которые могли бы заинтересовать пользователей. Кроме того, она оказалась слишком требовательной, ну а это существенный минус, ведь в корпоративном секторе миллионы компьютеров не поддерживают Windows 11. В итоге крупный и средний бизнес предпочитает оставаться на Windows 10, ну а времени для раздумий не так много. Проблема в том, что данная операционная система завершит свой жизненный цикл уже в 2025 году. Крупные компании могут обратиться в Microsoft за обновлениями, оплачивая дополнительную поддержку в рамках годичного абонемента. А вот обычные пользователи окажутся в трудном положении. Фактически, альтернатив нет, поскольку все ранее озвученные предложения имеют те или иные минусы.

Например, Google всё активнее продвигает свою Chrome OS Flex. Данная операционная система создана под сильно устаревшее железо, где способна обеспечить выход в интернет и работу с документами. Главным минусом такого продукта называется отсутствие совместимости с привычным программным обеспечением Windows. Не стоит забывать, что интерфейс Chrome OS Flex представляет собой использование ресурсов интернета, что делает работу в этой ОС непривычной для большинства людей. Энтузиасты постоянно призывают сообщество Linux к действиям, предлагая воспользоваться слабостью Microsoft для популяризации альтернативной операционной системы. Похоже, подобные идеи уже нашли своё воплощение в реальном дистрибутиве Linux под названием Wubuntu. Уникальность данной операционной системы заключается в том, что она позволяет перейти на Linux без значительных потерь.
Так, базовый Wubuntu имеет интерфейс, который повторяет Windows 11. Дистрибутив основан на Linux Ubuntu, но разработчики внесли существенные правки. Интерфейс полностью копирует таковой в Windows 11, включая цветовую гамму, обои рабочего стола, горячие клавиши, и многое другое. Пользователям доступна панель задач «Пуск», расположение которой осталось неизменным. Пользователи, которые уже опробовали Wubuntu, рассказывают о том, что не заметили существенных отличий, а больше всего привлекает полная совместимость с программным обеспечением с Windows. Так, без значительных потерь производительности запускаются файлы .exe и .msi, а сама операционная система ещё и легко запускает любые приложения с Android. Разработчики пишут, что пока не заметили проблем с совместимостью, но призывают энтузиастов сообщать о любых мелочах, что позволит улучшить работоспособность новой операционной системы.
Но особенно интересны системные требования Wubuntu. Напомним, для Windows 11 потребуется процессор, выпущенный после 2018 года, а также наличие 4 Гб оперативной памяти и 64 Гб свободного пространства на диске. Новый дистрибутив на Linux прекрасно заработает на компьютере, где есть всего 2 Гб ОЗУ. Для нормальной работы хватит и 2-ядерного процессора с тактовой частотой 2 ГГц, а после установки система займёт 25 Гб. Для хранения дистрибутива потребуется флешка размером 8 Гб, ну а лучше всего докупить твердотельный накопитель, что ускорит работу Wubuntu. В случае чего, данная ОС сможет функционировать и на жёстком диске, не говоря уже о модуле безопасности TPM, без которого установить Windows 11 невозможно. Сам дистрибутив занимает 5.1 Гб, а приятной неожиданностью является возможность выбора версии на базе графической среды Cinnamon. В этом случае Wubuntu имитирует оболочку Windows 10, сохраняя все функции, включая поддержку приложений Windows. Оба варианта записываются на флешку или диск с достаточным объёмом памяти. Бесплатная версия включает все необходимые функции и может стать отличной альтернативой для тех, кто не хочет или не может перейти на Windows 11. Пользователи сохранят все преимущества запуска традиционных приложений, но не будут стоять перед необходимостью покупки нового компьютера. Проблема заключается лишь в том, что придётся делать чистую установку, ну а это ведёт к потере личных данных, настроек и программного обеспечения. Доступна платная версия стоимость 35 долларов. За эту сумму разработчики обещают выход автоматических обновлений, техническую поддержку и другие полезные возможности.
Telegram-канал @overclockers_news — теперь в новом формате. Подписывайся, чтобы быть в курсе всех новостей!