
Before starting the installation of Windows 2008 Server, make sure that the computers meet the hardware requirements of Windows Server 2008. Prepare the computer for the Operating System installation and set the BIOS to boot the computer from DVD drive.
Windows 2008 Server can be installed manually by sitting in front of the computer or by network installation using Windows Deployment Services. Here we will learn how to install Windows 2008 Server manually by siting in front of the computer.
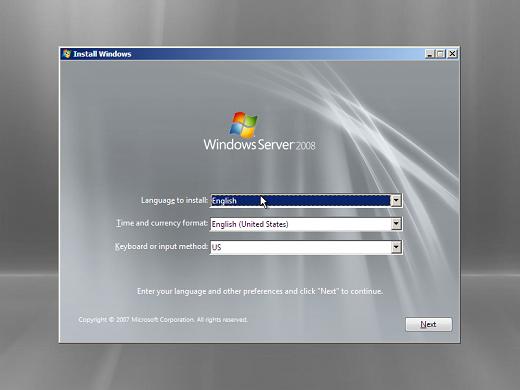
1) Place Windows 2008 Server DVD in DVD drive and power on the computer. First screen you get is the Language and Other Preferences. Select the language, time and currency format and input method in this screen. Click «Next» to continue.
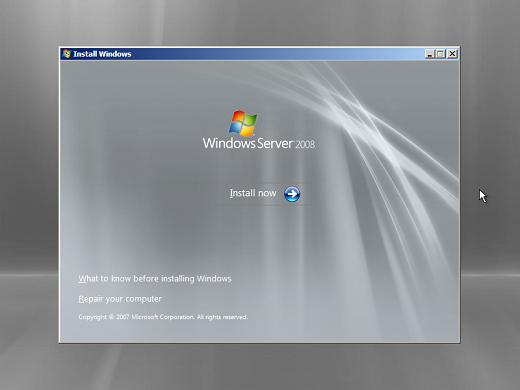
2) Click the «Install Now» button to move to next screen. You have an option to repair the computer also in this screen.
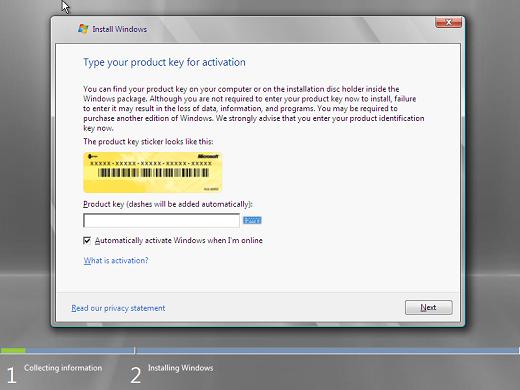
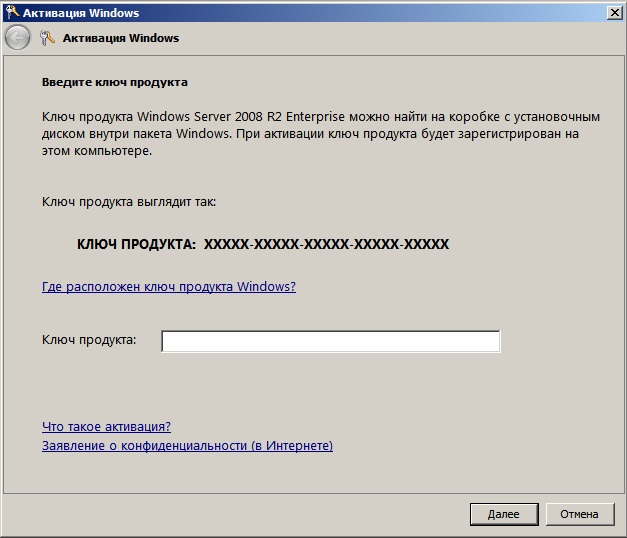
3) Enter the Windows 2008 product key in next screen. Click «Next» to continue.
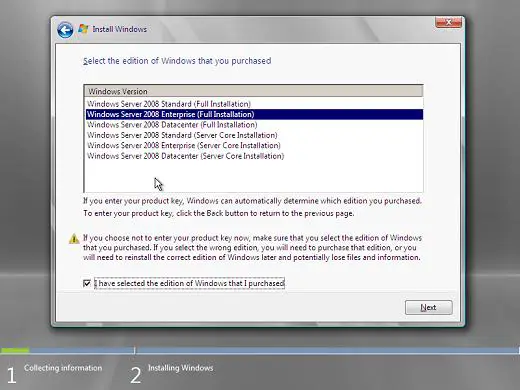
4) Select the Windows 2008 edition which you have purchased in next screen. Check the check box «I have selected the edition of Windows that I have purchased» and click «Next» to continue.
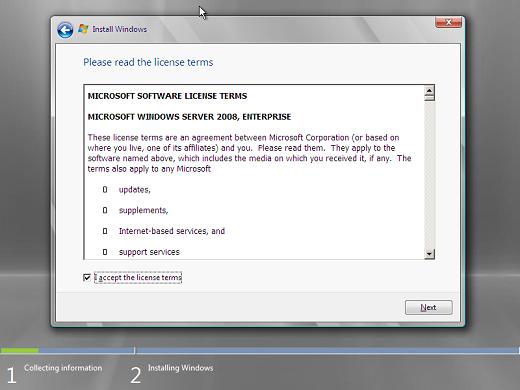
5) Accept Windows 2008 license terms in next screen by checking the «I accept the license terms» check box, and click «Next» to continue.
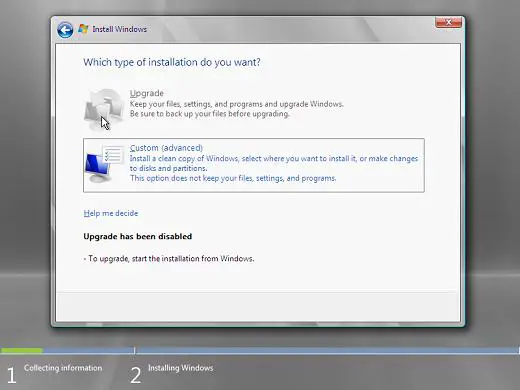
6) Select the installation type in next screen by clicking «Custom» button. Upgrade is desabled since this is a new installation.
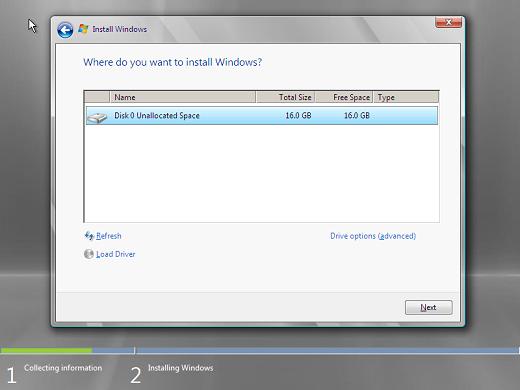
7) Select the drive where you want to install Windows 2008 Server. You can also click the «Drive optione» to create a new disk layout or to format a volume.
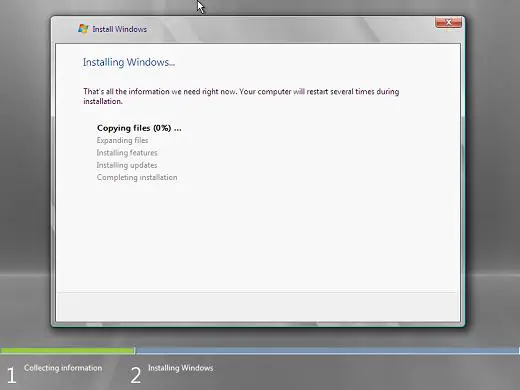
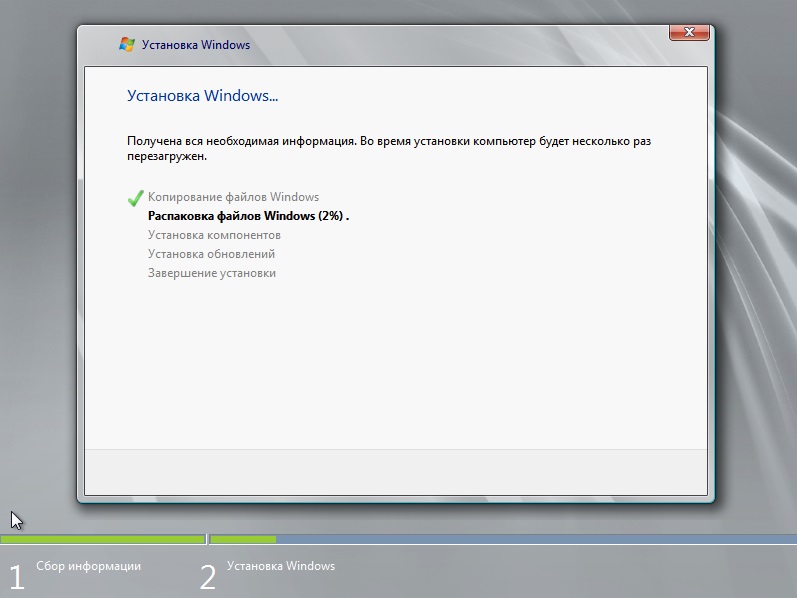
 Windows 2008 installation will start now and you can watch the progress in next screen. Once the installation is over the computer will reboot to your new installation.
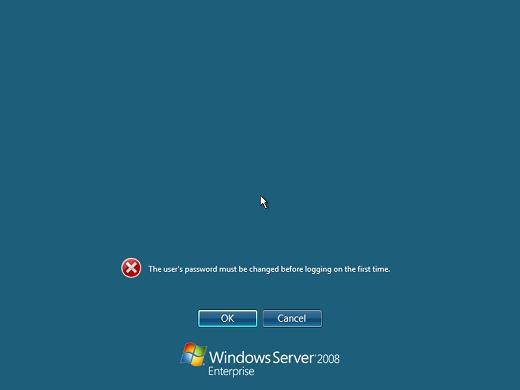
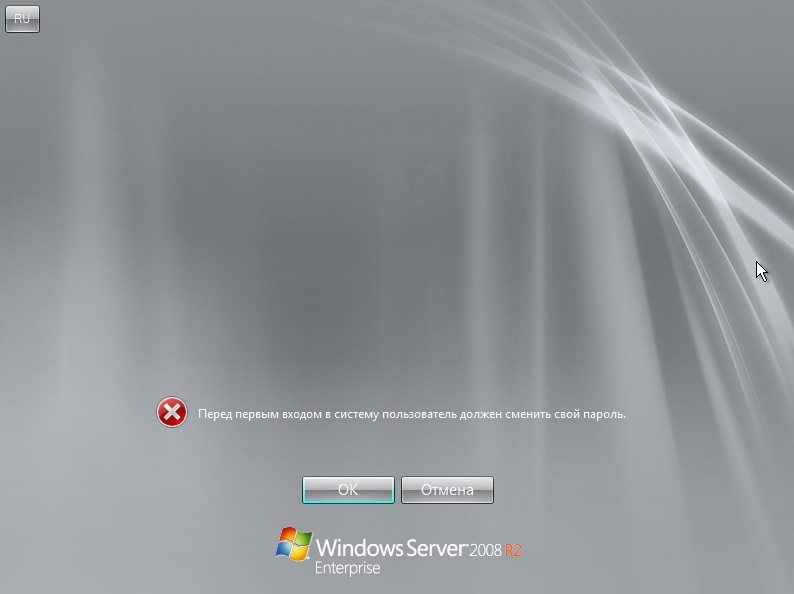
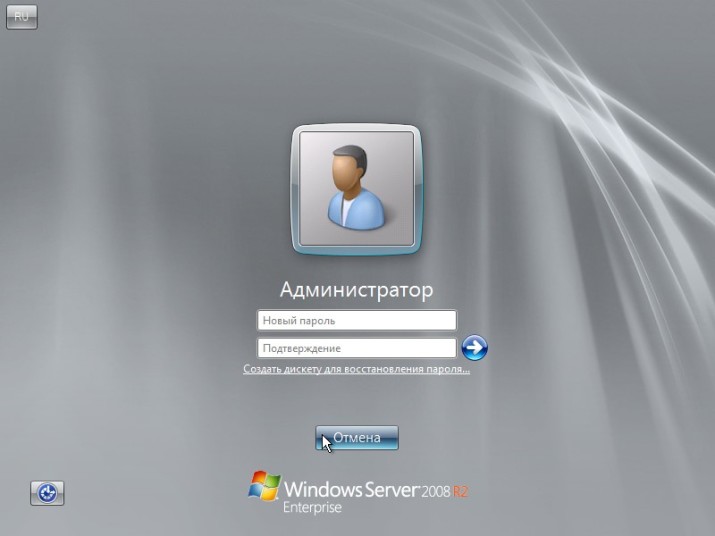
9) Change the administrator password after the reboot by clicking the «OK» button.
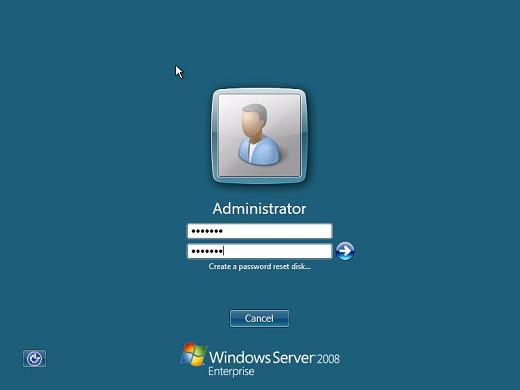
10) Enter the new password and confirm it in the next screen.
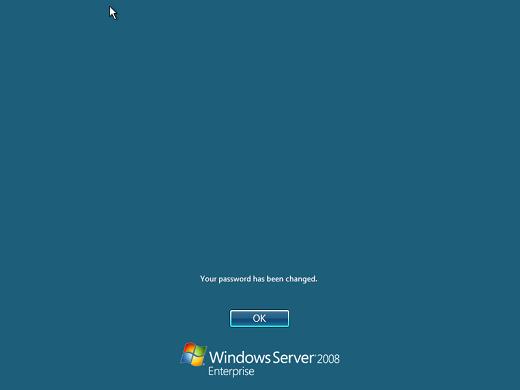
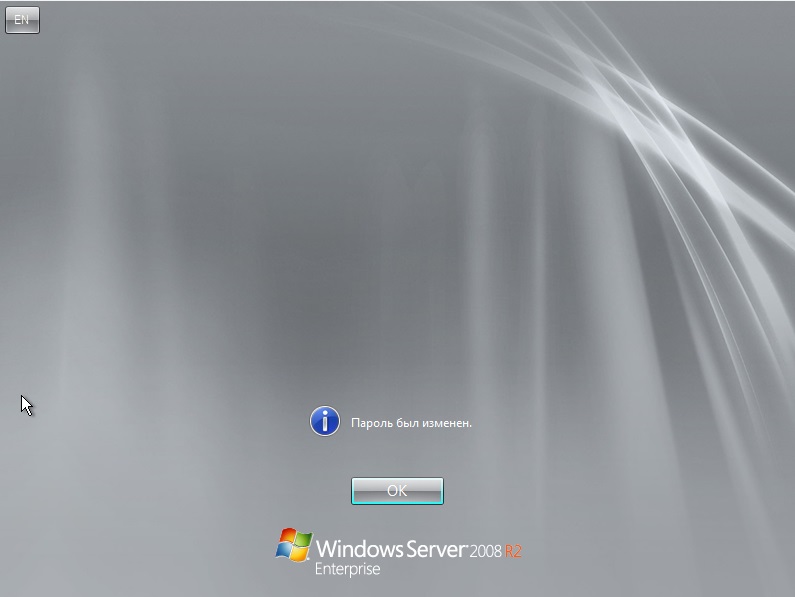
11) Click «OK» in «Your password has been changed» screen.
12) Your Windows 2008 Server is up and running… Be ready to start exploring it.

В данной статье пошагово со скриншотами рассмотрим как происходит процесс установки Windows Server 2008 r2. Процесс установки одинаковый для всех версий Windows Server 2008, для Standard, Enterprise и Datacenter.
Первое, что нам нужно сделать — это скачать сам дистрибутив. Скачать единый дистрибутив (Standard, Enterprise и Datacenter) можете скачать в нашем каталоге.
Далее, необходимо записать дистрибутив на загрузочную флешку, чтобы потом это все установить из под Bios/UEFI. Ознакомиться с интрукией как записать Windows на загрузочную флешку можете на следующей странице.
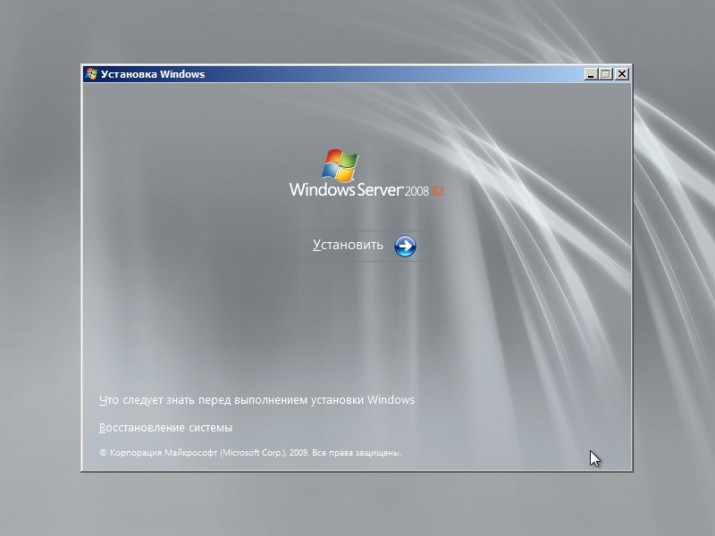
Далее, как флешка будет записана, можно с нее загрузиться и приступить непосредственно к установке. Первым окном будет выбор языковых настроек, выбираете нужное, либо оставляете по умолчанию.

Нажимаем «Установить».
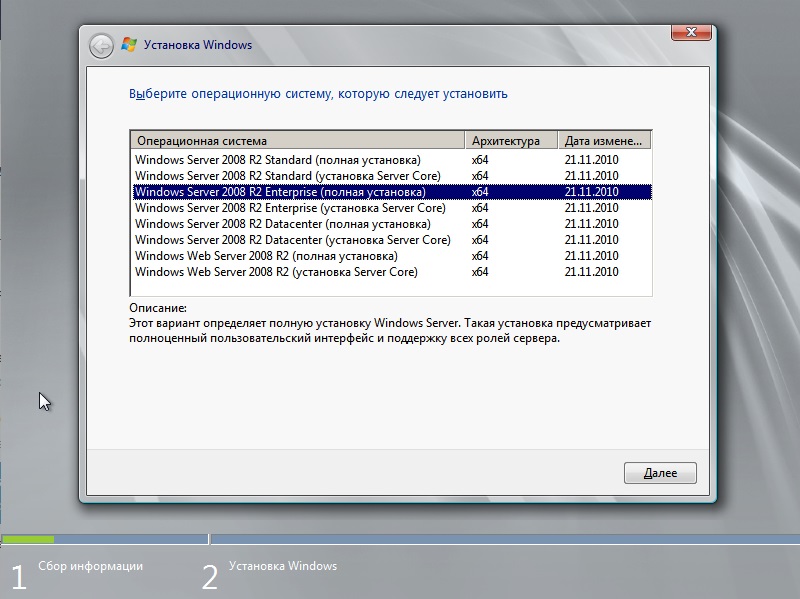
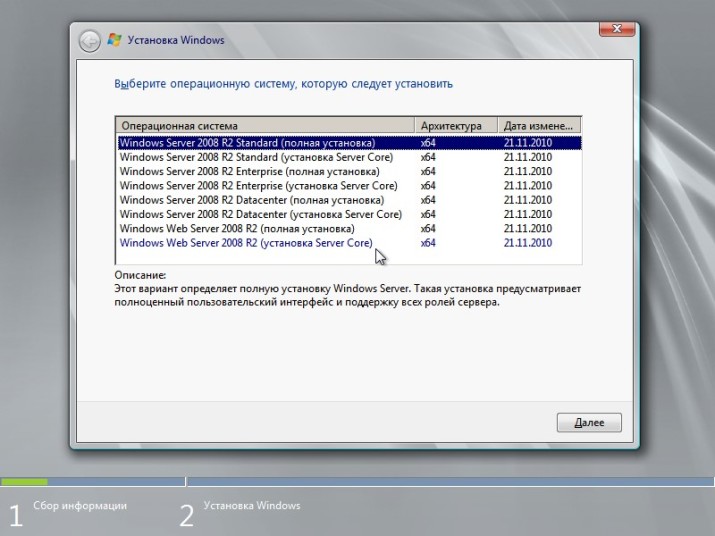
После выбираем нужную версию для установки. На примере мы выберем самую расширенную версию Windows Server 2008 R2 Enterprise (полная установка), но Вы по желанию можете выбрать любую. Процесс установки от этого не поменяется.
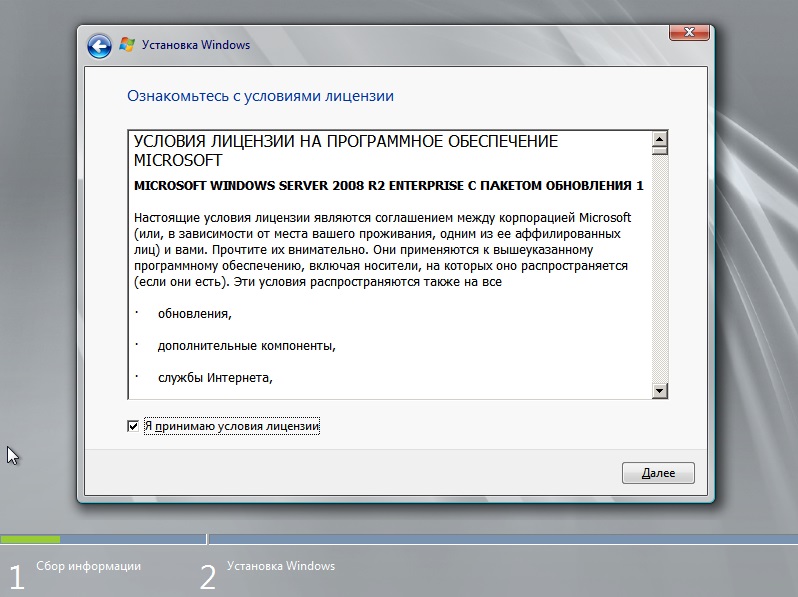
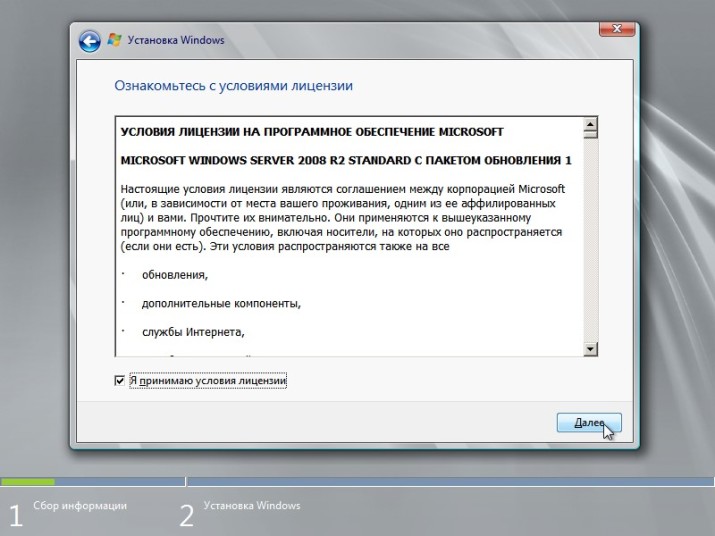
Принимаем лицензионное соглашение.
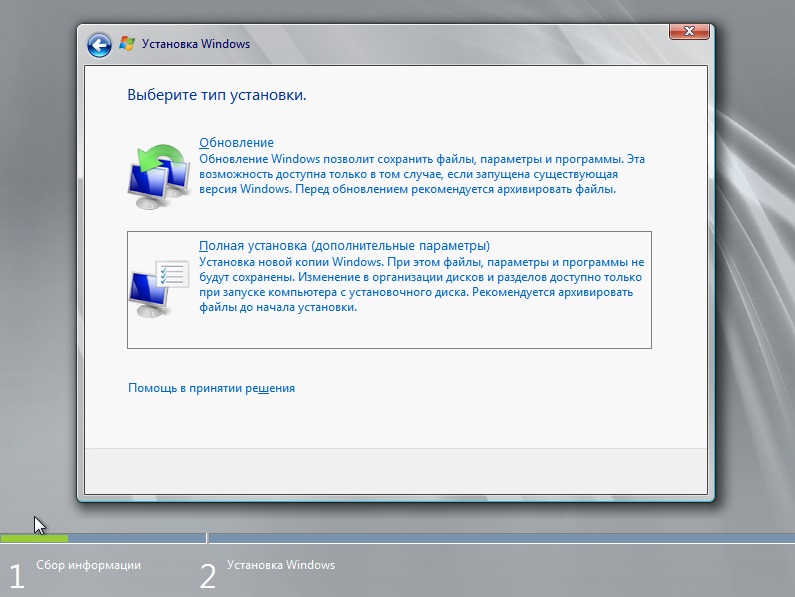
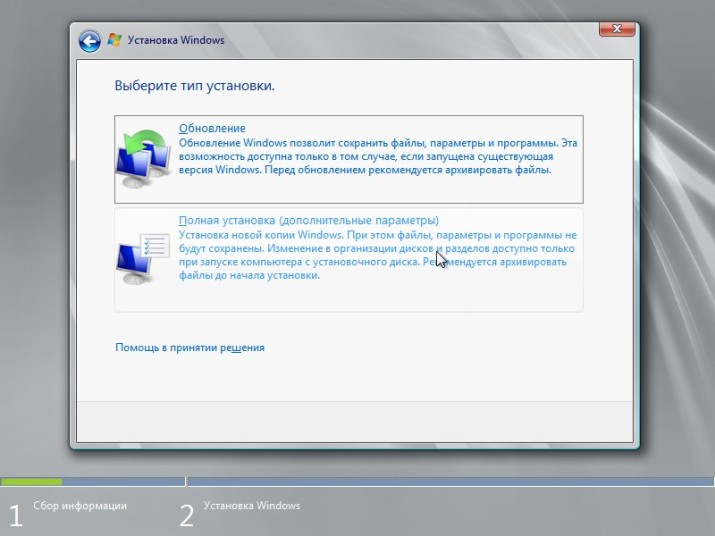
Т.к у нас чистая установка с нуля, выбираем пункт «Полная установка».
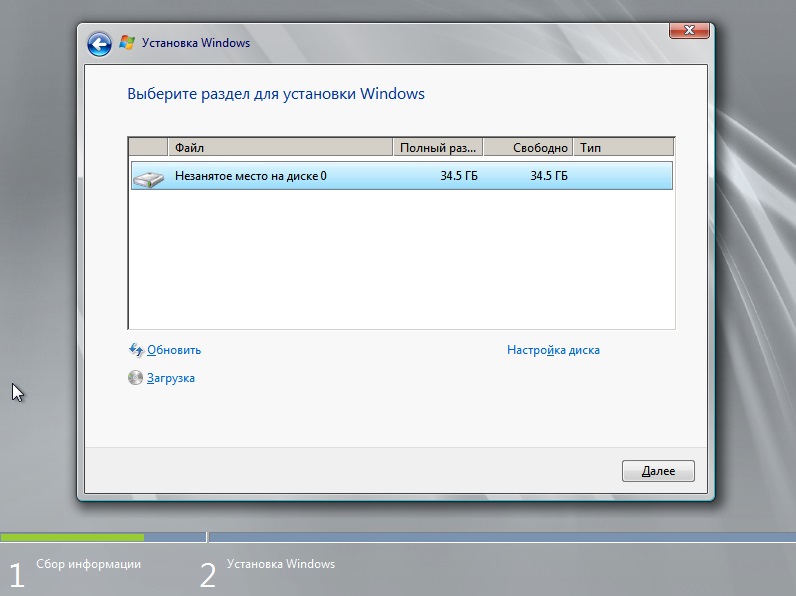
Следующим пунктом нам нужно выбрать целевой жесткий диск, на который будет установлена сама система. У нас на примере он один, поэтому выбираем его и жмем «Далее». У Вас же может быть несколько накопителей, выберите нужный для установки.
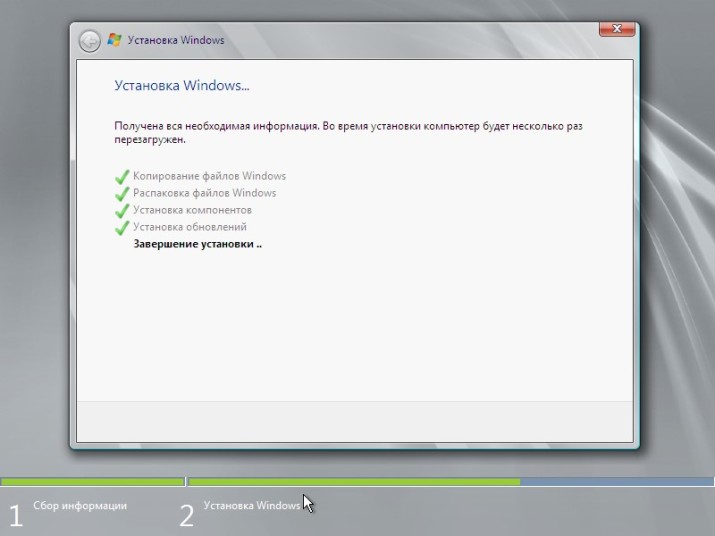
Теперь начнется непосредственно сама установка системы. Ожидайте установки, компьютер может перезагрузиться несколько раз.
После установки. Система запросит задать пароль администратора. Нажимаем «ОК» и придумываете свой пароль.
На этом все, после у Вы можете приступить к работе. Пробный период работы без активации системы составляет 3 дня. Для активации системы нужно зайти в меню «Свойства системы» и ввести ключ активации под Вашу версию системы. Приобрести ключи активации Windows Server 2008 R2 Standard и Windows Server 2008 R2 Enterprise можете в нашем каталоге. Доставка ключа активации в течении нескольких часов на Вашу электронную почту.
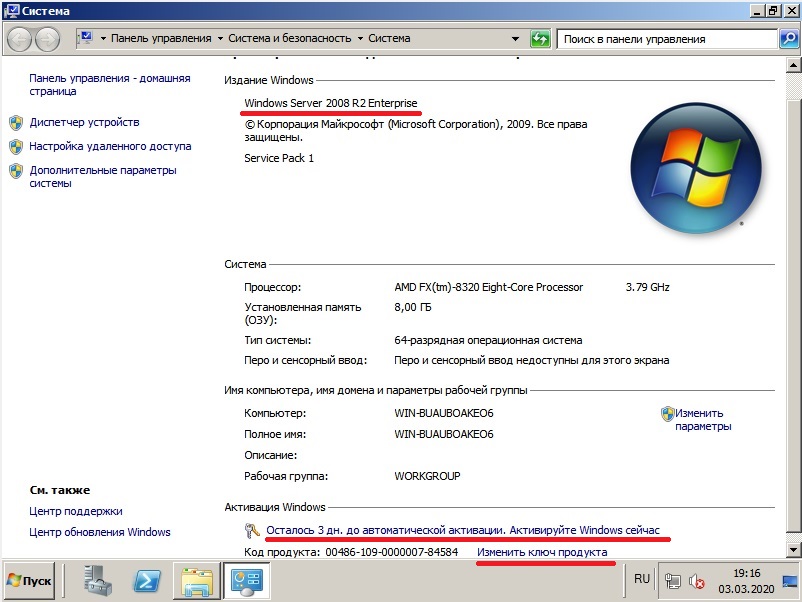
После нажатия на «Изменить ключ продукта» у Вас выйдет окно с полем для ввода Вашего ключа активации.
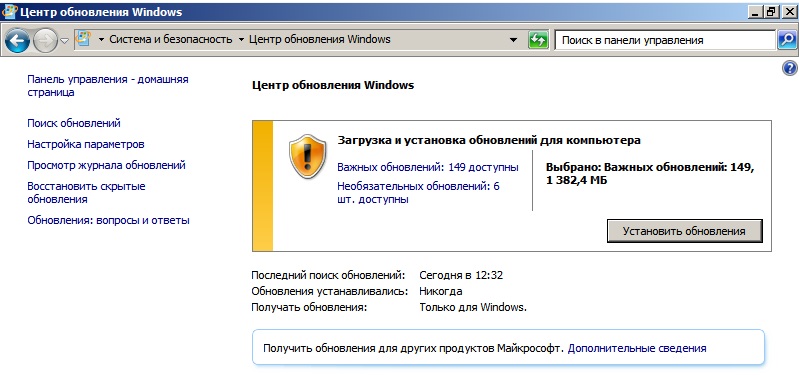
А так же, рекомендуем после активации Вашей системы сразу же найти и загрузить все актуальные обновления. Сделать это можете в меню «Панель управления» => Система и безопасность => Центр обновления Windows.
Лицензионный ключ активации Windows Server 2008 R2 от
The following article will guide you step by step to install Windows Server 2008, from the preparation process until the actual installation.
Determine hardware requirements
Problem: Any operating system offers minimum and optimal hardware requirements so that the system can run smoothly. So you need to determine if your system’s hardware strength meets the requirements of Windows Server 2008 operating system?
Resolution: Determine the hardware requirements at the three minimum, recommended, and optimal levels of Windows Server 2008, and compare it to your system.
You need to focus on the three main parts, which are RAM, processor, and free space on the hard drive.
Hardware / Configuration
Minimum
Suggest
Optimal
RAM memory
512MB
1GB
2GB
Processor
1Ghz
2Ghz
3Ghz
Hard drive (empty)
10GB
40GB
80GB
The recommended configuration is only required to run the operating system. You should consult the hardware requirements of the applications that will be run on the system for proper adjustments.
If you upgrade RAM to more than 16GB, you need to increase the amount of free space on the hard drive to make room for virtual memory (pagefile), Hibernate mode and dump files (dump file).
You can use the Microsoft Assessment and Planning Toolkit (MAP) tool to evaluate the server system. This tool will create a report to help you determine which server is ready to install Windows Server 2008.
Detailed steps to install Windows Server 2008
- Determine hardware requirements
- Perform preparation steps
- Check application compatibility
- Disconnect the power without interrupting the UPS
- Run the Windows Memory Diagnostic tool
- Prepare drivers for storage devices
- Back up the server
- Disable antivirus software
- Prepare Active Directory
- Decide which version of Windows Server 2008 to install
- Windows Web Server 2008
- Windows Server 2008 Standard
- Windows Server 2008 Enterprise
- Windows Server 2008 Datacenter
- Windows HPC Server 2008
- Windows Server 2008 for Itanium-Based Systems
- Install Windows Server 2008
- Manual installation
- Automatic installation
Perform preparation steps
Problem: After you have determined that the system meets the Windows Server 2008 hardware requirements, the next step is to perform the preparation before proceeding with the installation. Specifically, what are these?
Resolution: The following is a list of things to do during the pre-installation process.
-
Check application compatibility
-
Disconnect the power without interrupting the UPS
-
Run the Windows Memory Diagnostic tool
-
Prepare drivers for storage devices
-
Back up the server
-
Disable antivirus software
-
Prepare Active Directory
Above is all that should be done before installing Windows Server 2008. You may not have to do all of the above, because it depends on whether you will install it completely or upgrade it. level directly from the old operating system. In addition, you only need to take steps to prepare the Active Directory if you intend to turn your Windows Server 2008-based computer into a domain controller and add it to an existing Windows 2000/2003 domain.
Next is the detail of each job:
Check application compatibility
Before installing Windows Server 2008, you need to make sure that third-party applications that run on the system are supported by this operating system. To do this, you can check the documentation that came with the application or contact the vendor for a solution to see if this application is running on Windows Server 2008. In a professional working environment, technical documentation is extremely important because it helps you deploy applications on the system properly and effectively.
Another tool you can use is Microsoft Application Compatibility Toolkit 5.0 (ACT 5.0). This tool is used to collect compatibility data and save it to a centralized data store. These are very useful information when assessing risks that may occur after upgrading the operating system.
Note: You can also use ACT 5.0 in cases where the system has a smaller change, such as upgrading your browser or updating Windows. Please come here for more details.
Disconnect the power without interrupting the UPS
During the installation process, Windows Server 2008 will attempt to detect devices connected to the serial port. If you are connecting the UPS power via the serial port, you may have problems with the installer. So it is best to disconnect the UPS source until the installation is complete.
Run the Windows Memory Diagnostic tool
Please use Windows Memory Diagnostic tool to check RAM on the server. Click here to download the tool and then follow these steps:
-
Run the mtinst.exe file to start installing Windows Memory Diagnostic.
-
If you want to use the floppy disk to boot the server, select Create Startup Disk to install the Windows Memory Diagnostic on the floppy disk. If you use the CD, select Save CD Image to Disk .
-
Restart the server with the boot disk you just created.
-
The server will automatically boot into the Windows Memory Diagnostic interface and start the test.
Note: To check the server memory more carefully, you can run the extended test mode by pressing T when the Windows Memory Diagnostic is working. When choosing this mode, it is best to let the program run overnight.
Prepare drivers for storage devices
If your storage device has a driver (driver) included, you should save the driver to a floppy disk, CD, DVD or USB drive. During the installation process, you may need these drivers.
Back up the server
Backing up server data is an indispensable operation before making changes on the system. Make sure your important data is backed up carefully. When performing an operating system upgrade, you should have a backup of the system boot partition as well as system state data. These data can be backed up by creating a backup copy for Automated System Recovery (ASR).
Disable antivirus software
Anti-virus software will scan all files copied to the server, so it may affect the speed of system upgrade.
Prepare Active Directory
There are two steps to preparing the Active Directory service:
-
Prepare the forest.
-
Prepare the domain.
Note: You only need to prepare Active Directory when you intend to build a domain controller using Windows Server 2008 and join the existing Windows 2000/2003 domain.
Steps to prepare the forest:
-
Log in to the Schema Master of the current domain using the account that is a member of one of the Enterprise Administrators, Schema Administrators, or Domain Administrators groups.
-
Copy the adprep folder from sourcesadprep on the Windows Server 2008 installation disc into the Schema Master.
-
From the command line, go to the newly copied adprep folder, then run adprep / forestprep .
-
For read-only domain controllers (RODC), run adprep / rodcprep .
-
Wait for the task to complete and replicate before proceeding to the second step in the Active Directory service preparation stage.
Next is the domain preparation steps:
-
Log in to the Infrastructure Master of the current domain using the account that is a member of the Domain Administrators group.
-
Copy the adprep folder from sourcesadprep on the Windows Server 2008 installation disc into the Infrastructure Master.
-
From the command line, navigate to the newly copied adprep folder, then run adprepdomainprepgpprep
-
Wait for the task to complete and replicate.
At this point, you are done with the preparation and you can start installing Windows Server 2008. However, first you need to decide which edition to install?
Decide which version of Windows Server 2008 to install
Problem: Windows Server 2008 has many different versions, supports x86, x64 and Itanium processors and supports high availability, load balancing and virtualization. You need to review all editions and decide what is the best version for your company needs.
Resolution: You need to have a detailed look at each version of Windows Server 2008 and make an assessment in terms of company needs.
Windows Server 2008 has the following editions:
-
Windows Web Server 2008
-
Windows Server 2008 Standard
-
Windows Server 2008 Standard without Hyper-V
-
X86 Windows Server 2008 Enterprise
- Windows Server 2008 Enterprise x64
-
Windows Server 2008 Enterprise without Hyper-V
-
Windows Server 2008 Datacenter
-
Windows Server 2008 Datacenter without Hyper-V
-
Windows HPC Server 2008
-
Windows Server 2008 for Itanium-Based Systems
Note: The next article does not describe Windows Server 2008 Standard, Enterprise, and Datacenter versions ‘without Hyper-V’ because they are identical to the corresponding versions with Hyper-V.
Windows Web Server 2008
As its name suggests, this edition is built for a single purpose: to become a web server. Windows Web Server 2008 has architectural improvements in IIS 7.0, ASP.NET and Microsoft .NET Framework. This is the version used to deploy web pages, web applications and web services.
Windows Web Server 2008 support:
-
32GB Ram on 64-bit system (4GB on 32-bit system)
-
4 multi-core processors
Windows Server 2008 Standard
Windows Server 2008 Standard is a powerful server operating system that integrates many features to improve security, management, and reduce infrastructure costs, including:
-
Web services
- Hyper-V
- Terminal Services
- Presentation virtualization
-
Application virtualization
-
Network Access Protection (NAP)
-
BitLocker
-
RODCs
-
Windows Service Hardening
-
Bidirectional Windows Firewall
-
Next-generation cryptography support
-
Server Manager
-
Windows Deployment Services
-
Windows PowerShell
-
Next-generation TCP / IP
-
Server Core
Windows Server 2008 Standard support:
-
32GB Ram on 64-bit system (4GB on 32-bit system)
-
4 multi-core processors
-
250 network access service connections (Network Access Services — NAS)
-
50 connecting network policy server (Network Policy Server — NPS)
-
250 connecting terminal server (Terminal Server)
-
Hyper-V virtualization with a free solution
Windows Server 2008 Enterprise
Windows Server 2008 Enterprise adds high availability, the latest security technologies and upgrade capabilities compared to the Standard edition. Here are a few outstanding features:
-
Failover cluster — up to 16 nodes (Failover clustering)
- Fault-tolerant memory synchronization (Fault-tolerant memory)
- Cross copy
-
Grant up to 4 additional virtual machines
-
Active Directory Federation Services (ADFS)
-
Advanced certificate services
-
Active Directory Domain Services (ADDS)
Support Windows Server 2008 Enterprise:
-
8 processors
-
2TB Ram on 64-bit systems (64GB on 32-bit systems)
-
Unlimited number of VPN connections (virtual private network)
-
Unlimited number of network access service connections
-
Unlimited number of network policy server connections
Windows Server 2008 Datacenter
This is a publication for large-scale virtualization needs and is added with the ability to upgrade critical applications in large IT infrastructure. Here are the outstanding features:
-
Large-scale virtualization — allows you to add a multitude of virtual solutions
-
Failover clustering
-
Dynamic hardware division
-
Windows Server High Availability Program
Windows Server 2008 Datacenter supports:
-
2TB Ram on 64-bit systems (64GB on 32-bit systems)
-
64 processors 64-bit x64 and 32 32-bit x86 processors
-
Unlimited access to virtual images
-
16 failover clustering node (failover clustering link)
-
Hot add / replace hot memory and processor on supported hardware
-
Memory synchronization ignores errors
-
Cross copy
- Unlimited number of network access service connections
- Unlimited number of network policy server connections
- 65,535 connecting the terminal server
-
Advanced identity management
Windows HPC Server 2008
Dedicated to high-performance computing (HPC) environments, this edition allows you to scale up to thousands of processor cores. This is beneficial when you are mass load balancing work across multiple processors and need management as well as monitoring HPC environmental stability and health.
Windows Server 2008 for Itanium-Based Systems
Windows Server 2008 for Itanium-Based Systems allows you to run Windows Server 2008 on Itanium-based systems. Itanium platform processors are able to handle the fast computing needs of business applications in enterprise-class environments. The Itanium processor uses a completely new structure, not just extending from 32-bit structure to 64-bit. Another feature of this microprocessor is the architecture of Parallel Command Computing (EPIC), which improves performance through command-level parallelism, maximizing the opportunity to execute parallel instructions. Up to six statements can be executed in parallel.
Windows Server 2008 for Itanium-Based Systems support:
-
Dynamic hardware division
-
Take advantage of Itanium’s advantages (reliability, availability and upgradeability)
-
2TB RAM
-
64 Itanium processors or 64 cores
-
Hot add / replace hot RAM and processor
-
8 failover clustering nodes
- Memory synchronization ignores errors
- Licensing is not limited to virtual solutions with third party virtualization products
At this point, you already know the Windows Server 2008 editions and can make your decisions. Suppose you choose to install Windows Server 2008 Standard edition, we will proceed with the installation now.
Install Windows Server 2008
Problem: You have decided to install Windows Server 2008 Standard. Next, you need to choose whether to proceed with manual installation or automatic installation. It is possible that many servers will also need to upgrade.
Resolution: The next section of the article will cover step by step the installation of Windows Server 2008, both manually and automatically.
Manual installation
The Windows Server 2008 installation process is very organized. If you’ve ever installed Windows Server 2003, you may still remember that during the installation process, you are asked to answer configuration questions. With Windows Server 2008, these requests have been moved to the Initial Configuration Task Wizard that appears when the installation is complete. The following is a list of the information you need to provide during the installation process:
-
Language, currency and keyboard information (input language)
-
Valid product activation key
-
Installation location
-
Copy the operating system to install (if not enter the product key)
-
Install a new upgrade or installation
The entire installation of Windows Server 2008 only goes through three parts:
-
Install the operating system, including valid key validation
-
Initialize Initial Configuration Tasks configuration
-
Server Manager installation
Install the operating system
Follow these steps to install the operating system:
-
Insert the Windows Server 2008 installation disc into the drive and boot the server from the installation disk.
-
When asked to select a language, time, currency and keyboard information, make the appropriate choice and click Next .

Set language, time and currency, keyboard information. -
The Install Now option appears. If you are not sure about the hardware requirements, you can click on the What to Know Before link Installing Windows for more details.
-
Enter the product key and check the box on Automatically Activate Windows When I’m Online . Click Next .
Enter a valid product activation key. -
If you have not entered the product key in the previous section, you will now have to select the upcoming Windows Server 2008 edition and check the I Have Selected an Edition of Windows box that I Purchased . If you have entered a valid product key, the installer will automatically identify the version of Windows Server 2008 you are about to install. Click Next .
Select the Windows Server 2008 edition to install. -
Read the terms and accept them by checking the checkbox. Click Next .
-
In the new window that appears, because you boot the computer from the installation disk, the Upgrade option has been disabled. Click Custom (Advanced) .
The Upgrade option has been disabled when you boot from the installation disk.Note: If you want to proceed with the upgrade installation, you need to run the installer in a Windows environment.
-
On the next window, you need to select the Windows installation location. If there are drivers for third-party storage devices, install them now by clicking the Load Driver link.
Download the drivers of the third-party storage devices and select the installation location.At this point, Windows will begin to be installed on the system. You can see that the step-by-step process is expressed in percent. During the installation process, the server will have to restart several times. The installer will complete the following tasks:
— Copy the file
— Expand the file
— Function setting
— Install updates
— Finish -
When the installation process is complete, change the administrator administrator account password before logging in. After the password has been changed and you are logged in to the operating system, you are done with part 1 of the installation.


Initialize the configuration
After you log in to the operating system, the Initial Configuration Tasks Wizard window appears, consisting of three items:
-
Provide computer information (Provide system information)
-
Update this server (Update server)
-
Customize this server (Customize the server)

Initial Configuration Tasks Wizard
So, in these sections, what changes can you make to the configuration?
In Provide Computer Information , you can do the following:
-
Change time zone
-
Set up network configuration on the network interface card interface (NIC). You can also assign a static IP address, subnet mask, default gateway (default gateway) and DNS / WINS server. In many environments, you will probably be grouped with two network interface cards for the production data LAN (using third party software) and have a separate network interface card dedicated to backing up data. connect to backup LAN. In addition, you can leave the settings automatically assigned by the DHCP server, of course in case you have the DHCP server configured.
Note: In fact, you will often assign static IP addresses to infrastructure servers. In this case, you will need to collect that information with a valid IP address for the default gateway and for the DNS / WINS server before installing.
- Provide the computer name for the server, along with domain or workgroup information.
You need to restart the server for the changes to take effect.
In the Update This Server section , you can do the following:
- Allow automatic updating and feedback
- Configure the download and installation of operating system updates
In the Customize This Server section , you can do the following:
1. Add server role (role).
When you choose a role, the wizard will help you complete the role installation. You can choose the following roles:
- Active Directory Certificate Services
- Active Directory Domain Services
- Active Directory Federation Services
- Active Directory Lightweight Directory Services
- Active Directory Rights Management Services
- Application Server
- DHCP Server
- DNS Server
- Fax Server
- File Services
- Network Policy and Access Services
- Print Services
- Terminal Services
- UDDI Services
- Web Server (IIS)
- Windows Deployment Services
2. Add features.
As well as adding roles, when you select the feature, the wizard will help you complete the installation of that feature. There are many features for you to choose from.

Select the feature you want to install
Note: For both list of roles and features, when you highlight a role or feature, you will see a description on the right of the list. When you choose roles and features, remember to install as little as possible, preferably just choose the things you intend to use. If you install unnecessary roles or features, you will also install useless services and be able to open ports that are not valuable in production so that the server is no longer secure.
- Allow Remote Desktop to connect to the server
- Configure operating system firewall settings. By default, the firewall is enabled.
Next will be the third part of the installation process.
Server Manager installation

Server Manager gives you a global view of the server. When looking at the default details, you can see computer information, security information, and a summary of installed roles and features. Looking down, you will see resources and support. On the left side of the window are tools to help you add / remove and configure roles and features. You will also see options to diagnose, configure and manage drives. After setting the changes in Server Manager, your manual installation is complete.
Automatic installation
So you have completed the manual installation, the next part of the article will introduce you to the automatic installation process. With Windows Server 2008, use the unattend.xml file instead of unattend.txt. In fact, the unattend.xml file also replaces both the Sysprep.inf, Winbom.ini, and Cmdlines.txt files. The XML format has been adopted because it makes it easier to describe nested values, add new elements, and validate answer files. You can open the unattend.xml file in Internet Explorer version 5.5 and above to parse the .xml file and see if it is completely built. If the file is not built correctly, Internet Explorer will tell you where the error is.
To install automatically, run the setup.exe file with the unattend keyword
C:> setup.exe /unattend:unattend.xml
The unattend.xml file contains the necessary answers when running setup.exe, namely information such as computer name, acceptance of the end user license agreement (EULA), installation disk information, etc. v . You can also show or hide the user interface (UI) for each value set using the ShowUI flag = Yes / No. The following is how the installer responds when you use the ShowUI flag:
- ShowUI flag = Yes and the setting specified in the unattend.xml file: The installer uses the settings specified in the unattend.xml file and displays the user interface according to that setting.
- ShowUI flag = No and the setting specified in the unattend.xml file: The installer uses the settings specified in the unattend.xml file and does not display the user interface.
- ShowUI flag = Yes and the setting is not specified in the unattend.xml file: The installer displays the user interface with default values and users can change this setting if needed.
- ShowUI flag = No and the setting is not specified in the unattend.xml file: The installer uses the default value and does not display the user interface.
When performing automatic installation over the network, the system installer must have access to the unattend.xml file. When the installer starts from the CD / DVD drive, it will search for the unattend.xml file in the following locations:
-
Current directory
-
The location starts the setup.exe file
-
Floppy drive, USB or other CD / DVD drive
The syntax for the unattend.xml file is broken down into elements, and each element needs to be opened and closed in the correct order (when nested). Once ensured this, it will be a completely built .xml file. There is only one root element:.

A paragraph in the unattend.xml file
The operation of the unattend.xml file will stop with an error message if any of the following is true:
-
End user license agreement is not accepted
-
Product activation key is invalid
-
Unable to write to the installation disc
Creating an unattend.xml file can be a bit confusing, but once you’ve created it successfully, it will make the job a lot easier. There are a number of tools available on the web that can help you create this file. You can also get creative by adding a few scripts to automatically name computers that follow your naming convention and many other configuration options.
See more:
- Instructions for installing Windows Server 2012 step by step
- Instructions for installing Windows Server 2016 on Windows 10
Windows Server 2008 is a closed source operating system released February 4, 2008 based on Windows Vista. It has extended support until the 14th January 2020.It is available in both 32 and 64 bit versions but will be the last 32 bit Windows server operating system.
-
1
Insert the Windows 2008 Server installation disk into the computer.
-

1
Select your ‘Language’, ‘Time and currency format’ and your ‘Keyboard or input type’ then click next.
-
2
Click Install now.
-

3
Type in your product key, select whether you want to ‘Automatically activate Windows when’ and click Next.
- There is a trial period of 60 days so if you can’t find your product key, leave the field blank and click Next.
-
4
The ‘Automatically activate Windows’ is a personal preference but the box was checked for this tutorial.
-
5
If you have not entered a product key you will get this screen.
- Press Yes to enter the product key now or No to activate it later.
-

6
Choose your edition of Windows Server 2008, check the ‘I have selected the edition of Windows that I have purchased’ box and click Next.
- Server Core Installation is a text based version of Windows Server 2008 whilst the full edition is a graphical display.
- You could be cheeky and choose a different version of Windows Server 2008 to the one you have bought but you will have to use a product key for that different version which will not be the same as the one you have bought.
-
7
Check the ‘I accept the license terms’ and click next.
- It’s a good idea to read the license agreement so you know what you’re agreeing to.
-

8
Select the type of installation that you want.
- Upgrade allows you to keep your files, settings etc. before upgrading.
- Custom (selected in this tutorial) does a clean install of Windows.
-

9
Choose where you want to install Windows and click Next.
-
10
The next part requires no input from the user.
- The screen may flicker during this process. However, this is completely normal.
-

11
Restart your computer by click Restart Now or the computer will do it automatically.
-
12

Do not press anything here.
- Pressing anything here will result in you being put in a setup loop.
- If you did press something and setup began again, restart the computer and you’ll be fine.
-
13

Wait for windows to setup the computer.
-

14
Installation may hang here. Be patient and allow for a few minutes for the computer to continue with the installation.
- If there is no disk activity (usually indicated by a flashing light on the computer) for several minutes, then restart the computer.
-

15
This step requires no input from the user but it might take some time.
-
16
Installation may hang here but be patient.
-

17
Press OK to continue.
-
Pressing Cancel will do nothing.
-
-

18
Type in a password and then retype the same password underneath and click the arrow.
- The password must contain numbers and a capital letter.
- You must type in a password or else you cannot continue.
-
19
Click OK
-

20
The main installation is complete but this program can be used to configure settings for Windows.
- Click the check box at the bottom if you do not want this to be displayed each time you start the computer.
-

21
This is the Server Manager which contains tools etc. for your server.
- Click the check box in the ‘Computer Information’ if you do not want this to be displayed at start up.


-

1
Click start.
-

2
Click this icon.
-

Alternatively you can click the little arrow and then Shut Down.
-
-
3
You must type in a reason for the Shutdown that’s at least one character or longer and then click OK.


Ask a Question
200 characters left
Include your email address to get a message when this question is answered.
Submit
Video
-
The installation process will sometimes look as though it has frozen but actually hasn’t so wait a few minutes before restarting the computer.
Warning
- Windows Server 2008 is a very specialised operating system so do ask yourself if you really need to use it before installing it.
Things you’ll need
- Windows Server 2008 installation disk
- A computer with the following specifications:
- CPU: 1GHz (32 bit) or 1.4GHz (64 bit)
- RAM: 512MB
- HDD: 20GB (32bit), 32GB (64bit)
References
About this article
Thanks to all authors for creating a page that has been read 18,643 times.
Is this article up to date?
Подготовка и установка Windows Server 2008 R2 включает в себя несколько этапов: подготовка, проверка совместимости оборудования; установка Windows Server 2008 R2 и первоначальная настройка.
Подготовительные мероприятия
Перед началом установки нужно выполнить подготовительную работу.
Основные пункты:
- Определитесь с редакцией операционной системы Windows Server 2008. Это может быть Standard, Enterprise, Datacenter и т.д..
- Проверьте, соответствует ли ваш сервер минимальным системным требованиям выбранной редакции операционной системы.
- Подготовьте носитель с файлами для установки (в нашем случае USB флеш диск).
Разница между Windows Server 2008 R2 Standard, Enterprise, Datacenter в таблице
| Возможность | Standard Edition | Enterprise Edition | Datacenter Edition | Web Edition |
|---|---|---|---|---|
| Число поддерживаемых процессоров | До 4 | До 8 | 1. До 32 на платформе x86 2. До 64 на платформе x64 |
До 4 |
| Количество поддерживаемой памяти | 1. До 4 Гбайт на платформе x86 2. До 32 Гбайт на платформе x64 |
1. До 64 Гбайт на платформе x86 2. До 2 Тбайт на платформе x64 |
1. До 64 Гбайт на платформе x86 2. До 2 Тбайт на платформе x64 |
1. До 4 Гбайт на платформе x86 2. До 32 Гбайт на платформе x64 |
| Кластеризация | Нет | До 16 узлов | До 16 узлов | Нет |
| Права на использование виртуальных машин | 1 ВМ | До 4 ВМ | Не ограничены | Не поддерживается |
- Если вы планируете использовать данный сервер для хранения или обработки данных — установите отдельный жесткий диск для операционной системы.
- После установки операционной системы Windows Server установите «родные» драйвера для используемого оборудования.
- Драйвера скачайте с официального сайта производителя или возьмите диск, который поставлялся вместе с вашим серверным оборудованием.
- Используйте официальные методы активации операционной системы Windows Server 2008 R2.
Установка Windows Server 2008 R2
Подготовка окончена. Можно приступать к установке. В среднем по времени она займет примерно 15-20 минут, всё зависит от производительности вашего сервера. Работать придется с довольно простыми диалоговыми окнами.
Ниже описаны ключевые этапы:
- Вставьте USB флеш накопитель в рабочий USB разъём сервера.
- Включите сервер.
- Путем нажатия кнопки F2 или DEL (зависит от модели материнской платы) зайдите в BIOS.
- Выберите первым загрузочным устройством вставленный USB флеш накопитель .
- Сохраните изменения и перезагрузите устройство.
1. Первоначально нам предложено выбрать языковые настройки и параметры местоположения:
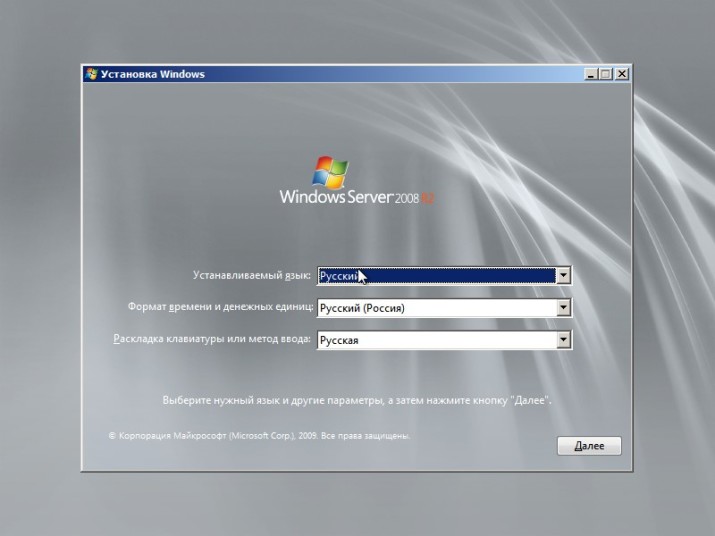
Выберите необходимые настройки и нажмите кнопку: ДАЛЕЕ.
2. В следующем диалоговом окне нам предлагается на выбор несколько пунктов, но нас на данный момент интересует только установка:
Нажмите кнопку: УСТАНОВИТЬ.
С редакцией операционной системы мы определились ранее:
Выберите необходимую и нажмите кнопку: ДАЛЕЕ.
3. Окно с условиями лицензионного соглашения:
Поставьте галочку: «Я принимаю условия лицензии» и нажмите кнопку ДАЛЕЕ.
4. Тип установки:
Нажмите: «Полная установка».
5. Выбор раздела для установки:
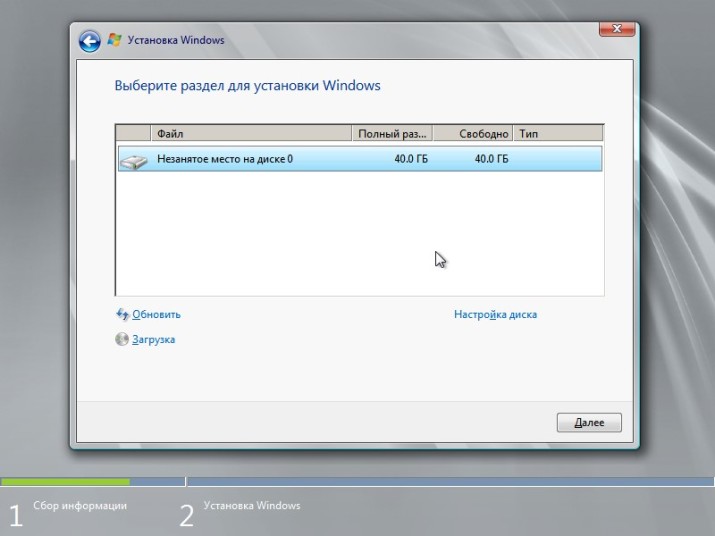
На этом пункте остановимся поподробнее.
Возможно, появится ошибка типа: «невозможно определить жесткий диск» с предложением отменить установку, либо выбрать дополнительный драйвер. Необходимо скачать и скопировать драйвер контроллера для данной материнской платы. Как это сделать мы расскажем позже, либо воспользуйтесь Google поиском для изучения данного вопроса.
Вставьте USB флэшку и нажмите кнопку: ЗАГРУЗКА. Затем выберите нужный драйвер. Обычно мастер установки просит данный драйвер при установке на динамический жесткий диск.
В случае, если производится установка на отдельный жесткий диск, действуйте следующим образом:
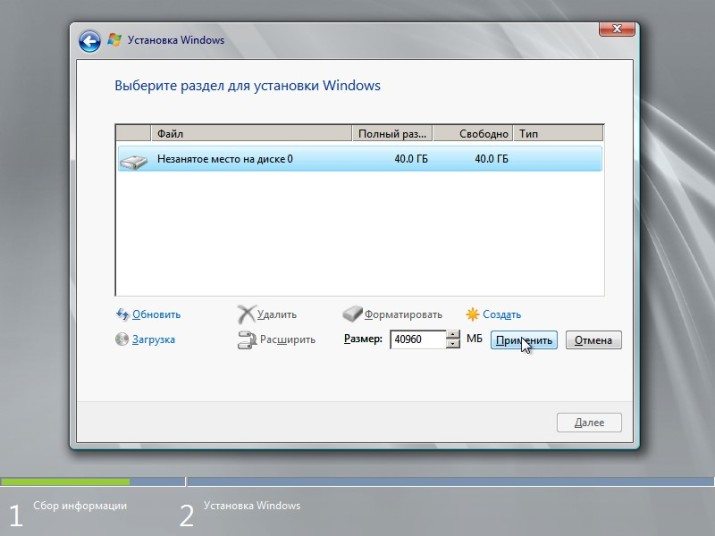
- Выделите курсором строку «Незанятое место на диске».
- Нажмите кнопку СОЗДАТЬ, далее кнопку: ПРИМЕНИТЬ.
Появляется следующее окно:
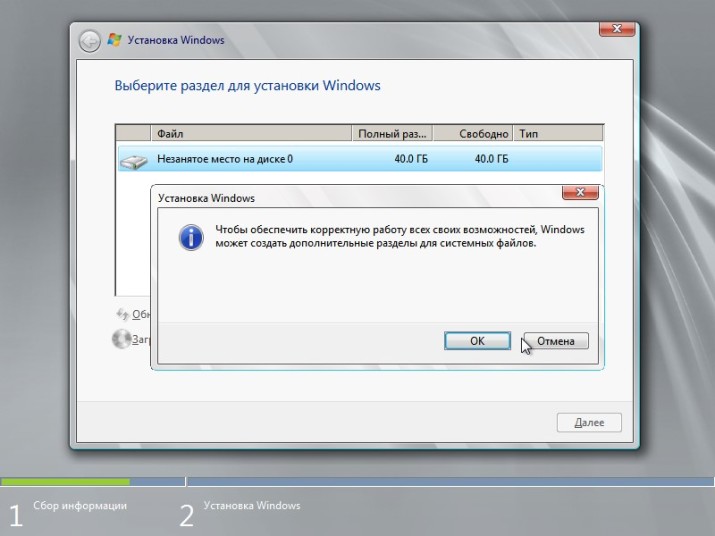
Нажмите кнопку ОК. Затем кнопку: ДАЛЕЕ.
Всегда удаляйте старые системные разделы на диске и создавайте новые, чтобы избежать дальнейших проблем.
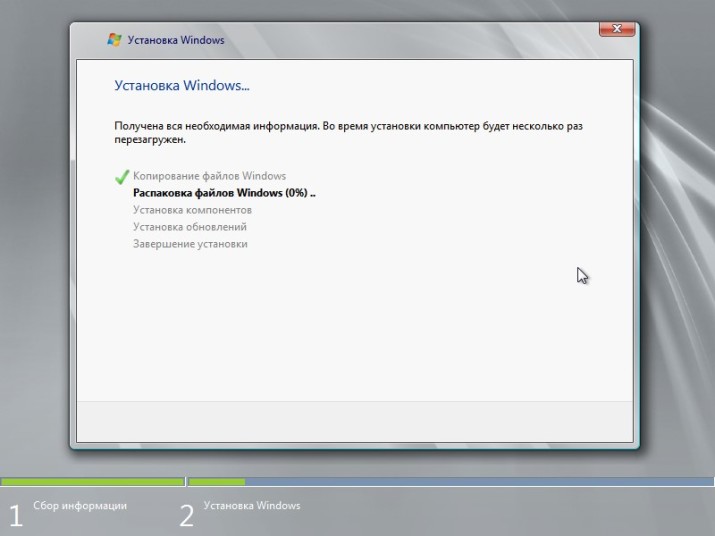
Процесс установки
Установка началась. В процессе мы увидим следующие окна:

Создание пароля администратора сервера
Во время установки система несколько раз перезагрузится. Если в настройках загрузки компьютера по умолчанию вы выбирали флэшку, то теперь нам нужно выбрать жесткий диск, на который мы производим установку. В противном случае мы опять вернемся к первоначальному этапу.
Если вы увидели окно входа в систему, то всё прошло удачно:
Вводим пароль и его подтверждение и нажимаем кнопку «Стрелка вправо». Пароль должен содержать буквы разного регистра, цифры и быть длинной не менее восьми символов. Запишите пароль, чтобы не забыть, он понадобится после каждой перезагрузки системы.
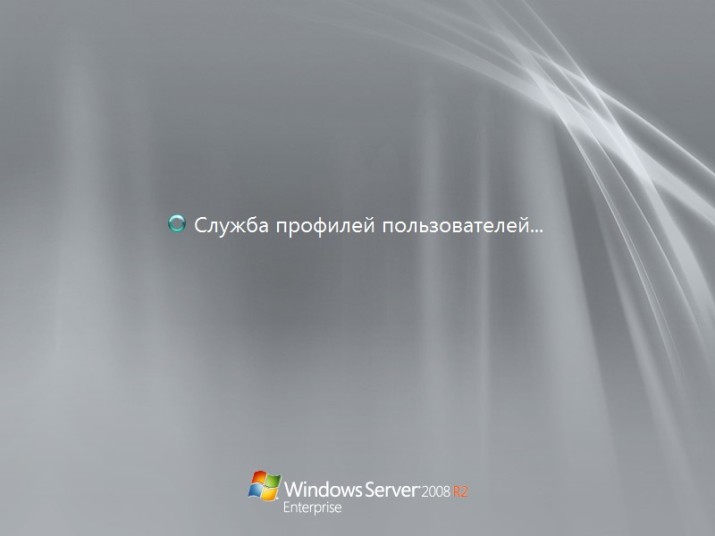
Применение параметров и запуск службы профилей пользователей

В части установки операционной системы мы закончили.
Минимальная первоначальная настройка
Устанавливаем драйвера и перезагружаемся. После перезагрузки появится окно первоначальной настройки:
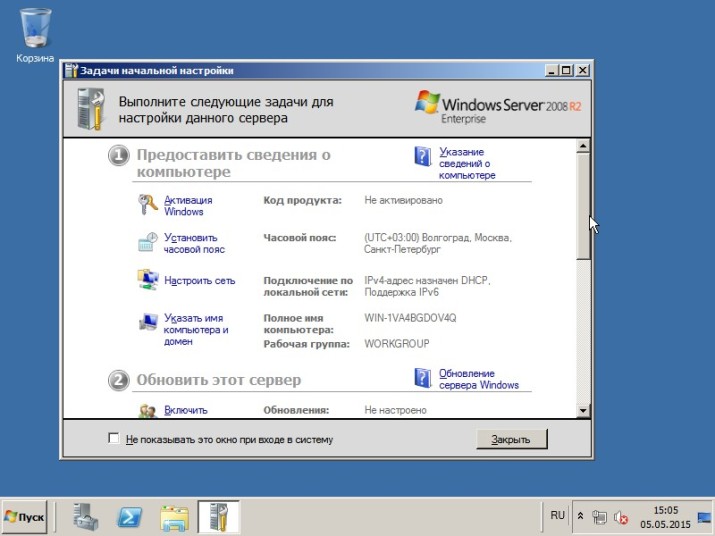
Здесь приведены основные пункты первоначальной настройки
a) Нам нужно активировать систему. Существует много способов это сделать. Про это читайте отдельно.
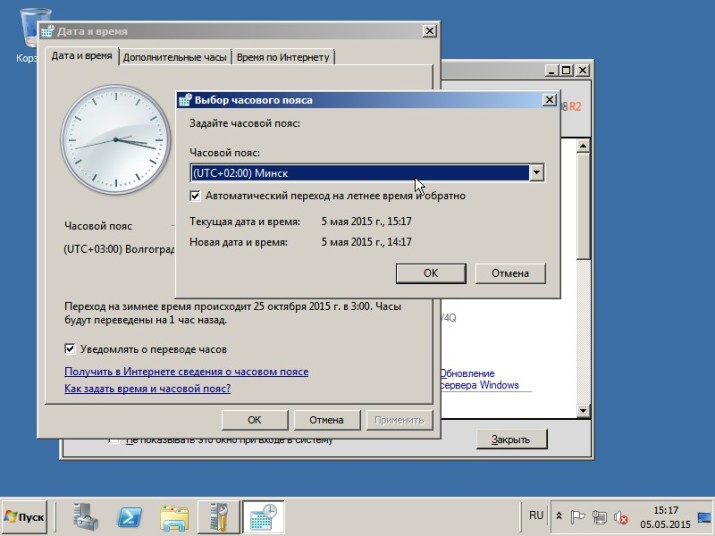
b) Установите нужный часовой пояс.
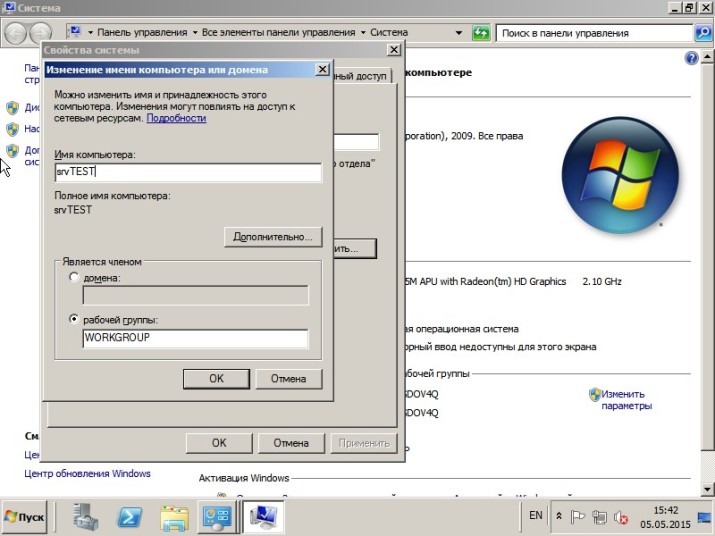
c) Поменяйте имя сервера на нужное (пример srvTEST).
Перезагрузку можно произвести после всех остальных настроек.
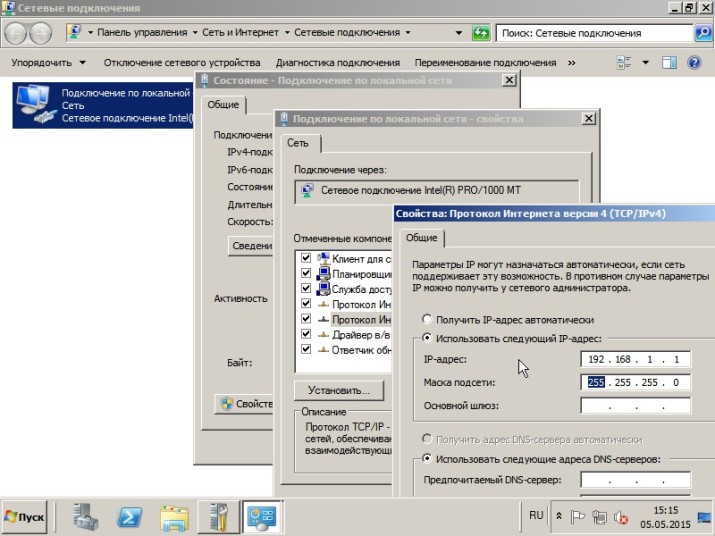
d) В настройках сети пропишите IP-адрес и маску подсети (пример 192.168.1.1, 255.255.255.0).
e) Установите необходимые обновления из центра обновления Windows:
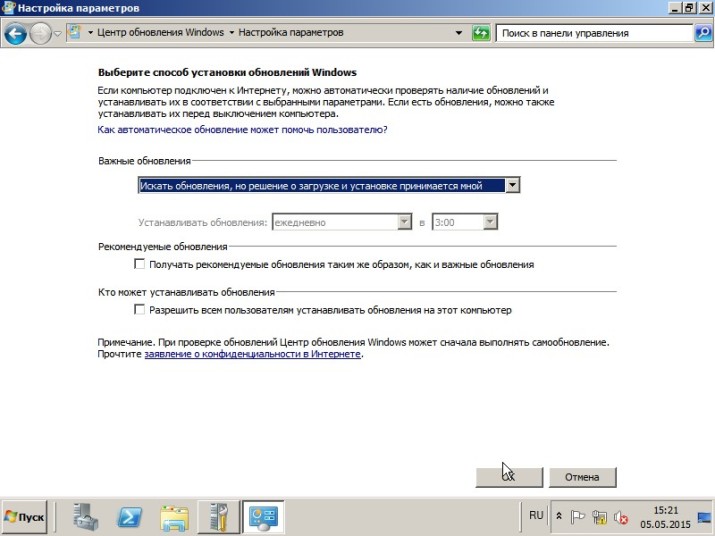
В способе установки обновлений выберите пункт: «Искать обновления, но решение о загрузке и установке принимается мной».
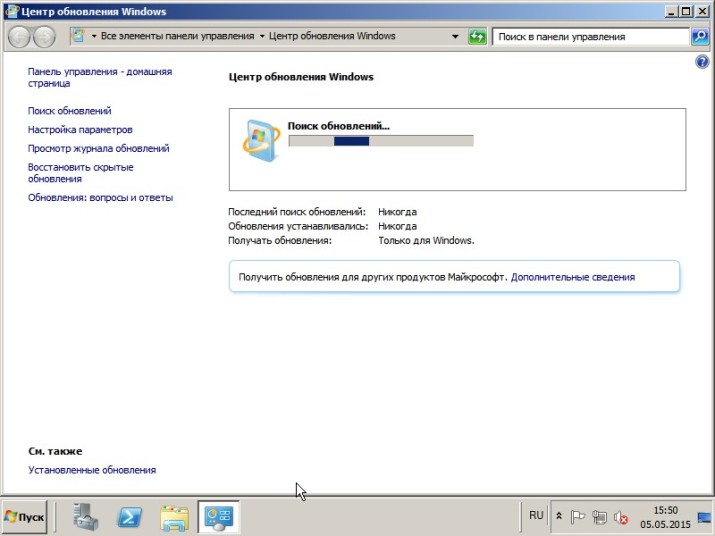
Произведите поиск и установку обновлений.
f) Для удобства дальнейшего администрирования настраиваем службу удаленных рабочих столов (может потребоваться для настройки Server 2008 для удалённой работы 1С:Бухгалтерия).

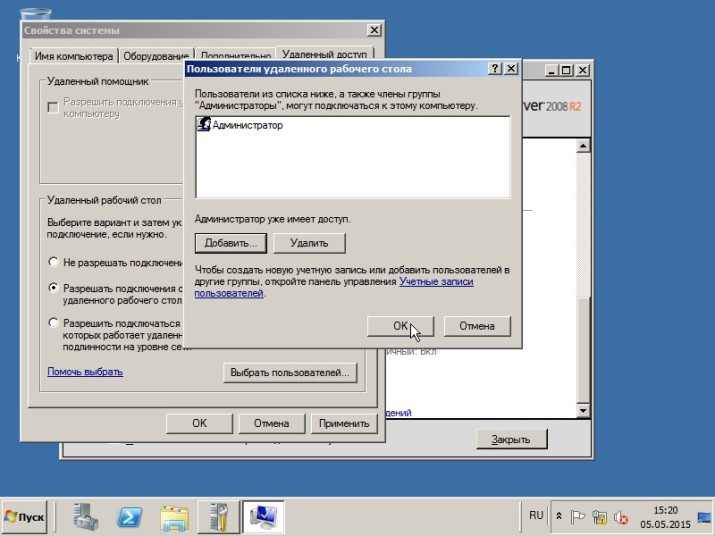
g) Добавьте пользователя для подключения.
Первоначальная настройка операционной системы завершена
Перезагрузите сервер. После перезагрузки автоматически установятся обновления.
Наш сервер 2008 установлен и готов к дальнейшему развитию: добавлению ролей, установке программ и т.д. О том, что делать дальше читайте в следующих статьях.