
You can use Font Awesome icons on the desktop in design mockups, presentations, and elsewhere in your desktop applications.
We’ll cover what files and directories are contained in the desktop-use version of Font Awesome and details of using ligature-based fonts and SVG.
What’s in the Download?
Our Desktop-focused download contains the following directories and files:
| Folders & files | What They Are |
|---|---|
/otfs |
Ligature-based font files for each style in Font Awesome |
/svgs |
Individual optimized .svg vector files for each icon in Font Awesome (separated by style) |
Install the Ligature-based Font Files
Get up and running using ligatures to insert icons into your documents by first installing all of the styles you’d like to use. Here’s a rundown of what font file corresponds to which Font Awesome style:
| Font Files | Icon Style | Availability |
|---|---|---|
/otfs/Font Awesome 6 Free-Solid-900.otf |
Solid | Free Plans |
/otfs/Font Awesome 6 Free-Regular-400.otf |
Regular | Free Plans |
/otfs/Font Awesome 6 Brands-Regular-400.otf |
Brands | Free Plans |
/otfs/Font Awesome 6 Pro-Solid-900.otf |
Solid | Pro only |
/otfs/Font Awesome 6 Pro-Regular-400.otf |
Regular | Pro only |
/otfs/Font Awesome 6 Pro-Light-300.otf |
Light | Pro only |
/otfs/Font Awesome 6 Pro-Thin-100.otf |
Thin | Pro only |
/otfs/Font Awesome 6 Duotone-Solid-900.otf |
Duotone Solid | Pro only |
/otfs/Font Awesome 6 Duotone-Regular-400.otf |
Duotone Regular | Pro only |
/otfs/Font Awesome 6 Duotone-Light-300.otf |
Duotone Light | Pro only |
/otfs/Font Awesome 6 Duotone-Thin-100.otf |
Duotone Thin | Pro only |
/otfs/Font Awesome 6 Sharp-Solid-900.otf |
Sharp Solid | Pro only |
/otfs/Font Awesome 6 Sharp-Regular-400.otf |
Sharp Regular | Pro only |
/otfs/Font Awesome 6 Sharp-Light-300.otf |
Sharp Light | Pro only |
/otfs/Font Awesome 6 Sharp-Thin-300.otf |
Sharp Thin | Pro only |
/otfs/Font Awesome 6 Sharp-Duotone-Solid-900.otf |
Sharp Duotone Solid | Pro only |
/otfs/Font Awesome 6 Sharp-Duotone-Regular-400.otf |
Sharp Duotone Regular | Pro only |
/otfs/Font Awesome 6 Sharp-Duotone-Light-300.otf |
Sharp Duotone Light | Pro only |
/otfs/Font Awesome 6 Sharp-Duotone-Thin-100.otf |
Sharp Duotone Thin | Pro only |
You’ll want to install these into the Font Manager that your operating system uses to manage fonts. For Macs, that is often Font Book or Font Explorer X. For Windows, it’s the Fonts control panel. Also, depending on your operating system and management software, make sure that you’ve activated/enabled these fonts in the Font Manager once they are installed. They will only be available to use in your apps if they have been activated.
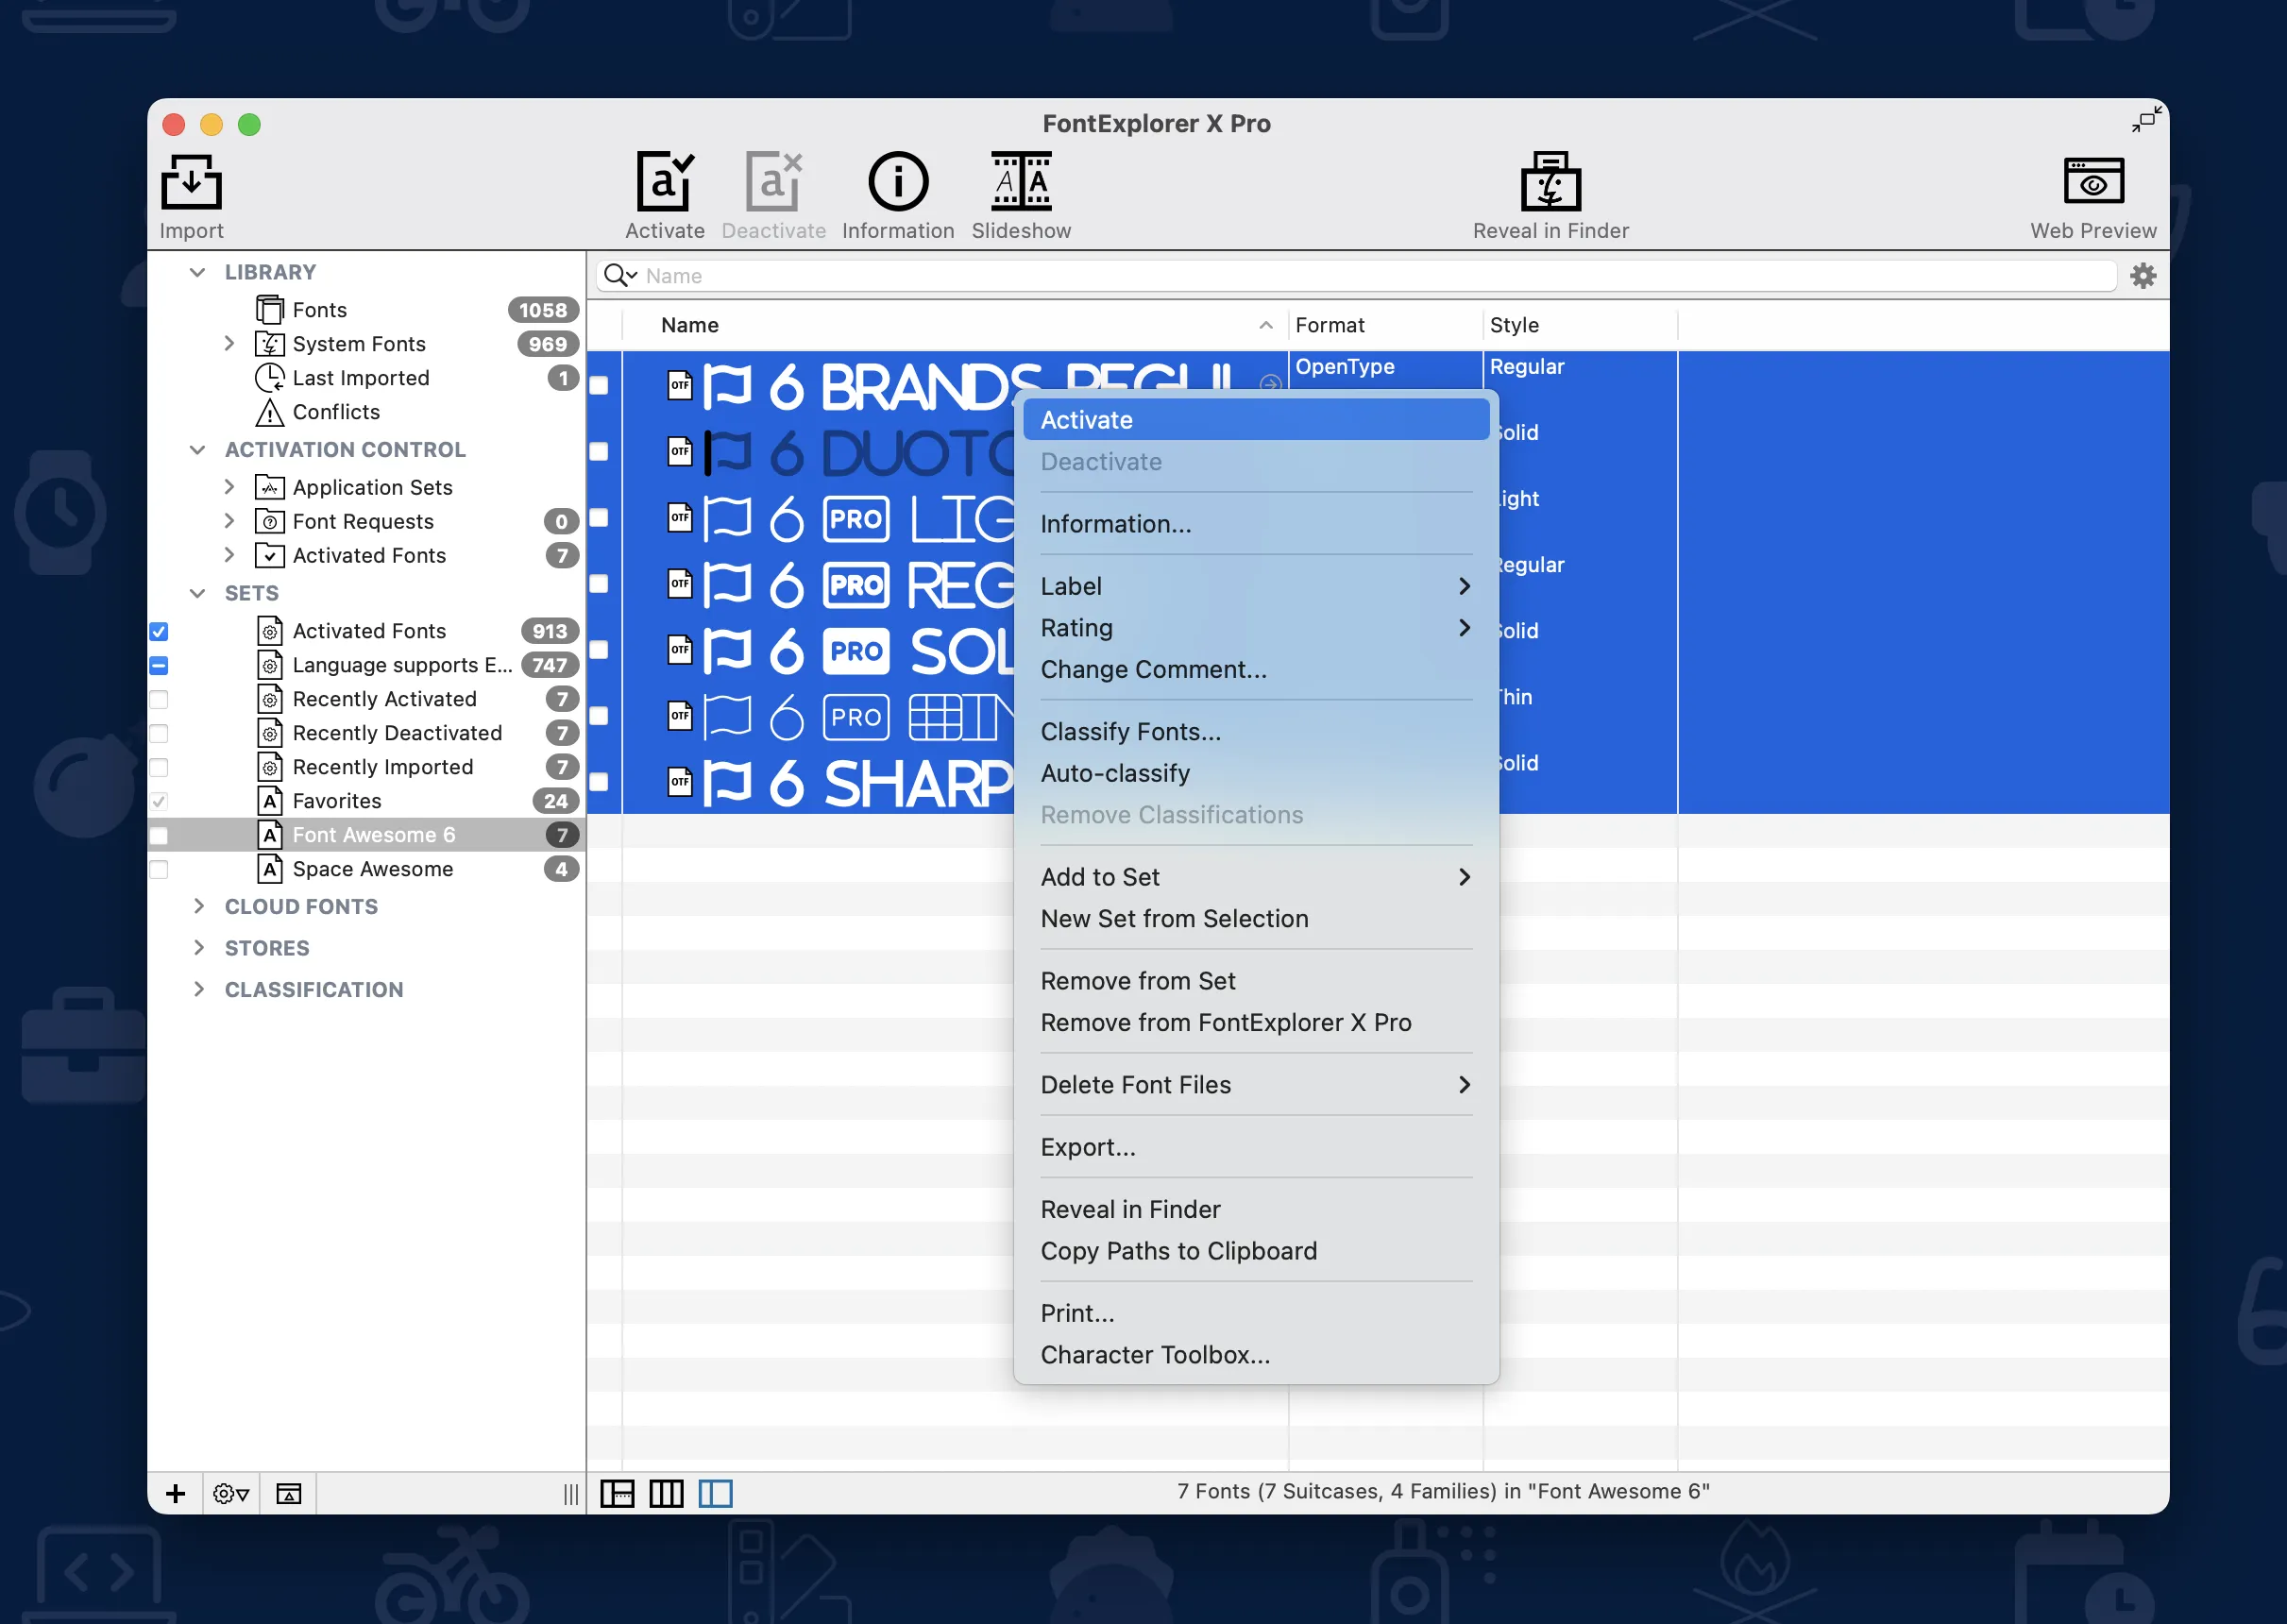
Font Awesome 6 installed and being activated in Font Explorer X on Mac OS X
Enable Ligatures
Many desktop programs have a setting for enabling ligatures. Most of the time, we find it’s on by default, but if you’re having trouble with ligatures, you might want to check that ligatures are turned on.
We have instructions for a few common applications listed below, but you should check the documentation for your specific program and version.
Adobe Creative Cloud
In Photoshop, you can toggle ligatures using the “fi” button in the Character palette. In Illustrator, you can find the “fi” button in the Open Type palette.

Enabling Font Awesome 6 ligatures in Adobe Photoshop
Windows + Microsoft Office
To enable ligatures in Microsoft, open your font settings by hitting Ctrl-D. In the Advanced tab under Open Type Features, set ligatures to “All” and make sure the “Use contextual alternates” checkbox is checked. And make sure your document isn’t in compatibility mode.
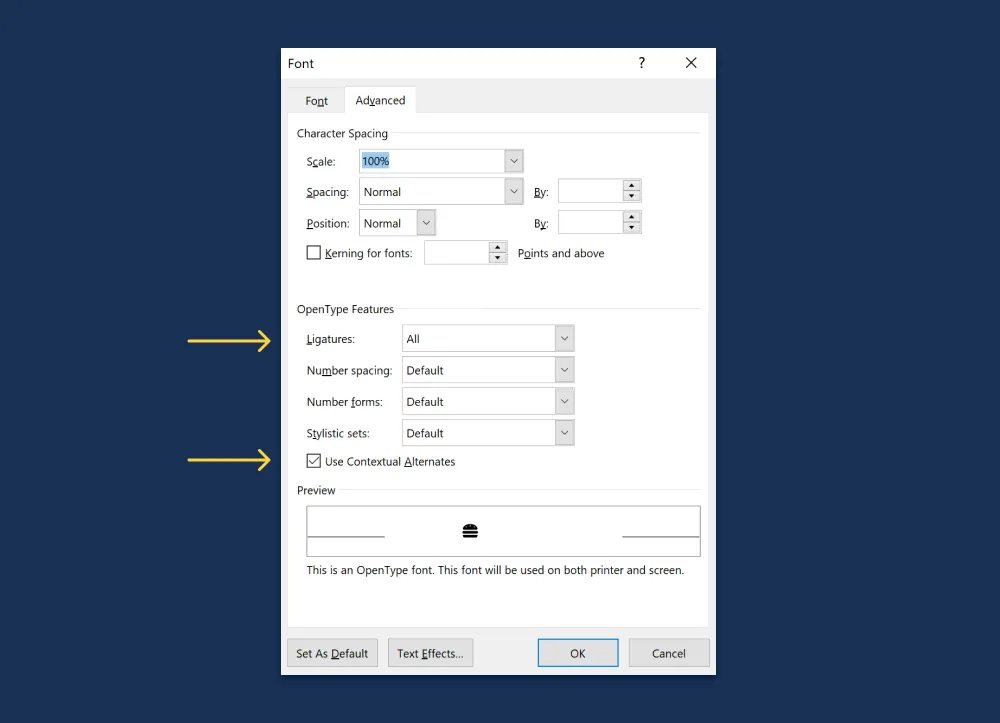
Enabling Font Awesome 6 ligatures in Microsoft Office on Windows
Go Add Some Icons!
Our icons are now ready to do your Desktop project’s bidding. Learn how to add them to your project and then use their power to bring order and style to your designs!
Font Awesome icons is an amazing set of various icons sets, some of them free to use for any usage, and some of them accessible only with a paid subscription.
What Is Font Awesome?
Font Awesome icons is an amazing set of various icons sets, some of them free to use for any usage, and some of them accessible only with a paid subscription.
The free sets consists of standard solid fonts, called the FAS set for Font Awesome Standard icons, that has a whole range of scalable drawings that will be perfect to illustrate any document you are creating, from a website to a professional looking CV for your digital nomad job search — or even to include in your freelance writing or other freelance gigs deliverables.
The standard business fonts, called the FAB set for Font Awesome Business icons that contains brands logos for use in your documents, such as the Google Docs icons or the Office 365 and Microsoft Office icons for their products Microsoft Excel — Microsoft Word — Microsoft Outlook — Microsoft Powerpoint — and many more!
But, how to use that font in other applications than the standard Web design tasks? Find it out below — it all start with downloading the Font Awesome icons sets locally on your computer before being able to use them in other applications such as GIMP image manipulation program, and virtually any software that allows for font switch.
The first step after having downloaded Font Awesome icon set locally on your computer, is to unzip the package, and navigate at the root folder.
There, you will find a TrueType Font file called fontawesome-webfont.ttf — double click on that file to open it in the Windows font management software.
Then, click on the install button on top of the window, and that’s it — the whole font awesome icon set is now installed on your computer, even if it doesn’t look like, and if you haven’t seem any special character yet.
The Font Awesome icons set installation procedure works the same on Mac computers!
How to use Font Awesome in Microsoft Word?
After having installed the icon set on your computer, open your Microsoft Word document and put the mouse pointed where you want to insert the Font Awesome icon.
In the menu Insert, find the Symbol option, which will open the symbol browser.
Select the FontAwesome option in the system fonts list, and browse the symbols until you find the one you want to include in your document. Double click on the icon, and it will be included in your document, you can then style it as any other character.
The added FontAwesome characters will be part of the overall character count of the document, which you can verify using a word counter tool online.
If you cannot find the icon within the list, another option is to find the Font Awesome icons character code from the list, and enter it in the symbol brower’s character code field, which will directly find the exact icon from the list.
How to use Font Awesome in Microsoft Excel?
The same way that you have added icons in Word, you can add a Font Awesome icon in any Excel workbook by selecting the cell in which you want to add these symbols, and open the symbols browser from the insert menu, and symbol button.
The symbol browser will open, in which you can select the Font Awesome icon set and browse the symbols until you find the right one.
As it might be difficult to find the right icon from that list with small characters, another way to get the right icon is to browse a more visually accessible list such as the Font Awesome icons display, copy the unicode name of the symbol you want to include, and paste it in Excel’s symbol browser character code field — it will directly insert the right symbol in your document.
How to use Font Awesome in Microsoft Powerpoint?
Inserting Font Awesome symbols in any Microsoft Powerpoint presentation to make it look even better is as easy as a few clicks!
After having installed the icons set, open a Microsoft Powerpoint document and put the mouse pointer in a text entry field at the place where you want to insert an icon.
Then, select the Insert menu, and click on the symbol button. From there, you will be able to select the icons to include form the symbols browser window that shows up.
As it might be complicated to find the icon simply from the visual list that might appear small, another option is to search by text description or to browse larger icons display on the Font Awesome icons list in which the symbols codes are accessible. Copy the code, and paste it in Powerpoint’s character code box to include the icon in your presentation.
How To Use Font Awesome in GIMP?
Unfortunately, there is no simple way to browse the Font Awesome icons list from the GIMP application. However, after the icons have been installed on your computer, you can include the ones you need in your favorite editor, such as any of the Microsoft Office or Libre Office and Open Office programs, find the icons you want, include them in a document, copy them, and paste them in GIMP program, either alone, in which case it will become a pixelated picture included in current layer, or in a text box, in which case you will interact with them as you would with any characters from any font.
Another solution is to install the icon set directly in the GIMP program, by going in the preferences menu from the edition main menu, and checking the fonts folders available on your computer.
Then, simply copy and paste the TrueType font file fontawesome-webfont.ttf and paste it in one of these folders. Then, restart your GIMP program in order to access the Font.
You will then be able to access the font directly from GIMP — however, the easiest way to include Font Awesome symbols will be to use the system font Character Map that you can find in Windows main search, select the FontAwesome font, and browse for the icons you want to include in your GIMP creation, and then copy and paste them there.
In you have trouble accessing the icons you want to include, simply look for them via tags or large icons browsing on the Font Awesome icons detailed list, copy the hexadecimal 4 characters code, and paste it in the go to unicode field in the Character Map to find it directly, and be able to copy and paste it.
How to include Font Awesome icons in Libre Office?
As soon as the Font Awesome has been installed on your computer, you can include any of its symbols in a Libre Office document by opening the Insert menu and then the special character option, that will open a specific characters search window.
Select the Font Awesome from the fonts list, and the symbols will be displayed right away.
Simply find the ones to insert in current document, and double click on it to include it!
Using the Font Awesome on your computer in short
It it fairly simply to have the Font Awesome icon set for all your digital creations and to make amazing deliverables for your freelance writing or other digital nomad job’s documents.
All you have to do, is to install the font on your computer, and search for the icons from a symbols list program or the icons set list.
Frequently Asked Questions
- How to use Font Awesome Excel?
- You can add a Font Awesome icon to any Excel workbook by selecting the cell where you want to add these symbols and open the symbol browser from the insert menu and click the symbol button.
Installing font awesome
There are 3 ways to accomplish this:
- Get a CDN hosted version of font awesome
- One time ‘install’
- Using a package manager such as LibMan
A) Get a CDN hosted version of font awesome
- Sign up at Font Awesome — Start and create a ‘Font Awesome kit’ using a valid email address.
- Once you confirm your e-mail address, you will have access to a ‘Kit code’, which is just a script tag that contains a unique ID linking to your custom .js file hosted on
fontawesome.com. - Copy Pasta the script tag into the section of your _Layout.
Setting up an account on the site lets you customise some of the Font Awesome resources you w load in your site.
Although this is the quickest way to get up and running quickly, you will not get IntelliSense for all of the icons. Most of the time, I visually browse the icons font-awesome’s site web anyways.
Note: The CDN version does not have a CSS file you need to add, it’s wrapped up in the JS file.
B) Install the files and host yourself
- Download the zip at Font Awesome — Download
- Extract the zip file to your project, typically wwwroot/lib/
- Reference the appropriate scripts in your _Layout.
<head>
  <link href="/your-path-to-fontawesome/css/all.css" rel="stylesheet"> <!--load all styles -->
  <script defer src="/your-path-to-fontawesome/js/all.js"></script> <!--load all styles -->
</head>
Tip — you could host your own Font Awesome files in development but use the CDN version on your server. You can make this differentiation in your application by using the and tags in your layout page.
<environment include="Development">
        <script src="~/lib/fontawesome-free-5.10.1-web/js/all.js"></script>
</environment>

<environment exclude="Development">
    <script src="https://use.fontawesome.com/abcdef1234.js"></script>
</environment>
C) Using a package manager (LibMan)
Using a package manager is another way to install the files directly to your project. LibMan, built into Visual Studio, is one as good as any.
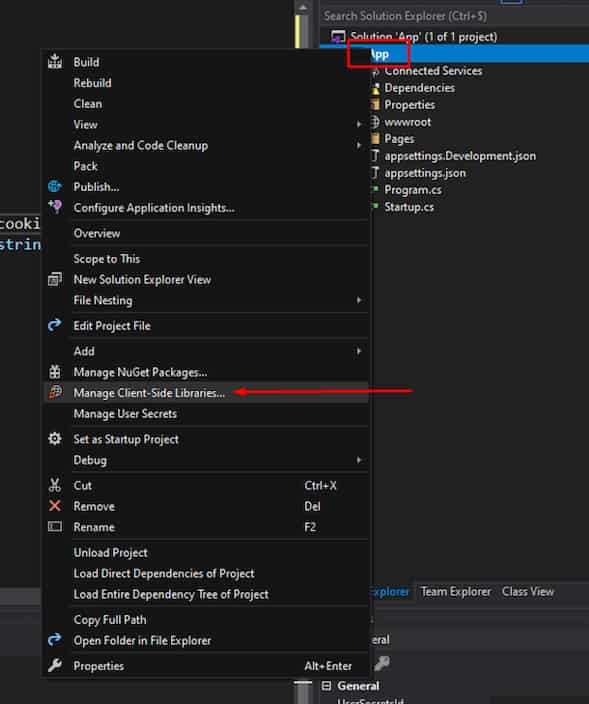
- Right click on main project and click the contextual menu item «Manage Client-Side Libraries…»
If you don’t already have it, it creates a new file in your project called
libman.json. This files contains the list of libraries for the project. You can restore them by right-clicking on this file and selecting “Restore Client-Side Libraries”.
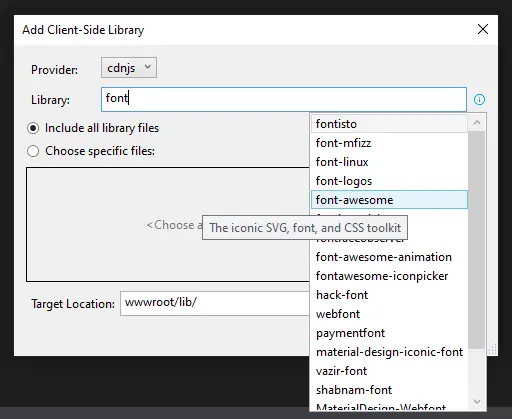
One way to add the library is to again, right-click on your Project File and Add > Client-Side Library.
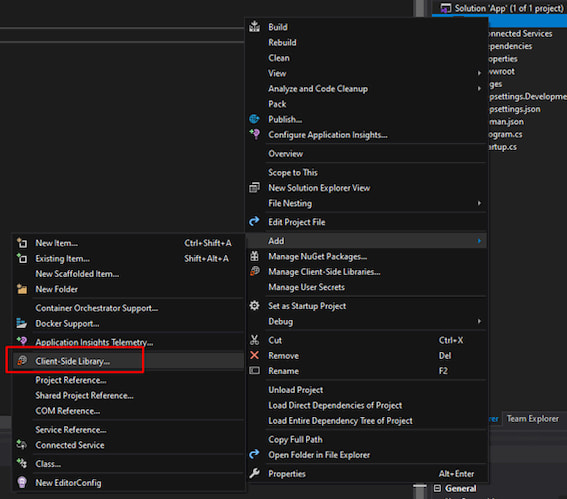
Find Font-Awesome and hit Install.
About Font Awesome
Font Awesome is a font and icon toolkit based on CSS and Less made by Dave Gandy for use with Bootstrap, and later was incorporated into the BootstrapCDN. In terms of use, Font Awesome ranks it second place after Google Fonts.
- Как установить шрифт Awesome
- Способ 1. Загрузите установочный файл с официального сайта
- Способ 2. Подключите через CDN
- Как использовать иконки Font Awesome
- Встраивание иконок с помощью HTML-тегов
- Стилизация иконок с помощью CSS
Как подключить шрифт Awesome
Шрифт Awesome – это популярный набор иконок и инструментов для веб-разработки, основанный на технологии шрифтов и CSS. Он предоставляет коллекцию масштабируемых векторных иконок, которые легко настраиваются с помощью стилей CSS, таких как размер, цвет и тень.
Шрифт Awesome позволяет разработчикам быстро и легко добавлять иконки к своим веб-сайтам без необходимости использовать изображения. Он широко используется для улучшения пользовательского интерфейса и опыта на веб-сайтах и в веб-приложениях. Иконки помогают визуально представить функции, действия и информацию, делая интерфейс более интуитивно понятным.
Особенности:
- Иконки векторные и масштабируются без потери качества на устройствах с различным разрешением.
- Интеграция с HTML и CSS позволяет легко внедрять иконки в проект.
- Стили CSS позволяют изменять внешний вид иконок, включая цвет, размер и эффекты.
- Библиотека содержит тысячи иконок, которые охватывают различные категории, такие как социальные сети, интерфейсные элементы и многое другое.
- Поддерживается во всех современных браузерах и совместим с различными фреймворками, включая Bootstrap.
Есть две основные версии шрифта: Free (бесплатная) и Pro или Pro Max (платная). Обычно первой достаточно для большинства проектов, но вы можете приобрести Pro для доступа к дополнительным иконкам и функциям:
- все 33 612 иконок,
- классический и Sharp-стиль для каждой иконки,
- возможность скачивать иконки Pro-версии,
- бессрочная лицензия на Font Awesome Pro,
- больше просмотров страниц и пользовательских иконок,
- дополнительные плагины и сервисы,
- установка с помощью менеджеров пакетов,
- сервисы и инструменты для упрощения работы с иконками,
- новые иконки, функции и обновления ПО,
- техподдержка от реальных людей.
Как установить шрифт Awesome
Способ 1. Загрузите установочный файл с официального сайта
- Перейдите на официальный сайт Font Awesome и загрузите архив с библиотекой.
- После загрузки распакуйте архив. Внутри вы найдете папки, такие как /css и /webfonts.
- Скопируйте содержимое папок /css и /webfonts в директорию вашего проекта, например, в папку /css/awesome.
- Добавьте следующую строку в секцию <head> вашего HTML-файла, чтобы подключить стили Font Awesome:
<link rel=»stylesheet» href=»/css/awesome/css/all.css» />
Этот метод обеспечивает автономность вашего проекта и независимость от внешних ресурсов.
Способ 2. Подключите через CDN
Если вы предпочитаете более быстрый и простой способ, можно использовать подключение через CDN (Content Delivery Network).
Вставьте следующий код в секцию <head> вашего HTML-файла:
<link rel=»stylesheet» href=»https://use.fontawesome.com/releases/v6.6.0/css/all.css»>
Преимущества использования CDN:
- Сайт может загружаться быстрее благодаря распределению нагрузки между вашим сервером и CDN.
- Если пользователь уже посещал сайты, использующие тот же CDN для Font Awesome, иконки могут быть загружены из кеша браузера.
Недостатки использования CDN:
- Проект не будет работать без подключения к интернету.
- Вы станете зависимы от доступности и скорости работы CDN.
Как использовать иконки Font Awesome
После установки Font Awesome на ваш веб-сайт вы можете начать использовать его иконки в вашем HTML-коде.
Рассмотрим различные способы добавления и настройки иконок Font Awesome в ваших проектах.
Встраивание иконок с помощью HTML-тегов
Тег <i>
Самый простой способ добавить иконку – использовать тег <i> с соответствующими классами. Например, чтобы отобразить иконку «пользователь», используйте следующий код:
<i class=»fas fa-user»></i>
Здесь:
- fas – указывает на стиль иконки Font Awesome Solid (сплошной);
- fa-user – имя иконки «пользователь».
Тег <span>
Тег <span> служит для выделения части текста или элементов внутри строки:
Пример:
<span class=»fas fa-book»></span>
Этот код добавит иконку «книга» в текстовый поток, что удобно для вставки иконок внутри абзацев.
Тег <div>
Тег <div> создает блочный элемент и подходит для размещения иконок в отдельные секции.
Пример:
<div class=»fas fa-comments»></div>
Иконка «комментарии» будет отображена в отдельном блоке.
Тег <button>
Иконки внутри кнопок делают их более информативными и привлекательными.
Например, кнопка с иконкой «корзина» и текстом «Купить» делает действие более понятным:
<button>
<i class=»fas fa-shopping-cart»></i> Купить
</button>
Встраивание иконок в текст
Иконки Font Awesome могут быть легко встроены в текстовые элементы для улучшения визуального восприятия.
Пример:
<p>
Пожалуйста, свяжитесь с нами <i class=»fas fa-phone-alt»></i> для получения дополнительной информации.
</p>
Здесь иконка телефона добавлена в текст, подчеркивая призыв к действию.
Настройка размера иконок
Font Awesome предоставляет классы для изменения размера иконок. Вы можете использовать следующие классы:
- fa-xs – экстра-маленький размер;
- fa-sm – маленький размер;
- fa-lg – большой размер;
- fa-2x, fa-3x, …, fa-10x – увеличение размера в указанное число раз.
Примеры:
<i class=»fas fa-globe fa-4x»></i> <!— Иконка «глобус» увеличена в 4 раза —>
<i class=»fas fa-paper-plane fa-xs»></i> <!— Иконка «бумажный самолетик» уменьшена —>
Стилизация иконок с помощью CSS
Изменение цвета
Цвет иконки можно изменить с помощью свойства color в CSS.
Пример:
<i class=»fas fa-heart» style=»color: red;»></i>
Иконка «сердце» будет отображена красным цветом.
Изменение размера с помощью CSS
Кроме встроенных классов, размер иконки можно настроить через CSS.
Пример:
<I class=”fas fa-tree” style=”font-size: 36px;”></i>
Устанавливает размер иконки «дерево» в 36 пикселей.
Добавление отступов
Контролируйте пространство вокруг иконок с помощью свойств margin и padding.
Пример:
<I class=”fas fa-comment” style=”margin-right: 8px;”></i> Оставить отзыв
Код добавляет отступ справа от иконки «комментарий», отделяя ее от текста.
Применение эффектов
Используйте CSS для добавления эффектов, таких как тени или вращение.
Пример:
<i class=»fas fa-sun» style=»color: gold; text-shadow: 2px 2px 5px orange;»></i>
Иконка «солнце» с золотым цветом и оранжевой тенью.
Анимация иконок
Font Awesome поддерживает анимацию иконок с помощью специальных классов. За вращение иконки отвечают:
- fa-spin – постоянное вращение;
- fa-pulse – вращение с паузами.
Пример:
<i class=»fas fa-cog fa-spin»></i> <!— Иконка «шестеренка» будет постоянно вращаться —>
Анимация при наведении
Используйте CSS для добавления эффектов при взаимодействии пользователя.
Пример:
<style>
.icon-hover:hover {
color: blue;
transform: scale(1.2);
}
</style>
<i class=»fas fa-envelope icon-hover»></i>
Иконка «конверт» изменит цвет на синий и увеличится при наведении курсора.
Советы по оптимизации:
- Минимизируйте количество используемых стилей. Подключайте только необходимые стили иконок (Solid, Regular, Brands и т.д.), чтобы сократить время загрузки.
- Кеширование. Используйте кэширование для ускорения загрузки иконок на повторных посещениях.
- Альтернативный текст. Для доступности добавляйте атрибут aria-hidden=»true» к иконкам и предоставляйте текстовые альтернативы, если необходимо.
Заключение
Использование иконок Font Awesome позволяет улучшить визуальную привлекательность и функциональность вашего веб-сайта. Благодаря гибким настройкам и широкому выбору иконок вы можете создавать интуитивно понятные и современные интерфейсы, которые улучшат опыт пользователей.
How To Install Font Awesome Pro Without Errors on Windows PC. Follow simple step by step video tutorial guide to install Font Awesome Pro successfully.
Video Tutorial – Font Awesome Pro PC Installation Guide
Below are Additional Resources Which You Might Need
Font Awesome Pro Link
Internet Download Manager – Required For High Speed
UltraISO – Required For Mounting ISO
WinRAR – Required For Extracting of all archive formats
So you might be thinking why we launched this video tutorial guide for installation of Font Awesome Pro. Well not every user is an geek and expert technical PC User. Because with every passing day software installation is getting more and more difficult. Now companies have hardned the security of softwares. So it gives tough time to users to follow simple readme guide to install softwares like Font Awesome Pro. Therefore we have setup this forum to ease the installation of complex software like Font Awesome Pro. So if you are one of those user who just got a heavy software after using hgh data bandwidth and now are in deep trouble wondering how to make Font Awesome Pro work successfully 100%.
We are aware of the fact that You might find several random guides online, but our aim on this forum is to build big community and one single platform for troubleshooters and PC issue debuggers. Later on we will start covering Mac OS X issues as well. So if your Font Awesome Pro won’t start after installation. Then don’t worry because of Font Awesome Pro errors and problems. So if you get any errors such as Font Awesome Pro is crashed. Or you are getting Font Awesome Pro has stopped working. Then your search is finally over. The below provided easy video guide will definitly solve it and you will have working full setup of Font Awesome Pro.
We have compiled this for newbies and beginners to follow easy steps to Install Font Awesome Pro. So you won’t get error such as setup of Font Awesome Pro is corrupted or is missing files. Secondly the Fix files for Font Awesome Pro are also included in guide as part of steps. Secondly error like Font Awesome Pro is not valid ISO or zip” etc will not appear.
So if you are already tired of searching answers to Font Awesome Pro Errors on Windows PC then you are now at right place. We’ll help you to troubleshoot every problem and installation issue in Font Awesome Pro. If your Font Awesome Pro is crashing after installation. Then we’ll tell you how to fix Font Awesome Pro Crash after installation is completed. It will help you to fix this error. If you are searching how to install Font Awesome Pro from ISO file. Then don’t worry. The above video below will guide you how to install Font Awesome Pro from ISO file without burning CD or DVD. So burning is not mandatory.
Still if your problems are not resolved after following complete steps. Then please leave a comment below and we will help you to fix the problem. Because we understand your frustration.