
Applies ToWindows 11 Windows 10
Ручка планшета может улучшить взаимодействие с устройством, делая задачи более интуитивно понятными и эффективными. Представьте себе, что вы рисуете свои идеи прямо на экране с подвижностью традиционного пера, но с дополнительными преимуществами цифровых инструментов. Ручка планшета обеспечивает точное управление, что делает ее идеальной для рисования, заметок и даже навигации по вашему устройству. Ручка не предназначена для замены мыши или клавиатуры, но улучшает способ работы и создания.
Когда вы используете ручку с Windows, она обеспечивает естественное ощущение. Чувствительность к давлению и распознавание наклона имитируют опыт использования реального пера, что делает его идеальным инструментом для художников и дизайнеров. Для учащихся это означает создание заметок более организованным и интерактивным способом с возможностью выделять, добавлять заметки и даже преобразовывать рукописный текст в текст.
Ручка также может помочь вам быть более продуктивным. Вы можете быстро отбирать идеи, размечать документы и легко перемещаться по презентациям. Интеграция с Windows Ink Workspace еще больше расширяет его полезность, предлагая набор инструментов, предназначенных для повышения эффективности работы с пером.
В этой статье описаны некоторые распространенные действия и параметры в Windows для максимально эффективного использования пера.
Ручка планшета использует Bluetooth для подключения к компьютеру, поэтому сначала необходимо связать в Windows. Чтобы связать ручку с компьютером, выполните следующие действия.
-
Нажмите кнопку Пуск , а затем выберите Параметры > Устройства Bluetooth & .
Или
Выберите следующий ярлык bluetooth & устройства :
Открытие устройств Bluetooth &
-
Убедитесь, что ручка находится в режиме связывания. Это действие зависит от типа пера. Например, с помощью ручки Surface нажмите и удерживайте верхнюю кнопку пера в течение 5–7 секунд, пока индикатор не мигает белым, чтобы включить режим связывания Bluetooth.
-
Выберите Добавить устройство.
-
В окне Добавление устройства выберите Bluetooth.
-
Выберите имя ручки. Например, «Ручка Surface».
-
После подключения нажмите кнопку Готово , чтобы закрыть окно.
-
Дополнительные сведения см. в статье Связывание устройства Bluetooth в Windows.
Меню пера в Windows 11 упрощает доступ к любимым приложениям.
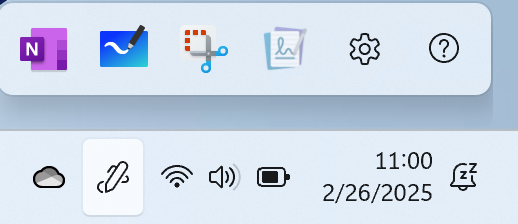
По умолчанию меню пера содержит сочетания клавиш для OneNote, Whiteboard, ножницы и Журнал.
Показать меню пера на панели задач
Может потребоваться включить отображение меню пера на панели задач.
-
Щелкните правой кнопкой мыши панель задач и выберите Параметры панели задач или используйте следующее сочетание клавиш:
Панель задач
-
В разделе Значки системного лотка включите меню пера.
Затем на панели задач появится значок пера .
Чтобы открыть меню пера, коснитесь значка пера .
Совет: Если у пера есть кнопка ярлыка, вы можете настроить его функцию, чтобы открыть меню пера. Например, см. раздел Использование ручки Surface.
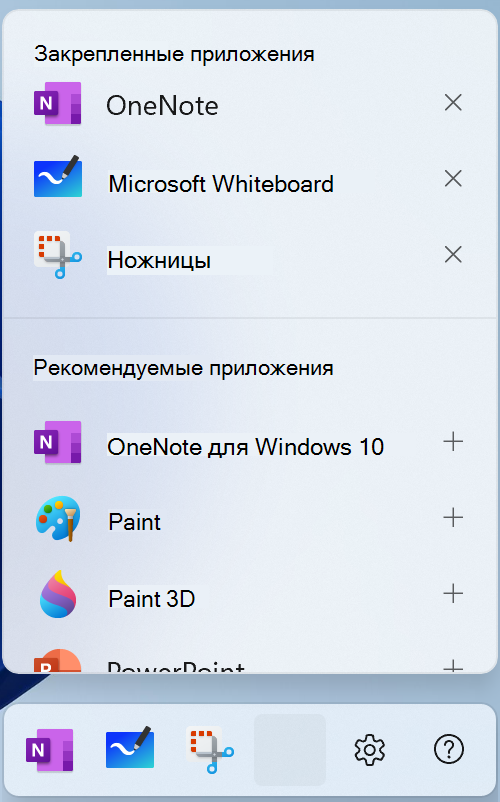
Добавление или удаление ярлыков
Вы можете добавить до четырех приложений в качестве ярлыков в меню пера.
-
Выберите меню пера в углу панели задач.
-
Когда появится меню пера, выберите Параметры , а затем изменить меню пера .
-
Чтобы удалить приложение из меню пера, щелкните значок удаления рядом с приложением в списке закрепленных приложений.
Совет: В меню пера можно закрепить только четыре приложения. Вы не можете добавить приложение, если четыре приложения уже закреплены.
-
Чтобы добавить приложение в доступный слот в меню пера, прокрутите страницу, чтобы найти приложение в списке предлагаемых приложений или всех приложений. Затем щелкните значок добавления рядом с приложением.
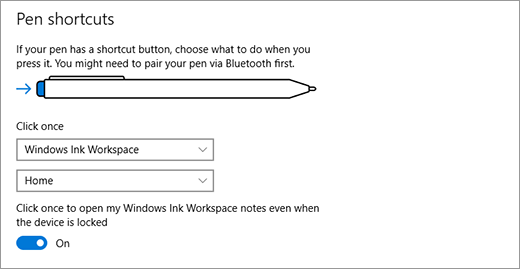
Вы можете настроить возможности пера и его работу на своем компьютере. Выберите, с какой рукой вы пишете, или что делает ваш компьютер при касании, двойном касании или удерживании кнопки ярлыка пера.
Чтобы изменить параметры, выберите Пуск > Параметры > Устройства Bluetooth & > Ручка & Windows Ink .
Или используйте следующий ярлык:
Открытие параметров

Большинство цифровых перьев для Windows являются перезаряжаемыми или имеют заменяемый аккумулятор AAAA. Прежде чем начать, проверка инструкции, поставляемые с ручкой.
Для большинства перьев можно заменить батарею, откручив конец ручки. Если вам нужны более конкретные инструкции, проверка с производителем пера.
Например, чтобы заменить батарею в ручке Surface без клипа, вытяните верхний конец прямо снизу. Дополнительные сведения о других моделях ручки Surface см. в статье Изменение батареек ручки Surface.
Статьи по теме
-
Рукописный ввод
-
Рисование заметок и создание эскизов в OneNote
-
Whiteboard помощь & обучении
-
Использование приложения «Ножницы» для захвата снимков экрана
-
Справка и обучение Журнал Microsoft
-
Помощь и обучение по ручке Surface
-
Определение модели ручки Surface и ее функций
-
Приложение Surface в Microsoft Store
Нужна дополнительная помощь?
Нужны дополнительные параметры?
Изучите преимущества подписки, просмотрите учебные курсы, узнайте, как защитить свое устройство и т. д.
Start Menu and Taskbar
Open Start Menu
Win
Start Menu and Taskbar
Open Start Menu
Ctrl + Esc
Start Menu and Taskbar
Cycle through the apps on the taskbar
Win + T
Start Menu and Taskbar
Open the app pinned in the (1) position on the taskbar
Win + 1
Start Menu and Taskbar
Open the right-click menu for the app pinned in the (1) position on the taskbar
Win + Alt + 1
Start Menu and Taskbar
Show or hide desktop
Win + D
Start Menu and Taskbar
Show session options (Lock, Change user, Log off, Task Manager)
Ctrl + Alt + Del
Start Menu and Taskbar
Open Task Manager
Ctrl + ↑ Shift + Esc
Windows key
Zoom to the screen
Win + +
Windows key
Zoom out to the screen
Win + -
Windows key
Exit Magnifier
Win + Esc
Accessibility
Turn High Contrast on or off (use left Shift and left Alt)
Alt + ↑ Shift + Print Screen
Accessibility
Turn Mouse Keys on and off (use left Shift and left Alt)
Alt + ↑ Shift + Num Lock
Windows key
Open the Ease of Access Center
Win + U
Desktop
Minimize all open windows
Win + M
Desktop
Restore minimized windows
Win + ↑ Shift + M
Desktop
Minimize all windows except the selected or currently active window
Win + Home
Desktop
Maximize selected window
Win + ↑
Desktop
Maximizes the active window vertically while maintaining its width
Win + ↑ Shift + ↑
Desktop
Minimize selected window
Win + ↓
Desktop
Snap selected window to the left half of the screen (If the window is already there, Windows key + Up or Down will snap it into a quadrant)
Win + ←
Desktop
Snap selected window to the right half of the screen (If the window is already there, Windows key + Up or Down will snap it into a quadrant)
Win + →
Desktop
Move selected window to the left monitor
Win + ↑ Shift + ←
Desktop
Move selected window to the right monitor
Win + ↑ Shift + →
Desktop
Open Task view (virtual desktops)
Win + ⭾ Tab
Desktop
Add new virtual desktop
Win + Ctrl + D
Desktop
Move to the next virtual desktop (to the right)
Win + Ctrl + →
Desktop
Move to the next virtual desktop (to the left)
Win + Ctrl + ←
Desktop
Close current virtual desktop
Win + Ctrl + F4
Windows key
Open the Action Center
Win + A
Windows key
Open Cortana in text mode
Win + S
Windows key
Open Cortana in text mode
Win + Q
Windows key
Open Cortana in listening mode (similar to saying «Hey, Cortana»)
Win + C
Windows key
Open File Explorer
Win + E
Windows key
Open the Windows 10 Feedback Hub
Win + F
Windows key
Search for PC’s on a network
Win + Ctrl + F
Windows key
Open the Game Bar
Win + G
Windows key
Open the Settings menu
Win + I
Windows key
Open the Connect sidebar (for connecting to Bluetooth or Miracast devices)
Win + K
Windows key
Lock the computer
Win + L
Windows key
Lock screen orientation
Win + O
Windows key
Open presentation or projection sidebar
Win + P
Windows key
Open the Run window
Win + R
Windows key
Open the Windows Ink Workspace for scribbling on tablets or touchscreen laptops
Win + W
Windows key
Take a screenshot of the entire desktop and save it to the Screenshots folder in the Pictures folder
Win + Print Screen
Windows key
Open the emoji keyboard
Win + .
Windows key
Open clipboard history (this feature is added with October 2018 Update)
Win + V
Windows key
Open screenshot toolbar, capture an area of the screen
Win + ↑ Shift + S
Windows key
Open ‘change input language’ popup and switch to next language
Win + Space
Windows key
Switch to next input language
Alt + ↑ Shift
Windows key
Show desktop temporarily
Win + ,
Windows key
Open virtual keyboard
Win + Ctrl + O
Windows key
Start Speech Recognition
Win + Ctrl + S
Windows key
Start text dictation
Win + H
Windows key
Restart graphics driver (in case of problems)
Win + Ctrl + ↑ Shift + B
Change Pen Shortcut Button Settings in Windows 10
- Open Settings, and click/tap on the Devices icon.
- Do step 3 (click once), step 4 (doubel-click), step 5 (press and hold), and/or step 6 (app override) below for which shortcuts you want to change.
- To Choose «Click once» shortcut button behavior for Pen. …
- To Choose «Double-click» shortcut button behavior for Pen.
- How do you use window ink without a pen?
- How do I turn on Windows pen?
- How do I turn off pen mode?
- How do I enable my stylus on Windows 10?
- Can I use Windows ink without touch screen?
- How do I add Windows ink to my taskbar?
- How do you use pen ink on Windows?
- What pen works with Windows ink?
- How do I turn off Windows 10 pen?
- How do I permanently remove Windows ink?
- Can you use a pen on a touch screen laptop?
How do you use window ink without a pen?
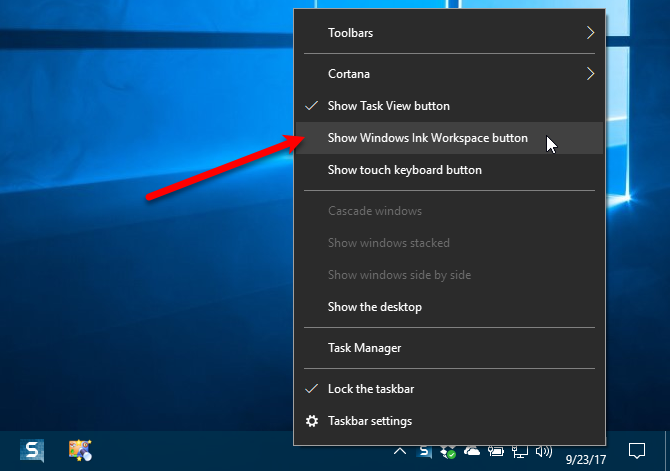
Enable Windows Ink Workspace in Windows 10 without a Stylus or Touchscreen. If Windows 10 doesn’t detect support for touch, you won’t see the Windows Ink Tools in the notification area. Not to worry, all you need to do is right-click the taskbar, select Show Windows Ink Workspace button then click it. That’s it!
How do I turn on Windows pen?
Use the top button of your pen
- Go to Start > Settings > Devices > Add Bluetooth or other device > Bluetooth .
- Press and hold the top button of your pen for 5-7 seconds until the LED flashes white to turn on Bluetooth pairing mode.
- Select your pen to pair it to your Surface.
How do I turn off pen mode?
Go to the Windows menu and search «Pen and Touch». Or open up your Control Panel and search for it there. Select the «Press and Hold» option and click Settings. Disable the «press and hold for right-clicking» box at the top.
How do I enable my stylus on Windows 10?
To access pen settings, open the Settings app and select Devices > Pen & Windows Ink. The “Choose which hand you write with” setting controls where menus appear when you use the pen. For example, if you open a context menu while it’s set to “Right Hand”, it will appear to the left of the pen tip.
Can I use Windows ink without touch screen?
You can use Windows Ink Workspace on any Windows 10 PC, with or without a touchscreen. Having a touchscreen allows you to write on the screen with your finger in the Sketchpad or Screen Sketch apps. Here is our hands-on guide to using Windows Ink Workspace on your Windows 10 PC or device.
How do I add Windows ink to my taskbar?
You launch the Windows Ink Workspace from the taskbar. Here’s how to get started with it. If the Windows Ink Workspace icon is not visible, right-click the taskbar and click or tap Show Windows Ink Workspace button. Click or tap the Windows Ink Workspace icon in the taskbar.
How do you use pen ink on Windows?
Select Windows Ink Workspace from the taskbar to open it. From here, you can select Whiteboard or Fullscreen Snip. (You can also select More and Learn more about pen or access Pen settings .) Tip: Press the top button on your pen once to quickly open Microsoft Whiteboard, or double-press it to open Snip & Sketch.
What pen works with Windows ink?
Bamboo Ink Plus pen from Wacom
Optimized for Windows Ink and works with a wide range of Windows 10 touchscreens. Plus, exchangeable nibs offer plenty of writing options.
How do I turn off Windows 10 pen?
If you don’t plan on using a pen with Windows 10 and you want to get the Windows Ink Workspace off your taskbar, you can turn it off just like you’d turn off other system icons. To do this, head to Settings > Personalization > Taskbar > Turn System Icons On or Off.
How do I permanently remove Windows ink?
Navigate to: Computer Configuration ->Administrative Templates ->Windows Components ->Windows Ink Workspace. In the right pane, double-click Allow Windows Ink Workspace to open its properties. Check the Enabled option. Next, select Disabled from the drop-down menu under the Options section.
Can you use a pen on a touch screen laptop?
Tablet PCs feature a touchscreen. You can use your finger as an input device, but your finger is short and stubby and, please, you need a manicure. A better option is to use a digitizer pen, or stylus.
…
How to use the pen as a mouse.
| Mouse Activity | Pen Equivalent | Description |
|---|---|---|
| Click | Tap | Tap the stylus on the screen. |
Мы уже рассказывали о возможностях использования технологии Windows Ink в приложении «Карты». Сегодня хотим поведать об основных функциях Windows Ink Workspace. Технология Windows Ink входит в обновление Windows 10 Anniversary Update и позволяет обладателям устройств, поддерживающих сенсорный ввод или работу с пером, быстро и легко фиксировать свои идеи.
Начните работать с Windows Ink Workspace
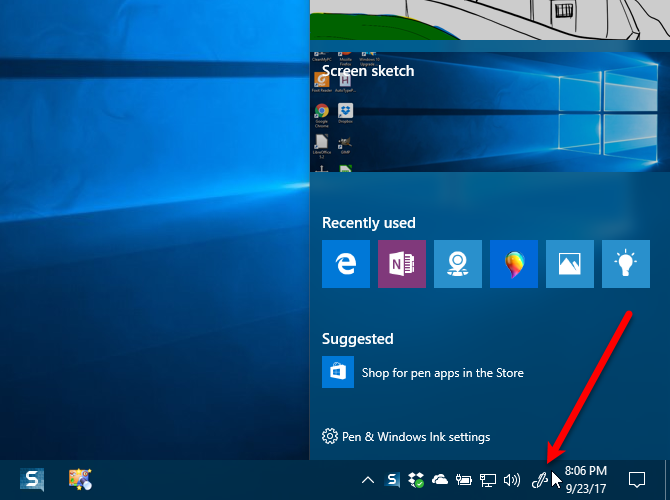
Рабочая область Windows Ink* Workspace открывает доступ ко всем функциям и приложениям, использующим рукописный ввод. Открыв панель, вы получите доступ к таким возможностям, как «Записки», «Альбом», «Наброски на экране», а также ссылки на недавно использованные приложения, оптимизированные для работы с пером.
Найти Windows Ink Workspace просто: достаточно щелкнуть большим пальцем кнопку ручки** или нажать на соответствующую кнопку в области уведомлений справа на панели задач! Если вы не видите значок, щелкните правой кнопкой мыши панель задач и выберите «Показать кнопку Windows Ink Workspace».
Больше интерактива
Записки доступны в меню «Пуск» или в верхней части Windows Ink Workspace. Напишите адрес, и приложение «Карты» поможет составить маршрут. Перечень из нескольких пунктов превратится в удобный список. Кроме того, при использовании Кортаны, если вы укажете дату или время в записке, они сразу будут выделены. Затем, коснувшись выделенного фрагмента, можно создать напоминание. Оно появится на всех ваших устройствах, где установлена Кортана***.
Рисуйте в альбоме, используя цифровую линейку
Альбом Windows Ink Workspace — это чистый лист, на котором легко сделать быструю зарисовку, зафиксировать идею или составить схему для мозгового штурма.
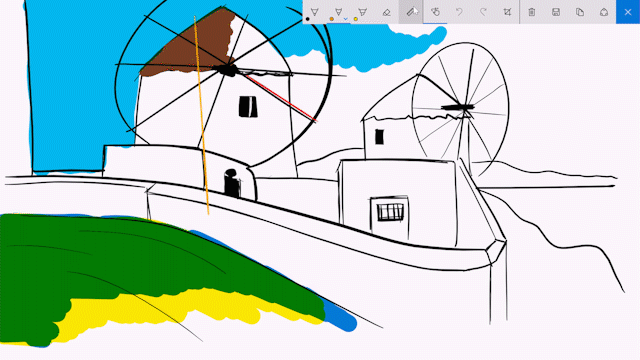
В Windows Ink вы можете измерить расстояние или начертить прямую линию с помощью цифровой линейки — пользоваться ей так же удобно, как и обычной! Откройте альбом или наброски экрана в Windows Ink Workspace и нажмите на значок линейки в правом верхнем углу панели инструментов. Разместив цифровую линейку нужным образом, вы можете рисовать идеально ровные линии пером (или пальцем, если вы переключитесь на сенсорный ввод с помощью соответствующего значка).
Делайте пометки и рисунки на снимках рабочего стола с помощью набросков экрана
Функция набросков позволяет рисовать на снимке вашего рабочего стола. Вы сможете делать на цифровых документах рукописные пометки точно так же, как на распечатанных, или добавлять собственные штрихи к понравившимся картинкам из приложения «Фотографии» и легко делиться результатами.
Наброски экрана позволяют вам выражать свои эмоции или персонализировать изображения наиболее естественным образом — рисуя или делая пометки. Вы также можете обрезать изображение, оставив только нужную часть. Как и рисунок в альбоме, набросок экрана легко сохранить и отправить друзьям и коллегам.
* Требуется планшет или компьютер, поддерживающий сенсорный ввод. Перо может продаваться отдельно.
** Требуется перо с кнопкой Bluetooth. Использование данной кнопки должно быть включено в настройках.
*** Кортана доступна не для всех рынков; функционал в разных регионах и на разных устройствах может отличаться.
Windows Ink has been a part of Windows 10 since late 2016. The Windows Ink Workspace is a set of apps designed for touch-enabled devices. Combined with an active stylus, or pen, you can quickly jot down notes in the Sticky Notes app, sketch ideas in the Sketchpad app, or makes notes on screenshots in the Screen Sketch app.
You don’t need to have a device with a pen, like a Surface Pro 4. You can use Windows Ink Workspace on any Windows 10 PC, with or without a touchscreen. Having a touchscreen allows you to write on the screen with your finger in the Sketchpad or Screen Sketch apps.
Here is our hands-on guide to using Windows Ink Workspace on your Windows 10 PC or device. We didn’t have a pen to test on our Windows 10 touchscreen laptop.
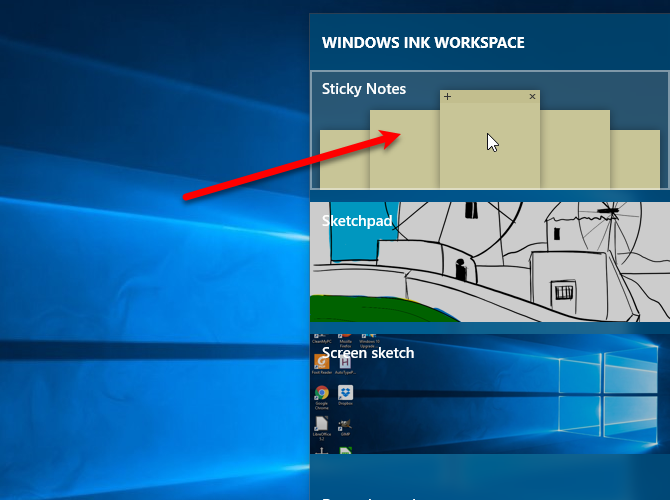
Open the Windows Ink Workspace
If you have a Surface Pro device, press the button on the pen to open the Windows Ink Workspace. If you’re using a Windows 10 PC with or without a touchscreen, but no pen, you may need to add the Windows Ink Workspace button to the Taskbar.
The button looks like script capital «I» and would be on the right side of the Taskbar next to the time and date. If you don’t see the button, right-click on an empty area on the Taskbar and select Show Windows Workspace button from the popup menu.
To open the Windows Ink Workspace, click the button that now appears on your Taskbar.
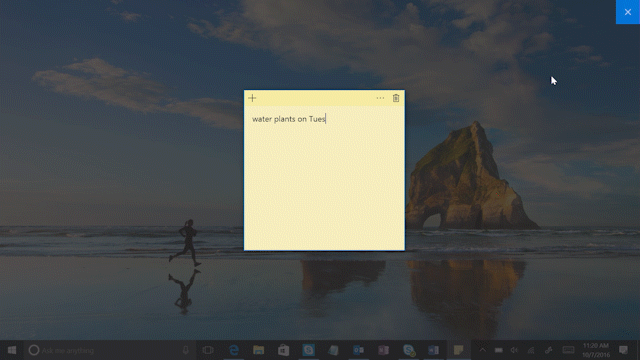
Jot Down Notes and Create Reminders With Sticky Notes
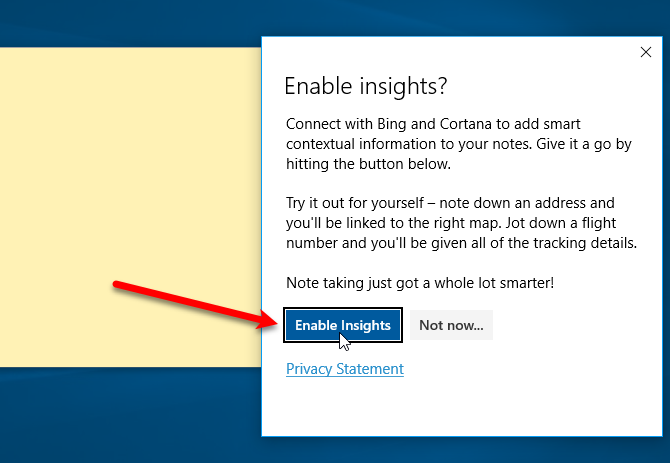
Sticky Notes has been part of Windows for a while, but the Windows Ink Workspace links your sticky notes to Cortana. When you enter a reference to a day or time, like «tomorrow,» you can let Cortana remind you of the event you write on the note. If you enter a flight number, Cortana will fetch the flight status from Bing. If you’re using multiple Windows devices, your Sticky Notes will be synced across them.
Click the Windows Ink Workspace button on the Taskbar and then click Sticky Notes at the top.
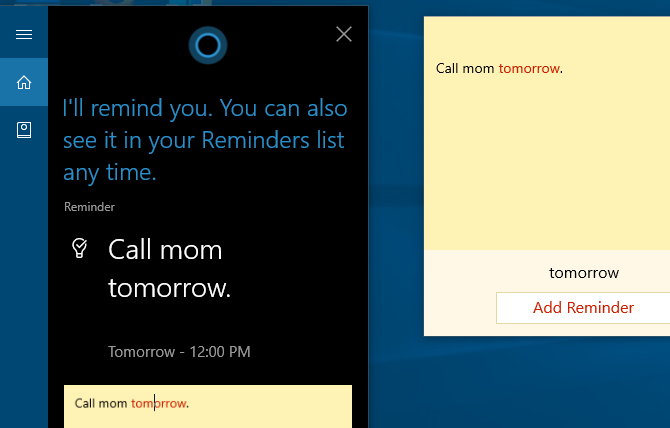
To be able to use the integrations with Bing and Cortana, you must enable insights. When the dialog box pictured below displays, click Enable Insights.
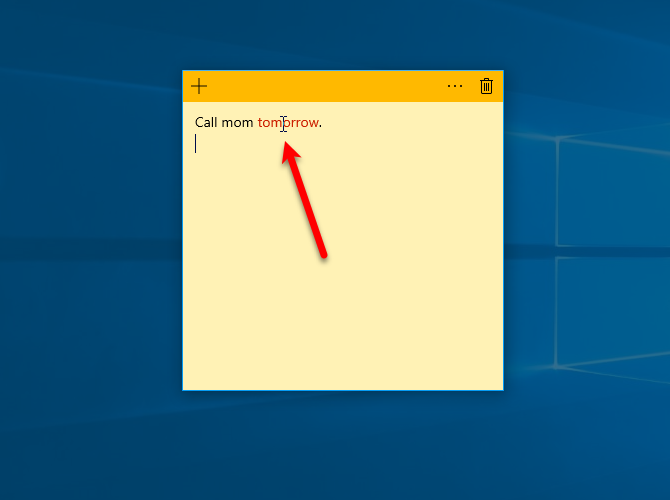
If you have a pen for your device, write a message on the sticky note. Or type the note if you don’t have a pen. You’ll notice that any day or time you put on the note turns red. To create a reminder from your note, click the red text.
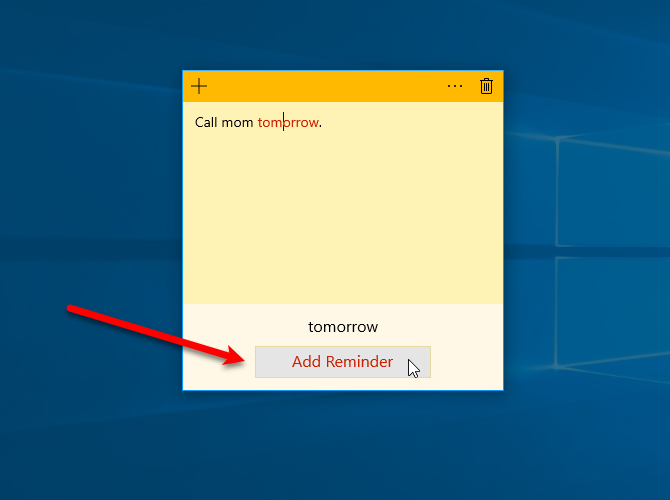
Next, click the Add Reminder button that displays at the bottom of the note.
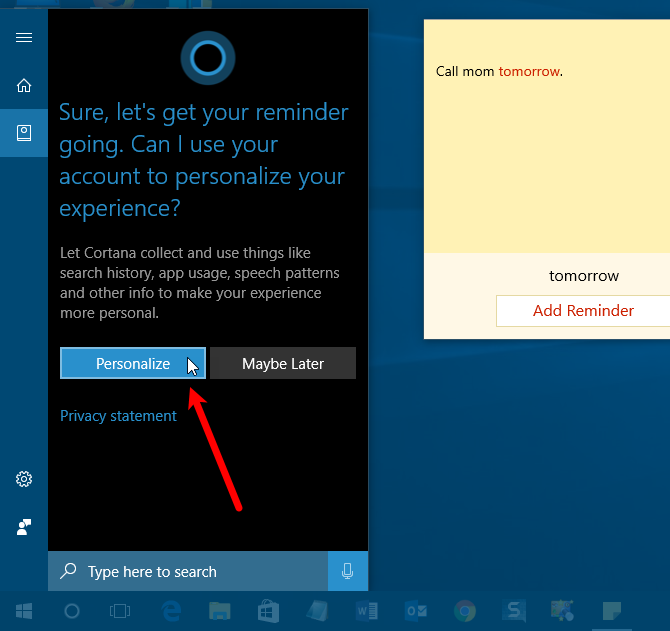
Cortana pops up asking to use your Microsoft account to personalize your experience. Click Personalize.
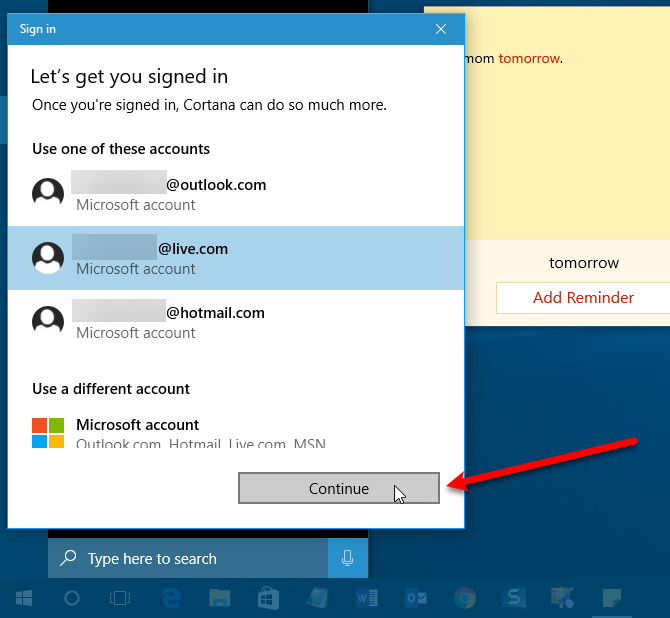
Select the account you want to use and click Continue. You can use a live.com, outlook.com, or hotmail.com account.
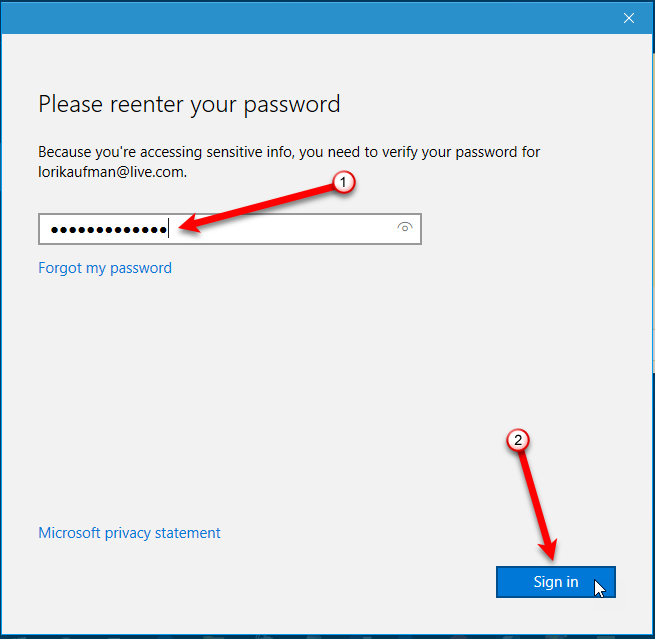
Even though you’re already signed into Cortana, you must re-enter your password again because you’re accessing sensitive information. Then, click Sign in.
Set the time and date and select the frequency and then click Remind.
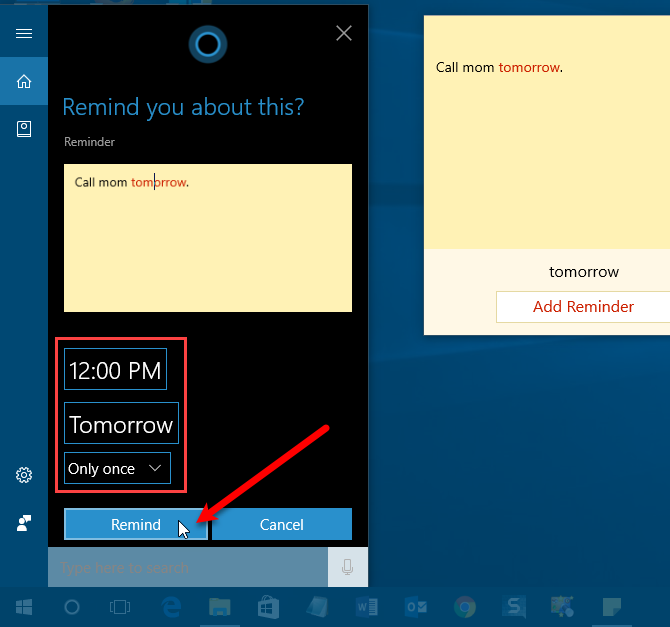
Cortana says she will remind you and shows you the reminder she set up.
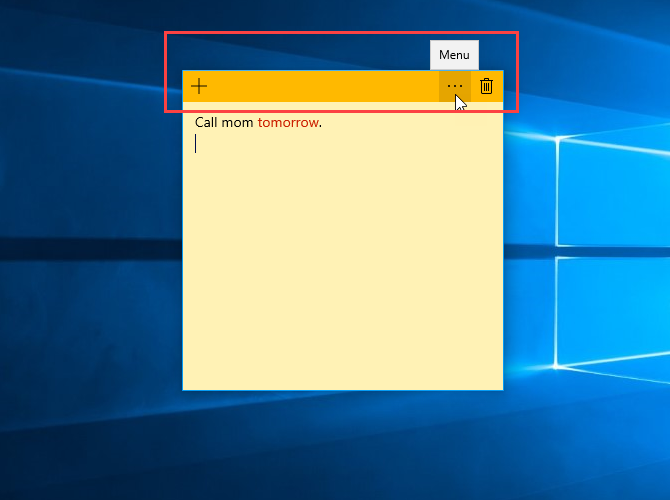
Use the plus icon to add a new note. To change the color of the current note, click the Menu button and select a color. Each note can be a different color. To delete the note, click the trash can icon.
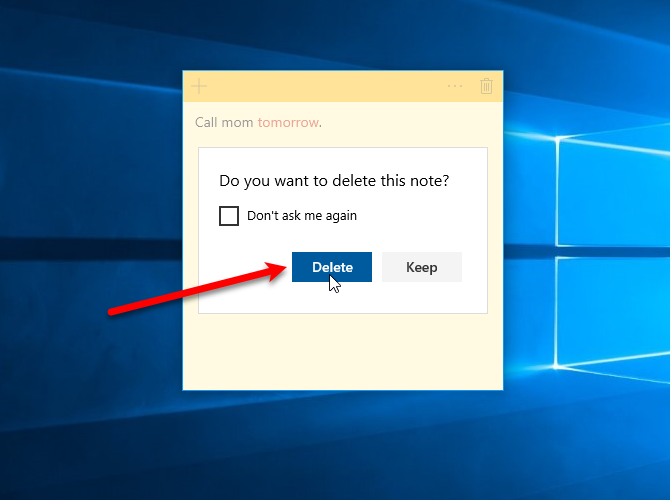
When you delete a note, a confirmation dialog box displays to make sure you want to delete it. If you don’t want to see this dialog box every time, check the Don’t ask me again box before clicking Delete.
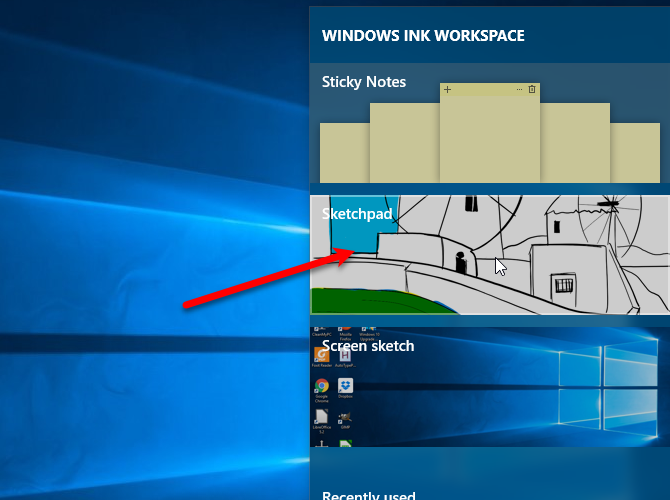
Sketch Your Ideas With Sketchpad
Sketchpad is a very simple app that displays a blank one-page sketchpad where you can write or draw anything you want on it. This is handy if you come up with an idea and you need to draw something to get it down. Instead of grabbing a piece of paper, use Sketchpad.
To start sketching, click the Windows Ink Workspace button on the Taskbar and then click Sketchpad.
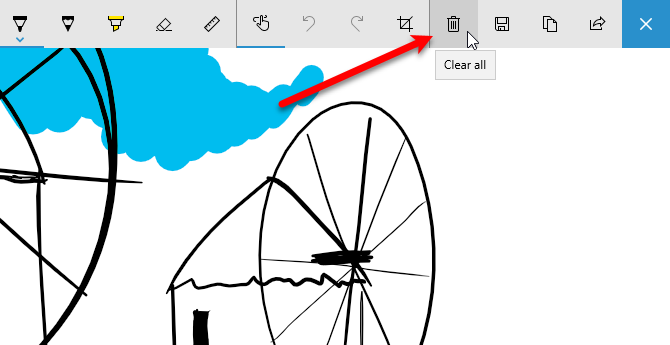
Microsoft provided a default drawing in Sketchpad to start with. To clear the sketchpad completely and start fresh, click Clear all on the toolbar.
In the left section of the toolbar, you’ll find the Ballpoint Pen, Pencil, Highlighter, Eraser, and Ruler tools. Click on a tool to use it on the sketchpad, then use your pen, finger, or mouse to draw or erase on the sketchpad.
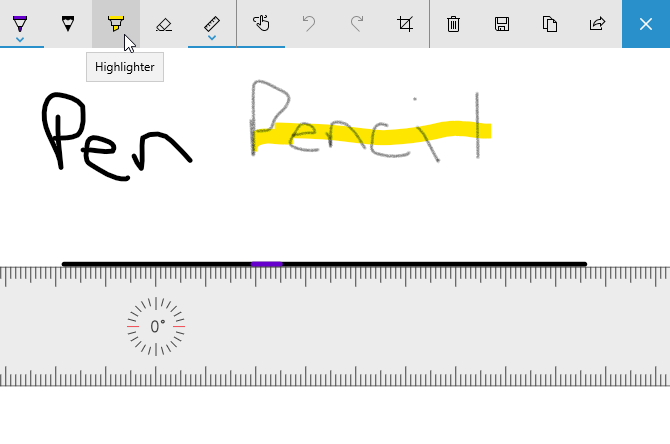
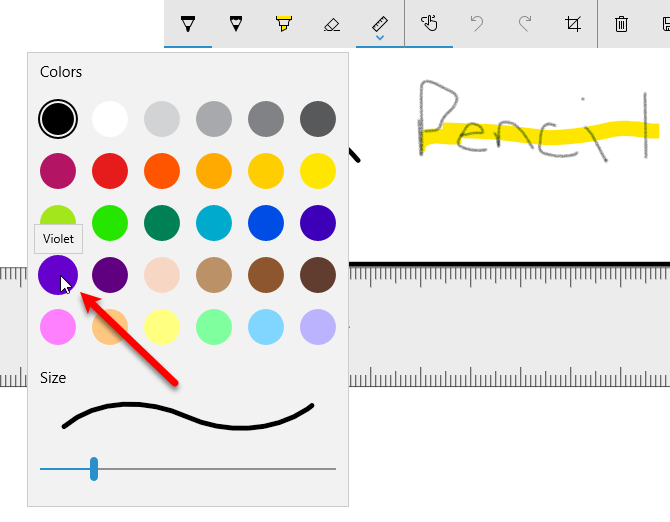
The ballpoint pen and pencil each have thirty colors you can use to draw and the highlighter has six different colors. To change the color for a tool, click the arrow on the button and then click the color you want to use. You can also change the Size of the tool.
Ever tried to draw a straight line on a screen? It’s hard enough on paper without a ruler. The Sketchpad app includes a ruler you can use at any angle, even without a pen.
Click the Ruler tool on the toolbar. You’ll see a ruler display on the sketchpad at a 45-degree angle. If you have a touchscreen, you can move the ruler around with one finger and change the angle by twisting two fingers around on the ruler.
If you don’t have a touchscreen, use the mouse to click and drag the ruler around. To change the angle without a touchscreen, move the mouse cursor over the ruler and use the scroll wheel.
Once you’ve positioned the ruler, draw along the edge of the ruler with any of the drawing tools. You’ll find even if you stray away from the edge of the ruler, the line you’re drawing will stay straight.
The middle section on the toolbar allows you to turn Touch Writing on or off, undo and redo actions, and crop your sketch.
The buttons in the right section of the toolbar allow you to clear the entire sketchpad, save the sketch as a PNG file, copy the sketch to the clipboard, or share your sketch through Windows 10’s sharing center.
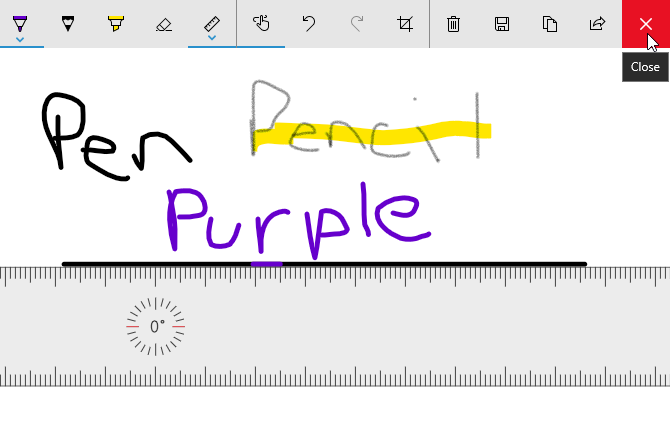
Close the Sketchpad using the red X button on the right side of the toolbar. Your sketch remains in the Sketchpad app until you clear it.
Annotate Screenshots With Screen Sketch
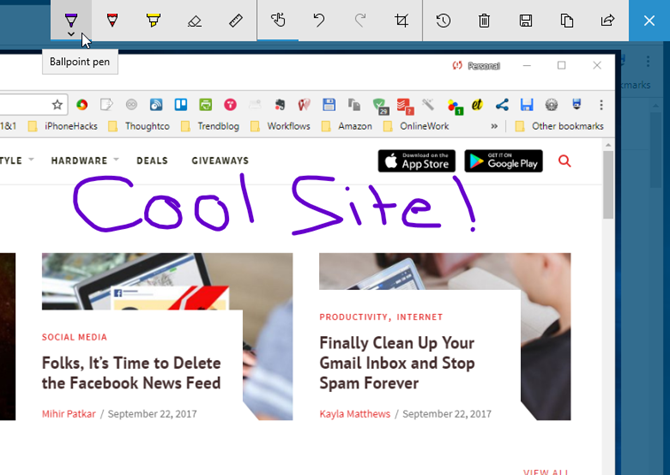
The Screen Sketch app allows you to take a screenshot of whatever’s currently on your screen and then draw on it using the same tools available in the Sketchpad app. It’s like Edge’s Ink feature, but you can draw on the entire screen, not just on a web page.
To use Screen Sketch, make sure what you want to capture is active on the screen. Then, click the Windows Ink Workspace button and click Screen Sketch.
The app captures the screen and presents it for you to write on. Use the drawing tools and the ruler to draw or write what you want using a pen, your finger, or a mouse.
You can save, copy, or share your screenshot just like you can do with sketches in the Sketchpad app.
Open a Pen-Enabled App
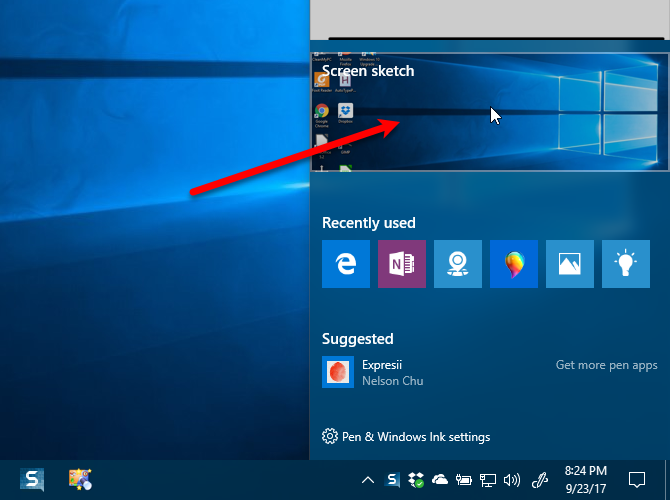
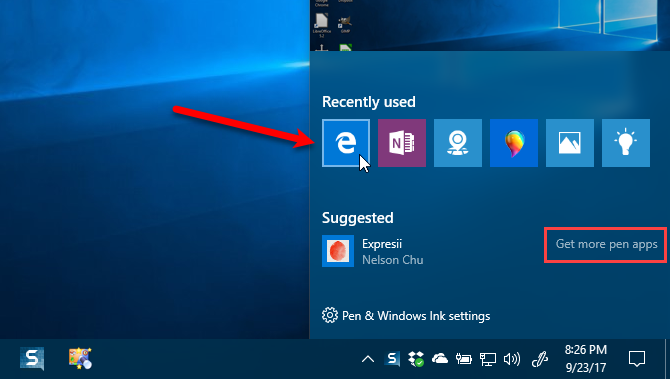
Recently used pen-enabled apps are listed towards the bottom of the Windows Ink Workspace, whether or not you have a pen.
For example, you can click the Edge icon.
Then use Edge’s Ink feature to write on a web page. Some of the same tools you’ll recognize from the Sketchpad and Screen Sketch app are also available in Edge’s Ink feature. You can also save and share your annotated web page.
Get More Pen-Enabled Apps
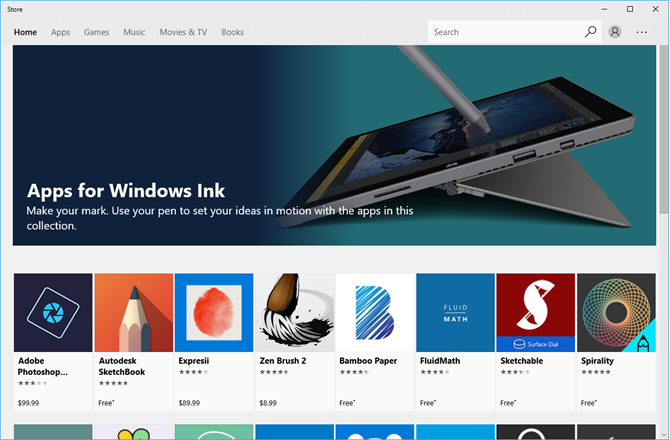
The Get more pen apps link on the Windows Ink Workspace opens the Windows Store and shows you all the apps in which you can use your pen.
Customize the Pen Settings
If you’re using a pen, you can customize it in the Windows 10 Settings app by clicking Pen & Windows Ink settings at the bottom of the Windows Ink Workspace. As we mentioned, we don’t have a pen to test, but you can learn about the Pen settings on Microsoft’s support site.
Organize Your Ideas and Life With Windows Ink
Try out the Windows Ink Workspace to take notes and create reminders for yourself, sketch your ideas, or annotate a screenshot. You can also share your sketches and screenshots with others.
If the Windows Ink Workspace doesn’t quite meet your note-taking needs, give OneNote a try.
Have you used the Windows Ink Workspace? On a Surface device or a Windows 10 PC with a touchscreen? What do you use the Windows Ink apps for? Let us know your thoughts and experiences in the comments below.