
Troubleshoot your Surface Pen
Applies ToSurface Devices Surface
For enhanced help and support, we recommend using the Surface app.
The Surface app knows your device, detects the most common issues, and provides you with simple, personalized solutions.
Open the Surface app
If you are unable to use the app on your Surface device, you can still follow the basic support solutions below.
This article provides troubleshooting steps to help resolve issues with your Surface Pen if it isn’t writing, opening apps, or connecting to Bluetooth.
Common issues
Here are some things you can try first.
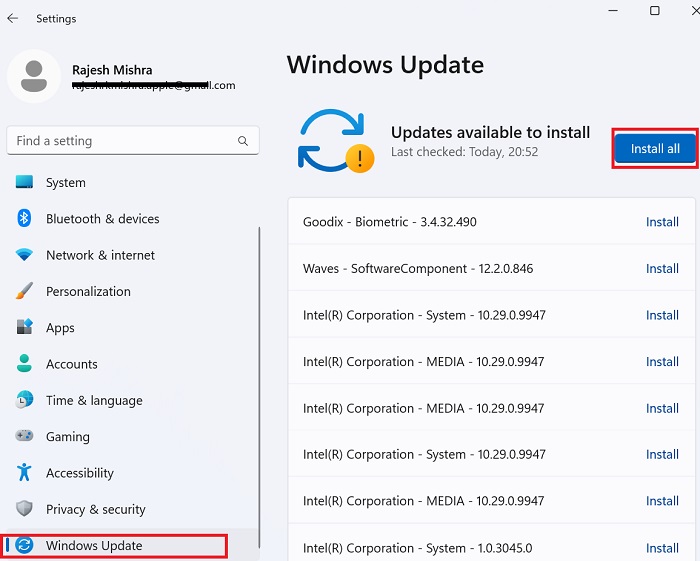
Check for updates
You can quickly check the health of your Surface drivers and firmware using the Surface app.
Open the Surface app
-
In the Surface app, expand Help & support to check if the update status is «You’re up to date» or something else.
-
If needed, select the option to update the devices.
Note: If you don’t have the Surface app installed, you can download the Surface app from the Microsoft Store. When it has downloaded, select Start, search for Surface, then select the app from the list of results.
Check if your Surface Pen is compatible with your Surface
For more info, go to Identify your Surface Pen and features.
Note: Surface Laptop Go models and Surface Laptop 7th Edition are not compatible with the Surface Pen, as they do not support inking or writing.
Check the battery level of your pen
You can quickly find your pen’s battery level in the Surface app.
Open the Surface app
-
At the bottom of the app, you will see your connected Surface accessories.
-
Find your pen to view its battery level.
Note: If you don’t have the Surface app installed, you can download the Surface app from the Microsoft Store. When it has downloaded, select Start, search for Surface, then select the app from the list of results.
Make sure the pen is paired with your device to view its battery level. For more help, please view Use Surface Slim Pen 2.
Alternatively, you can check the general battery level by pressing the top button on the Pen. If the LED light color is amber or red, it indicates that the battery is low and needs to be charged or replaced depending on the type of pen used.
For more help charging your Surface Slim Pen, please view Fix problems with charging Surface Slim Pen or for help changing the batteries in Surface Pen, please view Change Surface Pen batteries.
My pen won’t pair with my Surface
-
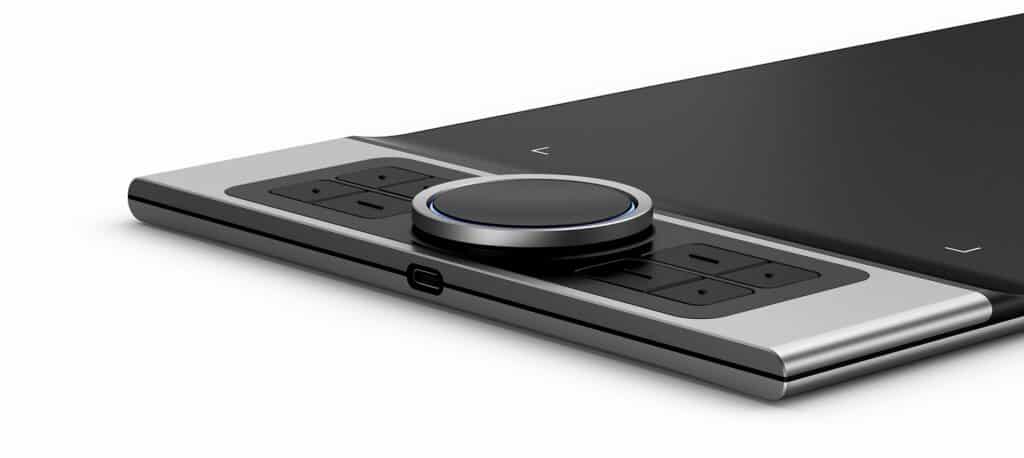
To enable Bluetooth pairing mode on your Surface Pen, press and hold the top button for about 5-7 seconds. The LED light will begin to flash continuously, indicating that the pen is ready to pair.
-
Next, Open Bluetooth settings on your PC and make sure Bluetooth is turned on. Then, select the option Add device.
-
Choose Surface Pen in the list of devices. Follow any other instructions if they appear, then select Done.
If your pen isn’t appearing in the list of devices, you can use the LED to help identify the issue. Press and hold the top button of your pen for 5-7 seconds and observe the LED light. Then, compare your observation to the table below.
|
When you press and hold the top button |
What does it mean? |
|
The LED light blinks continuously. |
Your pen is receiving power and trying to pair with a device. Restart your Surface and try pairing it again. |
|
The LED light blinks for 2-3 seconds. |
Your pen is currently paired with another nearby Surface device. To resolve this, find the other Surface and remove the pen from its Bluetooth devices list. Go to the Bluetooth devices list, select the pen and remove it.
Once removed, try pairing the pen with the device you want to use. |
|
Red or Amber LED light |
This indicates low power. Depending on your pen model, you may need to charge the Slim Pen battery or replace the batteries for other Pens. |
|
There is no LED light (does not turn on). |
If the light on your pen isn’t turning on even after changing the batteries or charging, it may be time to replace your pen. To learn how to request a replacement, please refer to the Request a replacement pen section. |
Note: Microsoft Classroom Pen 1 and Microsoft Classroom Pen 2 don’t support Bluetooth or pen cap functionality.
Other issues
Here are some other issues you may be having with your Surface Pen. Select any header, and it’ll open to display more information:
If your pen still doesn’t ink after trying the steps in the previous section, there are some things you can try. For more info, see What to try if your Surface Pen doesn’t ink.
Note: Our premium Surface Slim Pen 2 is equipped with an easily removable pen tip. Removal is intended only for pen tip replacement. Excessive (500 or more) removal+ reinsertion cycles of the pen tip can damage the internal parts of the pen and lead to inking failures. Pen failure due to excessive removal and reinsertion cycles isn’t covered under the product warranty.
Make sure that Bluetooth is turned on and your pen is connected to your Surface. For more information, refer to My pen won’t pair with my Surface
You can customize your pen shortcuts to assign specific functions to the buttons.
Open pen settings
-
Go to Pen & Windows Ink in your settings.
-
Under Choose what your shortcut button does, you can assign an action to happen for Single-click, Double-click or Press and hold (where available), including opening the program or app of your choice.
-
Try writing in another app to see if the issue persists or not. If the problem does not persist, then the issue may be with the app.
-
Try removing and re-inserting the pen tip or replacing the pen tip. For more information, please see Replace Surface Pen tips.
Request a replacement pen
If these steps didn’t resolve the problem, you can request a replacement Surface Pen. Go to Device service and repair, sign in with your Microsoft account, and select a Surface or register a new device.
After you select a registered device, you’ll see replacement offers based on your warranty status and eligibility for exchange. To learn more about the Surface Warranty, you can visit Surface warranty: FAQ.
Related topics
Surface Pen help
How to use your Surface Pen
Replace Surface Pen tips
Change the batteries in Surface Pen
Need more help?
Want more options?
Explore subscription benefits, browse training courses, learn how to secure your device, and more.
Once upon a time, Wacom ruled the land of graphics tablets, but that was before young start-ups like XP Pen and Huion started causing problems to its legacy. And if you’re a proud owner of an XP Pen device, you’ll be happy to hear that the company can easily be considered on par with Wacom when it comes to device quality and customer service.
But you’re probably here because you found your XP Pen not working and want to figure out how to fix it. We’re here for you! We will walk you through the various reasons that can cause your XP Pen to stop working (and you should know these if you wish to use your tablet for many happy years), and we will also help you address these issues.
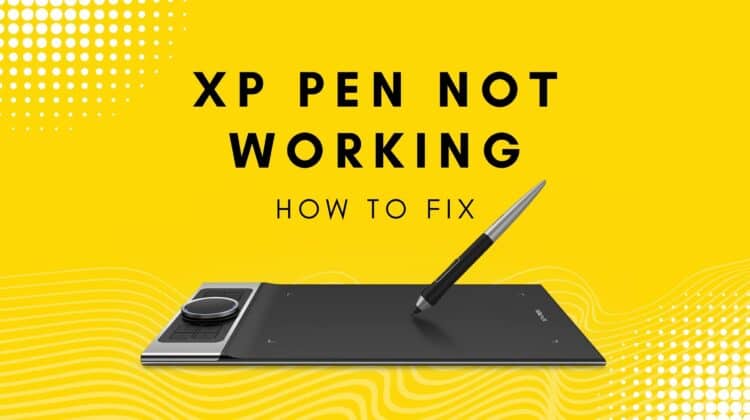
XP Pen Not Working: Quick Fixes
If your XP Pen stops working, first ensure that the pen/tablet is fully charged. Also, make sure your cables are secure and put in correctly; tablets can stop working due to an improper connection. Another hack for Windows users is to turn off sleep mode and disable Windows Ink Workspace.
For more details, keep reading.
Why is my XP Pen Not Working?

So XP Pen has a variety of models in its catalog, and we’ve tried to cover as many of these models as possible in this guide. So regardless of which graphic tablet you have, be it the Artist, Artist Pro, Star, Innovator, Deco, or Deco Pro series, you should be able to find solutions in this article.
Let’s start by looking at the top reasons why you can’t get your XP Pen to work correctly.
Check the charge on your stylus
This issue, of course, does not affect the majority of XP Pen styluses (like the XP-Pen PA2) that do not need charging. However, if you own a chargeable stylus that works with a tablet like the Artist 22 or Artist Pro 16, you should check if it is sufficiently charged. Chances are this is the most likely reason why the XP Pen has stopped working!
Driver issues
Ah, another notoriously common reason your XP Pen is not working. It’s not just the state of New York; graphics tablets have a reputation for bad drivers causing trouble, too. This is why you must be extra careful when configuring your tablet to work with your computer. Ensure that you install the latest drivers at the time of installation.
It’s also possible that the driver is clashing with another software, app, or service running on your computer. We will look into figuring out the offending app further down in our article.
Issues in your app or OS
While initially setting up your tablet with your computer can be a bit tricky; it should run fine once complete. Configuration issues rarely pop up between your XP Pen software after setup, but it’s something you should not dismiss.
Apps like Adobe Photoshop, Illustrator, and Clip Studio EX save user-preference files that are customized to your usage. If these files are corrupted, or you accidentally deleted them on your app, it can cause your XP Pen to stop working completely.
While we’re on the subject, check out our guide on the best drawing apps for your tablet!
Additionally, if the settings on the XP Pen app on your computer have been tampered with, it can cause the graphics tablet to stop functioning. There are also system settings that can clash with the normal functioning of the XP Pen software. For example, did you recently add a new hardware device to your PC, like a printer or a tablet from a different manufacturer?
Also, is your computer’s operating system up to date?
Sleep Mode
This one applies especially to users with computers using the Windows operating system. Multiple users have experienced this issue, so there are plenty of documented cases online. Whenever a Windows machine wakes up from Sleep Mode, the connected XP Pen tablet becomes unresponsive or turns sluggish.
Windows Ink Workspace
Here’s another possible cause for an XP Pen not working correctly, exclusively for Windows users. Windows Ink Workspace is Microsoft’s attempt at making the operating system more stylus-friendly and includes features like Sketchpad, Sticky Notes, and Screen Sketch. It’s helpful as it puts all your commonly used tools in a box.
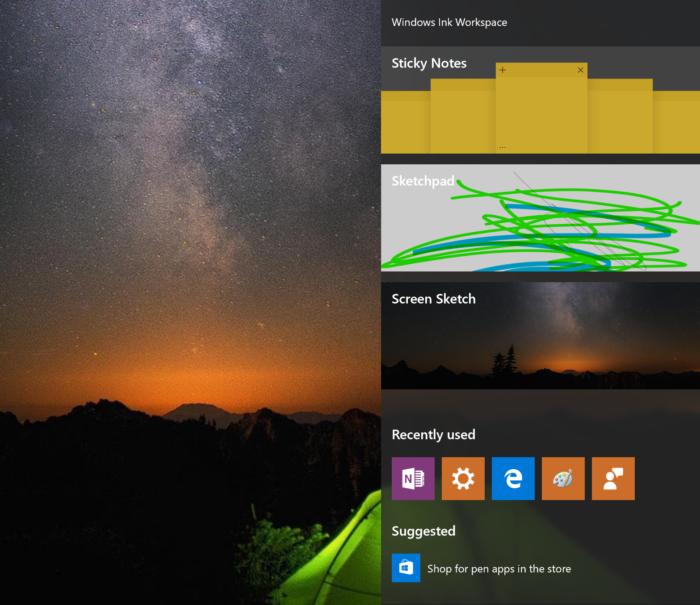
While it’s useful in its own way, it seems to cause writing and drawing issues for the XP Pen, and sometimes it makes the tablet completely unresponsive. Unfortunately, you can’t just turn off the Windows Ink Workspace — but we’ve explained how to disable it in the troubleshooting section below, so be patient!
Damaged cables
This one’s fairly obvious. A damaged cable will cause communication issues between your tablet and your computer. And it’s very common for tablet cables to become damaged because of how often artists and users move them around — wear and tear happens. Another point of failure is the connector, as the frequent movements make them loose.
Hardware troubles
A faulty stylus could also be the reason that your XP Pen tablet is not responding to input. People often underestimate how delicate these styluses are, so if you have a habit of tossing them on your desk when you’re done, that’s a good way to damage the stylus.
If you have a model with Express Keys, test a couple of them out. It will help you figure out whether the stylus is unresponsive or the tablet itself.
Been thinking about switching to Huion? Read our XP Pen vs Huion comparison to help you decide.
Finally, the section you’ve been waiting for! Take a deep breath, and let’s dive into this and get your XP Pen working again.
Check for driver updates
As we mentioned above, corrupted or low-quality drivers can be a real headache. There’s a reason companies release new drivers for their products periodically. So step 1 would be to search for new driver rollouts for your XP Pen tablet. You can do that by visiting this link: XP Pen Drivers download page.
Install the driver (it’s pretty simple, just follow the steps on the installation wizard), disconnect your tablet, and reboot your computer. Once it powers back on, connect your tablet and test to see if it’s working properly.
Driver installations have a magical way of fixing these issues, so let’s hope for the best!
Reboot your computer
Sometimes, all it takes is a restart to fix issues with your computer, especially if it’s a Windows computer. If you’ve already rebooted your machine in the previous step, you can skip this, but if not, we recommend you power cycle your computer. Be sure to disconnect your tablet before you do so, and wait until the computer is on the desktop before attempting to reconnect it.
Fix software configurations
And now, things begin to get complicated, but not too complicated, so don’t worry!
Typically, software code clashing is what causes devices to act up or simply die. Thankfully, once you reconfigure a few things and make changes to your system, these problems should go away.
There are a few different steps that you need to try, so we’ve broken them up into subsections below.
Turn off Sleep Mode on Windows
So Sleep Mode can cause issues for your XP Pen tablet — but what’s the solution? We recommend putting your computer on ‘Hibernate’ instead of Sleep Mode.
Or you can turn it off altogether; here are the steps to do that.
- On your Windows computer, look for the Power & Sleep settings. If you have an older version of Windows, this might be named Power Options. It can be found in your Control Panel, or you can use the search bar on your desktop to look for it.
- Now go to Additional power settings under Related settings in the right pane.
- You should now see the current configuration for power management on your computer.
- Click on Change plan settings.
- You will now see drop-down boxes next to ‘Put the computer to sleep.’ Set them both to Never.
- Click Save Changes at the bottom, and you’re all done! Good job!
Disable Windows Ink Workspace
With one pesky cause out of the way, let’s look at the next one. Remember when we said there was no straightforward way to disable Windows Ink Workspace? We weren’t kidding — you’re gonna have to go into the registry for this one.
If you feel like John McClane going into the vent shaft right now, relax. We’ve got your back!
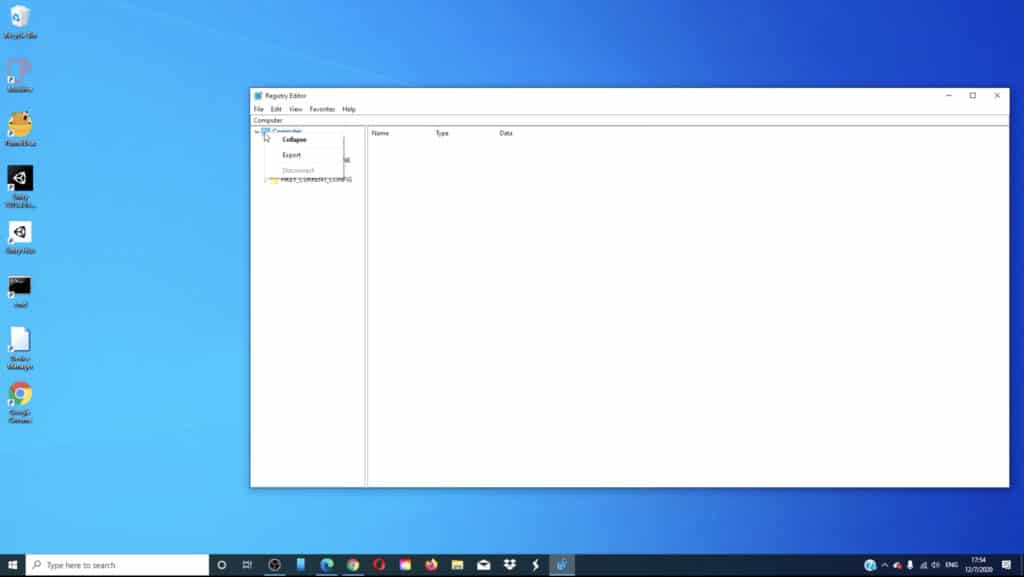
- First, back up your registry. Just in case you mess up (you won’t, we trust you), you can use the backup to quickly reset your registry to its original form.
- To do this, you have to first open the registry — to do that, press Windows + R simultaneously to open the Run box, and in that, type in ‘Regedit.’ Or you can type it in your desktop search box.
- When the Registry Editor pops up, click on ‘Computer.’ Then click on File > Export.
- Save it somewhere convenient, like your desktop.
- Next, navigate to HKEY_LOCAL_MACHINE\SOFTWARE\Policies\Microsoft.
- Here, right-click on the Microsoft icon and then choose New > Key.
- Name this new key WindowsInkWorkspace.
- Right-click it.
- Then click New > DWORD (32-bit) Value. Name this as AllowWindowsInkWorkspace.
- Double-click this, and change the value to ‘0’ (zero).
Configure your drawing app
Software issues with your app of choice (MediBang Paint, Clip Studio) may be the reason your XP Pen is not working. Here are some steps to try.
- Review the preferences and settings for your tablet on the software. Has anything changed? If possible, reset the app to default settings and test your tablet again. Different apps have different methods to reset preferences/customize settings, so use Google to find the correct method for your app.
- Did you recently install any new plugins? Poorly coded plugins can cause hardware issues for your tablet; uninstall any recent add-ons to your drawing app.
- Test your tablet with different software. If it works fine everywhere else, you may need to uninstall and reinstall your drawing software.
Check XP Pen software
XP Pen offers software for both Mac and PC that help you configure and fine-tune how your tablet functions. To find the app, search for ‘XP Pen’ or ‘PenTabletSetting’ on your Mac/PC.
We recommend you reset your settings on this app to see if it makes your tablet work again. You can export your saved settings first by clicking ‘Export configuration file‘ at the bottom. To reset the defaults, simply click on the Default button.

Update your computer
In an ever-changing world with software conflicts and security threats, you can no longer afford to ignore OS updates. It’s critical that you keep your computer up to date so that both the system and various software run correctly.
On a Mac, update your computer by clicking the Apple logo in the top-left corner and then clicking About This Mac. You should see a ‘Software Update’ button on the window that pops up.
If you’re on a Windows computer, the process adds a couple more steps. Click Start and then navigate to Settings > Updates & Security > Windows Update. Here, select ‘Check for updates.‘
Change power settings on the USB port

So this is a strange one and is specifically for Windows users (what is it with Windows and XP Pen?). The system sometimes cuts power to the USB port after a period of time, effectively disabling your XP Pen tablet. And this might be the reason your tablet is dead when you resume work after a break.
It can be easily fixed by unplugging and replugging the USB cable into your computer, but there’s a permanent fix for this too.
To fix this, first, open up your Windows settings. Here, click on System and go to Power & sleep. Under Relating settings, click on Additional power settings. If this sounds familiar, it’s because you came here to disable Sleep Mode earlier!
Next, click Change plan settings, regardless of which power management plan is selected. Click on Change advanced power settings. This will open up the Power Options window.
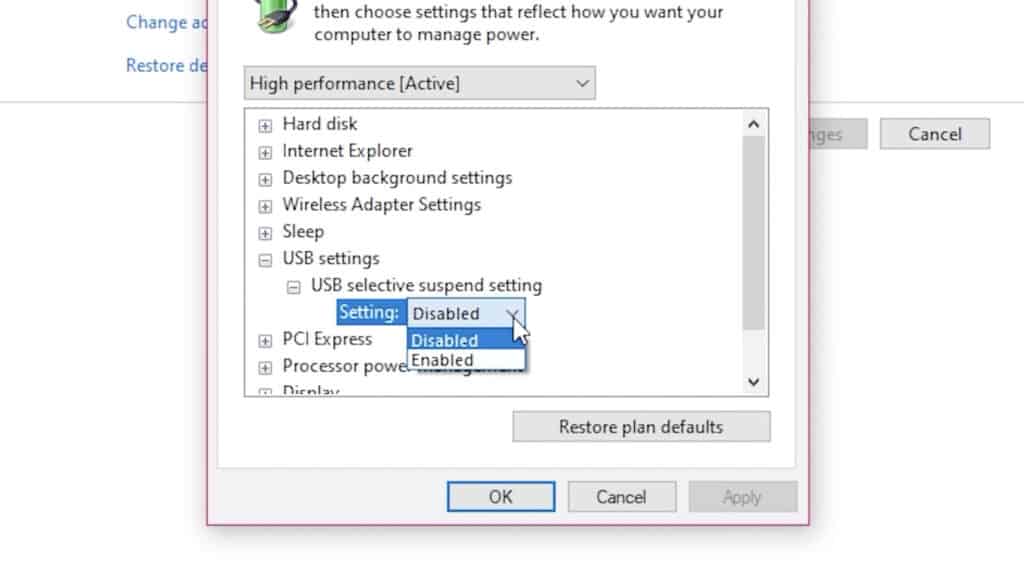
On this window, click on USB Settings > USB selective suspend setting. Change ‘Enabled’ to ‘Disabled’ by clicking it.
Here’s a video guide that walks you through the entire process:
Test your stylus and tablet
It may be your stylus that’s malfunctioning or your tablet, or in a worst-case scenario, both. We recommend you check your XP Pen stylus for signs of damage, change the nib, and if you have a chargeable stylus, charge it for a while and test it again.
As for the tablet, try connecting it to a different computer with a new connector cable. These steps will help isolate the issue and help you reach a conclusion faster about what’s wrong with your setup.
At this point, if you’re annoyed enough with your tablet and wish to replace it, don’t do so before reading our list of the best drawing tablets!
And if you find your XP Pen stylus is at fault, we found a YouTube video that addresses the glitching issues. It’s a bit technical and involves some soldering, but if you feel up for it, check it out:
Contact Customer Care
The last step in our guide is to reach out to XP Pen’s customer care department. The good news is that these guys are very responsive, and the community, in general, thinks pretty highly of the company’s after-sales service. We recommend you connect with them, and hopefully, you’ll be working on your tablet pretty soon!
Frequently Asked Questions
How do I charge my XP stylus pen?
Most XP Pen styluses do not need charging, but if you have one that has a battery, an indicator on the pen will light up when the pen is low on juice. To charge it, plug the bundled USB cable into the stylus and the other end into a charging brick or your computer’s USB port.
Do I need to charge my XP-Pen pen?
That depends on the model of the XP Pen stylus you own. If you see an LED indicator on your stylus, it will need charging. Most XP Pen styluses work on the principle of electromagnetic resonance, with a tiny coil inside the stylus causing the tablet to pick up electrical signals nearby.
Conclusion
If you came here wondering why is my XP Pen not working, we hope that our guide helped you get it functioning properly again. As you can see, there are numerous reasons why your tablet can act up, but luckily, the fixes are pretty simple! And if one of our fixes worked for you, we’d love to hear some feedback in the comments!
Is your XP-PEN tablet malfunctioning on your Windows 11 device? No need to lose sleep over it as you are not alone in having faced this vexing Windows issue. Irrespective of whether the XP-PEN is frozen, lagging, or failing to get detected, these 16 reliable solutions have got you fully covered. Read on…
So, what makes the XP-PEN ill-function on your Windows device? There are a number of roadblocks that you need to take care of when faced with a frustrating problem:
- Driver issues
- Outdated firmware
- USB connection
- Windows update
- Tablet settings
- Pen calibration
- Software conflict
- Power settings
- Permissions error
- Hardware fault
In this exhaustive guide, we are going to spot each one of these bad actors and attempt to flush them out to bring the XP-PEN back on track. For those unfamiliar, XP-PEN is a noted brand of graphic tablets and pen displays that excel in providing top-notch digital drawing, designing, and handwriting on Windows. Features like the fully customizable buttons, pressure sensitivity, and gesture controls make them popular among professionals, designers, and artists.
1. Restart Your PC
For a handful of users, a simple restart has brought the XP-PEN alive. So, we should go for the soft reset before moving any further. If the XP-PEN is malfunctioning due to a temporary glitch, a quick reboot will let you resolve the issue – in a jiffy!

2. XP-PEN Tablet Not Detected by Windows 11
Bear in mind that your tablet might not have been detected due to USB issues. Therefore, make sure to fix this culprit.
- Disconnect your tablet from the USB port and plug it into a different USB port.
- If you are using a USB hub, make sure to connect the tablet directly to the PC.
- Then, press Win + X, select Device Manager, and click Scan for hardware changes.
- Up next, follow the instructions and fix the issues.

3. USB Power Management Disabling XP-PEN
Windows tends to disable USB devices to save power. Be sure that the USB devices are active.
- To do so, press Win + X and select Device Manager.
- Up next, expand Universal Serial Bus Controllers and double-click each USB Root Hub.
- Now, head over to the Power Management tab and uncheck Allow the computer to turn off this device to save power.
4. Update XP-PEN Driver
Is the XP-PEN driver outdated, or corrupted on your PC? If you are not sure, try updating the XP-PEN driver.
- To do so, press Win + X and select Device Manager.
- After that, you need to expand Human Interface Devices and Universal Serial Bus Controllers.
- Then, right-click on any XP-PEN-related entry and select Update driver.
- Now, head over to the XP-PEN official website and download the latest driver.
- Next up, install the driver and restart your computer.
5. Reinstall the XP-PEN Driver
Even after updating the XP-PEN driver, if the problem continues to haunt your PC, reinstall the driver.
- Head over to Device Manager > Expand the Human Interface Devices and Universal Serial Bus Controllers > Right-click and choose Reinstall device.
- After that, restart your Windows 11 device.
6. Restart Your XP-PEN Service
It’s worth pointing out that the XP-PEN requires a background service to work smoothly. Hence, ensure that the XP-PEN service is live and kicking.
- To get it done, press Win + R, type
services.msc, and press Enter. - After that, scroll down and find PenTabletService or TabletService.
- Up next, right-click it and select Restart.
- Now, set the Startup type to Automatic if it is not already.
7. Check the Windows Ink Interference
Do you know that Windows Ink can also be in direct conflict with XP-PEN? Be sure to get rid of this roadblock.
- Simply, open the XP-PEN settings panel > Find Windows Ink under the Mapping or General settings.
- Then, toggle Windows Ink off > restart your PC and test the tablet.
8. Reconfigure the Pen Pressure Settings
Double-check if the pen pressure settings are correct.
- On your PC, dive into the XP-PEN settings and go to Pen Pressure.
- After that, test the pen pressure by drawing in the settings panel.
- If you are using Photoshop, open Edit > Preferences > Tablets and switch between WinTab and Windows Ink.
9. Fine-tune the Misconfigured Screen Mapping
Find out if the misconfigured screen mapping is causing this issue.
- To get going, launch the XP-PEN settings and go to Monitor Mapping.
- Select the correct display if using multiple monitors.
- Use the Calibration Tool in XP-PEN settings to adjust alignment.
10. Reconfigure Tablet Buttons
Are the buttons disabled in settings? Take a detailed look at the settings and fine-tune them.
- To fix this issue, open XP-PEN settings and navigate to Shortcut Keys.
- Now, check if button functions are assigned.
- Then, click Reset to Default if they still don’t work.
11. Remove the XP-PEN Software Confliction
Be warned that the tablet drivers could be interfering with XP-PEN.
- To take on the XP-PEN software conflict, press Win + X and select Apps & Features.
- Now, you have to uninstall any other tablet software (e.g., Wacom, Huion).
- Once the uninstallation is done, restart your PC and reinstall only the XP-PEN driver.
12. XP-PEN Firmware Outdated
No luck as yet? It would be the right time to go for the firmware updates as they will likely resolve the compatibility issues.
- So, visit the XP-PEN support website.
- After that, enter your tablet model and check for firmware updates.
- Next up, go through the provided instructions to update the firmware.
13. Update Your PC
Should the issue still persist, now is the right time to go for the Windows updates.
- Press Win + I to launch Settings > Windows Update > Check for updates and install any available updates > Restart your PC after updating.
14. Fix XP-PEN Tablet Not Working in Certain Apps
Is the tablet wrongly configured in specific software? Take a close look at this loophole and fix it.
- Launch the app’s Preferences or Input Settings.
- Now, find the Tablet Input Method and switch between Windows Ink and WinTab.
- Next, be sure to restart the application after making changes.
15. Is the XP-PEN Tablet Lagging or Freezing?
It’s also important to pinpoint the background apps or outdated graphics drivers as they could be causing the issue.
- To begin with, press Ctrl + Shift + Esc to open Task Manager.
- Then, make sure to end all unnecessary processes that are using too much CPU or RAM.
- After that, press Win + X > select Device Manager.
- Expand Display adapters > Right-click your GPU and select Update driver.

16. XP-PEN Pen Not Responding (Battery Issues)
Is the stylus battery dead or altogether worn out? Fix the battery issues sooner rather than later.
- If your stylus has a removable battery, replace it.
- If rechargeable, charge it fully before use.
- Additionally, try using another XP-PEN stylus if available.
17. Windows Defender Blocking XP-PEN Software
Keep a close eye on Windows Security as it might be flagging XP-PEN as a false positive.
- To get rid of this culprit, launch the Settings app on your Windows device > Privacy & Security > Windows Security.
- Now, click Virus & threat protection.
- Choose “Manage settings.”
- Under the Exclusions section, you need to add the XP-PEN installation folder and then restart your PC.

Wrapping up…
That’s pretty much it! That wraps up this guide about fixing the XP-PEN on PC. Now, be sure to shoot your feedback and the tips that have restored its full functionality.
Why Is XP-Pen Not Working?
Several XP-Pen users have reported issues related to their tablets that have stopped working as soon as they’re connected to the PC. For some users, the stylus pen has stopped responding and started behaving sluggishly. Some of the most common reasons why this happens are listed below:
- Running outdated, corrupted, or damaged tablet driver.
- Interferences from third-party PC software.
- Hardware issues (for instance, you might be using a damaged pen).
- Improper configuration.
Whatever the reason, if you want to troubleshoot the problem of XP-Pen not responding when connected to a PC, try the workarounds shared below.
How To Fix XP Pen Not Working In Windows 10?
Steps To Fix XP Pen Stylus Not Working in Windows 10/11 PC
Follow these workarounds to immediately resolve the XP Pen not recognized/working’ issue.
FIX 1: Check the Connection
Oftentimes, the X-Pen device may stop responding due to improper connection. Hence, check your USB connector cable and ensure it’s working properly. You can try another USB port as well to witness any difference. Make sure that both the inputs (USB Cable and the HDMI cable) are properly connected, so that the X-Pen device works without any hiccups.
A damaged cable can also cause communication issues between your tablet and your computer. If that’s the case, make sure you replace it!
Fix 2: Update Drivers
The final option to resolve the XP Pen driver not working is to update the Pen/Tablet drivers on your PC. Updating drivers is an important and mandatory task as it helps to maintain the communication between the hardware and the software of your PC. This can be done in two ways: Manual & Automatic.
Manual Method: Use The XP Official Website
The manual method involves navigating to the official website and downloading the latest drivers from the website. The next step would be to install the drivers which are again a time and effort consuming task. It is important to know the model and make of your device and search for the most appropriate drivers on the website.
Automatic Method: Use Advanced Driver Updater
The automatic method of updating drivers to resolve XP Pen Drivers not working in Windows 10 is by using a third-party tool known as Advanced Driver Updater. This is called automatic because the user has nothing much to do here except launching the software, scanning the driver issues, and then clicking the Update Driver button to fix them. Advanced Driver Updater scans your computer and searches for the most updated drivers available on the internet. It replaces the missing, corrupt, and outdated drivers on your PC with the newer ones. Here are the steps to use Advanced Driver Updater:
Step 1: Download and Install Advanced Driver Updater from the link below:
Step 2: Open the application and click on the Start Scan Now button.

Step 3: Once the results are displayed, click on the Update Driver button next to the driver issue listed related to your XP Pen/Tablet.

Step 4: Wait for some time and Advanced Driver Updater will automatically take a backup of your previous driver, and download and install the newer and most compatible one on your system.

Once the process completes, restart your computer and check if the XP Pen driver not working issue has been resolved. Another advantage of using Advanced Driver Updater is that it helps to update all the drivers of your system and this means your computer will deliver a smooth and flawless performance resulting in an enhanced experience.
Fix 3: Disable Sleep Mode In Windows 10
Sleep Mode is a great feature designed to minimize your electricity consumption when the computer is not in use for a long time without having to turn it off. But many external devices do not reconnect or wake when the computer is used again after entering the Sleep Mode. Thus, this implies that you must not put your PC into safe mode on purpose and if this is an automatic setting enabled, then here are the steps to turn Sleep Mode Off:
Step 1: Press the Windows + R on your keyboard to launch the RUN box and then type Control in the text box followed by a click on the OK button.

Step 2: A new window will appear on the screen labelled as Control Panel. Click on the dropdown menu on the top right corner next to View By option and choose Small Icons.

Step 3: Next, click on Power Options, and in the new window, click on Change Plan Settings under the Preferred Plan.

Step 4: Now, locate the option labelled as Put the Computer to Sleep and choose Never from the option next to it.

Step 5: Click on the Save Changes button at the bottom and restart your computer.
Try and use your XP Pen for some time and check if the XP Pen Stylus not working issue has been resolved.
FIX 4: Disable the “Windows Ink Workspace” Feature In Windows 10 PC
To those of you who don’t know, “Windows Ink Workspace” is a built-in functionality in Windows 10, that focuses on improving your experience with digital pens. It gives users the ability to handwrite or draw on their computers. But, sometimes, instead of enhancing your digital graphics experience, it can lead to some glitches and lags. Hence, disabling the feature can help you get rid of the potential issues.
Follow the instructions shared below to turn off Windows Ink Workspace on Windows 10:
STEP 1 = Open the Run dialog box, type gpedit.msc and hit the OK button. This will instantly open the Group Policy Editor on your Windows PC.
STEP 2 = Navigate to the following path:
Computer Configuration > Administrative Templates > Windows Components > Windows Ink Workspace
STEP 3 = Find and click on the “Allow Windows Ink Workspace” settings from the right pane.

STEP 4 = Choose the “Enabled” option and then select the “Disabled” option from the drop-down menu under Options. Click the Apply button, followed by the OK button!

Do not forget to restart your computer and you have successfully disabled the Windows Ink Workspace feature on Windows 10.
You can also deactivate the feature using Registry Editor as well. For this, all you have to do is:
STEP 1: Open the Windows Registry by pressing the Windows + R keys and typing regedit in the text field, followed by Enter.
STEP2: Once the Registry window opens, navigate to the below-mentioned path.
HKEY_LOCAL_MACHINE\SOFTWARE\Policies\Microsoft\WindowsInkWorkspace.
Note: If this folder is not available then navigate on the above path to the Microsoft folder and make right-click on it. Next, from the context menu, choose New>Key and name it as WindowsInkWorkspace.

STEP 3: Next, when you click on WindowsInkWorkspace, you would find certain items in the right panel where you have to locate AllowWindowsInkWorkspace. Double click on this key and set the value data to 0 followed by the Ok button.
Note: If you do not see this key, then you can create it by right-clicking on the space of the right pane and then selecting New> DWORD (32-bit) Value and set its Value Date to 0.

STEP 4: Exit the Windows Registry Editor and restart the PC for changes to take effect.
Now check if the XP Pen Stylus Not working issue has been resolved for good.
Fix 5: Configure The Drawing App
Well, if there’re some software conflicts with the drawing app you’re using, it may cause the XP-Pen to not respond at all. Here’re certain things to do to resolve these conflicts:
- Reset the application to default settings.
- Uninstall any recent add-ons that you have installed on your drawing app.
Re-install the drawing application and test your tablet with different software.
The Final Word on How To Fix XP Pen Not Working In Windows 10?
The XP Pen/Tablet is a must-have device for graphic designers and other drawing experts who can transfer their vivid imaginations on a digital platform. However, when the XP Pen is not working, it does not mean that you have to replace the device but rather check the hardware first followed by the software troubleshooting steps.
Follow us on social media – Facebook, Twitter, and YouTube. For any queries or suggestions, please let us know in the comments section below. We would love to get back to you with a solution. We regularly post tips and tricks, along with answers to common issues related to technology.
Table of contents
- How to Use an XP-Pen Device with a Windows 10 PC
- Why Is My XP-Pen Not Working?
- How to Solve XP-Pen Not Working
- Method 1: Restart your computer
- Method 2: Troubleshoot the Device
- Method 3: Check the connection
- Method 4: Disable sleep mode
- Method 5: Turn off the Windows ink workspace
- How to Fix XP-Pen Drivers Not Working
- Method 1. Update the tablet driver manually
- Method 2. Update the tablet driver automatically
- Conclusion
- FAQ
If you want to know how to fix your XP pen not working, you’ve come to the right place!
XP-Pen devices are regarded as niche gadgets, at least for now. Though the company is well established, its products aren’t that popular outside the graphics industry.
As XP-Pen gadgets slowly become more entrenched in modern life, they are expected to work right out of the box.
However, some users have been struggling with using their XP-Pen tablets and pens after connecting to a Windows 10 PC.
If you’re one of the affected users, we wrote this guide for you.
Read on to learn some effective techniques to get your XP-Pen device working normally again.
How to Use an XP-Pen Device with a Windows 10 PC
Before delving into the solutions for when your XP-Pen device isn’t functioning properly, it is beneficial to know how to correctly set up an XP-Pen tablet, for instance, the Artist series tablet. Knowing this will help you avoid some missteps that can cause the tablet to not work when connected to your PC.
- The first step is to connect the cables provided to your computer. You must plug both the USB and HDMI cables into your tablet and computer.
- Once you make the connection, the tablet driver will automatically start installing. If not, install it manually and reboot your computer.
- After the PC reboots, right-click anywhere on your desktop and select Display Settings. Scroll down the Display screen and click the drop-down box under Multiple Displays. Select Extend these displays and close the Settings window.
- Next, look for the icon on the taskbar that represents the connected tablet. Click it to open the tablet’s driver settings and switch to the Monitor Setting tab. Click the Monitor drop-down box, select Monitor 2, and click OK.
Why Is My XP-Pen Not Working?
Here are the possible reasons why your XP-Pen tablet or pen has stopped working:
- An outdated or corrupt tablet driver
- Interference from PC software
- Hardware issues (for example, a damaged pen)
- Improper configuration
How to Solve XP-Pen Not Working
Several XP-Pen customers reported that their tablets had stopped responding like before when connected to a PC.
For others, the stylus pen stopped functioning or became sluggish, not drawing properly. For all the scenarios of XP-Pen devices not working normally, the solutions given below should help.
Method 1: Restart your computer
In certain cases, the simplest solution to address computer problems, particularly on Windows systems, is a reboot. If you’ve already performed a restart during the previous step, you can skip this one. However, if not, we strongly recommend power cycling your computer. Before doing so, make sure to disconnect your tablet. Wait until your computer fully boots up to the desktop before attempting to reconnect the tablet.
Also Read: Laptop Lifespan: Why You Should Definitely Shut Down Your PC Every Night
Method 2: Troubleshoot the Device
Make sure that your XP-Pen device is properly configured. Reconfigure the device and follow the proper steps outlined by the manufacturer.
Also, check the device’s power status. A fully charged X-Pen is less likely to give glitches during use.
The X-Pen pen should be functional and not damaged. If it is damaged, you may need to order a new pen.
PRO TIP
Keeping your device drivers up-to-date is crucial for ensuring optimal performance and compatibility with your hardware. Auslogics Driver Updater can automatically detect and update outdated or missing drivers for your XP-Pen and other devices. This tool helps prevent potential issues and enhances the overall functionality of your system.
Method 3: Check the connection
Sometimes, your X-Pen device or pen may stop working because of an improper connection. Check the USB connector cable and make sure it is actually working.
You can try another USB port on your PC and see if it makes a difference. If you have another cable lying around, you can try that as well.
Remember that for most X-Pen devices, you need to connect both the USB cable and the HDMI cable for the device to work properly. According to the manufacturer, both inputs must be connected.
Method 4: Disable sleep mode
Many users encountered the issue when trying to use the device straight from Sleep Mode. When the PC wakes up, the XP-Pen pen either becomes sluggish or stops working.
This behavior seems to be prevalent with Sleep Mode on Windows 10 and doesn’t happen with the Hibernate mode.
So, instead of putting your PC to sleep, try hibernating it instead. Though it will take longer for the PC to wake up, at least you’ll be able to continue using the XP-Pen right away.
Alternatively, you can simply turn off Sleep Mode on your computer. You can do this from the Control Panel.
- Type cpl into the Start menu and press Enter to open the applet.
- To change the view mode in the Control Panel to Small Icons, use the drop-down menu at the top right corner of the window.
- Locate and click Power Options.
- On the Power Options screen, click the Change plan settings link for your current power plan.
- On the Edit Plan Settings screen, click the drop-down menu beside Put the computer to sleep and select Never.
- Click the Save Changes button and exit the Control Panel.
Restart the computer and try using your XP-Pen pen. You may try the next fix if the pen or device still has issues.
Method 5: Turn off the Windows ink workspace
As new technological innovations spring up, Windows 10 does a good job of evolving along.
With the rise of digital pens and graphics tablets, Microsoft introduced Windows Ink Workspace in Windows. This feature improves the user experience for those with digital drawing devices.
As with most recent innovations, Windows Ink Workspace has some way to go before it becomes fully optimized for all use cases.
Sometimes, instead of enhancing the digital graphics experience, it can cause lags and other glitches when drawing, writing, or painting with a graphics pen.
Disabling the feature removed the lag for some users. You can try it out and see if it works for you too.
An important caveat: You can’t remove or disable Windows Ink Workspace through conventional means. The workaround is to disable it from the registry by setting the main registry key for this feature to 0.
Note
Tread carefully in the registry. Doing or undoing the wrong thing here can cause serious problems for your computer.
Hence, we recommend that you take a registry backup before you edit it. If something goes amiss, you can restore this backup.
First, take a backup of your registry:
- Type
regeditinto the Start menu and press Enter. - In the Registry Editor, right-click Computer in the left pane and select Export.
- Give the file a name, choose a save location, and click Save to create your backup.
You can now go ahead and disable the Windows Ink Workspace feature.
- Navigate the path below or use the bar at the top to quickly jump to the location:
HKEY_LOCAL_MACHINE\SOFTWARE\Policies\Microsoft\WindowsInkWorkspace
If the policy WindowsInkWorkspace isn’t present, create it yourself. Right-click the Microsoft folder in the left pane and select New > Key. Name the new registry key WindowsInkWorkspace.
- Double-click the AllowWindowsInkWorkspace entry in the right pane and change the value in the Value Data field to 0.
Like before, if this entry doesn’t exist, create it by right-clicking WindowsInkWorkspace > New Key and assign 0 as the value data.
After this procedure, reboot the machine and connect your XP-Pen device. It should now work normally.
If this doesn’t solve the issue with your graphics device, the next solution should fix everything.
Also Read: Ultimate Guide: How to Fix Broken Registry Items in Windows 10/11
How to Fix XP-Pen Drivers Not Working
If your XP-Pen device keeps misbehaving, follow the steps below to update the tablet driver.
Method 1. Update the tablet driver manually
XP-Pen regularly releases updates for its stable of graphics tablets, pen display monitors, and stylus pens.
To manually update the driver for your specific device, visit the XP-Pen official download page and choose the driver that corresponds with your device.
Make sure to download the driver that fits your device architecture. You can also grab the latest firmware update for your graphics device and install it for a better experience.
When you’ve downloaded the driver, install it as you would a normal Windows application. Simply follow the instructions of the installation wizard.
After updating your driver this way, reboot the machine. The issue with the XP-Pen device or pen should be solved.
You can also update your device driver through Device Manager:
- Open Device Manager. Open the Power User menu with the
Win key + Xshortcut and selectDevice Manager. - Expand the option that houses your XP-Pen device.
- Right-click your XP-Pen device and select
Update Driver. - On the next screen, click Search automatically for drivers.
Windows will download and install the latest available driver for the device.
Method 2. Update the tablet driver automatically
If you prefer an easier, simpler, and more convenient method of updating the tablet driver – and any other device driver on your PC – you can opt for Microsoft-certified driver updating software like Auslogics Driver Updater.
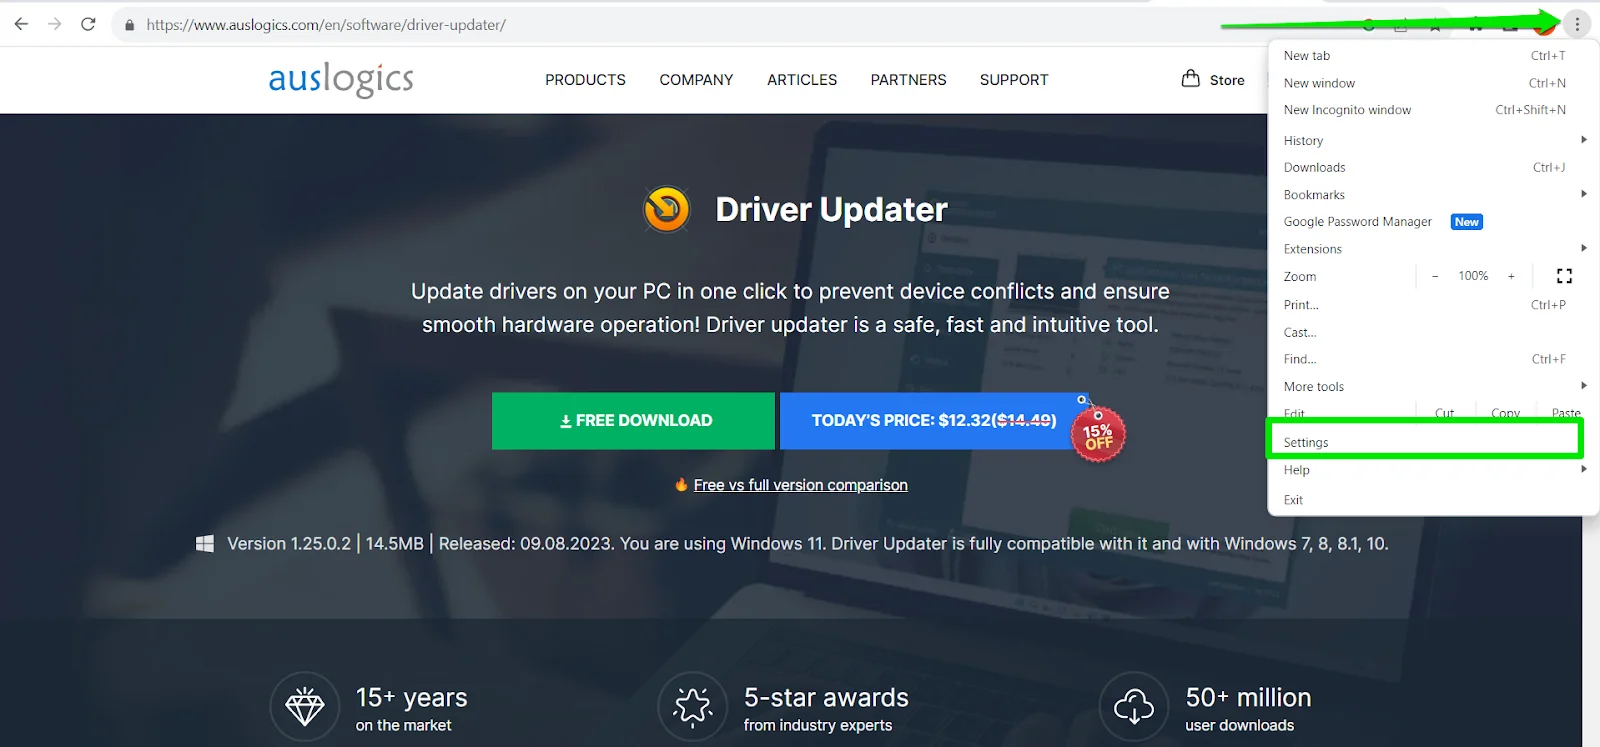
Driver Updater just needs to scan your PC once. After a few seconds, it will locate all the hardware drivers on your PC and identify those that need updating.
You don’t need to worry about finding the correct drivers or installing them yourself. Driver Updater does the search for you. All you have to do is click the Update button next to a driver and it will be updated automatically.

With a license, you can bring all your hardware drivers up to date with just two clicks — one to start the scan and one to update everything.
Driver Updater backs up your current drivers before installing new ones, so you won’t need to worry should something go wrong.
You can visit the Auslogics Driver Updater software page to learn more about what it can do and download it to your system.
Download Auslogics Driver Updater
Prevent hardware errors and ensure problem-free device operation with this advanced tool that detects outdated drivers and safely gets them updated.
Conclusion
XP-Pen devices are gaining importance in various fields, including virtual learning and digital art. However, it’s crucial to set up your XP-Pen device correctly – make sure to follow the instructions in the official manual carefully.
Your XP-Pen device might not work due to outdated drivers, software interference, hardware problems, or configuration errors.
To address these issues:
- Restart your computer
- Troubleshoot device configuration
- Disable Sleep Mode
- Disable the Windows Ink Workspace
- Update graphics drivers with Auslogics Driver Updater.
We hope one of the fixes above has helped you resolve the XP-Pen not working issue. XP-Pen devices are really nice gadgets for digital drawing, and it is very important for their owners to be able to solve bugs like this when they happen.
FAQ
How do I connect the XP pen to my PC?
To connect your XP Pen to your PC, plug in both the USB and HDMI cables provided with the device into your tablet and computer.
How do I charge my XP pen?
Most XP Pen devices do not require charging. They are powered through the USB or HDMI connection to your computer. If you have a specific XP Pen model that requires charging, refer to the manufacturer’s instructions.
How do I uninstall the XP pen driver?
To uninstall the XP Pen driver, go to the Control Panel on your computer, find the program related to XP Pen, and select “Uninstall” or “Remove.” Follow the on-screen prompts to complete the uninstallation process.
How do I unlock the cursor on my laptop
Unlocking a laptop’s cursor is the same as enabling a touchpad after it’s been disabled. You can use the key on the laptop’s keyboard that depicts the shortcut, the dedicated touchpad switch button, or your laptop’s specific keyboard shortcut.
How do I enable a touchpad on my Acer laptop without a mouse?
You can enable your touchpad by tapping the F7 key or Fn + F7. If that doesn’t work, try the F6 button, the Fn + F6 combo, the F2 button, or the Fn + F2 combo.