
A major downgrade to system performance, security, and usability on Windows comes from running out of storage. Manage and expand disk size without getting into low space errors, save the organization of data, and keep the system performance perfect. In this guide, I cover the various approaches you can use to increase disk space across various Windows tools, such as Disk Management, Command Prompt, and PowerShell. You will also find useful troubleshooting tips that will help you have a hassle-free experience.
1. Requirements and Precautions
Step by step disk size increase instructions to be followed before boosting Windows disk size. It can be very risky and turn into a real disaster of an unexpected loss of data if you do not complete these steps correctly, change disk partitions, and resize the volumes. Hence, realizing these milestones is important when making the process, while failure to do so can lead to problems.
1.1 Backup Important Data
Sometimes, changing the disk size and partitions causes data loss due to the process working in an inexact manner. Create a full backup for your important files to avoid any unwanted data loss. You should backup your files on a reliable backup tool on an external drive, or to cloud storage.
1.2 Checking for Enough Disk Space
To expand a volume, you must have unallocated space on your disk. Unallocated space is the portion of the disk that is not assigned to any volume. If unallocated space isn’t available, you may need to create it by shrinking another volume, deleting an unused partition, or moving data to an external drive.
1.3 Understand Disk File System Compatibility
Not all file systems allow certain modifications:
- NTFS (New Technology File System) is more flexible and supports larger disk sizes, as well as most resizing options.
- FAT32 (File Allocation Table 32) has limited support for large partitions. If your drive uses FAT32 and needs resizing, consider converting it to NTFS for greater compatibility.
1.4 Check Compatibility of Windows Versions
Some features and commands are only supported in certain versions of Windows (e.g., Windows 10, Windows 11, Windows Server). Check that your version supports the command or feature you’re planning to use.
2. Using Disk Management (Graphical Tool)
Disk Management is a user-friendly, built-in Windows tool for managing partitions and is available on most Windows editions.
2.1 Step-by-Step Guide: Extending a Volume in Disk Management
Windows offers the simple process of extending a volume using Disk Management. Integrated Disk Management is an amazing tool that allows you to manage disk partitions without any third-party tools.
- Access Disk Management:
- To open Disk Management, press Win + X and select Disk Management from the list.

Alternatively, you can open it by pressing Win, type diskmgmt.msc, and hit Enter. If you’ve installed a previous Windows OS onto your drive, then Disk Management will display all partitions along with the allocated and unallocated spaces on your drives.

- Locate the Disk and Partition:
- After accessing Disk Management, you’ll see a list of all available disks and their partitions. Each disk is represented visually with segments indicating the partitions, such as C for the main drive and other labels for additional partitions. Unallocated space, if present, will appear as a separate segment marked as “Unallocated.”

To extend a specific partition, identify the disk where it is located. Right-click on the partition you’d like to expand Volume and right-click (drive). Then, this will open the Extend Volume Wizard, which gives you the ability to use unallocated space on the selected disk for expansion. Continue through the wizard for the extension process.

- Using the Extend Volume Wizard:
After you right-click the desired partition and choose Extend Volume, the Extend Volume wizard will show up to help you expand the selected partition. We wanted to make a wizard and make the process simple and intuitive. It will ask and then prompt you to indicate how much free space you want to add to an existing partition. By default, the wizard will use all available unallocated space, but you can adjust this if needed.

Follow the prompts by clicking Next to continue, and finally, select Finish to complete the process. The partition will now reflect the new expanded size.
Disk Selection:
The next screen you encounter in the Extend Volume Wizard is the one that contains a slot in which you are supposed to choose your disk. This process is done to ensure that you are increasing the correct partition. When the wizard is run, it will then display the available disks, the extension then lists the disks with some unallocated space. Make sure that the disk that you want to extend is listed, and check that it has enough unallocated space.

After confirming the disk, pick it, adjust the size if needed, then click Next from the wizard, no changes will be made to any other disks or partitions by accident.
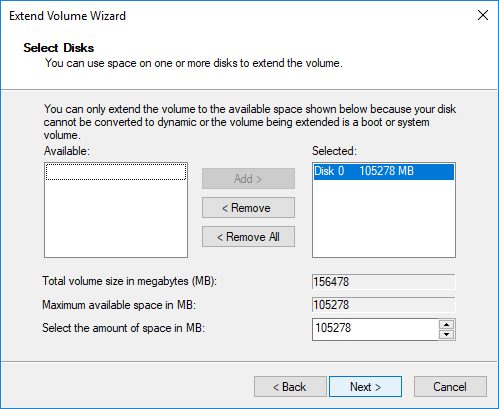
Size Selection:
In the Extend Volume Wizard, the Size Selection step allows you to specify the amount of unallocated space to add to your existing volume. The wizard displays the maximum available space that can be allocated, but you have the option to use all or only part of it. Please enter the desired amount in megabytes, ensuring it meets your storage needs without overcommitting resources.

This step gives you control over how much space you extend, which is useful if you plan to keep some unallocated space for other partitions or future needs. Once you’ve entered the amount, click Next to proceed.
Complete:
Once you have set up your settings in the Extend Volume Wizard, proceed to the last step by clicking on ‘Finish’. This final action writes changes made, joining the specified unallocated space with the selected partition and increasing its size. Once completed, you should see the extended volume reflected in Disk Management with the updated size.

This step finalizes the process, making the additional space available for use in your operating system. Always double-check the extended volume to make sure it meets your storage requirements before exiting Disk Management.
- Review Changes:
After completing the extension, it’s important to verify that the volume has expanded as expected. Open Disk Management to review the updated volume size and make sure the changes were applied correctly.

Make sure that the additional space has been added to the extended volume by looking at the partition details. It is critical to this step because if it goes right, it confirms that the fund worked and that the new space is ready to be used. If the expected size still has something to be updated, go back to the procedures or troubleshoot.
2.2 Troubleshooting Common Disk Management Issues
- “Extend Volume” is Greyed Out:
The problem is that the unallocated space isn’t contiguous with the partition, and it doesn’t have an option to extend the volume (although the drive may be defective if it can’t be detected). It may be resolved by reorganizing partitions with tools such as Command Prompt or with third-party software.

- Lack of Unallocated Space:
To create unallocated space, shrink an existing partition by right-clicking on it and selecting Shrink Volume. Enter the amount of space to free up, and it will appear as unallocated space next to the partition.

3. Using Command Prompt (CMD)
The Command Prompt provides a text-based approach for resizing disk volumes, which is helpful for those who like to do the work directly in command or in the case of a server for which a graphical interface is unavailable. A power command line utility for managing disks, partitions, and volumes in Windows, Diskpart is used by this method. With Diskpart, users can expand volumes. To get the required permissions, you have to run Command Prompt as an Administrator. The next steps, therefore, show how to expand the disk using Diskpart since the GUI-based disk management tools.
3.1 Diskpart Commands for Disk Expansion
- Open Command Prompt as Administrator:
- First, type “cmd” in the Windows search bar, right-click on Command Prompt, then click Run as Administrator. This grants elevated permissions necessary for managing system-level changes. Once open, you’ll use Diskpart to access and modify disk information directly.

- Launch Diskpart Utility:
- In the Command Prompt, type
diskpart Press Enter to open the Diskpart utility. Diskpart will prompt you with a new line to enter specific commands for disk management. This utility enables users to list, select, and extend volumes on their system.

- List Available Disks:
To view all available disks on the system, type
list disk In the Diskpart command line, press Enter. This command displays a list of disks with details such as size and free space. Each disk is assigned a number, which helps in identifying the target disk for expansion.

- Select the Disk:
After identifying the disk, select it by typing.
select disk X (replace “X” with the disk number). This command targets the disk you want to modify, allowing further commands to apply specifically to this disk. Diskpart will confirm the selection, indicating that the chosen disk is now active.

- Display Volumes on the Disk:
To locate the volume you want to extend, use the
list volume
This command lists all partitions (volumes) on the selected disk, showing each volume’s letter, label, and current size. By noting the volume number, you’ll be able to target it precisely for expansion.
- Select the Target Volume:
With the volume number noted, enter
select volume Y 
(replace “Y” with the volume number). This command enables you to execute expansion commands specifically on this volume. Once selected, Diskpart will confirm that the volume is active for any following operations.
- Extend the Volume:
Once the correct volume is selected, type
extendPress Enter to expand the volume using any available unallocated space on the disk. This command allows Diskpart to allocate the unassigned space to the selected volume, increasing its size without affecting the existing data. Diskpart will confirm the extension, showing the updated size of the volume. This process is quick and efficient, making it ideal for expanding storage on the fly. Always verify the changes in Disk Management to make sure that the extension was successful and that the volume now has the desired capacity.

3.2 Troubleshooting Diskpart Issues
- Error: “The volume cannot be extended because the volume was created with another tool.” Some partitions created with non-Windows tools may not extend in Diskpart. Use Disk Management or a third-party tool if this occurs.
- Volume In Use or Locked: If Diskpart cannot modify the system volume because it’s in use, consider Safe Mode or a third-party tool.
4. Using Third-Party Disk Management Tools
Suppose users are looking for a less user-friendly graphical interface. In that case, they have the option of downloading other disk management tools that offer features far beyond the capabilities of Windows’ built-in tools. Such tools possess a feature set including dynamic resizing, drag and drop, and partition merging — good for those who aren’t too comfortable with command line operations. Popular third-party tools include:
Popular Third-Party Tools for Disk Expansion
- EaseUS Partition Master: Known for its intuitive interface, this tool supports many operations like resizing, cloning, and merging partitions with ease. It’s popular due to its wide range of free features and options for more complex partition management.
Download from – (https://www.easeus.com/partition-manager) - MiniTool Partition Wizard: Offering a free version with important tools, MiniTool Partition Wizard allows resizing, merging, and other disk-related tasks. It’s a reliable option for beginners and professionals needing a simple solution for partition adjustments.
Download from (https://www.partitionwizard.com)
- AOMEI Partition Assistant: This tool provides drag-and-drop partitioning features, making tasks like resizing, splitting, and moving partitions simple. AOMEI also supports dynamic disk adjustments, helping users manage disk space effortlessly.
Download from (https://www.diskpart.com)
Pros and Cons of Third-Party Tools
- Pros: User-friendly, flexible, and allows resizing without adjacent unallocated space.
- Cons: To access some advanced features, you may have to use a paid version.
5. Troubleshooting Common Disk Extension Issues
5.1 No Unallocated Space Available
You need to create some unallocated space on the disk before extending a volume if there is no unallocated space on the disk. If you need unallocated space, you can shrink an already existing partition with unused space or delete partitions you don’t need anymore. Having done this, make sure that any data contained on the partitions being deleted is backed up; this data will be erased once and for all. Another option is to offload some files to an external drive, thus freeing up space to allow for partition adjustments. Once unallocated space is available, you can proceed with extending the volume in Disk Management or Command Prompt.
5.2 Unextendable System Partitions
The biggest reason is that system partitions (Containing, for example, the Windows OS or boot data) are often restricted from resizing. Errors can occur while attempting to extend these partitions. Third-party disk management tools provide advanced functionality that can be used to resize system volumes, which Disk Management fails to support. Temporarily moving system data around such that they can resize will help these tools, but do this with care and back up the data first. Moreover, make certain that the third-party software you plan to install is compatible with your Windows version, or your system may become unstable, or data could corrupt.
5.3 File System Limitations
Some of them, for example, FAT32, have limitations with maximum partition size and flexibility in resizing. For instance, FAT32 only supports partitions up to 32 GB in Windows, something that could be more practical in the current disk drives. Some of these limitations can be corrected by converting a FAT32 partition to NTFS for the following reasons: NTFS includes larger volumes and has greater flexibility regarding size adjustments. It can be accomplished with the help of the Convert command using Command Prompt, which will convert the disk with retention of data with different file system types. NTFS also has relatively improved security attributes, increased efficiency, and incremental file capacity, thus being more appropriate for major storage purposes.
Conclusion
Consequently, Assume that, like most computer users, you need tips on how to manage disk spaces effectively for the smooth running of your Windows system. As storage is used more, users may require partitioning to increase data storage by taking up the available space. Disk Management in the Control Panel area and Diskpart in Command can be very useful, but for some specific operations, special programs may have to be employed.
They help to avoid such problems as the system is slowing down due to insufficient disk space. Because changes in partitions may lead to loss of data, it is wise to back up data that is essential for tasks. Thus, by adhering to different guidelines, users would be assured their systems are equipped for raising storage needs, which, in effect, prolongs the efficiency of the system.
About the writer
Vinayak Baranwal wrote this article. Use the provided link to connect with Vinayak on LinkedIn for more insightful content or collaboration opportunities.
Table of Contents:
About increasing C drive space
How do I increase C drive space without losing data in Windows 11/10/8/7? This is one of the most frequently asked questions when you browse technical forums or communities. Computer will slow down and reduce performance if C drive where operating system is installed is running out of free space. Here is one of the posts found on related forums.
«Hello everyone, I would like to ask whether it is possible to increase space for C drive without formatting my laptop or losing any data. I bought this laptop with 4 partitions, system (C:), document (D:), photos (E) and local (F:) and they are built in volume by default. The C drive has 85GB space and there other with 200, 350 and 350 in order. The C drive is almost full of data and I cannot install any other applications. I’ve deleted everything that I can from C drive. It is way too complicate to reparation the disk and reinstall Windows. I want to resize Windows partition so as to increate system partition size without disturbing existing data. Thanks.»
Low disk space is one of the issues that many users may encounter. With the passage of time, Windows C drive is not large enough to install application and it is running out of space. You receive error message from system:
«Low disk space. You are running out of disk space on system (C:). To free space on this drive by deleting old or unnecessary file, click here…»
«Low Disk Space. You are running out of disk space on Local Disk (C:). Click here to see if you can free space on this drive.»
In many causes, the partition layout on hard drive seems reasonable when computer was originally set up. It is for sure that a majority of users allocates disk space based on specific requirement, and all of them have tried best to make sure system partition is well configured in order to achieve best performance. However, unfortunately, C drive still runs out of space much earlier than other volumes. You might have installed too many applications and stored large amount of data on C drive. Anyway, system partition does not have much free space now, and computer slows down a lot. It is difficult to for most users to reinstall Windows again, as the process is kind of complicated and time-consuming. Thus, the ideal solution is increasing C drive space without affecting existing data.
There are several ways you can try to increase free space in Windows 11/10/9/7, and you have a try.
- Free up disk space in C drive: You can delete unnecessary files from C drive and uninstall non-frequently used programs. Thus method cannot free up enough space, and you will face low disk space issue soon.
- Run the Disk Cleanup utility: Disk Cleanup removes temporary files, clears the cache, empties your Recycle Bin, and removes a variety of other files and items you no longer need.
- Extend C drive: You can increase C drive space by
extending C drive
: add free disk space to system partition or move free space of other partition to C drive.
Resizing partition
in Windows is common operation and it does not cause data loss. - Repartition hard drive: hard drive repartitioning can reallocate disk space, and you can arrange large space for system drive. However, the process removes all partitions on the disk, and you need to backup data in advance.
Method #1: Increase C drive space in Disk Management
Windows Disk Management provides extend volume feature which is able to increase partition size by adding unallocated disk space and the process does not cause data loss. But not all partition can be extended in Disk Management, for instance, unallocated space can only be added to adjacent partition.
Step 1. Right-click on Windows Start button and select Disk Management. This will launch Disk Management console.
Step 2. Right-click on C drive in Disk Management and choose Extend Volume option. Then the Extend Volume Wizard shows up.
Step 3. Click Next button on the Extend Volume Wizard welcome interface.

Step 4. Set disk space to be added to C drive and click Next button.
Note: the volume size you enter here is in megabytes (MB) and you can follow the default setting if you do not have other requirements.
Step 5. Click Finish button when the process completes and you’ll return to Disk Management and the C drive will be extended successfully.
Limitation on Disk Management to increase C drive space:
- Extend Volume option is available for NTFS partition, and FAT32 partition and exFAT partition are not supported.
- There should be unallocated disk space next to the partition you want to expand and the unallocated space is on the right side in order.
Thus, if there is not free disk space next to C drive (usually on the right-side), the Extend Volume option will be grayed out. In that case, you can delete the adjacent partition to get unallocated space and then add it to C drive, or you can move disk space from other partition to C drive using third-party software.
Method #2: Extend C drive with free disk partition software
If you find the Extend Volume option is grayed out in Windows Disk Management, you will need to delete D drive which is the partition on the right side of C drive, so that you can create unallocated space and add it to C drive. You need to transfer data of D drive to other partition or external hard drive before deleting it. However, there is an ideal alternative solution to increase C drive space without deleting any partition.
DiskGenius Free provides the function to extend partition and it is able to move free disk space from other partition to C drive directly. Apart from extending partition, it is able to resize volume, create partition, wipe partition, hide partition, clone & image partition, check bad sectors, recover lost data, etc. The follow steps shows how to extend C drive in Windows 10.
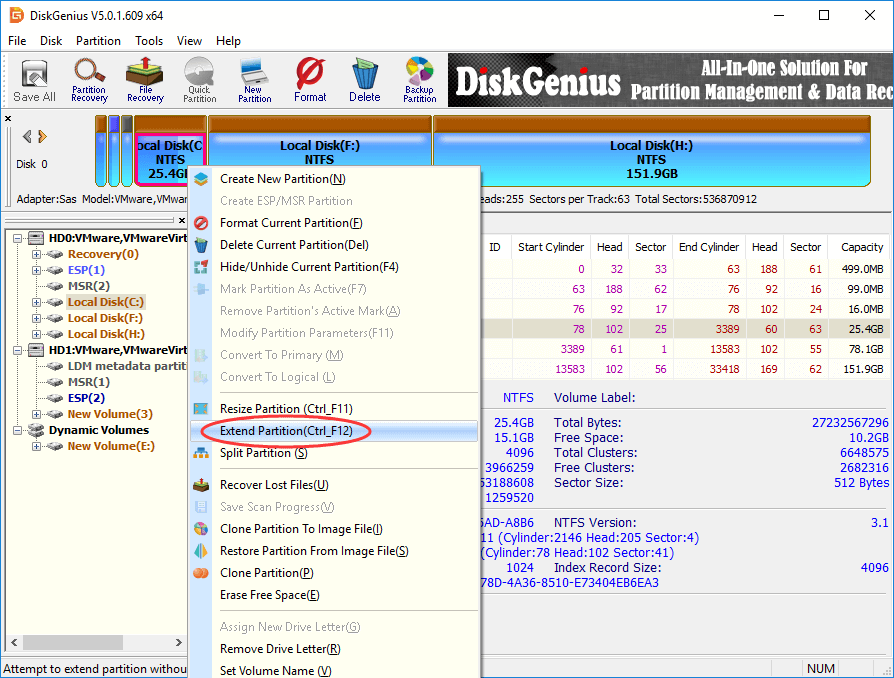
Step 1. Download and launch DiskGenius Free Edition after installing on your computer. Right-click on the C drive you want to increase space and choose Extend Partition.
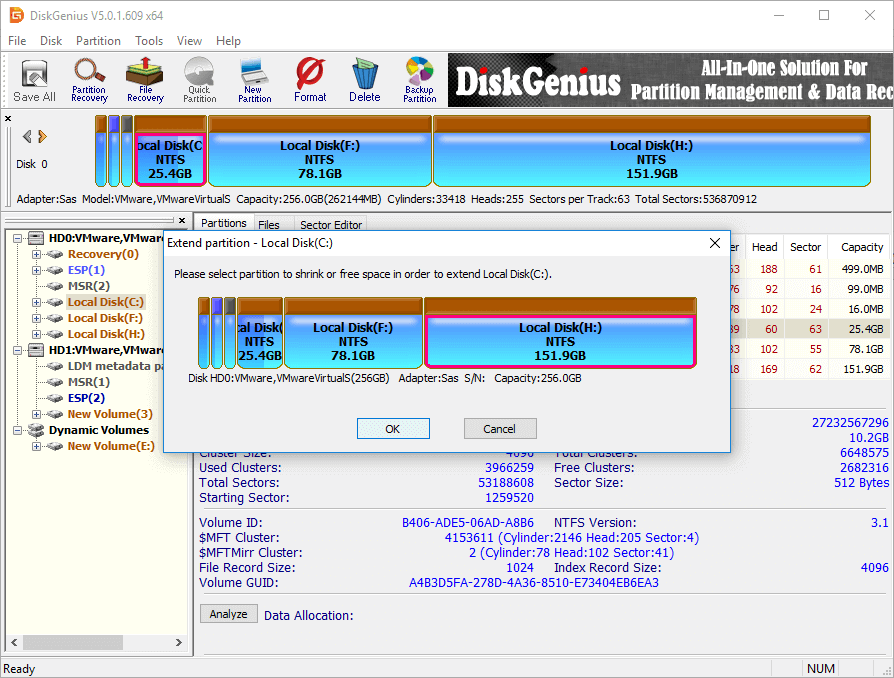
Step 2. The Extend Partition window shows up, and you need to choose a partition which contains large free space and click OK button.
Partition selected in this step should contain enough free space, as the software will move free space from this partition to C drive.
Step 3. Set the disk space to be moved to C drive and click Start button. You can drag the partition bar to set partition size or type in the exact size in the column.
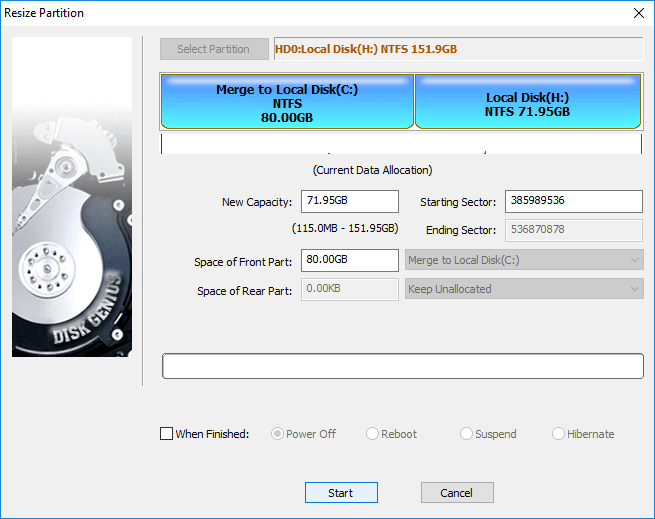
DiskGenius lists steps to be done during the resizing process and things you need to note. Click Yes button to continue.
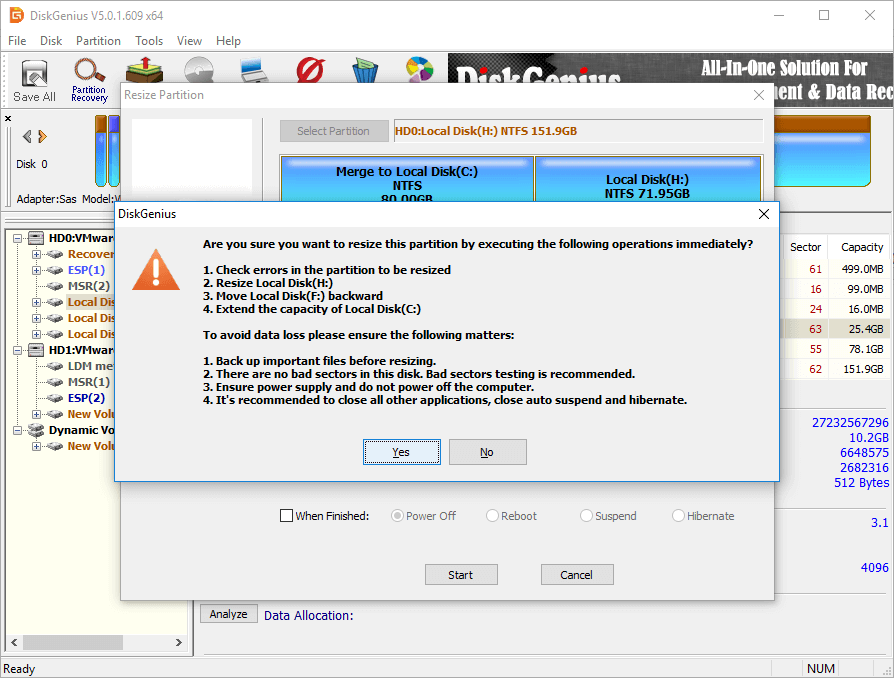
Note:
Changing partition size involves too many operations, such as modify partition start and end location, change parameters in MBR and DBR, move data, etc. therefore, the process is not risk free even if the partition manager software is stable. This it is advised to ensure follow matters to guarantee the process completes successfully:
- There are not bad sectors on the disk, especially related partitions.
- Make sure power supply works well and do not shut down computer before the partition resizing finishes.
- Close all other programs that accessing the partitions to be moved space.
- Disable system hibernate so that computer won’t go hibernate during extending C drive.
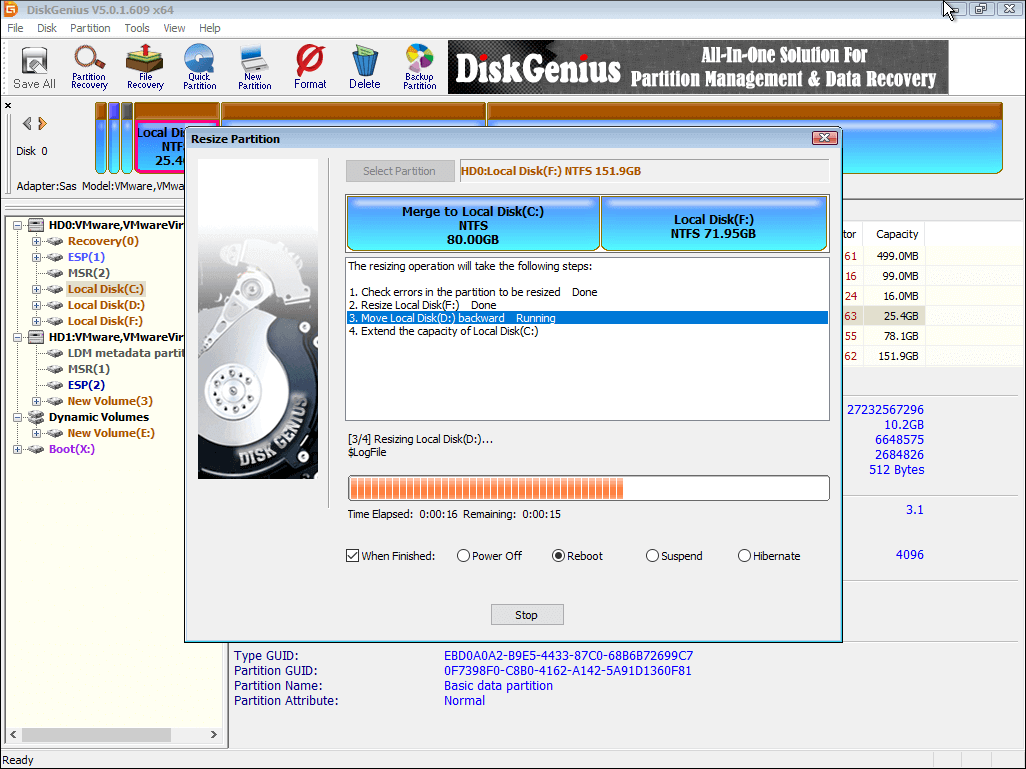
Due to the partition to be extended is system volume, DiskGenius will boot to its WinPE edition to complete rest operations. Now it is preparing for the WinPE environment for DiskGenius WinPE edition, after which computer will reboot to the WinPE edition automatically.

Now DiskGenius WinPE edition is launched automatically and continues to extend C drive, as below. When the resizing process completes, computer will restart to Windows automatically.
Method #3: Increate system partition size using diskpart commands
Diskpart is Windows built-in utility, and it includes functions to manage disks and partitions via commands. Here are steps to increate C drive space via diskpart command:
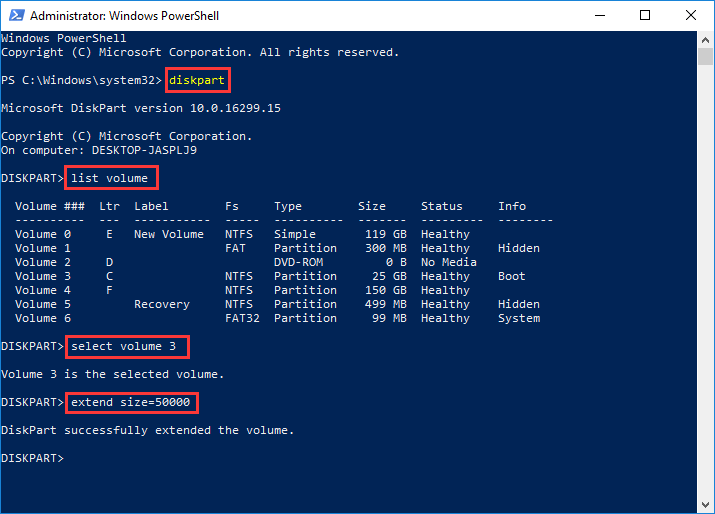
Step 1. Right-click Windows 10 Start button and select Windows PowerShell (Admin) option.
Step 2. Type diskpart in Windows PowerShell and press Enter key.
Step 3. Type follow commands in turn and press Enter key after each command.
List volume
Select volume # (Replace # with the volume number of C drive)
Extend size=xxxx (replace XXXX with disk size in MB you want to add to C drive)
Limitations on diskpart when increasing partition size:
- The partition to be extended should be in NTFS file system.
- There should be contiguous unallocated space on the right side of partition to be extended.
- Users who are not familiar with using command prone to making mistakes and leading to data loss.
Method #4: Increase C drive space by adding unallocated space
What to do if there is unallocated disk space which is not adjacent to system partition? Do you know how to add unallocated space to C drive so as to increase C drive space without losing data? Here is any easy solution:
Step 1. Launch DiskGenius from your computer and locate the free disk space from system disk.
Step 2. Right-click on the free disk space and select
Allocate Free Space To
, as follows. Then you can select a target partition to add the unallocated space. In this example, we want to increate system partition size, thus we need to select C drive.
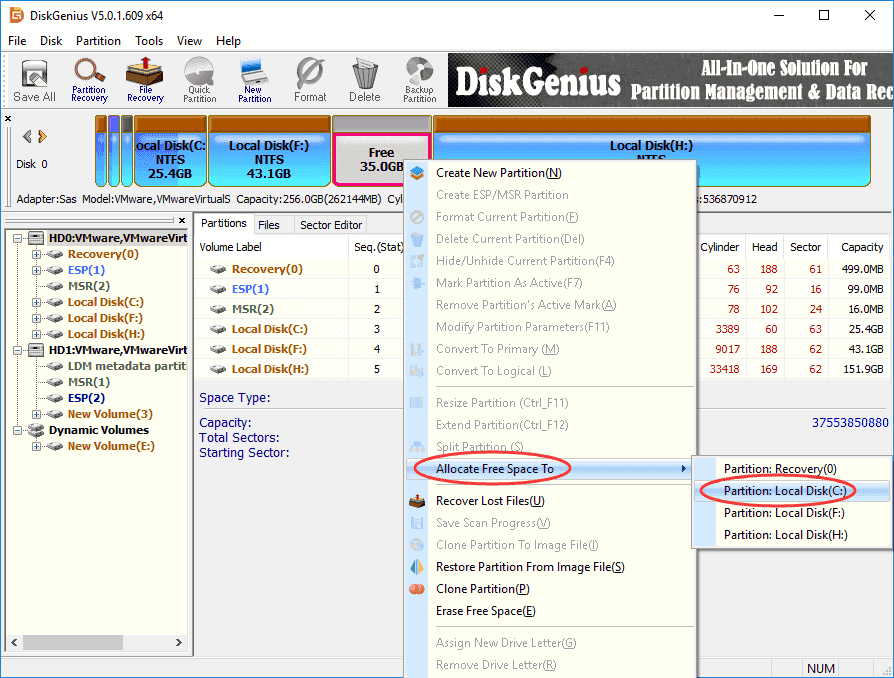
Step 3. Partition resizing wizard will pop up and you can follow prompts to complete following actions.
Conclusion on resizing Windows partition
In conclusion, this tutorial presents four solutions to increase C drive space without formatting computer or losing any data in Windows 11, Windows 10, Windows 8, Windows 7, Windows Vista and Windows XP. Disk Management works in very few situations, and you can use third-party disk partition software in most cases to extend C drive. DiskGenius Free is free tool to manage disks and partitions and helps make best of disk space. If you have any questions or need any help in using DiskGenius, please feel to contact our technical support team.
FAQs
1. Why does my C drive is running out of free space?
The reason for insufficient space on the C drive:
- There are too many junk files and temporary files in the C drive.
- There are too many programs that are not commonly used.
- The partition capacity of disk C is too small.
2. How to obtain larger C drives and faster computers?
Backup Big data to external storage device: If you have saved a certain number of large files on your C drive but do not need to use them frequently, we recommend that you back up these files to an external storage device. You can apply DiskGenius or Isoo Backup to get help.
Regularly delete useless large files from drive C: Deleting old or unnecessary files on the system drive will free up space to ensure the normal operation of the Windows system.
Many Windows users prefer third-party partition manager or drive management utilities for changing the storage space of hard disk volumes. However, this is no more needed with Windows 11 and you can easily adjust the storage of volumes using various methods. In this article, we will explain how you can increase or decrease volume size of hard disk in Windows 11 along with the conditions.
Adjusting Disk Volume Storage
Here are some of the things you should understand before proceeding further:
- For decreasing storage (shrinking) – removed space from the volume will be moved to unallocated space on hard disk.
- For increasing storage (extending) – you should have unallocated space next to the volume which you want to extend. There should be no other volumes or empty space between unallocated space and target volume.
Unallocated means, there should be no file system setup on that storage space. If you have raw files, they will be deleted when allocating the space. Also, the target volume should be formatted with NTFS or ReFS file system.
Let’s explain both cases in detail using various options.
1. Using Disk Management App
Follow the below steps to shrink or extend a volume using the in-built Disk Management app.
1.1. Create Unallocated Space by Shrinking a Volume
In our example, we will create unallocated space of 70 GB from D: drive.
- Search and open “Disk Management” app which will show all available partitions on your hard disk.
- Right-click on the volume and select “Shrink Volume…” option.

- System will query the available space and show you the details in MB.
- Since we want to move 70 GB, type 71680 in “Enter the amount of space to shrink in MB” box (70 GB * 1024 = 71680 MB). You can find the remaining size is automatically calculated and make sure it is sufficient for that drive.
- When you are sure, click on the “Shrink” button.
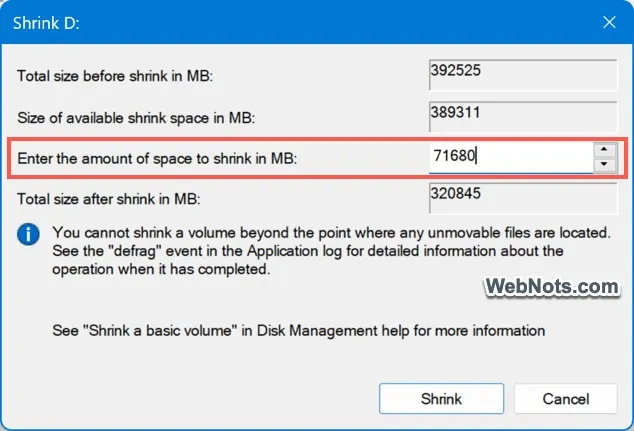
- This will take few seconds and you will see a new unallocated partition is created (with the mentioned size 70 GB).

Now, you can format that unallocated space and use it as a new volume on your drive. Simply, right-click and select “Format” option and then use “Change Drive Letter and Paths” if needed.

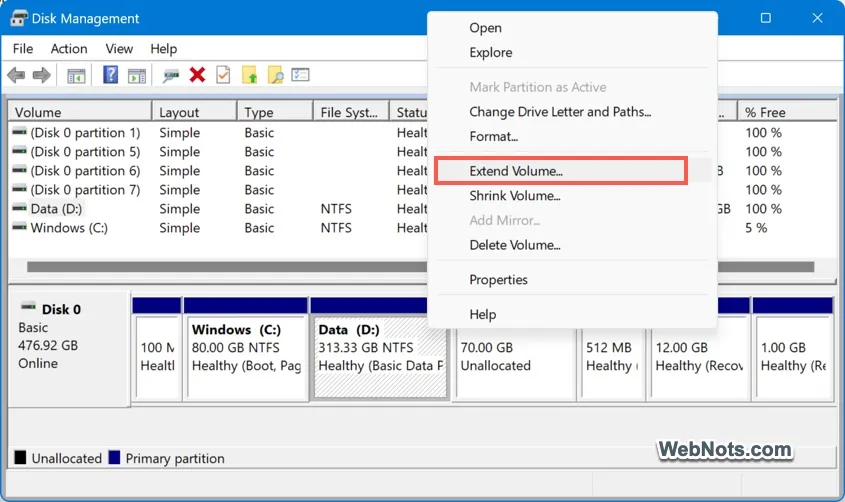
1.2. Extend a Volume with Unallocated Space
As mentioned, extending will work only if there is an immediate unallocated space on the drive.
- Right-click on the volume and select “Extend Volume…” option.
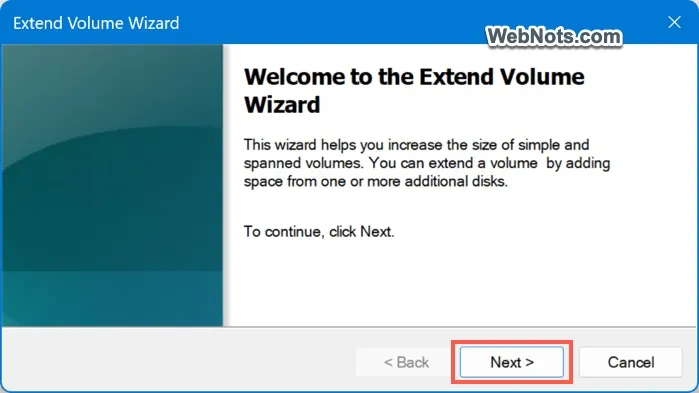
- This will open a “Extend Volume Wizard” and click on “Next” button.
- Windows will automatically allocate all unallocated space next to the selected volume. If you want to reduce the size, enter the applicable size in “Select the amount of space in MB” box and click “Next” button.

- Click “Finish” button to extend the selected volume.
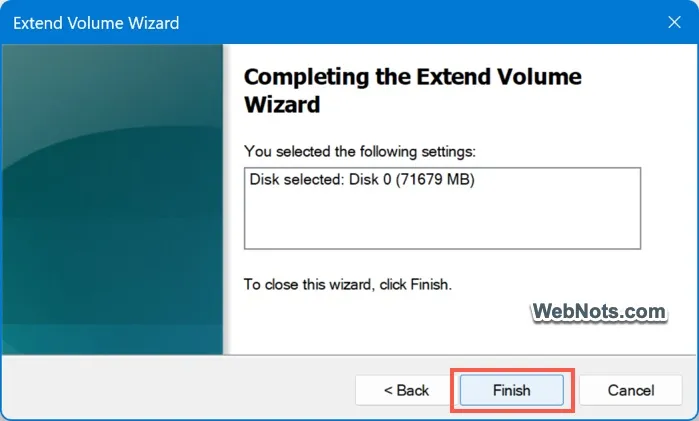
- This will instantly increase the size of the selected volume which you can see in the list.

2. Using Windows Settings App
Using Disk Management app is highly recommended as you can see the unallocated size and positions visually. However, using Settings app will be the easier option especially for reducing the size (shrinking).
- Right-click on Start menu icon and select “Settings” from the menu that appears.
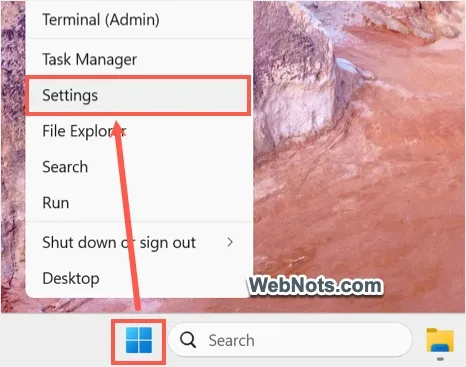
- This will open Windows Settings app and navigate to “System” section from left sidebar.
- Scroll down on the right-pane and click on “Storage” option.

- Here, you can view the category wise current storage situation.
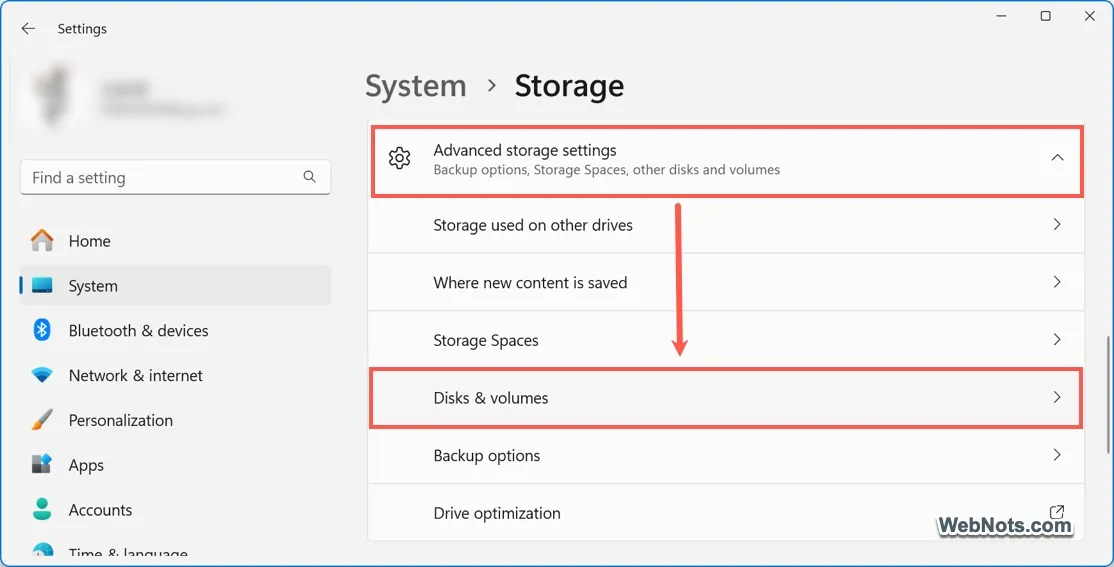
- Scroll down on the page and click on “Advanced storage settings” option under “Storage management” section.
- This will expand the section and click on “Disks & volumes” option.
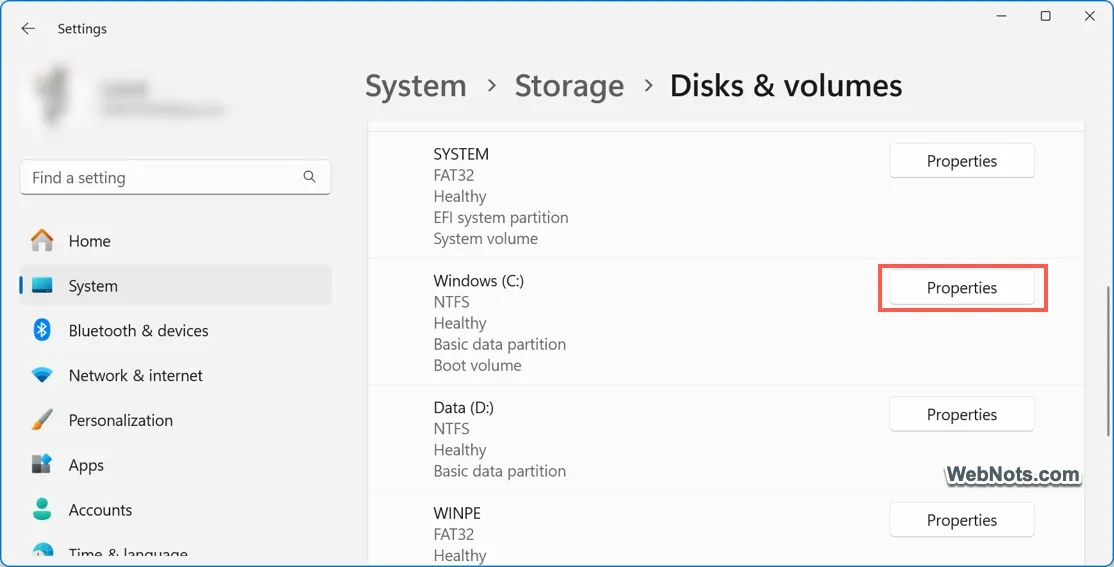
- You can find the status of all available disks and volumes and click on the “Properties” button against the volume you want to shrink or extend.
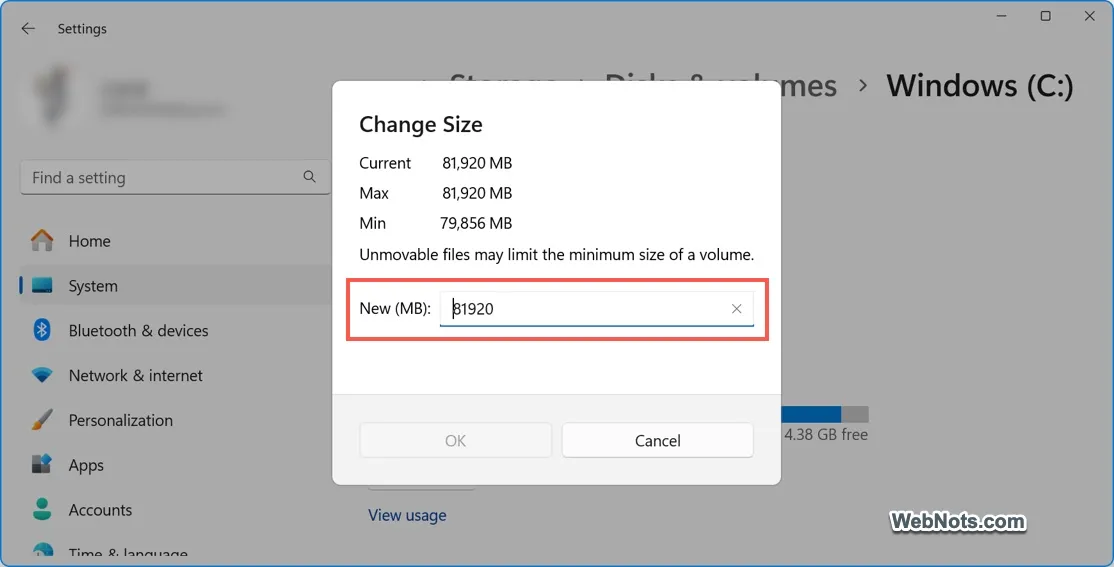
- Click the “Change size” button showing below the Size heading.
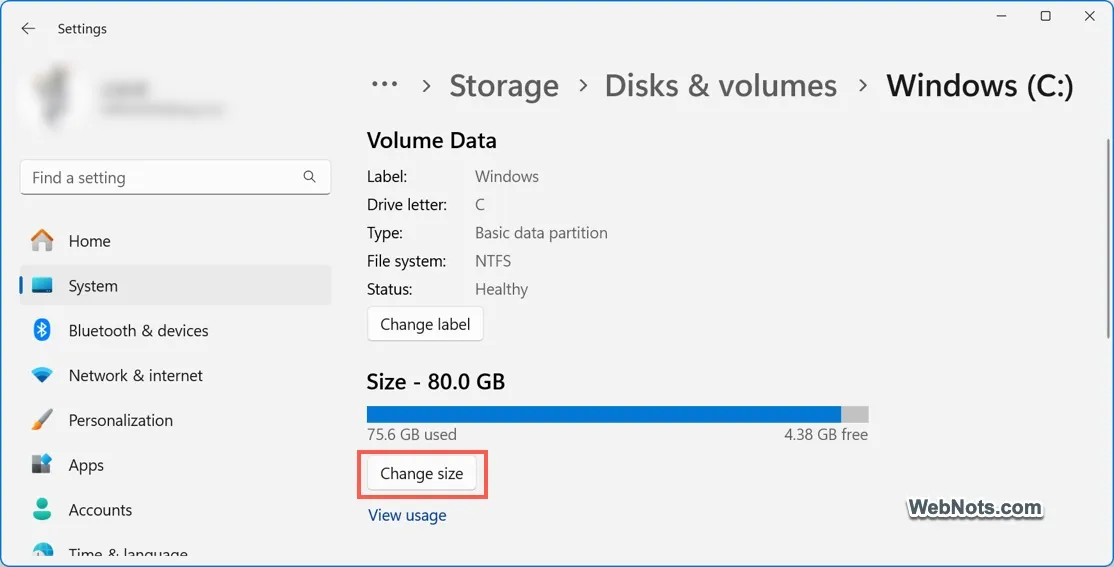
- This will open “Change Size” pop-up and take few seconds to load the current details. You can find the current, maximum and minimum storage sizes in MB.
- Make sure to calculate the new total size you want in MB and enter it in “New (MB)” text box. Press “OK” button to allocate or remove the space.
3. Shrink Using Command Prompt
Windows also offers a command to shrink the volume.
- Open the Command Prompt app in administrator mode.
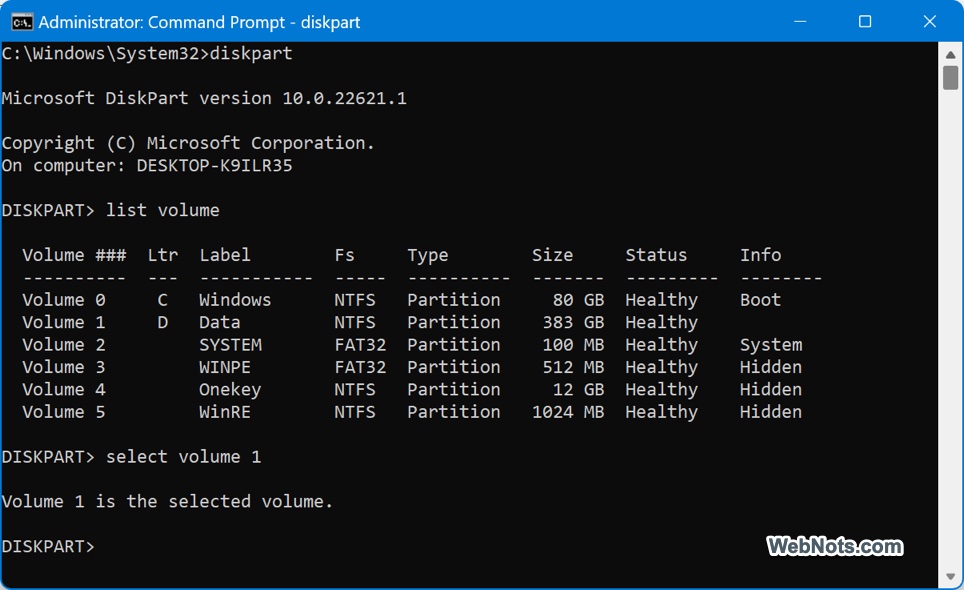
- Type diskpart and enter to change the prompt.
- Type list volume and press enter to view all the volumes on your hard drive and note down the volume number showing in the first column.
- Now, type select volume volume_number and press enter. You will see a notification saying “Volume # is the selected volume”.
- Type shrink desired=100 and press enter to reduce 100 MB from the selected volume.
4. Extend Volume Using Windows PowerShell
Similar to shrinking with Command Prompt, you can extend a volume using Windows PowerShell to its maximum size.
- Open Windows PowerShell in administrator mode.
- Type the following script and press enter. This will extend the volume D to its maximum size. You can change the volume letter as you need.
$drive = "D"
$newsize = (Get-PartitionSupportedSize -DriveLetter $drive)
Resize-Partition -DriveLetter $drive -Size $newsize.SizeMax
Final Words
It is easy to decrease or shrink the storage space of a hard disk volume using Disk Management or Windows Settings app. However, there are plenty of limitations for extending the volume with unallocated space. Make sure to understand the conditions mentioned above for extending a volume. For example, when your volume C: drive is running out of storage, you simply can’t allocate space from D: even though it has large amount of free space.
Содержание статьи:
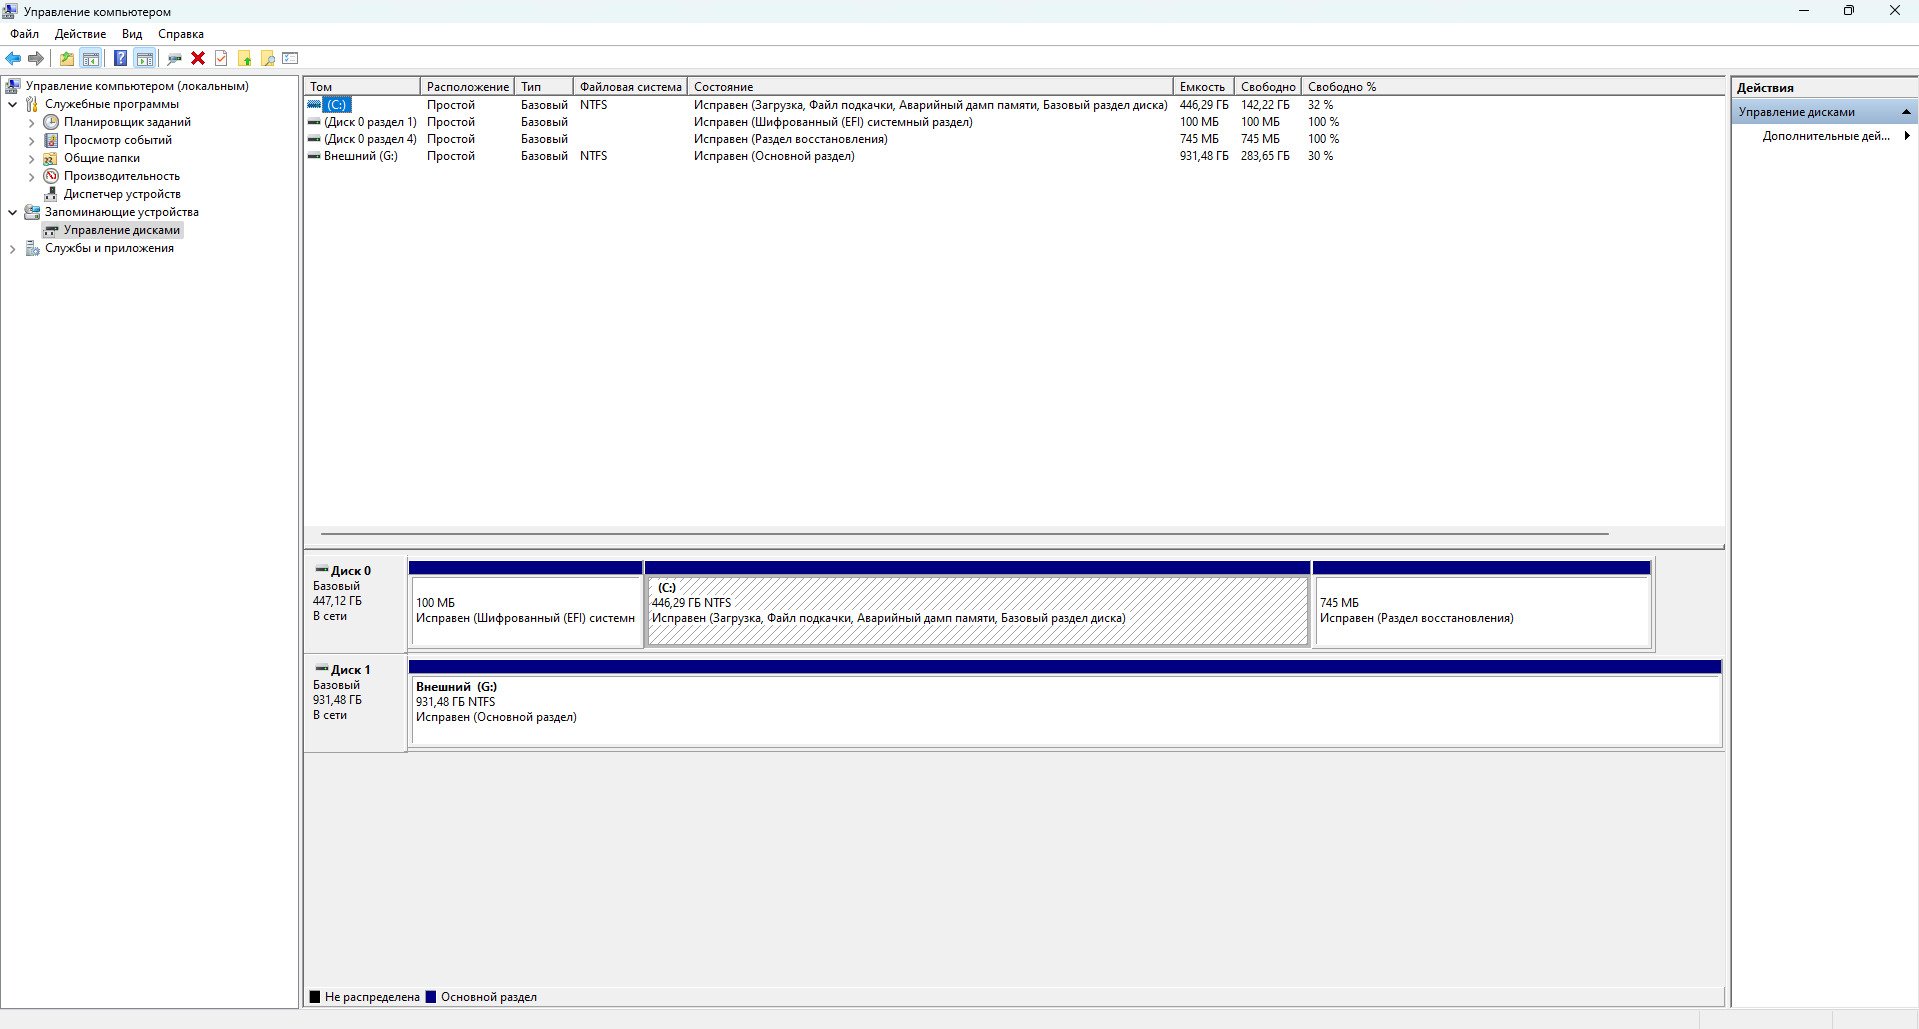
- Увеличение объема диска «C:\»
- ШАГ 1: открываем управление дисками
- ШАГ 2: отделяем часть свободного места
- ШАГ 3: присоединяем к диску «C:\» не распределенное место
- А, что если вкладка расширить том на диске «C:\» не активна
- Вопросы и ответы: 132
Вопрос от пользователя
Здравствуйте.
У меня не так давно закончилось место на диске с Windows — и в трее рядом с часами стала вылазить ошибка «Недостаточно место на системном разделе диска, это может быть причиной…».
Дело в том, что на диске «C:\» на самом деле мало места — всего 30 ГБ, но на другом диске «D:\» — 420 ГБ (свободно примерно 200 ГБ). Можно ли увеличить объем диска «C» за счет диска «D» без потери данных?
PS
Ноутбук Acer Aspire 5550, система Windows 8, жесткий диск на 500 ГБ (Seagate, если не путаю).
Здравствуйте.
Чаще всего изменять объем диска приходится, когда при установке ОС Windows неправильно рассчитали требуемый размер системного диска (также при покупке ПК — часто диск разбит не очень удобно: либо всего один раздел с Windows, либо размер системного раздела очень мал).
Вообще, подобную операцию по изменению размера разделов можно сделать даже без установки дополнительных программ, если у вас установлена ОС Windows 7÷11 (если XP — воспользуйтесь ссылкой на спец. софт для форматирования, разбивки жестких дисков, ссылка ниже).
Теперь покажу на конкретном примере, куда и как нажимать 👌.
📌 В помощь!
Программы для работы с жесткими дисками (HDD) и твердотельными накопителями (SSD): разбивка, форматирование, дефрагментация…
*
Увеличение объема диска «C:\»
(Актуально для Windows 7, 8, 10, 11. Без потери данных и доп. программ)
*
ШАГ 1: открываем управление дисками
📌 Важно: чтобы увеличить размер диска «C:\» — у вас должно быть в наличии свободное место на каком-то другом разделе диска (часть которого мы заберем).
В современных ОС Windows есть встроенная сервисная программа для форматирования и разбивки дисков. Называется она — 👉 управление дисками. Разумеется, первым делом ее необходимо открыть.
Для этого нажмите сочетание кнопок Win+R.
Далее должно появиться окно «Выполнить» — введите в строку «Открыть» команду diskmgmt.msc и нажмите Enter (или OK, см. скриншот ниже).
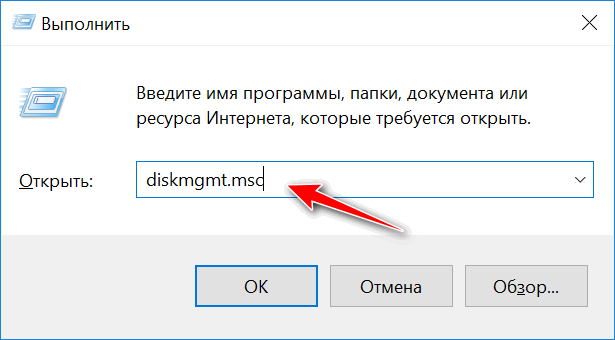
diskmgmt.msc — запускаем управление дисками
Затем должна запуститься искомая утилита…

Управление дисками
*
ШАГ 2: отделяем часть свободного места
Теперь нам нужно выбрать тот раздел диска, на котором есть свободное место, и «отнять» его для последующего присоединения к разделу диска «C:\».
👉 У меня, например, есть несколько разделов:
- «C:» — на 132 ГБ (см. скрин ниже 👇);
- «H:» — на 751 ГБ (на котором 187 ГБ свободно, и часть этого места я дам разделу «C:»).
Для этого нужно щелкнуть правой кнопкой мышки по разделу «H:» и выбрать опцию «Сжать том» (отмечу, что данные при этом не должны пострадать!).
Сжать том
Далее на минуту-другую Windows задумается: будет произведен анализ свободного места на диске для оценки возможности сжатия.
Ожидание — анализ диска
Теперь необходимо указать, сколько свободного места вы хотите отнять на диске. В своем примере ниже я взял цифру в 5000 МБ (т.е. в 5 ГБ).
Сколько свободного места отнять в МБ
После того, как раздел будет сжат — Вы должны увидеть, как у вас появиться не распределенное место на диске (прямоугольник с черной полоской сверху, см. скрин ниже). Это-то место и можно теперь присоединить к другому разделу диска.
Не распределенная область
*
ШАГ 3: присоединяем к диску «C:\» не распределенное место
Щелкаем правой кнопкой мышки по диску, к которому хотим присоединить не распределенное место на диске (в текущем примере — присоединяем к диску «C:\»), и выбираем в меню опцию «Расширить том».
👉 Примечание!
Если у вас опция «Расширить том» не активна и горит серым цветом (ее нельзя нажать) — читайте внизу статьи пару предложенных решений
Расширяем том (диск C)
Далее вам будет предложена для присоединения не размеченная область на диске (те 5 ГБ, которые мы в предыдущем шаге отняли от другого раздела диска). Выбираем их и нажимаем далее.
Мастер расширения тома
В общем-то, последний шаг — согласиться с операцией, нажав на кнопку «Готово».
Готово!
Всё! Теперь ваш системный диск стал больше на 5000 МБ. 👌
*
А, что если вкладка расширить том на диске «C:\» не активна
В некоторых случаях, при попытке расширить том — эта опция в управлении дисками может быть не активна (она просто горит серым цветом и ее нельзя нажать, пример ниже).
Расширить том не активна
Есть два пути решения:
- Самый простой вариант в этом случае — воспользоваться спец. программами для изменения размера разделов HDD 👉 из этой статьи (лично я свой пример ниже покажу в MiniTool Partition Wizard, рекомендую!).
- Также можно попробовать удалить лишние разделы, используемые для восстановления (обычно, всё это из-за них). Как правило, подобное наблюдается чаще на ноутбуках, где есть специальные разделы от производителя. В своем примере ниже я покажу, как их удалить, чтобы функция «Расширить том» стала активной (Важно! В этом случае у вас отключится возможность восстановления — т.е. отката устройства к заводским предустановкам).
*
Вариант 1: использование альтернативного ПО
И так, будем считать, что утилита MiniTool Partition Wizard у вас установлена и запущена. 👌
1) Для начала нужно найти тот раздел диска, который вы хотите присоединить (в моем примере 👇 это раздел на 25 ГБ, «E:»). После нажать по нему правой кнопкой мышки и выбрать опцию «Delete» (вся информация на этом разделе будет удалена!).
Для подтверждения действия — в левом верхнем углу нажмите по кнопке «Apply».
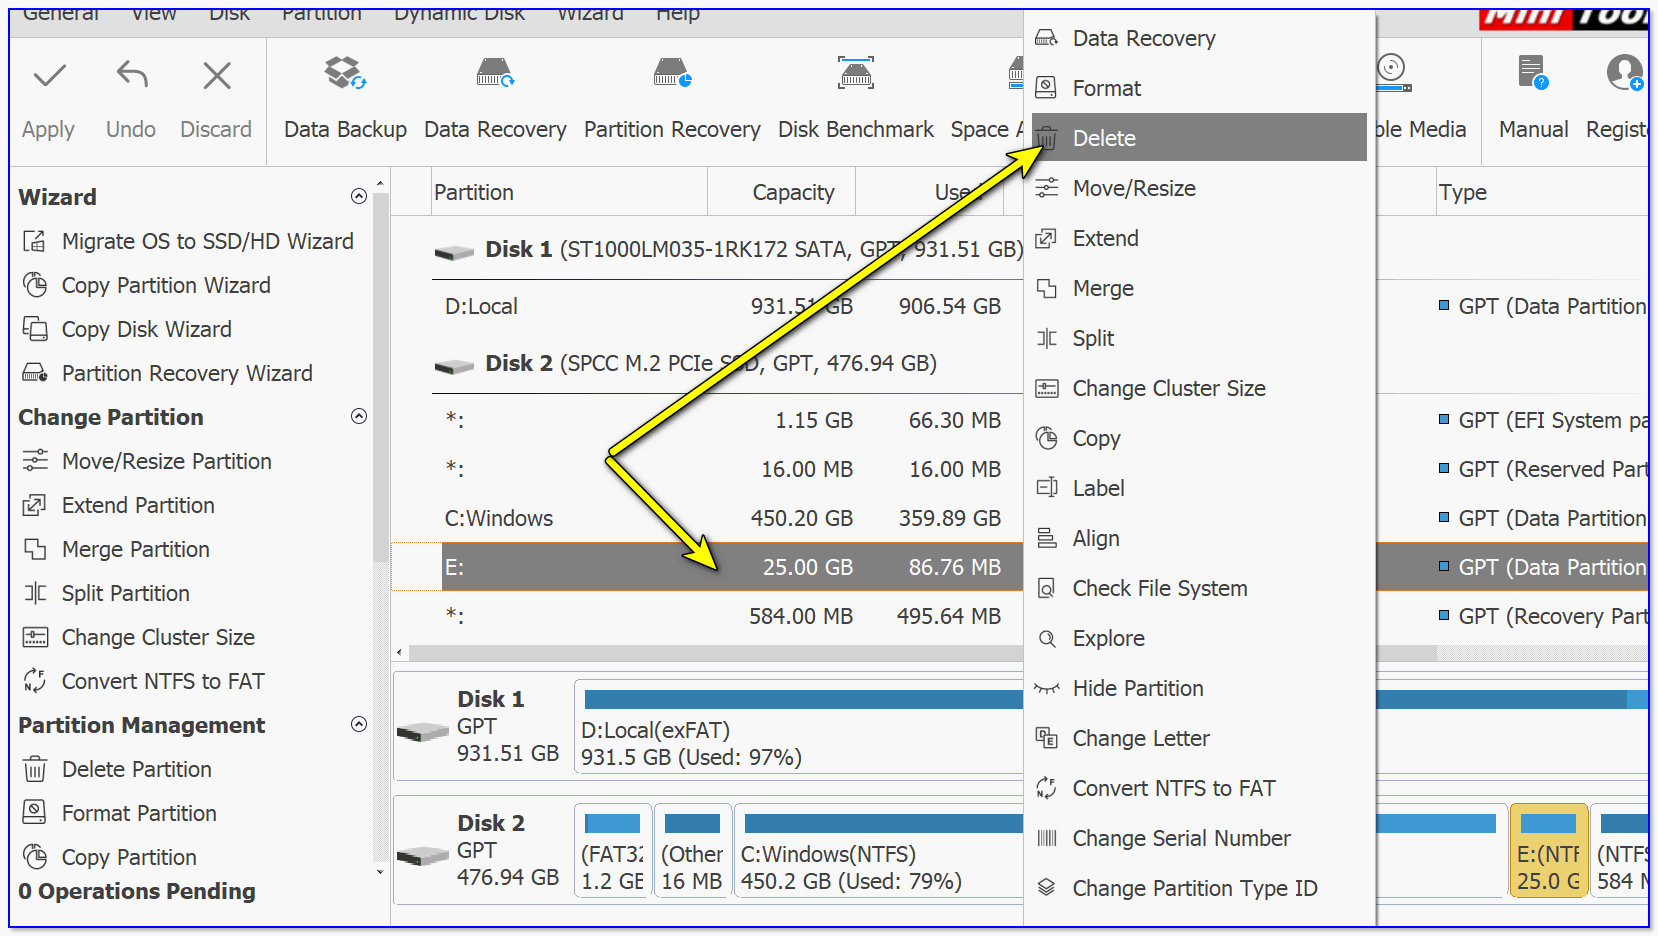
Выбор и удаление раздела, который хотим присоединить (он пустой)
Статус этого раздела должен стать как «Unallocated» (см. скрин ниже).

Unallocated
2) Далее нужно нажать правой кнопкой мыши по системному диску «C:» (т.е. к которому будем присоединять не размеченную область) — и выбрать опцию «Extend».
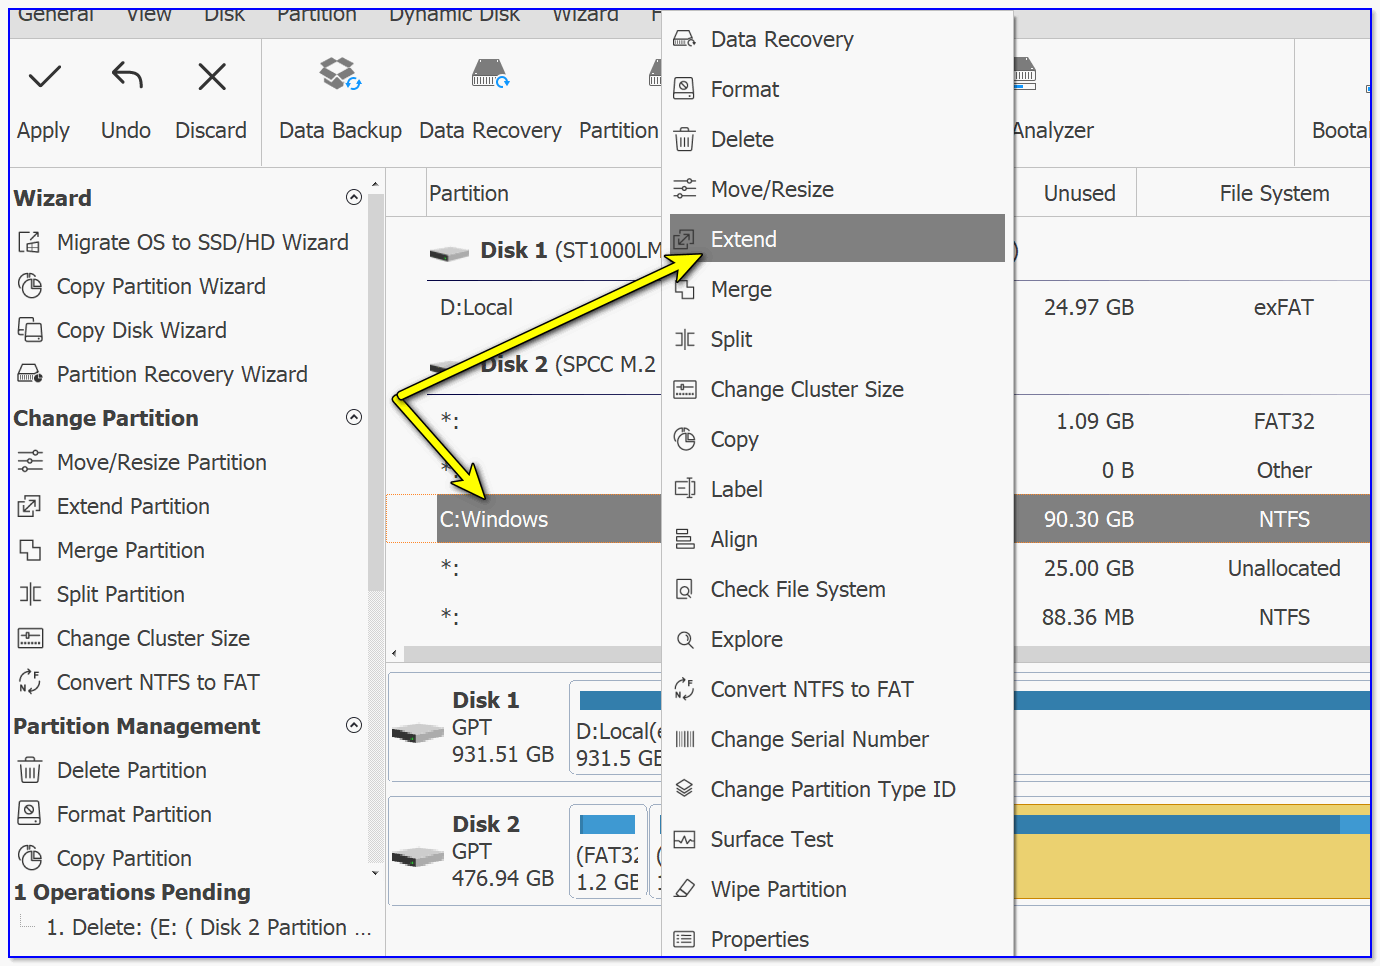
Extend — расширить диск с ОС
3) Появится окно в котором нужно выбрать нашу не размеченную область (в моем случае те 25 ГБ), сдвинуть ползунок вправо на максимум и нажать «OK».

На весь объем свободного пространства
4) После этого вы должны увидеть, что не размеченная область будет присоединена к диску «C:» (см. скрин ниже 👇). Осталось только подтвердить изменения, нажав на кнопку «Apply» (слева, на верхней панели).

Теперь только раздел с ОС
Примечание: в некоторых случаях для выполнения операции может понадобиться перезагрузка компьютера…
*
Вариант 2: через удаление «сбойного» раздела
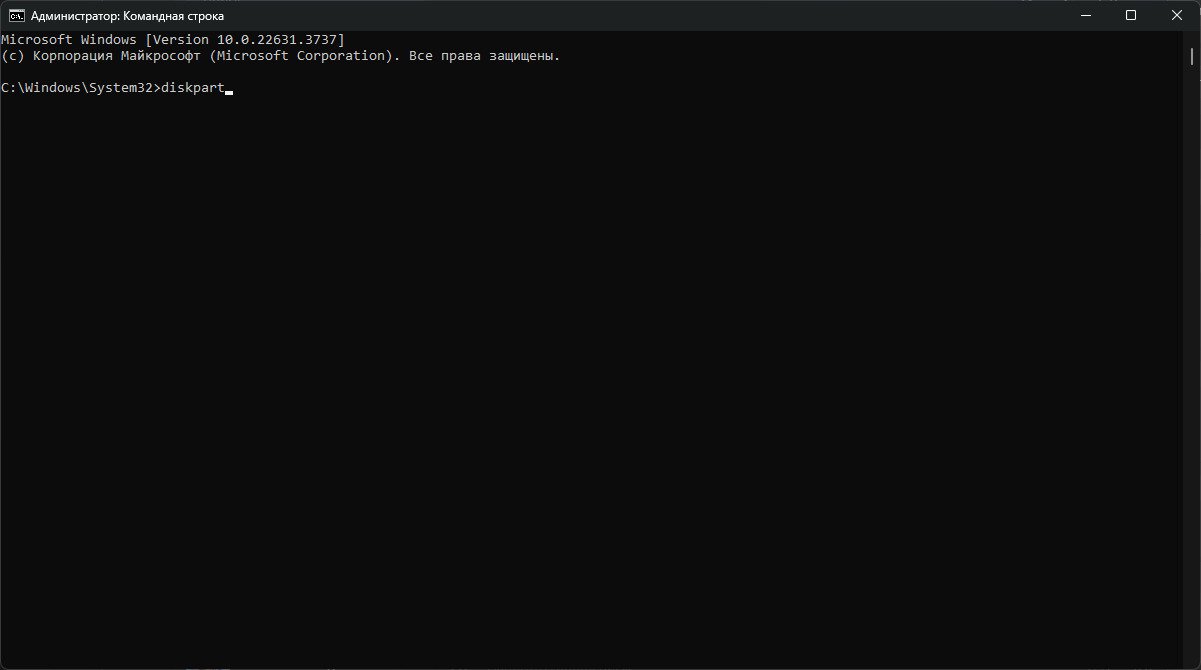
Необходимо сначала запустить 👉 командную строку от имени администратора: для этого откройте диспетчер задач (сочетание кнопок Ctrl+Shift+Esc), затем нажмите Файл/новая задача, введите CMD и нажмите Enter (пример ниже).
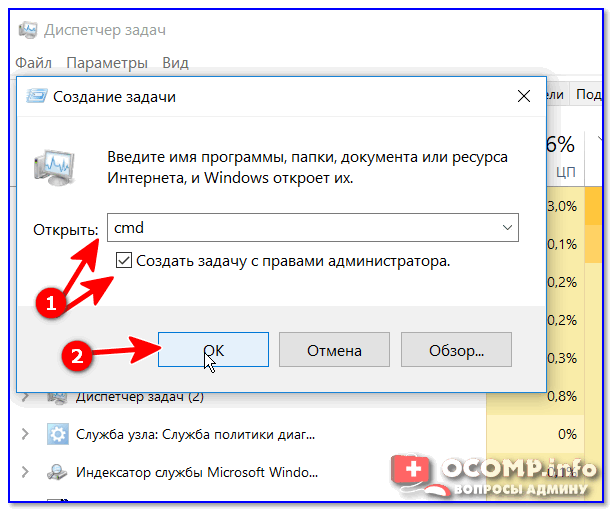
CMD от имени администратора
- ввести команду diskpart и нажать Enter;
- следом команду list disk (появятся все диски в системе, на примере ниже — в системе один диск с идентификатором «0»);
- select disk 0 — указываем какой диск нужно выбрать. В вашем случае, возможно, вместо «0» — нужно будет указать отличный идентификатор диска (скрин с примером ниже).
Diskpart
Следующие шаги:
- list partition — смотрим все разделы, которые есть на данном диске;
- select partition 6 — выбираем конкретный раздел на диске. Обратите внимание, что вместо «6» — вам нужно указать свою цифру (убедитесь, что появилась надпись «Выбран раздел X»).
List partition (в моем случае нужно было удалить 6 и 8 разделы (используемые для восстановления), чтобы вкладка «Расширить том» стала активной).
И последняя команда для удаления выбранного раздела — delete partition override.
Важно! Будьте внимательны, эта команда удалит выбранный раздел, вся информация с него пропадет!
Удален выбранный раздел!
Для удаления следующего раздела, вам необходимо снова его выбрать (например, select partition 8, а затем снова использовать команду для удаления delete partition overrid).
*
Собственно, на этом всё — задача решена!
Желаю удачи!
👣
Первая публикация: 8.06.2017
Корректировка: 1.02.2022
Если вы используете несколько разделов на одном накопителе, то со временем может возникнуть потребность в увеличении системной области. Рассказываем о том, как сделать это в Windows 10 и 11.
Источник: CQ / Интерфейс Windows 10
В Windows 10 можно увеличить объем диска C, используя встроенные средства управления дисками. Для этого выполните следующие действия:
- Щелкните правой кнопкой мыши на значке «Этот компьютер»;
- Выберите «Управление» (потребуются права администратора);
- В левой части окна выберите «Управление дисками»;
- Найдите диск C и щелкните по нему правой кнопкой мыши.
- Выберите опцию «Расширить том». Если она недоступна, освободите место на другом разделе;
- Щелкните правой кнопкой мыши на разделе с достаточным свободным местом и выберите «Сжать том»;
- Укажите количество мегабайт для сжатия;
- Подтвердите действие и дождитесь завершения процесса;
- Появится нераспределенное пространство, и опция «Расширить том» станет доступной.
Во время выполнения операции компьютер может перезагружаться несколько раз. Не выключайте его в этот момент. Также избегайте изменения меток дисков и назначения активных разделов.
Расширение диска C с помощью встроенных инструментов Windows 11
Источник: СQ / Интерфейс Windows
В Windows 11 тоже можно изменить размер разделов с помощью системных настроек:
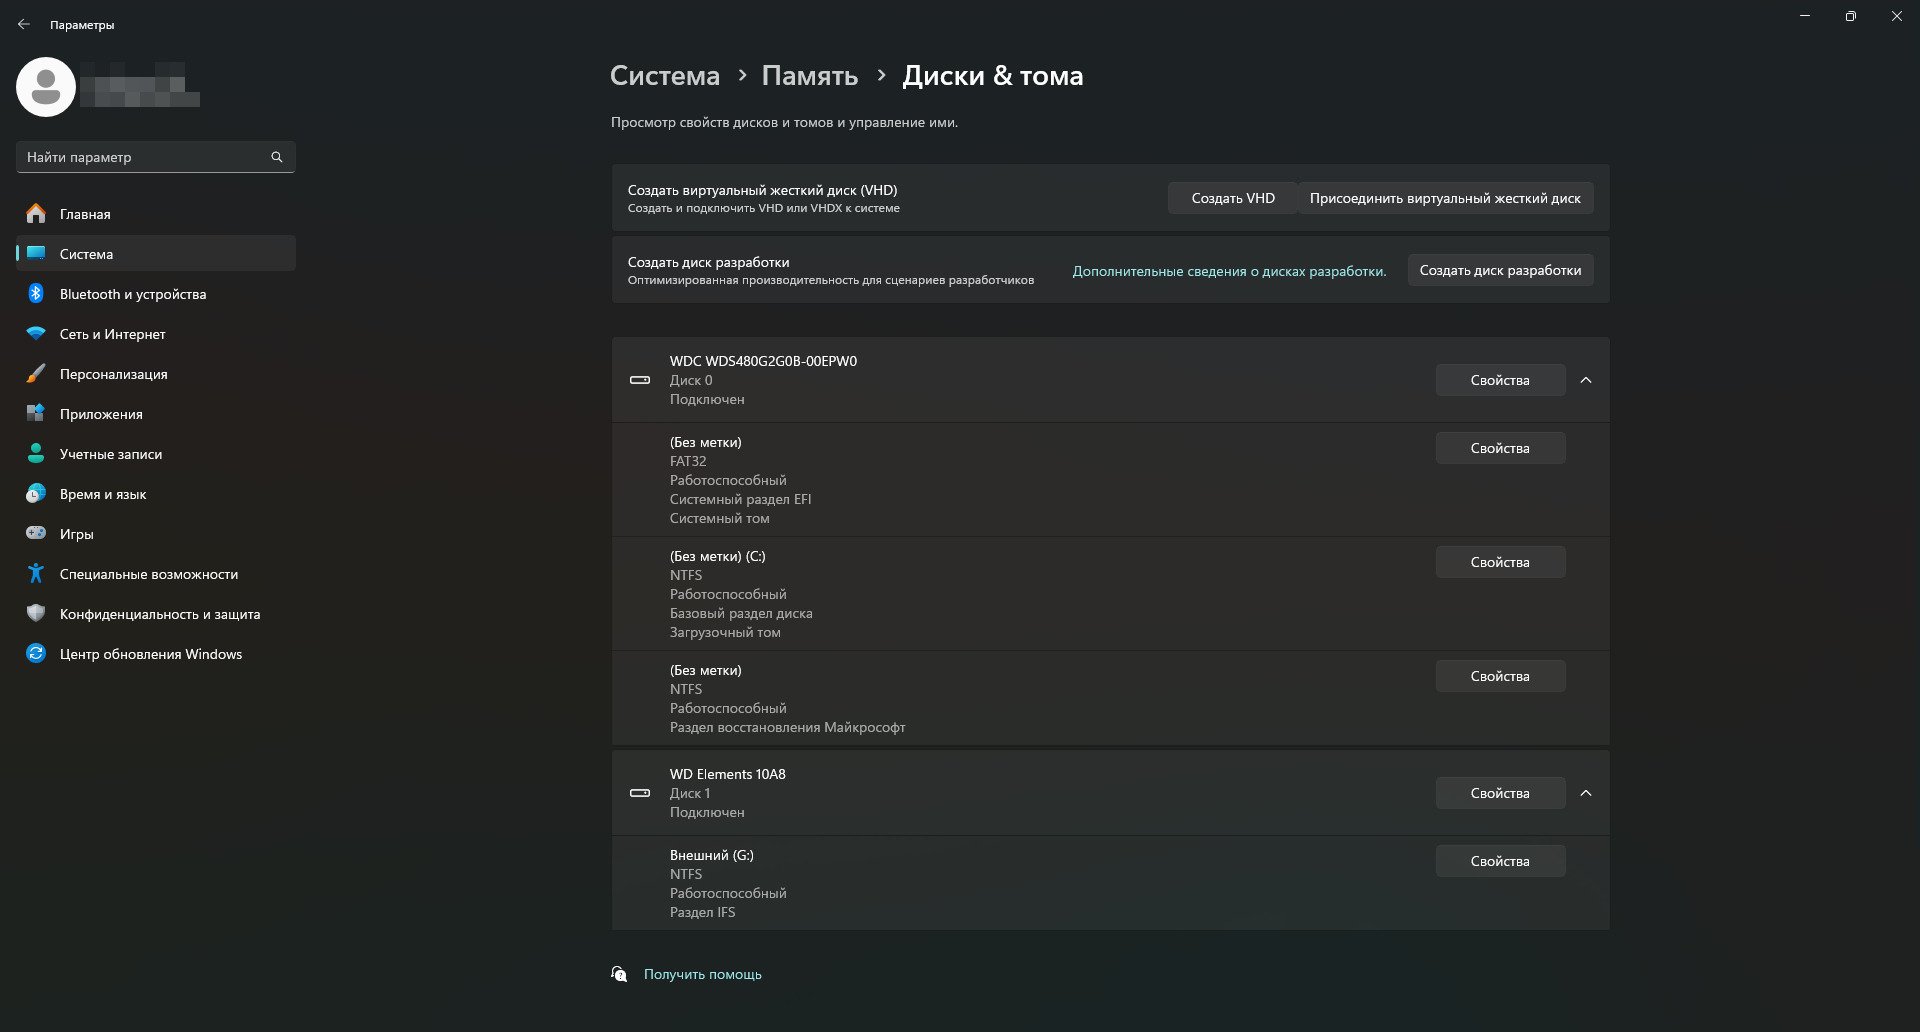
- Откройте «Параметры» > «Система» > «Память» > «Дополнительные параметры хранилища» > «Диски и тома»;
- Выберите нужный диск и нажмите «Свойства»;
- Нажмите кнопку «Изменить размер»;
- Укажите значения в мегабайтах для увеличения или уменьшения объема диска, соблюдая ограничения доступного пространства.
Расширение диска C с помощью командной строки
Источник: CQ / Интерфейс Windows
Для изменения размера разделов можно использовать командную строку:
- Запустите командную строку (Win + R, введите cmd, нажмите Ctrl + Shift + Enter).
- Разрешите приложению вносить изменения;
- Введите команды diskpart и list disk, нажимая Enter после каждой;
- Введите select disk <номер>, заменив <номер> на идентификатор диска со свободным местом (например, select disk 2);
- Введите detail disk, чтобы узнать номер тома и букву диска;
- Введите select volume <номер>, заменив <номер> на идентификатор тома (например, select volume 5);
- Для расширения введите команду extend. Для конкретного размера используйте extend size=<размер в МБ> (например, extend size=10240);
- Эти методы помогут вам эффективно увеличить объем диска C, используя встроенные инструменты Windows или командную строку.
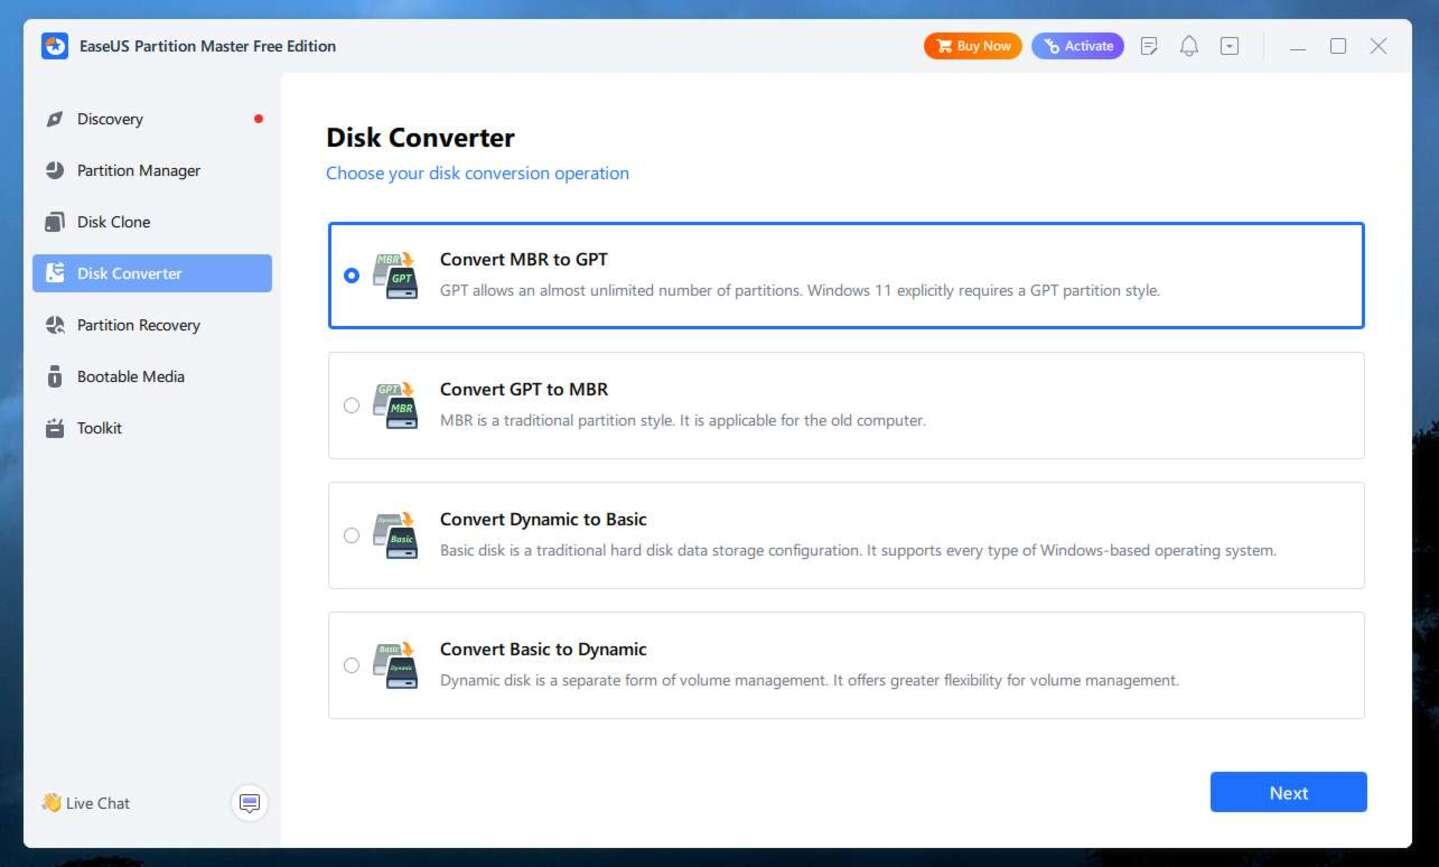
Как увеличить объем диска с помощью программы EaseUS Partition Master
Источник: Lifewire / Интерфейс EaseUS Partition Master
EaseUS Partition Master представляет собой мощное программное обеспечение для управления разделами жесткого диска, предлагающее широкий спектр функций:
- Расширение существующего раздела;
- Изменение размера и перемещение разделов;
- Копирование разделов или дисков;
- Создание, удаление и форматирование разделов;
- Сокрытие и отображение разделов, и многое другое.
Программа совместима с различным софтом, включая RAID, и поддерживает все версии Windows. Если на диске C заканчивается место, EaseUS Partition Master поможет вам быстро и безопасно устранить эту проблему:
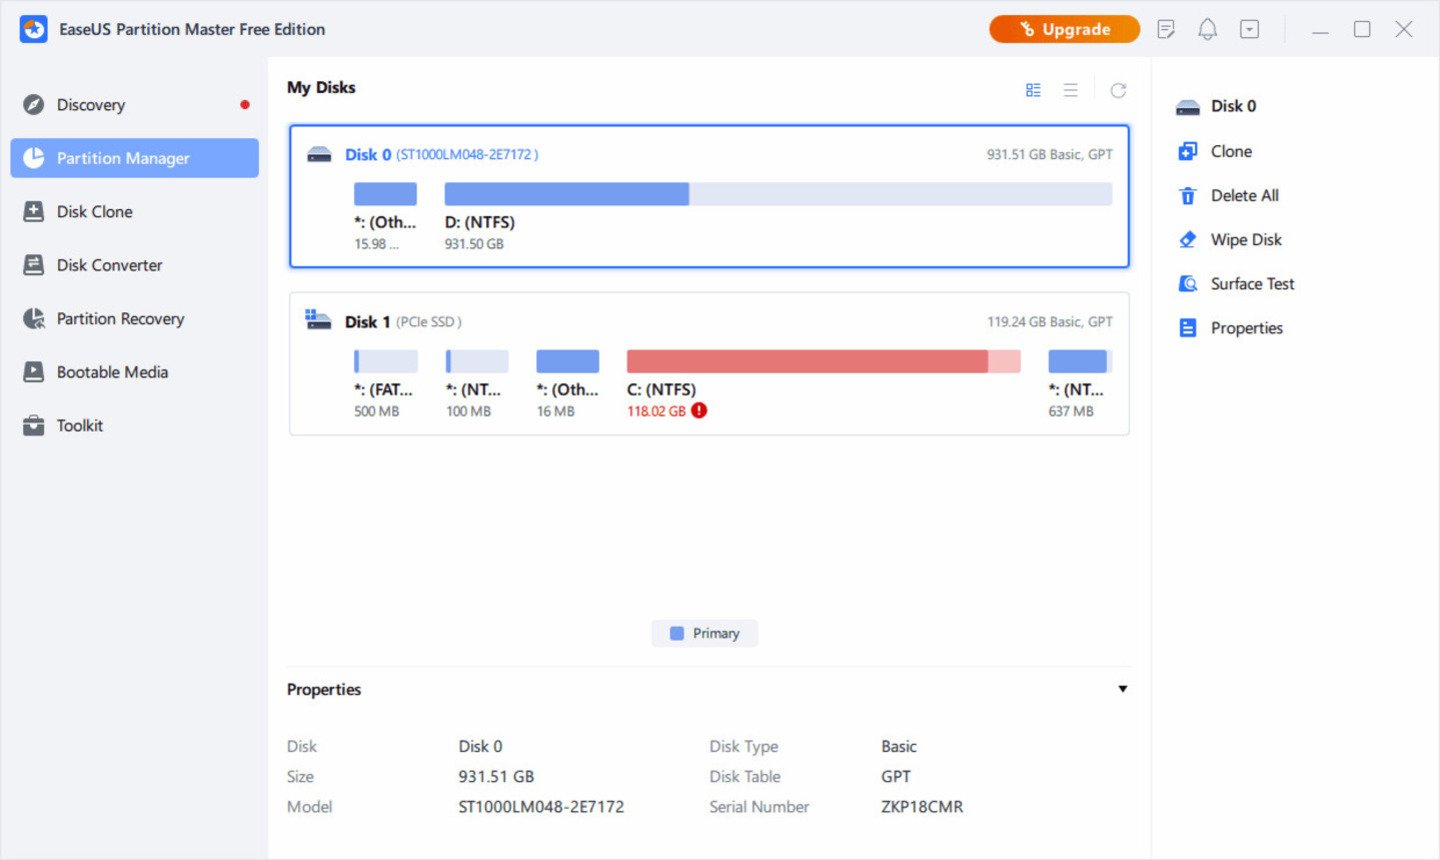
Изображение OlderGeeks / Интерфейс EaseUS Partition Master
- При нехватке места на диске появится предупреждение, которое обычно отмечено красным цветом;
- Кликните по предупреждению, и программа автоматически настроит ваш диск C для устранения проблемы. Нажмите кнопку «Продолжить»;
- Завершите процесс, нажав кнопку «Выполнить операцию» в верхнем углу и применив все ожидающие операции, нажав «Применить».
Для более точной настройки можно использовать функцию «Ручная настройка» в левом нижнем углу, чтобы регулировать дисковое пространство в соответствии с их потребностями.
Заглавное фото: Windows Central