
In the contemporary landscape of digital imaging and color management, the need for accurate and consistent color representation across different devices is paramount. This is where the International Color Consortium (ICC) profiles come into play. These profiles define how colors are represented and allow for consistent color reproduction across a variety of devices—monitors, printers, and cameras.
For users of Windows 11, understanding where ICC profiles are stored can enhance their experience, especially for those working in photography, graphic design, or any field that demands color precision. This article delves into the critical aspects of ICC profiles, their purpose, and most importantly, their storage locations within the Windows 11 operating system.
What are ICC Profiles?
Before we dive into where they are stored, let’s differentiate what ICC profiles are and why they are crucial:
-
Definition: An ICC profile is a standardized description of a color space. It contains information about how colors should be represented on different devices.
-
Device-Specific: Different devices (like monitors and printers) can produce different colors. An ICC profile allows for the translation of colors from one device to another, ensuring consistency in color output.
-
Types of ICC Profiles:
- Input Profiles: Used for input devices like scanners and cameras.
- Display Profiles: Tailored for monitors to display colors accurately.
- Output Profiles: Designed for printers, ensuring the colors printed match what is displayed on the screen.
Purpose of ICC Profiles
The primary purpose of ICC profiles revolves around color management. They serve several functions:
-
Color Calibration: Devices can be calibrated for accurate color representation, ensuring what you see on your display corresponds closely to what gets printed.
-
Consistency: By using ICC profiles, users can maintain color fidelity across various devices. What you see on your screen should look as close as possible to what comes off the printer.
-
Device Independence: ICC profiles help neutralize the color variations that occur between different devices, allowing for a unified color representation.
Where are ICC Profiles Stored in Windows 11?
In Windows 11, ICC profiles are stored in specific locations that allow the operating system and applications to access them as needed. The primary storage locations for ICC profiles are as follows:
1. System Directory
The main directory for ICC profiles in Windows 11 is:
C:WindowsSystem32spooldriverscolorIn this directory, you’ll find files with the .icc or .icm extensions. These are the actual ICC profile files that the operating system uses for color management. This location is accessible to all applications that require color management capabilities.
To navigate to this folder, you can use File Explorer:
- Open File Explorer.
- Click on «This PC».
- Navigate to the
C:drive. - Follow the path
Windows>System32>spool>drivers>color.
Here, you will find a series of ICC profile files that are either default profiles installed with Windows or custom profiles you have added.
2. User Directory
In addition to the system directory, Windows 11 also allows users to store ICC profiles in their own user directories. The specific path for this is:
C:Users\AppDataLocalMicrosoftWindowsColorTo access this location:
-
Open File Explorer and enter
%localappdata%MicrosoftWindowsColorin the address bar. -
This action will lead you directly to the Color folder, where ICC profiles can be stored locally for an individual user.
This is particularly useful for applications that support user-specific settings and profiles, allowing various users to have their preferred ICC profiles without affecting the overall system settings.
Managing ICC Profiles in Windows 11
By understanding where ICC profiles are stored, users can manage them effectively. Here’s how you can add, remove, or change ICC profiles within Windows 11:
Adding ICC Profiles
-
Download or Create a Profile: First, obtain your ICC profile from a reliable source. This could be from a monitor manufacturer, printer manufacturer, or color calibration tool.
-
Install the Profile:
- Copy the
.iccor.icmfile. - Navigate to
C:WindowsSystem32spooldriverscoloror your personal directory underC:Users\AppDataLocalMicrosoftWindowsColor. - Paste the profile file in the designated folder.
- Copy the
-
Accessing Color Management Settings:
- Right-click on the Start menu and select
Settings. - Go to
Systemand then click onDisplay. - Scroll down and select
Advanced display settings. - Click on
Color management, then go to theDevicestab. - Here, you can select your display device and add the new profile.
- Right-click on the Start menu and select
Removing ICC Profiles
-
Go to Color Management Settings:
- Follow the steps outlined above to reach the
Devicestab in theColor management.
- Follow the steps outlined above to reach the
-
Select the Profile to Remove:
- Click to highlight the profile you wish to remove.
-
Remove the Profile:
- Click on the
Removebutton. Note that you cannot remove the default profiles provided by Windows, but you can delete custom profiles stored in either directory.
- Click on the
Changing ICC Profiles
-
Access Color Management Settings:
- As previously discussed, go to the Color management settings in Windows 11.
-
Select Your Device:
- Choose the device (monitor or printer) for which you want to change the profile.
-
Add and Set a New Profile:
- Click on
Addto select and add your desired ICC profile. - Once added, select the new profile from the list, and then click the
Set as Defaultbutton.
- Click on
Troubleshooting ICC Profiles
While managing ICC profiles can enhance your color management capabilities, users may encounter various issues. Below are some common dilemmas and their solutions:
Profile Not Applying
Sometimes, you may notice that your selected profile does not seem to be applying properly:
-
Check Profile Compatibility: Ensure that the ICC profile you are using is compatible with your device.
-
Restart the Application: If you’re working in a design application, restart it after applying a new profile.
-
System Restart: A simple reboot can often rectify many issues with new settings.
Profile Display Issues
If colors still appear inaccurate even after installing the correct ICC profile, consider the following:
-
Check Monitor Calibration: Ensure that your monitor is properly calibrated. An incorrectly calibrated monitor can display colors inaccurately regardless of the ICC profile.
-
Update Graphics Drivers: Outdated graphics drivers can contribute to display issues. Make sure your drivers are up to date.
The Importance of Color Calibration
Color calibration and management play significant roles in achieving accurate color reproduction. At the heart of this process are ICC profiles. They serve as the linchpin, translating color data from one device to another in a consistent and reliable way. In a professional setting, incorrect colors can lead to miscommunication, skewed branding, and loss of credibility.
To ensure that you derive the maximum benefit from ICC profiles, consider using a color calibration tool, which can provide bespoke profiles tailored specifically for your devices.
Conclusion
In summation, ICC profiles are vital components of effective color management in Windows 11. Understanding where they are stored—both in the system directory and your personal user directory—enables you to customize your color experiences effectively. Considering the intricate relationship between devices and color reproduction, managing ICC profiles will contribute significantly to enhancing your digital imaging and design practices.
By mastering the locations and functionalities surrounding ICC profiles, Windows 11 users can ensure that their workflow remains uninterrupted, leading to more accurate and satisfying results in their creative endeavors.
Color management has become an essential aspect of digital workflows, especially for professionals in photography, design, and printing. ICC (International Color Consortium) profiles are used extensively to ensure consistent color reproduction across various devices like monitors, printers, and scanners. Windows 11, a modern operating system from Microsoft, offers built-in support for ICC profiles, enabling users to manage and utilize these profiles effectively. This article delves into the storage and management of ICC profiles in Windows 11, including where they are stored, how to access them, and tips for effective color management.
Understanding ICC Profiles
Before diving into how ICC profiles are stored in Windows 11, it’s vital to grasp what these profiles are. An ICC profile is a set of data that characterizes a color input or output device by defining the color characteristics of that device. These profiles help translate the colors from one device to another, ensuring that a color seen on a screen appears the same when printed or viewed on another screen.
These profiles come in various types, including:
- Input Profiles: For devices like scanners and cameras, which define how they capture colors.
- Display Profiles: For monitors and screens, which help represent colors accurately.
- Output Profiles: For printers that describe how colors are produced on paper.
By knowing where ICC profiles are stored, users can manage color settings for their devices effectively.
Location of ICC Profiles in Windows 11
In Windows 11, ICC profiles are stored in specific system directories that are integral to the operating system’s color management functionality. The main locations for ICC profiles include the following:
-
System Directory: By default, Windows stores ICC profiles in the
C:WindowsSystem32spooldriverscolordirectory. This is where the operating system and applications usually look for ICC profile files. -
User Directory: Windows also allows users to store custom ICC profiles in their local user profiles. The location for user-specific ICC profiles is
C:Users\AppDataLocalMicrosoftWindowsICM. -
Color Management App: Windows 11 includes a Color Management settings application that allows users to manage ICC profiles. This is accessible from the Control Panel or through the Settings app, where profiles can be added, removed, or changed for individual devices.
Accessing ICC Profiles
Method 1: Through Windows Settings
To view or change ICC profiles in Windows 11, follow these steps:
- Access Settings: Right-click on the Start menu and select “Settings,” or press
Windows + Ito open the Settings app directly. - Navigate to System: From the left sidebar, click on “System.”
- Find Display Settings: Scroll down and select “Display.”
- Advanced Display Settings: Click on “Advanced display settings” at the bottom of the Display section.
- Color Management: Under the “Display information” section, you’ll see a link to “Color management.” Click this link.
- Add or Change ICC Profiles: In the Color Management window, you can select the device (like your monitor) and add or remove ICC profiles from the list.
Method 2: Through Control Panel
Another way to access ICC profiles is through the traditional Control Panel:
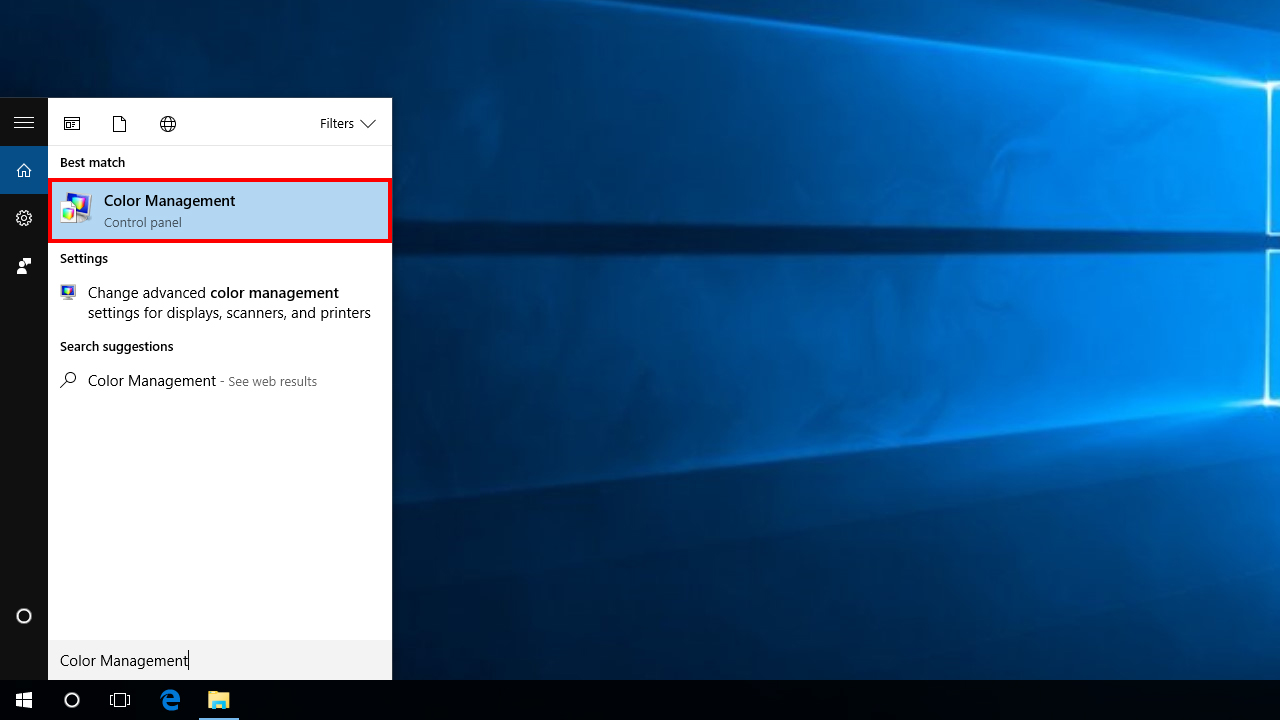
- Open Control Panel: Search for “Control Panel” in the Start menu.
- Search for Color Management: In the Control Panel, type “Color Management” into the search bar at the top right.
- Select the Color Management Option: Click on “Color Management” in the search results.
- Manage Profiles: You will be able to view and modify ICC profiles for connected devices.
Installing ICC Profiles
Sometimes, you may need to install a new ICC profile for specific devices, especially if you wish to calibrate a monitor or printer. Here are the steps to install ICC profiles in Windows 11:
-
Download the ICC Profile: ICC profiles can usually be downloaded from the manufacturer’s website. Ensure you have the correct profile for your device.
-
Copy the Profile: Navigate to the folder where the ICC profile is downloaded. The profile should end with the
.iccor.icmfile extension. -
Paste in the Appropriate Folder: Copy the ICC file and paste it into
C:WindowsSystem32spooldriverscolororC:Users\AppDataLocalMicrosoftWindowsICM. -
Open Color Management Settings: Follow the instructions above to open Color Management settings.
-
Add the Profile: In the Color Management window, make sure the correct device is selected and use the “Add” button to include the new profile.
Managing ICC Profiles
Managing ICC profiles effectively is essential for achieving accurate color representation across devices. Windows 11 provides several tools and options in the Color Management settings to help users do this.
Calibration Tools
-
Display Calibration: Windows also provides tools for display calibration, which is accessible from the Color Management settings. By following the on-screen instructions, users can adjust their display settings to match the ICC profiles accurately.
-
Third-party Calibration Software: For more detailed calibration, third-party software and hardware solutions from companies like X-Rite or Datacolor can be used. These typically include a calibration device that measures the colors on your screen and creates ICC profiles based on the readings.
Troubleshooting ICC Profile Issues
Sometimes, users may encounter issues related to ICC profiles. Here are common problems and troubleshooting tips:
-
Profile Not Loading: If the ICC profile is not recognized, ensure you have copied it to the correct folder and that the profile is compatible with your device.
-
Colors Appear Incorrect: If colors look off even after applying an ICC profile, double-check that the display is calibrated correctly and verify that you’re using the right profile.
-
Default Profile Conflicts: Sometimes, Windows may default to a different ICC profile. Make sure that the desired profile is set as the default in the Color Management settings.
-
Uninstalling a Profile: If you want to remove an unwanted profile, select it in the Color Management window and click the “Remove” button.
Conclusion
Understanding where ICC profiles are stored in Windows 11 and learning how to access, install, and manage them is crucial for any user working with color-critical applications. ICC profiles play a significant role in maintaining color accuracy across various devices, and Windows 11 provides a robust system for managing these profiles.
Whether you are a photographer, graphic designer, or anyone else who relies on color accuracy, mastering ICC profiles will enhance your work significantly. With the simple steps outlined in this article, you can manage ICC profiles efficiently, troubleshoot potential issues, and optimize your color settings for the best possible results.
Answer:
In Windows 10 and Windows 11, you can simply right-click on the .icc profile and click ‘Install Profile,’ or you can copy the file to the following location: C:Windows\system32\spool\drivers\color.
Next, you need to make some adjustments in Control Panel, all of which are described in the article.
What Is An ICC Profile?
ICC profiles are used to match the color values and gamma of your display with a particular device such as your camera, printer, scanner, etc.
In other words, an ICC profile is a LUT (Look-Up Table) with certain properties of a color gamut where a particular color will be displayed as the exact shade of it, not just any random tone of that color.
Now, when doing color-critical work in software such as Photoshop, it’s imperative to have a calibrated display in order for your image to look the same on other calibrated displays or when printing.
Keep in mind that the ICC profiles work best with the particular monitor due to panel variance.
So, even if you have the same monitor as another user’s ICC profile, the results won’t be precisely the same. In fact, sometimes monitor manufacturers even change the panel model of their monitors.
Regardless, you could still get an enhanced picture quality with better colors.
If you happen not to like it, you can always restore the settings to default.
For the most accurate settings, you will have to use a hardware calibration device, also known as a colorimeter, such as the Calibrite Display Pro HL that we use, for your own display — which is how you create the ICC profile in the first place.
We also have a guide on how to calibrate a monitor.
How To Install ICC Profiles

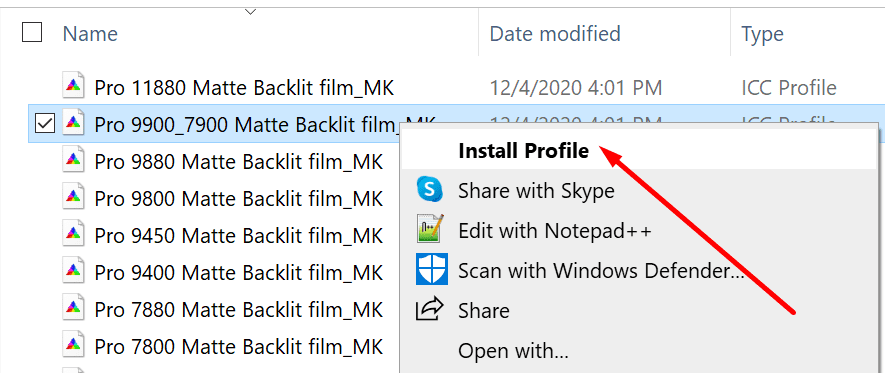
In Microsoft Windows, after you download the .icc profile, you can simply right-click on it and select ‘Install Profile.’
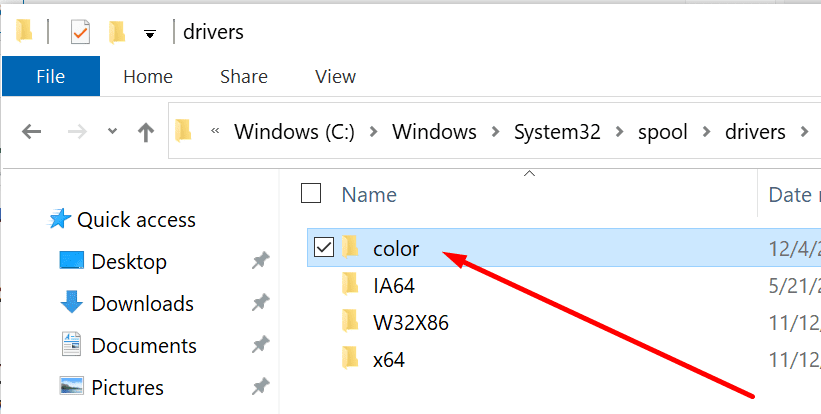
If you can’t add the ICC profile that way — which can be the case if you have already installed a profile before and want to replace it, copy the profile to the following folder location where the ICC profiles are stored:
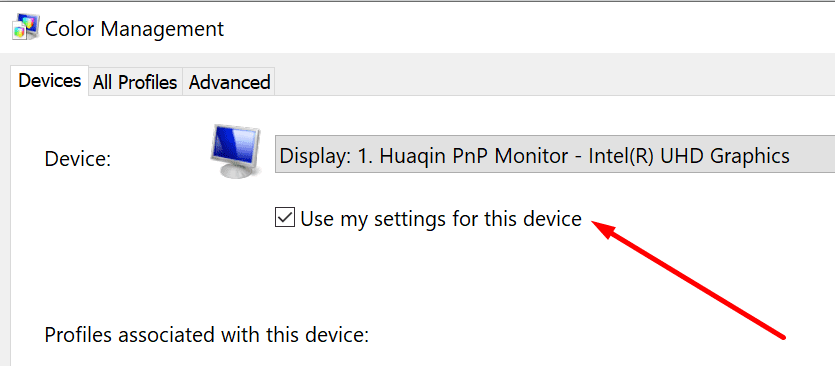
C:/Windows/system32/spool/drivers/colorNext, open the Color Management from the Control Panel. Tick ‘Use my settings for this device‘ option and then ‘Add…‘ the ICC profile.
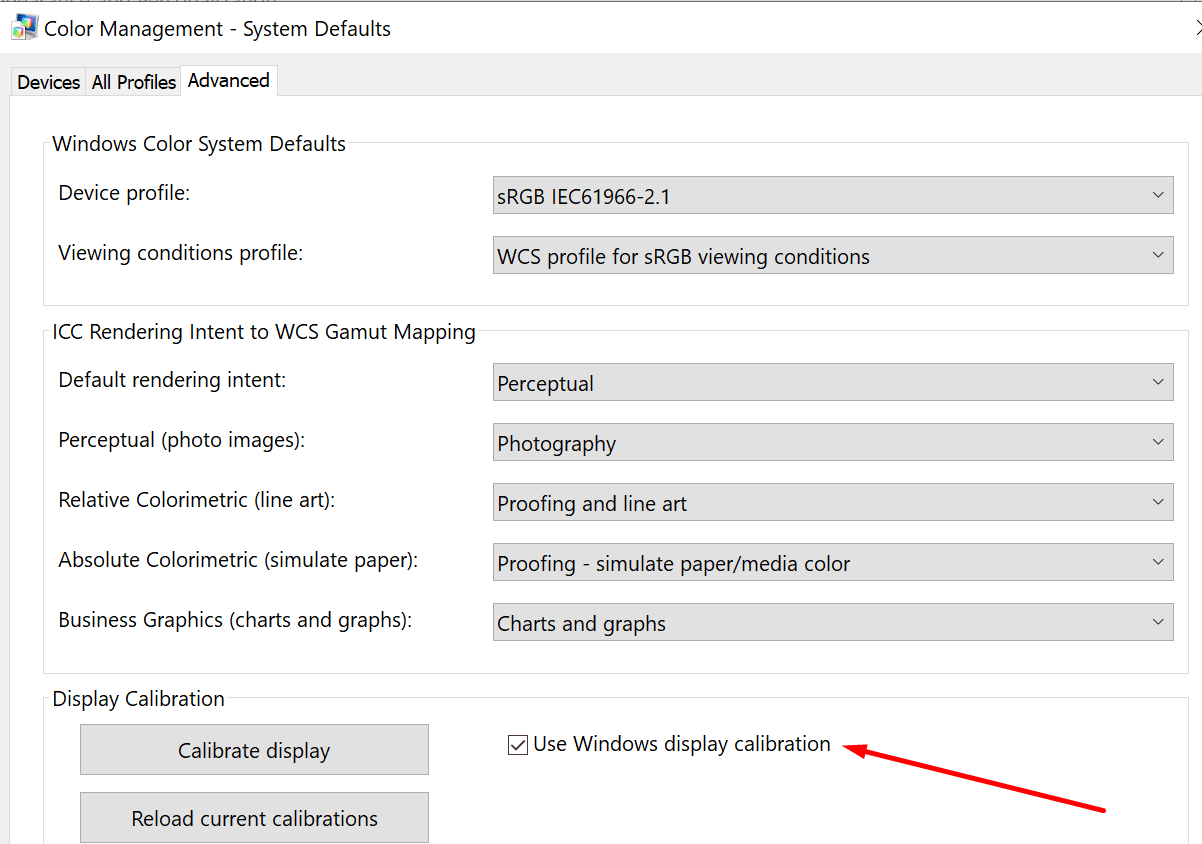
After that, go to the ‘Advanced‘ tab where you will have to click on the “Change system defaults” first, then ‘Advanced‘ again and tick ‘Use Windows display calibration‘. You can now close all windows.
That’s how easy it is to load an ICC profile.
This method works for installing the ICC profiles for Windows Vista, 7, 8, 10 and 11.
MAC OS X users can copy the profiles to:
- /Library/Colorsync/Profiles
- ~/Library/Colorsync/Profiles
Depending on whether the profile should apply to the entire system or just a specific user.
Install ICC Profiles – Easier Way
There’s also a great and free ICC software called DisplayProfile, which you can use to store many ICC presets and quickly swap between them.
It will list all ICC profiles found in the C:/Windows/system32/spool/drivers/color location and you just select which one you want to apply.
For multiple monitors, you just drag the DisplayProfile window to the background of a monitor you want to change the ICC profile and select the profile.
When using an ICC profile, Google Chrome will automatically use it for color management. If you’re using Mozilla Firefox, you’ll need to make the following changes:
Type "about:config" in the URL bar
Set "gfx.color_management.mode" to "1"
Set "gfx.color_management.display_profilem" to "false"
Some games will ignore your ICC profile when run in full-screen. In this case, you’ll need to use software such as Color Clutch, Color Profile Keeper or Reshade to force the ICC profile, but this method may not work for all games.
The DisplayCAL Profile Loader is also a very useful free application that will re-apply the ICC profile you set as default anytime Windows or a certain application reverts to the default sRGB IEC61966-2.1 profile. You’ll need to use it in combination with the above-mentioned apps for the full-screen games.
If you’re unsatisfied with the results, you’ll have to get a colorimeter and calibrate your monitor or try manually fine-tuning your monitor calibration using Lagom test images.
ICC profiles can also be used to restrict the monitor’s native color gamut to a specific color space. You can find more about this in our sRGB emulation article.

An ICC profile is a set of data that your Windows 10 computer relies on to match your display color values to your external devices. In other words, it calibrates the color accuracy of your devices.
Your PC activates the ICC profile every time you connect a camera or a printer. Using the correct ICC profile is crucial when working with image editing tools such as Photoshop. You want to calibrate your devices so as to get the same colors on both.
For example, not using the right ICC profile may result in getting different shades of green on your PC and printer.
Contents
- 1 Steps to Install an ICC Profile on Windows 10
- 1.1 Method 1
- 1.2 Method 2
Method 1
- Download the .icc profile you want to install.
- Go to the Download folder, and right-click on the ICC profile.
- Select Install profile.

- Wait until Windows completes the install process.
Method 2
- Copy your ICC profile to C:/Windows/system32/spool/drivers/color.

- Go to Control Panel.
- Navigate to Color Management.
- Enable the following option: Use my settings for this device.

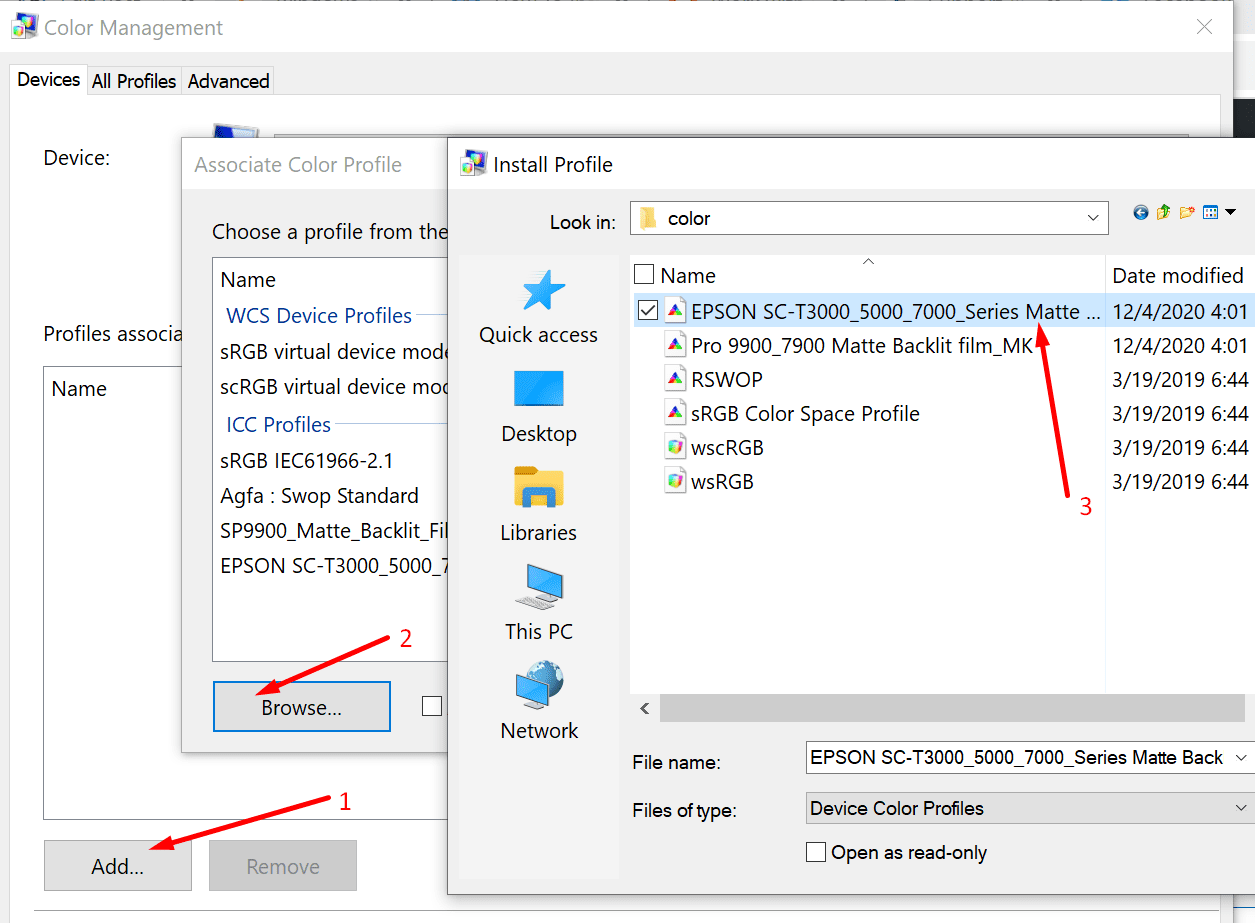
- Then add your ICC profile.

- Navigate to the Advanced tab.
- Select Change system defaults (bottom of the window).

- Then enable the option called Use Windows display calibration.

Where Can I Find The Right ICC Profile For my Device?
The main source for ICC profiles should be the official website of your device’s manufacturer. For example, if you need an ICC profile for your Epson printer, go to Epson’s website.
Select your printer model and go to the page where you can download the ICC profile for your device model. ICC profiles usually come in a .zip file format. In other words, you need to first unzip the folder and then extract the files.
The bad news is that not all hardware manufacturers provide users with ICC profiles. Another option is to simply search for the ICC profiles you need on third-party websites. But don’t download your ICC profiles from shady-looking websites. The risk of malware tagging along is just not worth it.
Author Madalina Dinita
Madalina has been a Windows fan ever since she got her hands on her first Windows XP computer.
She is interested in all things technology, especially emerging technologies — AI and DNA computing in particular.
Our Basic Calibration service supports Windows 7 or later. The following tutorial shows how to load a display calibration ICC Profile using Windows. View the Mac version.
Windows 7+
-
Step 1: Color Management
-
Step 2: Enable Calibration
-
Step 3: Apply ICC Profile
-
Step 4: Multiple Displays
Download the Sample ICC Profiles.
Windows 7+
Default ICC Profile Location: C:\Windows\system32\spool\drivers\color
Note: Currently with a multi-display setup, the screen mode must be set to extended (not duplicated) for the ICC Profiles to load. See Step 4.
Step 1: Color Management
In the start menu, type “Color Management”, then open the application.
Step 2: Enable Calibration
Note: This step is only required once during initial setup.
Click on the “Advanced” tab, then click “Change system defaults”.

In the new pop-up window click on the “Advanced” tab, then check the box “Use Windows display calibration”. Finally, close the window.

Step 3: Apply ICC Profile
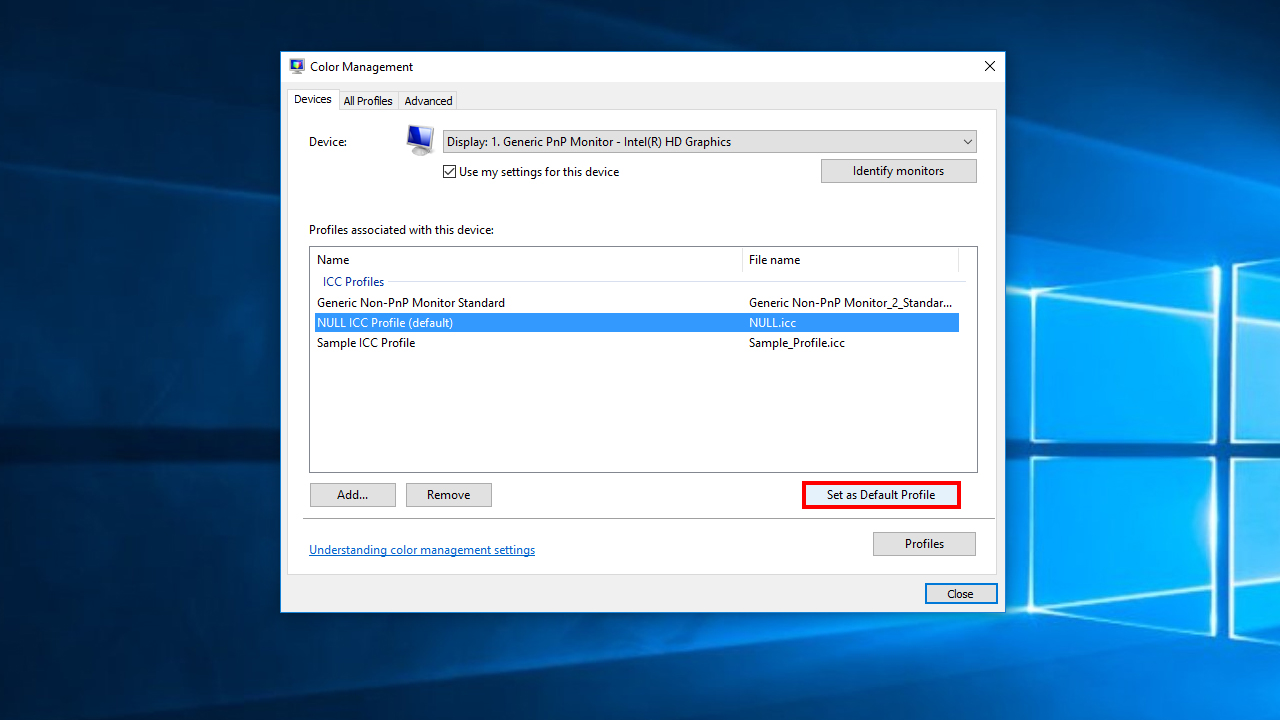
Under the “Devices” tab, select the desired display. Make sure “Use my settings for this device” is checked, then click “Add”.

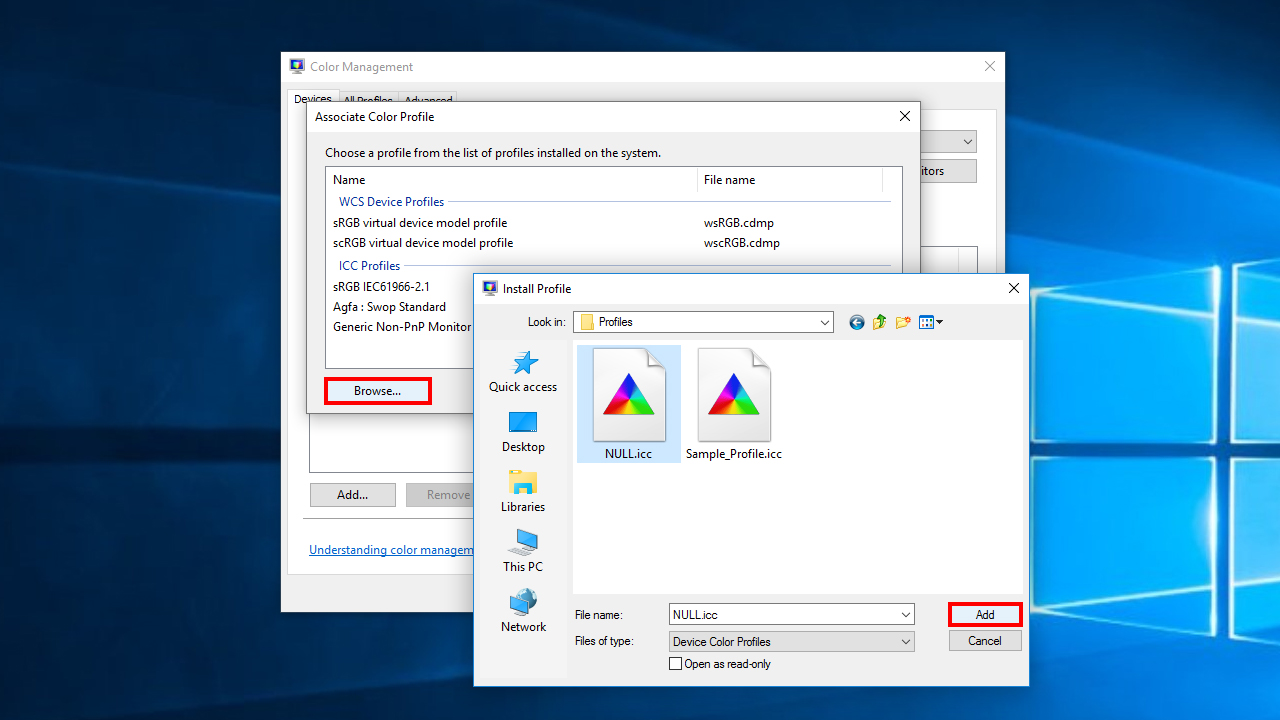
In the pop-up window, click “Browse” and locate the ICC Profile.
Select the ICC Profile in the list and click “Set as Default Profile”.
Step 4: Multiple Displays
To enable ICC Profiles for multiple displays, right-click on the desktop and choose “Display settings”. Scroll down to “Multiple displays” and set it to “Extend these displays”.

Learn how to install ICC Profiles on a Mac.
Contact
For any questions or inquiries, please contact us.