
Все способы:
- Способ 1: Активация в «Программах и компонентах»
- Способ 2: Активация через «PowerShell»
- «Hyper-V» в Windows 10 Home
- Вопросы и ответы: 14
Способ 1: Активация в «Программах и компонентах»
Платформа виртуализации «Hyper-V» является встроенным компонентом системы, однако по умолчанию она отключена. Чтобы иметь возможность пользоваться этим инструментом и запускать его из меню «Пуск», сначала его нужно активировать.
- Запустите апплет «Компоненты Windows» командой
optionalfeatures, выполненной в диалоговом окошке быстрого запуска, вызываемого нажатием клавиш Win + R. - Найдите в списке пункт «Hyper-V», отметьте его флажком и нажмите «OK». Установка будет выполнена автоматически, дополнительно Windows может потребовать перезагрузить компьютер.

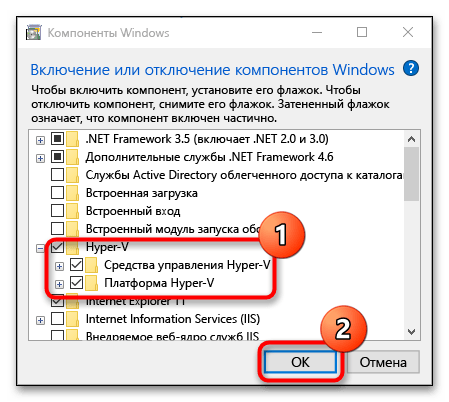
После этого ярлыки запуска гипервизора станут доступны в меню «Пуск» и списке Windows. Если чекбокс «Hyper-V» затенен частично, разверните пункт и посмотрите, доступен ли для активации компонент «Платформа Hyper-V». Если название имеет блеклый цвет, а флажок в чекбоксе установить не удается, платформа виртуализации «Hyper-V» на данном компьютере недоступна в силу аппаратных ограничений процессора.
Способ 2: Активация через «PowerShell»
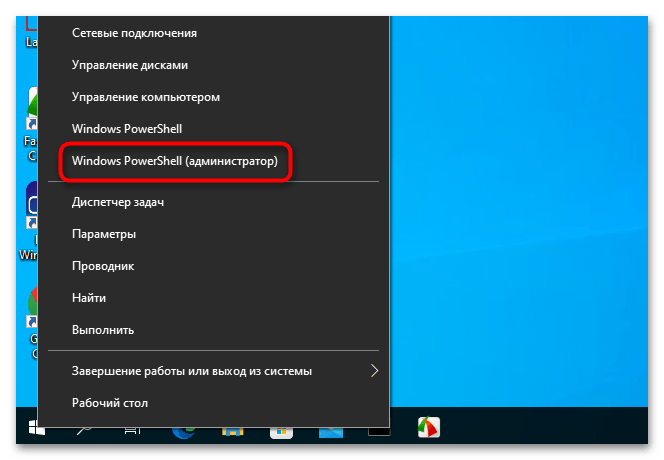
Активировать компонент «Hyper-V» можно также из «PowerShell» или классической «Командной строки».
- Запустите ту или иную консоль от имени администратора из контекстного меню кнопки «Пуск» или поиска Windows.
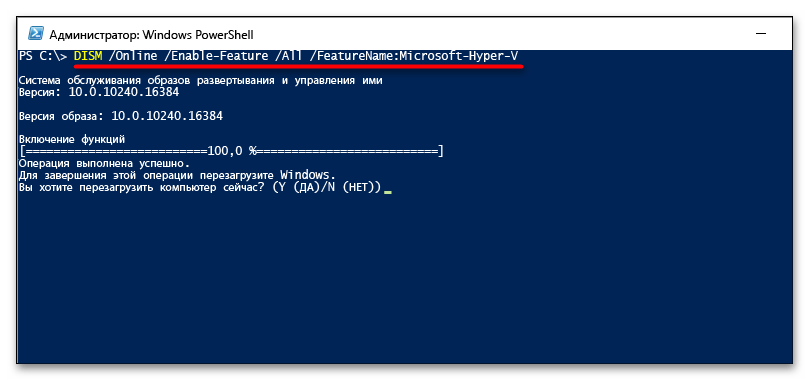
- Выполните команду
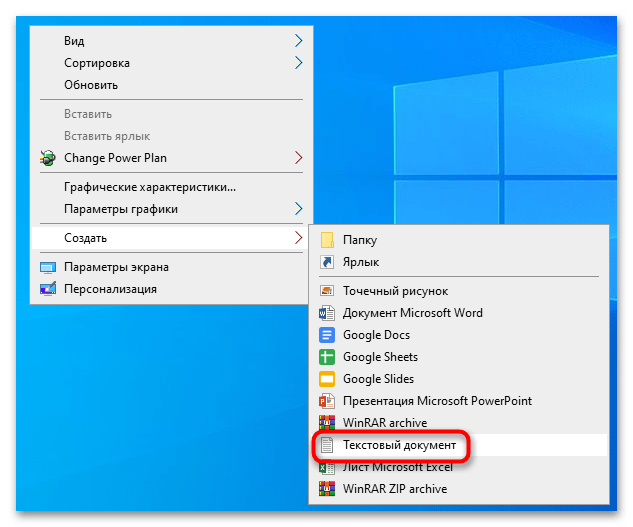
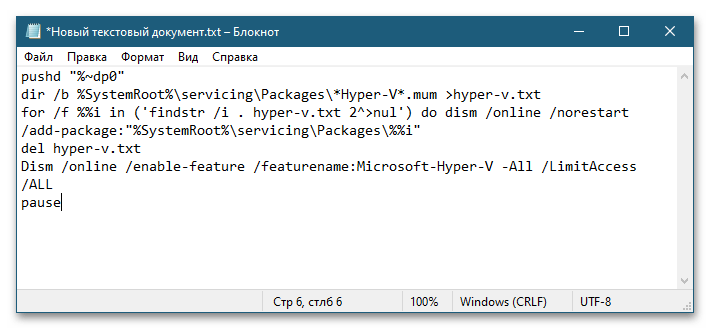
DISM /Online /Enable-Feature /All /FeatureName:Microsoft-Hyper-V. - Создайте «Блокнотом» текстовый файл на рабочем столе или в любом другом расположении.
- Вставьте в него такой код:
pushd "%~dp0"

dir /b %SystemRoot%\servicing\Packages\*Hyper-V*.mum >hyper-v.txt

for /f %%i in ('findstr /i . hyper-v.txt 2^>nul') do dism /online /norestart /add-package:"%SystemRoot%\servicing\Packages\%%i"

del hyper-v.txt

Dism /online /enable-feature /featurename:Microsoft-Hyper-V -All /LimitAccess /ALL
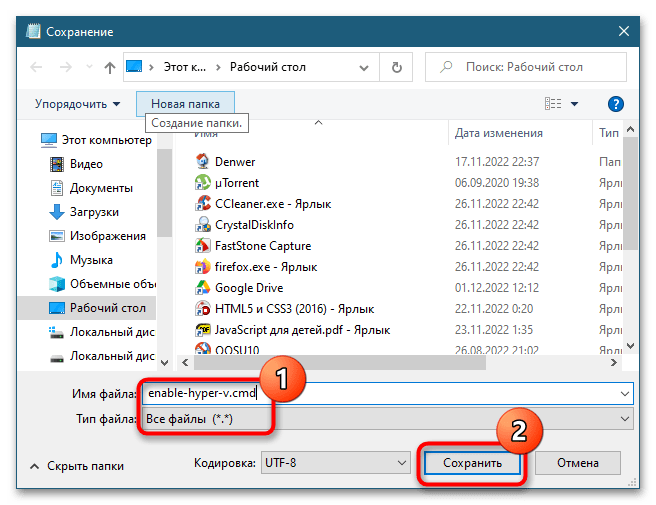
Pause - Сохраните файл как enable-hyper-v.cmd. Название может быть произвольным, главное, чтобы расширение файла было .cmd или .bat.
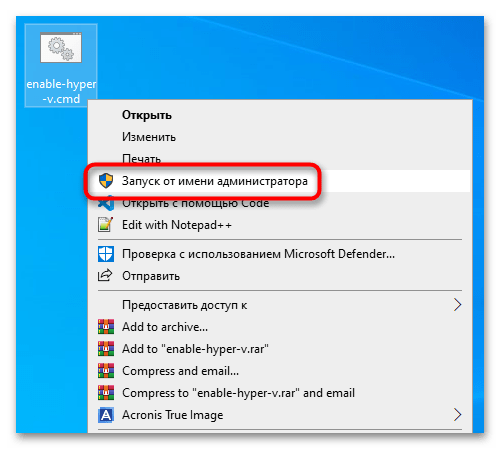
- Запустите созданный скрипт от имени администратора. После того как командный файл отработает, активируйте «Hyper-V» в окне апплета «Компоненты Windows».
Перезагрузите компьютер, введя в консоли «Y» и нажав клавишу ввода.
«Hyper-V» в Windows 10 Home
В Windows 10 редакции Home компонент «Hyper-V» не просто неактивен, он отсутствует в списке апплета «Компоненты Windows». Чтобы сделать его доступным, выполните следующие действия:
Отсутствие компонента «Hyper-V» может иметь и другие причины, в частности удаление его автором сборки (при скачивании пиратских копий ОС), что иногда встречается в выложенных в свободный доступ пользовательских релизах. В таких случаях рекомендуется выполнить обновление Windows 10 до новой сборки с помощью официального установочного образа либо переустановить систему.
Наша группа в TelegramПолезные советы и помощь

The Windows Hypervisor Platform in Windows 11 is a fundamental component of virtualization in Windows 11, allowing users to run virtual machines with enhanced performance and compatibility. Enabling the Windows Hypervisor Platform unlocks many features, including support for Hyper-V and other virtualization technologies. In this guide, we’ll walk you through the simple steps to enable the Windows Hypervisor Platform on your Windows 11 system, empowering you to harness the full potential of virtualization.
How to Turn on Windows Hypervisor Platform in Windows 11?
- Click on the Start Menu and open the Control Panel.
- Switch the Control Panel view to Category.

Category View
- Now, Click on Programs.

Programs
- Under Programs and Features, click on Turn Windows Features on or off.

Turn Windows Features on or off
- Windows Features dialog box will open now.
- Search and locate the Windows Hypervisor Platform from the list of services available .

Enable Windows Hypervisor Platform in Windows 11
- Click on the checkbox next to it and then click on OK.
- The system will prompt for a restart. Click Close. Continue with Restart if prompted. It is recommended that changes made to the system reflect while using the environment.

Close
- That is it, Windows Hypervisor Platform is now enabled on your Windows 11 laptop or PC. Enjoy Seamless Connectivity.
The Windows Hypervisor Platform serves as the foundation for running virtual machines on Windows 11. It provides a robust and secure environment for hosting virtualized workloads, enabling efficient resource utilization and seamless integration with other Windows features.
Check System Compatibility:
- Press Windows + R to open the Run dialog box.
- Type msinfo32 and press Enter to open the System Information window.
- Look for the “ Hyper-V Requirements ” section and verify that all requirements are met, including CPU support for virtualization technology and hardware-assisted virtualization.
Enable Virtualization in BIOS/UEFI:
- Restart your computer and access the BIOS/UEFI settings by pressing the designated key during startup (often Del, F2, or Esc ).
- Navigate to the virtualization settings (usually located under CPU or Advanced settings ).
- Enable Intel VT-x or AMD-V (depending on your processor) and any other relevant virtualization features.
Save the changes and exit the BIOS/UEFI settings. - Once virtualization support is enabled in the BIOS/UEFI settings, you can proceed to enable the Windows Hypervisor Platform in Windows 11 using the above-mentioned steps.
Take away:
By following the steps outlined in this guide, you can ensure compatibility with virtualization technologies and unlock a world of possibilities for development, testing, and productivity. Explore the potential of virtualization with the Windows Hypervisor Platform and elevate your Windows 11 experience today. Happy Coding! Peace out!
Sign in to your MUO account
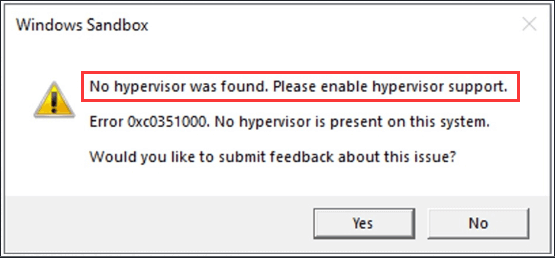
Windows Sandbox is a handy utility to test untrusted apps and files in a secure virtual environment. The setup process is pretty straightforward for Windows Sandbox. However, when you try to launch the app, you may encounter the «No Hypervisor was found code 0XC0351000» error.
The error message indicates that Windows Sandbox was unable to detect Hypervisor. This can happen due to many reasons, including incorrectly configured virtual machine-related features in Windows Features.
Follow the steps in the article below to troubleshoot this error on your Windows PC.
1. Check and Enable Virtualization Technology in BIOS
All the virtualization-based tools need hardware virtualization enabled in BIOS to work. If you haven’t configured your hardware virtualization, check if it is enabled in Task Manager. If not, you can manually enable it in BIOS to support virtualization tools.
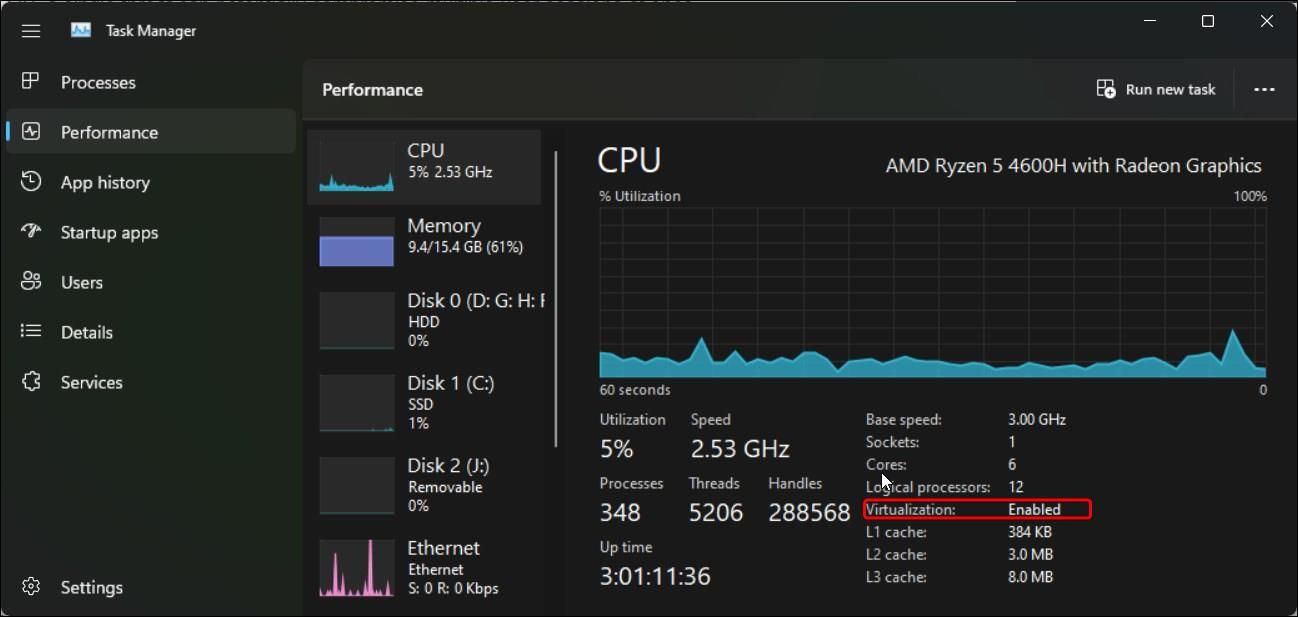
To check the virtualization status:
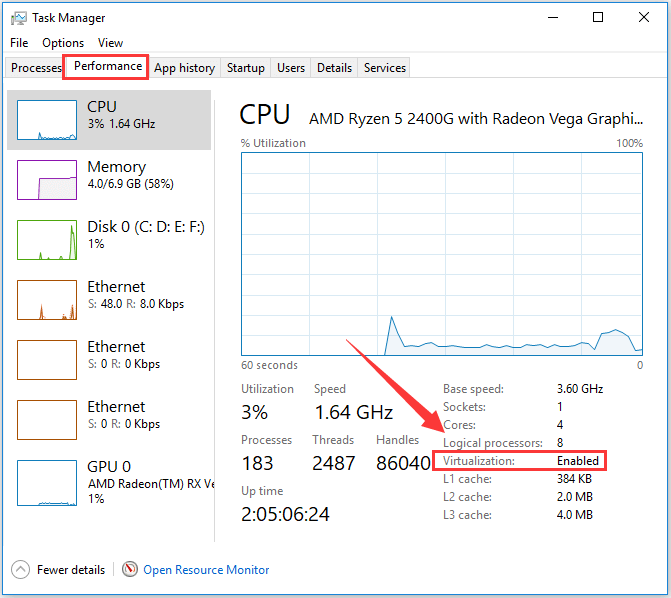
- Right-click on Start and open Task Manager.
- In Task Manager, open the Performance tab.
- Next, make sure the CPU tab is selected.
- Locate the Virtualization section. If Enabled, skip to the next method.
- If Disabled, follow the steps below to enable hardware virtualization on your computer.
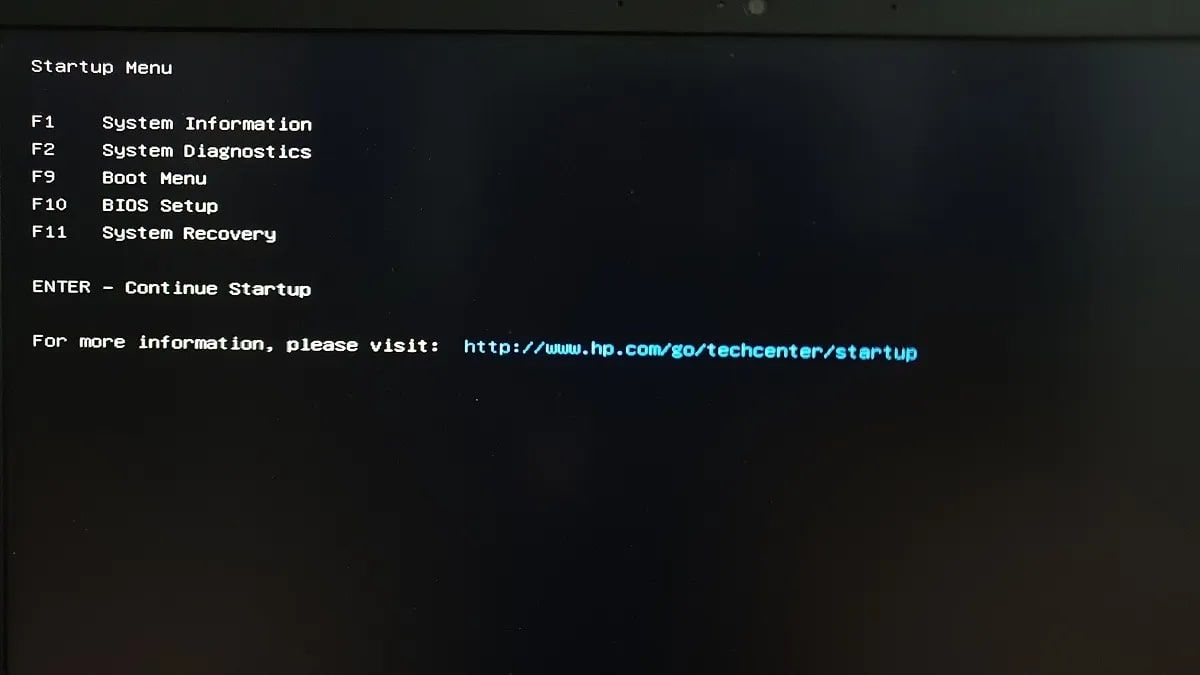
Now we’ll cover how to enable Hardware Virtualization in BISO on an HP computer. The instructions to enable hardware virtualization may vary depending on your computer manufacturer. You can find specific instructions on your computer manufacturer’s website, or check out how to enter the BIOS in Windows 10/11.
- Shut down your PC.
- Press the Power button and then start pressing the Esc key to view the Start menu.
-
Press F10 to enter BIOS Setup.

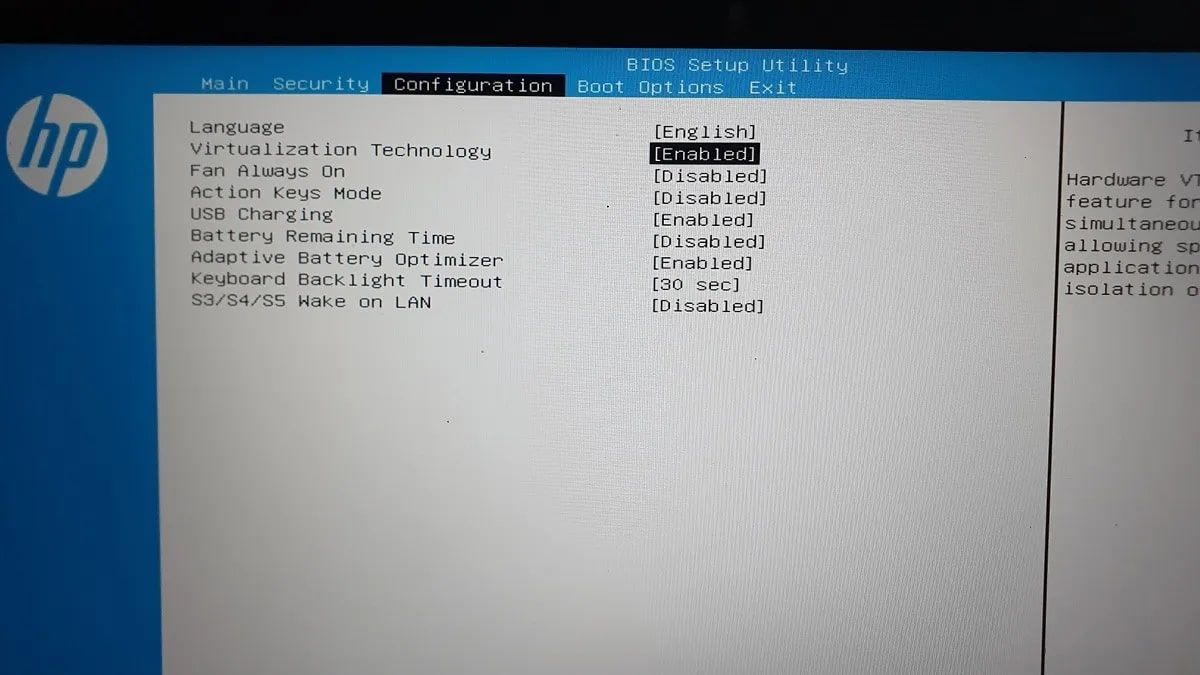
- In the BIOS Setup Utility, use the right-left arrow keys to locate and open the Configuration tab.
-
Next, use the down-up arrow keys to select Virtualization Technology or anything with similar terms.
- With the option highlighted, press Enter and select Enabled from the options. Now the Virtualization Technology status will show as Enabled.
- Press F10 again to save the changes and exit BIOS.
Wait for your computer to restart. Open Task Manager to see the Virtualization status in the CPU tab. If it says «Enabled,» try to open Windows Sandbox to see if it works without the error.
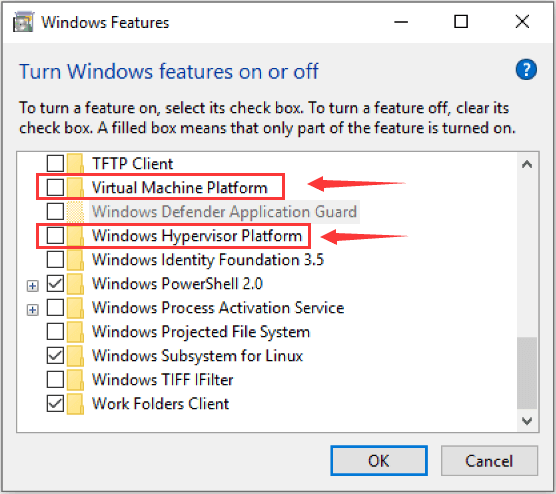
2. Enable Virtual Machine Platform Features
Windows Sandbox is available as an optional feature that you can install from the Windows Features dialog, and we’ve covered how to do this in our guide on how to enable and set up Windows Sandbox in Windows 11. Similarly, you may need to enable a few additional optional features essential to run the virtualization tool successfully.
The two optional features you need to enable are Virtual Machine Platform and Windows Hypervisor Platform. These tools enable platform support for virtual machines and provide the necessary API to run virtualization software on Windows.
To enable virtualization features:
- Press Win + I to open Settings.
-
Type appwiz.cpl and click OK to open Control Panel.

-
In the left pane, click on Turn Windows features on or off.

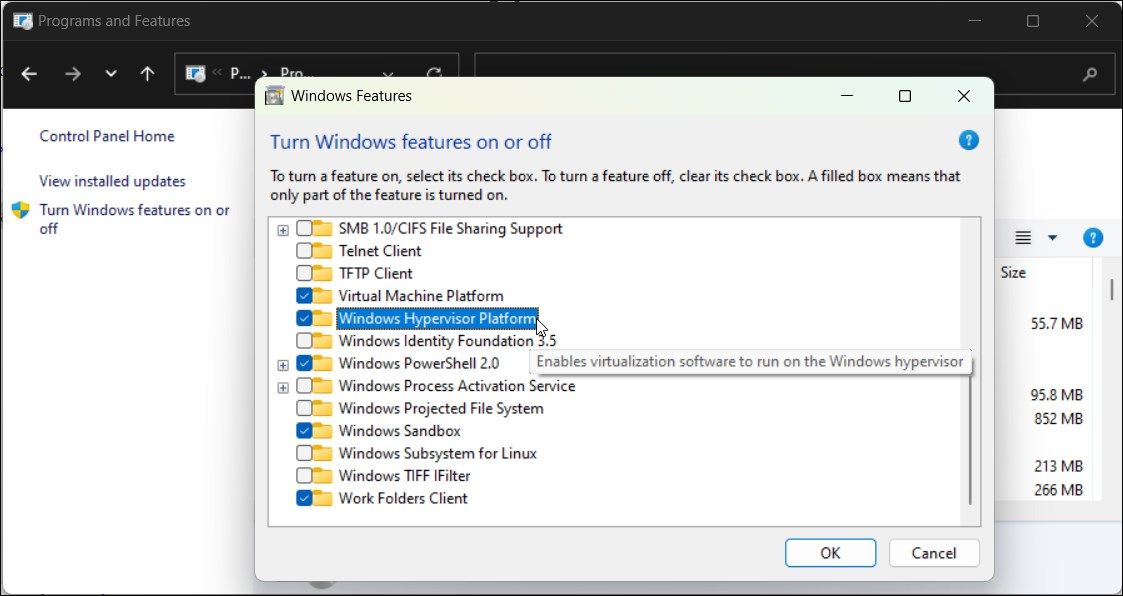
- In the Windows Features dialogue, scroll down and locate Virtual Machine Platform and Windows Hypervisor Platform.
- Select both options and click OK.
- Windows will start installing the necessary files. So, wait for the process to complete. Once done, click on Restart Now to restart your system and apply the changes.
3. Set Hypervisor to Run at System Startup
Windows Sandbox may not work if Hypervisor fails to start during system startup. To fix this issue, you can modify your Boot Configuration Data (BCD) file to launch Hypervisor automatically at system startup.
To set Hypervisor to launch at system startup:
- Press the Win key and type cmd. Then, right-click on Command Prompt and select Run as administrator.
-
In the Command Prompt window, type the following command and press Enter:
BCDEDIT /Set {current} hypervisorlaunchtype auto - Wait for the success message and restart your PC.
-
After the restart, open Command Prompt as administrator and run the following command:
bcdedit - Next, scroll down to the Hypervisorlaunchtype entry and make sure it is set to Auto.
- Try to launch Windows Sandbox and check if the No Hypervisor was found error is resolved.
Note that with the Hypervisor set to launch at startup, virtual machines running on third-party virtualization tools such as VMWare may not work correctly.
To disable Hypervisor at startup, type the following command in the elevated Command Prompt:
bcdedit /set hypervisorlaunchtype off
Once done, restart your computer to apply the changes.
Get Set With Your Sandbox Again
While only available on the Pro, Enterprise, and Education editions of the Windows 10 and 11 running systems, Sandbox is an excellent lightweight virtualization solution to test unsafe files and apps on your PC.
However, if this virtualization option is unavailable, consider using a Windows Sandbox alternative such as Sandboxie-Plus. It is free to use and works on all the editions of Windows OS.
Let us take a closer look at the error Windows Sandbox No Hypervisor Found error. With the support of our server management support services, we will give you a complete overview of the error.
Error: Windows Sandbox No Hypervisor Found error
Windows Sandbox is a useful tool for testing untrusted programs and data in a safe virtual environment.
The installation of Windows Sandbox is rather simple. When we try to open the program, however, we will receive the “No Hypervisor was discovered code 0XC0351000” issue.
According to the problem notice, Windows Sandbox was unable to recognize Hypervisor. This can occur for a variety of reasons, including improperly set up virtual machine-related capabilities under Windows Features.
To troubleshoot this problem on the Windows PC, follow the methods in the article below.
1. Check and Enable Virtualization Technology in BIOS
To function, all virtualization-based tools require hardware virtualization to in the BIOS.
Check Task Manager to see if the hardware virtualization is set up if not done. If not, we may enable it in BIOS to support virtualization tools manually. This is the first step in Windows Sandbox No Hypervisor Found error management.
To verify the state of virtualization, do the following:
- Open Task Manager by right-clicking on the Start button.
- Open the Performance tab in Task Manager.
- Next, ensure that the CPU tab is chosen.
- Navigate to the Virtualization section. Skip to the next method if Enabled.
Follow the instructions below to activate hardware virtualization on the machine if it is not active.
We’ll now go through how to activate Hardware Virtualization in BISO on an HP machine. The steps for enabling hardware virtualization may differ depending on the manufacturer of the machine.
-
- Turn off the computer.
- To access the Start menu, hit the Power button and then begin pressing the Esc key.
- To enter BIOS Setup, press F10.
- Use the right-left arrow keys to navigate to and open the Configuration tab in the BIOS Setup Utility.
- Then, using the down and up arrow keys, pick Virtualization Technology or something similar.
With the option underlined, hit Enter and choose Enabled from the menu.
- state of the Virtualization Technology will now be active.
- F10 once more to save the changes and exit BIOS.
Allow the computer to reboot. To view the Virtualization status under the CPU tab, use Task Manager. Whether it shows “Enabled,” try opening Windows Sandbox and seeing if it works without the error.
2. Enable Virtual Machine Platform Features
Windows Sandbox is an optional feature that we may enable via the Windows Features dialog. Similarly, we may need to activate a few extra optional capabilities in order to correctly execute the virtualization program.
Virtual Machine Platform and Windows Hypervisor Platform are the two optional features we must activate. These utilities provide virtual machine platform support and offer the API required to run virtualization software on Windows.
To activate virtualization features, do the following:
- To open Settings, press Win + I.
- To launch Control Panel, type appwiz.cpl and press OK.
- Turn Windows features on or off in the left pane.
- Scroll down in the Windows Features dialog to find Virtual Machine Platform and Windows Hypervisor Platform.
- Click OK after selecting both choices.
- Windows will begin to install the required files. So, just wait for the procedure to finish. After that, click Restart Now to restart the system and implement the changes.
3. Set Hypervisor to Run at System Startup
If the Hypervisor fails to launch on system startup, Windows Sandbox may not function properly. To resolve this issue, we can alter the Boot Configuration Data (BCD) file to automatically activate Hypervisor upon system startup.
To configure Hypervisor to launch upon system boot:
- Enter cmd into the Win key. Right-click Command Prompt and choose Run as admin.
- Enter the following command into the Command Prompt window:
BCDEDIT /Set {current} hypervisorlaunchtype auto - Wait for the success notification before restarting the computer.
- After restarting the computer, launch Command Prompt as administrator and type the following command:
bcdedit - Scroll down to the Hypervisorlaunchtype entry and make sure the mode is Auto.
- Launch Windows Sandbox to see whether the No Hypervisor Found problem has been addressed.
Please note consider that we chose the Hypervisor to launch at boot. Virtual machines running on third-party virtualization solutions such as VMWare may not function properly.
In the elevated Command Prompt, run the following command to disable Hypervisor upon startup:
bcdedit /set hypervisorlaunchtype offAfter that, restart the computer to have the modifications take effect.
Get Set With the Sandbox Again
Sandbox is an amazing lightweight virtualization option for testing dangerous files and programs on the PC. It is only accessible on the Pro, Enterprise, and Education editions of Windows 10 and 11.
If this virtualization option is not accessible, consider Sandboxie-Plus, a Windows Sandbox alternative. It is free to use and compatible with all versions of Windows.
[Need assistance with similar queries? We are here to help]
Conclusion
To sum up we have now gone through how to manage the Windows Sandbox No Hypervisor Found error. With the support of our server management support services, we have now learned to remove the error.
PREVENT YOUR SERVER FROM CRASHING!
Never again lose customers to poor server speed! Let us help you.
Our server experts will monitor & maintain your server 24/7 so that it remains lightning fast and secure.
GET STARTED
-
Home
-
Partition Manager
- Windows Sandbox No Hypervisor Was Found – Here’s How to Fix
By Amanda |
Last Updated
Sometimes, Windows users get an error prompting that “No hypervisor was found. Please enable hypervisor support” while opening Windows Sandbox. It can be fixed easily. Just keep reading this post to learn more about the detail.
Windows Sandbox is a phenomenal addition to Windows 10, which is susceptible to plenty of issues as well. No hypervisor was found is one of the common problems of Windows Sandbox. By the way, you can go ahead to MiniTool Partition Wizard to learn more information about Sandbox that make Windows 10 Pro the OS for PC enthusiasts.
About Windows Sandbox
Windows Sandbox is a built-in tool designed for users of Windows 10 Pro or Enterprise or later. It is used to safely running applications in isolation.
If you have downloaded an executable file but worry about whether it is safe to run in your computer, Windows Sandbox is a perfect tool for you.
Windows Sandbox is a part of Windows but is isolated from the host. You can run untrusted software in this isolated, temporary desktop environment without worrying about any impact to your host. Besides, any software installed in Windows Sandbox and its files will be deleted permanently when you close it.
However, certain issues could be found when using Windows Sandbox, including the internet connectivity problems and no hypervisor was found error.
In the next part of this post, I will tell you how to do if no hypervisor was found error appears when you run Windows Sandbox.
Fix 1: Make Sure Virtualization is Enabled
Just like any other virtual machine, Windows Sandbox is designed to use hardware-based virtualization for kernel isolation to isolate from the host. And this relies on Microsoft’s hypervisor.
Therefore, if no hypervisor was founder error appears, you need to check if CPU Virtualization is enabled.
To check CPU Virtualization, you need to open the Task Manager first by right-clicking the Start button and choosing Task Manager from the menu. In the pop-up window, click the Performance tab and you can see the status of Virtualization just as the following picture shows.
If Virtualization is shown as disabled here, go ahead to enable it in BIOS or UEFI setting.
Take BIOS as an example, you need to enter the BIOS after saving and closing all the current tasks. Then jump to the Advanced tab and enable Intel Virtualization Technology.
Note: The way to enter the BIOS and the process to enable virtualization could be different if you operate on different computers. Besides, if you are using a virtual machine, enable nested virtualization with this PowerShell cmdlet: Set-VMProcessor -VMName <VMName> -ExposeVirtualizationExtensions $true
Fix 2: Turn on Windows Features
If “No hypervisor was found” error still shows up after enabling CPU Virtualization, it is wise for you to enable some Windows features. Windows Sandbox can run successfully with the help of some operating system-based features. Let’s see how to turn on these features.
Step 1: Type Windows Feature in the search box.
Step 2: Choose Turn Windows features on or off among the listed apps to open it.
Step 3: Locate the features labeled Virtual Machine Platform and Windows Hypervisor Platform, and select the check boxes beside them.
Step 4: Click OK button to turn them on, then reboot your computer to see if the error has been resolved.
Fix 3: Add an Entry to BCD
The final operation you can do to remove the error is to ensure the hypervisor is configured to run automatically at computer startup. In order to make this configuration, you need to add an entry to the Boot Configuration Data (BCD) in Command Prompt.
Just do as the following steps.
Step 1: Run Command Prompt as Administrator.
Step 2: Type BCDEDIT /Set {current} hypervisorlaunchtype auto and press Enter key.
Step 3: Reboot your computer and run Command Prompt again as Step 1.
Step 4: Type bcdedit and press Enter.
Then, you will get some information as the following screenshot shows.

Please pay attention to the item hypervisorlaunchtype. The status showing beside this item should be Auto, which means that hypervisor has been set to run at computer startup.
Now, it’s your turn. Just do according to the instruction above to fix Windows Sandbox no hypervisor was found error by yourself.
About The Author
Position: Columnist
Amanda has been working as English editor for the MiniTool team since she was graduated from university. She enjoys sharing effective solutions and her own experience to help readers fix various issues with computers, dedicated to make their tech life easier and more enjoyable.
Amanda has published many articles, covering fields of data recovery, partition management, disk backup, and etc. In order to provide more useful tips and information, she is still committed to expand her technical knowledge.