
Windows 11, как и предыдущие версии системы, включает поддержку платформы виртуализации Hyper-V, позволяющую легко создавать и использовать виртуальные машины. Функция по умолчанию доступна лишь в редакциях Pro и Корпоративная, но при желании Hyper-V можно установить и в Windows 11 Домашняя.
В этой пошаговой инструкции подробно о том, как включить или установить Hyper-V в разных редакциях Windows 11, включая Home, а также об отключении Hyper-V при необходимости. Про процесс создания виртуальных машин можно прочитать в инструкции Как создать и использовать виртуальные машины Hyper-V.
- Как включить или установить Hyper-V в Windows 11
- Windows 11 Pro и Enterprise
- Windows 11 Домашняя
- Как отключить Hyper-V
Установка Hyper-V в Windows 11
Виртуальные машины Hyper-V доступны в виде компонента в Windows 11 Pro и Enterprise, но отсутствуют в редакции «Домашняя», хотя мы можем включить их и там, что также будет показано в инструкции.
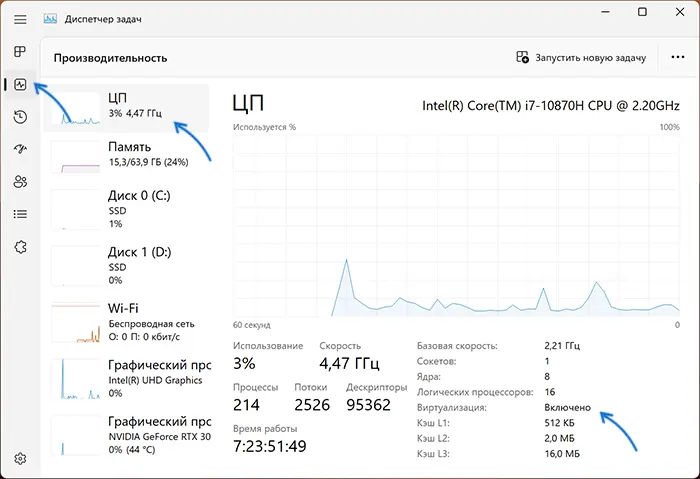
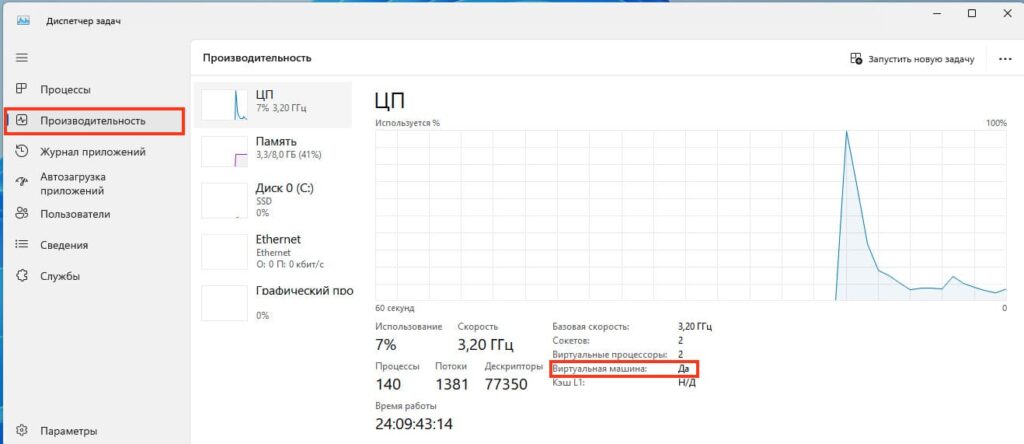
Прежде чем приступать, учитывайте: для работы виртуальных машин Hyper-V требуется поддержка виртуализации. Быстрый способ проверить её наличие — открыть диспетчер задач, перейти на вкладку «Производительность» и выбрать пункт «ЦП».
Если в пункте «Виртуализация» вы видите «Включено», можно продолжать. Иначе имеет смысл включить виртуализацию в БИОС/UEFI, при условии, что ваш процессор её поддерживает.
Включение Hyper-V В Windows 11 Pro и Enterprise
Для того, чтобы включить компоненты Hyper-V в Профессиональной и Корпоративной редакциях, выполните следующие шаги:
- Нажмите правой кнопкой мыши по кнопке «Пуск», выберите пункт «Выполнить», введите appwiz.cpl и нажмите Enter.

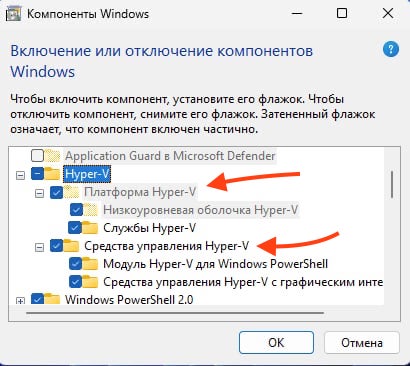
- В открывшемся окне слева нажмите «Включение или отключение компонентов Windows».

- В списке компонентов отметьте Hyper-V так, чтобы вложенные пункты тоже были отмечены — «Платформа Hyper-V» и «Средства управления Hyper-V».

- Нажмите «Ок», дождитесь завершения установки, при появлении запроса о перезагрузке компьютера — выполните перезагрузку.


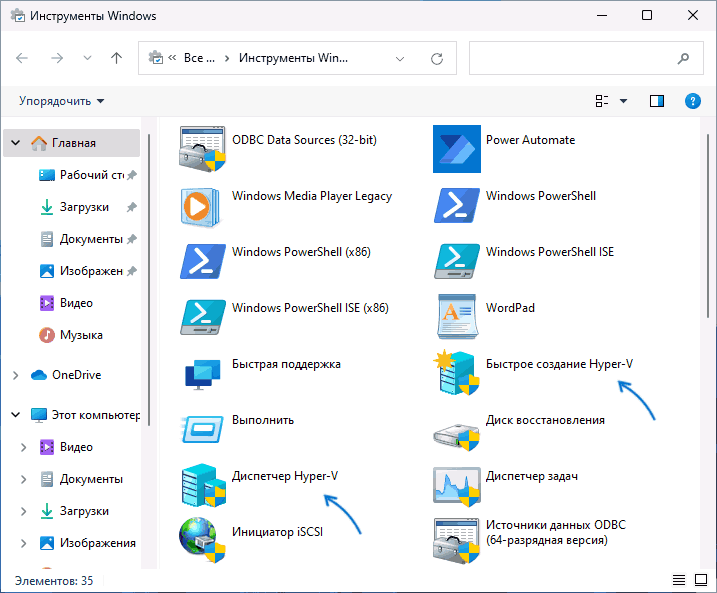
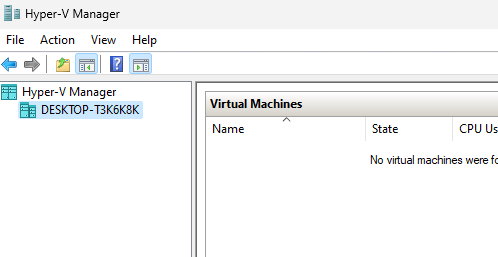
Готово, компоненты Hyper-V установлены, а инструменты управления виртуальными машинами вы сможете найти в пункте «Инструменты Windows» меню пуск (раздел «Все приложения») или Панели управления.
Как установить Hyper-V в Windows 11 Домашняя
Для установки компонентов Hyper-V в Домашней редакции Windows 11 достаточно создать файл bat со следующим кодом (как создать .bat файл):
pushd "%~dp0"
dir /b %SystemRoot%\servicing\Packages\*Hyper-V*.mum >hv.txt
for /f %%i in ('findstr /i . hv.txt 2^>nul') do dism /online /norestart /add-package:"%SystemRoot%\servicing\Packages\%%i"
del hv.txt
Dism /online /enable-feature /featurename:Microsoft-Hyper-V -All /LimitAccess /ALL
pause
После чего запустить его от имени Администратора, лучше — при подключенном Интернете: нажать правой кнопкой мыши по файлу и выбрать соответствующий пункт меню.

Это запустит установку необходимых компонентов.
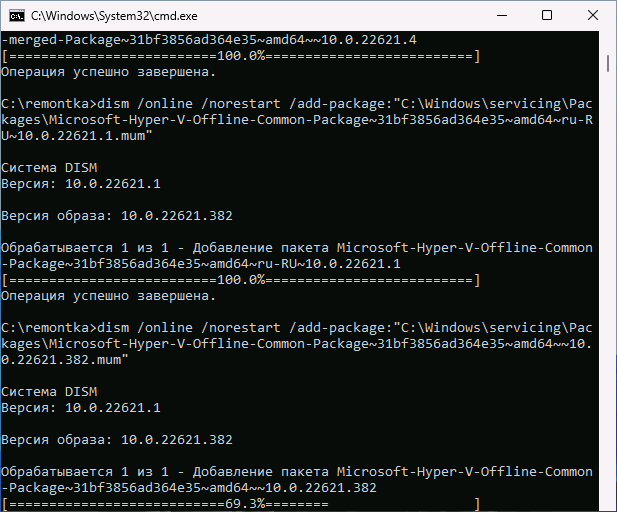
По завершении установки вам предложат выполнить перезагрузку в окне командной строки. Введите Y и нажмите Enter, дождитесь завершения перезагрузки и установки необходимых для работы Hyper-V компонентов.
В результате всё, что требуется для работы виртуальных машин Hyper-V и управления ими будет установлено, а нужные пункты для запуска настроек вы найдете в «Инструментах Windows» в меню Пуск и Панели управления.
Как отключить Hyper-V
Возможны два способа и ситуации необходимости отключения Hyper-V.
Первый — простое удаление компонентов, которое подойдёт в ситуации, когда использовать виртуальные машины Hyper-V в этой системе больше не планируется:
- Нажмите клавиши Win+R на клавиатуре, введите appwiz.cpl и нажмите Enter.
- Слева нажмите по пункту «Включение или отключение компонентов Windows».
- Снимите отметку с компонента Hyper-V и нажмите «Ок».
- Дождитесь удаления, при запросе о перезагрузке Windows — выполните её.
Второй вариант: Hyper-V мешает запуску других виртуальных машин, например, VirtualBox или эмуляторов Android, но удалять компоненты вы не планируете. В этом случае вы можете временно отключить Hyper-V без удаления:
- Запустите командную строку от имени Администратора.
- Введите команду
bcdedit /set hypervisorlaunchtype off
и нажмите Enter.
- Закройте командную строку и перезагрузите компьютер.
- Работа Hyper-V будет отключена, при этом компоненты останутся установленными.
- Включить их снова в дальнейшем можно будет с помощью команды
bcdedit /set hypervisorlaunchtype auto
с последующей перезагрузкой.
Модификация этого способа, позволяющая выбирать статус Hyper-V в меню при загрузке компьютера описана в статье: Как использовать виртуальные машины Hyper-V и VirtualBox на одном компьютере.
Платформа виртуализации Hyper-V доступна не только в Windows Server, но и в десктопных редакциях Windows 10 и 11. С помощью встроенного гипервизора Hyper-V пользователи могут создавать и запускать виртуальные машины. В этой статье мы рассмотрим, как включить компоненты Hyper-V в Windows 10 и 11.
Компоненты роли виртуализации Hyper-V можно установить в Pro и Enterprise редакциях Windows 10 и 11. Сначала, нужно проверить, поддерживает ли ваш компьютер виртуализацию Hyper-V. Откройте командную строку с правами администратор и выполните:
systeminfo
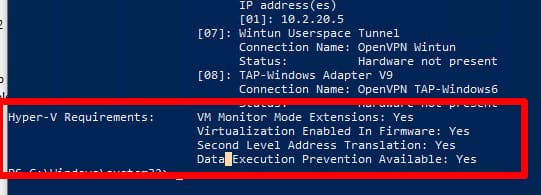
Промотайте в конец вывода и проверьте, что включены следующие компоненты в разделе Hyper-V Requirements:
VM Monitor Mode Extensions: Yes
Virtualization Enabled In Firmware: Yes
Second Level Address Translation: Yes
Data Execution Prevention Available: Yes

Если здесь указано Virtualization Enabled in Firmware: No, попробуйте включить аппаратную поддержку виртуализации в настройках BIOS/UEFI компьютера (может называться Intel VT-X или AMD-V).
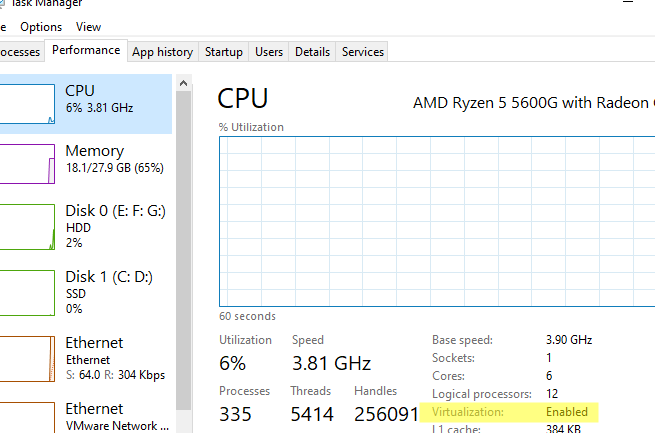
Также проверить совместимость вашего процессора можно на вкладке CPU в диспетчере задач Windows. Здесь должно быть указано
Virtualization: Enabled
.
Если тут указано
A hypervisor has been detected. Features required for Hyper-V will not be displayed
, значит компоненты Hyper-V уже установлены.
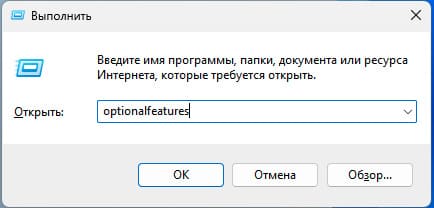
Включить роль Hyper-V в Windows 10 и 11 можно через панель управления компонентами Windows Features. Выполните команду
optionalfeatures
и выберите для установки компоненты Hyper-V Platform и Management Tools.
Также вы можете включить компоненты Hyper-V в Windows из командной строки. С помощью PowerShell команды:
Enable-WindowsOptionalFeature -Online -FeatureName Microsoft-Hyper-V -All
Или с помощью DISM:
dism.exe /Online /Enable-Feature:Microsoft-Hyper-V-All

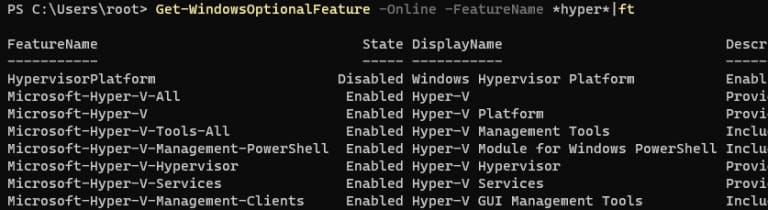
После завершения установки компонентов перезагрузите компьютер. Проверьте, что компоненты гипервизора установлены:
Get-WindowsOptionalFeature -Online -FeatureName *hyper*|ft

Включите автоматический запуск Hyper-V при загрузке:
bcdedit /set HypervisorLaunchType auto
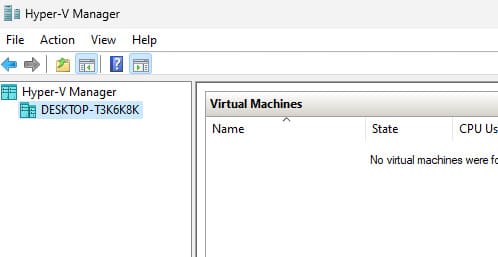
Для управления Hyper-V и виртуальными машинами используется графическая консоль Hyper-V Manager (
virtmgmt.msc
). Запустите ее и можете начать создавать виртуальные машины.
Также для управления гипервизором и ВМ можно использовать командлеты PowerShell из встроенного модуля Hyper-V.
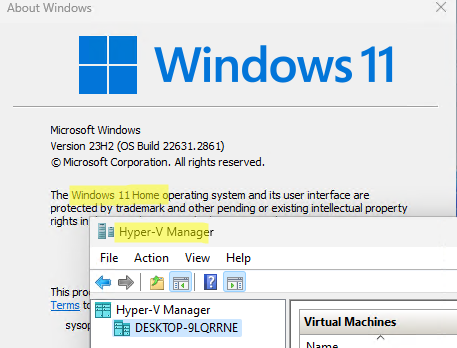
Компонент виртуализации Hyper-V отсутствует в домашних (Home) редакциях Windows 10 и 11. Однако есть небольшой трюк, который позволяет установить роль Hyper-V из зранилища компонентов WinSxS даже в Home редакции Windows.
Создайте на рабочем столе файл enable-hyperv.bat с кодом
pushd "%~dp0"
dir /b %SystemRoot%\servicing\Packages\*Hyper-V*.mum >hyper-v.txt
for /f %%i in ('findstr /i . hyper-v.txt 2^>nul') do dism /online /norestart /add-package:"%SystemRoot%\servicing\Packages\%%i"
del hyper-v.txt
 Dism /online /enable-feature /featurename:Microsoft-Hyper-V -All /LimitAccess /ALL
pause
Запустите BAT файл с правами администратора.
После завершения установки компонентов, перезагрузите компьютер. Проверьте, что виртуализация Hyper-V теперь доступна в вашей Home редакции Windows.
Платформа виртуализации Hyper-V доступна не только на серверных версиях Windows, но и в десктопных редакциях Windows 10 и 11. С помощью встроенного гипервизора Hyper-V можно создавать и управлять виртуальными машинами. В этой статье расскажем, как включить компоненты Hyper-V в Windows 10 и 11.
Приобрести оригинальные ключи активации Windows всегда можно у нас в каталоге:
Windows 11 — от 1690 ₽
Windows 10 — от 1490 ₽
Проверка совместимости с Hyper-V
Компоненты Hyper-V доступны в редакциях Pro и Enterprise Windows 10 и 11. Чтобы проверить, поддерживает ли ваш компьютер Hyper-V, выполните следующие шаги:
1. Откройте командную строку с правами администратора.
2. Введите команду:
systeminfo
3. Промотайте вывод до раздела Hyper-V Requirements и убедитесь, что все указанные параметры включены:
— VM Monitor Mode Extensions: Yes
— Virtualization Enabled In Firmware: Yes
— Second Level Address Translation: Yes
— Data Execution Prevention Available: Yes
Если параметр Virtualization Enabled In Firmware имеет значение No, необходимо включить виртуализацию в настройках BIOS/UEFI (параметр может называться Intel VT-X или AMD-V).
Также проверить совместимость вашего процессора можно на вкладке CPU в диспетчере задач Windows. Здесь должно быть указано Virtualization: Enabled .
Как включить Hyper-V в Windows через компоненты Windows
1. Нажмите Win + R и впишите команду optionalfeatures, после чего нажмите Enter. (Либо через Панель управления > Программы и компоненты > Включение и отключение компонентов Windows).
2. В списке найдите и выберите для установки компоненты Платформа Hyper-V и Средства управления Hyper-V.
3. Нажмите ОК для установки и перезагрузите компьютер.
Включение Hyper-V через PowerShell
Чтобы включить Hyper-V с помощью командной строки или PowerShell, выполните следующие команды:
1. Откройте PowerShell от имени администратора.
2. Выполните команду:
Enable-WindowsOptionalFeature -Online -FeatureName Microsoft-Hyper-V -All
Или с помощью DISM:
dism.exe /Online /Enable-Feature:Microsoft-Hyper-V-All

3. Перезагрузите компьютер после установки.
Проверка установки Hyper-V
Чтобы убедиться, что компоненты Hyper-V успешно установлены, выполните следующую команду в PowerShell:
Get-WindowsOptionalFeature -Online -FeatureName *hyper*|ft
Также включите автоматический запуск Hyper-V при загрузке системы:
bcdedit /set HypervisorLaunchType auto
Управление Hyper-V
Для управления виртуальными машинами можно использовать графическую консоль Hyper-V Manager. Чтобы открыть её, выполните команду:
virtmgmt.msc
Также для управления виртуальными машинами можно использовать командлеты PowerShell из модуля Hyper-V.
Как включить Hyper-V в редакции Home
Hyper-V недоступен в редакциях Home, однако его можно установить через командную строку с использованием компонента WinSxS. Для этого выполните следующие шаги:
1. Создайте на рабочем столе файл enable-hyperv.bat и вставьте в него следующий код:
pushd "%~dp0"

dir /b %SystemRoot%\servicing\Packages\*Hyper-V*.mum >hyper-v.txt

for /f %%i in ('findstr /i . hyper-v.txt 2^>nul') do dism /online /norestart /add-package:"%SystemRoot%\servicing\Packages\%%i"

del hyper-v.txt
   Dism /online /enable-feature /featurename:Microsoft-Hyper-V -All /LimitAccess /ALL

pause
2. Запустите этот BAT файл с правами администратора.
3. После завершения процесса установки перезагрузите компьютер.
Теперь проверка виртуализации Hyper-V будет доступна даже в домашней редакции Windows 10 или 11.

Следуя этой инструкции, вы сможете успешно включить Hyper-V и начать использовать виртуальные машины в вашей системе.
Лицензионный ключ активации Windows от
,
If you want to enable Hyper-V on Windows 10/11 Home edition, continue reading below.
Hyper-V is Microsoft’s hypervisor platform and, like the VΜware or VirtualBox hypervisors, allows you to run multiple operating systems on a singe Windows PC.
With the Hyper-V virtualization platform, you can create virtual machines that run on their own hardware without affecting the host. Compared to other hypervisors, Hyper-V offers comparable features and functionality which is why it is currently used by many system administrators to do their testing.
Hyper-V was originally built into Windows Server 2008 and later versions, but now it’s also available in Windows 10/11 Pro, Enterprise, and Education editions. But, don’t worry… if you’re a Windows 10/11 Home owner, in this article I’ll show you how you can install the Hyper-V platform even on your own system.
Hyper-V Requirements
A Virtual Machine (usually called «VM»), is a virtual computer with its own hardware (CPU, RAM, DISK, etc.), that is «borrowed» from the physical computer (usually called «HOST»). Thus, to install Hyper-V, the host machine must meet the following hardware requirements.
A. RAM: 8GB at least. (If you want to get better performance, RAM should be increased to at least 16GB or better to 32GB).
B. CPU: You must have a 64-bit Processor that supports Second Level Translation Address (SLAT). (Most Intel and AMD processors support the SLAT hardware mechanism, especially on computers pre-installed with Windows 8 or a later versions).
* Info: The «Second Level Address Translation» (SLAT), is a hardware mechanism which is supported when the Virtualization Technology is supported. If you own an Intel processor, go to your processor’s specification page and look if the «Intel® Virtualization Technology (Intel® VT-x)» located under «Advanced Technology». Alternatively see if the «Virtualization Technology» feature is enabled in BIOS.
C. in order to run Hyper-V, the following items must be enabled in BIOS : *
- Virtualization Technology
- Hardware Enforced Data Execution Prevention (DEP)
* Notes:
1. To find out if the above items are already enabled on your system:
1. Open Command Prompt and type systeminfo.exe
2. Scroll at the end of the report to find out if the Hyper-V requirements are met. If not, proceed to enable them in Bios by using the instructions below.


2. To Enable Virtualization Technology & Data Execution Prevention (DEP) in BIOS:
1. Restart the computer and repeatedly press one of these keys: F2, F10, F8, F12 or Del* when the computer manufacturer’s logo appears on the screen to enter the BIOS/UEFI settings (* The key may vary from manufacturer to manufacturer).
2. To Enable Virtualization in BIOS:
a. If you own an Intel CPU:
- Click the Advanced* tab and set the Virtualization (aka «Intel® Virtualization Technology (VT-x)» to Enable.
* Note: In some BIOS the «Virtualization» setting is located in Performance, or in System Configuration sections.
b. If you own an AMD CPU:
- Click the M.I.T. tab –> Advanced Frequency Settings –> Advanced Core settings and the set the SVM Mode (aka «Secure Virtual Machine») to Enable.
3. To Enable Data Execution Prevention (DEP) in BIOS:
Depending on your computer manufacturer, the option to enable the hardware DEP varies and can be located at Advanced or in Performance section and may be labeled as «Data Execution Prevention,» «XD,» «Execute Disable,» or «NX».
How to Enable Hyper-V on Windows 11/10 Home.
Once all the requirements above are met, follow these instructions to activate the Hyper-V feature on your Windows 10/11 home PC.
1. Open Notepad and paste the code below: *
pushd «%~dp0»
dir /b %SystemRoot%\servicing\Packages\*Hyper-V*.mum >hyper-v.txt
for /f %%i in (‘findstr /i . hyper-v.txt 2^>nul’) do dism /online /norestart /add-package:»%SystemRoot%\servicing\Packages\%%i»
del hyper-v.txt
Dism /online /enable-feature /featurename:Microsoft-Hyper-V -All /LimitAccess /ALL
pause
* Note: The above script adds the Hyper-V feature on Windows 10/11 home. The code has been created by the Microsoft Virtualization team on Github.
2. Save the file as Hyper-V Enabler.bat and close notepad.
3. Right-click on Hyper-V Enabler.bat and select Run as administrator. This will open the command prompt, and trigger the installation process to begin.

4. Once the installation completed, you will get a prompt asking if you want to restart the computer now, press Y to proceed.

5. During rebooting Windows will install updates and will take a few minutes to complete.
6. After signing to Windows, press the Windows key + R keys to open the Run dialog box.
7. Type optionalfeatures and hit Enter.

8. Check the Hyper-V option and press OK to enable the feature.

9. Wait for Windows to install Hyper-V, and when prompted, restart your computer.
10. Search for ‘hyper-v» to Open it and start creating virtual machines.

Final words: These are all the steps required to enable Hyper V on Windows 10 Home & Windows 11 Home Editions. If something doesn’t work as instructed, make sure your computer meets the requirements to run Hyper-V.
You can always disable Hyper-V if you no longer need it, either by unchecking the Hyper-V check box on Windows Features, or by executing the below command in PowerShell (Admin):
- DISM /Online /Disable-Feature /FeatureName:Microsoft-Hyper-V
That’s it! Which method worked for you?
Let me know if this guide has helped you by leaving your comment about your experience. Please like and share this guide to help others.
If this article was useful for you, please consider supporting us by making a donation. Even $1 can a make a huge difference for us in our effort to continue to help others while keeping this site free:
- Author
- Recent Posts
Konstantinos is the founder and administrator of Wintips.org. Since 1995 he works and provides IT support as a computer and network expert to individuals and large companies. He is specialized in solving problems related to Windows or other Microsoft products (Windows Server, Office, Microsoft 365, etc.).
- To enable Hyper-V on Windows 11, check and enable virtualization on the UEFI (BIOS), and then open Settings > Apps > Optional features > More Windows features, check the “Hyper-V” item, and click “OK” and “Restart now” to enable the feature.
UPDATED 11/8/2023: On Windows 11, to enable the Microsoft Hyper-V feature, you must first enable virtualization in the motherboard’s UEFI (Unified Extensible Firmware Interface) before you can turn on Hyper-V from the “Windows Features” settings or commands.
Hyper-V feature is a technology that includes the elements to create and manage virtual machines, allowing you to run other instances of Windows 11 and older versions of the operating system, such as Windows 10, 8.1, or 7, or other platforms like Linux alongside the main installation.
However, Hyper-V is an optional feature that you must enable manually through the Settings app or commands from PowerShell or Command Prompt. The virtualization technology is available on Windows 11 Pro and higher editions. It’s not available on Windows 11 Home. If you have the Home edition of Windows, you can try other virtualization alternatives, such as VirtualBox, or use the workaround outlined in this guide.
In this guide, I will teach you how to configure Hyper-V on Windows 11.
- Enable Hyper-V on Windows 11 Pro
- Enable Hyper-V on Windows 11 Home
Before enabling Hyper-V on Windows 11 Pro, Enterprise, and Education, you must turn on virtualization on the UEFI (Unified Extensible Firmware Interface). If you don’t have this feature enabled, check with your device manufacturer to find the specific details to complete this task.
If you want to determine whether Hyper-V is already enabled before going through the steps, open “Start,” search for “System Information,” and open the app. In the “Summary” section, confirm that the “A hypervisor has been detected. Features required for Hyper-V will not be displayed” message at the bottom of the page indicates that the feature is already running.
Turn on virtualization on UEFI
To enable virtualization on the UEFI firmware, use these steps:
-
Open Settings.
-
Click on System.
-
Click on Recovery.
-
Under the “Recovery options” section, click the Restart now button for the “Advanced startup” setting.

-
Click on Troubleshoot.
-
Click on Advanced options.
-
Click the “UEFI Firmware Settings” option.

-
Click the Restart button.
-
Open the Configuration, Security, or Advanced page (the page’s name will depend on your manufacturer).
-
Select the “Virtualization Technology,” “Intel Virtual Technology,” or “SVM Mode” option (the feature name will depend on your manufacturer).
-
Enable the virtualization feature.
-
Save the UEFI (BIOS) settings (usually press F10).


After you complete the steps, you can enable the Microsoft hypervisor to run virtual machines on Windows 11.
Turn on Hyper-V on Windows 11
Once virtualization is turned on at the hardware level, you can enable the software virtualization platform from the Settings app or using commands from PowerShell and Command Prompt. Here’s how.
Method 1: Enable Hyper-V from Settings
To enable Hyper-V on Windows 11, use these steps:
-
Open Settings on Windows 11.
-
Click on Apps.
-
Click the Optional features tab.

-
Under the “Related settings” section, click the “More Windows features” setting.
-
Check the Hyper-V option to enable the virtual machine platform on Windows 11.
-
Click the OK button.
-
Click the Restart now button.


Once you complete the steps, the Windows 11 virtualization feature will install along with Hyper-V Manager, which allows you to create and run virtual machines.
It’s important to note that configuring virtualization can slow down your computer, but it’s barely noticeable. However, the nature of running virtual machines on top of the host operating system will take up system resources that could noticeably slow down the device, similar to running any resource-intensive application.
Method 2: Enable Hyper-V from PowerShell
To enable Hyper-V from PowerShell on Windows 11, use these steps:
-
Open Start.
-
Search for PowerShell, right-click the top result, and select the Run as administrator option.
-
Type the following command on PowerShell to enable Hyper-V on Windows 11 and press Enter:
Enable-WindowsOptionalFeature -Online -FeatureName Microsoft-Hyper-V-All

-
Type “Y” to restart your computer.

After you complete the steps, Hyper-V Manager and its additional components will be installed on your computer.
Method 3: Enable Hyper-V from Command Prompt
To enable Hyper-V from Command Prompt, use these steps:
-
Open Start.
-
Search for Command Prompt, right-click the top result, and select the Run as administrator option.
-
Type the following command to enable Hyper-V and press Enter:
DISM /Online /Enable-Feature /All /FeatureName:Microsoft-Hyper-V
-
Type “Y” to restart your computer.

Once you complete the steps, the virtualization components will be installed on your computer.
Turn off Hyper-V on Windows 11
You can use the same methods to disable Hyper-V on your computer in the same ways as turning the feature on.
Method 1: Disable Hyper-V from Settings
To disable Hyper-V on Windows 11, use these steps:
-
Open Settings.
-
Click on Apps.
-
Click the Optional features tab.
-
Under the “Related settings” section, click the “More Windows features” setting.
-
Clear the Hyper-V option from the list.
-
Click the OK button.
-
Click the Restart now button.

Once you complete the steps, Microsoft Hyper-V will be disabled on your installation.
Method 2: Disable Hyper-V from PowerShell
To disable Hyper-V from PowerShell on Windows 11, use these steps:
-
Open Start.
-
Search for PowerShell, right-click the top result, and select the Run as administrator option.
-
Type the following command to disable Hyper-V and press Enter:
Disable-WindowsOptionalFeature -Online -FeatureName Microsoft-Hyper-V-All
-
Type “Y” to restart your computer.

After you complete the steps, the Hyper-V Manager and its additional components will be disabled on Windows 11.
Method 3: Disable Hyper-V from Command Prompt
To disable Hyper-V from Command Prompt, use these steps:
-
Open Start.
-
Search for Command Prompt, right-click the top result, and select the Run as administrator option.
-
Type the following command to disable Hyper-V and press Enter:
DISM /Online /Disable-Feature:Microsoft-Hyper-V

-
Type “Y” to restart your computer.

Once you complete the steps, Hyper-V, alongside its additional components, will be removed from the system.
Enable Hyper-V on Windows 11 Home
Before enabling Hyper-V on the Home edition of Windows 11, the device must have virtualization support enabled on the UEFI (Unified Extensible Firmware Interface). If you don’t have this feature enabled, check with your manufacturer for the specific details to complete this task.
Turn on virtualization on Windows 11 Home
To enable virtualization on Windows 11 Home, use these steps:
-
Open Settings.
-
Click on System.
-
Click on Recovery.
-
Under the “Recovery options” section, click the Restart now button for the “Advanced startup” setting.
-
Click on Troubleshoot.
-
Click on Advanced options.
-
Click the “UEFI Firmware Settings” option.
-
Click the Restart button.
-
Open the Configuration, Security, or Advanced page (the page’s name will depend on your manufacturer).
-
Select the “Virtualization Technology,” “Intel Virtual Technology,” or “SVM Mode” option (the feature name will depend on your manufacturer).
-
Enable the virtualization feature.
-
Save the UEFI (BIOS) settings (usually press F10).
After completing the steps, you can enable the Microsoft hypervisor to run virtual machines on Windows 11.
Install Hyper-V on Windows 11 Home
Since the Home edition doesn’t have the virtualization feature, you must install the components manually before enabling the feature. Although the script works as intended, you should always create a temporary full backup of your device since you will modify the system files, which Microsoft doesn’t support.
To install Hyper-V on Windows 11 Home, use these steps:
-
Open Start.
-
Search for Notepad and click the top result to open the app.
-
Copy and paste the following script into the text file:
pushd "%~dp0"
dir /b %SystemRoot%\servicing\Packages\*Hyper-V*.mum >hv-home.txt
for /f %%i in ('findstr /i . hv-home.txt 2^>nul') do dism /online /norestart /add-package:"%SystemRoot%\servicing\Packages\%%i"
del hv-home.txt
Dism /online /enable-feature /featurename:Microsoft-Hyper-V -All /LimitAccess /ALL
pause
-
Click on File and choose the “Save as” option.
-
Confirm a name and use the .bat extension. For example, hyperv-home.bat.
-
Click the Save button.
-
Right-click the hyperv-home.bat file and select the Run as administrator option.

-
Press the “Y” key to restart the computer.


After you complete the steps, the Hyper-V Management Tool and Platform will install on your Home edition of Windows 11.
Disable Hyper-V on Windows 11 Home
Once you have installed the virtualization feature, you can enable or disable it from the system feature settings like Windows 11 Pro.
To disable Hyper-V on Windows 11 Home, use these steps:
-
Open Settings.
-
Click on Apps.
-
Click the Optional features tab.
-
Under the “Related settings” section, click the “More Windows features” setting.
-
Clear the Hyper-V option from the list.
-
Click the OK button.
-
Click the Restart now button.
Once you complete the steps, Microsoft Hyper-V will be disabled on Windows 11 Home.
Update November 8, 2023: The contents of this guide have been updated to ensure accuracy and include additional steps.