
Платформа виртуализации Hyper-V доступна не только в Windows Server, но и в десктопных редакциях Windows 10 и 11. С помощью встроенного гипервизора Hyper-V пользователи могут создавать и запускать виртуальные машины. В этой статье мы рассмотрим, как включить компоненты Hyper-V в Windows 10 и 11.
Компоненты роли виртуализации Hyper-V можно установить в Pro и Enterprise редакциях Windows 10 и 11. Сначала, нужно проверить, поддерживает ли ваш компьютер виртуализацию Hyper-V. Откройте командную строку с правами администратор и выполните:
systeminfo
Промотайте в конец вывода и проверьте, что включены следующие компоненты в разделе Hyper-V Requirements:
VM Monitor Mode Extensions: Yes
Virtualization Enabled In Firmware: Yes
Second Level Address Translation: Yes
Data Execution Prevention Available: Yes

Если здесь указано Virtualization Enabled in Firmware: No, попробуйте включить аппаратную поддержку виртуализации в настройках BIOS/UEFI компьютера (может называться Intel VT-X или AMD-V).
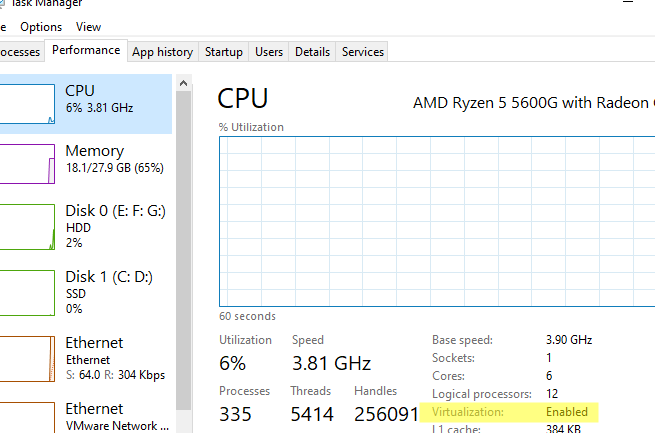
Также проверить совместимость вашего процессора можно на вкладке CPU в диспетчере задач Windows. Здесь должно быть указано
Virtualization: Enabled
.
Если тут указано
A hypervisor has been detected. Features required for Hyper-V will not be displayed
, значит компоненты Hyper-V уже установлены.
Включить роль Hyper-V в Windows 10 и 11 можно через панель управления компонентами Windows Features. Выполните команду
optionalfeatures
и выберите для установки компоненты Hyper-V Platform и Management Tools.
Также вы можете включить компоненты Hyper-V в Windows из командной строки. С помощью PowerShell команды:
Enable-WindowsOptionalFeature -Online -FeatureName Microsoft-Hyper-V -All
Или с помощью DISM:
dism.exe /Online /Enable-Feature:Microsoft-Hyper-V-All

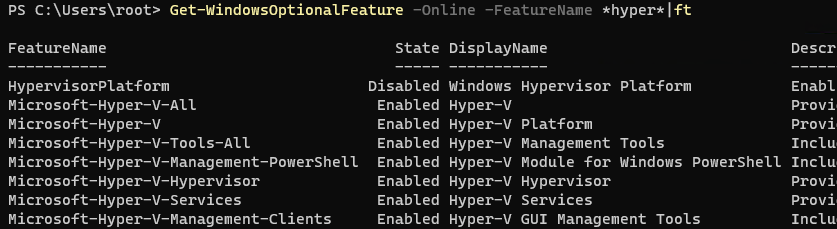
После завершения установки компонентов перезагрузите компьютер. Проверьте, что компоненты гипервизора установлены:
Get-WindowsOptionalFeature -Online -FeatureName *hyper*|ft
Включите автоматический запуск Hyper-V при загрузке:
bcdedit /set HypervisorLaunchType auto
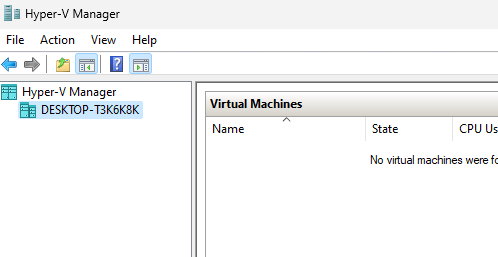
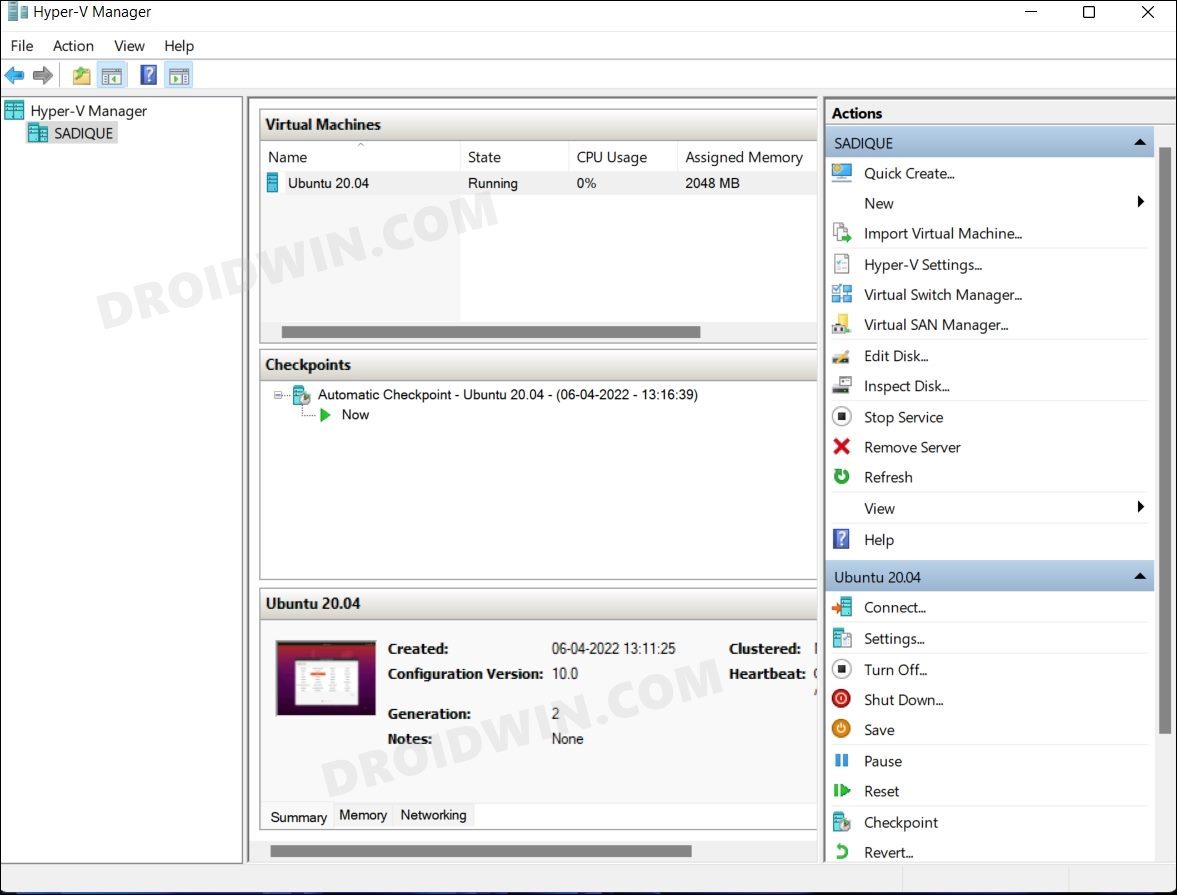
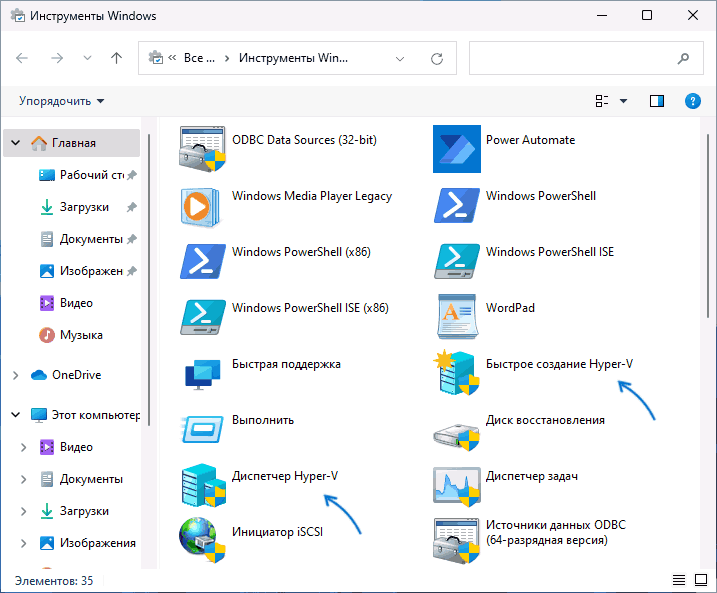
Для управления Hyper-V и виртуальными машинами используется графическая консоль Hyper-V Manager (
virtmgmt.msc
). Запустите ее и можете начать создавать виртуальные машины.
Также для управления гипервизором и ВМ можно использовать командлеты PowerShell из встроенного модуля Hyper-V.
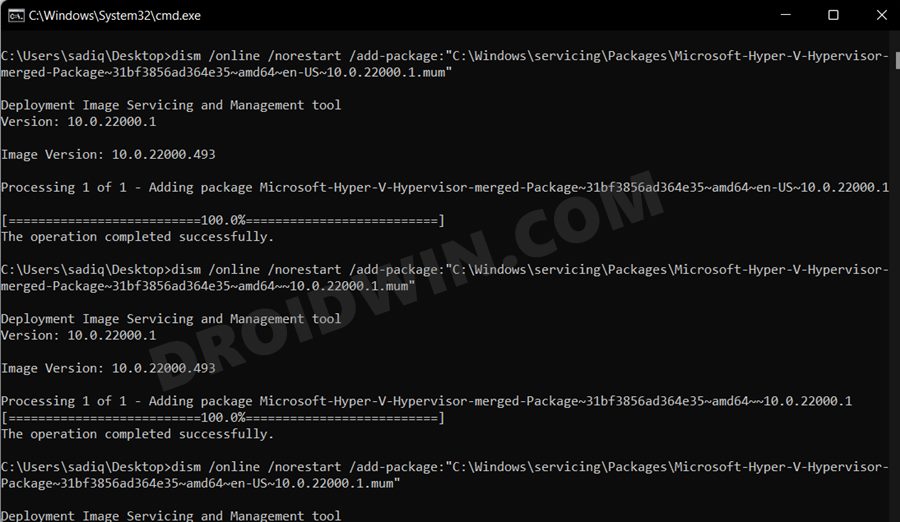
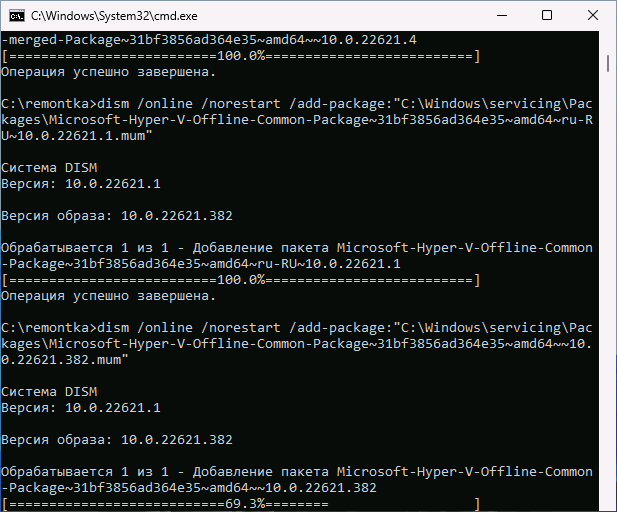
Компонент виртуализации Hyper-V отсутствует в домашних (Home) редакциях Windows 10 и 11. Однако есть небольшой трюк, который позволяет установить роль Hyper-V из зранилища компонентов WinSxS даже в Home редакции Windows.
Создайте на рабочем столе файл enable-hyperv.bat с кодом
pushd "%~dp0"
dir /b %SystemRoot%\servicing\Packages\*Hyper-V*.mum >hyper-v.txt
for /f %%i in ('findstr /i . hyper-v.txt 2^>nul') do dism /online /norestart /add-package:"%SystemRoot%\servicing\Packages\%%i"
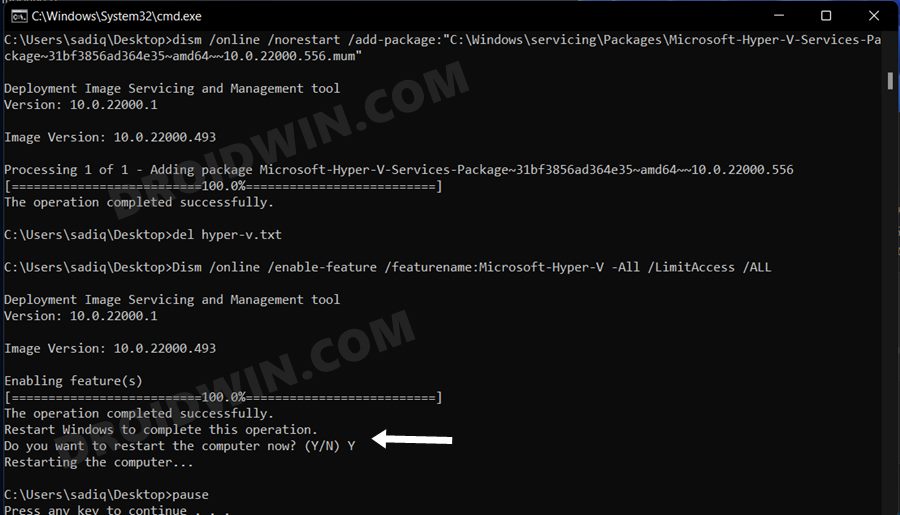
del hyper-v.txt
 Dism /online /enable-feature /featurename:Microsoft-Hyper-V -All /LimitAccess /ALL
pause
Запустите BAT файл с правами администратора.
После завершения установки компонентов, перезагрузите компьютер. Проверьте, что виртуализация Hyper-V теперь доступна в вашей Home редакции Windows.
This chapter describes how to setup and run App Build Environments without using ctrlX WORKS.
Remember ctrlX WORKS provides all necessary actions required to deal with App Build Environments.
This is the recommended constellation:
-
Despite QEMU supports both Windows and Linux we are recommending to use a Windows host operating system .
-
Host and guest machine should use CPU architecture amd64. Snaps for a arm64 targets are build via cross build.
-
The following assumes that ctrlX AUTOMATION SDK has been installed in the /home/boschrexroth/ctrlx-automation-sdk (or simplified ~/ctrlx-automation-sdk) directory.
Installation on Windows 10 Host
QEMU on Windows
Download and install the newest version of QEMU for Windows from https://qemu.weilnetz.de/w64/.
Install Windows Hypervisor Platform
We recommend to install Windows Hypervisor Platform:
- Right click on the Windows button and select ‘Apps and Features’.
- Select Programs and Features on the right under related settings.
- Select Turn Windows Features on or off.
- Select Windows Hypervisor Platform — NOT Hyper-V.
- Close dialog with OK.
This feature can also be installed via command line:
- Start cmd.exe as administrator (run as …)
-
Enter
dism /online /Enable-Feature /FeatureName:HypervisorPlatform /All
Hints:
- After enabling Windows Hypervisor Platform a system restart may be required.
- The feature Hyper-V is automatically disabled.
-
You can disable the feature with:
dism /online /Disable-Feature /FeatureName:HypervisorPlatform
-
If you use Virtual Box also please enable the internal Hyper-V option for each virtual machine.
Install Px.exe as Local Proxy Server
See Use PX.exe as Local Proxy on a Windows Host.
Installation on Linux Host
You have to install both QEMU and KVM on your host system.
Therefor you can run this script:
~/ctrlx-automation-sdk/scripts/environment/install-qemu.sh
Running the QEMU Virtual Machine
Create an Instance of a QEMU Virtual Machine
Do following steps:
- Create a new folder (on a disk with enough free disk space)
- Copy the content of the SDK folder ~/ctrlx-automation-sdk/scripts/environment into your instance folder.
Hint: You can download the folder from here
~/ctrlx-automation-sdk/scripts/environment/
Start the QEMU Virtual Machine
To start the QEMU VM instance change to its installation folder and run one of these script files:
- __launch-amd64-noproxy (.bat, .sh) : If the VM has direct internet access
- __launch-amd64-proxy (.bat, .sh): If the VM has to use a proxy server on the host computer
The VM is started as console application, you can see the trace output.
We recommend to not use this console directly because a lot of shell functions are not supported.
During first boot a lot of software will be installed — so please be patient.
If this process is finished the VM will shutdown. Just run the launch script to restart the VM.
Network Connection to your QEMU Virtual Machine
From the point of view of your host computer, the VM does not have own network interface cards. Services running on the VM are available via port forwarding.
This port forwarding is configured in the launch… script with one or more hostfwd= settings e.g.:
-netdev user,id=eth0,hostfwd=tcp::10022-:22
Here port 10022 of the host is forwarded to port 22 (SSH) of the VM. If port 10022 is used on the host the VM will not start. In this case please enter a free host port number in the launch script e.g. 20022.
For forwarding further ports e.g. 502 (Modbus) just extend this line e.g.:
-netdev user,id=eth0,hostfwd=tcp::10022-:22,hostfwd=tcp::502-:502
Important
From your host computer a SSH connection can be established using 127.0.0.1:10022
During the first connection with Visual Studio Code enter: ssh -p 10022 boschrexroth@127.0.0.1 password is boschrexroth
Shutdown
It’s very important to shutdown the QEMU VM properly. So initiate a shutdown e.g. with this command on your VM console:
QEMU Virtual Machine Networking
The QEMU software represents a virtual network between the host operating system and the virtual machine.
Important
This virtual network is only seen by the virtual machine NOT by the host operating system.
Furthermore QEMU provides a gateway, a DNS and an optional SMB server for its VM.
Per default this virtual network has the subnet 10.0.2.0/24 and from the perspective of the QEMU VM these IP addresses are assigned:
- 10.0.2.15 IP address of the VM itself
- 10.0.2.2 Gateway and host operating system
- 10.0.2.3 DNS server
- 10.0.2.4 SMB server
For deeper information visit QEMU Documentation/Networking
Troubleshooting, Tips
General
Read error messages carefully, search in the internet for these messages and hints for troubleshooting.
Performance
Deactivate all other virtual machines on your host to avoid performance disadvantages.
An emulated AARCH64 QEMU VM is slow — be patient.
http/https Access
Check the http/https access of your host to the internet — respectively to the Ubuntu sites e.g. with:
wget -p http://ports.ubuntu.com/ubuntu-ports
If failed check your DNS settings and server(s).
Snap Store Status
Check the Snap Store Status if snaps cannot be installed.
WinSCP and Putty
On your Windows host you can use WinSCP combined with PuTTy instead of the Windows ssh and scp.
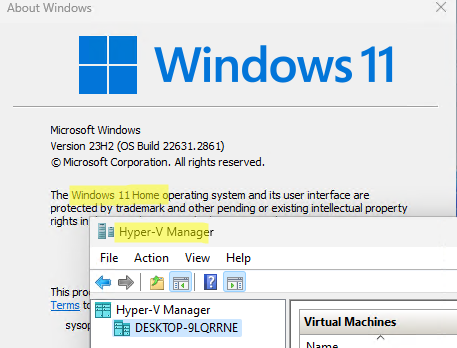
In this guide, we will show you the steps to install and then enable Hyper-V on your Windows 11 PC. Developed by Microsoft, Hyper-V is a hardware-based hypervisor that gives you a platform for running multiple instances of different operating systems on your PC. This process of testing out OS in a virtual environment has existed for a long time, thanks to third-party apps like VMWare and Virtual machine. And truth be told, they all perform quite decent. So why is there a need to get inclined towards the offering from Redmond giants?
Well, since Hyper-V is baked into the system, it gives you a much more optimized and efficient platform to test out the guest OS. Regarding which, you could run Windows, Ubuntu, and a bunch of other Linux distros in its ecosystem. However, by default, Hyper-V is only available for the Pro, Education, and Enterprise edition of Windows and isn’t included in the Home edition of Windows. But fret not. In this guide, we will show you a nifty method to install and enable Hyper-V on the Windows 11 Home edition as well. So without any further ado, let’s get started.
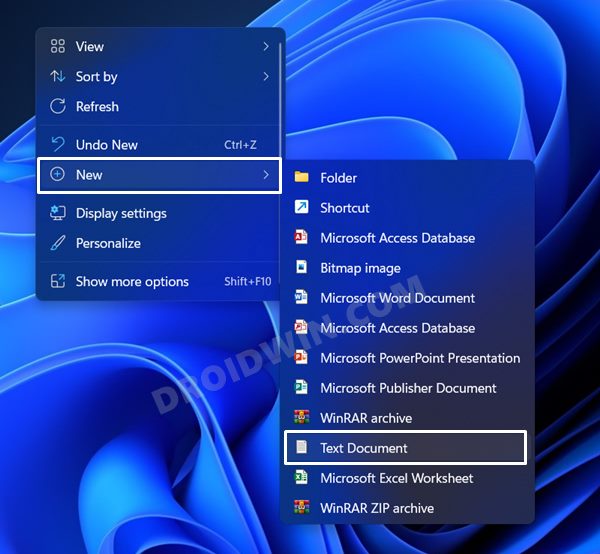
- Right-click on your Desktop and select New > Text Document.

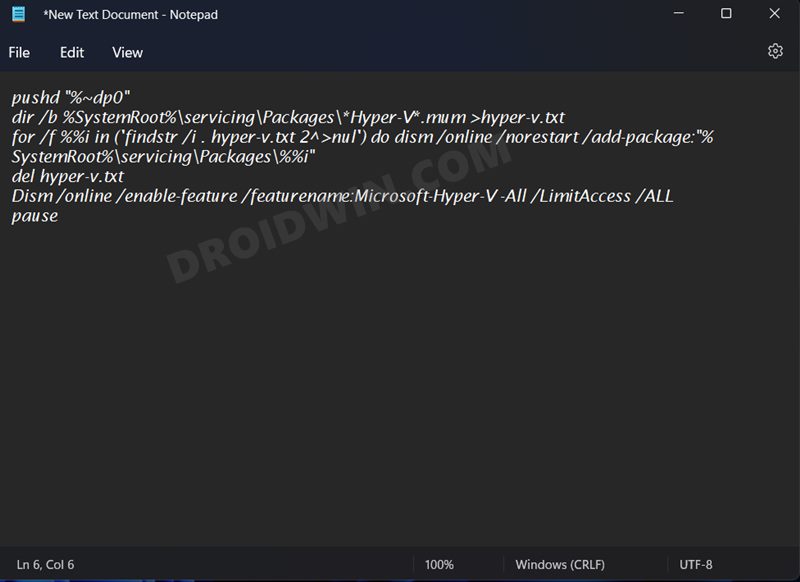
- Then double-click to open it and copy-paste the below command into it:
pushd "%~dp0"
dir /b %SystemRoot%\servicing\Packages\*Hyper-V*.mum >hyper-v.txt
for /f %%i in ('findstr /i . hyper-v.txt 2^>nul') do dism /online /norestart /add-package:"%SystemRoot%\servicing\Packages\%%i"
del hyper-v.txt
Dism /online /enable-feature /featurename:Microsoft-Hyper-V -All /LimitAccess /ALL
pause
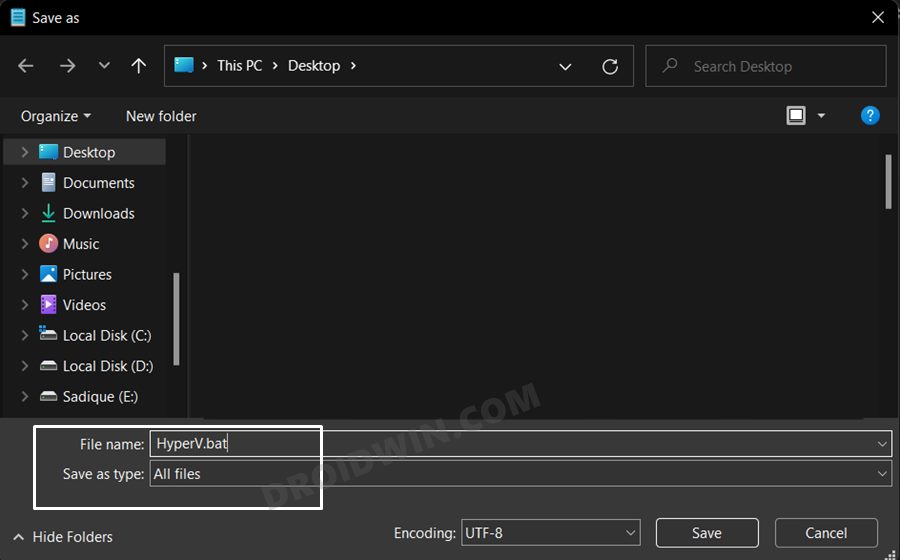
- Now go to File > Save As and change the Save As Type to All Files.
- Then type in HyperV.bat in the file name section and hit Save (you could give it any name, just make sure to have the .bat extension at the end).

- Now right-click on this batch file and select Run as administrator. The CMD window will now launch and it will install the necessary dependencies.

- Once the download is complete, restart your PC. And with that, the Hyper-V is now installed on your Windows 11 PC.

How to Enable Hyper-V in Windows 11
- Bring up the Run dialog box via Windows+R shortcut keys.
- Then type in the below command and hit Enter to open Windows Features:
optionalfeatures.exe
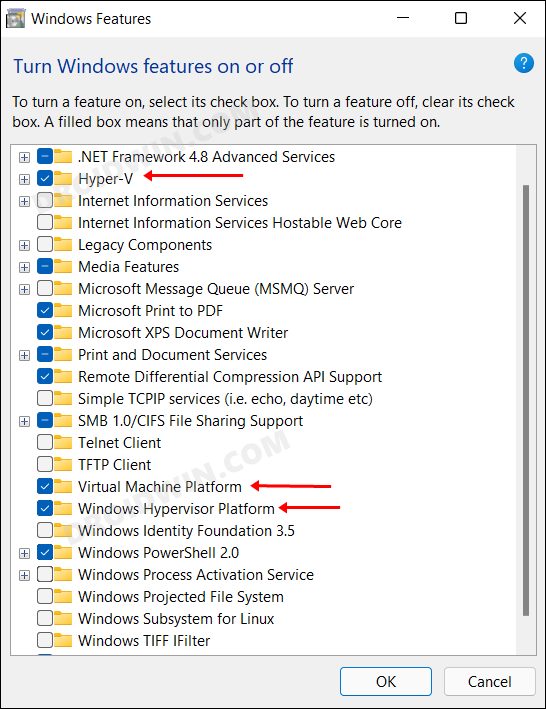
- Now, checkmark Hyper-V, Virtual Machine Platform, and Windows Hypervisor Platform and click OK.

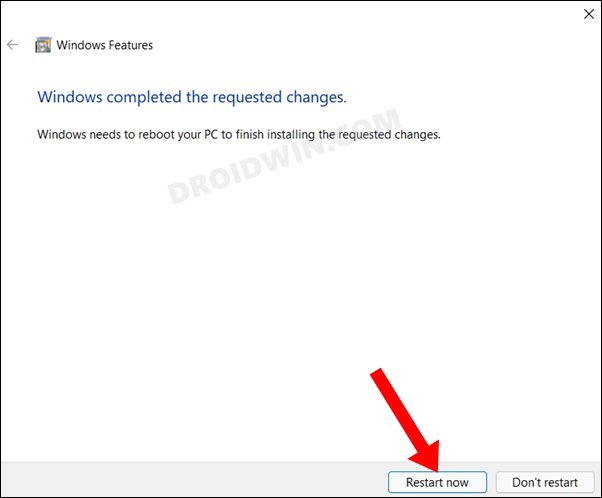
- It will install the necessary dependencies. Once done, restart your PC for the changes to take place.

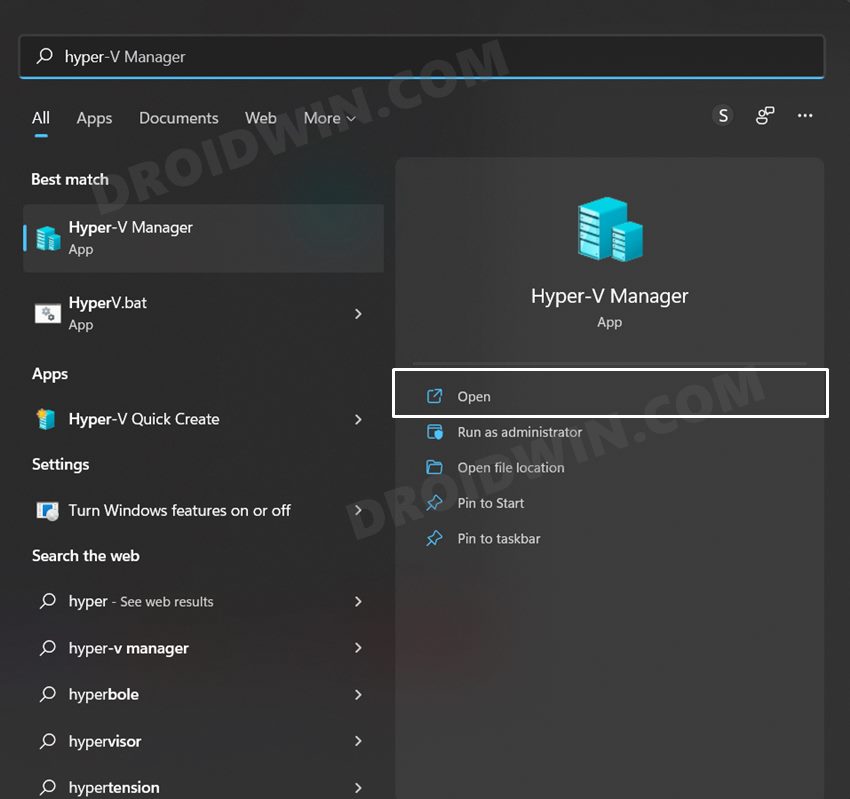
- To access it, just head over to the Start Menu, search Hyper-V Manager, and open it. Or you could also type in virtmgmt.msc in the Run dialog box to open it.

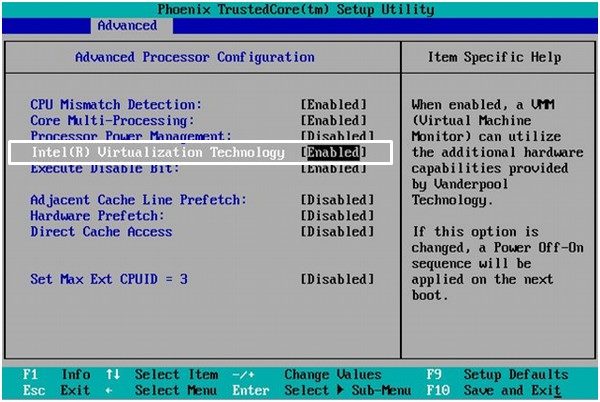
- Moving on, you will now have to enable the Virtualization Technology from the BIOS as well. So power off your PC. Then power it on and as soon as it starts booting up, continuously press the designated shortcut keys to boot your PC to BIOS:
Acer: F2
Asus: Delete
Dell: F12
HP: F9
Intel: F2
Lenovo: F12
Toshiba: F2 or F12
Other OEMs: Esc Key or any Function Keys
- Now go to the System Configuration or Advanced tab and enable Virtualization Technology.

- Then save the changes, exit the BIOS and boot your PC to the OS. That’s it. Hyper-V has now been enabled on your Windows 11 PC.
How to Create Virtual Machine using Hyper-V in Windows 11
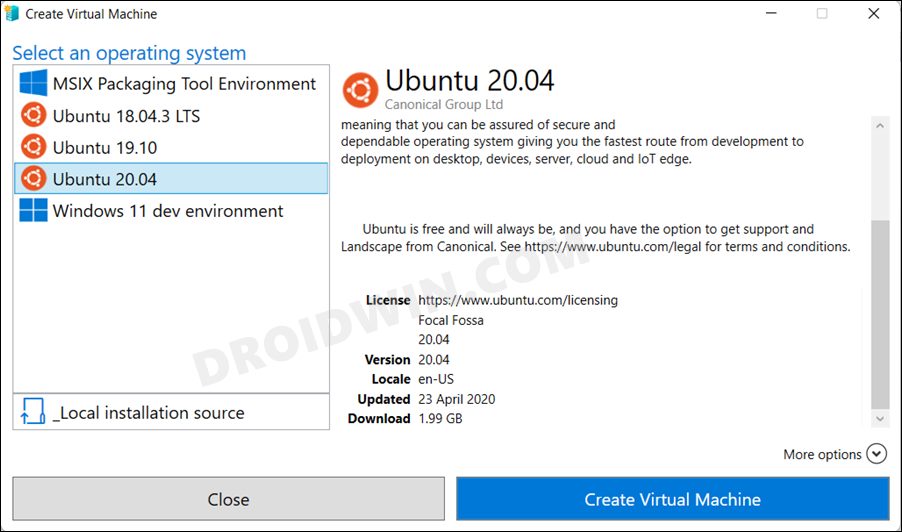
- To begin with, download your preferred operating system’s ISO file.
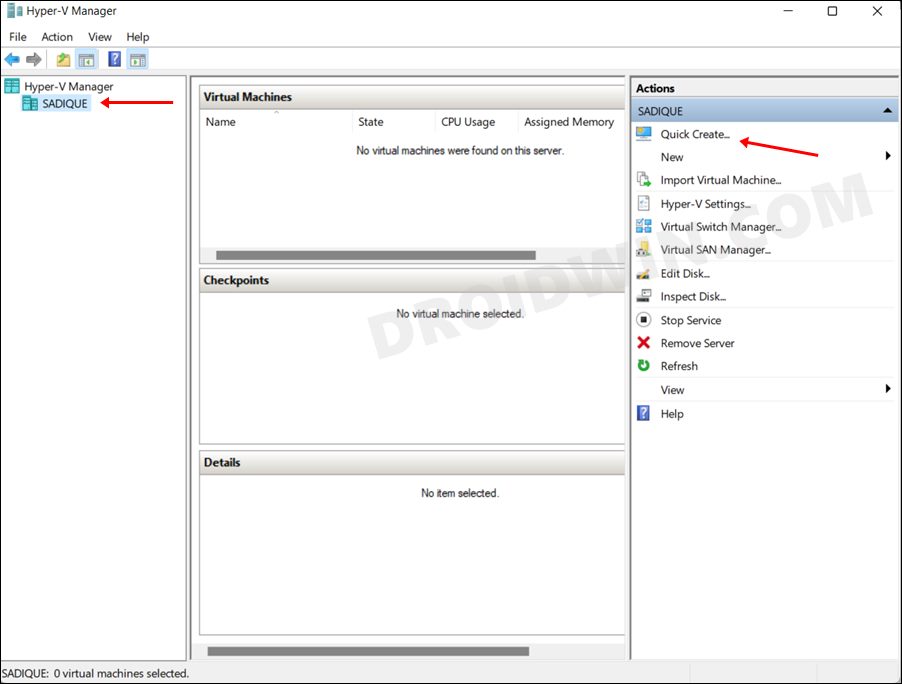
- Then head over to the Start Menu, search Hyper-V Manager, and open it.
- After that, select your name from the left side and click on Quick Create present on the right side.

- Now click on the Local Installation Source button load the downloaded ISO to Hyper-V. Or you could also select a one that is provided by the Hyper-V itself.

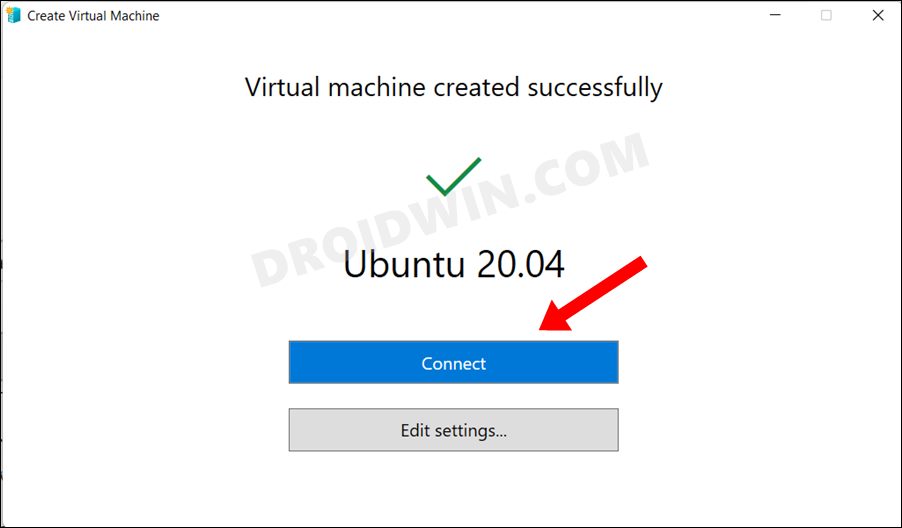
- Then hit the Create Virtual Machine button and wait for the process to complete. Once done, click on Connect.

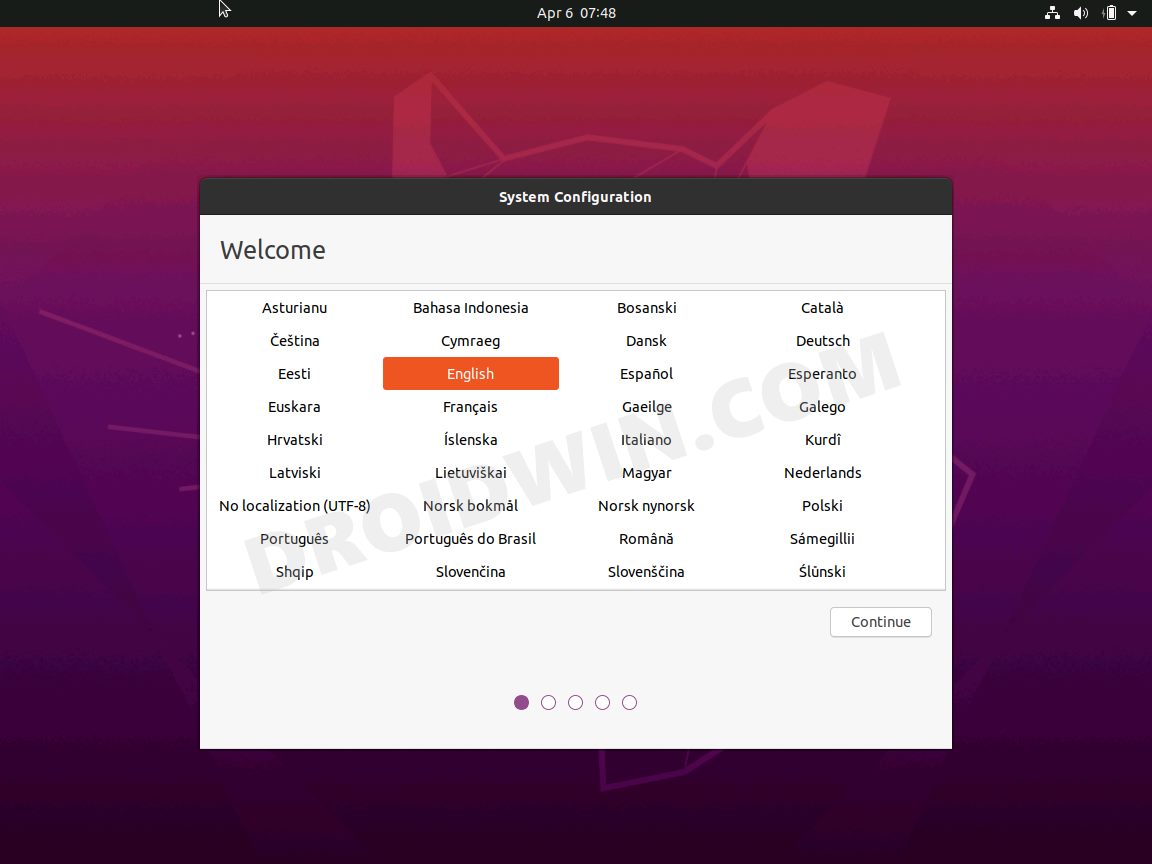
- The OS will now be loaded to the Hyper-V and you may proceed with the rest of the installation.

That’s it. These were the steps to install and enable Hyper-V in Windows 11. Likewise, we have also listed the steps to create a virtual machine using it. If you have any queries concerning the aforementioned steps, do let us know in the comments. We will get back to you with a solution at the earliest.
- How to Install macOS on Windows and Run Mac Apps
- Guide to Install Windows 11 on any PC using a Virtual Machine
- How To Find Windows Version, Build, And Edition From ISO File
- How to Install Chrome OS Flex in Virtual Machine

The Windows Hypervisor Platform in Windows 11 is a fundamental component of virtualization in Windows 11, allowing users to run virtual machines with enhanced performance and compatibility. Enabling the Windows Hypervisor Platform unlocks many features, including support for Hyper-V and other virtualization technologies. In this guide, we’ll walk you through the simple steps to enable the Windows Hypervisor Platform on your Windows 11 system, empowering you to harness the full potential of virtualization.
How to Turn on Windows Hypervisor Platform in Windows 11?
- Click on the Start Menu and open the Control Panel.
- Switch the Control Panel view to Category.

Category View
- Now, Click on Programs.

Programs
- Under Programs and Features, click on Turn Windows Features on or off.

Turn Windows Features on or off
- Windows Features dialog box will open now.
- Search and locate the Windows Hypervisor Platform from the list of services available .

Enable Windows Hypervisor Platform in Windows 11
- Click on the checkbox next to it and then click on OK.
- The system will prompt for a restart. Click Close. Continue with Restart if prompted. It is recommended that changes made to the system reflect while using the environment.

Close
- That is it, Windows Hypervisor Platform is now enabled on your Windows 11 laptop or PC. Enjoy Seamless Connectivity.
The Windows Hypervisor Platform serves as the foundation for running virtual machines on Windows 11. It provides a robust and secure environment for hosting virtualized workloads, enabling efficient resource utilization and seamless integration with other Windows features.
Check System Compatibility:
- Press Windows + R to open the Run dialog box.
- Type msinfo32 and press Enter to open the System Information window.
- Look for the “ Hyper-V Requirements ” section and verify that all requirements are met, including CPU support for virtualization technology and hardware-assisted virtualization.
Enable Virtualization in BIOS/UEFI:
- Restart your computer and access the BIOS/UEFI settings by pressing the designated key during startup (often Del, F2, or Esc ).
- Navigate to the virtualization settings (usually located under CPU or Advanced settings ).
- Enable Intel VT-x or AMD-V (depending on your processor) and any other relevant virtualization features.
Save the changes and exit the BIOS/UEFI settings. - Once virtualization support is enabled in the BIOS/UEFI settings, you can proceed to enable the Windows Hypervisor Platform in Windows 11 using the above-mentioned steps.
Take away:
By following the steps outlined in this guide, you can ensure compatibility with virtualization technologies and unlock a world of possibilities for development, testing, and productivity. Explore the potential of virtualization with the Windows Hypervisor Platform and elevate your Windows 11 experience today. Happy Coding! Peace out!
Windows 11, как и предыдущие версии системы, включает поддержку платформы виртуализации Hyper-V, позволяющую легко создавать и использовать виртуальные машины. Функция по умолчанию доступна лишь в редакциях Pro и Корпоративная, но при желании Hyper-V можно установить и в Windows 11 Домашняя.
В этой пошаговой инструкции подробно о том, как включить или установить Hyper-V в разных редакциях Windows 11, включая Home, а также об отключении Hyper-V при необходимости. Про процесс создания виртуальных машин можно прочитать в инструкции Как создать и использовать виртуальные машины Hyper-V.
- Как включить или установить Hyper-V в Windows 11
- Windows 11 Pro и Enterprise
- Windows 11 Домашняя
- Как отключить Hyper-V
Установка Hyper-V в Windows 11
Виртуальные машины Hyper-V доступны в виде компонента в Windows 11 Pro и Enterprise, но отсутствуют в редакции «Домашняя», хотя мы можем включить их и там, что также будет показано в инструкции.
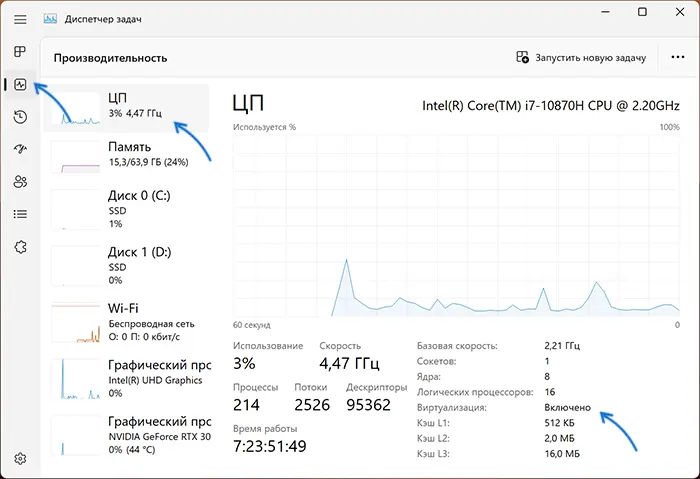
Прежде чем приступать, учитывайте: для работы виртуальных машин Hyper-V требуется поддержка виртуализации. Быстрый способ проверить её наличие — открыть диспетчер задач, перейти на вкладку «Производительность» и выбрать пункт «ЦП».
Если в пункте «Виртуализация» вы видите «Включено», можно продолжать. Иначе имеет смысл включить виртуализацию в БИОС/UEFI, при условии, что ваш процессор её поддерживает.
Включение Hyper-V В Windows 11 Pro и Enterprise
Для того, чтобы включить компоненты Hyper-V в Профессиональной и Корпоративной редакциях, выполните следующие шаги:
- Нажмите правой кнопкой мыши по кнопке «Пуск», выберите пункт «Выполнить», введите appwiz.cpl и нажмите Enter.

- В открывшемся окне слева нажмите «Включение или отключение компонентов Windows».

- В списке компонентов отметьте Hyper-V так, чтобы вложенные пункты тоже были отмечены — «Платформа Hyper-V» и «Средства управления Hyper-V».

- Нажмите «Ок», дождитесь завершения установки, при появлении запроса о перезагрузке компьютера — выполните перезагрузку.


Готово, компоненты Hyper-V установлены, а инструменты управления виртуальными машинами вы сможете найти в пункте «Инструменты Windows» меню пуск (раздел «Все приложения») или Панели управления.
Как установить Hyper-V в Windows 11 Домашняя
Для установки компонентов Hyper-V в Домашней редакции Windows 11 достаточно создать файл bat со следующим кодом (как создать .bat файл):
pushd "%~dp0"
dir /b %SystemRoot%\servicing\Packages\*Hyper-V*.mum >hv.txt
for /f %%i in ('findstr /i . hv.txt 2^>nul') do dism /online /norestart /add-package:"%SystemRoot%\servicing\Packages\%%i"
del hv.txt
Dism /online /enable-feature /featurename:Microsoft-Hyper-V -All /LimitAccess /ALL
pause
После чего запустить его от имени Администратора, лучше — при подключенном Интернете: нажать правой кнопкой мыши по файлу и выбрать соответствующий пункт меню.

Это запустит установку необходимых компонентов.
По завершении установки вам предложат выполнить перезагрузку в окне командной строки. Введите Y и нажмите Enter, дождитесь завершения перезагрузки и установки необходимых для работы Hyper-V компонентов.
В результате всё, что требуется для работы виртуальных машин Hyper-V и управления ими будет установлено, а нужные пункты для запуска настроек вы найдете в «Инструментах Windows» в меню Пуск и Панели управления.
Как отключить Hyper-V
Возможны два способа и ситуации необходимости отключения Hyper-V.
Первый — простое удаление компонентов, которое подойдёт в ситуации, когда использовать виртуальные машины Hyper-V в этой системе больше не планируется:
- Нажмите клавиши Win+R на клавиатуре, введите appwiz.cpl и нажмите Enter.
- Слева нажмите по пункту «Включение или отключение компонентов Windows».
- Снимите отметку с компонента Hyper-V и нажмите «Ок».
- Дождитесь удаления, при запросе о перезагрузке Windows — выполните её.
Второй вариант: Hyper-V мешает запуску других виртуальных машин, например, VirtualBox или эмуляторов Android, но удалять компоненты вы не планируете. В этом случае вы можете временно отключить Hyper-V без удаления:
- Запустите командную строку от имени Администратора.
- Введите команду
bcdedit /set hypervisorlaunchtype off
и нажмите Enter.
- Закройте командную строку и перезагрузите компьютер.
- Работа Hyper-V будет отключена, при этом компоненты останутся установленными.
- Включить их снова в дальнейшем можно будет с помощью команды
bcdedit /set hypervisorlaunchtype auto
с последующей перезагрузкой.
Модификация этого способа, позволяющая выбирать статус Hyper-V в меню при загрузке компьютера описана в статье: Как использовать виртуальные машины Hyper-V и VirtualBox на одном компьютере.