
@des1roer
ученье — свет, а неученье — приятный полумрак
win 7. как в переменные среды прописать http_proxy ?
-
Вопрос задан
-
3861 просмотр
Комментировать
Подписаться
1
Оценить
Комментировать
Пригласить эксперта
Ответы на вопрос 1
Ну как обычно: set http_proxy=192.168.0.1:3128
Комментировать
Ваш ответ на вопрос
Войдите, чтобы написать ответ
Похожие вопросы
-
Показать ещё
Загружается…
Минуточку внимания
Реклама
Configuring an HTTP proxy for command-line tools in Windows is vital in environments with restricted internet access or strict routing policies. It ensures applications like curl and wget always funnel requests through the specified proxy, maintaining reliable connections and adhering to network rules.
Environment variables offer a direct way to set proxy configurations system-wide on Windows. Recognizing these variables allows PowerShell, Command Prompt, and other terminal-based tools to apply uniform network settings, reducing per-application overhead and minimizing errors.
Reliable proxy management remains crucial for IT professionals who handle complex enterprise environments. Consistent application of HTTP and HTTPS proxies saves time, avoids manual configuration, and contributes to an organized, policy-compliant network infrastructure.
-
Ensure a functioning HTTP proxy or server is available.
-
Open Command Prompt or PowerShell.
-
Define the HTTP proxy by setting the http_proxy environment variable with the server address and port.
# setx http_proxy http://proxyserver:8080
SUCCESS: Specified value was saved.
-
Define the HTTPS proxy by setting the https_proxy environment variable with the secure proxy server address and port.
# setx https_proxy https://proxyserver:8080
SUCCESS: Specified value was saved.
-
Verify the proxy configuration by echoing the environment variables.
# echo %http_proxy%
http://proxyserver:8080
-
Test the settings using a command-line tool like curl.
# curl http://example.com
[Output showing connection through proxyserver]
-
For temporary session-based proxy settings, use set instead of setx.
# set http_proxy=http://proxyserver:8080
Use setx for persistent user-level variables in Windows, and set for variables that revert after closing the session.
-
Remove proxy settings by clearing the environment variables.
# setx http_proxy ""
SUCCESS: Specified value was saved.
# setx https_proxy ""
SUCCESS: Specified value was saved.
Restart the terminal session or log off and on again to ensure changes to environment variables take effect.
Discuss the article:
Comment
anonymously. Login not required.
Upgrade & Secure Your Future with DevOps, SRE, DevSecOps, MLOps!
We spend hours on Instagram and YouTube and waste money on coffee and fast food, but won’t spend 30 minutes a day learning skills to boost our careers.
Master in DevOps, SRE, DevSecOps & MLOps!
Learn from Guru Rajesh Kumar and double your salary in just one year.
Get Started Now!


Setting the proxy configuration in Linux and Windows
If you use a proxy server or firewall, you may need to set the http_proxy environment variable in order to access some url from command-line.
Windows Command line
set http_proxy=http://your_proxy:your_port
set http_proxy=http://username:password@your_proxy:your_port
set https_proxy=https://your_proxy:your_port
set https_proxy=https://username:password@your_proxy:your_port
Windows GUI
1. Open the Control Panel and click the System icon.The System Properties dialog is displayed.
2. On the Advanced tab, click on Environment Variables. The Environment Variables dialog is displayed.
3. Click New in the System variables panel. The New Sytem Variable dialog is displayed.
4. Add http_proxy with the appropriate proxy information
Windows Registry
IE can set username and password proxies, so maybe setting it there and import does work
reg add “HKCU\Software\Microsoft\Windows\CurrentVersion\Internet Settings” /v ProxyEnable /t REG_DWORD /d 1
reg add “HKCU\Software\Microsoft\Windows\CurrentVersion\Internet Settings” /v ProxyServer /t REG_SZ /d name:port
reg add “HKCU\Software\Microsoft\Windows\CurrentVersion\Internet Settings” /v ProxyUser /t REG_SZ /d username
reg add “HKCU\Software\Microsoft\Windows\CurrentVersion\Internet Settings” /v ProxyPass /t REG_SZ /d password
netsh winhttp import proxy source=ie
Command to enable proxy usage:
reg add “HKCU\Software\Microsoft\Windows\CurrentVersion\Internet Settings” /v ProxyEnable /t REG_DWORD /d 1 /f
Command to disable proxy usage:
reg add “HKCU\Software\Microsoft\Windows\CurrentVersion\Internet Settings” /v ProxyEnable /t REG_DWORD /d 0 /f
Command to change the proxy address:
reg add “HKCU\Software\Microsoft\Windows\CurrentVersion\Internet Settings” /v ProxyServer /t REG_SZ /d proxyserveraddress:proxyport /f
Linux
export http_proxy=http://your_proxy:your_port
export http_proxy=http://username:password@your_proxy:your_port
export https_proxy=https://your_proxy:your_port
export https_proxy=https://username:password@your_proxy:your_port
export https_proxy=https://%username%:%password%@your_proxy:your_port
FAQ
1. How to escape if password has a @ character
Ans – try %40 instead of @
2. What is the file name where it stroed the proxy in Ubantu
Ans – /etc/environment
3. How to set proxy inforamtin in Apt?
Ans – Adding following line to /etc/apt/apt.conf has solved the problem:
Acquire::http::proxy “http://10.1.3.1:8080/”;
If file does not exist, create it. Do not confuse it with apt.conf.d directory.
4. How to set proxy inforamtin in linux Profile?
5. Why manual export failed to affect apt-get with the proxy info?
Ans – The reason your manual export failed to affect apt-get is because sudo ignores that environment variable by default (i.e. it doesn’t pass it on to the command). For one-off runs, you could do sudo env http_proxy=http://10.1.3.1:8080 apt-get update. Otherwise, you could configure sudo to allow http_proxy to fall through.
Certification Courses
DevOpsSchool has introduced a series of professional certification courses designed to enhance your skills and expertise in cutting-edge technologies and methodologies. Whether you are aiming to excel in development, security, or operations, these certifications provide a comprehensive learning experience. Explore the following programs:
- DevOps Certification — Learn the fundamentals and advanced concepts of DevOps practices and tools.
- DevSecOps Certification — Master the integration of security within the DevOps workflow.
- SRE Certification — Gain expertise in Site Reliability Engineering and ensure reliability at scale.
- MLOps Certification — Dive into Machine Learning Operations and streamline ML workflows.
- AiOps Certification — Discover AI-driven operations management for next-gen IT environments.

Explore our DevOps Certification, SRE Certification, and DevSecOps Certification programs at DevOpsSchool. Gain the expertise needed to excel in your career with hands-on training and globally recognized certifications.
Загнать всех в цепочку прокси можно переменной окружения HTTP_PROXY (HTTPS_PROXY) Из консоли выполняем в windows — set, в Linux — export… Но значит ли это, что все TCP/IP соединения начнут использовать прокси автоматически? Выходит, что таки да. Есть даже переменная «no_proxy» Но я, однако, сомневаюсь… но проще попробовать, чем искать ответ в сети… Не забыть опубликовать ответ в комментариях.
Setting HTTP_PROXY in Windows or Linux
In []:
#Set the HTTP_PROXY environment variable using the command specific to your shell. For example, in bash, use the export command.
export HTTP_PROXY=http://my.proxyserver.com:8080
In []:
#To make this change persistent, add the command to the appropriate profile file for the shell.
#For example, in bash, add a line like the following to your .bash_profile or .bashrc file:linux
http_proxy=http://username:password@hostname:port;
export $HTTP_PROXY
In Windows
In [6]:
from IPython.display import Image
In [11]:
Image(url='http://docs.pivotal.io/pivotalcf/devguide/images/proxy/new.png')
Out[11]:
In [12]:
Image(url='http://docs.pivotal.io/pivotalcf/devguide/images/proxy/proxy.png')
Out[12]:
Или в окне консоли
In []:
# example
SET http_proxy=http://someproxy.com:3128
How to tell Python to automatically use the proxy setting in Windows XP like R’s internet2 option?
In []:
#Set up environment variable http_proxy / https_proxy to http://your-proxy-server-address:proxy-port

#The urlopen() function works transparently with proxies which do not require authentication.
#In a Unix or Windows environment, set the http_proxy, or ftp_proxy environment variables to
#a URL that identifies the proxy server before starting the Python interpreter.
#For example (the '%' is the command prompt):

% http_proxy="http://www.someproxy.com:3128"
% export http_proxy
% python
...
The no_proxy environment variable can be used to specify hosts which shouldn’t be reached via proxy; if set, it should be a comma-separated list of hostname suffixes, optionally with :port appended,
In []:
#for example
cern.ch,ncsa.uiuc.edu,some.host:8080.
Посты чуть ниже также могут вас заинтересовать
Если ваш компьютер находится в сети за прокси сервером, вы получите ряд проблема при доступе из сессии PowerShell к внешним ресурсам. Например, вы не сможете получить содержимое внешней веб-страницы с помощью командлета Invoke-WebRequest, обновить справку с помощью Update-Help, подключиться к тенанту Azure/Microsoft 365 (модуль Exchange Online PowerShell), установить модули из PSGallery, или компоненты RSAT, или загрузить пакет с приложением из внешнего репозитория пакетов (с помощью PackageManagement или winget). В этой статье мы разберемся, как из настроить PowerShell для доступа в Интернет через прокси-сервер с аутентификацией.
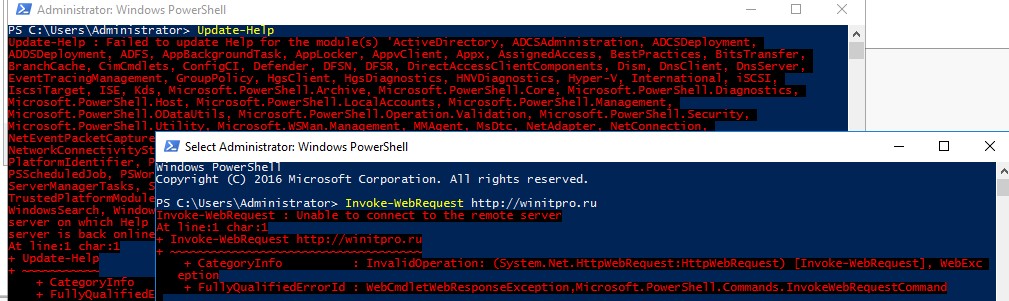
Попробуйте обновить справку Powershell:
Update-Help
Или обратиться к внешней веб-странице:
Invoke-WebRequest https://winitpro.ru
При отсутствии прямого выхода в Интернет команда вернет такую ошибку:
update-help : Failed to update Help for the module(s) 'DhcpServer, DirectAccessClientComponents….’ with UI culture(s) {en-US} : Unable to connect to Help content. The server on which Help content is stored might not be available. Verify that the server is available, or wait until the server is back online, and then try the command again.
Invoke-WebRequest: Unable to connect to the remote server
Find-Module modulename
Unable to resolve package source 'https://www.powershellgallery.com/api/v2'
Дело в том, что Powershell (а точнее класс .NET System.Net.WebClient, который используют все командлеты при обращении к внешним ресурсам по HTTP/HTTPS) не использует настройки прокси-сервера, заданные в параметрах пользователя. Рассмотрим, как настроить задать параметры прокси сервера и выполнить аутентификацию из консоли PoweShell.
Содержание:
- Настройка параметров подключения к прокси-серверу в PowerShell
- Аутентификация на прокси сервере из PowerShell
- Использование прокси в PowerShell Core
- Как автоматически применить настройки прокси с помощью профиля PowerShell?
- Вывести настройки прокси сервера из PowerShell
- Как изменить настройки прокси-сервера в Windows из PowerShell?
Настройка параметров подключения к прокси-серверу в PowerShell
Проверьте текущие настройки системного прокси в сессии Powershell:
netsh winhttp show proxy
Как вы видите, настройки прокси не заданы.
Current WinHTTP proxy settings:
Direct access (no proxy server).
Можно импортировать настройки прокси-сервера из настроек Windows (Internet Explorer):
netsh winhttp import proxy source=ie
или задать их вручную:
netsh winhttp set proxy "192.168.0.14:3128"

Вы можете задать список IP адресов или имен сайтов, для подключения к которым не нужно использовать прокси-сервер (bypass list):
netsh winhttp set proxy "192.168.0.14:3128" bypass-list= "10.*,172.*,192.168.*,*.corp.winitpro.ru"
Вы можете проверить, выполняется ли подключение к определённому URL адресу через прокси или нет. Выполните команду:
([System.Net.WebRequest]::GetSystemWebproxy()).IsBypassed("https://winitpro.ru")
Если команда вернула
False
, значит подключение к этому URL будет выполнено через прокси-сервер, заданный в сесии PowerShell.
Если на прокси-сервере требуется аутентификация, то при выполнении запросов PowerShell будут появляться ошибки “(407) Proxy Authentication Required”. Например, при попытке подключиться к своей тенанту Azure с помощью модуля AzureAD:
Connect-AzureAD
Я получаю ошибку:
The remote server returned an error: (407) Proxy Authentication Required.Далее рассмотрим, как аутентифицироваться на прокси сервере из PowerShell.
Аутентификация на прокси сервере из PowerShell
Рассмотрим два способа аутентификации на прокси-сервере: вы можете использовать SSO аутентификацию, или указать имя и пользователя для аутентификации вручную.
Если вы авторизованы в системе под доменной учетной записью, и ваш прокси поддерживает Active Directory аутентификацию Kerberos, или NTLM (если вы его еще не отключили), то для аутентификации на прокси-сервере можно воспользоваться учетными данными текущего пользователя (вводить имя/пароль не потребуется):
$Wcl = new-object System.Net.WebClient
$Wcl.Headers.Add(“user-agent”, “PowerShell Script”)
$Wcl.Proxy.Credentials =
[System.Net.CredentialCache]::DefaultNetworkCredentials
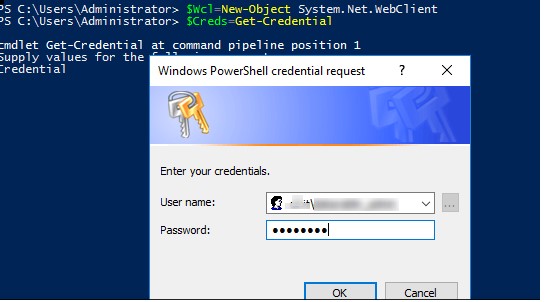
Если нужно вручную аутентифицироваться на прокси-сервере, выполните следующие команды. Указав имя и пароль пользователя в окне Windows Security credential request.
$Wcl=New-Object System.Net.WebClient
$Creds=Get-Credential
$Wcl.Proxy.Credentials=$Creds
Теперь можно попробовать обратится к внешнему сайту или обновить справку командой Update-Help.
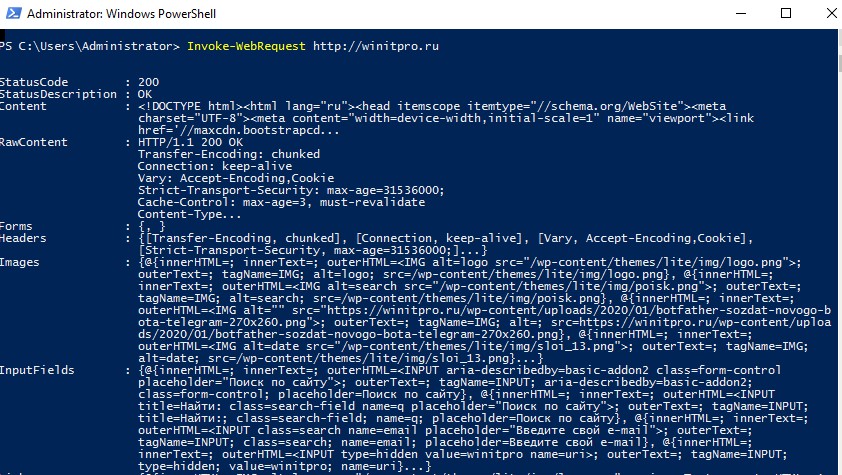
Как вы видите, командлет Invoke-Web Request вернул данные со страницы внешнего сайта!
С помощью PowerShell вы можете проверить свой внешний IP адрес, под которым вы выходите в интернет. Если вы настроили подключение через прокси, команда должна вернуть внешний IP адрес вашего прокси сервера:
(Invoke-WebRequest -uri "http://ifconfig.me/ip").Content
Если вы не хотите использовать настройки прокси для всей сессии PowerShell, вы можете использовать специальные параметры командлета Invoke-WebRequest для аутентификации на прокси под текущим пользователем:
Invoke-WebRequest https://winitpro.ru -ProxyUseDefaultCredentials -Proxy _http://192.168.0.14:3128
Либо можно запросить учетную запись интерактивно:
$ProxyCreds = Get-Credential
Invoke-WebRequest https://winitpro.ru -Proxy "_http://192.168.0.14:3128" -ProxyCredential $ProxyCreds
Рассмотренные выше способ позволяет настроить параметры прокси сервера и выполнить аутентификацию в классическом Windows PowerShell 5.1 (как узнать, какая версия PowerShell установлена).
Использование прокси в PowerShell Core
В новых версиях PowerShell Core (7.x) для выполнения веб запросов в командлетах Invoke-WebRequest, Find-Module, Install-Module и т.д., вместо класса System.Net.WebRequest используется класс System.Net.HttpClient.
Соответственно, чтобы настроит параметры прокси сервера в PowerShell Core нужно использовать команду:
[System.Net.Http.HttpClient]::DefaultProxy = New-Object System.Net.WebProxy('http://your-proxy:3128')
Для аутентификации на прокси под текущим пользователем Windows:
[System.Net.Http.HttpClient]::DefaultProxy.Credentials = [System.Net.CredentialCache]::DefaultCredentials
Для интерактивного запроса имени пользователя и пароля для аутентификации на прокси:
[System.Net.Http.HttpClient]::DefaultProxy.Credentials = Get-Credential
Также PowerShell Core поддерживает специальные переменные окружения Windows, в которых можно задать параметры прокси:
-
HTTP_PROXY
– прокси для HTTP запросов -
HTTPS_PROXY
— прокси для HTTPS запросов -
ALL_PROXY
– прокси и для HTTP и для HTTPS -
NO_PROXY
– список адресов исключений для прокси
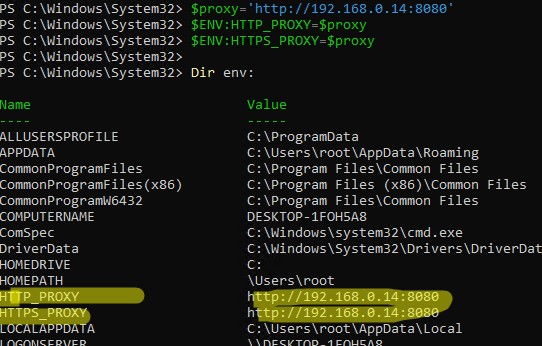
Из PowerShell вы можете задать переменные окружения с помощью следующих команд:
$proxy='http://192.168.0.14:8080'
Можно сразу в переменных окружения задать имя пользователя и пароль для аутентификации на прокси-сервере:
$proxy='http://username:password@IP:PORT'
$ENV:HTTP_PROXY=$proxy
$ENV:HTTPS_PROXY=$proxy
Проверьте, что новые переменные окружения были заданы:
Dir env:
В PowerShell Core на Linux вы можете экспортировать системные настройки прокси из переменных окружения так:
export HTTP_PROXY=http://192.168.0.14:3128
export HTTPS_PROXY=http://192.168.0.14:3128
Как автоматически применить настройки прокси с помощью профиля PowerShell?
Вы можете создать профиль PowerShell для автоматического запуска команд импорта настроек прокси при запуске PowerShell.
Для этого выполните команду, которая создаст файл профиля PowerShell («
C:\Users\username\Documents\WindowsPowerShell\Microsoft.PowerShell_profile.ps1
«):
notepad $PROFILE
(или
notepad $PROFILE.AllUsersCurrentHost
– если нужно применить профиль PowerShell ко всем пользователям).
Профиль PowerShell это простой PS1 скрипт, который всегда выполняется при запуске консоли PowerShell.exe.
Скопируйте в блокнот нужный PowerShell код. Например, вы используете для настройки параметров прокси-сервера на клиенте PAC файлы (Autoconfig). Вы можете указать адрес сервера с PAC файлом и способ аутентификации на прокси-сервере под текущим пользователем:
#Использовать актуальную версию TLS 1.2 для подключения
[Net.ServicePointManager]::SecurityProtocol = [Net.SecurityProtocolType]::Tls12
[system.net.webrequest]::DefaultWebProxy = new-object system.net.webproxy('http://192.168.1.90:80')
#можно заменить предыдущую строку на netsh winhttp import proxy source=ie, если нужно импортировать настройки прокси из Internet Explorer
[system.net.webrequest]::DefaultWebProxy.credentials = [System.Net.CredentialCache]::DefaultNetworkCredentials
#можно запросить учетные данные пользователя
#System.Net.WebRequest]::DefaultWebProxy.Credentials = Get-Credential
# можно загрузить пароль пользователя из XML файла (см. статью про использование сохраненных паролей в PowerShell):
# System.Net.WebRequest]::DefaultWebProxy= Import-Clixml -Path c:\pc\password.xml
[system.net.webrequest]::DefaultWebProxy.BypassProxyOnLocal = $true
Настройки политики запуска PowerShell скриптов (PowerShell Execution Policy) по умолчанию запрещают запуск всех PS скриптов, даже из файлов профилей PowerShell. Чтобы разрешить запуск PS1 скриптов придется выполнить команду:
Set-ExecutionPolicy RemoteSigned
Сохраните файл Microsoft.PowerShell_profile.ps1 и перезапустите командную строку PowerShell. Теперь, когда вы открываете новую сессию PowerShell, выполняется код из файла профиля и в сессию импортируются настройки прокси-сервера.
Вывести настройки прокси сервера из PowerShell
Вы можете получить текущие настройки прокси-сервера в Windows из реестра командой PowerShell:
Get-ItemProperty -Path 'HKCU:\Software\Microsoft\Windows\CurrentVersion\Internet Settings' | Select-Object ProxyServer, ProxyEnable
В моем пример адрес и порт прокси сервера:
192.168.0.14:3128
Прокси сервер включен:
ProxyEnable =1

Также можно получить настройки WebProxy так:
[System.Net.WebProxy]::GetDefaultProxy()
![System.Net.WebProxy]::GetDefaultProxy в powershell](https://winitpro.ru/wp-content/uploads/2017/04/GetDefaultProxy.jpg)
Если необходимо, вы можете включить (отключить) использование прокси следующими командами (соответственно):
Set-ItemProperty -Path 'HKCU:\Software\Microsoft\Windows\CurrentVersion\Internet Settings' ProxyEnable -value 1
и
Set-ItemProperty -Path 'HKCU:\Software\Microsoft\Windows\CurrentVersion\Internet Settings' ProxyEnable -value 0
Как изменить настройки прокси-сервера в Windows из PowerShell?
Вы можете задать параметры прокси-сервера с помощью PowerShell. Например, следующая функция PowerShell позволяет изменить настройки прокси. Предварительно функция доступность прокси-сервер и порта на нем с помощью командлета Test-NetConnection
function Set-Proxy ( $server,$port)
{
If ((Test-NetConnection -ComputerName $server -Port $port).TcpTestSucceeded) {
Set-ItemProperty -Path 'HKCU:\Software\Microsoft\Windows\CurrentVersion\Internet Settings' -name ProxyServer -Value "$($server):$($port)"
Set-ItemProperty -Path 'HKCU:\Software\Microsoft\Windows\CurrentVersion\Internet Settings' -name ProxyEnable -Value 1
}
Else {
Write-Error -Message "Неверные настройки прокси-сервера:  $($server):$($port)"
}
}
Set-Proxy 192.168.0.14 3128
Добавить дополнительные адреса в список исключений прокси:
$ProxyExceptionList = ";*.winitpro.ru;*.yandex.ru"
$ProxyProperty = Get-ItemProperty "HKCU:\Software\Microsoft\Windows\CurrentVersion\Internet Settings"
If ($ProxyProperty.ProxyOverride) {
$OldValue = $ProxyProperty.ProxyOverride
$NewValue = $OldValue+$ProxyExceptionList
$ProxyProperty | Set-ItemProperty -Name ProxyOverride -Value $NewValue
} else {
Write-Warning "Proxy overrides list empty!"
}
Дополнительно, вы можете сохранить в реестре имя и пароль пользователя для аутентификации на прокси сервере:
Set-ItemProperty -Path 'HKCU:\Software\Microsoft\Windows\CurrentVersion\Internet Settings' -name ProxyUser -Value "username"
Set-ItemProperty -Path 'HKCU:\Software\Microsoft\Windows\CurrentVersion\Internet Settings' -name ProxyPass -Value "password"
Обратите внимание, что в старых билдах Windows 10, Windows Server 2016 и более старых версиях Window по умолчанию для подключения используется устаревший и небезопасный протокол TLS 1.0. Поэтому, например, при поиске модуля в PSGalery вы получите ошибку:
WARNING: Unable to resolve package source ‘https://www.powershellgallery.com/api/v2’.
Чтобы использовать TLS 1.2 для подключений к конечным точкам из PowerShell, выполните команду:
[Net.ServicePointManager]::SecurityProtocol = [Net.SecurityProtocolType]::Tls12