
Making sure the clock on your computer is correct might sound like a minor thing, but it’s actually very important for keeping your computer running well. This is also extremely important for businesses that need the right time stamps for log files, syncing data, and keeping things secure. In this guide, I’ll show you how to sync your Windows 11 clock with an internet time server, change your Network Time Protocol (NTP) server, and update your NTP time using the command prompt (CMD).
Also see: How to Change Date and Time Format in Windows 11

Why keeping time right on your PC is important
Having your computer’s clock synced isn’t just about the right time showing on your taskbar. It’s also very important for a bunch of other computer tasks like managing files, scheduling stuff, network authentication, and logging what’s happening. It makes sure everything works together correctly and in order, which is a big deal when your computer’s part of a network.
Windows 11, just like the ones before it, uses the Network Time Protocol (NTP) to keep its clock in line with external time servers. By default, it syncs with time.windows.com, but there are loads of other public NTP servers out there you can use instead of the default one.
Linked issue: Date and Time is Always Wrong in Windows
How to sync your Windows 11 time with the internet using CMD
If you want to make sure your system’s time is correct, Windows 11 lets you sync it up with an internet time server. The following steps will show you how to do that using CMD:
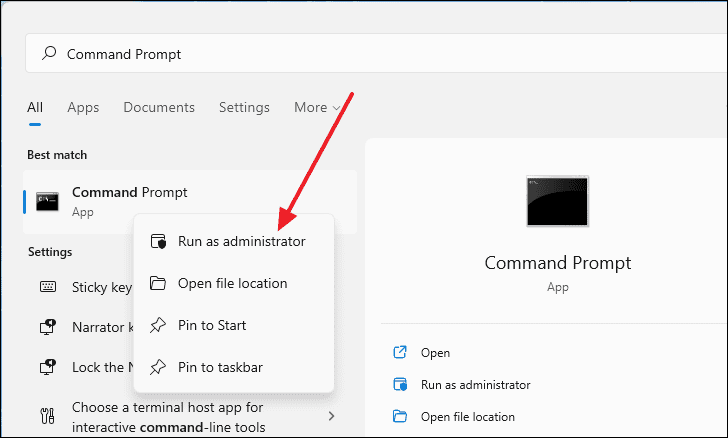
- Start by opening the Command Prompt as an admin. Just search for “cmd” or “command prompt” in the Start menu, right-click on “Command Prompt” in the search results, and pick “Run as administrator” from the menu that pops up.
- With the Command Prompt window open, enter the following command:
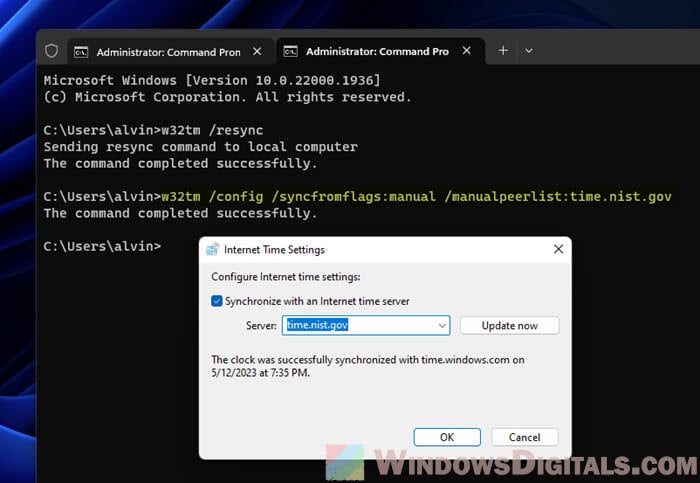
w32tm /resync

- Hit the Enter key after you type in the command. If all goes well, you’ll see a message saying the command worked. This step gets your system’s clock in sync with the default internet time server.

This feature can also help sort out issues if your computer’s clock is running slow or fast, making sure your computer’s time is as accurate as possible.
Related resource: How to Change Date and Time Format in Windows 11
How to switch your NTP time server in Windows 11
Normally, your Windows system will keep its clock synced with Microsoft’s time server (usually time.windows.com). But sometimes, you might need to sync with a different NTP server, such as when the default one isn’t reachable at the moment or you prefer using a local time server in your country. Follow the steps below to switch to your preferred NTP time server in Windows 11 using CMD:
- Start Command Prompt as admin, just like before.
- In the Command Prompt window, type in the following command to change the NTP server. Swap “time.nist.gov” with your chosen NTP server’s address:
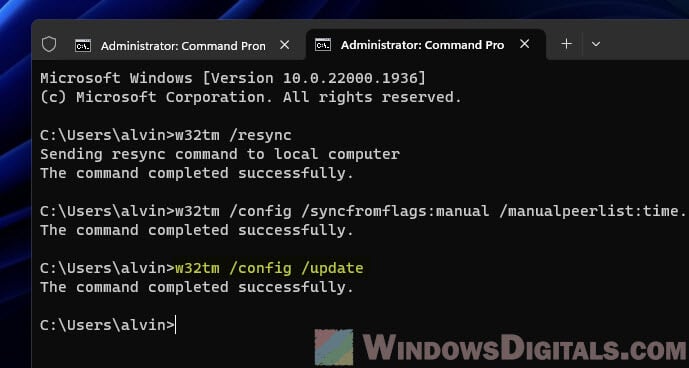
w32tm /config /syncfromflags:manual /manualpeerlist:time.nist.gov

- Hit the Enter key after you enter the command. This changes your NTP server to the one you prefer.
- To make sure the changes take effect, type this command and press Enter:
w32tm /config /update

- Then, get your system’s clock synced up with the new NTP server by using the w32tm /resync command.
How to refresh your NTP time
Refreshing your NTP time in Windows is just a matter of making it resync. Just follow the steps in “How to sync your Windows 11 Clock using CMD” and run the “w32tm /resync” command to get your system clock updated or fixed whenever you need.
What to do if you run into time sync issues
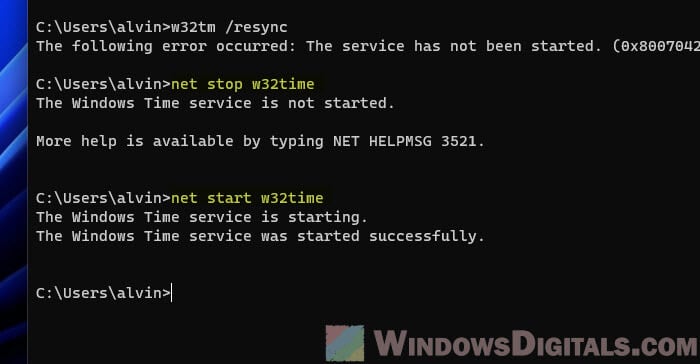
Even if you follow the steps exactly, you might run into problems with the time sync process. Like, you might see an error when trying to use the w32tm /resync command. Common errors include messages like “The service has not been started (0x80070426)” or “The computer did not resync because the time service was shutting down.”
If that happens, try this command to restart the w32time service, which can often kick any time syncing issues to the curb in Windows 11 or 10:
net stop w32time
net start w32time
After the service is back up and running, give the time sync another go with the w32tm /resync command.
If restarting doesn’t smooth things over, consider unregistering and then re-registering the time service in Windows with these steps:
- First, start by unregistering the Windows Time Service with this command:
w32tm /unregister. - Then, stop the Windows Time Service using this command:
net stop w32time. - Next up, re-register the Windows Time Service with this command:
w32tm /register. - Finally, get the Windows Time Service going again with:
net start w32time.
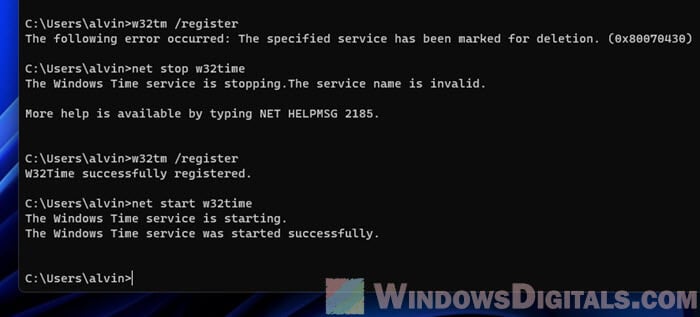
Running through the above steps will unregister, stop, re-register, and then restart the Windows Time Service. It should be able to fix any related issues in the process.
So, what have we learned?
Using the command line lets you set up automatic tasks, which is very helpful if you’re managing several computers—think network administrators, for example. You can write scripts that run these commands automatically at set times. Besides, since you can run CMD commands remotely, it’s also a handy option for network environments.
Syncing your time on Windows 11 ensures that your computer’s clock matches the actual time, which is crucial for tasks like meeting deadlines, attending online events, or maintaining system security. The process involves accessing the system settings and enabling automatic time synchronization. This can be done quickly by navigating through a few menus and settings within your Windows 11 system. Once set up, your computer will automatically adjust to the correct time based on your location.
Syncing the time on your Windows 11 PC ensures your clock is accurate, keeping everything from your emails to your scheduled tasks on track. Follow these steps to get your clock in sync.
Step 1: Open Settings
Click the Start button and select “Settings”.
The Settings app is where you’ll find most of the controls and options for your PC. You can also open Settings by pressing “Windows + I” on your keyboard for a quick shortcut.
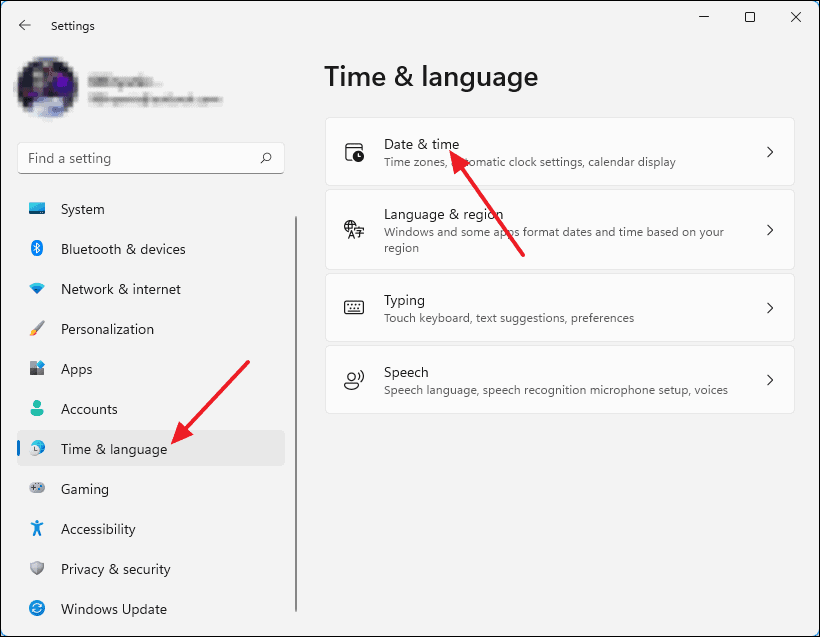
Step 2: Go to Time & Language
In the Settings window, click on “Time & Language”.
This section of Settings is where you can manage everything related to time zones, regional settings, and language. It’s like your personal assistant for managing time!
Step 3: Select Date & Time
Under “Time & Language”, choose “Date & Time”.
Here, you’ll find options related to your system’s date and time, including settings to change time zones or adjust the time format.
Step 4: Toggle On “Set Time Automatically”
Find the switch labeled “Set time automatically” and toggle it on.
By enabling this setting, you’re allowing Windows to automatically sync the time for you. It uses internet time servers to ensure accuracy.
Step 5: Adjust Time Zone
Ensure that “Set time zone automatically” is also toggled on if you travel frequently.
When this setting is enabled, your computer will adjust to the correct time zone based on your location. It’s especially useful for travelers who cross time zones often.
After completing these steps, your Windows 11 is now set to automatically sync its time with internet time servers. This ensures that your computer’s clock remains accurate, reflecting the correct time without manual adjustments.
Tips for Syncing Time on Windows 11
- Ensure your internet connection is stable, as time synchronization relies on internet servers.
- Check if your system’s date and time are incorrect. A wrong date might cause issues with syncing.
- Be aware that some third-party software can interfere with time settings.
- Enable synchronization with a specific time server for precise accuracy.
- Regularly check your time sync settings if you notice discrepancies in your system’s clock.
Frequently Asked Questions
Why is syncing time important on Windows 11?
Syncing time ensures your system’s clock is accurate, which is important for system updates, scheduled tasks, and security protocols.
How do I check if my time is synced correctly?
You can verify if your time is synced by checking the “Sync now” button under Date & Time settings. If your time updates, it’s synced correctly.
Can I manually set the time on Windows 11?
Yes, you can, but it’s recommended to keep it on automatic sync for accuracy and convenience.
What if I can’t find the time sync settings?
Ensure your Windows 11 is up to date, and try accessing the settings again. If problems persist, consult Microsoft’s support page.
Does my time zone affect time synchronization?
Yes, it’s important to have the correct time zone set to ensure your clock matches the local time.
Summary
- Open Settings.
- Go to Time & Language.
- Select Date & Time.
- Toggle on “Set time automatically”.
- Adjust time zone.
Conclusion
In today’s fast-paced world, having the correct time on your Windows 11 computer is more than just a convenience; it’s a necessity. Whether you’re catching a virtual meeting or keeping tight deadlines, an accurate clock is your best ally. By following the steps outlined in this guide, you’ll ensure that your system’s time is precise and reliable.
Syncing time on Windows 11 is a simple process that removes the hassle of manual adjustments. With automatic synchronization, your computer leverages internet time servers to maintain the correct time. This is particularly helpful for those who travel frequently or operate in various time zones.
Inaccurate time settings can lead to a range of issues, from missed meetings to software malfunctions. By setting your system to sync time automatically, you prevent these problems from arising. Plus, it’s one less thing to worry about in your busy schedule.
For further reading, explore more about how different time servers work, and consider experimenting with various settings to see which works best for you. If you’re interested in diving deeper, Microsoft offers comprehensive guides and resources on additional features in Windows 11. Happy computing, and stay on time!
Matthew Burleigh has been writing tech tutorials since 2008. His writing has appeared on dozens of different websites and been read over 50 million times.
After receiving his Bachelor’s and Master’s degrees in Computer Science he spent several years working in IT management for small businesses. However, he now works full time writing content online and creating websites.
His main writing topics include iPhones, Microsoft Office, Google Apps, Android, and Photoshop, but he has also written about many other tech topics as well.
Read his full bio here.
Title: A Comprehensive Guide on How to Sync Time in Windows 11
Maintaining accurate time on your computer is vital for a plethora of reasons. Whether you’re conducting research, running a business, or just planning your day, the implications of precise timekeeping are far-reaching. Windows 11, with its user-friendly interface and advanced features, makes it easier than ever to sync time on your device. This article will delve into the various methods for syncing time in Windows 11, helping you ensure your system clock is accurate and reliable.
Understanding Time Synchronization
Time synchronization is the process of ensuring that the system clock on your computer matches the universal time standard. Windows utilizes a protocol called Network Time Protocol (NTP) to retrieve the current time from an internet time server. Correctly synced time helps in performing various functions efficiently, from using applications to logging in and troubleshooting system issues.
Why Syncing Time is Important
-
System Performance: Many applications rely on the system clock for performance, logging, and scheduling tasks. Incorrect time settings can cause unwanted behavior.
-
Security Protocols: Modern security protocols like TLS/SSL depend on accurate time settings to function properly. An incorrect clock may lead to certificate errors.
-
File Management: When you create, modify, or delete files, timestamps play an essential role in organizing and managing them effectively.
-
Scheduled Tasks: Tasks scheduled through Windows Task Scheduler may fail or run incorrectly if the system clock is not accurate.
-
Troubleshooting and Logging: For IT professionals and system administrators, accurate timestamps are crucial for diagnosing issues and reviewing event logs.
Methods to Sync Time in Windows 11
Windows 11 offers a variety of ways to sync your system clock. The following sections outline these methods in detail:
Method 1: Through Windows Settings
One of the simplest ways to sync time on your Windows 11 device is through the Settings app.
-
Open Settings: Right-click on the Start button or press
Windows + Ito open the Settings menu. -
Navigate to Time & Language: On the left sidebar, click on “Time & Language.”
-
Adjust Date and Time: Under the Date & time section, you will see various settings related to time and date.
-
Set Time Automatically: Ensure that the «Set time automatically» option is toggled on. This allows Windows to sync your time with an internet time server.
-
Set Time Zone Automatically: If your location supports it, enable the «Set time zone automatically» option to keep your time zone aligned with your geographical location.
-
Sync Now: If you want to sync immediately, you can find the «Sync now» button under Synchronize your clock. Click this to synchronize your clock with the internet time server instantly.
Method 2: Using the Control Panel
For those who prefer a classic approach, the Control Panel offers time synchronization features as well.
-
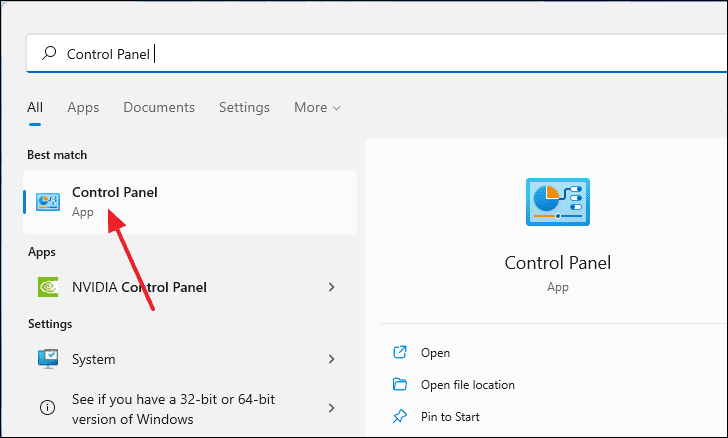
Open Control Panel: Type «Control Panel» in the search bar and click on the application.
-
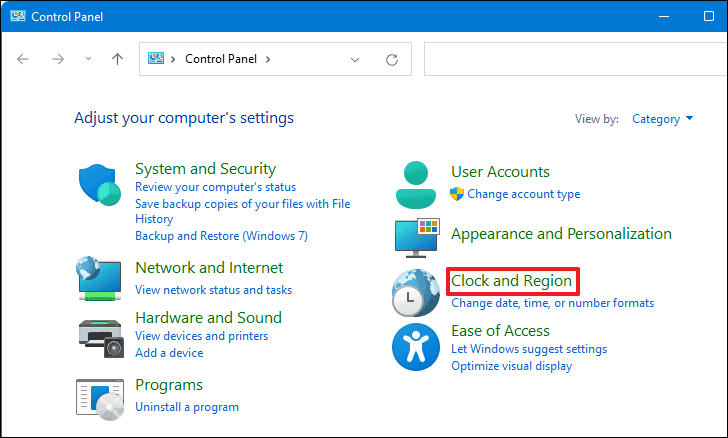
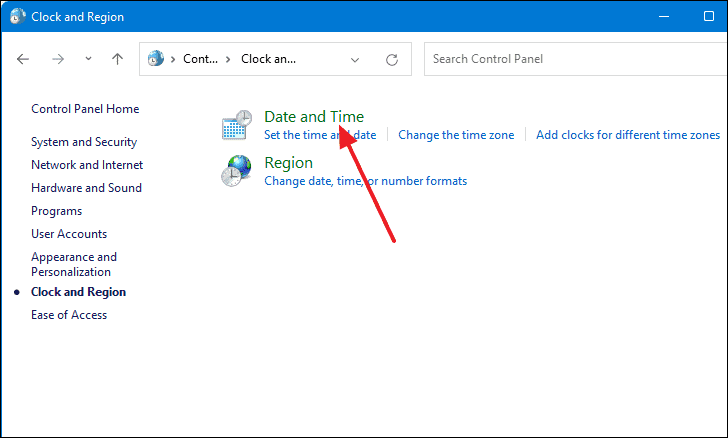
Navigate to Date and Time: In the Control Panel, click on “Clock and Region,” and then on “Date and Time.”
-
Internet Time Settings: In the Date and Time dialog, navigate to the Internet Time tab and click on “Change settings.”
-
Synchronize with an Internet Time Server: Make sure the “Synchronize with an Internet time server” option is checked. Select a server from the dropdown list or input a preferred NTP server.
-
Update Now: To immediately sync, click the “Update now” button and then click OK to close the dialog.
Method 3: Command Prompt
For users comfortable with command-line interfaces, using the Command Prompt is a powerful way to sync your clock.
-
Open Command Prompt: Press
Windows + S, type “cmd,” right-click on Command Prompt, and select “Run as administrator.” -
Execute Command: Type the following command:
w32tm /resyncThis command will force Windows to synchronize the time with the configured time server.
-
Check Synchronization Status: After executing the command, you can check the synchronization status by typing:
w32tm /query /statusThis will give you the current status of the time synchronization service and whether it is working as intended.
Method 4: Using PowerShell
Similar to Command Prompt, Windows PowerShell can be utilized for time synchronization.
-
Open PowerShell: Press
Windows + Xand select “Windows Terminal (Admin)” or “Windows PowerShell (Admin).” -
Run Sync Command: Use the same synchronization command as in Command Prompt:
w32tm /resync -
Fetch Status Information: To see time sync information, input:
w32tm /query /status
Method 5: Syncing Time via Registry Editor
Advanced users may want to delve into the Windows Registry for more control over time synchronization settings.
-
Open Registry Editor: Press
Windows + Rto open the Run dialog, type “regedit,” and hit Enter. -
Navigate to Time Settings: Go to the following key:
HKEY_LOCAL_MACHINESYSTEMCurrentControlSetServicesW32TimeParameters -
Modify NtpServer Value: Find
NtpServerand double-click to edit it. You can input a different NTP server value or leave it as is. -
Enable Syncing: Make sure that the
Typevalue is set to “NTP.” -
Restart Windows Time Service: Open Command Prompt as an administrator and run:
net stop w32time net start w32time
Troubleshooting Time Synchronization Issues
Sometimes, even after following the above methods, syncing issues can arise. Here are some common symptoms and solutions:
1. Internet Connection Problems
Make sure your device is connected to the internet. The time synchronization service requires internet access to retrieve time from NTP servers.
2. Firewall Settings
If you’re behind a firewall, make sure that it allows outbound connections on ports used by NTP, primarily UDP port 123.
3. Windows Time Service Not Running
If the Windows Time service is not running, synchronization will fail. You can check the service status:
-
Open Services: Press
Windows + Rto open the Run dialog, typeservices.msc, and hit Enter. -
Locate Windows Time: Scroll down to find “Windows Time” and check if it is running.
-
Start Service: If not running, right-click on it and select “Start” or “Restart.”
4. Incorrect Time Zone
Ensure that the time zone setting on your system is correct:
-
Open Settings: Go to Settings > Time & Language > Date & time.
-
Check Time Zone: Adjust the time zone manually if it is incorrect.
Additional Tips for Accurate Timekeeping
-
Choosing Reliable NTP Servers: By default, Windows syncs with Microsoft’s time servers, but you may want to use more reliable ones, such as:
- time.windows.com
- time.nist.gov
- pool.ntp.org
You can implement these servers through the Control Panel or Registry Editor.
-
Regular Manual Syncing: Sometimes, performing manual syncs at regular intervals can help maintain time accuracy.
-
Use Timekeeping Software: If you find manual adjustment tedious, consider utilizing third-party time synchronization tools that may offer additional features.
Final Thoughts
Time synchronization in Windows 11 is a straightforward process, facilitated through multiple methods that cater to different user preferences. Whether you are a novice or an expert, ensuring that your system clock remains accurate is an essential aspect of maintaining an optimized computing experience. Remember to troubleshoot any potential issues that arise and keep your system settings checked regularly to enjoy the full benefit of accurate timekeeping.
By following the guidelines laid out in this article, you should now have the knowledge and tools to effectively sync time on your Windows 11 machine. Whether through the modern interface of Settings, the classic Control Panel, command-line utilities, or the in-depth Registry Editor, Windows 11 provides a robust framework for managing your time settings. Stay synced, and enjoy all the advantages of precise timekeeping!
It is critical in Windows to keep the system clock time synchronized with the servers. Many services, background operations, and even applications like Microsoft Store rely on system time to function effectively. These apps or systems will fail or crash if the time is not properly adjusted. You might receive several error messages as well. Every motherboard these days includes a battery just to keep the time synced, no matter for how long your PC was turned off. However, the time settings may vary for a variety of reasons, such as a damaged battery or an operating system issue. Not to worry, syncing time is a breeze. We bring to you a perfect guide that will teach you how to sync time in Windows 11.

You could sync your computer clock to Microsoft time servers using the three methods listed below viz through Settings, Control Panel, or Command Prompt. You can still find a way to sync your computer clock with Command Prompt if you want to go old school.
Method 1: Through Windows Settings
Follow the given steps to sync time on Windows 11 via settings app:
1. Press Windows + I keys simultaneously to open Windows Settings.
2. In the Settings windows, click on Time & language in the left pane.
3. Then, select the Date & time option in the right pane, as shown.

4. Scroll down to Additional settings and click on Sync now to sync Windows 11 PC clock to Microsoft time servers.

Also Read: How to Fix Windows 11 Taskbar Not Working
Method 2: Through Control Panel
Another way to sync time in Windows 11 is through Control Panel.
1. Click on the Search icon and type Control Panel, and click on Open.

2. Then, set View by: > Category and select the Clock and Region option.

3. Now, click on Date and Time shown highlighted.

4. In the Date and Time window, switch to the Internet Time tab.
5. Click on the Change settings… button, as depicted below.

6. In the Internet Time Settings dialog box, click on Update now.
7. When you get The clock was successfully synchronized with time.windows.com on Date at Time message, click on OK.

Also Read: How to Enable Hibernate Mode in Windows 11
Method 3: Through Command Prompt
Here are the steps to sync time on Windows 11 through Command Prompt:
1. Click on the Search icon and type command prompt and click on Run as an administrator.

2. Click on Yes in the User Account Control prompt.
3. In the Command Prompt window, type net stop w32time and press Enter key.

4. Next, type w32tm /unregister and hit Enter.

5. Again, execute the given command: w32tm /register

6. Now, type net start w32time and hit the Enter key.

7. Lastly, type w32tm /resync and press the Enter key to resync time. Restart your PC to implement the same.

Recommended:
- How to Delete Folders and Subfolders in PowerShell
- 9 Best Calendar Apps for Windows 11
- How to Enable Narrator Caps Lock Alert in Windows 11
- How to View Running Processes in Windows 11
We hope this article helped you with how to sync time in Windows 11. You can write suggestions and questions in the comment section down below. We would love to know your thoughts about which topic you want us to explore next.
Having your system’s clock accurately synchronized is essential in Windows 11, as many applications, services, and processes rely on the correct time to function properly. If the system time is incorrect, you may encounter errors or issues with apps like the Microsoft Store or experience problems with background services. Fortunately, Windows 11 offers several methods to sync your time effortlessly. In this guide, we’ll explore the most effective ways to ensure your system clock is accurate.
Sync time in Windows 11 using Command Prompt
If you’re facing persistent time synchronization issues, you can use the Command Prompt to force Windows to resync the time manually. Here’s how:
- Press the
Windowskey and typeCommand Prompt. Right-click on it in the search results and select Run as administrator.
- In the Command Prompt window, enter the following commands one by one, pressing
Enterafter each command:
net stop w32timeThen, type:
w32tm /unregisterNext, enter:
w32tm /registerStart the time service again by typing:
net start w32timeFinally, force the resynchronization with:
w32tm /resync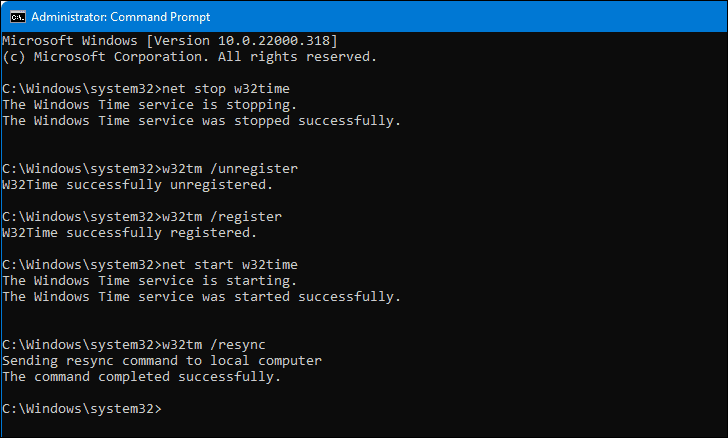
- After completing these steps, restart your computer to apply the changes, and your system time should now be synchronized.
Sync time from the Settings menu
Another straightforward method to sync your time is through the Windows 11 Settings. Follow these steps:
- Open the Settings menu by pressing
Windows + ion your keyboard. - In the Settings window, select Time & language from the left sidebar, then click on Date & time on the right.
- Scroll down to the Additional settings section and click on Sync now.
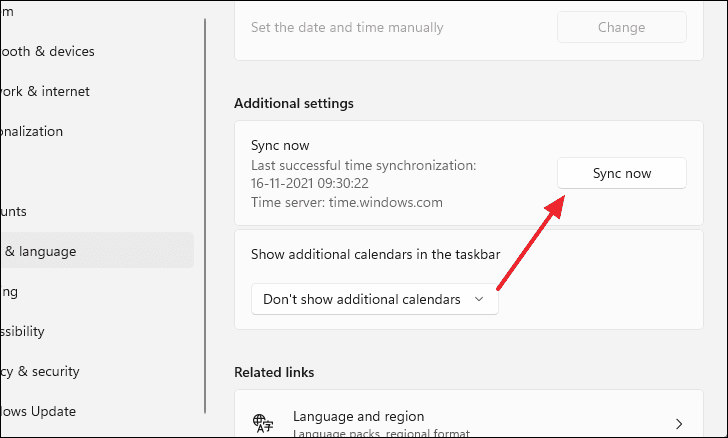
After clicking Sync now, you might see a checkmark indicating that the synchronization was successful, and the button may become grayed out.

Manually sync time from the Control Panel
You can also sync your system time via the Control Panel. Here’s how:
- Click the
Startbutton and typeControl Panelin the search bar. Select it from the search results.
- In the Control Panel window, click on Clock and Region.
- Then, click on Date and Time.
- In the Date and Time window, switch to the Internet Time tab.
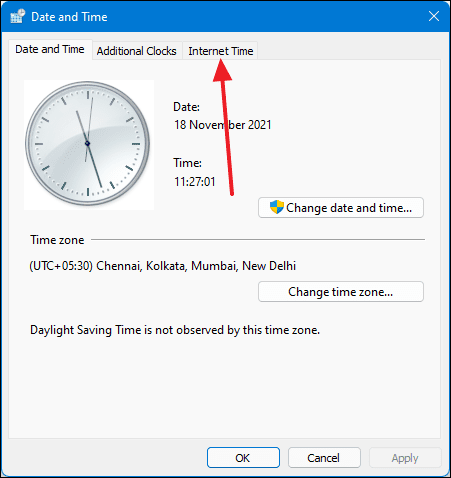
- Click on Change settings….
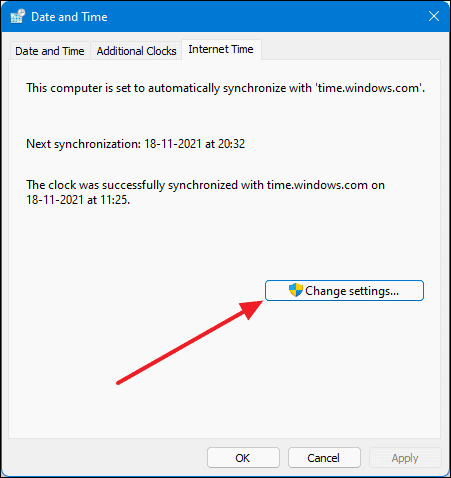
- In the Internet Time Settings dialog box, click on Update now to synchronize your clock.
- Once you see the message «The clock was successfully synchronized…», click OK to close the window.

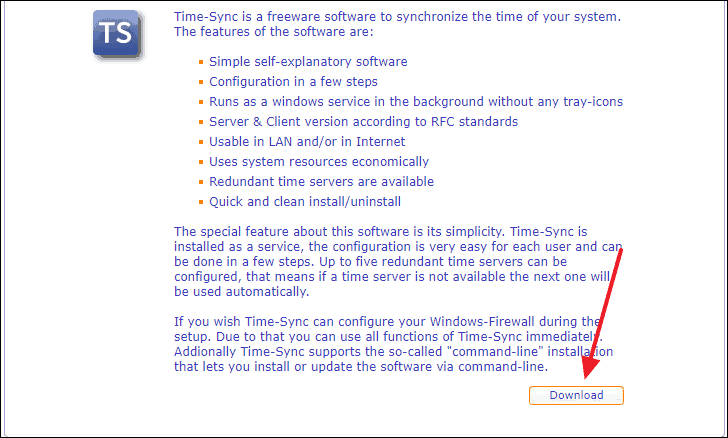
Use Time-Sync software to sync time
If you prefer using third-party software, Time-Sync is a lightweight application that runs in the background to keep your system time updated. Here’s how to use it:
- Visit the Time-Sync download page and click on the Download button.
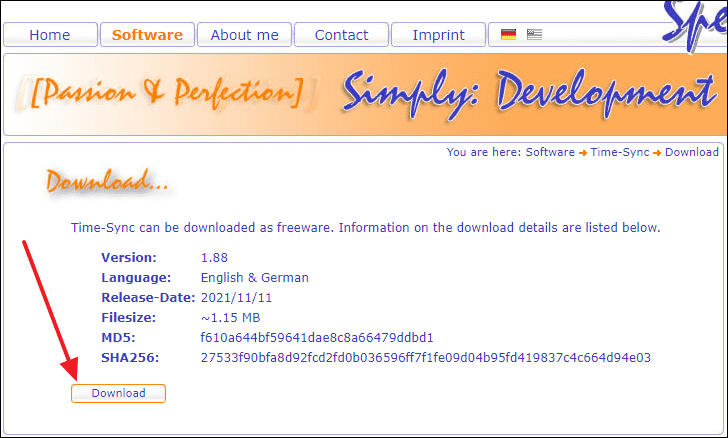
- On the next page, click on Download again to start downloading the installer.
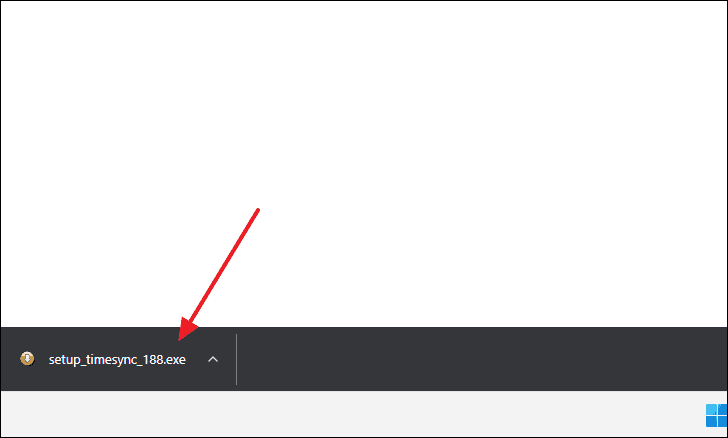
- Save the installer file to your preferred location by clicking Save.
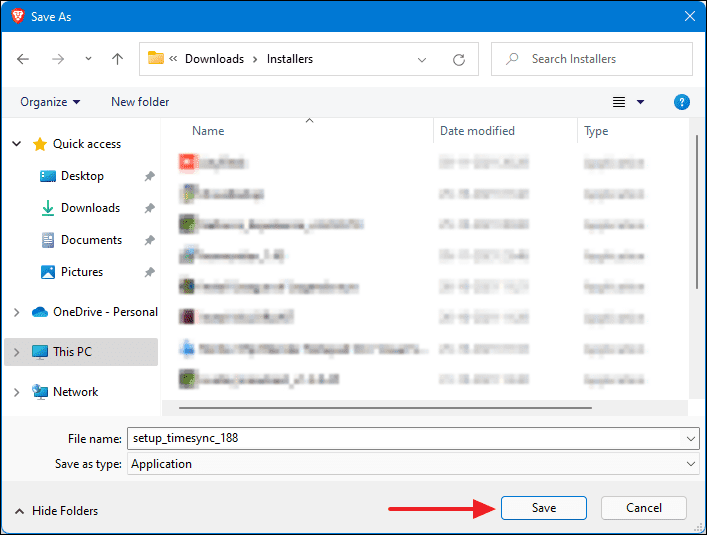
- Once the download is complete, run the
setup_timesync_188.exefile and follow the installation prompts to install Time-Sync.
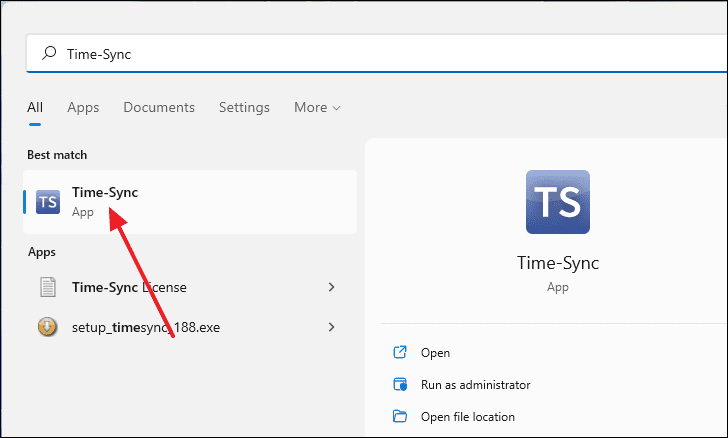
- After installation, open Time-Sync by searching for it in the Start menu and selecting it from the results.
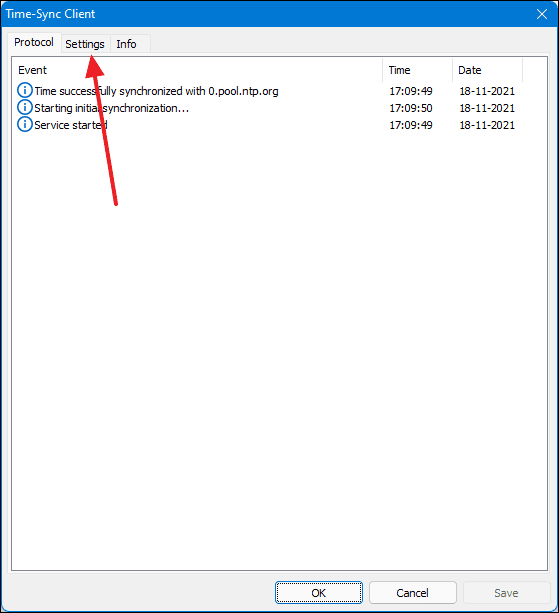
- In the Time-Sync Client window, navigate to the Settings tab.
- Under the Update interval section, select your preferred synchronization interval from the dropdown menu, then click OK.
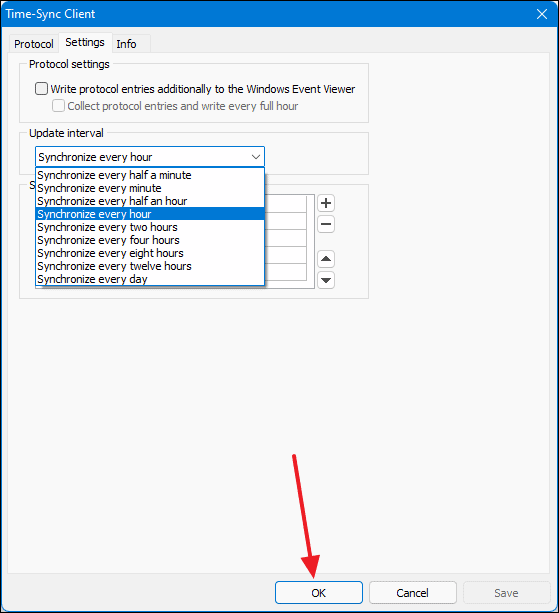
Time-Sync will now run in the background and keep your system time synchronized automatically.
Keeping your Windows 11 system time accurate is essential for the optimal performance of applications and system processes. Using any of these methods, you can ensure your system clock is always up to date.