
Applies ToWindows 11 Windows 10
Note: If your issue prevents you from booting into Windows, you won’t be able to follow the steps in this article. After the device tries to restart a few times, it should automatically enter the Windows Recovery Environment. To find information about restoring your device in this scenario, please visit the article, Windows Recovery Environment.
Summary
A «clean boot» starts Windows with a minimal set of drivers and startup programs, so that you can determine whether a background program is interfering with your game or program. This is similar to starting Windows in Safe Mode, but provides you more control over which services and programs run at startup to help you isolate the cause of a problem.
How to perform a clean boot
These steps might look complicated at first glance, but following them in order, step-by-step, will help get you back on track.
-
Sign in to the computer as an administrator. See Manage user accounts in Windows to learn more about configuring a user account as an administrator.
-
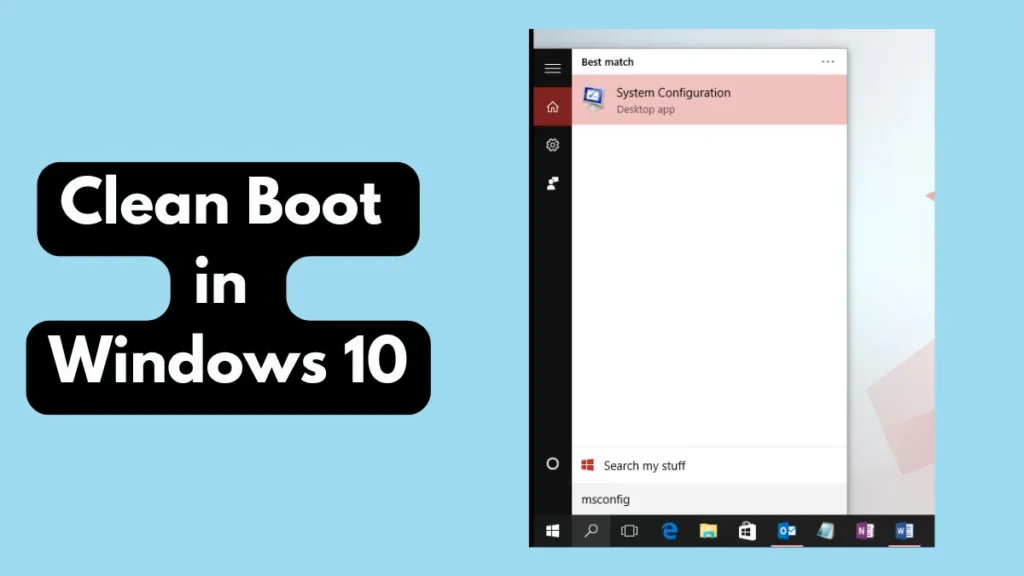
Select Search , type msconfig , and then select System Configuration from the list of results.
Important: If the computer is connected to a network, network policy settings might prevent you from following these steps. Only use the System Configuration utility to change the advanced boot options on the computer with guidance from a Microsoft support engineer. Using the System Configuration utility might make the computer unusable.
-
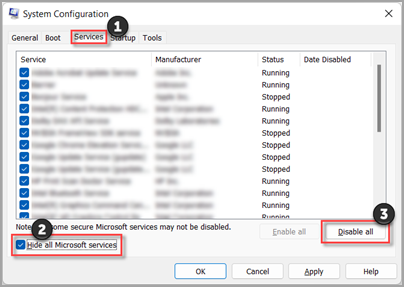
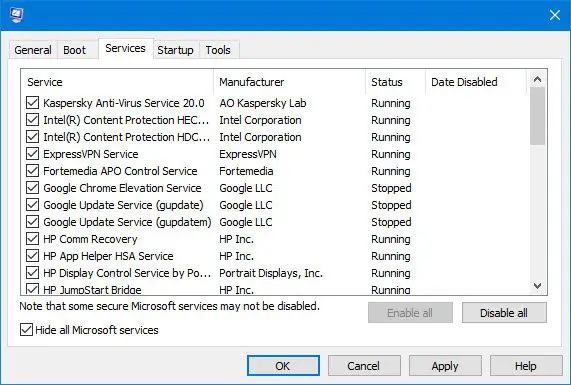
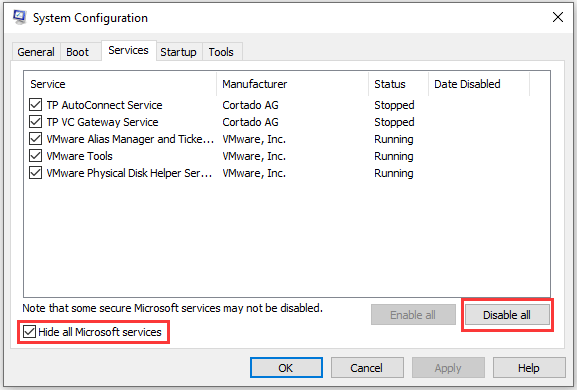
On the Services tab of System Configuration, select Hide all Microsoft services, and then select Disable all. Select Apply.

-
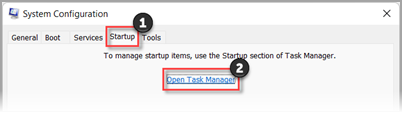
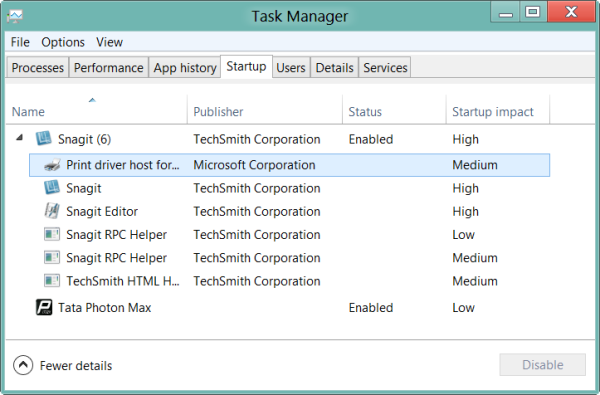
On the Startup tab of System Configuration, select Open Task Manager.

-
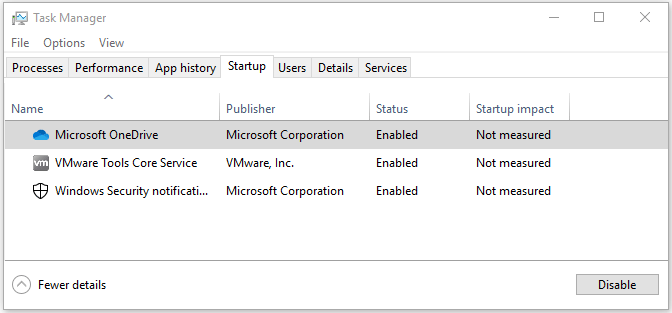
On the Startup apps tab in Task Manager, for each Enabled startup item, select the item and then select Disable. (Keep track of which items have been Disabled. You will need to know this later.)
-
Close Task Manager.
-
On the Startup tab of System Configuration, select OK. When you restart the computer, it will be in a clean boot environment. You can now try to troubleshoot your problem by trying the troubleshooting steps in the section, Install, uninstall, or run an application.
Warning: Your computer might temporarily lose some functionality while in a clean boot environment.
-
Once you are done troubleshooting your problem and want to return your computer to a normal startup, follow the steps in the section, Reset the computer to start normally after clean boot troubleshooting.
Install, uninstall, or run an application
After you restart the computer, you’ll have a clean boot environment. Then, do one of the following, as appropriate for your situation:
Note: If you receive the error, «The Windows Installer service could not be accessed», you’ll need more information. Follow the steps in the section, How to start the Windows Installer service when system services are not loaded. Then try installing or uninstalling the app or update again.
If the installation or uninstallation is successful, your issue is resolved. To return your computer to a normal startup, follow the steps in the section, Reset the computer to start normally after clean boot troubleshooting.
If the installation or uninstallation still fails, that means this issue is not caused by interference from a service or an app. You might need to contact the program manufacturer for more specific support.
If the app runs correctly while in a clean boot environment, then your problem was caused by interference from another app or service. You can find out which app or service is causing the issue by following the steps in the section, How to determine what is causing the problem after you do a clean boot.
If your app still doesn’t run as expected while in a clean boot environment, then your problem is not caused by interference from another app or service. You might need to contact the program manufacturer for more specific support.
If you run a Setup program without starting the Windows Installer service, you might receive the following error message:
The Windows Installer service could not be accessed. Contact your support personnel to verify that the Windows Installer service is properly registered.
The Windows Installer service doesn’t start if you clear the Load system services check box in the System Configuration utility. To use the Windows Installer service when system services are not loaded, start the service manually. Here’s how:
-
Select Search , then type computer management. Select Computer Management from the list of results.
-
In the console tree, select the arrow to expand Services and Applications, and then select Services.
-
In the details pane, right-click Windows Installer, and then select Start.
How to determine what is causing the problem after you do a clean boot
If your problem does not occur while the computer is in a clean boot environment, then you can determine which startup app or service is causing the problem by systematically turning them on or off and restarting the computer. While turning on a single service or startup item and rebooting each time will eventually find the problematic service or application, the most efficient way to do this is to test half of them at a time, thus eliminating half of the items as the potential cause with each reboot of the computer. You can then repeat this process until you’ve isolated the problem. For detailed steps for how to do this, expand the following section:
-
Sign in to the computer as an administrator. See Manage user accounts in Windows to learn more about configuring a user account as an administrator.
-
Select Search , then type msconfig. Select System Configuration from the list of results.
-
Select the Services tab, and then select Hide all Microsoft services.
-
Select each of the check boxes in the upper half of the Service list.
-
Select OK, then restart Windows.
-
After the computer restarts, determine whether the problem still occurs.
-
If the problem still occurs, one of the checked items is the problematic service. Repeat steps 1 through 6, but in Step 4, clear the lower half of the boxes in the Service list that you selected in your last test.
-
If the problem doesn’t occur, the checked items are not the cause of the problem. Repeat steps 1 through 6, but in Step 4, turn on the upper half of the boxes that you cleared in the Service list in the last test.
-
Repeat these steps until you’ve either isolated the problem to a single service, or until you’ve determined that none of the services are the cause of the problem. If you experience the problem when only one service is selected in the Service list, then that startup service is the one causing the problem, and you should go to step 9. If none of the services cause the problem, go to step 7.
-
-
Select the Startup tab, then select Open Task Manager. On the Startup apps tab on Task Manager, one at a time, select the upper half of the items you Disabled earlier, then select Enable.
-
Restart Windows.
-
If the problem still occurs, repeat step 7, but this time disable the lower half of the items you enabled in your last test.
-
If the problem does not occur, repeat step 7, but disable everything you enabled in your last test and enable the other half of the items you disabled.
-
If you still experience the problem after only one Startup item is enabled, then the enabled item is the one causing the problem, and you should go to step 9. If no Startup item causes the problem, there might be a problem with a Microsoft service. See Recovery options in Windows.
-
-
After you determine the startup item or the service that causes the problem, contact the program manufacturer to determine whether the problem can be resolved, or run Windows with the service unchecked or the Startup item disabled.
Reset the computer to start normally after clean boot troubleshooting
After you finish troubleshooting, follow these steps to reset the computer to start normally.
-
Select Search , then type msconfig. Select System Configuration from the list of results.
-
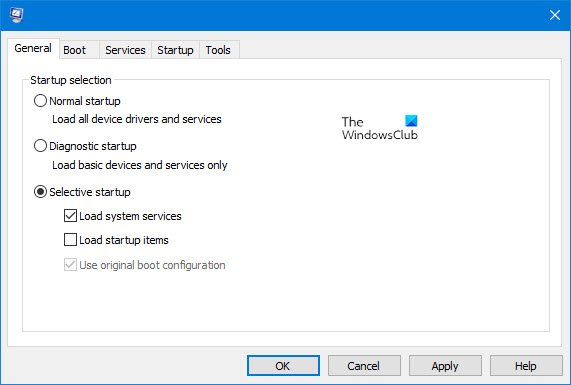
On the General tab, select Normal Startup.
-
Select the Services tab, clear the check box beside Hide all Microsoft services, select Enable all, then select Apply.
-
Select the Startup tab, then select Open Task Manager.
-
In Task Manager, Enable all of the startup programs you had disabled before, and then select OK.
-
When you’re prompted to restart the computer, select Restart.
Need more help?
Want more options?
Explore subscription benefits, browse training courses, learn how to secure your device, and more.
Learn how to perform a clean boot in Windows 11, 10, 8, and 7. This guide explains the step-by-step process to troubleshoot software conflicts and resolve performance issues using a clean boot.

Why You Should Perform a Clean Boot?
A clean boot in Windows is an effective troubleshooting method to isolate software conflicts, startup issues, and performance problems.
By performing a clean boot, Windows starts with a minimal set of drivers and startup programs, which helps you pinpoint whether a background service or startup item is causing issues.
Performing a clean boot is essential for:
- Diagnosing Software Conflicts: Some programs or services may conflict with each other, causing errors or slow performance.
- Resolving Startup Problems: A clean boot helps identify startup programs that are causing delays or crashes.
- Improving System Performance: Reducing unnecessary background services can resolve performance-related issues.
- Troubleshooting Errors: If you experience Blue Screen of Death (BSOD) or random freezes, a clean boot can help isolate faulty software or drivers.
How to Perform a Clean Boot in Windows 11

- Open System Configuration: Press
Win + R, typemsconfig, and press Enter. - Hide Microsoft Services: Go to the Services tab and check Hide all Microsoft services.
- Disable Non-Microsoft Services: Click Disable all to turn off non-Microsoft services.
- Disable Startup Programs: Go to the Startup tab and click Open Task Manager. Disable all unnecessary startup programs.
- Restart Your Computer: Click OK and restart to enter clean boot mode.
How to Revert to Normal Boot in Windows 11
- Open the System Configuration tool again.
- Go to the General tab and choose Normal startup.
- Restart your system.
Once you’ve completed your troubleshooting, return to normal boot by reopening System Configuration, choosing Normal startup, and restarting.
Note: If your computer is connected to a network, network policy settings might prevent you from following the steps outlined in this guide. Only use the System Configuration utility to change the advanced boot options on your computer with guidance from a Microsoft support engineer.
How to Perform a Clean Boot in Windows 10
- Open System Configuration: Press
Win + R, typemsconfig, and hit Enter. - Hide Microsoft Services: In the Services tab, check the box for Hide all Microsoft services.
- Disable Non-Microsoft Services: Click Disable all to prevent third-party services from running.
- Disable Startup Programs: In the Startup tab, open Task Manager and disable all startup items.
- Restart: Apply the changes and restart your computer.
While in this environment, you can troubleshoot or install/uninstall applications. Some functionality might be temporarily disabled. After troubleshooting, reset your computer to normal startup by opening System Configuration, selecting Normal startup, and restarting.
How to Perform a Clean Boot in Windows 8 and 7
For both Windows 8 and 7, the clean boot process is nearly identical to Windows 10:

- Open System Configuration by typing
msconfigin the Run dialog (Win + R). - In the Services tab, check Hide all Microsoft services and click Disable All.
- Switch to the Startup tab in System Configuration (Windows 8 users may need to open Task Manager for this step).
- Disable all unnecessary startup programs.
- Restart the system.
Benefits of Performing a Clean Boot
- Isolate software conflicts.
- Speed up startup and performance.
- Identify faulty applications.
- Troubleshoot hardware or driver issues.
How to Determine What is Causing the Problem After You Perform a Clean Boot
If your problem doesn’t occur in a clean boot environment, you can pinpoint the problematic service or startup program by systematically re-enabling them in batches and restarting your computer each time. Start by enabling half the services and testing, then continue enabling or disabling in halves until you identify the faulty program. This method efficiently narrows down the cause. Once isolated, you can decide whether to contact the software vendor for a solution or leave the item disabled to avoid the issue.
For detailed steps, you can refer to Microsoft’s official guide.
FAQs About Clean Boot in Windows
1. What is the difference between clean boot and safe mode?
While both clean boot and safe mode are used for troubleshooting, a clean boot only disables non-Microsoft services and startup programs, allowing more features to run. Safe mode, on the other hand, disables most drivers and essential services to load only basic functions of the OS.
2. Will I lose my files after performing a clean boot?
No, performing a clean boot doesn’t delete your files. It simply prevents third-party services and programs from running during startup.
3. How often should I clean boot my system?
You only need to perform a clean boot when troubleshooting software conflicts, performance issues, or startup problems. It is not recommended to perform it regularly.
4. Can I still use my installed programs in clean boot?
Yes, your programs are still installed, but some might not work until you revert to a normal boot since certain services may be disabled in clean boot.
5. How do I know if a clean boot solved my issue?
If the problem doesn’t occur after performing a clean boot, it’s likely caused by one of the disabled services or programs. You can narrow it down by selectively enabling services one by one until the issue reappears.
Conclusion
Performing a clean boot in Windows 11, 10, 8, or 7 is a straightforward and highly effective way to troubleshoot software conflicts and performance issues. By following the steps outlined above, you can isolate the cause of system problems without affecting your data or permanently disabling essential programs.
Visit Our Post Page: Blog Page
What is Clean Boot State in Windows 11/10/8/7? How to perform Clean Boot? What is the difference between Safe Mode and Clean Boot State in Windows 11/10? Well, most of us are familiar with Safe Mode in Windows. When you restart your Windows computer and start pressing the F8 key on your keyboard, you will enter Safe Mode. The Safe Boot mode uses a minimal pre-defined set of device drivers and services to start the Windows operating system.
On the other hand, there is also the Clean Boot State which is used to diagnose and troubleshoot advanced Windows problems. If your computer is not starting normally, or if you receive errors when you start the computer that you cannot identify, you could consider performing a “clean boot.”
What does a Clean Boot do?
When you start the computer in clean boot, the computer starts by using a pre-selected minimal set of drivers and startup programs, and because the computer starts with a minimal set of drivers, some programs may not work as you expected.
How to perform Clean Boot
To enter Clean Boot State, type MSConfig in start search and hit Enter to open the System Configuration Utility. Click the General tab, and then click Selective Startup.
Clear the Load Startup Items checkbox, and ensure that Load System Services and Use Original boot configuration are checked.
Next, click the Services tab. Select the Hide All Microsoft Services checkbox. Now click Disable all.
Next, click on the Startup tab and Open Task Manager.

Disable all the Startup apps that normally load on your PC and close the Task Manager.
Close the Task Manager and then click Apply > OK in the System Configuration window to apply your preferences.
Click Apply/OK and restart the computer.
This will put Windows into a Clean Boot State.
If the clean boot helped you fix the error, fine! Else in the General tab, also click to clear the Load System Services checkbox, click Apply/OK, and restart.
To configure Windows to use the normal startup state, simply undo the changes.
What to do after Clean Boot; How to troubleshoot in Clean Boot?
Clean-boot troubleshooting is designed to isolate a performance problem. To perform clean-boot troubleshooting, you must take a number of actions, and then restart the computer after each action. You may need to manually disable one item after another to try and pinpoint the one that is causing the problem. Once you have identified the offender, you can consider removing or disabling it.
Before you perform Clean Boot, you need to ensure the following:
In the System Configuration Utility:
- Select Hide all Microsoft services
- Then select Disable all.
- Click Apply/OK.
Once you enter Clean Boot State, you may find that your problem has gone away.
Then you need to enable one Service after another and reboot into Clean Boot till the problem reappears.
To make things easier, you could select each of the checkboxes in the upper half of the Service list, click OK & Restart. After the computer restarts, if the problem persists, one of the checked items from the upper half is the problematic service. If the problem doesn’t occur, the checked items are not the cause of the problem. Thus you can proceed with similar steps until you’ve isolated the problem to a single service.
In this way, you will be able to identify the process that is causing problems.
Best to always create a system restore point first.
See this post if the Use original boot configuration is greyed out in Windows 10. You might want to also read about Hardware Clean Boot.
Does a clean boot erase everything?
No, it is a state of Windows where it starts with minimum programs allowing users to figure out if another program is causing any issue on the PC. It will never delete your files and programs but is only meant for troubleshooting.
Is a Clean Boot safe?
Yes, it is safe. When you boot normally, it will launch all the programs that have registered with the startup. During Clean Boot, it filters out those programs and helps users to troubleshoot hardware or software problems.
Is Clean Boot and Windows Recovery the same?
While both the programs help you troubleshoot, Clean boot is used when Windows is working, but Recovery is when you have lost access to the PC or getting BSOD. You will need to use a Windows bootable USB drive to boot into the recovery. Make sure to use it carefully, especially if you plan to reset the PC.
,
In this article, we’ll explain what a clean boot is, when to use it, and show you step-by-step how to perform a clean boot on Windows 10/11.
The Clean Boot State (aka «Clean Boot Mode») of Windows is a diagnostic mode that starts your system with only the basic services and programs required to operate. Starting Windows in clean boot mode helps you determine if a third-party program or service is interfering with your system’s performance or causing problems.
How Clean Boot Mode works?
During clean boot, Windows starts with only the basic drivers and services required for basic operation. This allows you to determine whether the problem is caused by a third-party program or service or is due to the Windows operating system.
Why Is a Clean Boot Useful?
A clean boot is particularly useful to troubleshot problems like:
- High CPU, memory, or disk usage caused by background processes.
- Situations where the system becomes unresponsive, slow or unstable.
- A system device is not working properly.
How to Perform a Clean boot in Windows 11/10 to Diagnose Problems.
To start your PC in clean boot state:
1. Simultaneously press the Windows + R keys to open the ‘Run‘ command box.
2. In run command box, type «msconfig» press Enter to open the System Configuration utility.

3. Select the Services tab, select the Hide all Microsoft services check box, and then click Disable all to turn off all non-Microsoft services. When done, click Apply.

4. Now select the Startup tab and click Open Task Manager.

5. In Task Manager, select each Enabled startup program and click Disable (or right-click on it and click Disable).

6. When done, close Task Manager and click OK on System Configuration utility.

7. Finally, click Restart to reboot your PC in Clean Boot state.

What to do after Windows enters in Clean Boot mode?
After starting Windows in clean boot state, check if the problem persists. Then according the result do the following:
-
If the problem persists and is not resolved, then it is most likely caused by a malfunction of your Windows operating system or hardware. In this case, try to repair or reinstall Windows first and if the problem remains check your hardware.
-
If the problem is resolved in clean boot state, then it is caused by a third-party app or service. In this case, do the following:
1. Open the System Configuration utility (msconfig.exe) again and enable all disable services and startup apps gradually* to find out which of them causes the problem.
* Note: This means to re-enable services and startup programs one by one, restarting your PC after each change until you find the problematic application or service.
2. Once you find which service or application is causing the problem, keep it disabled if you don’t need it, or uninstall and reinstall it.
Conclusion
A Clean Boot State is a powerful yet simple method to diagnose and resolve software-related issues in Windows. By temporarily disabling third-party services and startup programs, it allows you to isolate the root cause of performance problems, application crashes, or system errors. Follow the steps outlined in this guide to perform a clean boot and restore your PC’s functionality.
That’s it! Let me know if this guide has helped you by leaving your comment about your experience. Please like and share this guide to help others.
If this article was useful for you, please consider supporting us by making a donation. Even $1 can a make a huge difference for us in our effort to continue to help others while keeping this site free:
- Author
- Recent Posts
Konstantinos is the founder and administrator of Wintips.org. Since 1995 he works and provides IT support as a computer and network expert to individuals and large companies. He is specialized in solving problems related to Windows or other Microsoft products (Windows Server, Office, Microsoft 365, etc.).
-
Home
-
News
- How to Clean Boot Windows 10 and Why You Need to Do So?
How to Clean Boot Windows 10 and Why You Need to Do So?
By Stella | Follow |
Last Updated
If you are unable to run a program or install an update on your computer, you can perform a clean boot to try to find the conflicting service that prevents you from using your computer normally. You can see this post to learn how to clean boot Windows 10. More useful information, you can visit the MiniTool home page.
Why You Need to Perform a Clean Boot in Windows 10?
You know that there are different device drivers, settings, and programs on your Windows 10 computer. At times, the software may run into conflicts. But, you don’t know which programs are conflicting. You just note that your Windows can’t boot normally or you can’t install updates normally.
In this situation, you can consider performing a Windows 10 clean boot, since a clean boot enables your Windows to boot with a minimal set of drivers and startup programs so that you can find out whether there is a background program is disturbing the normal operation of your Windows 10.
In this guide, we will walk you through the detailed steps on how to perform a clean boot in Windows 10.
To clean boot a Windows 10 computer, you need to follow these steps:
1. Press Cortana.
2. Type msconfig in the search box and press Enter.
3. Switch to the Services section.
4. Check the Hide all Microsoft services option.
5. Press the Disable all button.
6. Switch to the Startup section.
7. Press Open Task Manager.

8. Click the startup program that may interfere with Windows 10 and press Disable. Then, repeat this step to disable all the suspected programs.
9. Close Task Manager and the System Configuration window.
10. Restart your computer.
Your Windows 10 computer will only boot with the essentials. If you can’t use a program or install an update previously, you can try to do these jobs now.
If the issue still exists, you can know that there is no conflict between software and the exact cause happens somewhere else.
If the issue disappears in the clean boot environment, then you can try to find out the offending program or service that cause the issue. You need to repeat step 1 to step 4 above, but only re-enable half of the services
For instance, you can re-enable the top half of all the non-Microsoft related services (the ones that are important to Windows should be hidden in the fourth step). After restarting your computer, you can go to see if the issue happens again. If not, you need to re-enable the rest half non-Microsoft services to have a try again. If the issue appears, you can know that the conflicting service is in the lower half ones.
No matter the conflict happens in the top half or the bottom half of the services, you can then narrow down the search range by disabling services and rebooting PC. If the issue disappears, you can know what exactly causes it.
How to Quit the Clean Boot Environment?
After finding the conflicting program, you can let your computer quit the clean boot environment. You can follow these steps:
- Press Cortana.
- Type msconfig in the search box and press Enter.
- Switch to the Services
- Check Hide all Microsoft services.
- Press Enable all.
- Check the offending startup service.
- Switch to Startup.
- Press Open Task Manager.
- Choose a startup program and press Enable.
- Repeat the above step to enable all startup programs.
- Close Task Manager and the System Configuration window.
- Restart your computer.
Now, your computer should function normally.
About The Author
Position: Columnist
Stella has been working in MiniTool Software as an English Editor for more than 8 years. Her articles mainly cover the fields of data recovery including storage media data recovery, phone data recovery, and photo recovery, videos download, partition management, and video & audio format conversions.