
В этой статье мы разберемся, как восстановить загрузчик Windows 10 или 11 на современном компьютере, на котором используется UEFI интерфейс вместо классического BIOS и таблица разделов диска GPT (вместо MBR). Повреждение загрузчика Windows может быть вызвано установкой второй ОС (Dual Boot — конфигурация), повреждением файловой систему, некорректным восстановлении Windows после сбоя, удалением скрытых разделов, вирусом-вымогателем и рядом других причин.
Данная статья содержит подробную пошаговую процедуру восстановления поврежденного или удаленного загрузчика ОС в Windows 11/10/8.1 и Windows Server 2022/2019/2016/2012R2 на компьютерах, которые работают в нативном (не legacy) режиме UEFI. Инструкцию можно использовать как для восстановления бинарных файлов загрузчика Windows, так и конфигурационного файла загрузчика EFI\Microsoft\Boot\BCD (в случаях, когда Windows не загружается из-за отсутствия или повреждения файла конфигурацией загрузка BCD.
Содержание:
- Не загружается Windows: Boot configuration data is missing EFI\Microsoft\Boot\BCD
- Автоматическое восстановление загрузчика Windows
- Ручное восстановление загрузчика Windows с помощью BCDBoot
Не загружается Windows: Boot configuration data is missing EFI\Microsoft\Boot\BCD
UEFI компьютер с Windows, установленной в наивном режиме, не сможет загрузиться при повреждении EFI загрузчика Windows. При попытке загрузиться с диска с повреждённым или отсутствующим EFI загрузчиком появится BSOD (синий экран смерти) с ошибкой:

The boot configuration data for your PC is missing or contains errors.
File :\EFI\Microsoft\Boot\BCD
Error code: 0xc000000f
или
Error code: 0xc000014c
В русской версии Windows ошибка может быть такая:
Ваш компьютер нуждается в ремонте Данные конфигурации загрузки для вашего ПК отсутствуют или содержат ошибки Файл:\EFI\Microsoft\Boot\BCD

Код ошибки: 0xc000000f
Эта ошибка говорит о повреждении или даже полном удалении конфигурации загрузчика Windows — Boot Configuration Data (BCD). Если вы попытаетесь восстановить загрузчик на UEFI компьютере с помощью утилиты
bcdedit
, вы получите такую ошибку:
The boot configuration data store could not be found.
The requested system device cannot be found.
Дело в том, что если Windows 10/11 установлена в нативном режиме UEFI на GPT диск, то EFI загрузчик Windows (Windows Boot Manager) хранит программу управления загрузкой и конфигурацию BCD на отдельном скрытом разделе EFI (размером 100 мб с файловой системой FAT32). Утилита bcdedit не видит этот EFI раздел, и соответственно не может управлять конфигурацией загрузчика на нем.
Если при загрузке Windows появляется только черный экран с надписью “Operating System not found”, скорее всего у вас полностью удален загрузчик Windows. Следуйте инструкции по ссылке.
Автоматическое восстановление загрузчика Windows
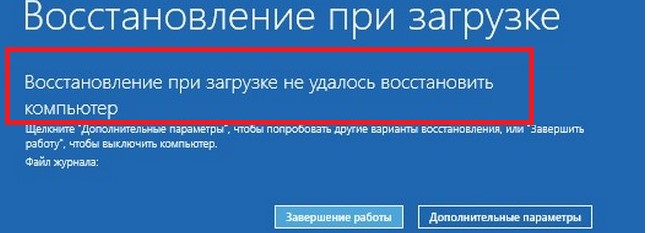
Процедура автоматического восстановления загрузчика, зашитая в среду восстановления Windows (WinRe), как правило, в таких случаях бессильна. Но попробовать все-же стоит:
- Загрузитесь с диска загрузочного диска, диска восстановления или установочной флешки с Windows 10 или 11;
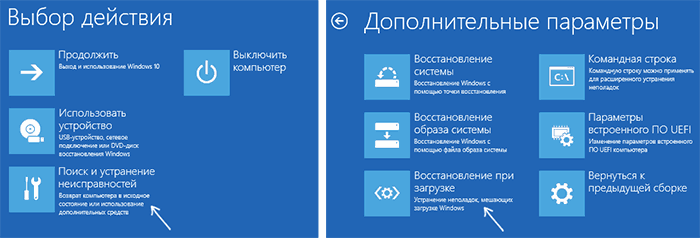
- На экране установки нажмите кнопку Восстановление системы;
- Затем выберите пункт Поиск и устранение неисправностей -> Восстановление при загрузке и выберите ОС, загрузчик которой нужно попытаться восстановить;
- Но скорее всего результат будет отрицательный: Восстановление при загрузке не удалось восстановить компьютер

Ручное восстановление загрузчика Windows с помощью BCDBoot
Перейдем к процедуре ручного восстановления EFI загрузчика Windows на UEFI компьютере.
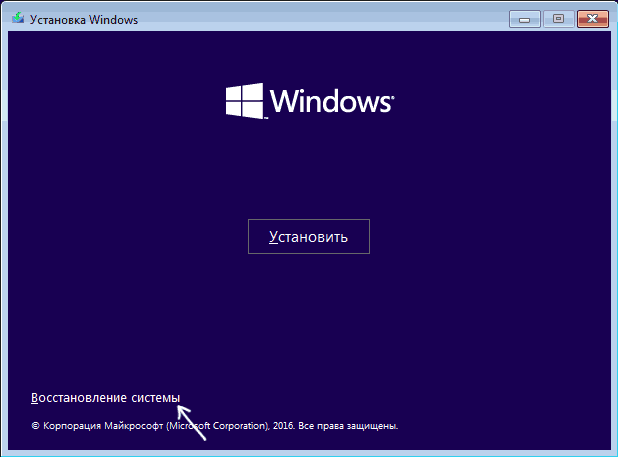
Для восстановления конфигурации загрузчика (BCD), вам нужно загрузить компьютер с оригинального установочного диска с Windows (диска восстановления или специально подготовленной установочной USB флешки с Windows ). После загрузки в среде восстановления нужно открыть окно командной строки: выберите Восстановление системы -> Диагностика -> Командная строка (System Restore -> Troubleshoot -> Command Prompt).
Командную строку также можно запустить, если у вас под рукой есть только установочный диск с Windows. Для этого достаточно на самом первом этапе установки Windows (при выборе языка и раскладки клавиатуры) нажать комбинацию клавиш Shift+F10 (или Shift+Fn+F10 на некоторых моделях ноутбуков).

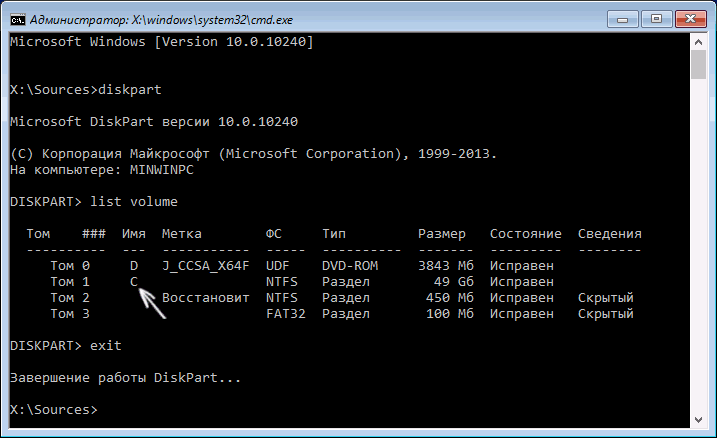
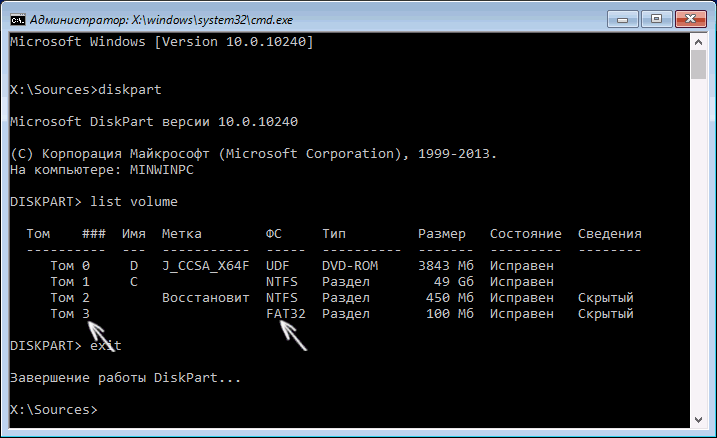
В открывшейся командной строке выполните запустите утилиту управления дисками, набрав команду:
diskpart
Выведите список дисков в системе:
list disk
На этом этапе очень важно определить тип таблицы разделов на диске, на котором установлена Windows: MBR или GPT. Дело в том, что EFI загрузчик используется только на дисках с GPT разметкой.
Если у диска в столбце Gpt указана звездочка (
*
), тогда на диске используется таблица разделов GPT, если нет – MBR.
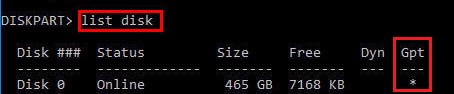
Если с помощью diskpart вы определили, что на вашем диске используется GPT разметка, следуйте дальнейшим шагам инструкции по восстановлению загрузчика.
Если у вас разметка MBR, тогда данная инструкция не применима к вашему компьютеру. Скорее всего у вас компьютер с BIOS, или в настройках UEFI включен режим совместимости Legacy/Compatibility Support Module/CSM.
На MBR дисках загрузчик хранится на отдельном разделе System Reserved, а не на EFI разделе (ни в коем случае не конвертируйте таблицу разделов MBR в GPT, пока не исправите загрузчик!!) Используйте другую инструкцию по восстановлению BCD загрузчика на MBR (Master Boot Record) диске.
Выберите диск, на котором установлена ваша Windows (если жесткий диск в системе один, его индекс должен быть равен 0):
sel disk 0
Выведите список томов и разделов в системе:
list partition
list volume
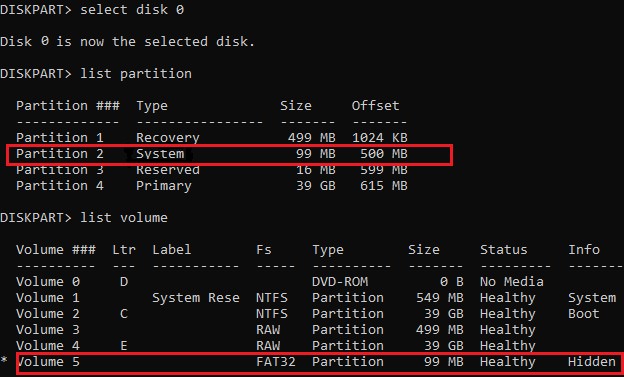
В нашем примере видно, что загрузочный раздел EFI имеет индекс Partition2 (он же Volume 5 с меткой Hidden). Проще всего определить EFI размер по файловой системе FAT32, размеру 100 Мб (это стандартный минимальный размер для Windows компьютеров, в редких случая размер раздела может быть). Чаще всего для него используется метка — System EFI или ESP/ EFI System Partion).
В нашем примере основной раздел, на который установлена Windows, имеет индекс volume 2, отформатирован в файловая система NTFS и ему назначена буква C:.
В вашем случае назначенная буква диске может отличаться. Это зависит, как вы загрузили свой компьютер в среде WinPE. Проще всего определить его по размеру. Если вы не уверены, нужно проверить что на этом диске есть каталог Windows. Выйдите из утилиты diskpart (команда exit) и выполните команду:
dir C:\
Убедитесь, что на этом диске есть каталоги
Windows
,
Program Files
,
Users
и прочие.
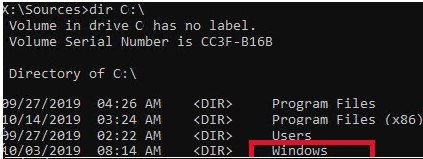
Если этих каталогов нет, значит вашему диску с Windows назначена другая буква диска. Проверьте содержимоет дисков с другими буквами.
Запомните букву диска, назначенную разделу с Windows, чуть ниже мы будем использовать ее в качестве одного из аргументов команды bcdboot.
В таблице также обязательно должен быть раздел MSR (Microsoft System Reserved) размером 16 мб в Windows 10/11 (или 128 Мб в Windows 8.1).
Назначьте скрытому EFI разделу произвольную букву диска (например, M:):
select volume 5
assign letter M:
Должна появится строка, свидетельствующая об успешном назначении буквы диска разделу EFI:
DiskPart successfully assigned the drive letter or mount point.
Завершите работу с diskpart:
exit
Перейдите в каталог с загрузчиком на скрытом разделе:
cd /d m:\efi\microsoft\boot\
В данном случае M: это буква диска, присвоенная разделу EFI чуть выше. Если каталог \EFI\Microsoft\Boot\ отсутствует
The system cannot find the path specified
), попробуйте следующие команды:
cd /d M:\Boot\
или
cd /d M:\ESD\Windows\EFI\Microsoft\Boot\
На этом этапе многие рекомендуют выполнить следующие команды, которые должны перезаписать загрузочную запись раздела, найти установленные Windows и добавить их в BCD:
bootrec /fixboot
bootrec /scanos
bootrec /rebuildbcd
или даже:
bootrec /FixMbr
(восстановление MBR записи для GPT диска выглядит странным)
Все эти команды применимы только для дисков с MBR. Если ваш компьютер загружается в UEFI режиме, то на нем обязательно используется таблица разделов GPT (как раз наш случай). Поэтому при запуске команд
bootrec
вы увидите ошибку:
access is denied
Для исправления загрузочных записей на EFI разделе нужно использовать утилиту
BCDBoot
, а не bootrec.
Утилита BCDBoot позволяет восстановить файлы загрузчика на EFI разделе, скопировав их системного каталога на разделе с Windows. Конфигурация загрузчика BCD пересоздается с помощью шаблона %WINDIR%\System32\Config\BCD-Template.
С помощью команды
attrib
снимите атрибуты скрытый, read-only и системный с файла BCD:
attrib BCD -s -h -r
Удалите текущий файл с конфигурацией BCD, переименовав его (так вы сохраните старую конфигурацию в качестве резервной копии):
ren BCD BCD.bak
С помощью утилиты bcdboot.exe нужно скопировать из системного каталога критические файлы среды загрузки UEFI в загрузочный EFI раздел и пересоздать конфигурацию загрузчика в хранилище BCD:
bcdboot C:\Windows /l en-us /s M: /f ALL
где,
- C:\Windows – путь к корневому системному каталогу Windows на диске (это ваш диск, на который была установлена ваша Windows, мы узнали его ранее с помощью команды diskpart);
- /f ALL – означает, что необходимо скопировать файлы среды загрузки Windows, включая файлы для компьютеров с UEFI и BIOS (теоретическая возможность загружаться на EFI и BIOS системах). Чтобы скопировать только EFI загрузчик, используйте команду /f UEFI;
- /l en-us — определяет языковой стандарт, который используется при инициализации хранилища BCD. По умолчанию используется en-US — английский язык (США);
- /s M: — скопировать файлы EFI загрузчика на указанный раздел;
- /с – эта новая опция BCDBoot в Windows 10, которая позволяет перезатереть имеющиеся загрузочные записи при создании нового хранилища (в том числе debugsettings). Используйте этот параметр, чтобы игнорировать старые настройки и создать полностью чистую конфигурацию BCD загрузчика;
- /v – используется для включения режима вывода подробной информации BCDBoot..
Теперь, если выполнить команду bcdedit, вы увидите следующую картину:
В секции диспетчера загрузки Windows (Windows Boot Manager) должна появится запись, указывающая на полный путь к файлу управления загрузкой UEFI. В этом примере он находится на разделе 2 (
partition=\Device\HarddiskVolume2
), путь
\EFI\MICROSOFT\BOOT\BOOTMGFW.EFI
.
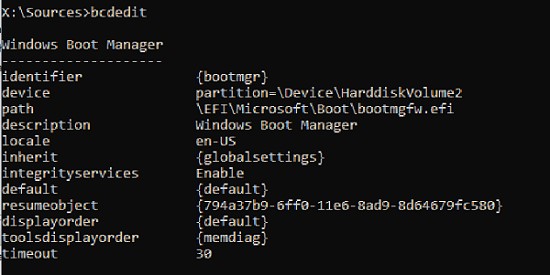
Windows Boot Manager
--------------------
identifier              {bootmgr}
device                  partition=\Device\HarddiskVolume2
path                    \EFI\Microsoft\Boot\bootmgfw.efi
description             Windows Boot Manager
locale                  en-US
inherit                 {globalsettings}
bootshutdowndisabled    Yes
default                 {CURRENT}
resumeobject            {xxxxxxxx-xxxx-xxxx-xxxx-xxxxxxxxxxxx}
displayorder            {default}
toolsdisplayorder       {memdiag}
timeout                 30
Windows Boot Loader
-------------------
identifier              {current}
device                  partition=C:
path                    \Windows\system32\winload.efi
description             Windows Server 10
locale                  en-US
inherit                 {bootloadersettings}
recoverysequence       {xxxxxxxx-xxxx-xxxx-xxxx-xxxxxxxxxxxx}
recoveryenabled         Yes
isolatedcontext         Yes
allowedinmemorysettings 0x15000075
osdevice                partition=C:
systemroot              \Windows
resumeobject            {xxxxxxxx-xxxx-xxxx-xxxx-xxxxxxxxxxxx}
В секции Windows Boot Manager должен быть указан путь к EFI разделу (
=\Device\HarddiskVolume2
), путь к файлу управления загрузкой (bootmgfw.efi). В секции Windows Boot Loader указан раздел Windows и путь к EFI загрузчику Windows (
\Windows\system32\winload.efi
). При включении компьютер передаст управление диспетчеру загрузки EFI, который запустит загрузчик Windows.
Возможные ошибки:
Перезагрузите компьютер, отключите загрузочный диск. Если вы все сделали правильно, в выборе устройств загрузки должен появиться пункт Windows Boot Manager в котором можно выбрать загрузку нужной операционной системы. Ваш EFI загрузчик и конфигурация BCD успешно восстановлены!
В некоторых случаях после восстановления BCD загрузчика, при загрузке Windows появляется ошибка
BAD SYSTEM CONFIG INFO
. Чтобы исправить ошибку:
Убедитесь, что вы не вносили недавно изменения в настройки UEFI
Загрузитесь с установочной/загрузочной флешки и измените конфигурацию загрузчика командами:
-
bcdedit /deletevalue {default} numproc -
bcdedit /deletevalue {default} truncatememory
Если после установки второй ОС, попыток воспользоваться свободным местом на скрытых разделах диска или их форматирования, в случае системных сбоев, при экспериментах с EasyBCD и в других случаях вы столкнулись с тем, что Windows 10 не загружается, сообщая «An operating system wasn’t found», «No bootable device found. Insert boot disk and press any key», то, возможно, вам требуется восстановление загрузчика Windows 10, о чем и пойдет речь ниже.
Вне зависимости от того, UEFI у вас или BIOS, установлена ли система на GPT диск со скрытым FAT32 разделом EFI загрузки или на MBR с разделом «Зарезервировано системой», действия по восстановлению будут одинаковыми для большинства ситуаций. Если ничто из нижеописанного не помогает, попробуйте Сброс Windows 10 с сохранением данных (третьим способом). Примечание: ошибки, подобные указанным выше, необязательно вызваны поврежденным загрузчиком ОС. Причиной может оказаться вставленный компакт-диск или подключенный USB-накопитель (попробуйте вынуть), новый дополнительный жесткий диск или проблемы с имеющимся жестким диском (прежде всего взгляните, а виден ли он в БИОС).
- Автоматическое восстановление загрузчика Windows 10
- Простое восстановление вручную
- Второй метод восстановить загрузчик Windows 10 вручную
- Видео инструкция
Автоматическое восстановление загрузчика
Среда восстановления Windows 10 предлагает опцию восстановления при загрузке, которое работает на удивление хорошо и в большинстве случаев оказывается достаточным (но не всегда). Чтобы восстановить загрузчик данным способом, проделайте следующие действия.
- Загрузитесь с диска восстановления Windows 10 или загрузочной флешки с Windows 10 в той же разрядности, что и ваша система (диска). Для выбора накопителя для загрузки можно использовать Boot Menu.
- В случае загрузки с установочного накопителя, на экране после выбора языка внизу слева нажмите пункт Восстановление системы.

- Выберите пункт Поиск и устранение неисправностей, а затем — Восстановление при загрузке. Выберите целевую операционную систему. Дальнейший процесс будет произведен автоматически.

По завершении вы либо увидите сообщение о том, что восстановление не удалось, либо компьютер автоматически перезагрузится (не забудьте вернуть загрузку с жесткого диска в БИОС) уже в восстановленную систему (но не всегда).
Если описанный способ не помог решить проблему, переходим к более результативному, ручному способу.
Процедура восстановления вручную
Для восстановления загрузчика вам потребуется либо дистрибутив Windows 10 (загрузочная флешка или диск), либо диск восстановления Windows 10. Если вы ими не обзавелись, придется воспользоваться другим компьютером для их создания. Подробнее о том, как сделать диск восстановления можно прочитать в статье Восстановление Windows 10.
Следующий этап — загрузиться с указанного носителя, поставив загрузку с него в БИОС (UEFI), либо используя Boot Menu. После загрузки, если это установочная флешка или диск, на экране выбора языка нажмите клавиши Shift + F10 или Shift+Fn+F10 на некоторых ноутбуках (откроется командная строка). Если это диск восстановления в меню выберите Диагностика — Дополнительные параметры — Командная строка.
В командной строке введите по порядку три команды (после каждой нажимаем Enter):
- diskpart
- list volume
- exit
В результате выполнения команды list volume, вы увидите список подключенных томов. Запомните букву того тома, на котором располагаются файлы Windows 10 (в процессе восстановления это может быть не раздел C, а раздел под какой-либо другой буквой).
В большинстве случаев (на компьютере только одна ОС Windows 10, скрытый раздел EFI или MBR в наличии), для того, чтобы восстановить загрузчик, достаточно после этого выполнить одну команду:
bcdboot C:\windows (где вместо C может потребоваться указать другую букву, о чем было сказано выше).
Примечание: если на компьютере несколько ОС, например, Windows 10 и 8.1, вы можете выполнить эту команду дважды, в первом случае указав путь к файлам одной ОС, во втором — другой (не сработает для Linux и XP. Для 7-ки зависит от конфигурации).
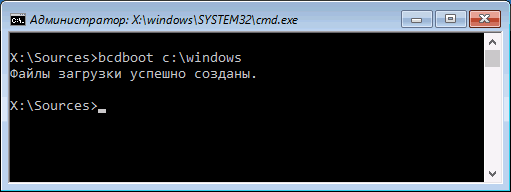
После выполнения этой команды вы увидите сообщение о том, что файлы загрузки успешно созданы. Можно попробовать перезагрузить компьютер в обычном режиме (вынув загрузочную флешку или диск) и проверить, загружается ли система (после некоторых сбоев загрузка происходит не сразу после восстановления загрузчика, а после проверки HDD или SSD и перезагрузки, также может проявиться ошибка 0xc0000001, которая в этом случае также обычно исправляется простой перезагрузкой).
Второй способ восстановить загрузчик Windows 10
Если вышеописанный способ не сработал, то возвращаемся в командную строку так же, как делали это ранее. Вводим команды diskpart, а потом — list volume. И изучаем подключенные разделы дисков.
Если у вас система с UEFI и GPT, в списке вы должны увидеть скрытый раздел с файловой системой FAT32 и размером 99-300 Мб. Если же BIOS и MBR, то должен обнаружиться раздел размером 500 Мб (после чистой установки Windows 10) или меньше с файловой системой NTFS. Вам требуется номер этого раздела N (Том 0, Том 1 и т.д.). Также обратите внимание на букву, соответствующую разделу, на котором хранятся файлы Windows.
Введите по порядку следующие команды:
- select volume N
- format fs=fat32 или format fs=ntfs (в зависимости от того, какая файловая система на разделе).
- assign letter=Z (присваиваем букву Z этому разделу).
- exit (выходим из Diskpart)
- bcdboot C:\Windows /s Z: /f ALL (где C: — диск с файлами Windows, Z: — буква, которую мы присвоили скрытому разделу).
- Если у вас несколько ОС Windows, повторите команду для второй копии (с новым расположением файлов).
- diskpart
- list volume
- select volume N (номер скрытого тома, которому мы присваивали букву)
- remove letter=Z (удаляем букву, чтобы том не отображался в системе, когда мы перезагрузимся).
- exit
По завершении, закрываем командную строку и перезагружаем компьютер уже не с внешнего загрузочного накопителя, проверяем, загружается ли Windows 10.
Видео инструкция
Надеюсь, изложенная информация сможет вам помочь. Кстати, можно попробовать также и «Восстановление при загрузке» в дополнительных параметрах загрузки или с диска восстановления Windows 10. К сожалению, не всегда все проходит гладко, и проблема легко решается: часто (при отсутствии повреждений HDD, что тоже может быть) приходится прибегать к переустановке ОС. Также для восстановления можно попробовать простую команду bootrec.exe /fixboot (см. Использование bootrec.exe для исправления загрузочных записей).
When Windows Boot Manager stops working, it can be frustrating. But don’t fret; fixing it is often straightforward. This guide will walk you through the steps to repair Windows Boot Manager on Windows 10 using easy-to-follow instructions. You’ll learn how to use Windows installation media, access Command Prompt, and run essential commands. By the end of this tutorial, your system should boot up normally again.
Step-by-step tutorial on Fixing Windows Boot Manager Windows 10
In this section, you’ll find a detailed and comprehensive guide to fixing Windows Boot Manager issues. Follow these steps carefully, and you should be back up and running in no time.
Step 1: Create Windows Installation Media
First, create a Windows installation media using a USB drive or DVD.
You’ll need another working computer to download the Windows 10 installation tool and create the media. Make sure your USB drive has at least 8GB of free space. This media will help you access repair tools.
Step 2: Boot from Installation Media
Next, insert the installation media into your computer and restart it.
You may need to change the boot order in your BIOS settings to boot from the USB or DVD. Press the appropriate key (usually F2, F12, ESC, or DEL) to enter the BIOS menu. Save your changes and restart.
Step 3: Access Repair Options
Once the system boots from the media, choose your language preferences and click “Next.”
Click the “Repair your computer” option on the bottom left of the screen. This will take you to the Windows Recovery Environment (WinRE), where you’ll find useful troubleshooting tools.
Step 4: Open Command Prompt
In the WinRE menu, select “Troubleshoot,” then “Advanced options,” and finally “Command Prompt.”
The Command Prompt is a powerful tool for fixing boot issues. It allows you to run specific commands that can repair the boot manager.
Step 5: Run Bootrec Commands
Type and execute the following commands one by one: bootrec /fixmbr, bootrec /fixboot, bootrec /scanos, and bootrec /rebuildbcd.
Each command serves a unique purpose. bootrec /fixmbr fixes the master boot record, bootrec /fixboot writes a new boot sector, bootrec /scanos scans for Windows installations, and bootrec /rebuildbcd rebuilds the boot configuration data.
Step 6: Restart Your Computer
Type exit to close Command Prompt and restart your computer.
Remove the installation media before restarting. Your computer should now boot up normally if the Boot Manager issue has been resolved.
After completing these steps, your computer should boot into Windows 10 without any problems. If issues persist, further troubleshooting may be needed.
Tips for Fixing Windows Boot Manager Windows 10
- Backup Important Data: Before you begin, ensure all important data is backed up to avoid data loss.
- Check for Hardware Issues: Sometimes, boot problems are caused by hardware failures.
- Use Safe Mode: Try booting in Safe Mode to diagnose and fix issues without full system load.
- Keep Installation Media Handy: Always have a Windows installation media for emergencies.
- Update BIOS/UEFI: Ensure your BIOS or UEFI firmware is up to date.
Frequently Asked Questions
How do I know if the boot manager is the problem?
If your computer shows errors like “BOOTMGR is missing” or fails to find a bootable device, the boot manager might be the issue.
Can I fix the boot manager without installation media?
It’s challenging but possible using built-in recovery options, though installation media is recommended.
What if the bootrec commands don’t work?
Try additional commands like chkdsk /r or consult a professional for hardware diagnostics.
Will this process delete my files?
No, these commands only fix the boot manager, not your files.
How can I prevent future boot manager issues?
Keep your system updated, regularly back up data, and avoid sudden shutdowns.
Summary of Steps
- Create Windows Installation Media.
- Boot from Installation Media.
- Access Repair Options.
- Open Command Prompt.
- Run Bootrec Commands.
- Restart Your Computer.
Conclusion
Fixing Windows Boot Manager Windows 10 doesn’t have to be daunting. With the right tools and a bit of patience, you can resolve boot issues and get back to using your computer effortlessly. Always remember the importance of regular backups and keeping your system updated to prevent such issues in the future. If you’re ever unsure or run into problems beyond your skill set, don’t hesitate to seek professional help. For further reading, consider looking into more advanced troubleshooting techniques or forums for community support.
Matt Jacobs has been working as an IT consultant for small businesses since receiving his Master’s degree in 2003. While he still does some consulting work, his primary focus now is on creating technology support content for SupportYourTech.com.
His work can be found on many websites and focuses on topics such as Microsoft Office, Apple devices, Android devices, Photoshop, and more.
Updated on Apr 28, 2025
Are you tired of dealing with boot issues on your Windows 10 computer? Whether it’s the Blue Screen of Death or a won’t boot error, these problems can be frustrating and time-consuming. Below is a typical case from the Microsoft forum:
When I try to turn my computer on, I get a screen saying, «Windows failed to start,» and that I should restart, insert, and install the disc.
Calm down! In this article, EaseUS will explore six effective ways to apply Windows 10 boot repair. From simple troubleshooting techniques to advanced system recovery options, we’ve got you covered. So, if you’re ready to get your computer up and running smoothly again, let’s dive in and discover some invaluable solutions to your Windows 10 startup problems.
This page can apply to most Windows boot errors and startup problems. You may share it via the social buttons below:
How to Perform Windows 10 Boot Repair — 6 Ways
This section will offer you six valuable solutions with a step-by-step guide. Before taking action, you can get more basic information in the following table:
| ⏱️Duration | 5-10 Minutes |
| 💻Goal | Fix Windows 10 won’t boot |
| 👩💻Suitable User | For all users: beginners and experienced users |
| 🧰Preparation |
✔️Prepare a healthy computer and a USB. ✔️Download and launch EaseUS Partition Master on a healthy computer. |
| 🛠️Methods |
|
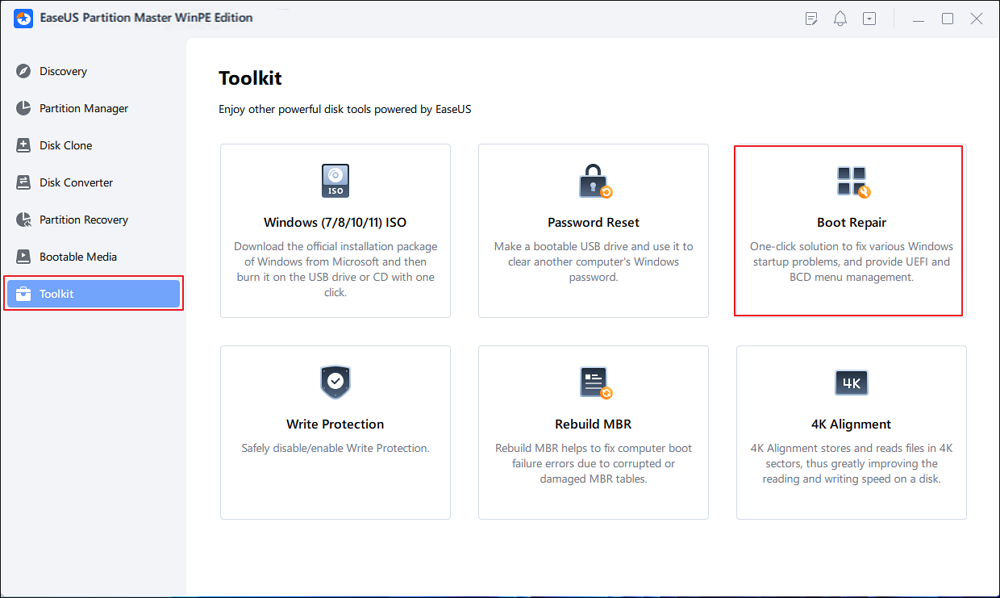
Fix 1. EaseUS Partition Master — Best Boot Repair Tool
Regarding Windows boot repair, EaseUS Partition Master Professional is our best recommendation. Using its «Boot Repair» feature, you can seamlessly repair various boot failure and startup issues, including the black/blue/white screen of death. Its user-friendly interface, enhanced data protection, and comprehensive features make it the ideal choice for repairing Windows boot problems without compromising data integrity.
Refer to the simplified steps to apply Windows 10 boot repair using EaseUS Partition Master:
Step 1. Start EaseUS Partition Master after connecting the external drive/USB to your computer, go to «Bootable Media,» and click «Create bootable media.»

Step 2. Select an available USB Drive or CD/DVD and click «Create.» You can also burn the Windows ISO file to the storage media.

Step 3. Connect the created bootable drive to the new computer and reboot the computer by pressing and holding F2/Del to enter the BIOS. Then, set the WinPE bootable drive as the boot disk and press F10 to exit.
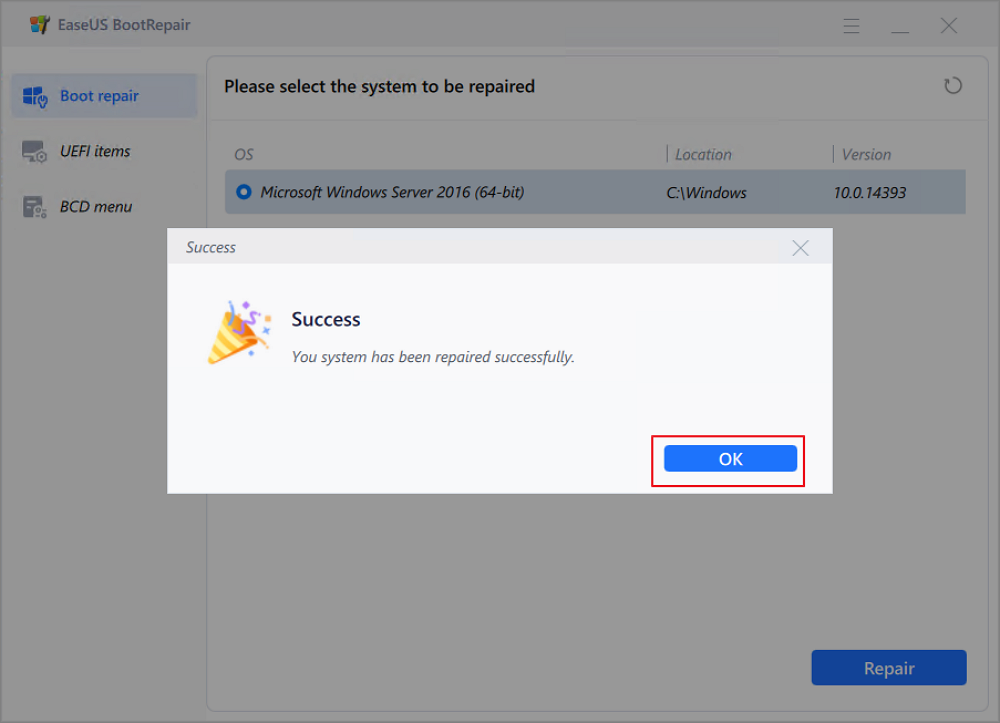
Step 4. Boot the computer again and enter the WinPE interface. Then, open EaseUS Partition Master and click «Boot Repair» under the «Toolkit» option.
Step 5: Select the system you want to repair and click «Repair.»
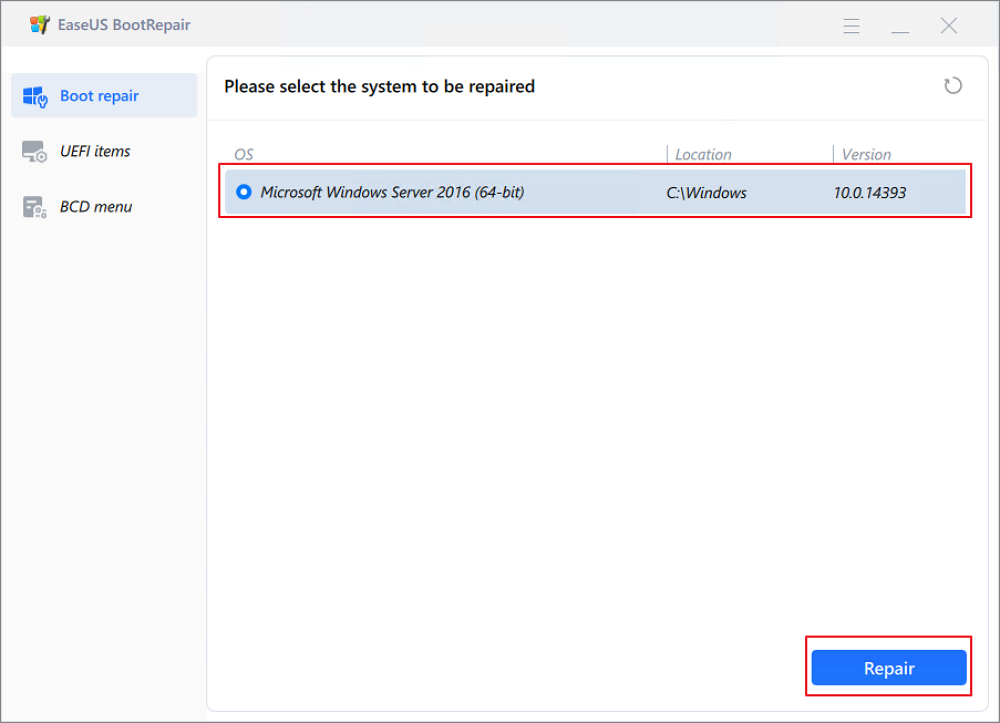
Step 6. Wait a moment, and you will receive an alert that the system has been successfully repaired. Click «OK» to complete the boot repair process.
Other Noble Functions of EaseUS Partition Master
Beyond SSD formatting, this tool also lets you perform a wide range of partition-related tasks:
- Solve the Default Boot Device Missing or Boot Failed error
- Fix UEFI Boot on Windows 11/10/8/7
- Fix Windows 10 startup repair not working
- Repair hard drive won’t boot
Download EaseUS Partition Master today now! It’s a reliable Windows 10 boot repair tool.
Fix 2. Change Boot Order in BIOS
If you have another available boot device that is already set in the BIOS settings, you can change the boot order and make the computer boot from it:
Step 1. To access BIOS settings, restart the computer and long-press the F2/Del/F8/F10/F12 keys.
Step 2. Go to the Boot tab and use the arrow keys to adjust the order.

Step 3. Save the above settings and try to restart the computer.
There is a built-in tool of Windows 10 that enables you to repair the boot errors automatically. Learn the quick steps below to learn how to use the «Startup Repair» feature:
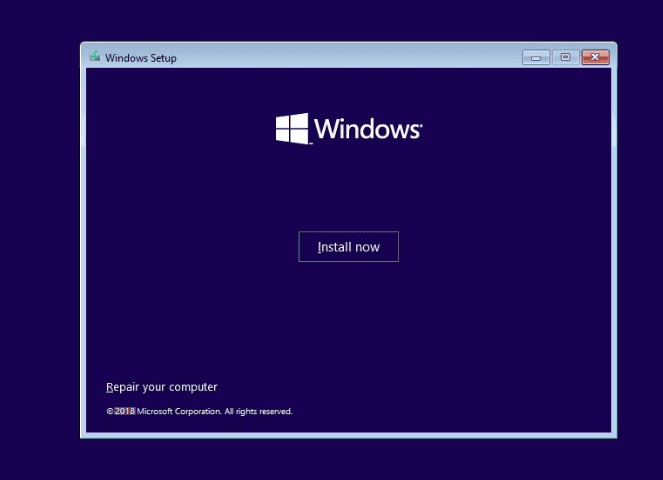
Step 1. Insert Windows 10 installation USB and reboot this computer.
Step 2. Refer to fix 2 to set the installation USB as the first boot disk.
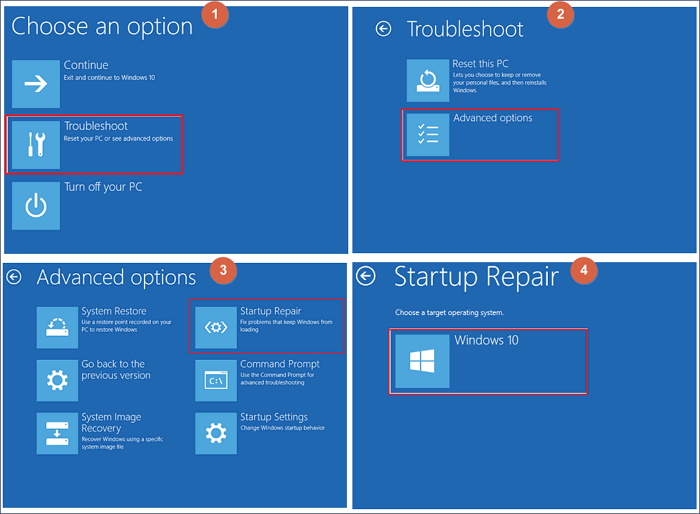
Step 3. Then, you will enter the Windows Setup window and choose «Repair your computer.»
Step 4. Click «Troubleshoot» to access the advanced options tab. Click «Startup Repair» and choose Windows 10 from the list.
Fix 4. Rebuild MBR via Bootable Media
The MBR is a critical component of your system that contains essential information about the partitions and the operating system installed on your hard drive. When the MBR becomes corrupted or damaged, it can lead to boot failures. In this case, you can retort to EaseUS Partition Master. With the assistance of its «Rebuild MBR» feature, you can repair the system disk as follows:
Step 1. Create a WinPE bootable disk
- Launch EaseUS Partition Master, and click «Bootable Media» on the toolbar. Select «Create bootable media».
- Click «Next» to finish the process.
Step 2. Boot EaseUS Partition Master Bootable USB
- Connect the bootable USB or CD/DVD to your PC.
- Press F2 or Del when you restart the computer to enter the BIOS screen. Set and boot your computer from «Removable Devices» or «CD-ROM Drive». And then EaseUS Partition Master will run automatically.
Step 3. Rebuild MBR
- Click «Toolkit» and choose «Rebuild MBR».

- Select the disk and the type of MBR. Then, click «Rebuild».

- After that, you can see «MBR has been successfully rebuilt on Disk X».

Fix 5. Run CHKDSK to Repair the Corrupted Drive
CHKDSK commands is a built-in Windows utility designed to scan and repair errors on your computer’s hard drive. It can detect and fix issues with the file system and bad sectors.
Step 1. Choose your preferred keyboard input, language, and time when booting from a Windows installation media.
Step 2. Select «Repair your computer,» then find the C:\ drive, where Windows is stored, and click «Next.»
Step 3. Select the CMD option in the «System Recovery Options» box, type the following command, and then hit «Enter»:
- chkdsk C: /f (where «C:» is the letter of the boot device.)
Fix 6. Rebuild BCD File
The BCD is a crucial database that stores important information about the installed operating system. When the BCD becomes corrupted or damaged, it can lead to problems such as the inability to boot into Windows, error messages during startup, or a missing operating system. Rebuild BCD can resolve the corrupted or lost BCD file:
Step 1. Access the Run search box by the «Windows +R» keys, write cmd, and hit «Enter.»
Step 2. Enter the CMDs below and hit «Enter» for each one:
- Bcdedit /export C:\BCD_Backup
- ren c:\boot\bcd bcd.old
- Bootrec /rebuildbcd
Step 3. Type exit to quit the utility and restart your computer.
Conclusion
To sum up, this post gives you six solutions for various unbootable errors in Windows 10. Among these methods, EaseUS Partition Master is the preferred choice for Windows 10 boot repair. It provides a tested and proven «Boot Repair» function and can also be applied for rebuilding MBR. If you are bothered by a similar issue, you can install this software and eliminate the annoying startup problems in Windows 10.
FAQ of Windows 10 Boot Repair
If your problems are not solved in the above parts, you will find further information about Windows 10 boot repair in this FAQ section:
1. How to repair Windows 10 boot problems without reinstalling?
Corrupted or lost system files can lead to Windows 10 won’t boot. In this case, users can run the system file checker using CMD. Follow the tutorial below carefully and learn how to repair Windows 10:
Step 1. Restart your computer from the Windows boot media.
Step 2. Navigate to the Windows Setup window and click «Next».
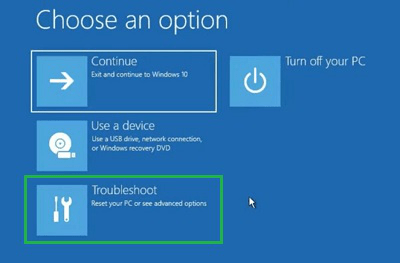
Step 3. Select «Repair your computer» > «Troubleshoot» > «Advanced options» > «Command Prompt.»
Step 4. Type the CHKDSK commands below and hit «Enter» for each.
- sfc /scannow
- chkdsk /f /r /x C:
2. Can I fix Windows 10 failed to boot without a disk?
Press F11 to bring up the Windows 10 Advanced Startup Options menu during the boot process. Select «Startup Repair» after clicking «Troubleshoot» > «Advanced Options.» Then, you can wait till Windows 10 resolves the startup issue.
3. How do I factory reset a Windows 10 computer?
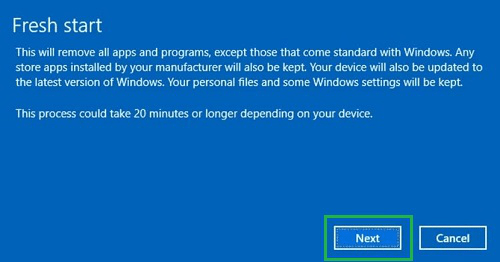
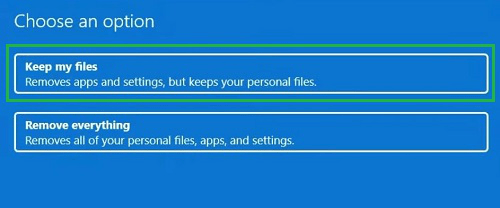
Navigate to «Start» > «Settings» > «Update & Security» > «Recovery» > «Reset this PC» > «Get Started to reset your computer.» Next, click Keep My Files, then pick Local or Cloud storage, adjust your preferences, and then select «Restore preloaded apps.»
Last Updated :
20 Jun, 2024
Command Prompt (CMD) offers a range of powerful tools for fixing Windows errors and boot problems. In this comprehensive guide, we’ll explore essential CMD commands and techniques to troubleshoot and repair common Windows issues. Whether you’re dealing with boot problems, Windows startup errors, or issues with the boot manager, CMD provides the necessary tools to diagnose and fix these issues. Follow along to learn how to use CMD effectively to repair Windows errors and keep your system running smoothly.
How to Access CMD in Windows Boot Problem?
When you face the Windows Boot Problem, the Windows OS will restrict you from going inside the system. So, if you can’t move inside the system, Accessing Command Prompt will become trickier. So, there are two methods by which you can use Command Prompt without Entering into the System.
Method 1: Access CMD in Windows Boot Problem using Safe Mode
The first & very simple method is the Open Safe Mode on Windows. If you launch the Windows Safe Mode, all of the inbuilt services of Windows will be executed without any kind of problem.
In the Safe Mode, no third-party applications are present to execute. And any kind of Boot Issues on Windows, can’t restrict the entering into the Safe Mode of the system.
Method 2: Access CMD in Windows Boot Problem using Recovery Environment
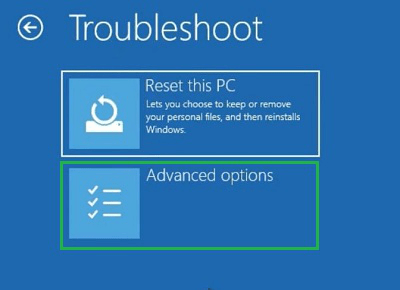
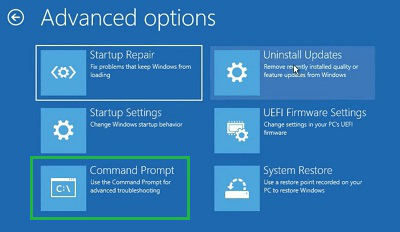
Step 1: On the Recovery Environment of Windows Boot Problem, click on the Troubleshoot Option.
Step 2: Now, click on the Advanced Options.
Step 3: Now, you will find the Command Prompt option. Click on that to Access CMD without launching OS.
How to Repair Boot Problems With CMD?
To Fix Boot Problems on Windows using Command Prompt, the following methods can be used. Let us start with the Windows Command made only to address Windows Boot Issues.
Method 1: Repair Windows Boot Problems with CMD using BOOTREC Command
The BOOTREC is the only command that is dedicated to all kinds of issues with Booting. If there is any Windows Boot Issue, you have to first execute the Windows BOOTREC Command. Open Command Prompt & use the command like the following.
Command 1: BOOTREC /FIXMBR
Command 2: BOOTREC /FIXBOOT

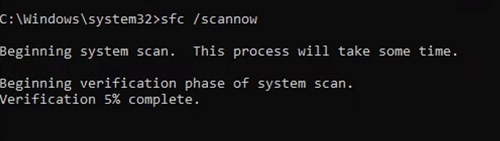
Method 2: Repair Windows Boot Problems with CMD using SFC Command
The System File Checker or SFC Command is not completely dedicated to Windows Booting Problems. It helps to address the Corrupt System File Concept. However, it can be used in the Command Prompt to fix Boot Problems caused by Corrupted System Files.
Command: sfc /scannow
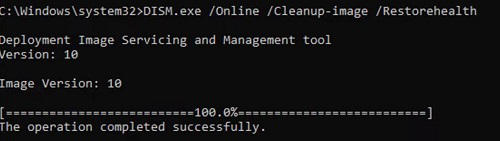
Method 3: Repair Windows Boot Problems with CMD using DISM Command
The Deployment Image Servicing and Management or DISM can be another good Windows Command executed to get rid of Boot Problems. Open the Windows Command Prompt & execute the following command. It will fix any Windows Image Problem quickly.
Command: DISM /Online /Cleanup-Image /RestoreHealth
Method 4: Repair Windows Boot Problems with CMD using System Cleanup Command
Step 1: Another important command that will Refresh Windows along with repairing the problem is the Cleanup Command. Use the Command on the CMD using the below manner.
Command: systemreset -cleanup

Step 2: Now, click on the Next Button to start the complete process.
Method 5: Repair Windows Boot Problems with CMD using System Reset Command
Step 1: If any of the above commands is not working, then you have to go for the Windows System Reset. And that could also be done from the Windows Command Prompt. To do so, use the following command.
Command: systemreset.exe

Step 2: Now, click on the Keep My Files option to start the process.
In conclusion, using Command Prompt (CMD) to repair Windows errors and boot problems can be a powerful and efficient solution. By mastering the relevant CMD commands and troubleshooting techniques, you can resolve common issues, repair the Windows boot manager, and fix boot sector problems. This guide has equipped you with the knowledge to diagnose and fix Windows errors using CMD, empowering you to keep your system running smoothly.