Do you know what Check Disk is? What else can Check disk do expect for checking disk health by repairing hard disk partition errors? You can also check disk usage and test disk speed, etc. Here, on this page, we’ll present you with a complete beginners’ guide. It will assist you in running the Check Disk or CHKDSK command to check disk health, test hard disk speed, and even check the disk usage of HDD/SSD on your Windows computer successfully. You can even apply the troubleshooting solutions to fix Check Disk errors like an export on your own. Let’s get started.
In this article, you’ll learn:
- What Is Check Disk
- Is There Any Free Check Disk Tools — Recommendation
- What Does Check Disk Actually Do and When To Use Check Disk
- How Do I Run CHKDSK & Check Disk (ScanDisk) in Windows 10
- Three Check Disk Commands: CHKDSK, SFC, and DISM, What’s The Difference
- Troubleshooting: Fix Two Common Disk Check Errors on Your Own
Tags: chkdsk, disk check tool, disk utility
Check disk, also known as Windows Check Disk, and some users also refer to it as «CHKDSK» (by Wikipedia), is actually a system tool or feature powered by Microsoft. It’s designed to verify the file system integrity of volumes and fix logical file system errors in Windows, OS/2 and DOS, etc., operating systems.
Is There Any Free Check Disk Tools — Recommendation
There are two check disk tools that are available for Windows users to run on their hard disk drives, SSDs, external drives, and even SD cards for free:
CHKDSK
While searching «check disk tool» online, Google, Bing, Firefox, etc., the search engine will prompt you with multiple types of disk testing tools. And at the top of the list, you’ll see CHKDSK or CHKDSK utility.
CHKDSK is a command tool that uses DiskPart to convey command syntax orders to the operating systems, and then the operating system will process the orders and execute the check disk operations on target disk volumes.
ScanDisk
Aside from CHDKSK, there is another tool known as Microsoft ScanDisk, and some users also take it as the Check Disk tool. It’s defined as a diagnostic utility program supporting checking and repairing file systems errors on a disk drive (by Wikipedia).
Differences Between: CHKDSK & ScanDisk
So what are the differences between these two check disk tools? Here is a comparison table that’ll cover some of the overall information about CHKDSK and Check Disk utility — ScanDisk.
Here are the details:
| Differences | CHKDSK | ScanDisk (Check Disk) |
|---|---|---|
| Initial Release | 1980 | 1993 |
| Developers |
|
Microsoft |
| Type | Command Tool | Utility Software |
| Operating System |
|
|
| Pricing | Free | Free |
Note that SanDisk was introduced in 1993 as a successor to replace CHKDSK and continue serving Windows users to check disk and fix disk partition problems with an easier operating process.
What Does Check Disk Actually Do and When To Use Check Disk
Alongside fixing file system errors, what else can these two check disk tools do for you? When shall you apply either of them on your computer?
What Can Check Disk Tool Do for You? Benefits of Check Disk
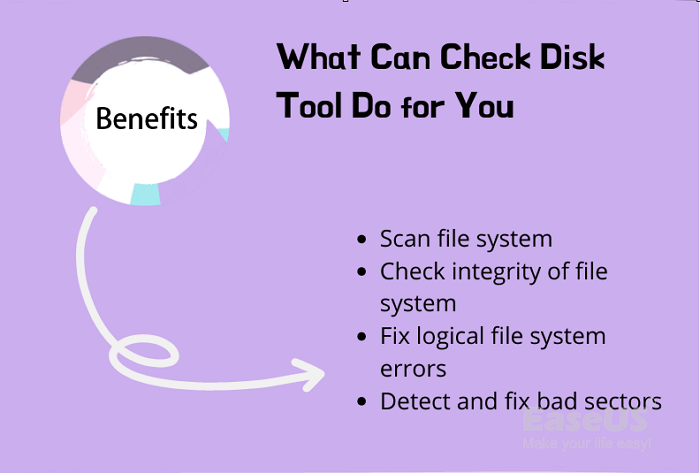
The basic feature of CHKDSK and ScanDisk is to check disk health. Here is a list of benefits that you’ll enjoy by running the Check Disk tool on your disk:
- Scan the file system on a disk (NTFS, FAT32).
- Check the integrity of the file system, including file system metadata.
- Fix any logical file system errors it finds.
- Detect bad sectors on a target disk due to physical damage.
When to Use Check Disk Tool — CHKDSK or ScanDisk
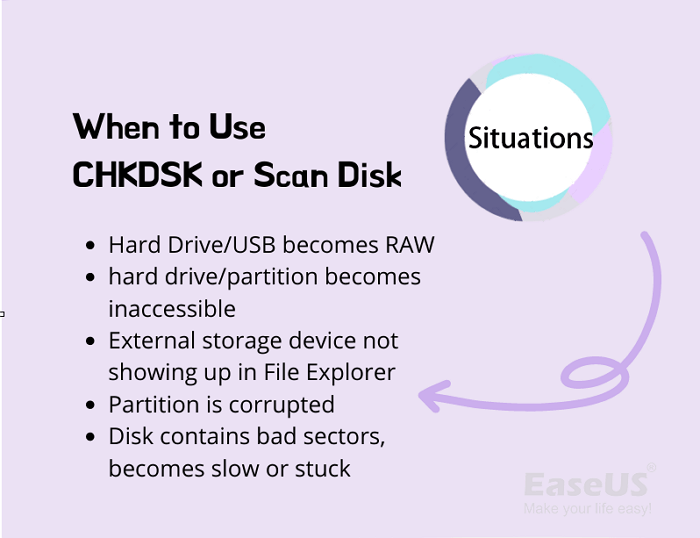
Here is a list of common issues that CHKDSK commands or ScanDisk can fix:
- The file system of the hard drive or external USB becomes RAW.
- Hard drive or partition becomes inaccessible.
- External storage disk shows in Disk Management but not in the File Explorer.
- Selected volume or partition is corrupted for unknown reasons.
- Disk contains a few bad sectors and becomes slow or even stuck.
You May Also Feel Like:
Here is a list of 5 reliable software: EaseUS Partition Master, Hard Disk Sentinel, HD Tune, DiskCheckup, CHKDSK/ScanDisk, and you can apply any one of them to check disk health for free.
How Do I Run CHKDSK & Check Disk (ScanDisk) in Windows 10
So how do you run the CHKDSK or ScanDisk to check disk and repair hard drive errors on your computers? Here in this part, you’ll learn how to run the check disk tools on Windows 10/11 or even older computers to fix existing disk problems efficiently.
CHKDSK VS ScanDisk, Which Is Suitable for You
Some of you may not be sure which tool — CHKDSK or ScanDisk is more suitable for you. Here is a comparison table that covers some unique factors to help you decide which tool can suites your demands:
| Comparison | CHKDSK | ScanDisk (Check Disk) |
|---|---|---|
| Steps to operate | 3-5 steps | 3-5 steps |
| Complex level | Medium | Easy |
| Suitable Users |
|
|
| Execution Media Tool | Diskpart | File Explorer Properties |

Guide 1: Run CHKDSK in Windows 11/10, Check and Fix Disk Errors
Applies to: Windows 11/10/8/7/XP and Windows Servers.
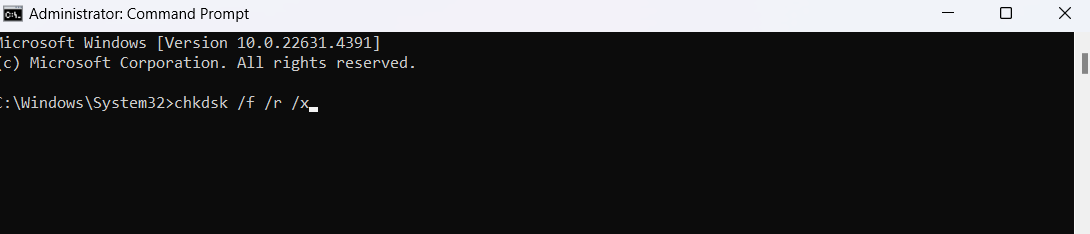
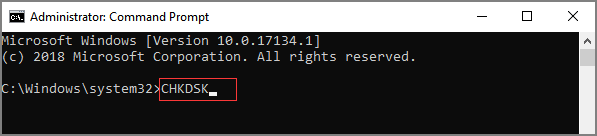
Step 1. Open CHDKSK by typing cmd in the search box, right-click Command Prompt, and selecting «Run as Administrator».
Step 2. Confirm the drive letter of your problematic drive.
You can open Windows File Explorer or Disk Management to check the drive letter of your disk where you need to check and fix errors on it.
Step 3. Type the CHKDSK syntax command and hit enter:
- chkdsk E: /f /r /x
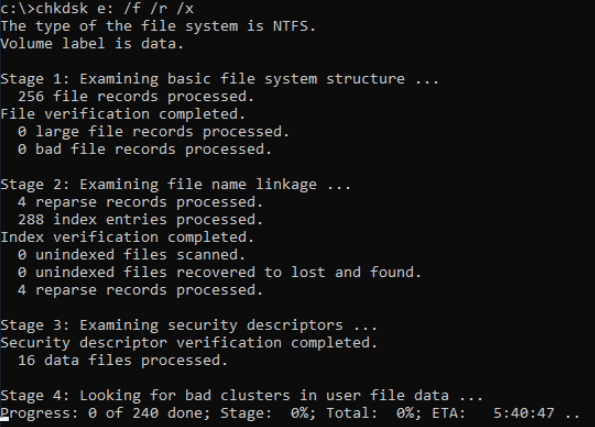
Step 4. Wait for the process to complete, and then type exit to close the command window.
Note that the syntax of CHKDSK have different meanings, and here are the explanation of the three commands:
- /f — Fixes errors on the disk.
- /r — Locates bad sectors and recovers readable information.
- /x — Forces the volume to dismount first, if necessary. /x also includes the functionality of /f.
Alongside these three parameters, CHKDSK also contains some other parameters that help to check and fix disk errors. If you need to learn more details about CHKDSK, you follow the below two links for help:
Guide 2: Run Check Disk — ScanDisk in Windows
Applies to: Windows 11/10/8/7 and Windows Servers.
Step 1. Press Windows + E keys to open File Explorer.
Step 2. Locate the problematic drive, right-click on it and select «Properties».
Step 3. Go to the Tools tab, and click «Check» under the Error checking section.
Step 4. Click «Scan drive» and wait for the program to scan and fix all found errors on your disk.
BONUS TIP: CHKDSK/ScanDisk Alternative
Aside from running CHKDSK or ScanDisk to check disk errors and fix file system corruption problems on your hard disk drives, you can also try to turn to third-party disk checking software for help. It’s easier and faster.
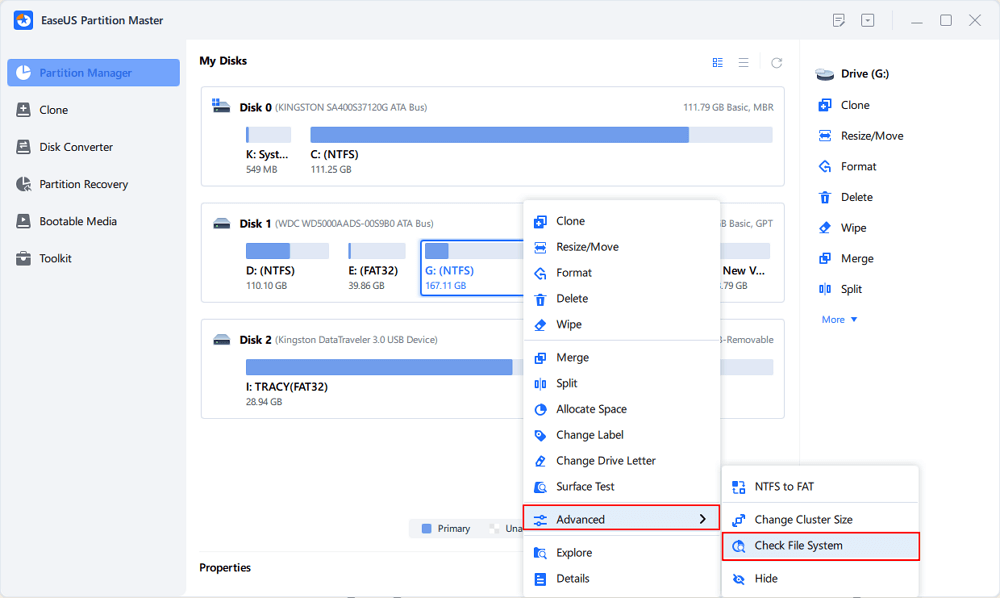
EaseUS Partition Master is one of the software that supports all levels of Windows users to simply scan and fix disk file system errors in only a few simple clicks:
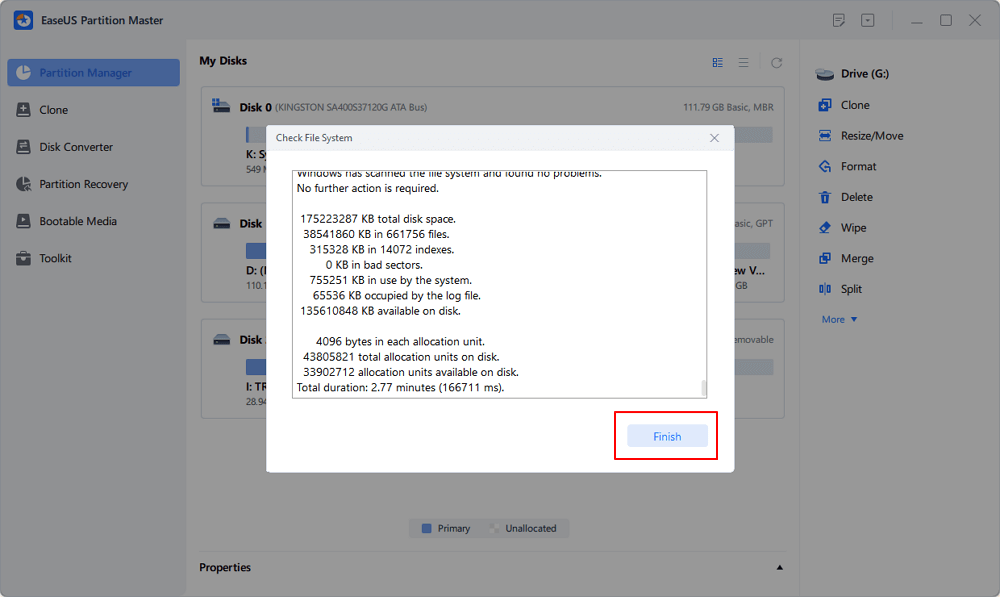
Step 1. Open EaseUS Partition Master on your computer. Then, locate the disk, right-click the partition you want to check, and choose «Advanced» > «Check File System».
Step 2. In the Check File System window, keep the «Try to fix errors if found» option selected and click «Start».
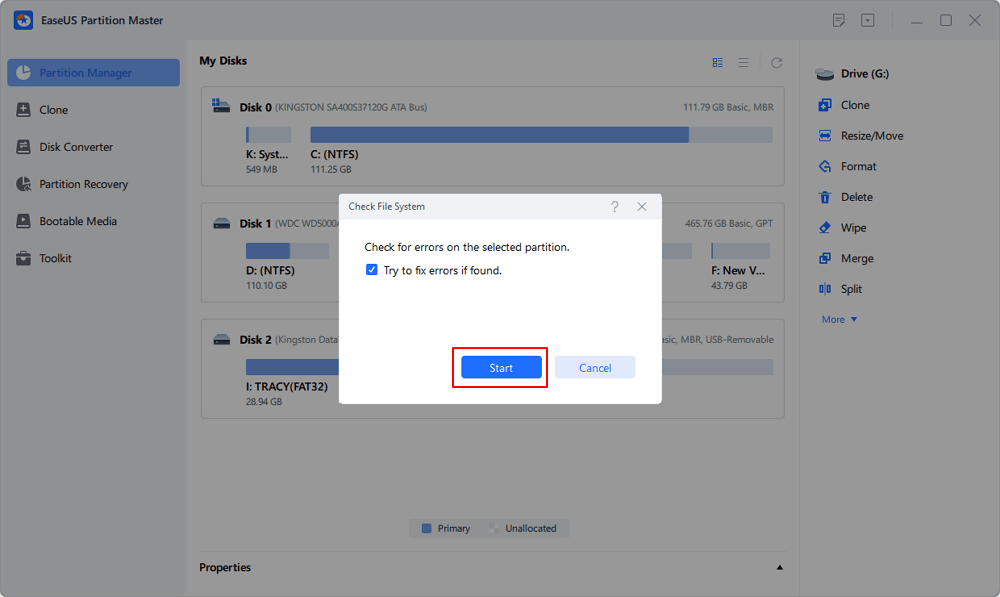
Step 3. The software will begin checking your partition file system on your disk. When it completes, click «Finish».
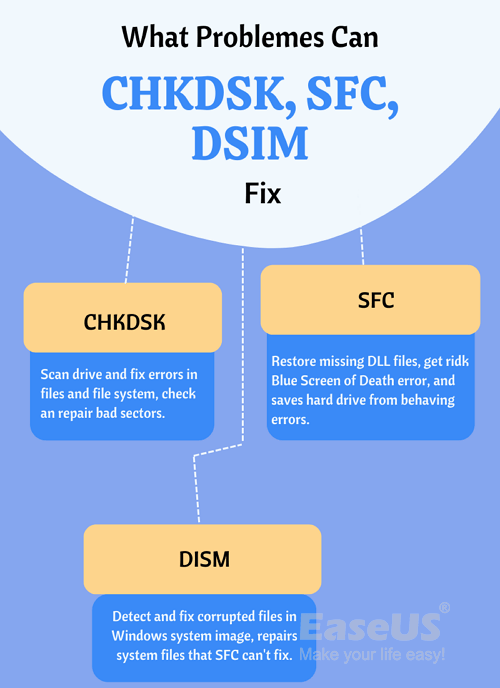
Three Check Disk Commands: CHKDSK, SFC, and DISM, What’s The Difference
Aside from CHKDSK, there are another two hot commands — SFC and DISM that some of you may confuse together. These three command lines actually work for different occasions.
Here are the main differences between CHKDSK, SFC, and DISM:
When to Use CHKDSK, SFC, DSIM
- CHKDSK (Check Disk) — When your computer hangs or becomes slow, drives suddenly become inaccessible, you can run CHKDSK.
- SFC (System File Checker) — When the file system of your hard drive contains unknown errors, the file system is corrupted or modified, turn to SFC.
- DISM (Deployment Image Servicing and Management) — When the computer is experiencing frequent crashes, freezes, and errors, especially when you already ran SFC, but nothing works. In this case, you need to turn to DISM.
What Problems Can CHKDSK, SFC, and DSIM Fix
- CHKDSK — It scans your entire drive to find and fix errors in files and the file system itself. It also checks bad sectors and repairs them automatically so to allow you to reuse the drive again.
- SFC — It saves you from hard drive not behaving correctly error, restores missed DLL files, and even gets rid of the Blue Screen of Death error from your computer.
- DSIM — It detects and fixes corrupted files in the component store of Windows system image and repairs system files that SFC can’t fix.
How to Run CHKDSK, SFC, and DISM Commands to Check Disk in Windows
Step 1. Right-click the Windows icon and select Run.
Step 2. Type cmd in the Run dialog, right-click Command Prompt, and select «Run as Administrator».
Step 3. Type CHKDSK, SFC, or DISM command lines to fix different disk errors and hit Enter each time:
- chkdsk E: /f /r /x — Check disk to fix file system error and bad sectors.
- sfc /scannow — Fully scan system files, repair and replace any damaged or missing files.
- Dism /Online /Cleanup-Image /CheckHealth — Detect corrupted files in the components store of Windows systems image.
- If no corruption is detected, try this command: Dism /Online /Cleanup-Image /ScanHealth.
- If DISM reports some problems are found, run this command: Dism /Online /Cleanup-Image /RestoreHealth to repair found errors and replace damaged files automatically.
What’s the Difference Between CHKDSK, SFC, and DISM
Summarily, the biggest differences between CHKDSK, SFC, and DISM commands are designed for fixing different errors on different objects.
- CHKDSK — Fix file system error on hard drives.
- SFC — Repair system file errors in Windows operating system.
- DSIM — Detect and repair Windows system file errors that SFC can’t fix.
LEARN MORE
You can follow CHDKSK vs. SFC to learn more details about CHKDSK and SFC in Windows computers.
Troubleshooting: Fix Two Common Disk Check Errors on Your Own
According to some Windows professionals and forums, we found that there are some common issues that many Windows users may have encountered while running the Check Disk tool on their computers.
Here are two top issues that you may have come across:
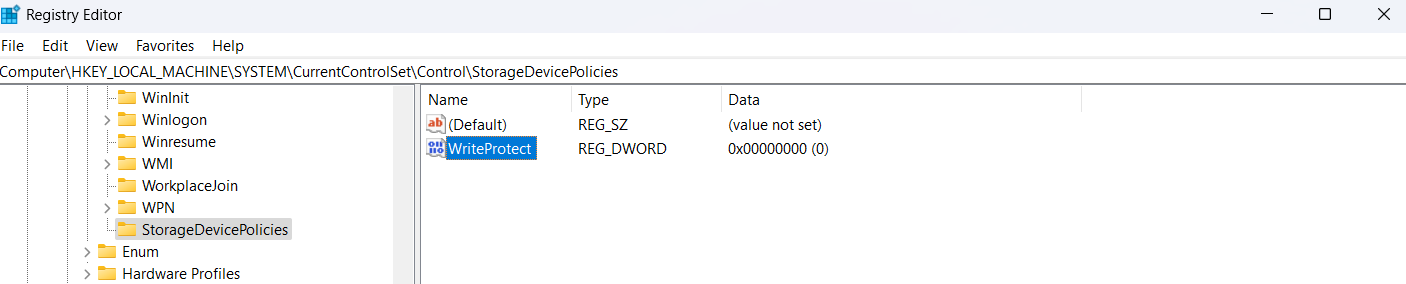
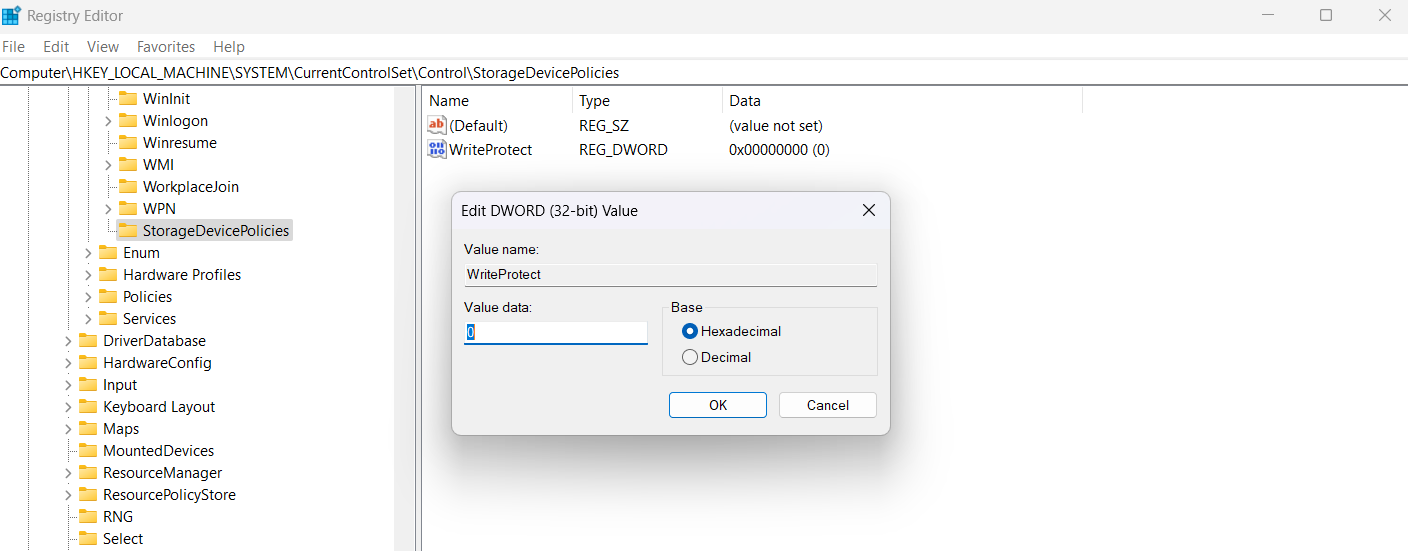
Error 1: Windows Cannot Run Disk Checking On This Volume Because It’s Write Protected
Causes of This Error:
- The hard drive is write-protected.
- The file system of the hard drive is corrupted.
Solutions to This Error:
- 1. Remove Write Protection via CMD, DiskPart, or third-party write protection removal tool.
- 2. Clear read-only in Registry.
- 3. Recover files from the hard drive and format them.
Stey-By-Step Guide:
For a step-by-step guide, you can refer to this link to Fix Windows Can’t Run Disk Checking On This Volume error with success.
Error 2: Disk Check (CHKDSK) Shows Up on Startup, Taking Long to Boot into Windows
Causes of This Error:
- Improper Windows system shutdown
- Suspicious malware or virus infection
- Unplug the external device from the computer without safe ejection
Solutions to This Error:
- 1. Use Command Prompt
- 2. Use Windows Registry Editor
- 3. Use Disk Check Alternative, like EaseUS Partition Master
Stey-By-Step Guide:
To get a detailed guide to get rid of the Disk Check tool from running in startup on Windows, you can follow this page to learn How to Stop Disk Check (CHKDSK) on Startup Windows 10 on your own.
Conclusion
On this page, we mainly explained to you what you could do with a check disk tool, such as check disk health, check disk usage, and test disk speed. Among these three types of tools, the top most concerned goal is to check disk health and fix disk partition errors.
To do so, you can run CHKDSK or ScanDisk — these two Check Disk tools for help. For Windows beginners, these two tools could be a bit complex, and you may refer to an alternative tool — EaseUS Partition Master for help.
Stay calm if you run Check Disk on a computer but come across some strange errors, such as Windows can’t run disk checking or check disk runs in startup and freezes Windows from booting up. Refer to the specific troubleshooting fixes above, and you can successfully get rid of this issue, making your computer run smoothly again.
В этой инструкции для начинающих по шагам показано, как проверить жесткий диск на ошибки и поврежденные сектора в Windows 7, 8.1 и Windows 10 через командную строку или в интерфейсе проводника. Также описаны дополнительные инструменты проверки HDD и SSD, присутствующие в ОС. Установка каких-либо дополнительных программ при этом не требуется.
Несмотря на то, что существуют мощные программы для проверки дисков, поиска бэд-блоков и исправления ошибок, их использование в большинстве своем, будем мало понятно обычному пользователю (и, более того, может даже навредить в некоторых случаях). Встроенная же в систему проверка с помощью ChkDsk и других системных инструментов, сравнительно проста в использовании и достаточно эффективна. См. также: Как проверить SSD на ошибки, анализ состояния SSD.
Примечание: если причиной того, что вы ищите способ проверить HDD стали непонятные звуки, издаваемые им, посмотрите статью Жесткий диск издает звуки.
Как проверить жесткий диск на ошибки через командную строку
Для проверки жесткого диска и его секторов на ошибки с использованием командной строки, ее для начала потребуется запустить, причем от имени Администратора. В Windows 8.1 и 10 вы можете сделать это, кликнув правой кнопкой мыши кнопке «Пуск» и выбрав пункт «Командная строка (администратор)». Другие способы и для других версий ОС: Как запустить командную строку от имени администратора.
В командной строке следует ввести команду chkdsk буква_диска: параметры_проверки (если ничего не понятно, читаем дальше). Примечание: Check Disk работает только с дисками, отформатированными в NTFS или FAT32.
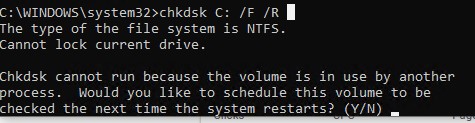
Пример работающей команды может выглядеть следующим образом: chkdsk C: /F /R— в этой команде будет проверен на ошибки диск C, при этом ошибки будут исправляться автоматически (параметр F), будет проведена проверка поврежденных секторов и попытка восстановления информации (параметр R). Внимание: проверка с использованными параметрами может занять несколько часов и как будто «зависать» в процессе, не выполняйте её, если не готовы ждать или если у вас ноутбук не подключен к розетке.

В случае, если вы попробуете проверить жесткий диск, который в настоящее время используется системой, вы увидите сообщение об этом и предложение выполнить проверку после следующей перезагрузки компьютера (до загрузки ОС). Введите Y для того, чтобы согласиться или N, чтобы отказаться от проверки. Если при выполнении проверки вы видите сообщение о том, что CHKDSK недопустим для дисков RAW, то может помочь инструкция: Как исправить и восстановить диск RAW в Windows.
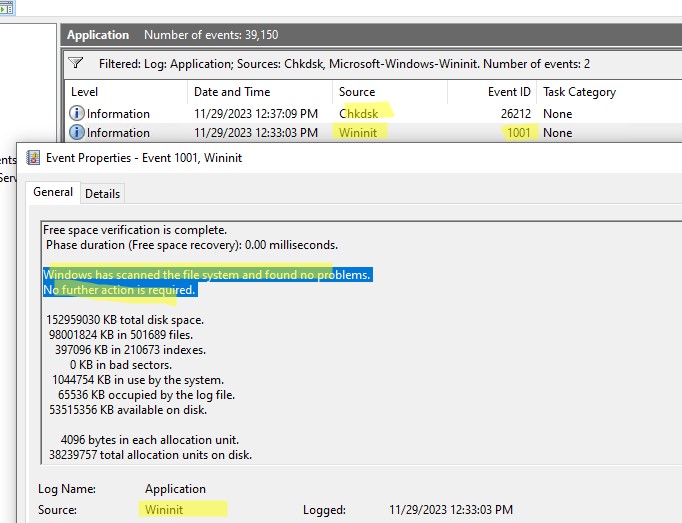
В остальных случаях сразу будет запущена проверка, по итогам которой вы получите статистику проверенных данных, найденных ошибок и поврежденных секторов (у вас она должна быть на русском языке, в отличие от моего скриншота).

Полный список доступных параметров и их описание вы можете получить, запустив chkdsk с вопросительным знаком в качестве параметра. Однако для простой проверки на ошибки, а также проверки секторов будет достаточно команды, приведенной в предыдущем абзаце.
В тех случаях, когда проверка обнаруживает ошибки на жестком диске или SSD, но не может их исправить, это может быть связано с тем, что работающая Windows или программы в настоящее время используют диск. В данной ситуации может помочь запуск оффлайн-сканирования диска: при этом диск «отключается» от системы, выполняется проверка, а затем снова монтируется в системе. Если же отключить его невозможно, то CHKDSK сможет выполнить проверку при следующей перезагрузке компьютера.
Чтобы выполнить оффлайн проверку диска и исправление ошибок на нем, в командной строке от имени администратора выполните команду: chkdsk C: /f /offlinescanandfix (где C: — буква проверяемого диска).

Если вы увидите сообщение о том, что нельзя выполнить команду CHKDSK, так как указанный том используется другим процессом, нажмите Y (да), Enter, закройте командную строку и перезагрузите компьютер. Проверка диска начнется автоматически при начале загрузки Windows 10, 8 или Windows 7.
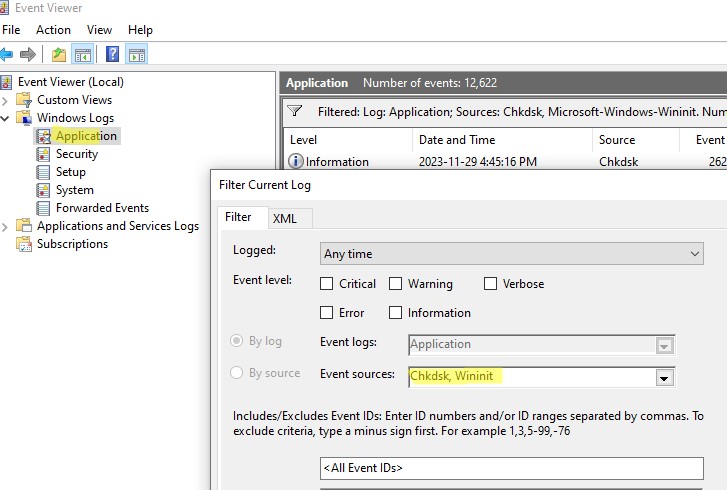
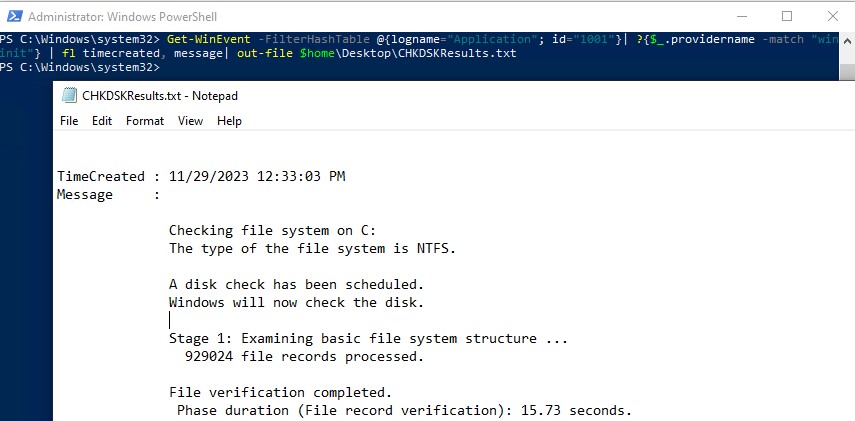
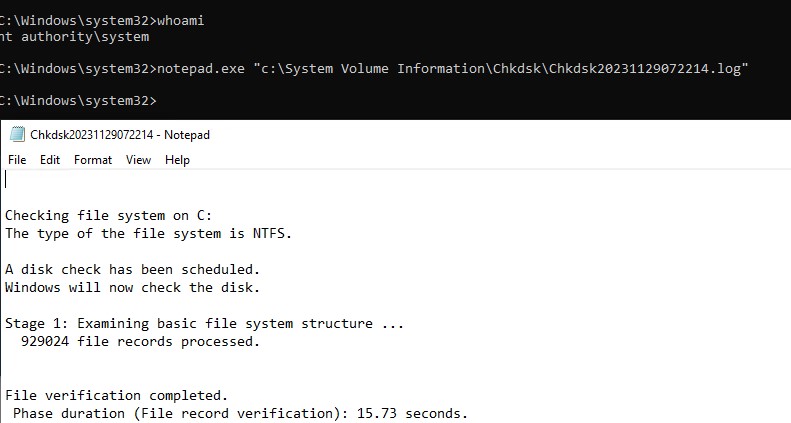
Дополнительная информация: при желании, после проверки диска и загрузки Windows, вы можете просмотреть журнал проверки Check Disk с помощью просмотра событий (Win+R, ввести eventvwr.msc) в разделе Журналы Windows — Приложение, выполнив поиск (правый клик по «Приложение» — «Поиск») по ключевому слову Chkdsk.

Проверка жесткого диска в проводнике Windows
Самый простой способ проверки HDD в Windows — использовать проводник. В нем, кликните правой кнопкой мыши по нужному жесткому диску, выберите пункт «Свойства», а затем откройте вкладку «Сервис» и нажмите «Проверить». В Windows 8.1 и Windows 10 вы, скорее всего, увидите сообщение о том, что сейчас проверка этого диска не требуется. Однако, вы можете запустить ее принудительно.
В Windows 7 присутствует дополнительная возможность включить проверку и исправление поврежденных секторов, отметив соответствующие пункты. Отчет о проверке вы все так же можете найти в просмотре событий приложений Windows.
Проверка диска на ошибки в Windows PowerShell
Проверить жесткий диск на ошибки можно не только с помощью командной строки, но и в Windows PowerShell.
Для того, чтобы проделать эту процедуру, запустите PowerShell от имени администратора (можно начать набирать PowerShell в поиске на панели задач Windows 10 или в меню Пуск предыдущих ОС, после чего кликнуть правой кнопкой мыши по найденному элементу и выбрать пункт «Запустить от имени администратора».
В Windows PowerShell используйте следующие варианты команды Repair-Volume для проверки раздела жесткого диска:
- Repair-Volume -DriveLetter C (где C — буква проверяемого диска, в этот раз без двоеточия после буквы диска).

- Repair-Volume -DriveLetter C -OfflineScanAndFix (аналогично первому варианту, но для выполнения оффлайн-проверки, как это описывалось в способе с chkdsk).
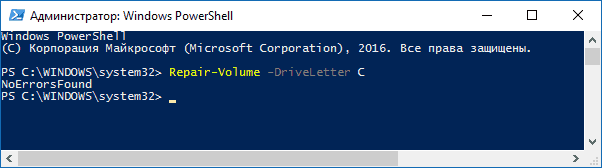
Если в результате выполнения команды вы увидите сообщение NoErrorsFound, это означает, что ошибки на диске найдены не были.
Дополнительные возможности проверки диска в Windows 10
Помимо перечисленных выше вариантов, вы можете использовать некоторые дополнительные встроенные в ОС средства. В Windows 10 и 8 обслуживание дисков, в том числе их проверка и дефрагментация происходят автоматически по расписанию, в то время, когда вы не пользуетесь компьютером или ноутбуком.
Чтобы просмотреть информацию о том, были ли найдены какие-либо проблемы с дисками, зайдите в «Панель управления» (сделать это можно, кликнув правой кнопкой мыши по Пуску и выбрав нужный пункт контекстного меню) — «Центр безопасности и обслуживания». Откройте раздел «Обслуживание» и в пункте «Состояние диска» вы увидите информацию, полученную в результате последней автоматической проверки.

Еще одна возможность, которая появилась в Windows 10 — утилита диагностики хранилища (Storage Diagnostic Tool). Для использования утилиты, запустите командную строку от имени администратора, затем используйте следующую команду:
stordiag.exe -collectEtw -checkfsconsistency -out путь_к_папке_сохранения_отчета
Выполнение команды займет некоторое время (может показаться, что процесс завис), при этом будут проверены все подключенные диски.

А после завершения выполнения команды, в указанном вами расположении будет сохранен отчет о выявленных проблемах.

Отчет включает в себя отдельные файлы, содержащие:
- Информацию проверки chkdsk и информацию об ошибках, собранную fsutil в текстовых файлах.
- Файлы реестра Windows 10, содержащие все текущие значения реестра, относящиеся к подключенным накопителям.
- Файлы журналов просмотра событий Windows (события собираются в течение 30 секунд при использовании ключа collectEtw в команде диагностики дисков).
Для рядового пользователя собранные данные могут не представлять интереса, однако в некоторых случаях может оказаться полезной для диагностики проблем работы накопителей системным администратором или другим специалистом.
Если при проверке у вас возникают какие-либо проблемы или требуется совет, пишите в комментариях, а я, в свою очередь, постараюсь вам помочь.
Table of contents
- What Is the CHKDSK Command?
- When Should I Use the CHKDSK Command?
- Tips to Know before Running CHKDSK
- Tip 1: CHKDSK is not all-powerful
- Tip 2: Back up your data
- How to Run CHKDSK on Windows 10/11
- How to run CHKDSK from File Explorer
- How to run CHKDSK from the Command Prompt
- How to run CHKDSK from installation media
- How to Adjust CHKDSK Options
- The Most Common CHKDSK Parameters in Windows
- How to Troubleshoot Windows CHKDSK Issues
- Issue 1: The drive is currently in use or in read-only mode
- Issue 2: CHKDSK keeps freezing
- Issue 3: The disk is write-protected
- Conclusion
- FAQ
If you are experiencing performance issues on your PC, the disk drive is usually one of the main suspects. An overload or error in your disk drive can cause lots of problems. This is where the Check Disk tool comes in.
If you’re not a fan of using the Command Prompt, it can be quite tricky. But don’t worry; we’ll show you how to run the CHKDSK command with our easy-to-implement steps.
Let’s begin.
What Is the CHKDSK Command?
CHKDSK (Check Disk) is a useful Windows tool that checks and fixes problems with your hard drives. It’s particularly useful when your computer freezes or when files become inaccessible due to a corrupted file system.
Beyond fixing errors, it can also help you maintain good computer hygiene. It scans your drive’s file system for things like broken file records or errors that could cause data loss or corruption.
CHKDSK typically fixes software (logical errors) and hardware (physical errors) issues on your hard drive.
An example of a logical error is a situation where you have a corrupted file system and the structure that organizes files on the drive becomes damaged. A physical error could be a bad sector problem , where a part of your hard drive can no longer store data properly.
When Should I Use the CHKDSK Command?
How often you should run Check Disk on Windows 10 or 11 depends on your PC usage patterns and the health of your disk. If you notice any of the symptoms below, we recommend running the CHKDSK utility tool as part of your regular PC maintenance .
- Disk errors or corruption. Running the CHKDSK repair command can help fix disk-related errors, such as the “Boot device not found” error, bad sectors, or file system errors, and recover data from corrupted files.
- Shutdowns and crashes. CHKDSK can help diagnose and fix unexpected shutdowns and the dreaded blue screens of death .
- Performance problems. If your Windows PC is slow, the CHKDSK command can help with hard drive diagnostics , fixing disk errors, and improving computer performance.
- Unresponsive apps, freezes, or glitches. If your apps become unresponsive or freeze or you encounter computer glitches frequently, it is time to run Windows CHKDSK as disk-related problems may be the culprit.
- File management problems. Files failing to save or open is a sign you need to try some CHKDSK commands since there may be underlying disk issues.
- Disk noise or strange sounds. If your hard drive starts producing strange noises, hardware issues may be at play. Running CHKDSK can help identify and fix them.
Tips to Know before Running CHKDSK
Here are some pointers to note before running the Check Disk tool:
Tip 1: CHKDSK is not all-powerful
While CHKDSK commands can help you resolve a variety of disk-related problems, they have certain limitations. To begin with, you can only use CHKDSK on Windows.
Also, the Check Disk tool can take quite some time to complete, especially when it comes to larger disks or drives with numerous errors. While it is doing its job, your system’s performance might be affected, and you won’t be able to use the drive.
Another concern is that CHKDSK may not be able to repair all disk-related errors. If your drive has developed severe physical damage or extensive corruption, other tools might be required. You may even require technical assistance in some cases.
If the CHKDSK command isn’t able to fix the disk errors on your computer, you can use tools like EaseUS Partition Master and MiniTool Partition Wizard . These tools check the hard drive for disk errors and repair them. However, each tool has its pros and cons, so check out what they can do for you before installing them.
Tip 2: Back up your data
Running the CHKDSK command involves altering disk data, which might cause a slight risk of data loss, especially if your drive has severe issues. This has been confirmed by some users .
For example, when trying to recover data from bad sectors with CHKDSK, you may accidentally lose or corrupt some of your files. If that happens, you will have to spend valuable time recovering deleted files on Windows .
To prepare for unforeseen events, you need to protect your data. We have a detailed guide on how to back up your Windows . You can go through the article and save your files.
How to Run CHKDSK on Windows 10/11
There are different ways to run Check Disk in Windows 10 and 11. You can opt for the most convenient one in your case and give it a try:
How to run CHKDSK from File Explorer
Running Check Disk from Windows Explorer is the easiest method. This is the option for those who may not be comfortable using the command line.
- Launch File Explorer, open This PC, right-click the drive you would like to check, and click Properties.
- Go to the Tools tab and click on the Check button under Error checking.
- The Error Checking window will open. If you see the You don’t need to scan this drive message, it means no errors are detected. If you still want to check this drive, click Scan drive.
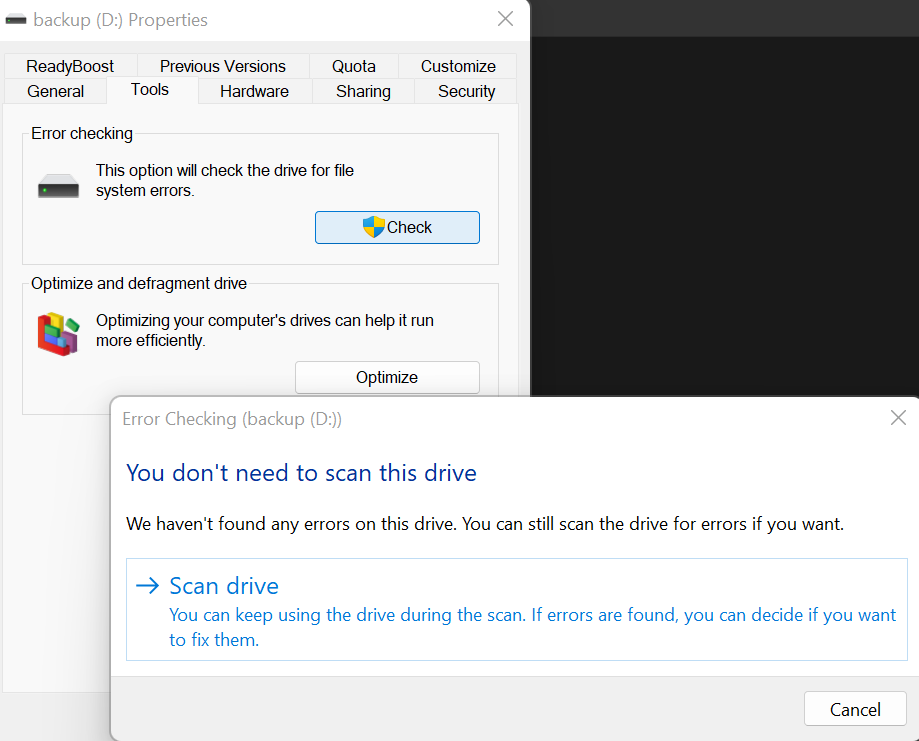
This method works on both Windows 10 and 11.
How to run CHKDSK from the Command Prompt
Running CHKDSK from Windows Explorer may be a little restrictive. This is where the Command Prompt comes in. When you run CHKDSK from the Command Prompt, you can configure the command to do more.
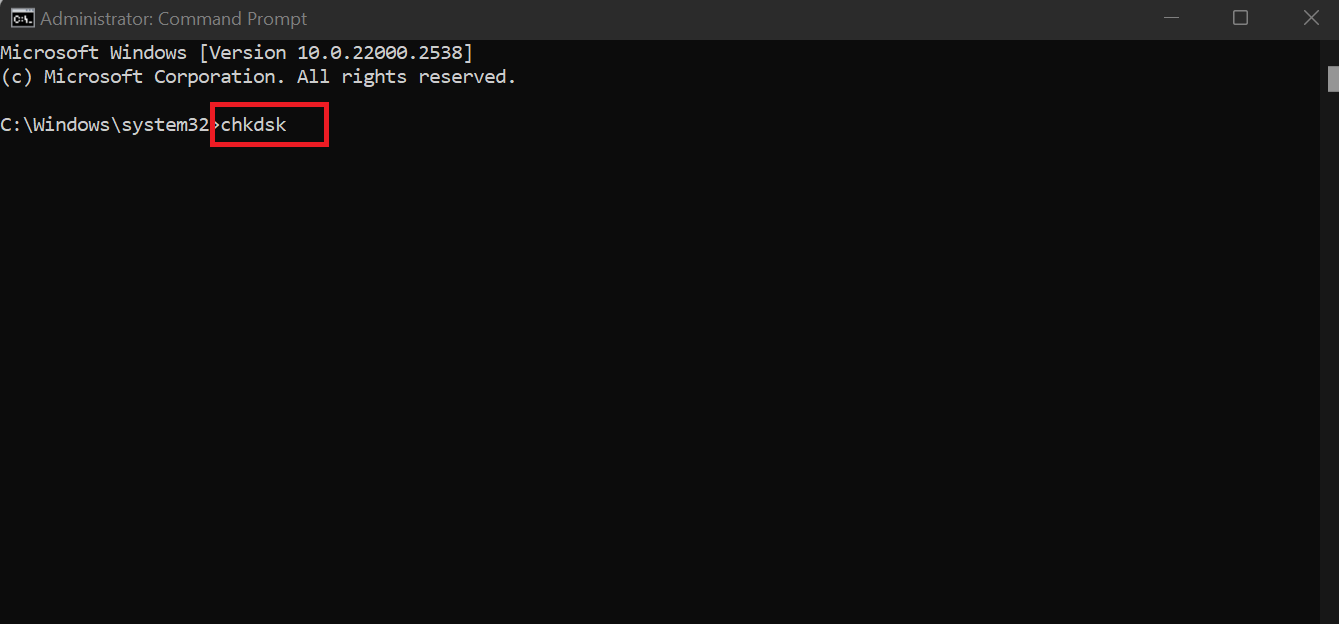
- Type “cmd” into your search bar and click Run as administrator under the Command Prompt option.

- Once the admin version of the Command Prompt is up and running, insert “chkdsk” and hit Enter. The CHKDSK utility will start scanning your C drive for problems.
- If you want CHKDSK to scan another drive, specify it at the end of the command. For example, if you want to check your D drive, enter “chkdsk D.”
On its own, the chkdsk command does not fix errors; it only scans your drive and shows you a report. Based on the report, you can proceed to take action:
- If it finds no errors, you don’t need to worry about anything.
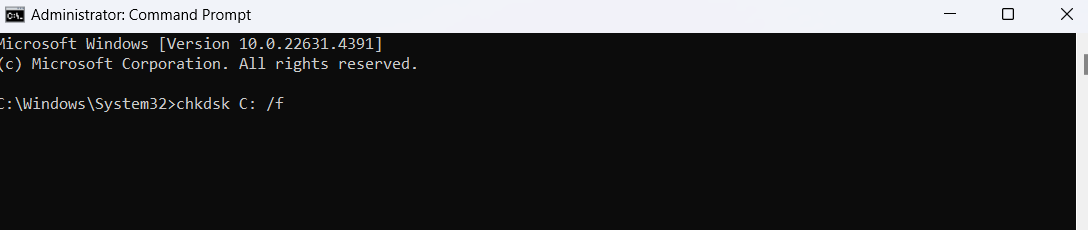
- However, if the scan comes back with errors, you need to start the process again, but this time use “chkdsk C: /f.” This command looks for errors and fixes them. Once the process is complete, you may need to restart your computer, especially if it is the main C drive.
How to run CHKDSK from installation media
If you are getting errors that won’t let you run CHKDSK on your computer, like “Access Denied” or “The volume is in use by another process,” this might be a better option.
- Create installation media , such as a Windows installation USB or DVD, and insert it into your PC.
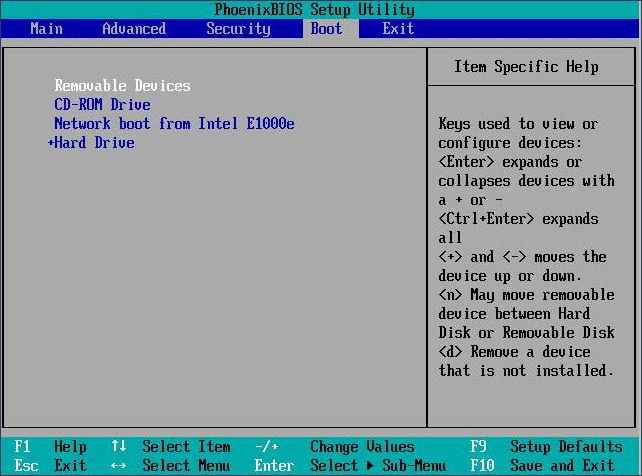
- Restart your Windows computer, then boot from the installation media. To prioritize the installation media over your hard drive, you might need to enter your BIOS settings and change the boot order.
- Configure your language, time, and keyboard input settings.
- Select Next and then click Repair your computer at the bottom left corner of your screen.