
В этой статье мы расскажем, что такое файл hosts и где он лежит.
hosts — это текстовый документ, в котором прописаны соответствия доменов IP-адресам. Когда вы вводите домен в адресной строке браузера, в первую очередь запрос IP-адреса отправляется к файлу hosts. Если в нем не прописана информация об искомом сайте, запрос перенаправляется к системе DNS.
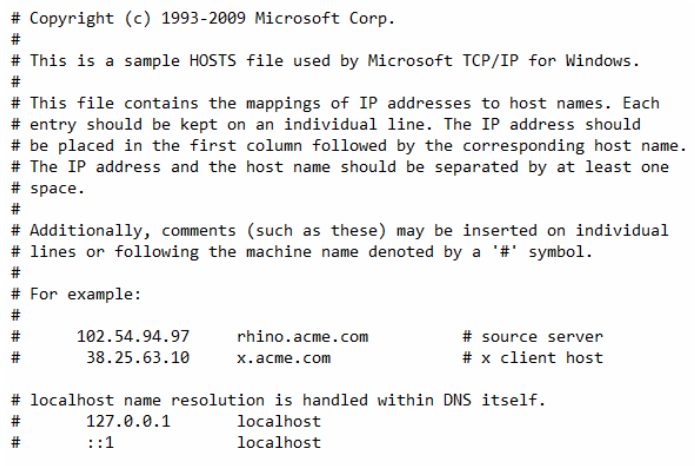
Как выглядит файл hosts в Windows:
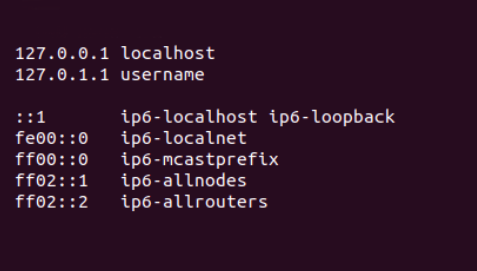
Как выглядит файл hosts в Linux:
Как появился файл hosts
В 1970-х годах появилась прародительница современного интернета: сеть под названием ARPAnet. Она состояла из нескольких сотен порталов с информацией. За маршрутизацию в этой сети отвечал файл hosts.txt: в нем хранились соответствия между именем ресурса и его IP-адресом.
В то время за hosts.txt отвечал Сетевой информационный центр Стэнфордского исследовательского института (сокращенно NIC SRI). Если в сети появился новый сайт, администраторы отправляли информацию об изменениях в NIC SRI. После этого они синхронизировали свой файл hosts с данными из NIC. Это происходило 1-2 раза в неделю.
Однако по мере распространения интернета эта схема работы стала невозможна: объем информации рос, и синхронизировать данные стало значительно сложнее.
В 1984 году появились документы, в которых была описана система DNS. Именно она пришла на замену hosts.txt.
Файл hosts по-прежнему существует, но его назначение изменилось. Он есть на каждом компьютере и отвечает за отображение сайтов на конкретном устройстве. На глобальную паутину hosts не влияет.
Как можно использовать файл hosts
Файл hosts можно использовать для проверки работы сайта: это полезно, если вы недавно зарегистрировали новый домен или изменили DNS-серверы для существующего. Обновление DNS происходит в течение 24 часов, однако hosts позволяет увидеть сайт раньше. Для этого в нем нужно прописать доменное имя и IP-адрес хоста.
Что такое хост? Это сервер или услуга, на которой размещен ваш сайт. Уточнить ее IP-адрес можно у поставщика услуг.
Где находится файл hosts
Расположение файла hosts зависит от семейства и версии ОС, которая установлена на вашем компьютере.
- Путь к файлу hosts на Windows 10: c:\windows\system32\drivers\etc\hosts
- Путь к файлу hosts на Windows 11: c:\windows\system32\drivers\etc\hosts
- Путь к файлу hosts на Windows 7: c:\windows\system32\drivers\etc\hosts
- Путь к файлу hosts на Linux: /etc/hosts
- Путь к файлу hosts на macOS: /private/etc/hosts
Не удается изменить файл hosts: как это исправить
Иногда попытка изменить hosts завершается ошибкой. С этим можно столкнуться, если вы редактируете файл в системе Windows.
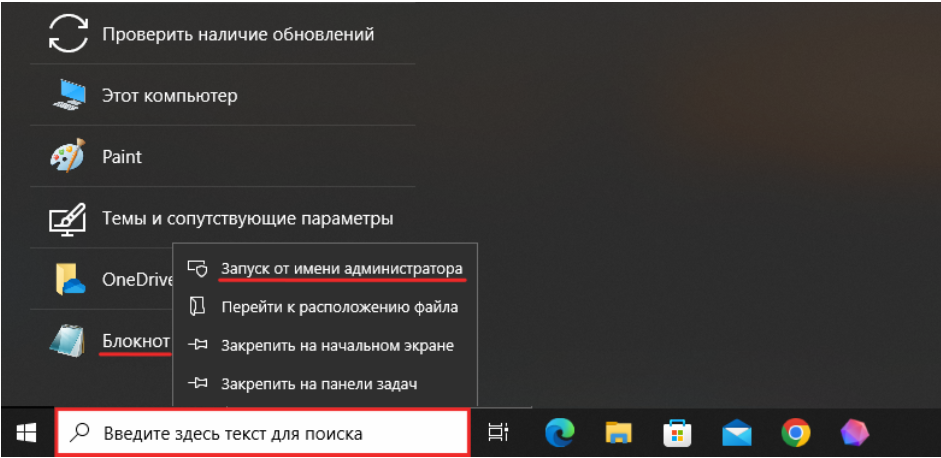
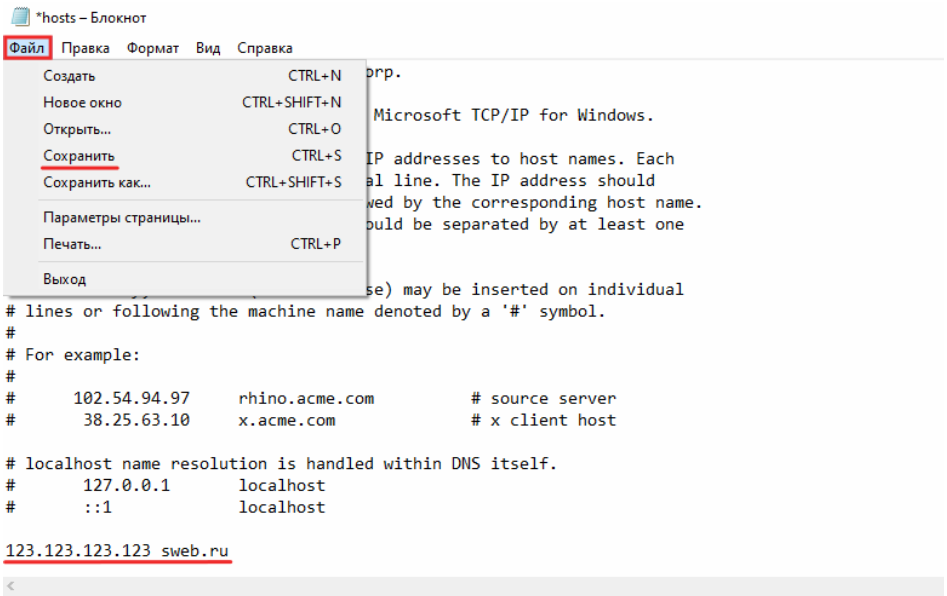
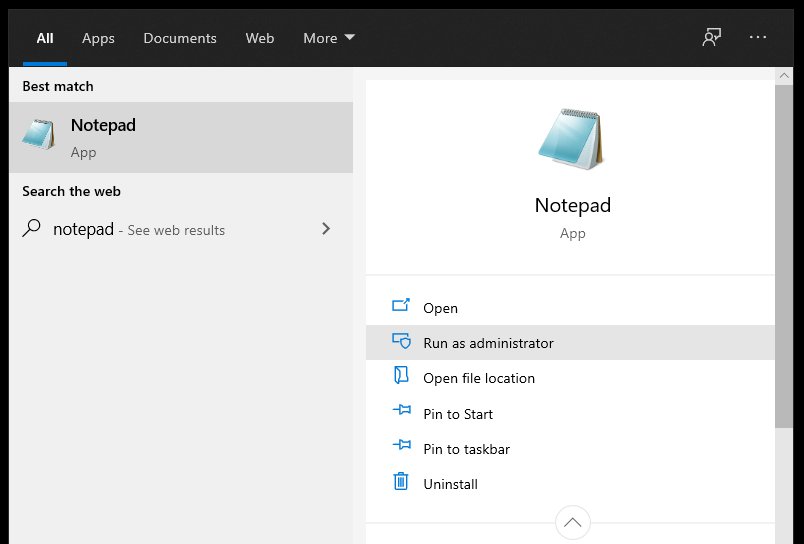
Чтобы решить эту проблему, откройте Блокнот от имени администратора. Для этого:
- Кликните по строке поиска. Нажмите на Блокнот правой кнопкой мыши и выберите Запуск от имени администратора:

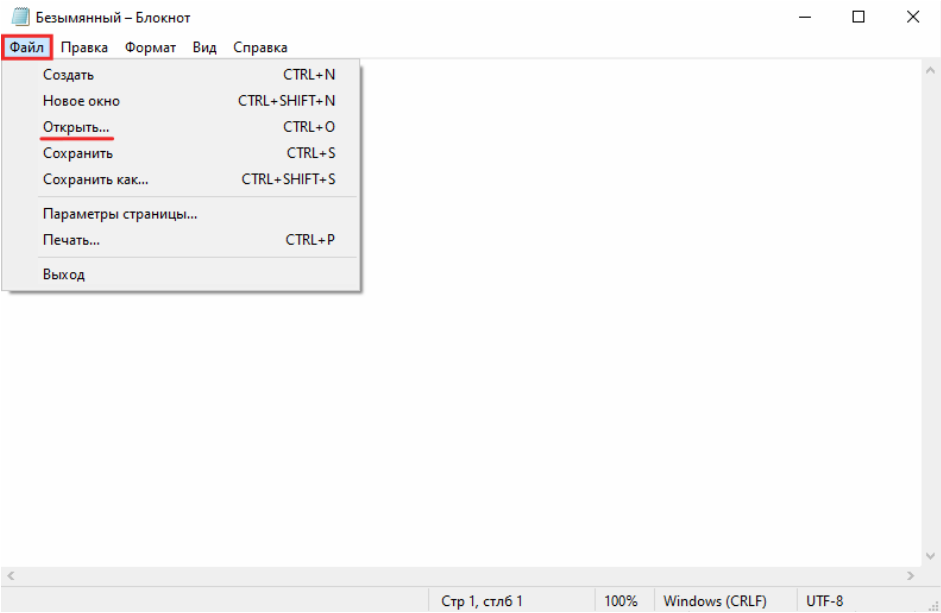
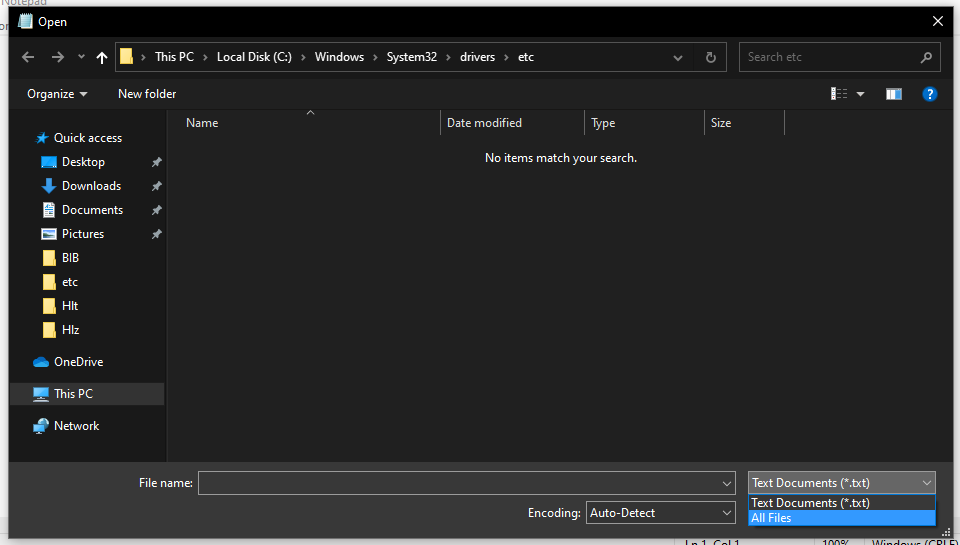
- Нажмите на меню Файл и выберите Открыть.
- Выберите файл hosts на вашем компьютере и нажмите Открыть.
- Добавьте данные о вашем сайте. В примере:
123.123.123.123 — IP-адрес вашего хостинга,
sweb.ru — доменное имя вашего сайта. - Затем нажмите Файл и выберите Сохранить
Что такое localhost
localhost — это домен, который позволяет обратиться к вашему компьютеру напрямую. Это имя привязано к IP-адресу 127.0.0.1.
Как правило, localhost используется для настройки сетевых инструментов: например, если вы настроили сервер на компьютере и хотите к нему обратиться по имени или IP.
Помимо этого, localhost можно использовать, чтобы закрыть доступ к какому-либо сайту. Предположим, вы хотите заблокировать vk.com на конкретном компьютере. Тогда в файл hosts необходимо добавить строку:
127.0.0.1 vk.com
Как восстановить оригинальный файл hosts
Если вы случайно удалили файл hosts, его можно восстановить вручную. Для этого перейдите в папку, в которой он должен храниться. Затем создайте текстовый файл без расширения, назовите его hosts. После этого файл необходимо наполнить. Содержимое по умолчанию зависит от ОС, которая установлена на вашем компьютере.
Стандартный hosts для Windows:
# Copyright (c) 1993-2006 Microsoft Corp.


#
# This is a sample HOSTS file used by Microsoft TCP/IP for Windows.
#
# This file contains the mappings of IP addresses to host names. Each
# entry should be kept on an individual line. The IP address should
# be placed in the first column followed by the corresponding host name.
# The IP address and the host name should be separated by at least one
# space.
#
# Additionally, comments (such as these) may be inserted on individual
# lines or following the machine name denoted by a '#' symbol.
#
# For example:
#
# 102.54.94.97 rhino.acme.com # source server
# 38.25.63.10 x.acme.com
# x client host
# localhost name resolution is handle within DNS itself.
# 127.0.0.1 localhost
# ::1 localhost
Стандартный hosts для Linux:
127.0.0.1 localhost
127.0.1.1 username
# The following lines are desirable for IPv6 capable hosts
::1 ip6-localhost ip6-loopback
fe00::0 ip6-localnet
ff00::0 ip6-mcastprefix
ff02::1 ip6-allnodes
ff02::2 ip6-allrouters
Вместо username укажите имя вашей учетной записи на компьютере.
Стандартный hosts для MacOS:
##
# Host Database
#
# localhost is used to configure the loopback interface
# when the system is booting. Do not change this entry.
##
127.0.0.1 localhost
255.255.255.255 broadcasthost
::1 localhost
После этого сохраните файл.
Несмотря на то, что файл hosts уже не влияет на работу сайтов в глобальной сети, он помогает решить некоторые важные задачи на вашем компьютере.
The Windows hosts file is a plain text file used by the operating system to map hostnames to IP addresses. It serves as a local DNS (Domain Name System) resolver, allowing users to override or specify network name resolutions for specific domains.
In this article, we will explore how to locate and edit the hosts file in Windows, along with practical use cases and important considerations.
Understanding the Windows Hosts File
The hosts file in Windows is a local database that connects IP addresses to domain names. It helps with network name resolution before DNS (Domain Name System) is used. Here are the key points to understand about this important system file:
- Function Before DNS: The hosts file acts as a manual resolver, allowing the operating system to match domain names with their corresponding IP addresses without relying on external servers for DNS lookups.
- IP Address Mapping: By associating IP addresses with domain names within the hosts file, Windows can directly translate human-readable URLs into machine-readable IP addresses for efficient communication over networks.
- Override DNS Lookups: One of the primary functions of the hosts file is to supersede DNS resolutions. Users can input specific mappings in the hosts file to direct domain queries to predefined IP addresses, bypassing standard DNS servers.
Understanding how the hosts file works as an initial resource for network name resolution helps us see why it’s important for controlling and customizing domain-to-IP address mappings on Windows systems.
Locating the Hosts File in Windows
The hosts file location Windows is fixed and consistent across modern versions like Windows 10 and Windows 11. You will find it at:
C:\Windows\System32\drivers\etc\hosts
This exact directory path is crucial because the hosts file resides within the system’s protected folders. Accessing this file requires administrative privileges, which you will need when editing.
Comparison with other operating systems reveals notable differences:
- Windows: Hosts file stored under
C:\Windows\System32\drivers\etc\. - macOS/Linux: Hosts file is located at
/etc/hostsand typically edited using terminal commands with root permissions.
Unlike macOS or Linux, where the hosts file sits in a straightforward location, Windows places it deep within system directories to enhance security. Understanding this location allows you to navigate directly without confusion during troubleshooting or editing tasks.
Accessing and Editing the Hosts File in Windows
Editing the hosts file in Windows requires administrative privileges to avoid permission errors. Follow these steps to safely open and modify the hosts file using Notepad or any other text editor.
1. Run Notepad as Administrator**
- Click on the Start menu, type Notepad.
- Right-click on the Notepad app icon and select Run as administrator.
- Confirm any User Account Control (UAC) prompts to grant elevated access.
2. Open the Hosts File
- In Notepad, go to File > Open.
- Navigate to the directory:
- C:\Windows\System32\drivers\etc\
- By default, this folder may appear empty because Notepad filters for
.txtfiles. Change the file type filter to All Files (.) to display the hosts file. - Select hosts and click Open.
3. Edit Carefully Without Corrupting System Files
- Make sure not to add extra file extensions or change existing permissions. The hosts file has no extension, so avoid saving it as
hosts.txt. - Add or modify entries as needed at the bottom of the file in proper format (explained in later sections).
4. Save Changes with Administrative Rights
Use File > Save within Notepad after editing. If you encounter any errors saving, confirm you launched Notepad with administrator access correctly.
This method ensures you can edit your windows localhost file securely without affecting system stability or triggering permission issues commonly seen when attempting to edit without elevated rights.
Correct Syntax and Format for Hosts File Entries
Understanding the hosts file syntax is essential for effective IP address domain mapping. Each entry in the hosts file follows a specific format:
IP_ADDRESS DOMAIN_NAME [www.DOMAIN_NAME]
- IP_ADDRESS: The numeric address you want the domain to resolve to.
- DOMAIN_NAME: The hostname or domain you want to map.
- Optional aliases such as
www.DOMAIN_NAMEcan be added after the main domain name, separated by spaces.
Examples of Typical Entries
Here are some common examples of how you can use the hosts file:
- Redirecting a website to a local server for development:
- 127.0.0.1 example.com www.example.com
- Previewing a live site before DNS propagation:
- 192.168.1.100 preview.mysite.com
- Blocking access to a site by redirecting it to localhost:
- 127.0.0.1 ads.example.com
Lines starting with # are treated as comments and ignored by the system.
- Use comments to explain changes or disable entries without deleting them.
Example:
Redirect old site URL during migration
192.168.1.50 oldsite.example.com #127.0.0.1 blockedsite.com # Disabled blocking temporarily
Comments improve clarity and make maintaining the file easier, especially when multiple entries exist or when revisiting after some time.
Adhering strictly to this format prevents errors and ensures Windows correctly interprets your mappings, allowing you to manipulate domain resolutions confidently.
Practical Uses of Editing the Hosts File in Windows
Using the hosts file to preview websites locally
By mapping domain names to specific IP addresses in the hosts file, you can view website changes before they go live by bypassing DNS lookups. This is especially useful for web developers testing new features or designs.
Blocking access to certain websites
Redirecting domains to localhost or invalid IPs effectively blocks access to specific websites. This method can be handy for restricting distractions or preventing access to harmful or time-wasting sites.
Redirecting domains for development and testing environments
The hosts file allows you to direct domains to different servers or environments, aiding in testing website functionality across various setups. It’s a quick and efficient way to manage multiple development environments without the need for external DNS configurations.
Important Considerations When Editing the Hosts File in Windows
When editing the hosts file in Windows, it is essential to save your changes with the appropriate permissions. Without administrative rights, your edits may not be saved correctly. Additionally, after making modifications to the hosts file, remember to clear both the DNS cache and your browser cache. This step ensures that the changes take effect immediately, allowing you to see the desired outcomes when accessing websites or testing redirects locally. By following these practices, you can effectively manage and utilize the hosts file for your specific needs.
Limitations and Modern Challenges with Hosts File Usage in Windows 10/11
The introduction of DNS over HTTPS (DoH) in modern browsers has significantly impacted the traditional role of the hosts file in Windows. DoH encrypts DNS queries and sends them over HTTPS, bypassing the operating system’s standard DNS resolution process—including the hosts file lookup.
DNS Over HTTPS Impact on Hosts File Blocking
- Browsers like Firefox, Chrome, and Edge offer DoH by default or as an optional feature.
- When enabled, DNS queries are sent directly to DoH servers without consulting Windows DNS settings.
- This behavior effectively bypasses any IP-to-domain mappings specified in your hosts file.
- Typical use cases such as blocking unwanted websites or redirecting domains using the hosts file may fail if DoH is active.
Limitations Imposed by Modern Browser Behavior
Using the hosts file for security purposes like content filtering or malware blocking faces new challenges:
- Hosts file entries become unreliable for enforcing domain blocks if browsers ignore system DNS.
- Enterprises relying on hosts-based filtering need alternative network-level solutions like firewalls or proxy servers.
- Local development environments using hosts for previewing sites may also experience inconsistent behavior depending on browser configurations.
Key Points to Keep in Mind
- Disabling DoH within browsers can restore hosts file effectiveness but reduces privacy benefits.
- Windows itself still respects the hosts file outside of DoH-enabled applications.
- The evolving landscape requires balancing between privacy-focused DNS methods and traditional network controls.
Understanding these limitations helps you set realistic expectations when relying on the Windows hosts file under modern network conditions.
Troubleshooting Common Issues with Hosts File Editing in Windows 10/11
Editing the hosts file in Windows 10/11 can sometimes lead to errors or issues. Here are some common problems you might encounter and how to fix them.
Common Errors Encountered When Editing Due to Lack of Admin Rights
One of the most common reasons for issues when editing the hosts file is not having the necessary admin rights. If you try to save changes without running the text editor as an administrator, you may receive an error message stating that you cannot save the hosts file.
To resolve this issue, follow these steps:
- Close the text editor if it’s currently open.
- Right-click on the text editor icon (e.g., Notepad) and select “Run as administrator”.
- Open the hosts file again using the text editor.
- Make your desired changes and try saving again.
By running the text editor with administrative privileges, you should be able to save changes to the hosts file without any errors.
How to Resolve ‘Access Denied’ or ‘File Locked’ Problems
If you encounter an “access denied” or “file locked” error message when trying to edit the hosts file, it could be due to another program or process using the file. This can happen if there are security software or other applications that have exclusive access to the hosts file.
To resolve this issue, try the following steps:
- Close any programs or applications that may be using the hosts file.
- Disable any security software temporarily (if applicable).
- Restart your computer to release any locks on the hosts file.
- Attempt editing the hosts file again following the previous troubleshooting steps.
By ensuring that no other processes are accessing the hosts file, you should be able to edit and save changes successfully.
If you continue experiencing issues despite following these troubleshooting steps, it may be helpful to seek further assistance from online forums or support communities dedicated to Windows troubleshooting.
Conclusion
Mastering the art of managing Windows localhost file offers you control over network name resolution that few tools provide. The benefits of customizing host files include faster website previews, enhanced local development workflows, and targeted domain blocking. Apply effective host editing tips such as always running your text editor with administrative privileges and carefully maintaining proper syntax to avoid issues. Use the Windows localhost file responsibly to maintain system stability and security. Your ability to manipulate this file empowers troubleshooting and customization, making it an essential skill in any Windows environment toolkit.
Post Views: 39

While the internet is only about 30 years old, in many ways the hosts file is a relic of its (not so ancient) past.
In most cases you probably won’t need to update your hosts file on Windows. But knowing where it is and how it works can be helpful if:
- you’re having trouble with local development
- you suspect malware has tampered with the hosts file
- you want a quick and simple way to block some websites
- or if you want to set up some helpful shortcuts to internal IP addresses
In this article we’ll cover what a hosts file is, how to edit it on Windows, and we’ll go over some neat tricks you can do with it.
What’s a hosts file anyway?
Back in the early days of the internet, before it was widespread, computers used a hosts file to map long, hard to remember IP addresses with much shorter, easier to remember hostnames.
For example, here’s a line you’ll find in many hosts files on Windows, Linux, and macOs:
127.0.0.1 localhost
That way, instead of having to remember a long IP address, all you had to do was visit localhost.
Why hosts files fell out of favor
The hosts files system worked well for the early internet, but there were a few major problems.
As the internet grew, so did the length and complexity of the hosts files. Also, each hosts file only worked for the computer it was on, and keeping them in sync with the changes in hostnames and IP addresses became a huge pain.
For example, imagine that you have two computers, A and B. Their hosts files contain this mapping for google.com:
172.217.26.46 google.com
But when Google updates their IP addresses, only computer A updates its hosts file to match:
172.217.175.78 google.com
So everyone on computer B is stuck without Google until someone updates the hosts file. When that person does update the hosts file, they add another entry to handle Google with the www subdomain.
172.217.175.78       google.com
172.217.175.78       www.google.com
Now everyone on computer B is taken to the correct website whether they visit google.com or www.google.com.
And everyone on computer A can only visit google.com, not www.google.com, at least until its own hosts file is updated to match.
As you can imagine, hosts files would get complicated, fast.
The solution
If you’re thinking that someone should have just made a central repository to map all IP addresses with all hostnames, that’s exactly what happened.
Early on, a central hosts file was manually maintained and shared by the Stanford Research Institute. This system lead to the invention of domains and top level domains like .com and .edu, Whois, and it became increasingly automated.
In the end, the humble hosts file and innovators like Elizabeth J. Feinler lead to the invention of the Domain Name System still in use today.
To edit a hosts file on Windows 10, you’ll need to open it as an administrator.
First, open Notepad as an administrator by pressing the Windows key, typing in «notepad», and clicking «Run as administrator»:
Note: You may need to click the arrow button to expand the dropdown to see the «Run as administrator» option
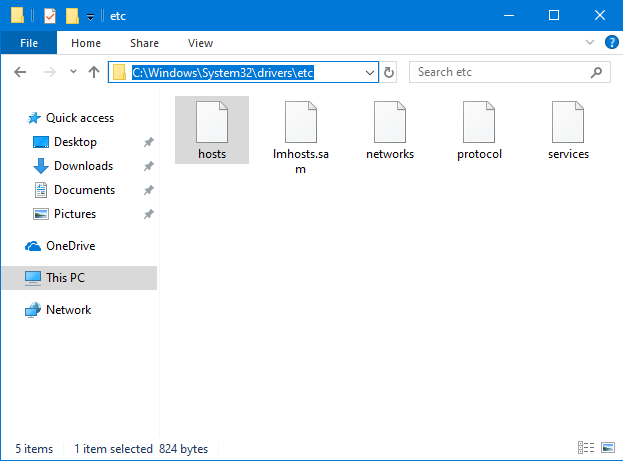
To open the hosts file in Notepad, click «File», «Open», and navigate to C:\Windows\System32\drivers\etc.
You won’t be able to see any files in this directory because they aren’t text documents. To change the file type, click on the dropdown in the bottom right of the Open menu and click on «All Files»:
You’ll see a file named hosts. Double click on that file to open it.
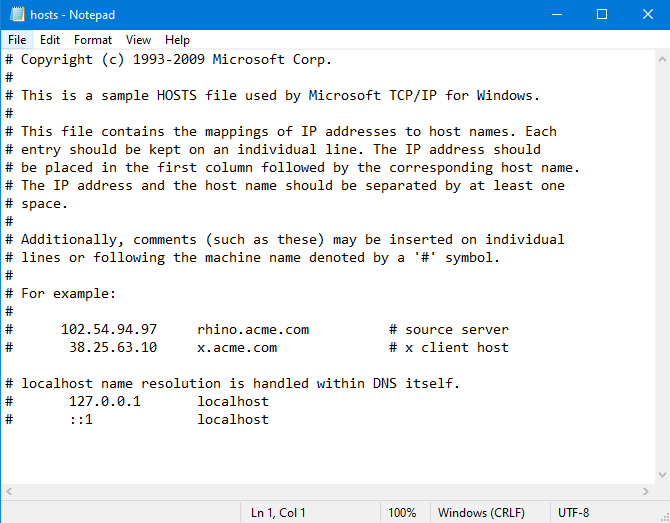
Then, you’ll see a hosts file similar to this:
# Copyright (c) 1993-2009 Microsoft Corp.
#
# This is a sample HOSTS file used by Microsoft TCP/IP for Windows.
#
# This file contains the mappings of IP addresses to host names. Each
# entry should be kept on an individual line. The IP address should
# be placed in the first column followed by the corresponding host name.
# The IP address and the host name should be separated by at least one
# space.
#
# Additionally, comments (such as these) may be inserted on individual
# lines or following the machine name denoted by a '#' symbol.
#
# For example:
#
#      102.54.94.97     rhino.acme.com          # source server
#       38.25.63.10     x.acme.com              # x client host

# localhost name resolution is handled within DNS itself.
#    127.0.0.1       localhost
#    ::1             localhost
Note that everything is commented out with # characters, meaning that nothing is actually being read from the hosts file. Modern versions of Windows include a sort of DNS system already, so if you visit localhost it’ll automatically redirect you to 127.0.0.1.
With that out of the way, here are some things you can do with the hosts file.
How to update the hosts file on Windows 10 if you have trouble with localhost
If you’re doing some local development and are having problems with localhost, you can just remove the comments from your hosts file:
...
# localhost name resolution is handled within DNS itself.
127.0.0.1       localhost
::1             localhost
After saving the hosts file, close Notepad.
Then, open PowerShell by pressing the Windows key, searching for «powershell», and clicking «Run as Administrator»:
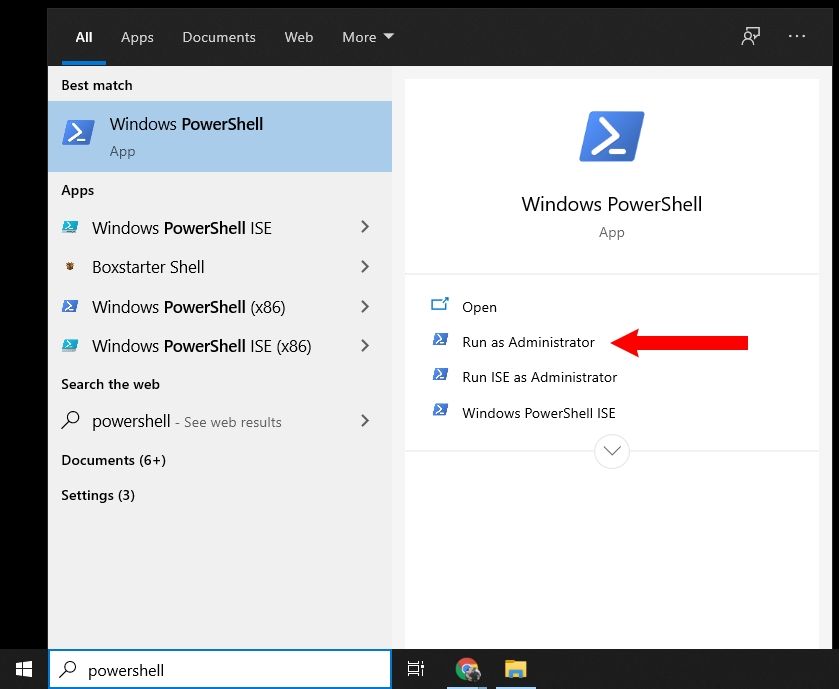
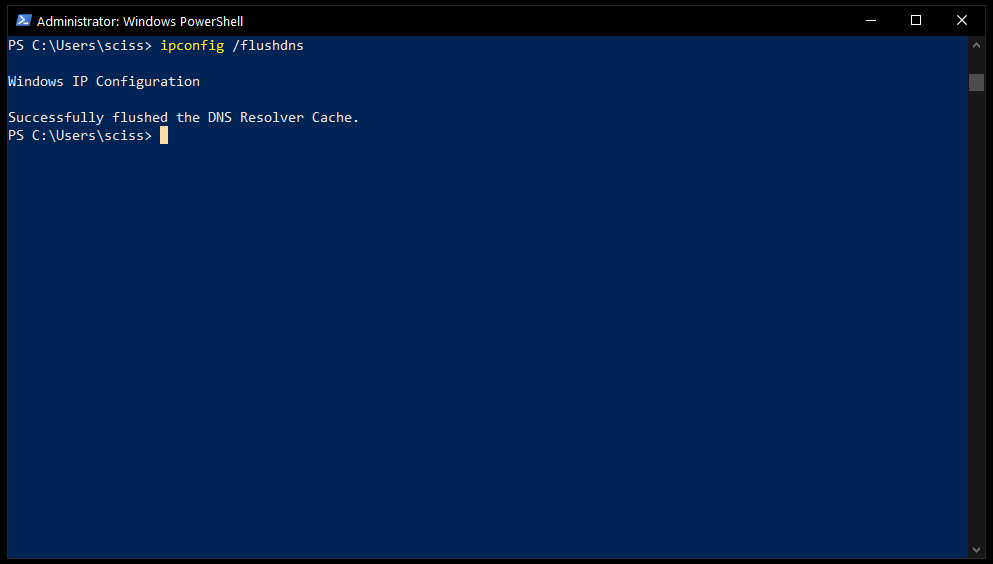
In the PowerShell window, enter ipconfig /flushdns to flush the inbuilt Windows DNS:
After that, you should be able to visit localhost in your browser and see whatever you’re hacking on. If you’re still having issues, try closing your browser completely, then open a new browser window and try again.
How to update your hosts file on Windows 10 if you think it’s been tampered with
Even though hosts files have fallen out of favor with newer systems like DNS, they still work for legacy reasons. And hackers have definitely taken advantage of this in the past.
What they would do is point a common website like google.com towards an unsafe IP address. This IP address could serve a site that looks just like Google’s, but is actually trying to steal your sensitive information.
While this was a problem in the past, most security software like the Windows Security Suite can recognize and fix problems with the hosts file automatically.
That said, if you open up your hosts file and see a lot of strange entries, then you may want to revert to the default Windows hosts file.
Just copy and paste the default hosts file from earlier in the article into your hosts file and save. Then, open PowerShell and use the ipconfig /flushdns command to flush the Windows DNS.
Note that some third-party security software uses the hosts file to block dangerous websites. If that’s the case, no worries – your security software should add all those entries back to your hosts file. We’ll go over how this works in the next section.
How to use the hosts file on Windows 10 to block websites
Don’t want friends or family to visit certain websites on your computer? Or are you like me and get distracted by all the cat photos on the internet?
If so, then you can use the hosts file to block websites entirely.
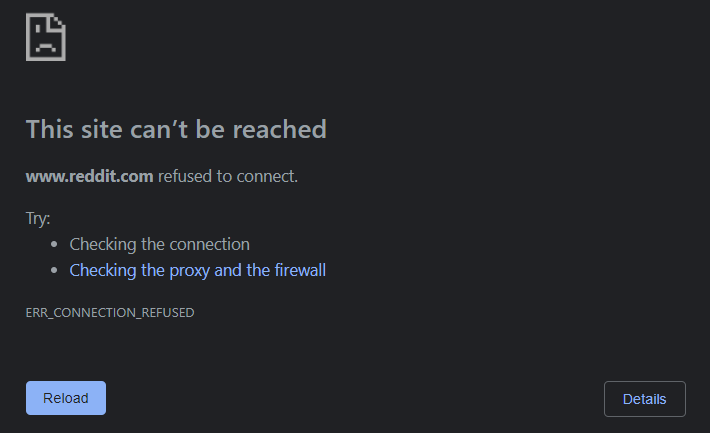
For example, if you want to block Reddit, just add this to the bottom of your hosts file:
127.0.0.1     reddit.com
127.0.0.1     www.reddit.com
Then, open PowerShell and run ipconfig /flushdns to flush the Windows 10 DNS. Also, close the browser windows that are open and reopen them.
After that, every time you try to visit Reddit, or click on a Reddit URL like https://www.reddit.com/r/FreeCodeCamp/, your browser will be redirected to 127.0.0.1, or localhost.
Since there’s no website there, your browser will show an error message:
The one downside is that this only works on one device – you could just reach for your phone and browse Reddit on that instead. Still, it’s a neat way to create some friction on your work computer.
This leads nicely into the last trick, which is to use the hosts file to make your life a little bit easier.
How to use the hosts file on Windows 10 to set up helpful shortcuts
If you spend a lot of time adjusting your router’s settings, or you have a cool project running on a Raspberry Pi, you’ll know that typing in a long IP address is a drag.
Instead, you can use the hosts file to make connecting to other devices on your local network much faster.
For example, if your router is at 192.168. 0.1, you can add the following to your hosts file:
192.168.0.1 my.router
Then, flush your Windows 10 DNS with ipconfig /flushdns and restart your browser.
And then any time you visit my.router, you should be redirected to 192.168.0.1.
Just note that you may need to visit http://my.router, at least the first time. Otherwise your browser might not recognize .router as a valid top-level domain (TLD), and will try to search for the term my.router instead.
To get around this, you could use a hostname like this instead:
192.168.0.1 router.my
This should work right away because .my is the TLD for people and companies in Malaysia.
Fortunately there are a whole lot of valid TLDs nowadays. Here’s a list of some of the most common TLDs out there: https://en.wikipedia.org/wiki/List_of_Internet_top-level_domains
Again, the one downside to this method is that it only works on once device. You’d have to update the hosts files on your other devices to enable the same shortcuts.
And that should be just about everything you need to know about the hosts file on Windows 10. And a lot of this knowledge should carry over to Linux and macOS.
So get out there and customize your hosts file like the pioneers of the internet once did.
Did you find this helpful? Are there any other hosts file tricks you know? Let me know over on Twitter.
Stay safe and happy hosts file editing!
Learn to code for free. freeCodeCamp’s open source curriculum has helped more than 40,000 people get jobs as developers. Get started
Have you ever wondered about the role of the Windows Hosts file on your computer? It’s a simple text file that can override IP addresses, helping you block domains or access development websites. Imagine the possibilities – from improved privacy to efficient web development. Get familiar with your Hosts file and experience its benefits.
Another way to think of the hosts file is as an address translator and redirector. If you went to New York City and asked to go to the New York Times Company, someone would translate your request into 229 West 43rd Street. A similar process happens on the web. Your web browser first checks your hosts file to see if it has any IP addresses for nytimes.com. If your hosts file has an entry, it is used. Otherwise, a domain name server is queried to get the IP address.
The Benefit of Hosts File
One benefit of using the hosts file is precedence. Most operating systems access this file first because it’s loaded into the computer’s memory at startup. There are some exceptions, such as people who use proxy servers.
When various Internet advertisements became invasive, some people used the hosts file to bypass the ad servers. People would add an entry to their hosts file that redirected an ad server away from the intended destination. Today, people use ad blockers.
And while the file has benefits, it can also be abused. Malware or hackers could use the same logic to redirect a domain to one of their choosing. For example, they might redirect your bank’s web to a fake domain that looks like your bank’s site. Perhaps the only difference is that the URL looks slightly different under scrutiny.
Hosts File Example
A more common use these days is for local web development. For example, I have a local instance of this website on my PC for testing. To display the website in my browser, I would add a line to my hosts file like the one below.
127.0.0.1 www.timeatlas.local
When I type the test domain name, www.timeatlas.local, into my web browser, the system first looks in the hosts file and finds the entry 127.0.0.1. This IP address is a universal address assigned to your PC’s local host. So, rather than going out to the web, the request would stop at my PC. In this case, timeatlas.local doesn’t exist on the internet.
Hosts File Location
The good news is you control the hosts file provided you have admin access to your PC. You can add, edit, or delete entries using a text editor. However, there may be security issues that deny you access. Microsoft support has provided a knowledge base article on modifying the hosts or lmhosts file.
It’s probably worth 5 minutes to review the file if you ever need to edit the hosts file. The hardest part is probably finding the file, and it is not just limited to the Windows operating system. Each operating system (OS) locates the file a bit differently.
- Microsoft Windows:
C:\Windows\System32\drivers\etc\hosts - Mac OS X:
/private/etc/hosts - Linux:
/etc/hosts
How to Use Hosts File to Block Domains
You might want to modify your hosts file for other reasons besides local development. For example, if you don’t want people to access sites and don’t have a router or software that blocks domains.
For example, if I wanted to block access to Amazon, I could add this line to my Hosts file.
127.0.0.1 www.amazon.com #Block Amazon

In this instance, I’m telling the computer to assign the IP address 127.0.0.1 for Amazon. The # sign represents a comment line.
If someone uses that computer and types www.amazon.com in the address bar, they would get an error message. The text varies based on which browser you use.

Plenty of articles and resources exist if you want to find more host files. Some people have compiled lists that you can download. Others have programs that make editing the file easier. I find many of these lists are cumbersome to maintain, and don’t use them. And if you do decide to change your hosts file, please remember to make a backup first.
Troubleshooting Windows Host File
Sometimes after making changes to the file, you get unexpected results. For example, I got the site instead of getting blocked when I typed the Amazon URL. Here are some common reasons.
- You are using a proxy, and it may be taking precedence. You can find this out by going to your Network & Internet settings.
- You need to clear your DNS cache. Go to your Windows Command and type ipconfig / flushdns
- You have a # symbol at the beginning of the line.
- The file won’t save because you don’t have Admin permissions. Try running your editor app as an Administrator.
- You made a typo when adding the line such as omitting the space between the IP address and domain.
- You saved the file in a different format. It needs to be a text file with no file extension.
The Hosts file, a.k.a etc/hosts has been around since 1984. Every operating system has one, including Windows. You may have encountered the term etc/hosts without knowing what it means, and why it is used. If you are a web developer, you surely know what this file is, and you want to find it quickly. In this guide, we explain what the Hosts file is, where it is located in Windows, what a host entry is, and how to edit the Hosts file without stumbling into permission errors. Let’s get started:
What is the Hosts file in Windows?
The Hosts file (also referred to as etc/hosts) is a text file used by Windows (and other operating systems) to map IP addresses to host names or domain names. This file acts as a local DNS service, for your local computer, and it overrides the mappings from the DNS server that your computer is connected to, through the network.
Where is the Hosts file located in Windows?
The Hosts files (or etc/hosts) is found in the following folder: «C:\Windows\System32\drivers\etc»
It is a file with no file extension, that can be opened and viewed in any text editor, including Notepad.
What is host entry in Windows?
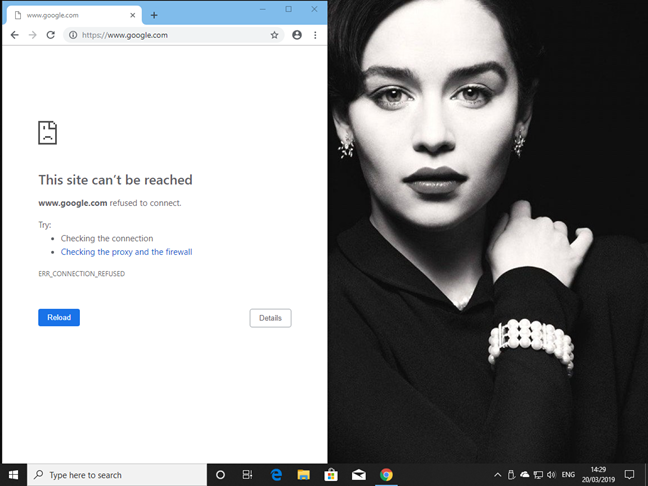
The Hosts file stores host entries. They are standardized lines of text that use the following format: IPaddress Hostname Comment. The first part is the IP address to redirect to, the second part is the domain that you want to redirect, and the third is a comment. The comment is not mandatory only the first two parts are. You can separate the three components of a host entry with spaces or TABs (press the TAB key once or twice). For example, you can add a line that says: «127.0.0.1 www.google.com»
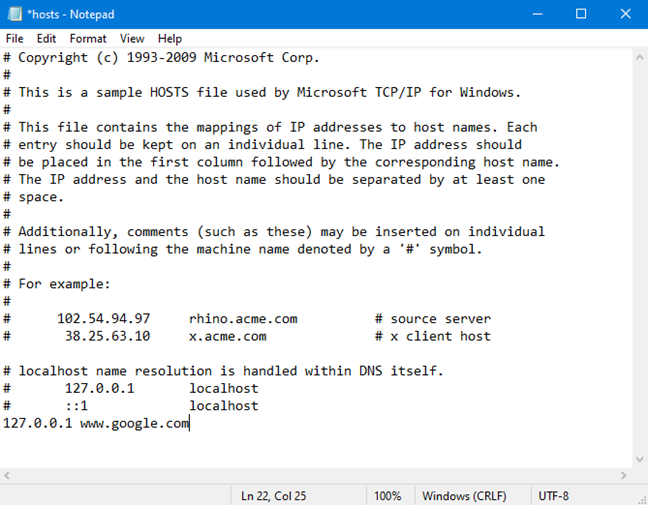
Once you save the entry above, Windows redirects the domain www.google.com to your local computer, in all your apps and web browsers.
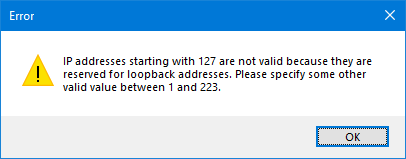
What is 127.0.0.1?
127.0.0.1 is a special purpose IP address that leads to the localhost, which is your computer. It is also called «loopback address,» meaning an address that leads back to the computer using the address. Unlike standard IP addresses, the loopback address is not associated with any hardware, and it is not physically connected to a network. This address is used by apps and services that are installed on your computer, to communicate with the localhost, meaning your computer.

Your computer also has a unique IP address, different from 127.0.0.1, associated with your network card, that is used to communicate with other devices and services over the network or the internet.
Most often, the localhost IP address is used when installing a web server on your computer, for web development, so that the web pages that are created can be run locally, and tested in a web browser, as if they were live on the internet.
To avoid conflicts in computer networks, the IP addresses used for network devices can be anything except 127.0.0.1. For example, if you manually try to modify the IP address of your network card, in Windows, you receive an error stating that: «IP addresses starting with 127 are not valid because they are reserved for loopback address. Please specify some other valid value between 1 and 223.»
How to open and view the Hosts (etc/hosts) file in Windows
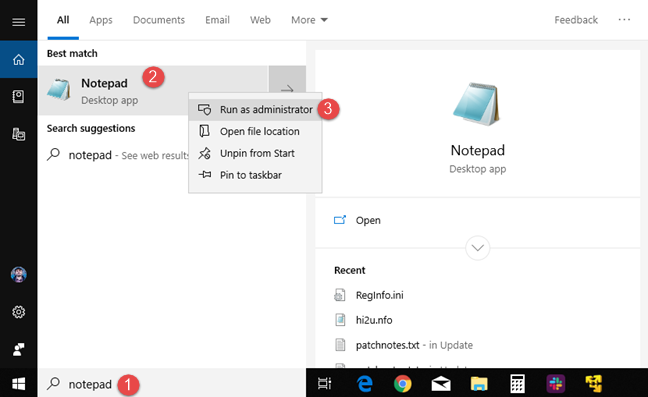
You can edit the Hosts file using any text editor. Let’s use Notepad, for example. First, and most important, is that you open Notepad (or your favorite text editor) with administrator permissions. One way to do that is to search for the word «notepad» in Windows 10, right-click (or tap and hold) the Notepad search result, and then click or tap «Run as administrator.» In the UAC prompt that is shown, press Yes.
Now you need to open the Hosts file. Click or tap File and then Open, or press CTRL+O on your keyboard.
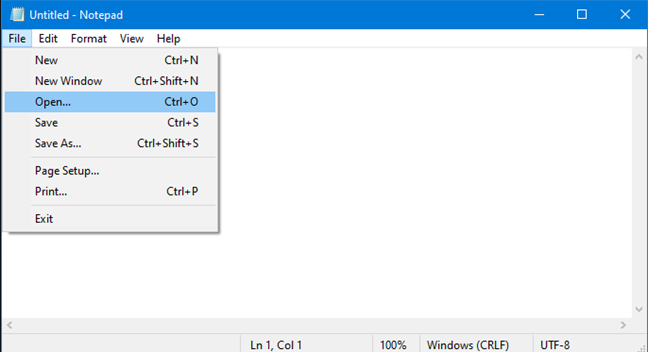
Browse to «C:\Windows\System32\drivers\etc» or copy and paste the path in the address field of the Open window, and press Enter.
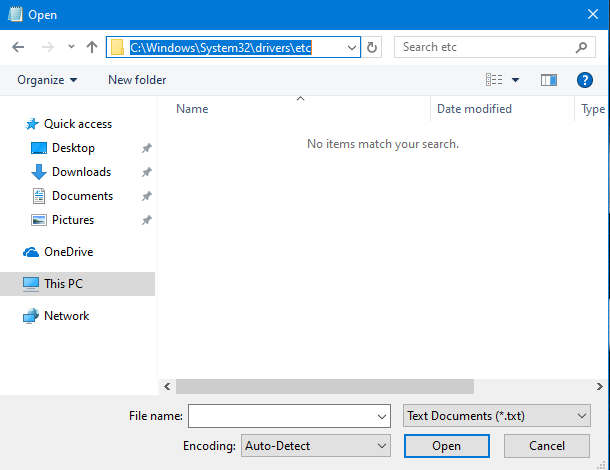
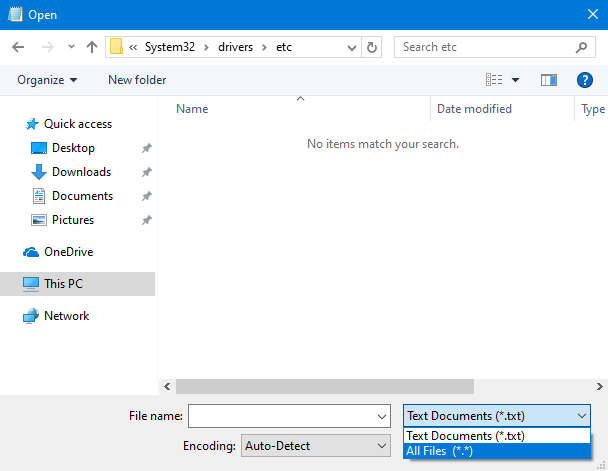
At first, «no items match your search» meaning that you do not see any files. That’s because the Hosts file does not have a file extension, and Notepad is looking only for files with the «.txt» extension. Click or tap the drop-down list to the right of the File name field, and choose «All Files (*.*).»
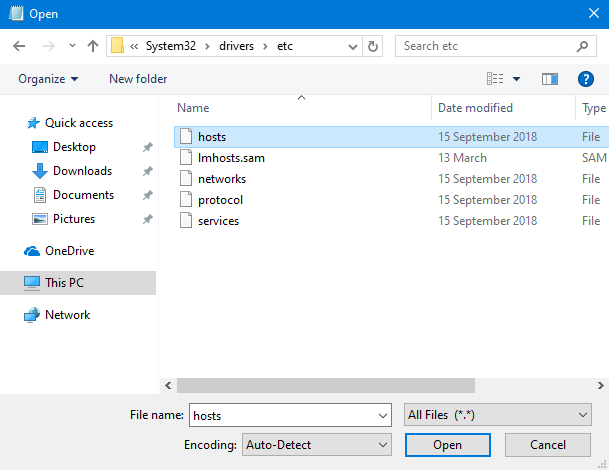
Now you see all the files in the folder, including hosts. Select the file and press Open.
How to edit the Hosts (etc/hosts) file in Windows
After you have opened the Hosts file, you can edit it, and add, change or remove entries, as you do in any other text file.
Remember that all the entries that you add must use this format: IP address Hostname. Add a line like «127.0.0.1 www.google.com» or «192.168.1.1 www.webapp.com»

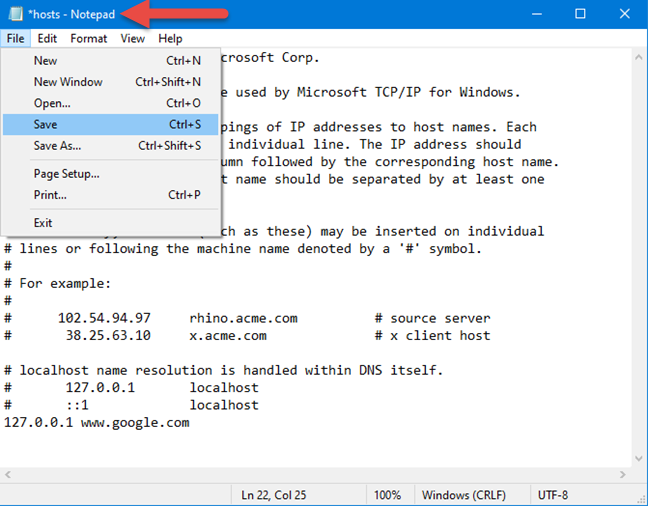
When you are done editing the Hosts file, you need to save your changes. If changes are made and not saved, notice that the tile of the Notepad window starts with a * sign. To save your changes, go to File and then Save or press CTRL+S on your keyboard.
After you have saved your changes, they are applied immediately and override the mappings from the DNS server that your computer is connected to.
Why do people use the Hosts file?
Most casual computer users are not going to use the Hosts file unless they want to pull a prank on someone and use it to block their access to Google, Facebook or some other site, and make them think that it is down, and no longer working. The people using the Hosts file most frequently are web developers who create websites and web apps, which must be tested locally, before publishing them on the internet.
IT professionals also use the Hosts file to block access to specific sites and web resources, on the computers they are managing at work. For example, they can use it to block advertising in their business network, from specific ad networks.
Malware can also use the Hosts file to redirect your web traffic to remotely controlled servers and steal personal information or other data.
I can’t edit the Hosts file in Windows! What do I do?
When editing and saving the Hosts file in Windows, you may receive an error message that states: «You don’t have permissions to save to this location.» This happens because you did not open Notepad or the text editor that you are using, with administrator permissions. Read the sections above and see how to start Notepad with administrator permissions.
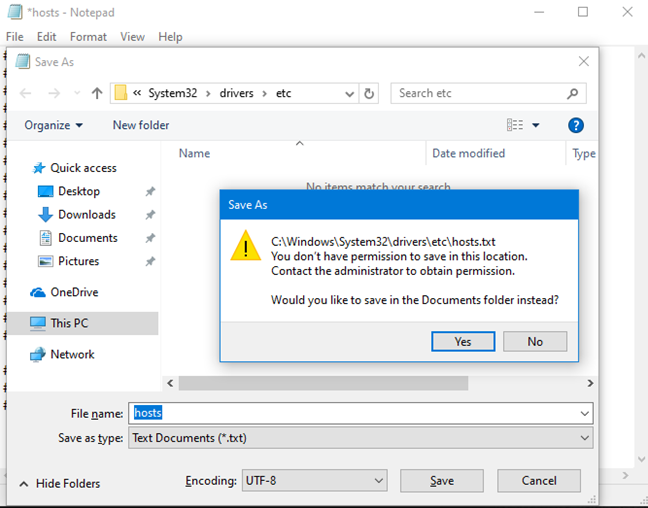
After you do that, you can edit the Hosts file without any errors and permission problems.
How do you use the Hosts file in Windows?
Thank you for reading this tutorial. We hope that we have managed to answer all your questions about the Hosts file. Before closing, tell us in a comment, how you plan to use the Hosts file in Windows? Is it for work or just prank on a friend or family member? Comment below and let’s share our experiences working with the Hosts file.