
Для работы проектов iXBT.com нужны файлы cookie и сервисы аналитики.
Продолжая посещать сайты проектов вы соглашаетесь с нашей
Политикой в отношении файлов cookie
Если вы увлекались киберспортом или оптимизацией Windows, то наверняка слышали о влияние высокоточного системного таймера HPET на общую производительность ПК. Но знаете ли вы, что, начиная с Windows 10 22H2 и Windows 11, компания Microsoft изменила классическую логику работы системного таймера, и прошлые команды, которые ранее позволяли существенно повысить производительность, более не работают. В этом небольшом материале вы узнаете, как исправить эту проблему и вернуть привычное поведение системного таймера HPET/TSC в новых версиях Windows, существенно ускорив работу своего компьютера.

Чтобы не нагружать вас лишней технической информацией, достаточно будет сказать, что ранее отключение или изменение значений системного таймера HPET глобально влияло на все процессы в Windows, существенно повышая отклик и плавность работы приложений и игр. Теперь же частота прерывания системного таймера HPET/TSC не функционирует на глобальном уровне ОС и не зависит от других процессов. Короче говоря, таймер теперь работает лишь для запущенных на переднем фоне приложений и не может опускаться ниже принудительно заданных значений, что существенно ломает многие старые игры и не позволяет пользователю добиться былой производительности. Подробнее почитать про всё это вы можете, перейдя по ссылке.
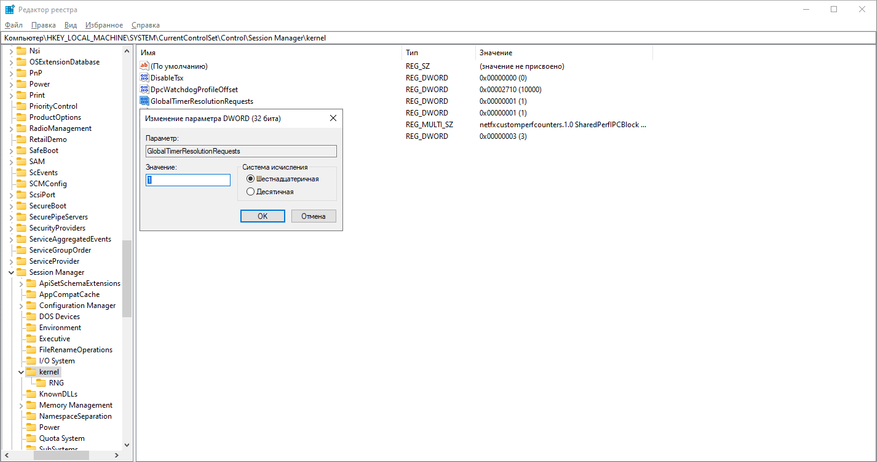
1. Нажимаем Win+R и вводим команду regedit. В появившемся окне переходим в раздел kernel и создаём новый параметр Dword32 с именем GlobalTimerResolutionRequests и значением 1 в шестнадцатеричной системе счисления. Или воспользуйтесь заранее уже готовым файлом с нужными настройками.
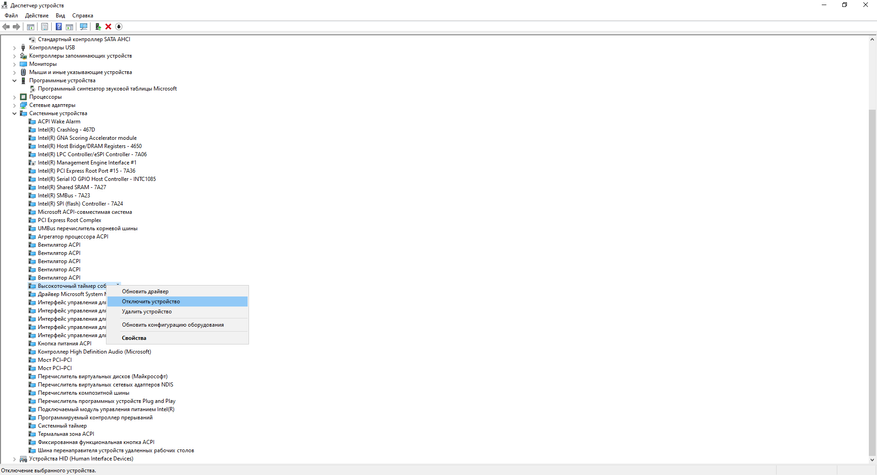
2. Нажимаем правым кликом мыши на «Пуск» и выбираем «Диспетчер устройств». Для отключения HPET и активации таймера TSC мы должны в разделе «Системные устройства» отключить «Высокоточный таймер событий» иногда он подписан как High Precision Even Timer. Правый клик мыши>>»Отключить устройство».
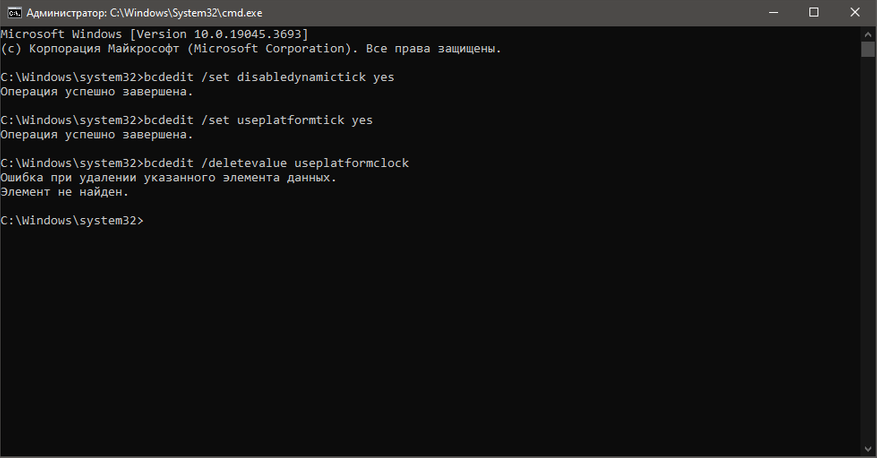
3. Теперь нам осталось только ввести команды для отключения встроенного программного таймера Windows и технологии экономии электроэнергии для ноутбуков. Вновь нажимаем Win+R и вводим команду CMD.
В появившемся окне вводим команды:
bcdedit /set disabledynamictick yes
bcdedit /set useplatformtick yes
bcdedit /set useplatformclock false
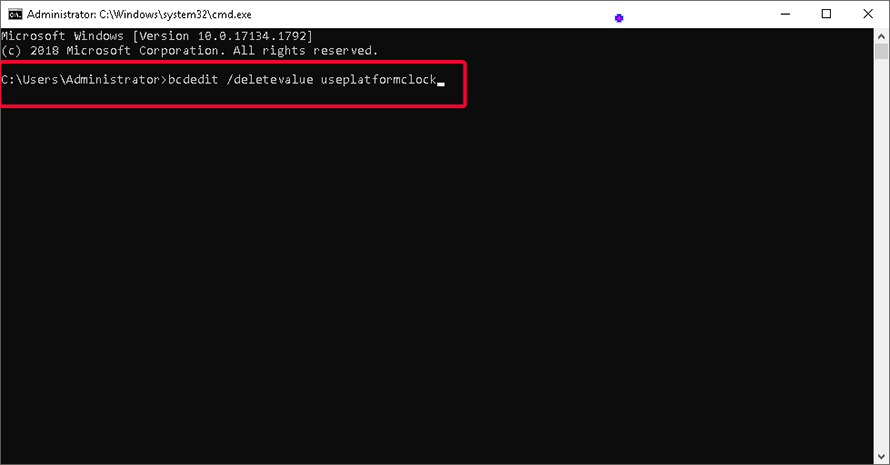
bcdedit /deletevalue useplatformclock
После перезагрузки ПК вы сразу почувствуете разницу в отклике Windows и плавности работы мыши. Однако, чтобы ещё сильнее ускорить работу компьютера, необходимо принудительно зафиксировать значения системного таймера TSC на минимальных значениях.
4. Выполним установку системной службы Windows, отвечающей за минимальное значение системного таймера.
- Скачиваем и извлекаем папку архива в корень любого диска.
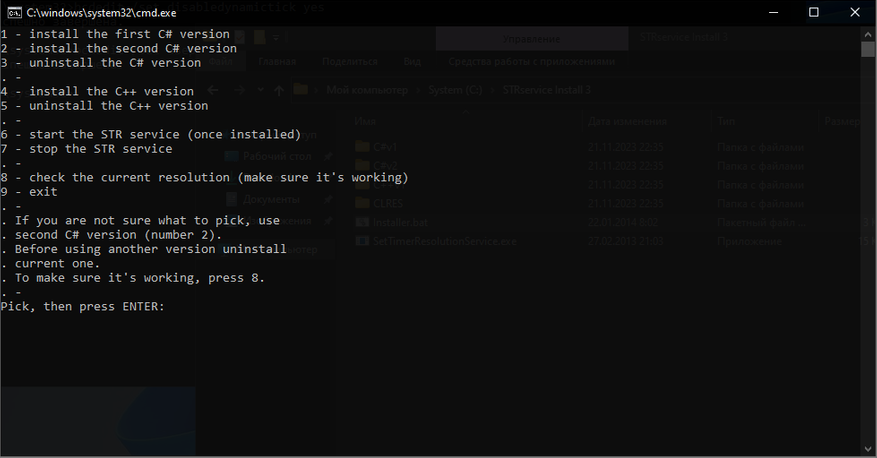
- Переходим в папку установщика и запускаем не от имени администратора файл Installer.bat.
- В появившемся окне выбираем желаемый таймер. Я советую 2 или 4.
- Дожидаемся окончания установки. (После установки не удалять папку установщика).
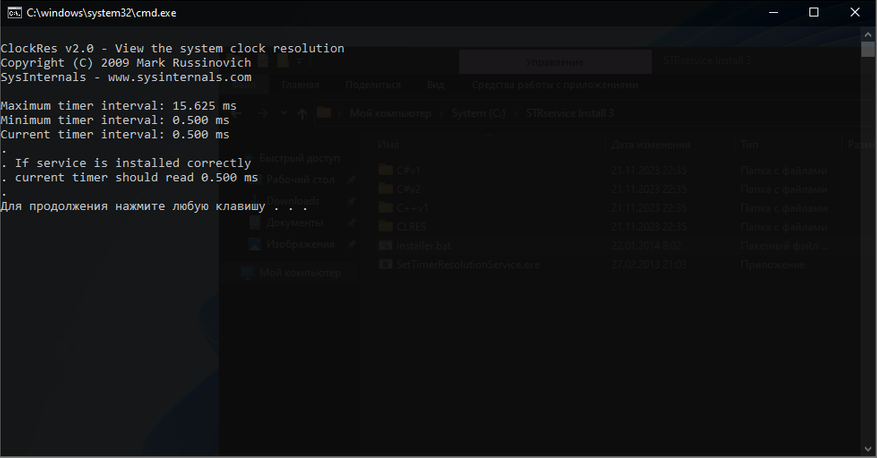
- Проверяем значение таймера, нажав 8.
- Если всё прошло успешно, то значение системного таймера будет равняться 0.5 мс.
Если вы заметили отрицательный эффект от отключения системного таймера HPET, то удалите в реестре Windows запись GlobalTimerResolutionRequest и вновь включите «Высокоточный таймер событий» в «Диспетчере устройств». Не забыв удалить системную службу таймера и ввести в cmd следующие команды:
bcdedit /deletevalue disabledynamictick
bcdedit /deletevalue useplatformtick
Вот, собственно, и всё! Всего за пару не хитрых шагов мы исправили оплошность корпорации Microsoft, вернув себе классическое поведение системного таймера Windows, существенно ускорив работу приложений и игр. Не говоря уже о самой ОС. Уважайте свободу, используйте только проверенное ПО и ни в коем случае не позволяйте компаниям диктовать вам свои условия. С вами был Павел. Ещё увидимся!
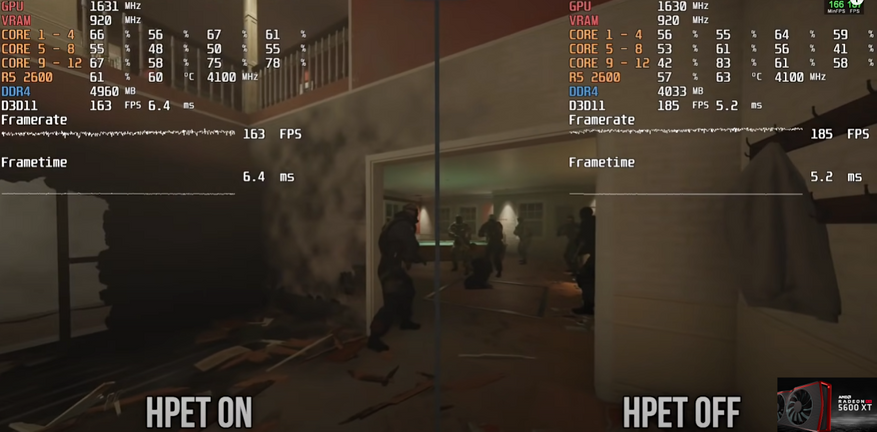
Я провёл дополнительное тестирование в новых играх, используя Windows 10 версии 22H2 (1945.3636). И могу с уверенностью утверждать, что принудительное отключение высокоточного системного таймера HPET позволяет добиться лучшей производительности не только в старых, но и в новых играх. Например, дважды прогоняя встроенный бенчмарк Cyberpunk 2077, отчётливо видна разница в минимальном и среднем FPS. Не говоря уже про отсутствие эффекта «Желе». Миф подтверждён: HPET следует принудительно отключать для максимальной плавности в играх и рабочем ПО!
Сейчас на главной
Новости
Публикации

Науке уже довольно давно известны виды грибков, которые могут овладевать муравьями и использовать их в своих целях. Однако совсем недавно, при съемках научно-документального сериала «Winterwatch»,…

Представьте себе гигантское, ветвистое древо жизни, где каждая веточка, каждый листик — это отдельный вид, а корни уходят в глубокое прошлое, к общим предкам. Понимание того, как именно…

В
русских деревнях крестьянская изба
была не просто жильём
— деревянные
срубы, сложенные из брёвен, хранили
тепло семейного очага и тайны древних
традиций. Мастерство строительства…

Черные дыры. Одно только это словосочетание будоражит воображение, рисуя картины космических монстров, пожирающих всё на своем пути. И, честно говоря, классическое представление о них, уходящее…

Мы живём в эпоху удивительных технологий. Смартфоны, ставшие продолжением нашей руки, электромобили, меняющие облик городов, медицинские томографы, заглядывающие внутрь человеческого…

Огурцы — любимая культура многих огородников, радующая сочными плодами всё лето. Однако их выращивание требует внимания к деталям, и один из частых вопросов: стоит ли срезать усы?…
Why Disable HPET?
While HPET is an extremely precise timer (14.32MHz) which in theory would mean that it would perform the best, in practice when tuning your system for gaming it seems that HPET is too precise bogging down your machine.
Gaming seems to benefit from comparatively less precise but more stable and consistent timers and ticks (TSC 3.32MHz) that have a beneficial impact on your percentiles and low FPS. In short, the level of precision HPET offers is not needed when gaming and will result in worse performance overall.
How to Disable HPET?
To get rid of HPET you need to open CMD with administrator privileges and type – bcdedit /deletevalue useplatformclock and then restart your machine. This will disable HPET on your machine, and to test that the changes took effect you can either use the bcdedit/enum command (no value for useplatformclock) or use TimerBench (pictured above) which gives you a more beginner-friendly interface.
As explained in this clarification post you do not need to disable HPET in the BIOS or Device Manager because those changes either do nothing or cause issues by enabling outdated system timers.
Once off, your system will use a TSC clock and you will need to then select between running RTC or TSC ticks, TSC sync policy, etc.
Most custom Windows 10/11 builds already have HPET off so if you get an error message after putting in the command it simply means that HPET was already disabled.
Choosing Between TSC & RTC Ticks
Your system clock has already been put in place (TSC) which means the next important component is to figure out the system tick. You can find more information about the system ticks in the clarification post but the short answer is that you will need to test both ticks (TSC+RTC vs TSC+TSC) to see which one runs better on your system.
RTC is an outdated tick that is not dynamic and has no optimizations which might decrease your system performance and conflict with high polling rate mice. RTC is recommended for unoptimized systems or people who just want the process to be as short as possible without further testing.
Most tuned systems should run TSC+TSC since it is a higher precision timer resolution compared to RTC which was intended for legacy applications (still lower precision than HPET clock).
How to Disable Dynamic Tick
Dynamic tick is a power-saving feature enabled on laptops that helps them preserve battery life. If you are aiming for the best possible performance and inputs such a feature being enabled is counterproductive.
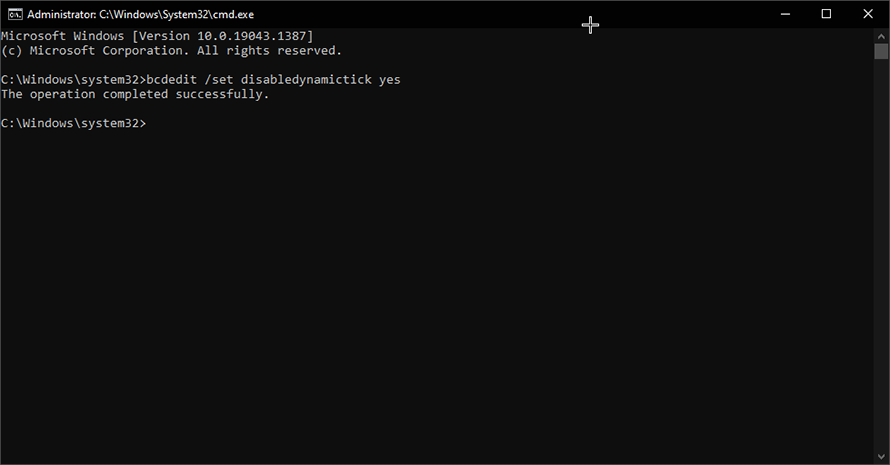
To disable dynamic tick open CMD with administrator privileges and use the command – bcdedit /set disabledynamictick yes. Restart your machine afterward and you should be set (check with bcdedit /enum).
Adjusting Your Windows Timer Resolution
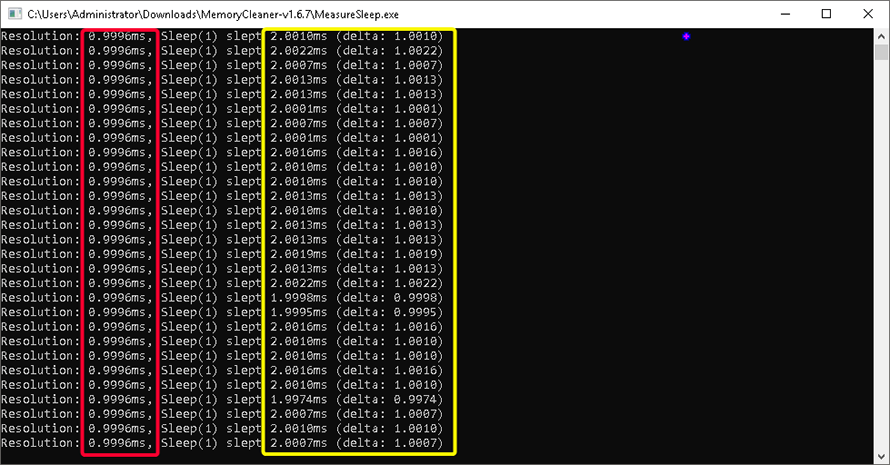
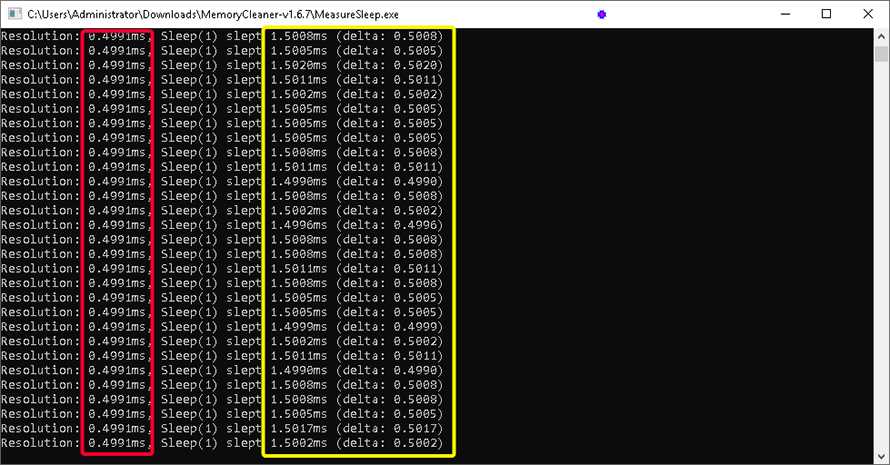
To take full advantage of the bcdedits you have done you need to manually adjust your system’s timer resolution. To do so you can use a simple utility like Memory Cleaner set to your desired timer resolution.
The reason you would do this is because Windows by default runs 15ms on idle and 1ms when you need higher precision for timer resolution values. You can achieve higher precision by using a manual micro-adjusted timer resolution as explained here and test the values using the MeasureSleep utility.
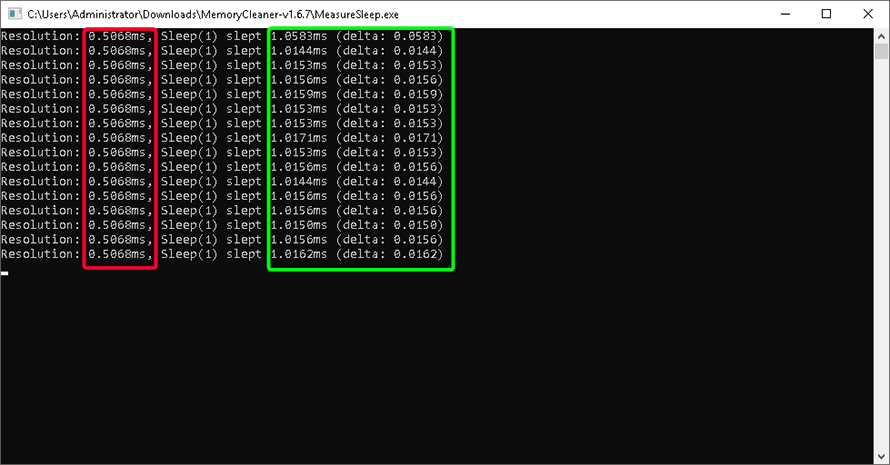
Values used: 5070 – 10000 – 5000
Your Windows timer resolution will behave differently depending on what tick you have chosen to use (RTC/TSC) therefore the values you will settle on will be different. If your system is set up correctly you should be able to achieve 1ms sleep delays with low deltas.
The High Precision Event Timer (HPET) is a hardware timer that has been developed by Intel and Microsoft. HPET has been used in PC chipsets for nearly a decade at the time of writing.
Different timers may be used depending on which operating system you have installed on your PC, and tweaking the timers may improve the overall performance of your PC as a result. This is mostly useful for gaming related activities and other real-time activities that benefit from additional resources.
The first thing that you need to find out is if HPET is supported by a computer system. You need to go into the BIOS or UEFI setup during boot to find out.
Since there are that many different versions out there it is hard to say where you will find the setting on your system. I found the setting under Advanced Mode > Advanced > PCH Configuration > High Precision Timer but you may find it in a different location. The PC should display information on how to enter the BIOS on start; common keys to press to enter the BIOS include ESC, F1, or DEL.
Enabling or disabling the timer in BIOS is only one part of the change that you have to make though. Windows may use different timers as said earlier even if the HPET timer is enabled in the BIOS.
You need to run the following commands on the command line in Windows to enable or disable the exclusive use of the HPET timer.
Note: We recommend that you create a backup of the operating system before you make these changes.
- Tap on the Windows-key, enter cmd, right-click cmd.exe in the results listing and select to run the command prompt with administrative privileges.
- To enable HPET as the only timer run the command bcdedit /set useplatformclock true
- To disable HPET in Windows run the command bcdedit /deletevalue useplatformclock
There are a couple of tests that you can run to see if the performance is better when the timer is enabled or disabled on your system. While you can check that by playing games or other applications as well, it is usually a good idea to run the following two programs as they provide hard data.
WinTimerTest is a lightweight portable program that displays timer related information to you. You should get a value of around 14.3 MHz if HPET is enabled, and less than that, usually 3.9 MHz if it is disabled. You can download it with a click on the following link: (Download Removed)
DPC Latency Checker is the second program that tests how the computer handles real-time data streams.
I suggest you run both programs before you make any change to your system, and then again after you have made changes. Not everyone is noticing improvements after enabling HPET in both the BIOS / UEFI and the Windows operating system. Some notice slow downs and others that micro-stutters go away after disabling the timer on their system. So, it is definitely a good idea to test all possible settings to see if one makes a difference for you if you noticed issues in first hand or improve the performance of the system.
Note that updating drivers and Windows itself may improve the use of the timers as well.
Summary
Article Name
Try changing HPET settings to improve your PC’s performance
Description
Find out how to detect timer settings on a Windows PC, to change them to improve performance, and to measure the performance using benchmarks.
Author
Martin Brinkmann
Publisher
Ghacks Technology News
Logo
Advertisement
background
During the actual work, such as the hardware interaction, media video playback, performance analysis, and multithreaded tasks, you may need to implement the MS level accuracy in the Windows platform. However, this requirement exists, but because the Windows system is not a real-time operating system, this accuracy timer is not an easy task.
Windows is not a real-time operating system, so any solutions cannot absolutely guarantee the accuracy of the timer, just minimize errors. Therefore, the stability of the system cannot be completely dependent on the timer, and the processing when you lose synchronization must be considered.
Waiting strategy
To achieve a high-precision timer, you must wait for both basic functions, waiting to skip for a certain time interval, and timing can be checked to adjust the wait event.
Waiting Policy is actually two:
1. Self-waving: Let the CPU vaccine time, take up a lot of CPU time, but the time is highly controllable.
2. Blocking waiting: Threads enter the blocking state, let the CPU time slide, after waiting for a certain period of time, then the operating system scheduling back to the operating state. When blocking, the CPU is not occupied, but the operating system scheduling is required, and the time is difficult to control.
It can be seen that the two have the advantages and disadvantages, and should be implemented in different needs.
So difficult to wait for the strategy, and then analyze the simple spin wait.
Spin wait
The pseudo code is as follows:
Waiting start time = current timing
while(((Current timing - waiting start time) <Time to wait
{
         Spin;
}
Obstruction
Blocking Waiting will handle the control to the operating system so that the operating system must timely turn back the timer thread to run back. By default, Windows system timer accuracy is 15.625ms, that is, the time slice is this size. If the thread is blocked, the time sheet is allowed to wait, and the time to schedule is running at least one slice 15.625 ms. Then you must reduce the length of the time slice to achieve higher precision.
General implementation of blocking waiting is the Sleep function of the Thread library, the measured Sleep function is not high, and it is estimated that the MS level is possible, that is, the error of + 1 ms.
Sleep will make the remaining CPU time slice give priority threads, and Yield is a thread that allows the remaining CPU time slice to run on the same core. After the time of the time consumption is completed, it will be re-scheduled. Under normal circumstances, the entire process can be completed within 1 ms.
In addition, Sleep or Yield is very unstable in CPU high load. It may block the time that is as high as a few MS, so it may generate more errors, so the error correction is best implemented.
Timer implementation
It should be noted that no matter whether it is selection or blocking, it is obvious that the timer should run in a separate thread and cannot interfere with the usage thread. For high-precision timers, trigger events to perform tasks are generally within timer threads, rather than using separate task threads.
This is because the time overhead of any task is mostly greater than the time interval of the timer, if the default is performed in other threads, it may result in a large number of threads. Therefore, the control should be given to the user, so that the user will dispatch the thread executed by the task when needed.
Trigger mode
Since the task is performed at the timer thread, the trigger of the timer produces three modes. The following is a pseudo code of three modes:
- Fixed time frame
, such as 10ms, task 7-12ms, will follow waiting for 10ms, task 7ms, wait 3MS, task 12ms (timeout 2ms lost synchronization), task 7ms, wait 1MS (back to sync) , Task 7ms, waiting for 3ms, … That is to do tasks according to the set time frame, as long as the task is not always time time, you can return to the original time frame.
var  Next frame time =0
while(Timer start)
{
         Next frame time + = interval time
    while(Current time <next frame time)
    {
         Waiting;
    }
         Trigger the task;
}
2. Delayed time frame
The above example will follow waiting for 10ms, task 7ms, wait 3MS, task 12ms (timeout, postpone time frame 2ms), task 7ms, waiting for 3ms, …. The timeout task will postpone the time frame.
var  Next frame time = 0;
while(Timer is open)
{
         Next frame time + = interval;
    if  (Next frame time <current timing)
                 Next frame time = Current timing
    while  (Current timing <next frame time)
    {
                 Waiting;
    }
         Trigger the task;
}
3. Fixed Waiting Framework
The above example will follow the wait 10ms, task 7ms, wait 10ms, task 12ms, wait 10ms, task 7ms … Waiting time is always constant.
while(Timer is open)
{
    var  Waiting start time = current timing;
    while  (((Current timing - waiting start time) <interval time)
    {
                 Waiting;
    }
         Trigger the task;
}
//
var  Next frame time = 0;
while(Timer is open)
{
         Next frame time + = interval;
    while  (Current timing <next frame time)
    {
                 Waiting;
    }
         Trigger the task;
         Next frame time = current timing;
}
Waiting in the While cycle can use spin or blocked, or combined with them to achieve the balance of accuracy, stability, and CPU overhead.
In addition, it can be seen from the pseudo code above that the implementation of these three modes can be uniform, and can be switched depending on the situation.
achieve
In order to achieve high-precision timer, we do not use blocking mode (Sleep function and yield function), but use QueryPerformanceFrequency () and queryperformancecounter () functions. These two functions are Visual C ++ and are for Windows 95 and their subsequent versions, which are related to the CPU clock frequency, which requires a computer to support precise timers from hardware. . The prototype of the queryperformancefrequency () function and queryperformancecounter () function is as follows:
BOOL QueryPerformanceFrequency(LARGE_INTEGER *lpFrequency);
BOOL QueryPerformanceCounter(LARGE_INTEGER *lpCount);
The data type of the parameters of the above two functions can be a 8-byte length of the total number of intensive numbers, or two four-byte long integer combination structures, and the specific usage is based on whether the compiler supports 64 bits. Fixed. This type is defined as follows:
typedef union _LARGE_INTEGER
{
    struct
    {
        DWORD LowPart; // 4 byte integer
        LONG HighPart; // 4 byte integer
    };
    LONG QuadPart; // 8 byte integer
}LARGE_INTEGER;
The steps to use the queryperformancefrequency () and queryperformancecounter () functions are as follows:
- First call the queryperformancefrequency () function to get the frequency f of the high-precision run counter, the unit is a few times per second (n / s), this number is generally
- QueryPerFormanceCounter () at the end of the code required to acquire the value N1, N2, the difference between the high-precision run counter, and the difference between the two values via f converted to time interval, t = (N2-N1) / f, when T When it is greater than or equal to the timing length, the timer is started;
gives an example of a simple computing time:
LARGE_INTEGER m_liPerfFreq={0};
 / / Get how much CPU Performance Tick per second
 QueryPerformanceFrequency(&m_liPerfFreq);
 LARGE_INTEGER m_liPerfStart={0};
 QueryPerformanceCounter(&m_liPerfStart);
 for(int i=0; i< 100; i++)
  cout << i << endl;
 LARGE_INTEGER liPerfNow={0};
 // Calculate the CPU to run to the current time
 QueryPerformanceCounter(&liPerfNow);
 int time=( ((liPerfNow.QuadPart - m_liPerfStart.QuadPart) * 1000)/m_liPerfFreq.QuadPart);
 char buffer[100];
 sprintf(buffer,"Perform time% D MilliseCond",time);
 cout<<buffer<<endl;
The following then achieves the accuracy of 1 ms:
  LARGE_INTEGER litmp;
       LONGLONG QPart1,QPart2;
       double dfMinus, dfFreq, dfTim;
       QueryPerformanceFrequency(&litmp);
       dfFreq = (double)litmp.QuadPart;/ / Get the clock frequency of the counter
       QueryPerformanceCounter(&litmp);
       QPart1 = litmp.QuadPart;// Get the initial value
       do
       {
          QueryPerformanceCounter(&litmp);
          QPart2 = litmp.QuadPart;// Get the median value
          dfMinus = (double)(QPart2-QPart1);
          dfTim = dfMinus / dfFreq;/ / Get the corresponding time value, unit is second
       }while(dfTim<0.001);
According to the above timer, the first timing and task framework, high-precision timer, the accuracy can reach the US level. Basically, most of the tasks are highly required to real time.
In this post I want to give more understanding of timers, there is a post made in 2021 which explains a bit about it but there is more the subject matter which I want to cover here.
There are a combination of timer settings you have to consider as some may conflict.
Old post: viewtopic.php?f=10&t=8535
Win32 Priority Separation (WPS)
In short WPS manages your processes with three varying attributes, I will explain how it works then show how you can change this.
1. Interval length (long or short)
2. Processor time (varied or fixed)
3. Priority ratio (foreground and background)
If you wish to read more see the PDF source at the bottom of the post.
Further on we will be talking about Hex numbers and binary, since not everyone can’t remember Hex to binary conversions I will post this useful link: https://www.aqua-calc.com/convert/numbe … -to-binary
A WPS setting is made of 6 binary numbers which have two numbers for each attribute.
Interval being the first two, Processor time the second two and Priority the last two. (AABBCC)
Binary numbers that are less than 6 will equal 0, so 1100 = 110000.
Interval length uses 01 for long intervals and 10, 11 and 00 for short intervals.
Processor time uses 10 for fixed intervals and 01, 11 and 00 for variable intervals.
Priority uses 00 for equal and fixed process priority -Overrides Processor time-, 01 for 2:1 ratio priority of foreground tasks to background tasks and 10 or 11 for a 3:1 ratio.
(Navigation context is Windows 11)
If you navigate to Settings > System > About > Advanced System Settings > Advanced > Performance > Advanced.
Under Processor scheduling is a very basic setting of WPS, if you ever wish to revert WPS changes to default you can just select either of the two settings and apply.
The two default options make the following binary codes:
Background services: Hex 18 = 11000
Short interval, Variable time with equal and fixed priority.
Since priority is 00 it overrides the variable time, so even a Hex Binary code of 1c/11100 and 38/111000 are equal to 18/11000.
Programs: Hex 26 = 100110
Short interval, Variable time with a 3:1 ratio to foreground tasks.
Equivelant Hex Binary codes are 13/10011 and 4c/1001100.
To keep this short I will list all the Hex codes, the old post has duplicate binary numbers and any other Hex code will be a variation that equals the same code for reasons as mentioned above.
Code: Select all
2A Hex = Short, Fixed , 3:1 ratio. (101010)
29 Hex = Short, Fixed , 2:1 ratio. (101001)
28 Hex = Short, Fixed , Equal & fixed. (101000)
26 Hex = Short, Variable , 3:1 ratio. (100110)
25 Hex = Short, Variable , 2:1 ratio. (100101)
34 Hex = Long, Fixed, 3:1 ratio. (110100)
32 Hex = Long, Fixed, 2:1 ratio. (110010)
38 Hex = Long, Fixed, Equal & fixed. (111000)
16 Hex = Long, Variable, 3:1 ratio. (010110)
15 Hex = Long, Variable, 2:1 ratio. (010101)
How to apply the WPS codes:
Open your Registry editor and navigate here:
Code: Select all
Computer\HKEY_LOCAL_MACHINE\SYSTEM\ControlSet001\Control\PriorityControl
In the right panel is a registry entry called «Win32PrioritySeparation» right click it and select modify.
Select the Hexadecimal and type in your chosen Hex code like so:
Once done restart your system to apply.
System clocks and system ticks
By default a PC will run on a system clock in order to synchronize processes, at times these clocks will delay/pause in order to maintain a consistent rate which causes stutters.
This is where system ticks can improve performance but these tweaks can be different on a per system basis.
For example HPET can be disabled via driver or in BIOS but not all motherboards have that option in BIOS.
Timers:
Time stamp counter (TSC):
Is a high resolution, low overhead tick timer with a few flaws which can be caused by powersaving, frequency.
However, recent intel CPUs include a constant rate TSC which counts the passage of time rather that the number of CPU clocks. (this removes the need for UsePlatformTick and wont be shown in the bootloader or terminal)
High Precision Event Timer (HPET)
Is a high resolution system timer that uses interrupts in order to maintain a rate of time.
Real Time Clock(RTC) and APCI PMT (PMT)
An outdated timer which can decrease performance.
Timer combinations:
For a modern Intel CPU using a TSC timer should be the best option.
In Device manager, look for the High Precision Event timer and disable the driver.
If you have the option to disable HPET in the BIOS then do so.
Open Terminal (Admin) then input the following commands:
Combination A
bcdedit /set useplatformclock no
bcdedit /set disabledynamictick Yes
bcdedit /set tscsyncpolicy enhanced
Restart your system.
For anything else it requires testing as I do not have an AMD or older Intel system.
Combination B
bcdedit /set useplatformclock false
bcdedit /set tscsyncpolicy legacy
bcdedit /set disabledynamictick no
Combination C
bcdedit /set useplatformclock true
bcdedit /set tscsyncpolicy enhanced
bcdedit /set disabledynamictick yes
Restart system.
If you have desyncing issues then disable useplatformtick with no instead of yes.
If you get increased latency issues/stutters disable the tscsyncpolicy with: bcdedit /deletevalue tscsyncpolicy.
Mix and match these commands to see if they are right for your setup.
Relationship between timers and WPS compatibility
When using both there are some factors to consider.
The command «bcdedit /set disabledynamictick» is a power saving function which when disabled prevents a variable tick and reduces input latency and improves consistency.
So this means you need to avoid using Variable process time in your WPS Hex Binary codes or it can cause BSOD and game crashes underload. (error code 0x22)
If you use long intervals in your Hex Binary codes while using a higher resolution timer you can potentially bottleneck performance/benefit of that tweak with WPS and vice versa.
If you have a good combination of settings for AMD systems post it in the comments to help others.
Sources:
1. https://www.techpowerup.com/forums/atta … df.163992/ (Win32PrioritySeparation 09/09/2008 PDF)
2. https://sites.google.com/view/melodystw … et-tsc-pmt (Timer related settings and their relationship with each other 2022)
3. https://en.wikipedia.org/wiki/Time_Stamp_Counter (Time stamp counter Wiki)
4. https://en.wikipedia.org/wiki/High_Prec … vent_Timer (High Precision Event Timer Wiki)
5. https://en.wikipedia.org/wiki/Real-time_clock (Real Time Clock Wiki)