
Иногда после установки очередного обновления Windows вы можете столкнуться с тем, что операционная система, программа или какой-то драйвер перестают работать или вызывают конфликты. В этом случае нужно удалить проблемное обновление и включить запрет на его повторную установку. В этой статье мы покажем, как временно приостановить установку обновления в Windows или полностью заблокировать установку нежелательного обновления, скрыв его для службы Windows Update.
Содержание:
- Скрыть обновление с помощью официальной утилиты Show or Hide Updates
- Приостановка обновлений в Windows
- Заблокировать установку обновления с помощью PowerShell
Скрыть обновление с помощью официальной утилиты Show or Hide Updates
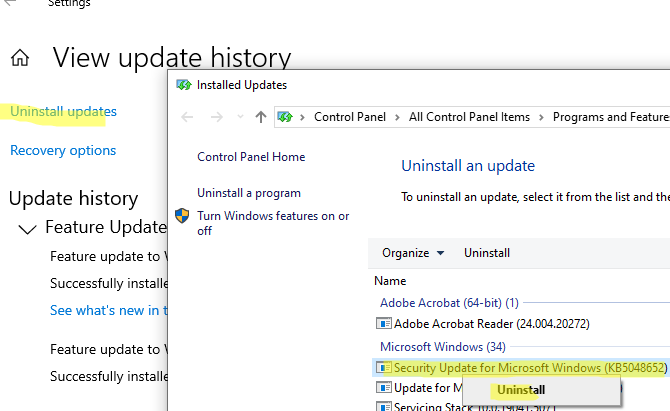
Если на компьютере уже установлено некорректного обновление, вызывающее проблему, его можно удалить через Settings -> Windows Update -> View Update History -> Uninstall updates. Щелкните по обновлению в списке и выберите Uninstall.
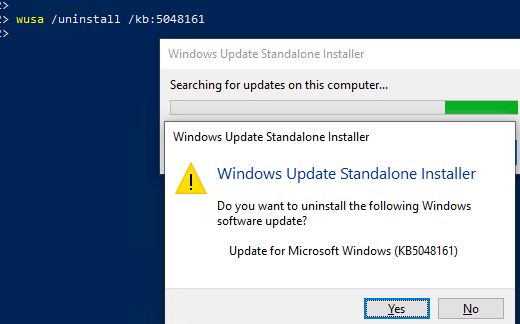
Либо можно удалить обновление из командной строки. Выведите обновления, отсортированные по дате установки с помощью PowerShell команды:
Get-HotFix | Sort-Object -Property InstalledOn -Descending
Найдите номер вашего обновления в списке (KBxxxxx) и удалите его по KB ID:
wusa /uninstall /kb:5048161
Однако удаленное обновление через некоторое время будет автоматически пытаться установится повторно (можно переопределить параметры автоустановки через групповые политики Windows Update).
Чтобы полностью заблокировать (скрыть) определенное обновление от службы Windows Update, можно воспользоваться официальной утилитой от Microsoft Show or hide updates (
wushowhide.diagcab
).
- Скачайте утилиту Show or hide updates с сайта Microsoft
- Запустите утилиту wushowhide.diagcab
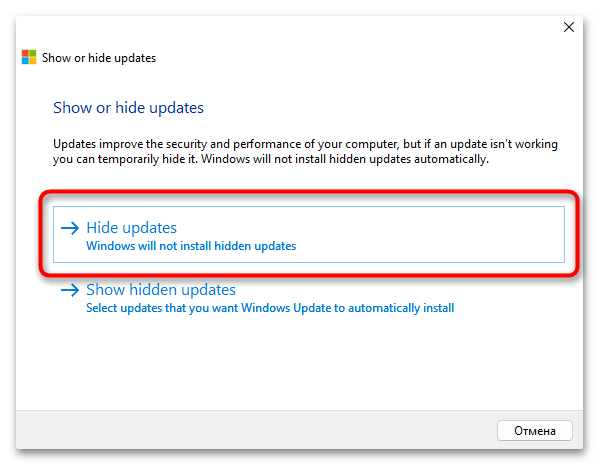
- Выберите пункт Hide updates

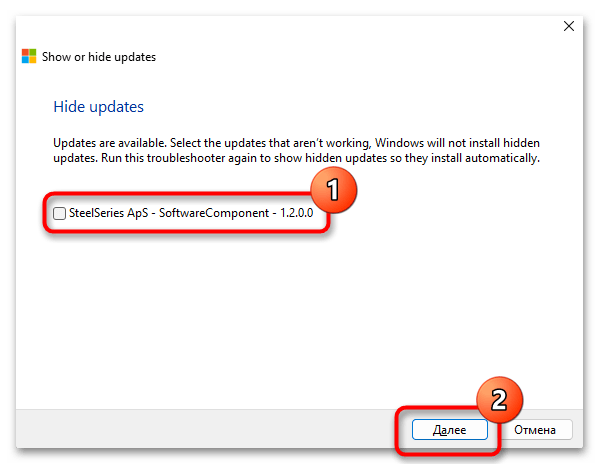
- Выберите в списке обновление, которое нужно скрыть

- Windows Update не будет пытаться установить скрытое обновление до тех пор, пока вы не сделаете его видимым.
Чтобы сделать обновление доступным к установке, нужно в утилите wushowhide.diagcab выбрать Show hidden updates и отменить скрытие обновления.
Если у вас в сети развернут собственный сервер обновлений WSUS, вы можете заблокировать установку конкретного обновления или даже автоматически удалить его с компьютеров где оно было установлено, отозвав его с опцией Approved for Removal (подробнее в статье Одобрение обновлений на WSUS).
Приостановка обновлений в Windows
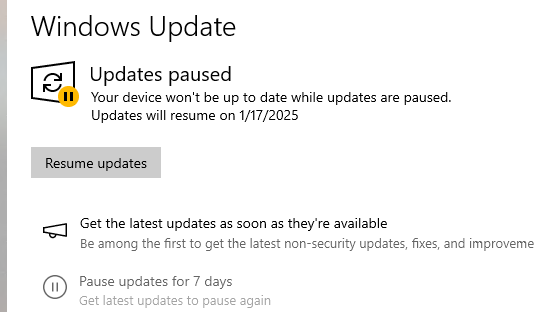
В Windows 10 и 11 пользователи могут полностью приостановить установку любых обновлений Windows на срок до 35 дней. Это способ обычно используется, когда в вышедшем обновлении обнаружен баг и вы хотите дождаться исправления.

Чтобы отложить установку обновлений на срок 7 дней, нужно нажать кнопку Pause updates for 7 more days в панели Settings -> Windows Updates. Можно поставить обновления на паузу 5 раз по 7 дней (итого на 35 дней). Скорее всего этого времени будет достаточно, чтобы инженеры Microsoft подтвердили наличие массовой проблемы в обновление и исправили или отозвали его.
С помощью PowerShell можно проверить до какой даты отложена установка обновлений:
Get-ItemProperty -Path 'HKLM:\SOFTWARE\Microsoft\WindowsUpdate\UX\Settings'| Select-Object PauseUpdatesExpiryTime
Либо можно поставить установку обновлений на паузу с помощью скрипта:
$pause = (Get-Date).AddDays(35)
$pause = $pause.ToUniversalTime().ToString("yyyy-MM-ddTHH:mm:ssZ")
Set-ItemProperty -Path 'HKLM:\SOFTWARE\Microsoft\WindowsUpdate\UX\Settings' -Name 'PauseUpdatesExpiryTime' -Value $pause
Это увеличит срок приостановки обновлений на максимальный срок 35 дней.
Заблокировать установку обновления с помощью PowerShell
Чтобы заблокировать установку определенного обновления в Windows можно использовать PowerShell командлеты из модуля PSWindowsUpdate. Установите модуль на компьютере, если он еще не установлен:
Install-Module -Name PSWindowsUpdate
Перезапустите консоль PowerShell и разрешите запуск командлетов модуля в текущей сессии (чтобы не менять глобальные настройки PowerShell Execution Policy):
Set-ExecutionPolicy -ExecutionPolicy RemoteSigned -Scope Process
Выведите список обновлений, доступных для установки:
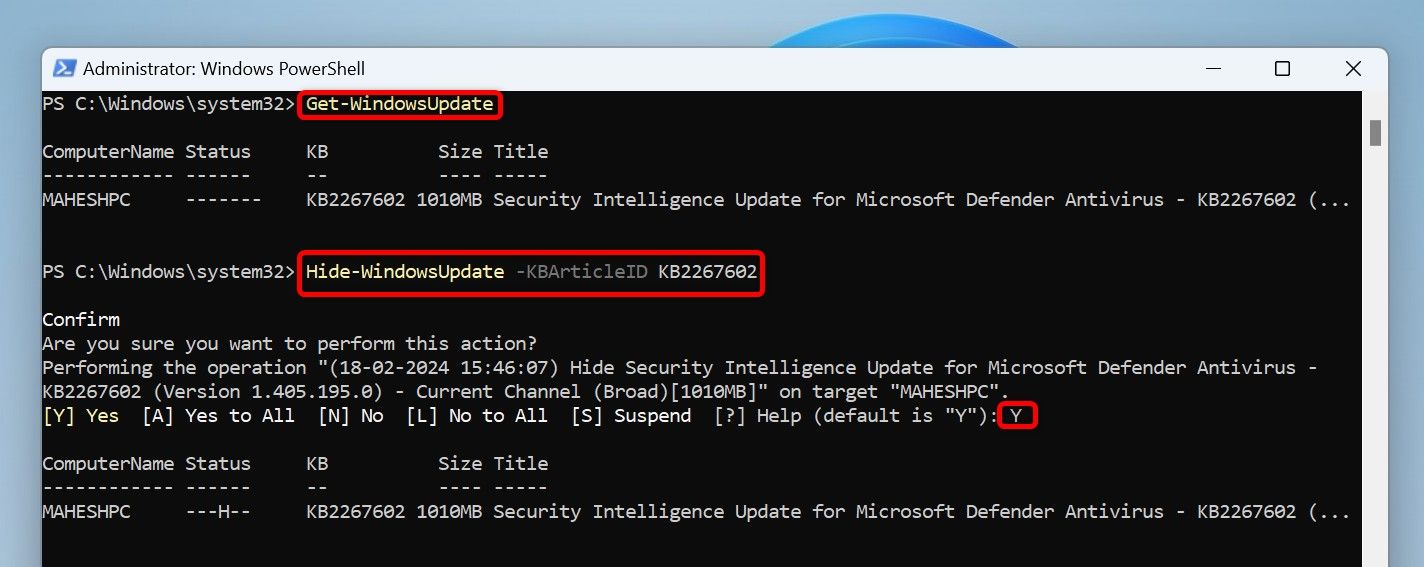
Get-WindowsUpdate
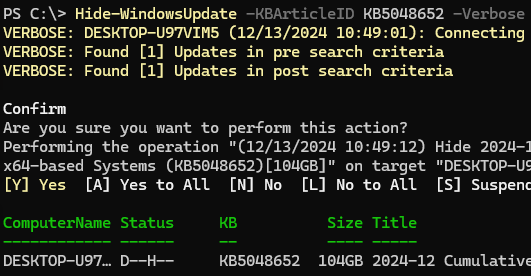
Чтобы скрыть конкретное обновлений, укажите его номер (KB) в следующей команде:
Hide-WindowsUpdate -KBArticleID KB5048652 -Verbose
Скрытые обновления не будут отображаться в списке доступных при сканировании обновлений с помощью команды Get-WindowsUpdate. Чтобы вывести скрытые обновления выполните:
Get-WindowsUpdate –IsHidden
Скрытые обновлений в столбце Status имеют атрибут H (
Hidden
).

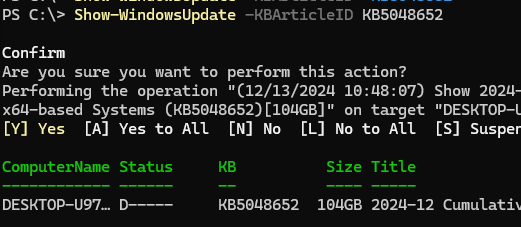
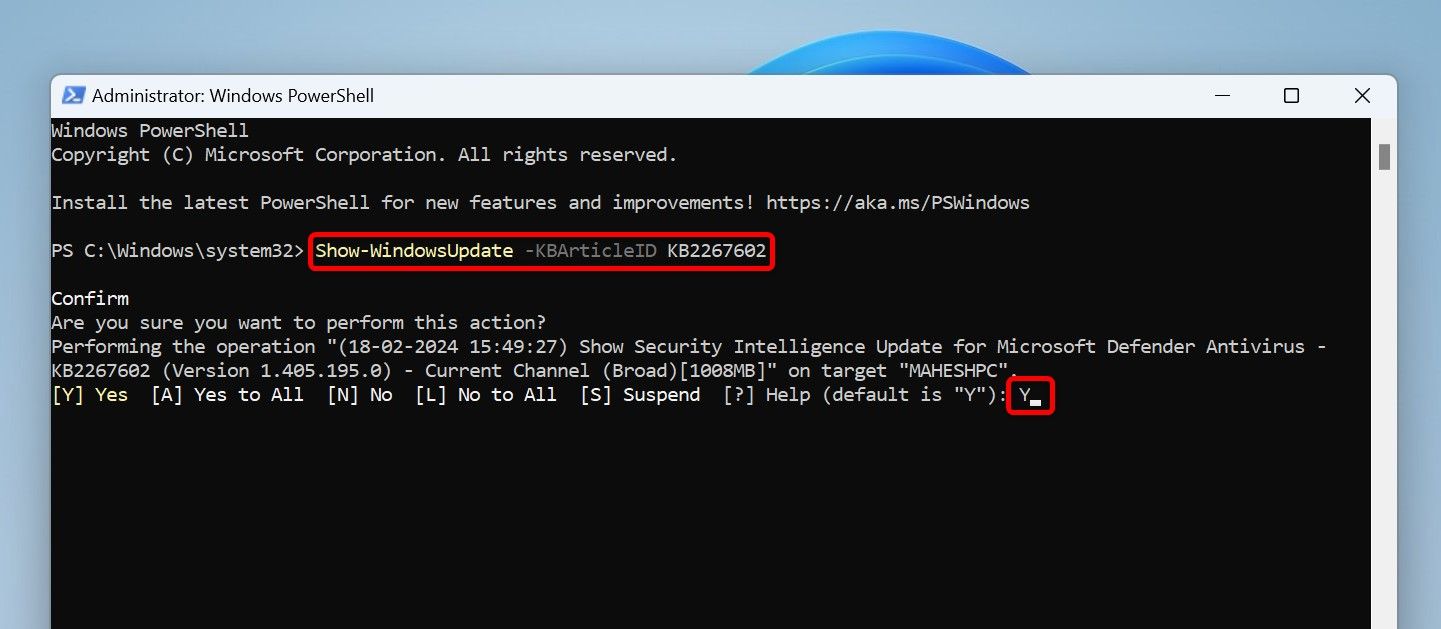
Чтобы отменить скрытие обновлений и разрешить его установку, выполните:
Show-WindowsUpdate -KBArticleID KB5048652
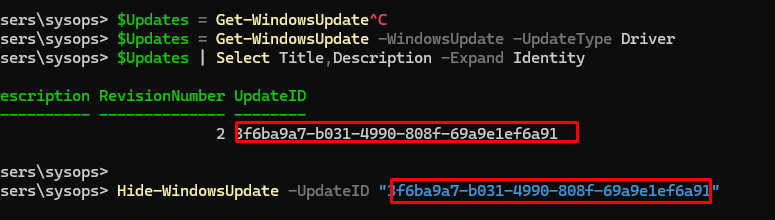
Довольно часто пользователям нужно заблокировать установку обновлений для драйвера какого-либо устройства (чтобы Windows не обновляла этот драйвер автоматически). Однако при выводе списка доступных обновлений через
Get-WindowsUpdate
вы обнаружите, что у обновлений драйверов в Windows Update отсутствует номер KB. В этом случае скрыть обновление драйвера можно по его ID:
$Updates = Get-WindowsUpdate -WindowsUpdate -UpdateType Driver
$Updates | Select Title,Description -Expand Identity
Скопируйте ID обновлений из результатов и скройте обновлений драйвера по его ID:
Hide-WindowsUpdate -UpdateID "3f6ba9a7-b031-4990-808f-69a9e1ef6a91"
Проблемные обновления Windows могут вызывать сбои в работе операционной системы, программ или драйверов. В таких случаях необходимо удалить проблемное обновление и заблокировать его повторную установку через Windows Update. В этой статье мы рассмотрим, как временно приостановить установку обновлений, полностью скрыть нежелательное обновление с помощью утилиты Show or Hide Updates или PowerShell, а также как заблокировать обновления драйверов.
Приобрести оригинальные ключи активации Windows 11 можно у нас в каталоге от 1690 ₽
Удаление проблемного обновления
Если обновление уже установлено и вызывает проблемы, его можно удалить через интерфейс Windows или командную строку.
Удаление через настройки Windows
1. Откройте Параметры:

– Перейдите Центр обновления Windows.
2. Перейдите в историю обновлений:
– Выберите Просмотреть журнал обновлений → Удалить обновления.


3. Удалите обновление:
– Найдите проблемное обновление в списке (например, KB5049622).
– Щелкните по нему и выберите Удалить.
– Подтвердите действие и перезагрузите компьютер, если требуется.

Удаление через командную строку
1. Выведите список установленных обновлений с помощью PowerShell:
Get-HotFix | Sort-Object -Property InstalledOn -Descending
Команда отобразит номера обновлений (KB) и даты установки.

2. Удалите обновление, указав его номер KB:
wusa /uninstall /kb:5053598
3. Подтвердите удаление в появившемся окне.
Удаленное обновление может автоматически установиться снова, если не заблокировать его установку.

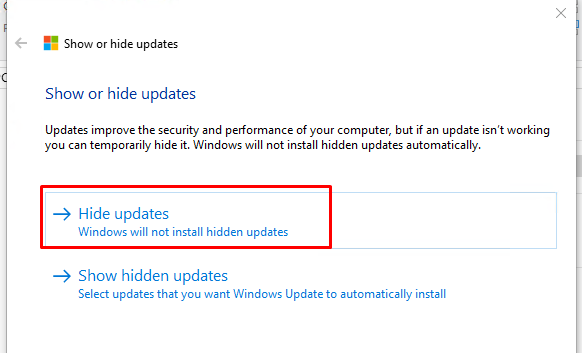
Скрытие обновления с помощью утилиты Show or Hide Updates
Официальная утилита Show or Hide Updates от Microsoft позволяет скрыть обновление, чтобы Windows Update не предлагала его для установки.
Использование утилиты
1. Скачайте утилиту wushowhide.diagcab с официального сайта Microsoft.

2. Запустите файл wushowhide.diagcab.

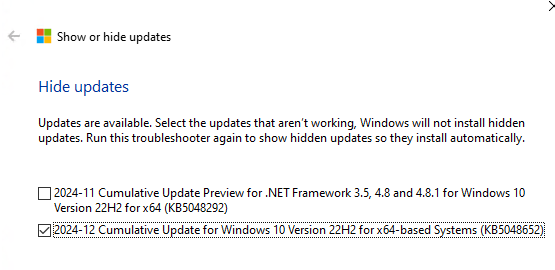
3. Выберите Hide updates (Скрыть обновления).

4. В списке отметьте обновление, которое хотите заблокировать (например, KB5048652).

5. Нажмите Далее и дождитесь завершения процесса.
Скрытое обновление не будет устанавливаться, пока вы не отмените его скрытие.
Отмена скрытия обновления
Чтобы снова сделать обновление доступным:
1. Запустите wushowhide.diagcab.
2. Выберите Show hidden updates (Показать скрытые обновления).
3. Отметьте обновление и подтвердите его разблокировку.
Приостановка обновлений в Windows
Windows 10 и Windows 11 позволяют временно приостановить установку всех обновлений на срок до 35 дней. Это полезно, если вы хотите дождаться исправления ошибок в проблемном обновлении.
Приостановка через настройки
1. Откройте Параметры → Обновление и безопасность → Центр обновления Windows.

2. Нажмите Приостановить обновления на 7 дней.
3. Повторите действие до 5 раз, чтобы продлить паузу до 35 дней.

Проверка статуса приостановки
Чтобы узнать, до какой даты приостановлены обновления, выполните в PowerShell:
Get-ItemProperty -Path 'HKLM:\SOFTWARE\Microsoft\WindowsUpdate\UX\Settings' | Select-Object PauseUpdatesExpiryTime

Установка паузы через PowerShell
Для автоматической приостановки обновлений на 35 дней используйте скрипт:
$pause = (Get-Date).AddDays(35)

$pause = $pause.ToUniversalTime().ToString("yyyy-MM-ddTHH:mm:ssZ")

Set-ItemProperty -Path 'HKLM:\SOFTWARE\Microsoft\WindowsUpdate\UX\Settings' -Name 'PauseUpdatesExpiryTime' -Value $pause


Блокировка обновлений через PowerShell
Модуль PSWindowsUpdate предоставляет мощные инструменты для управления обновлениями, включая их скрытие.
Установка модуля PSWindowsUpdate
1. Установите модуль:
Install-Module -Name PSWindowsUpdate

2. Разрешите выполнение команд модуля в текущей сессии PowerShell:
Set-ExecutionPolicy -ExecutionPolicy RemoteSigned -Scope Process
Просмотр доступных обновлений
Выведите список обновлений, доступных для установки:
Get-WindowsUpdate

Скрытие обновления
Скройте обновление, указав его номер KB:
Hide-WindowsUpdate -KBArticleID KB5048652 -Verbose
Параметр -Verbose отображает подробности операции.

Просмотр скрытых обновлений
Чтобы вывести список скрытых обновлений (с атрибутом H в столбце Status):
Get-WindowsUpdate -IsHidden

Отмена скрытия обновления
Для разблокировки обновления выполните:
Show-WindowsUpdate -KBArticleID KB5048652

Блокировка обновлений драйверов
Обновления драйверов в Windows Update часто не имеют номера KB, что усложняет их скрытие. Для блокировки таких обновлений используйте их уникальный UpdateID.
Поиск обновлений драйверов
Выведите список обновлений драйверов:
$Updates = Get-WindowsUpdate -WindowsUpdate -UpdateType Driver

$Updates | Select-Object Title, Description -ExpandProperty Identity
Скопируйте UpdateID нужного обновления из результатов.
Скрытие обновления драйвера
Скройте обновление, указав его UpdateID:
Hide-WindowsUpdate -UpdateID "3f6ba9a7-b031-4990-808f-69a9e1ef6a91"

Дополнительные рекомендации
Резервное копирование: Перед удалением или блокировкой обновлений создайте точку восстановления:
Checkpoint-Computer -Description "Before managing updates" -RestorePointType MODIFY_SETTINGS
Групповые политики: Для полного контроля над обновлениями настройте параметры Windows Update через Групповые политики:
– Откройте gpedit.msc.

– Перейдите в Конфигурация компьютера → Административные шаблоны → Компоненты Windows → Центр обновления Windows.

– Настройте Не включать драйверы в обновления Windows или Настройка автоматического обновления.

Мониторинг журналов: Проверяйте Журнал событий (журнал Setup) для анализа ошибок или подтверждения успешного скрытия обновлений.
Ограничения: Скрытие обновлений не влияет на уже установленные обновления. Для их удаления используйте методы, описанные в начале статьи.
Блокировка проблемных обновлений Windows с помощью утилиты Show or Hide Updates, PowerShell и модуля PSWindowsUpdate позволяет избежать конфликтов и сбоев. Временная приостановка обновлений на 35 дней дает время для исправления ошибок Microsoft, а скрытие обновлений, включая драйверы, предотвращает их повторную установку. Эти методы обеспечивают гибкость и контроль над процессом обновления, поддерживая стабильность системы.
In this guide, you’ll learn how to show or hide updates in Windows 11. We will explore how to use the wushowhide.diagcab tool (KB3073930) and PSWindowsUpdate PowerShell module to hide updates or show the hidden updates on Windows 10/11 PC.
The wushowhide.diagcab is a Microsoft troubleshooting tool that lets you show or hide updates on Windows 10 and Windows 11 computers. You can also use the “Show or hide updates” troubleshooter tool to stop a specific update from installing on your Windows PC. That’s interesting!!
If there are some updates that you do not wish to install on your device, you have two options: use the Show or hide updates diagnostic tool or use the PSWindowUpdate module to accomplish this task using PowerShell. The PowerShell method requires importing the PSWindowsUpdate module and configuring the execution policy to run scripts. Whereas the wushowhide.diagcab is much easier and offers a wizard to work with updates. Both the methods will be covered in this guide.

You may be wondering, Where did this wushowhide diag tool come from? In 2015, Microsoft released the KB3073930 update, which allowed users to manually block or hide Windows or driver updates. Not everyone was aware of this troubleshooter app but it became popular soon when many Windows users were looking to prevent installing driver updates or cumulative updates. Since then, a number of troubleshooting articles have recommended and made use of this tool.
Also See: Explore different ways to uninstall Windows 11 Update Patch
The secret of how the Wushowhide troubleshooter package works is still a mystery. Furthermore, there is no documentation or information anywhere online on how this tool works. The only thing to remember is that you must use an administrator account to run this tool on a Windows device.
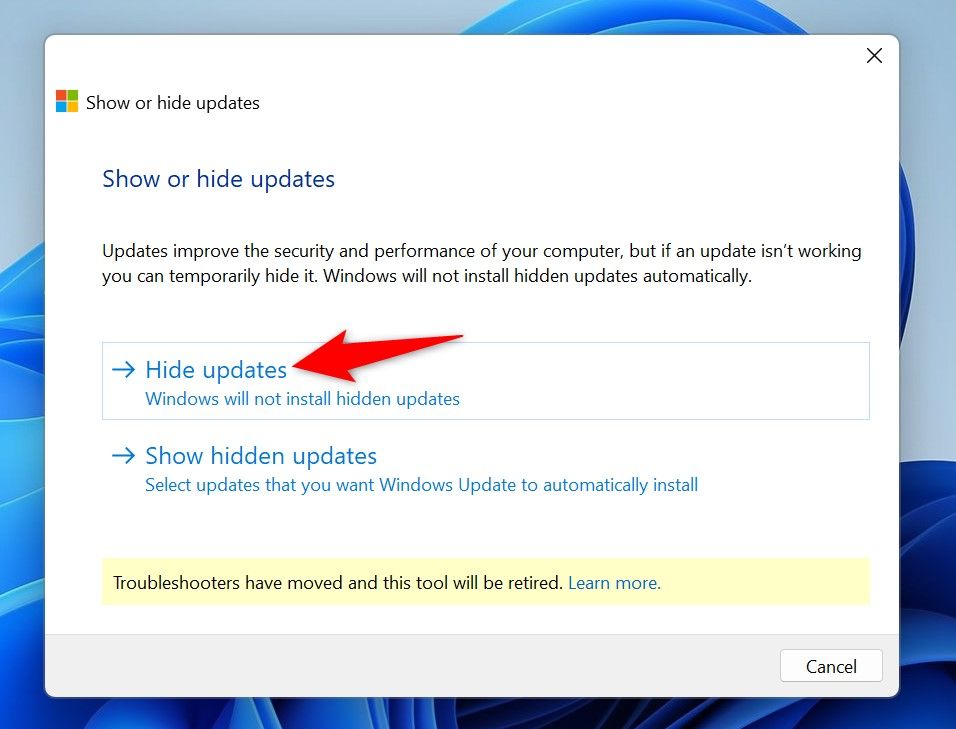
The Windows update show or hide updates tool basically does two functions:
- Show hidden updates: Using this option, you can select the updates that were previously hidden and now you want Windows Update to automatically install them.
- Hides updates: Select the updates to hide and your Windows 10/11 PC will not install hidden updates anymore.
Download the latest version of the wushowhide.diagcab troubleshooter app and save this file to your computer. The WU show or hide updates tool weighs only 48 KB in size.
Despite being released in 2015, we do not believe the Wushowhide Diacab tool has received any updates. We tested the Show or Hide updates tool on the most recent Windows 11 versions, including insider preview builds, and it performed flawlessly. The tool should also work on Windows 10 devices.
Hide updates in Windows 11
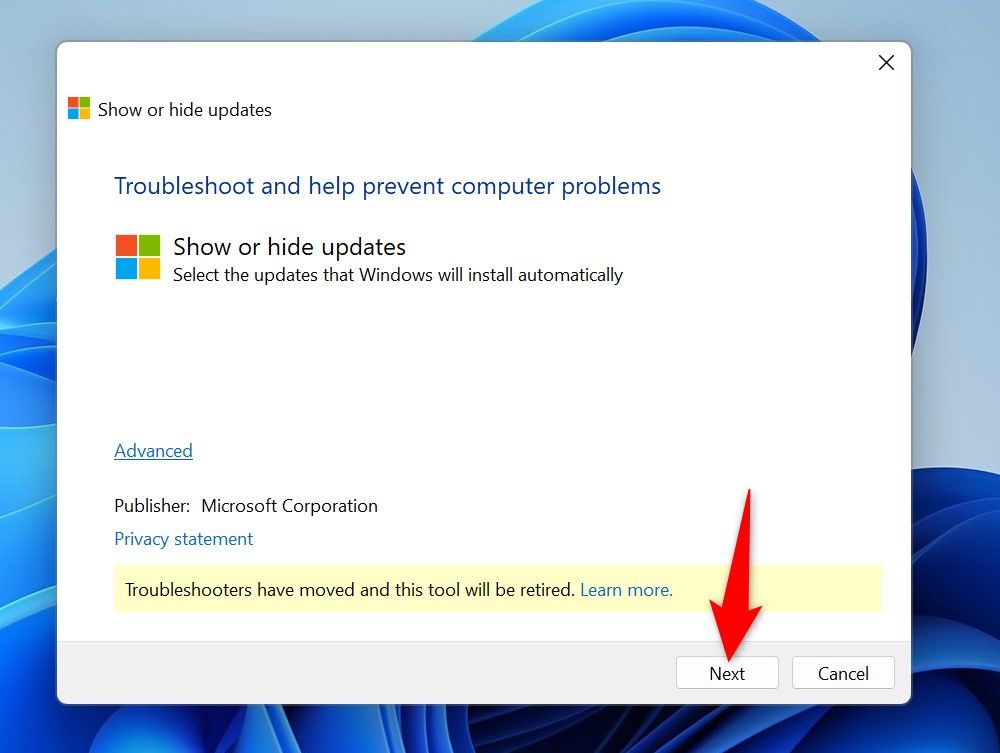
Let’s see how you can hide the specific updates using the Wushowhide tool. Run the wushowhide.diagcab file to launch the Show or hide updates troubleshooter tool. Select the Advanced option to ensure the option to apply repairs automatically is selected. Click Next.

Click the Hide Updates option as demonstrated in the screenshot below.

In this step, you must select the Windows 11 updates that you want to hide. In the example below, we have chosen the Windows 11 Insider Preview update, which will be hidden. Click Next.

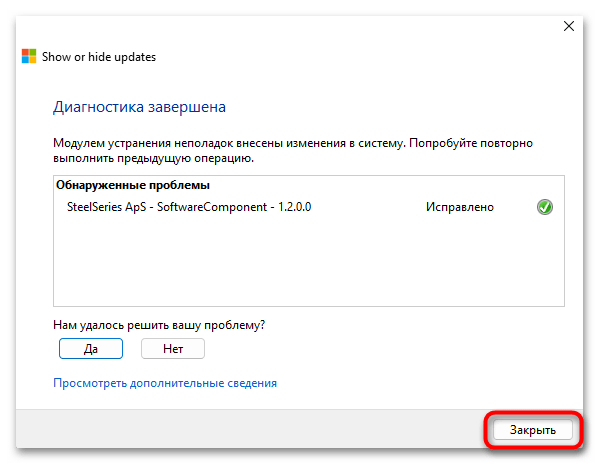
The Show or hide updates troubleshooter tool now hides the selected updates on Windows 11. On the final screen, you will see that the updates you selected were successfully hidden.
Remember that if the update is already installed on Windows 11, you cannot hide it using wushowhide tool. You must first uninstall the update from Windows 11 and then block it to prevent the installation.

If you have previously hidden some updates on Windows 11, you can use the Show or hide updates troubleshooter tool to unhide those updates. Let’s see how you can do that. Run the wushowhide.diagcab file to launch the troubleshooter tool. Click the “Show hidden updates” option.

From the list of updates, select the ones that want Windows to install automatically. In the example below, we have enabled the previously hidden Windows 11 Insider Preview update. Click Next.

Close the Show or hide updates troubleshooter tool.

The hidden updates are now available on Windows 11 for installation. If you don’t see the updates, go to Start > Settings > Windows Update and select Check for updates.
In the below screenshot, we see that the Windows 11 Insider Preview update that was previously hidden is now available for installation. Thanks to the Show or hide updates tool, it is now easier to prevent or remove a specific update from trying to install on Windows 11.

How to Show or Hide updates using PowerShell
On Windows 11, you can use PowerShell to show or hide updates using the PSWindowUpdate module. This approach is useful when you don’t have access to the wushowhide.diagcab or you’re not allowed to use that tool in your organization. Let’s get started.
Step 1: Install the PSWindowUpdate module
The PSWindowUpdate module contains cmdlets to manage Windows Update Client. To run the cmdlets, you require the minimum PowerShell version of 5.1.0.0. In case your Windows 11 PC is not installed with this module, you can run the below command to install it.
Install-Module -Name PSWindowsUpdate

Step 2: Set the PS Execution Policy
PowerShell’s execution policy prevents your device from the execution of malicious scripts. To effectively execute the PS scripts, the powershell execution policy must be configured. To determine the current PS execution policy on your Windows 11 device, run the command Get-ExecutionPolicy.
After installing PSWindowsUpdate module, you must configure the execution policy before you import and use the PSWindowsUpdate. Run the below powershell command to set the execution policy to RemoteSigned with scope as CurrentUser.
Set-ExecutionPolicy -ExecutionPolicy RemoteSigned -Scope CurrentUser

Step 3: Check for Windows Updates with PowerShell
After you have configured the PS execution policy for running the scripts, let’s import the PSWindowsUpdate module by running the below command in the PowerShell window.
Import-Module PSWindowsUpdate
Next, run the Get-WindowsUpdate cmdlet to check for Windows 11 updates with PowerShell. The output shows you the list of updates that are available for your system.
Note: If you want to hide a specific update using PowerShell, you need to make sure it’s not installed on the PC. If that is the case, first uninstall the update and then run the above command for the update to show up again.

Step 4: Hide the updates using PowerShell
Once you have identified the updates you want to hide with the Get-WindowsUpdate cmdlet, take note of their KB numbers, which are unique IDs assigned to each update.
The below syntax is for hiding the update using PowerShell. Before running this command, you must replace the KBNUMBER with the update number you want to hide.
Hide-WindowsUpdate -KBArticleID KBNumber
For example, the below PS command hides the KB5042098 update on your system.
Hide-WindowsUpdate -KBArticleID KB5042098
Note: When you run the above command, it immediately hides the update KB5042098 on the Windows device and the status in the output is displayed as —H–. The status “H” indicates that the selected update is permanently hidden for installation.

Step 5: Show hidden updates with PowerShell
If you previously hidden specific updates to prevent them from installing, you can display them using PowerShell.
The below syntax is for showing the hidden update using PowerShell. Before running this command, you must replace the KBNUMBER with the update number you want to show.
Show-WindowsUpdate -KBArticleID KBNumber
For example, the below PS command shows the hidden KB5042098 update on your system.
Show-WindowsUpdate -KBArticleID KB5042098

Conclusion
We hope that this tutorial has helped you to understand the various options for displaying or hiding Windows updates on your device. In situations when you want to block a specific update from installing on your Windows device, this tutorial is what you require. Please get in touch with us if you have any questions or comments, and feel free to share your experiences using these tools.
Still Need Help?
If you need further assistance on the above article or want to discuss other technical issues, check out some of these options.
Под скрытием обновлений Windows обычно понимается предотвращение скачивания и установки определенных пакетов. Будучи скрытыми, такие обновления более не будут отображаться в списке доступных пакетов в «Центре обновления Windows».
Способ 1: Пакет Show or Hide Updates
Если определенные обновления вызывают проблемы в работе оборудования, лучшим решением будет их удаление. Однако через некоторое время они установятся повторно. Чтобы этого не случилось, обновления следует скрыть, например с помощью специального диагностического пакета Show or Hide Updates от Microsoft.
Скачать средство Show or Hide Updates с официального сайта
- Скачайте диагностический инструмент с сайта Microsoft и запустите двойным кликом.
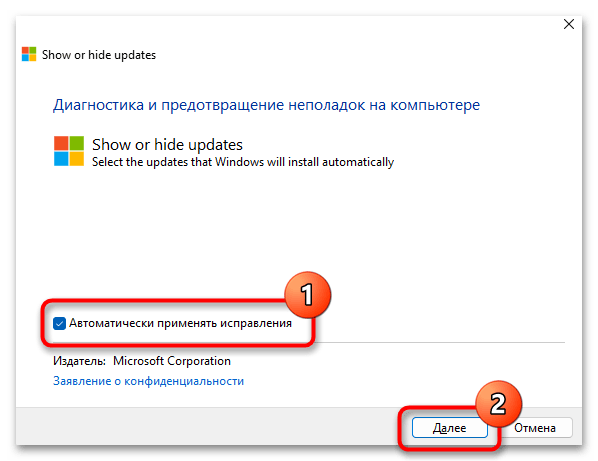
- Нажмите в открывшемся окне ссылку «Дополнительно», установите флажок в пункте «Автоматически применять исправления» и нажмите «Далее».
- Дождавшись завершения диагностики, выберите опцию «Hide updates». В случае обнаружения готовых к установке обновлений Show or Hide Updates выведет их список.
- Отметьте флажками пакеты обновлений, которые желаете скрыть и нажмите «Далее».
- В случае удачного изменения конфигурации утилита вернет сообщение «Исправлено». Нажмите «Закрыть», чтобы завершить работу инструмента.
Перед тем как приступать к диагностике, рекомендуется очистить папку кеша обновлений, расположенную по адресу C:\Windows\SoftwareDistribution\Download.
Подробнее: Удаление кеша обновлений в Windows 10
Способ 2: Модуль PSWindowsUpdate
Если средство диагностики не обнаружит обновление, можно привлечь более гибкий и функциональный инструмент – консольный модуль PSWindowsUpdate, предназначенный для управления обновлениями Windows из консоли «PowerShell» .
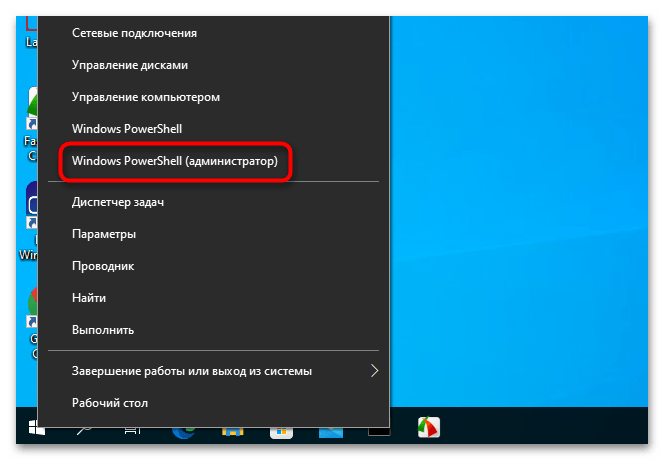
- Запустите «PowerShell» от имени администратора из контекстного меню кнопки «Пуск».
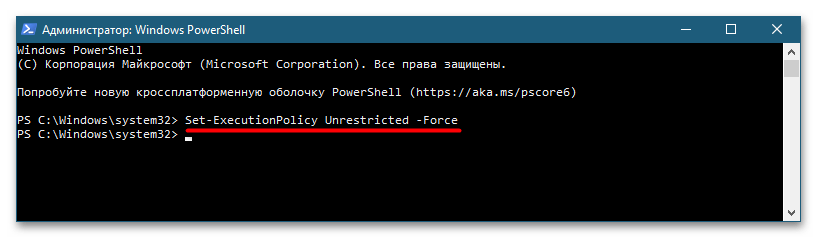
- Разрешите временное выполнение неподписанных сценариев, выполнив для этого команду
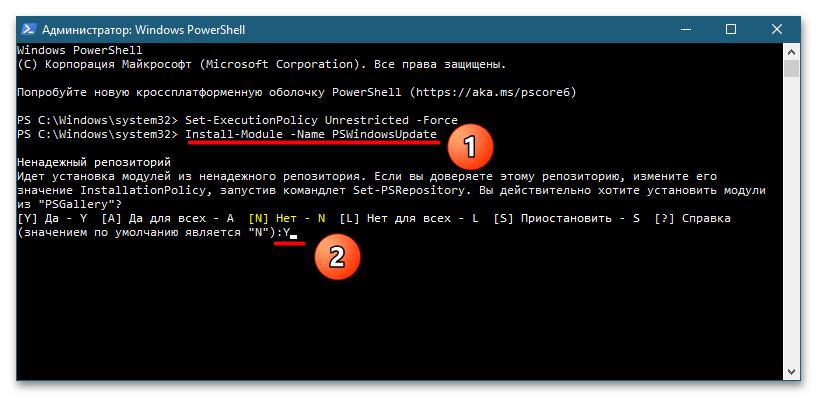
Set-ExecutionPolicy Unrestricted -Force. - Выполните команду установки модуля
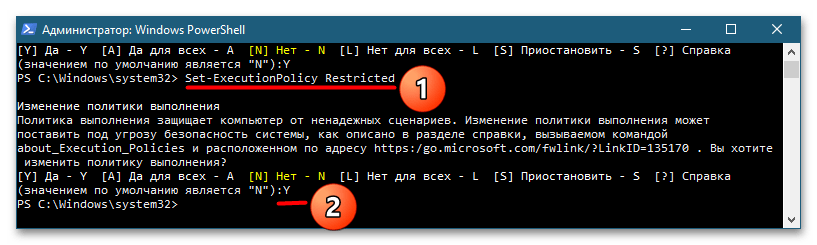
Install-Module -Name PSWindowsUpdateи подтвердите действие вводом Y и последующим нажатием клавиши Enter. - Восстановите политику выполнения неподписанных сценариев командой
Set-ExecutionPolicy Restrictedс подтверждением вводом Y нажатием клавиши Enter. - Выполните команду получения списка доступных обновлений
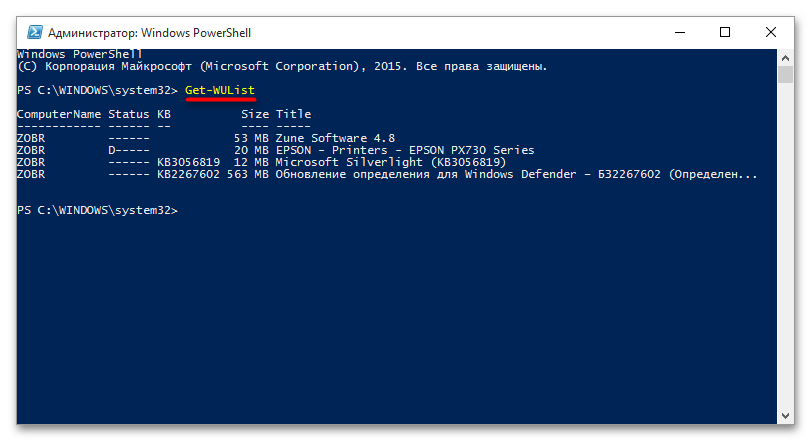
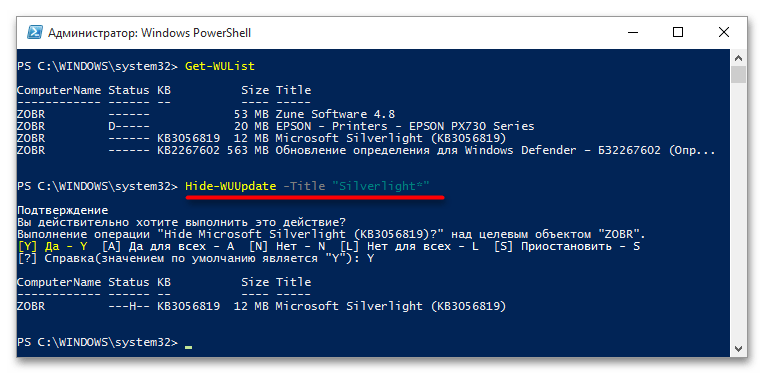
Get-WUList. - Найдите в списке обновление, которое желаете скрыть, а затем выполните команду
Hide-WUUpdate -Title "Title", где Title в прямых двойных кавычках – название пакета обновления.
Можно скрыть сразу несколько обновлений, выполнив одну за другой две следующих команды: $HideList = "KB0000000", "KB0000000" и Get-WindowsUpdate -KBArticleID $HideList -Hide. В переменную $HideList в данном примере передаются не названия, а номера пакетов обновлений.
Наша группа в TelegramПолезные советы и помощь
Quick Links
-
Why Should You Hide an Update?
-
Hide or Show Updates Using a Graphical Tool
-
Hide or Show Updates Using PowerShell
Summary
- To hide or unhide Windows updates, download Microsoft’s Show or Hide updates tool.
- To hide an update in the tool, select Next > Hide Updates, choose the update to hide, and click «Next.»
- To unhide an update in the tool, select Next > Show Hidden Updates, choose the update to bring back, and click «Next.»
If you don’t wish to install a specific update on your Windows 11 or Windows 10 PC, it’s possible to hide (and later unhide) that update on your Windows Update screen. We’ll show you how to do that using both graphical and command-line methods.
Why Should You Hide an Update?
There are multiple reasons you might want to hide an update.
It’s possible a specific update conflicts with your PC’s drivers, so you’ll want to hold off on installing that update. Another reason is that an update might break your software’s features. Sometimes, Windows updates are problematic on their own, causing various system issues.
In all these scenarios, you might want to hide the update so it doesn’t appear on the Windows Update screen, so that you or Windows don’t end up installing it.
The easiest way to hide and show Windows updates is by using Microsoft’s own Show or Hide updates tool. This tool shows you the available updates and lets you pick the ones you want to hide or show.
To use this method, download the Show or Hide updates tool and double-click the downloaded file to launch it. You don’t have to install the tool to use it; it’s a portable app.
Hide Updates
On the first screen, select «Next.»
Wait while it scans the available updates. This shouldn’t take too long. Then, click «Hide Updates.»
On the following page, select the update to hide (you can choose multiple updates if you want). Then, click «Next.»
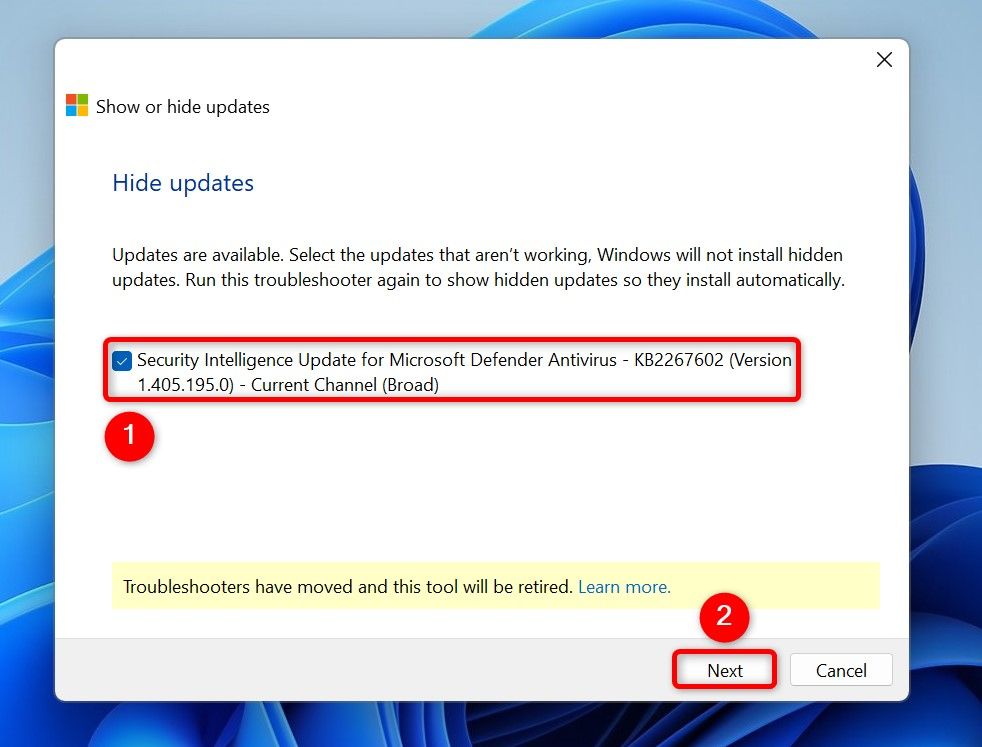
Wait for the tool to finish hiding the selected updates, and you’re all set.
Show Updates
Select «Next» on the first screen. Wait for it to find the available updates, then choose «Show Hidden Updates.»
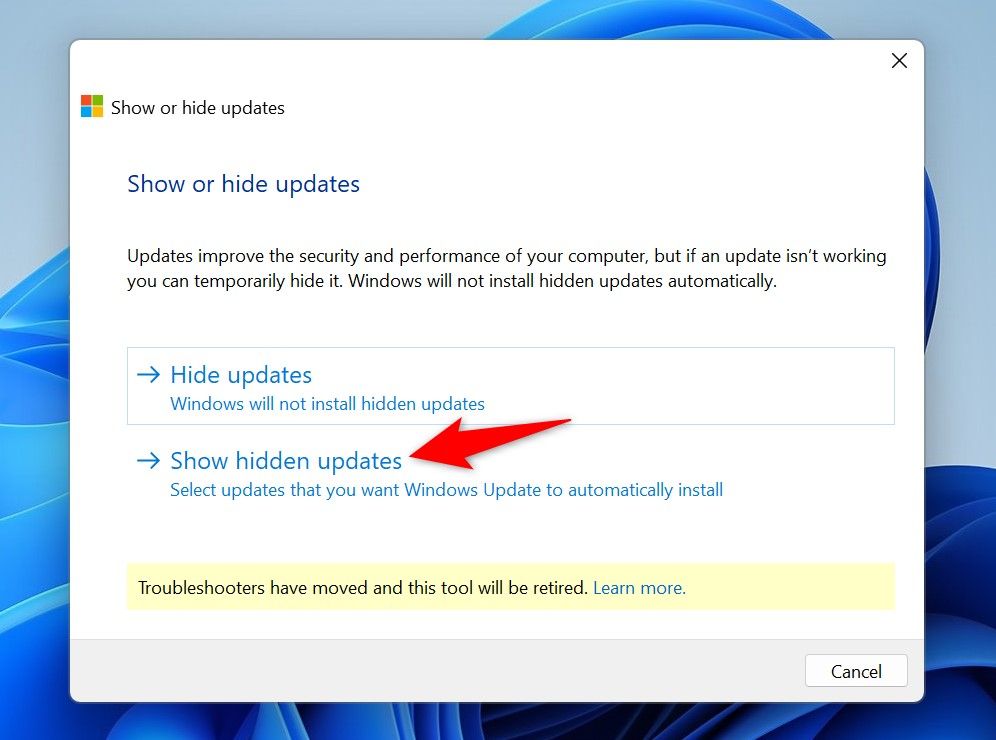
Select the currently hidden updates you’d like to unhide. Then, at the bottom, click «Next.»

Wait while the tool makes the selected updates visible in Windows Update, and you’re set.
Hide or Show Updates Using PowerShell
If you like command line methods, you can use a cmdlet in PowerShell to hide and show Windows updates.
To use this method, open the Start Menu, find PowerShell, and click «Run as Administrator.» In the User Account Control (UAC) prompt, choose «Yes.»
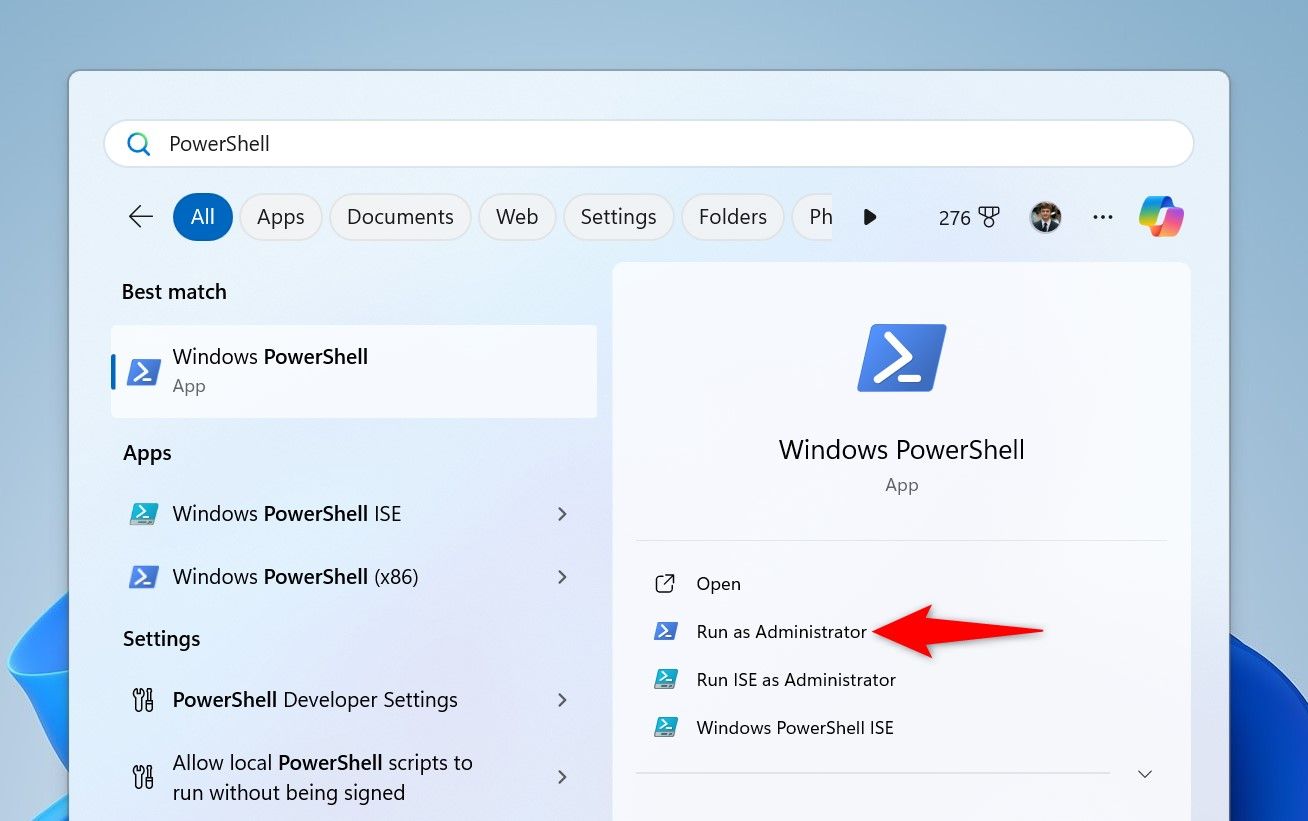
Hide Updates
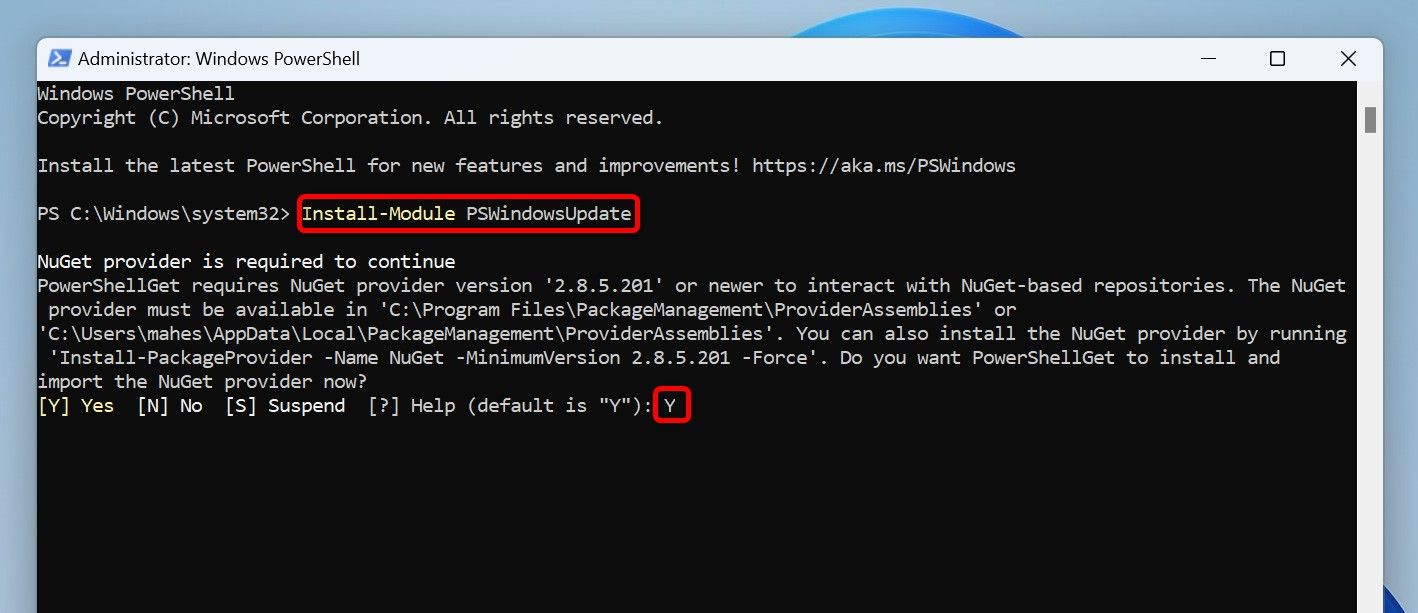
In PowerShell, type the following command and press Enter. This installs a module that lets you hide and show system updates:
Install-Module PSWindowsUpdate
To confirm its installation, type Y and press Enter.
Next, input the following command and press Enter:
Set-ExecutionPolicy RemoteSigned
Then, type Y, and press Enter. Now you’re ready to begin.
You can view the available Windows updates by running the following command:
Get-WindowsUpdate
Then use the following command to hide a specific update. Replace KBUpdate with the KB ID of the update to hide, then run the command with Enter:
Hide-WindowsUpdate -KBArticleID KBUpdate
After, type Y to confirm the action and press Enter.
Show Updates
Unlike the Show or Hide updates tool, PowerShell doesn’t let you see your hidden updates. You must know the update ID to unhide it with this utility.
On the PowerShell window, type the following command and press Enter:
Install-Module PSWindowsUpdate
Then, type Y and press Enter.
To show a hidden update, use the following command. Replace KBUpdate with the KB ID of the update to unhide, then press Enter to run it:
Show-WindowsUpdate -KBArticleID KBNUMBER
Then, type Y and press Enter.
It’s generally best to keep Windows up to date, so don’t hide updates without a good reason. The same goes for your programs; keep your Windows apps running the latest version.