
I’m not answering a reader question this time; just passing on some useful information.
You can save power by setting up your Windows PC to go into sleep mode (called Standby in XP) after so many minutes without use. You can save even more power by having it go from sleep to hibernation after a longer period of neglect.
Both modes save power, and can bring you back to the same place you were at before you powered down. While sleep mode cuts down on power consumption considerably, your computer is still on. It still needs electricity to keep Windows, currently-running applications, and open files in RAM. But when a PC hibernates, it copies everything in RAM to a file on the hard drive, then shuts down the PC completely.
Hibernation saves more power, but it’s slower. A modern PC can go in and out of sleep almost instantaneously. It can take more than half a minute to hibernate, and another half minute to wake up.
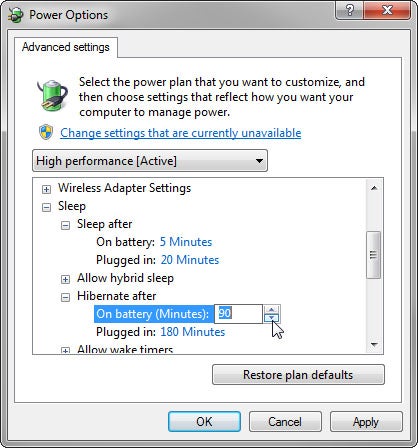
For the best balance of power and convenience, I keep my PC set to go to sleep after 20 minutes of no use, and to hibernate after 180 minutes. (That’s for AC power; on battery, it’s 5 and 90 minutes.) Here’s how to set this up:
If you’re using Windows XP, right-click the desktop and select Properties. Click the Screen Saver tab, then the Power button. Click the Hibernate tab and check Enable Hibernation. Click the Apply button. Then click the Power Schemes tab for standby and hibernate options.

In Vista or Windows 7, click Start, type power, and select Power Options. In the left pane, click Choose when to turn off the display. You’ll find a Sleep option there, but nothing about hibernation. So click the Change advanced power settings link. Expand the Sleep section for “Sleep after” and Hibernate after” options.
Contributing Editor Lincoln Spector writes about technology and cinema. Email your tech questions to him at answer@pcworld.com , or post them to a community of helpful folks on the PCW Answer Line forum . Follow Lincoln on Twitter .
Все способы:
- Пробуждаем компьютер
- Вариант 1: Сон
- Вариант 2: Гибернация
- Решение возможных проблем
- Заключение
- Вопросы и ответы: 27
Некоторые пользователи, чьи компьютеры работают 24 часа в сутки с редкими перезагрузками, мало задумываются о том, как быстро происходит запуск рабочего стола и необходимых программ после включения машины. Основная же масса людей выключают свои ПК на ночь или на время своего отсутствия. При этом закрываются все приложения, и происходит завершение работы операционной системы. Запуск сопровождается обратным процессом, что может занимать значительное время.
Для того чтобы его сократить, разработчики ОС предоставили нам возможность вручную или автоматически переводить ПК в один из режимов пониженного потребления электроэнергии с сохранением работоспособного состояния системы. Сегодня мы поговорим о том, как вывести компьютер из сна или гибернации.
Пробуждаем компьютер
Во вступлении мы упомянули о двух энергосберегающих режимах – «Сон» и «Гибернация». В обоих случаях компьютер «ставится на паузу», но в режиме сна данные хранятся в ОЗУ, а при гибернации записываются на жесткий диск в виде специального файла hiberfil.sys.
Подробнее:
Включение гибернации в Windows 7
Как включить спящий режим в Windows 7
В некоторых случаях ПК может «засыпать» автоматически из-за определенных системных настроек. Если такое поведение системы вас не устраивает, то данные режимы можно отключить.
Подробнее: Как отключить спящий режим в Windows 10, Windows 8, Windows 7
Итак, мы перевели компьютер (или он сам это сделал) в один из режимов – ждущий (сон) или спящий (гибернация). Далее рассмотрим два варианта пробуждения системы.
Вариант 1: Сон
Если ПК находится в режиме сна, то запустить его снова можно, нажав любую клавишу на клавиатуре. На некоторых «клавах» также может присутствовать специальная функциональная клавиша со знаком полумесяца.
Поможет пробудить систему и движение мышью, а на ноутбуках достаточно просто поднять крышку, чтобы начать работу.
Вариант 2: Гибернация
При гибернации компьютер отключается полностью, так как нет необходимости хранить данные в энергозависимой оперативной памяти. Именно поэтому запустить его можно только с помощью кнопки включения на системном блоке. После этого запустится процесс считывания дампа из файла на диске, а затем запустится рабочий стол со всеми открытыми программами и окнами, как было до отключения.
Решение возможных проблем
Бывают ситуации, когда машина ни в какую не желает «просыпаться». В этом могут быть виноваты драйвера, устройства, подключенные к USB-портам, или настройки плана электропитания и BIOS.
Подробнее: Что делать, если ПК не выходит из спящего режима
Заключение
В этой небольшой статье мы разобрались в режимах отключения компьютера и в том, как его из них вывести. Использование данных возможностей Windows позволяет сэкономить электроэнергию (в случае с ноутбуком заряд батареи), а также значительное количество времени при запуске ОС и открытии необходимых для работы программ, файлов и папок.
Наша группа в TelegramПолезные советы и помощь
Quick Links
-
Configure How Long Windows Waits Before Hibernating After Sleeping
-
Choose Whether Windows Hibernates at Critical Battery Levels
-
Enable or Disable Hybrid Sleep
-
Hibernate Your PC When You Press the Power Button or Close the Lid
By default, Windows will automatically put your PC to sleep after several minutes of inactivity, or when you close the lid. It will hibernate your computer a certain number of minutes later, but if you’d rather it hibernate more often, the settings are a bit tricky to find.
In sleep mode, your computer goes into a lower power state. It can wake and become usable almost instantly because it keeps providing power to the RAM. When the computer hibernates, it writes the contents of its RAM to the hard drive and then stops using power. It’ll take longer to wake up, as it has to load the contents of the hibernation file back into RAM, but you won’t lose your data if your battery dies, the power goes out, or some other power-related catastrophe happens.
Configure How Long Windows Waits Before Hibernating After Sleeping
To find hibernation settings, open the Control Panel and head to Hardware and Sound > Power Options > Change Plan Settings.
(These settings are tied to your power plan. However, by default, your computer will always stay set to the «Balanced» power plan unless you choose another power plan.)
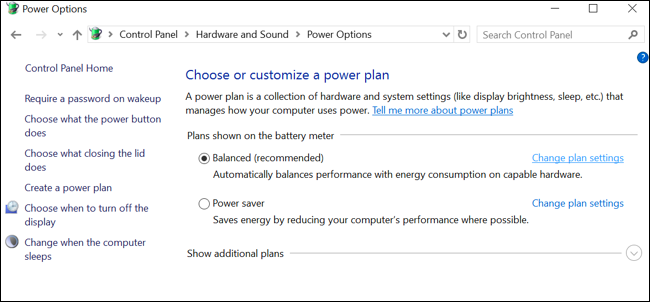
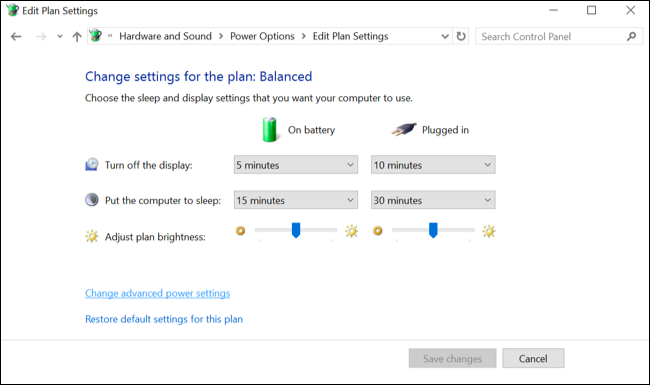
You can control exactly when your computer goes to sleep from here. If you have a laptop, there are separate settings for both when it sleeps when it’s «on battery» and when it’s «plugged in». Click the «Change Advanced Power Settings» link toward the bottom.
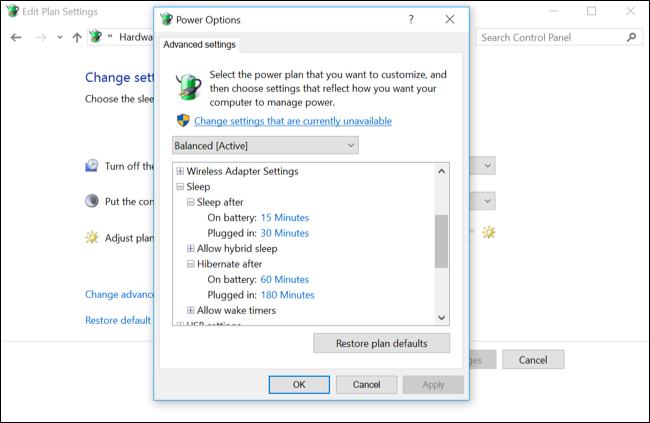
Expand the «Sleep» section and then expand «Hibernate After». You can choose exactly how many minutes your computer waits before it goes to sleep on both battery power and when plugged in. Enter «0» and Windows won’t hibernate.
For example, if you set your computer to sleep after 10 minutes and hibernate after 60 minutes, it will go to sleep after 10 minutes of inactivity and then hibernate 50 minutes after it starts sleeping.
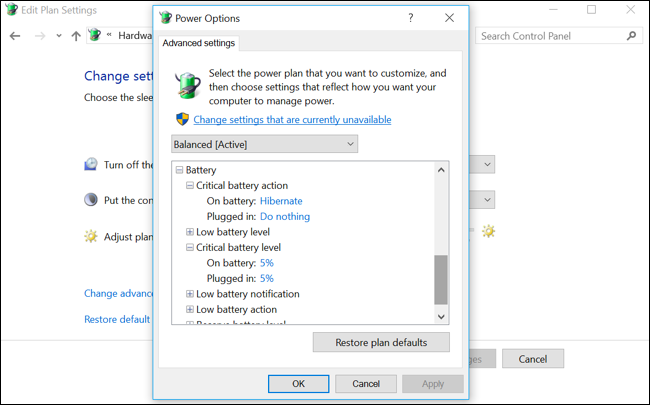
Choose Whether Windows Hibernates at Critical Battery Levels
Windows can automatically hibernate when the battery reaches a critical level, which is important. This ensures a laptop will automatically go into hibernation mode and save its state. If the laptop didn’t automatically hibernate at a low battery level, the battery would simply die and stop providing power to the RAM. You’d then lose all your work as the computer shuts off.
You’ll find the option to configure this in the Advanced Settings window we used above. This time, expand the «Battery» section.
Under «Critical Battery» action, you can choose what you want the computer to do when it reaches a critical battery level—for example, hibernate. If you don’t want the laptop to hibernate, you can just tell it to shut down and lose its system state, but then you’ll lose your data whenever your laptop gets to a low battery level. We think setting this to hibernate is a good idea.
Under «Critical Battery Level», you can choose what battery percentage level Windows considers «critical.» If your laptop’s battery drains quickly, you might want to set this at a slightly higher level. If your laptop’s battery drains slowly, you might want to set it at a slightly lower level.
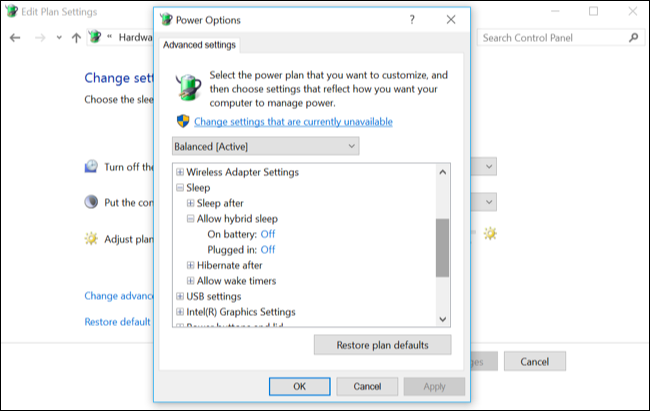
Enable or Disable Hybrid Sleep
You’ll also notice a «hybrid sleep» option here. By default, this is enabled on desktop PCs, but not on laptop PCs.
When hybrid sleep is enabled, the computer will automatically save the contents of its RAM to disk every time it sleeps. This is useful for desktop PCs, as it ensures they won’t lose their system state if they lose power—after all, desktops don’t have integrated batteries, as laptops do.
This isn’t enabled for laptops as it would use additional battery power to save the contents of the RAM to disk each time the laptop goes to sleep. Microsoft’s Raymond Chen has explained this option in more detail.
You should probably leave this option alone. It generally shouldn’t be enabled on laptops and shouldn’t be disabled on desktops.
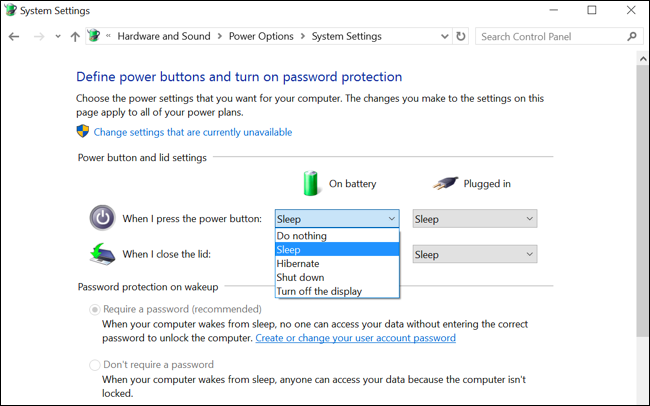
Hibernate Your PC When You Press the Power Button or Close the Lid
You can also choose what happens when you press your PC’s power button or close your laptop’s lid by heading to Control Panel > Hardware and Sound > Power Options > Choose what the power button does.
Under «When I press the power button», you can choose what the computer does when you perform these actions. By default, your computer will either shut down or go to sleep—but you can make your computer hibernate when you press the power button or close the lid, if you like.
Have you ever needed to step away from your computer for an indefinite period but didn’t want to shut it down? This could be for various reasons; maybe you have some work that you wish to get right back into post your lunch break or your PC boots on like a snail. The sleep mode in Windows OS lets you do just that, but what if I told you there’s a better power-saving feature than the usual sleep mode?
Hibernation mode is a power option that lets Windows users exploit the features of both a complete system shut down and the sleep mode. Just like Sleep, users can configure when they want their systems to go under Hibernation, and if they wish, the feature can be entirely disabled, too (although keeping it active does make for a better overall experience).
In this article, we will be explaining the difference between sleep and hibernation modes, and also show you how to enable or disable hibernation on Windows 10.
Table of Contents
What is Hibernation?
Hibernation is a power-saving state primarily made for laptops, although it is available on certain computers as well. It differs from Sleep in terms of power usage and where your currently open (before you left your System); files are saved.
The sleep mode is activated by default when you leave your computer without shutting it down. In the sleep state, the screen is turned off, and all the foreground processes (files and applications) are saved in the memory (RAM). This allows the System to be in a low-power state but still be running. You can get back to work by a single click of the keyboard or by simply moving your mouse. The screen boots on within a few seconds, and all your files & applications will be in the same state as they were when you left.
Hibernation, pretty much like Sleep, also saves the state of your files & applications and is activated after your System has been under Sleep for a prolonged period. Unlike Sleep, which stores files in the RAM and therefore requires a constant power supply, Hibernation doesn’t require any power (like when your System is shut down). This is made possible by storing the current state of the files in the hard drive instead of the temporary memory.
When in an extended sleep, your computer automatically transfers the state of your files to the hard disk drive and switches to Hibernation. As the files have been moved to the hard drive, the System will take a little extra time to boot on than required by Sleep. Although, the boot on time is still faster than booting your computer after a complete shutdown.
Hibernation is particularly useful when the user doesn’t want to lose the state of his/her files but also won’t have the opportunity to charge the laptop for some time.
As obvious, saving the state of your files requires reserving some amount of memory and this amount is occupied by a system file (hiberfil.sys). The reserved amount is roughly equal to 75% of the System’s RAM. For example, if your System has 8 GB of RAM installed, the hibernation system file will take up almost 6 GB of your hard disk storage.
Before we move on to enabling Hibernation, we will need to check if the computer has the hiberfil.sys file. If absent, the computer can not go under Hibernation (PCs with InstantGo do not have the hibernation power option).
To check if your computer can hibernate, follow the below steps:
1. Launch File Explorer by double-clicking on its icon on the desktop or pressing the keyboard shortcut Windows Key + E. Click on Local Drive (C:) to open C Drive.

2. Switch to the View tab and click on Options at the end of the ribbon. Select ‘Change folder and search options’.

3. Again, switch to the View tab of the Folder Options window.
4. Double click on Hidden files and folders to open a sub-menu and enable Show hidden files, folders, or drives.

5. Uncheck/untick the box next to ‘Hide protected operating system files (Recommended).’ A warning message will appear when you try to untick the option. Click on Yes to confirm your action.

6. Click on Apply and then OK to save changes.

7. The Hibernation file (hiberfil.sys), if present, can be found at the root of the C drive. This means your computer is eligible for hibernation.

Enabling or disabling Hibernation is quite easy, and either action can be achieved in a couple of minutes. There are also multiple methods via which one can enable or disable Hibernation. The easiest one is executing a single command in an elevated command prompt while other methods include editing Windows Registry Editor or accessing advanced power options.
Method 1: Enable or Disable Hibernation using Command Prompt
As mentioned, this is the easiest way to enable or disable Hibernation on Windows 10 and, therefore, should be the first method you try.
1. Open Command Prompt as an administrator using any of the listed methods.
2. To enable Hibernation, type powercfg.exe /hibernate on, and press enter.
To disable Hibernation, type powercfg.exe /hibernate off and press enter.

Both the commands do not return any output, so to check if the command you entered was executed properly, you will need to head back to the C drive and look for the hiberfil.sys file (Steps are mentioned earlier). If you find the hiberfil.sys, it implies you were successful in enabling Hibernation. On the other hand, if the file is absent, Hibernation has been disabled.
Method 2: Enable or Disable Hibernation Via Registry Editor
The second method has the user editing the HibernateEnabled entry in the Registry Editor. Be careful when following this method as Registry Editor is an extremely powerful tool, and any accidental mishap can lead to a whole other set of problems.
1. Open Windows Registry Editor using any of the following methods
a. Open Run Command by pressing Windows Key + R, type regedit and press enter.
b. Press Windows Key + S, type regedit or registry editor, and click on Open when the search returns.

2. From the left panel of the registry editor window, expand HKEY_LOCAL_MACHINE by double-clicking on it or by clicking on the arrow to its left.
3. Under HKEY_LOCAL_MACHINE, double-click on SYSTEM to expand.
4. Now, expand CurrentControlSet.
Follow the same pattern and navigate to Control/Power.
The final location indicated in the address bar should be:
HKEY_LOCAL_MACHINE\SYSTEM\CurrentControlSet\Control\Power

5. In the right-hand panel, double click on HibernateEnabled or right-click on it and select Modify.

6. To enable Hibernation, type 1 in the text box under Value Data.
To disable Hibernation, type 0 in the text box under Value Data.
7. Click on the OK button, exit registry editor, and restart your computer.
Again, head back to the C drive and look for the hiberfil.sys to ensure if you were successful in enabling or disabling Hibernation.
Also Read: Disable Windows Pagefile and Hibernation To Free Up Space
Method 3: Enable or Disable Hibernation Via Advanced Power Options
The final method will have the user enable or disable Hibernation through the Advanced Power Options window. Here, users can also set the time frame after which they want their system to go under Hibernation. Like the previous methods, this one is also quite simple.
1. Open Advanced Power Options by any of the two methods
a. Open Run command, type powercfg.cpl, and press enter.
b. Open Windows Settings (Windows Key + I) and click on System. Under Power & Sleep settings, click on Additional power settings.
2. In the Power Options window, click on Change plan settings (highlighted in blue) under the Selected plan section.

3. Click on Change advanced power settings in the following Edit Plan Settings window.

4. Expand Sleep by clicking on the plus to its left or by double-clicking on the label.
5. Double-click on Hibernate after and set the Settings (Minutes) to how many minutes you would like your System to sit idle for before going into Hibernation.
To disable Hibernation, set the Settings (Minute) to Never and under Allow hybrid sleep, change the setting to Off.
6. Click on Apply, followed by OK to save the changes you made.
Recommended:
- How to Enable Google Feed in Nova Launcher
- 5 Ways to Remove Hyperlinks from Microsoft Word Documents
- How to Identify different USB Ports on your Computer
We hope you were successful in enabling or disabling Hibernation on Windows 10. Also, let us know which one of the three above methods did the trick for you.