
Applies ToWindows 11 Windows 10
При входе с помощью пароля учетной записи Майкрософт
Если вы забыли пароль учетной записи Майкрософт и хотите сбросить его, вы можете выбрать следующие варианты:
-
На экране входа выберите Я забыл пароль.
-
На экране входа выберите Параметры входа , а затем — Веб-вход. Следуйте инструкциям, чтобы войти в систему, а затем выберите Забыли пароль.
-
В любом браузере перейдите к разделу Сброс пароля.
Вы можете изменить пароль с помощью приложения «Параметры».
-
В приложении «Настройки» на устройстве с Windows, выберите Учетные записи > параметры входа или воспользуйтесь следующим сочетанием клавиш:
Параметры входа
-
Выберите Пароль > Изменить, а затем следуйте инструкциям. Вам потребуется ввести старый пароль, чтобы создать новый.
-
Если вы забыли пароль, выберите Забыли текущий пароль и следуйте инструкциям, чтобы проверить учетную запись и создать новую.
-
При входе с помощью ПИН-кода
Если вы забыли пароль учетной записи Майкрософт, но знаете свой ПИН-код, вы можете изменить пароль с помощью приложения «Параметры».
-
В приложении «Настройки» на устройстве с Windows, выберите Учетные записи > параметры входа или воспользуйтесь следующим сочетанием клавиш:
Параметры входа
-
Выберите Пароль > Изменить, а затем следуйте инструкциям. Вам потребуется ввести старый пароль, чтобы создать новый.
-
Если вы забыли пароль, выберите Забыли текущий пароль и следуйте инструкциям, чтобы проверить учетную запись и создать новую.
-
Если вы забыли пароль и вам нужно сбросить его, это можно сделать на экране входа в Windows. Вам потребуется заблокировать компьютер, когда вы будете готовы выполнить указанные ниже действия.
-
Нажмите кнопку ввода пароля .

-
Нажмите кнопку ОК , а затем сброс пароля.
-
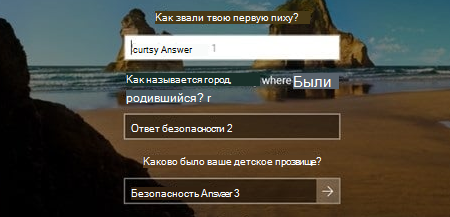
Ответьте на контрольные вопросы, которые вы настроили при создании учетной записи.
При входе с помощью пароля локальной учетной записи
Если вы забыли пароль и вам нужно сбросить его, это можно сделать на экране входа в Windows.
-
Нажмите кнопку ввода пароля .
-
Нажмите кнопку ОК , а затем сброс пароля.
-
Ответьте на контрольные вопросы, которые вы настроили при создании учетной записи.
Совет: Если вы создали диск сброса пароля, можно выбрать параметр Использовать диск сброса пароля вместо этого и следовать инструкциям.
Вы можете изменить пароль с помощью приложения «Параметры».
-
В приложении «Настройки» на устройстве с Windows, выберите Учетные записи > параметры входа или воспользуйтесь следующим сочетанием клавиш:
Параметры входа
-
Выберите Пароль > Изменить, а затем следуйте инструкциям. Чтобы создать новый пароль, необходимо ввести старый пароль.
-
Если вы забыли пароль, выберите Я забыл пароль и следуйте инструкциям, чтобы проверить свою учетную запись и создать новую.
-
Ответьте на контрольные вопросы.
-
Введите новый пароль.
-
Если у вас есть доступ к учетной записи администратора, уже настроенной на компьютере, можно сбросить пароль для локальной учетной записи, к которую вы пытаетесь получить доступ, выполнив следующие действия.
-
Открыть управление компьютером
-
Разверните узел Локальные пользователи и группы > пользователи
-
Щелкните правой кнопкой мыши пользователя, для которого требуется изменить пароль, и выберите пункт Задать пароль…
-
Введите новый пароль и подтвердите его.
Важно: Если у вас нет учетной записи администратора для изменения пароля, вам потребуется сбросить устройство с Windows. Дополнительные сведения см. в разделе Сброс компьютера.
Дополнительные сведения
Важно: Учетные записи Майкрософт, операционная система Windows и другие продукты Майкрософт содержат пароли для защиты вашей информации. В этой статье приведены некоторые параметры, которые можно использовать для сброса или восстановления пароля, если вы забудете его. Если эти параметры не работают, служба поддержки Майкрософт не может помочь вам получить или обойти потерянный или забытый пароль.
Не можете войти?
Если вам не удается войти в учетную запись Майкрософт, большинство проблем можно определить с помощью нашего Вспомогательного приложения для входа.Вспомогательное приложение для входа
Обращение в службу поддержки
Чтобы получить техническую поддержку, перейдите в раздел Обращение в службу поддержки Майкрософт, опишите проблему и выберите Техническая поддержка. Если вам по-прежнему нужна помощь, выберитеОбратитесь в службу поддержки, чтобы получить наилучший вариант поддержки.
Важно: Чтобы защитить учетную запись и ее содержимое, нашим агентам поддержки не разрешается отправлять ссылки для сброса пароля или получать доступ к сведениям об учетной записи и изменять их.
Нужна дополнительная помощь?
Нужны дополнительные параметры?
Изучите преимущества подписки, просмотрите учебные курсы, узнайте, как защитить свое устройство и т. д.
FAQ
[Windows 11/10] Забыли имя пользователя, пароль или PIN-код учетной записи Microsoft
Поддерживаемые продукты: ноутбук, настольный компьютер, моноблок, игровая консоль, материнская плата, видеокарта, ЖК-монитор, мини-ПК
Ваша Учетная Запись Microsoft связана со всеми приложениями и службами Microsoft. Если Вы не можете получить доступ к своей Учетной Записи Microsoft или войти в Windows с помощью PIN-кода, обратитесь к этой статье, которая поможет Вам решить проблему.
Забыли имя пользователя Учетной Записи Microsoft
Если Вы забыли адрес электронной почты своей Учетной Записи Microsoft или вошли в систему и получили сообщение об ошибке Эта Учетная Запись Microsoft не существует, рекомендуется выполнить следующие действия, чтобы найти свое имя пользователя.
Метод 1: Найдите свое имя пользователя, если в Вашей Учетной Записи настроена информация безопасности
Если Вы ранее настроили информацию безопасности для своей Учетной Записи Microsoft, Вы можете использовать эту опцию, чтобы получить свое имя пользователя.
Примечание: Этот вариант не будет работать, если в Вашей Учетной Записи не настроена информация безопасности или если Вы больше не можете получить доступ к этой информации безопасности. Переходите к следующему шагу: Метод 2: Найдите имя пользователя своей Учетной Записи Microsoft в продукте или услуге, которую Вы используете.
- Найдите свое имя пользователя, используя контактный номер телефона службы безопасности или адрес электронной почты.
- Запросите код безопасности, который будет отправлен на номер телефона или адрес электронной почты, который Вы использовали.
- Введите код и выберите Далее.
- Когда Вы увидите нужную Учетную Запись, выберите Войти.
Если поиск имени пользователя не увенчался успехом (например, Вы не настроили свою контактную информацию безопасности или у Вас больше нет доступа к ней), попробуйте Метод 2: Найдите имя пользователя своей Учетной Записи Microsoft в продукте или услуге, которую Вы используете.
Метод 2: Найдите имя пользователя своей Учетной Записи Microsoft в продукте или услуге, которую Вы используете
Для защиты Вашей Учетной Записи Microsoft придерживается строгой политики в отношении того, как наши специалисты могут помочь Вам с Вашей Учетной Записью. Поддержка Microsoft не может предоставить информацию об Учетной Записи без надлежащей проверки, но есть места, которые Вы можете просмотреть в самих продуктах.
Настраивали ли Вы когда-нибудь дополнительный адрес электронной почты для учетной записи, в которую хотите войти, например @outlook.com, @gmail.com или @live.com? Если да, попробуйте это.
- Устройства Windows
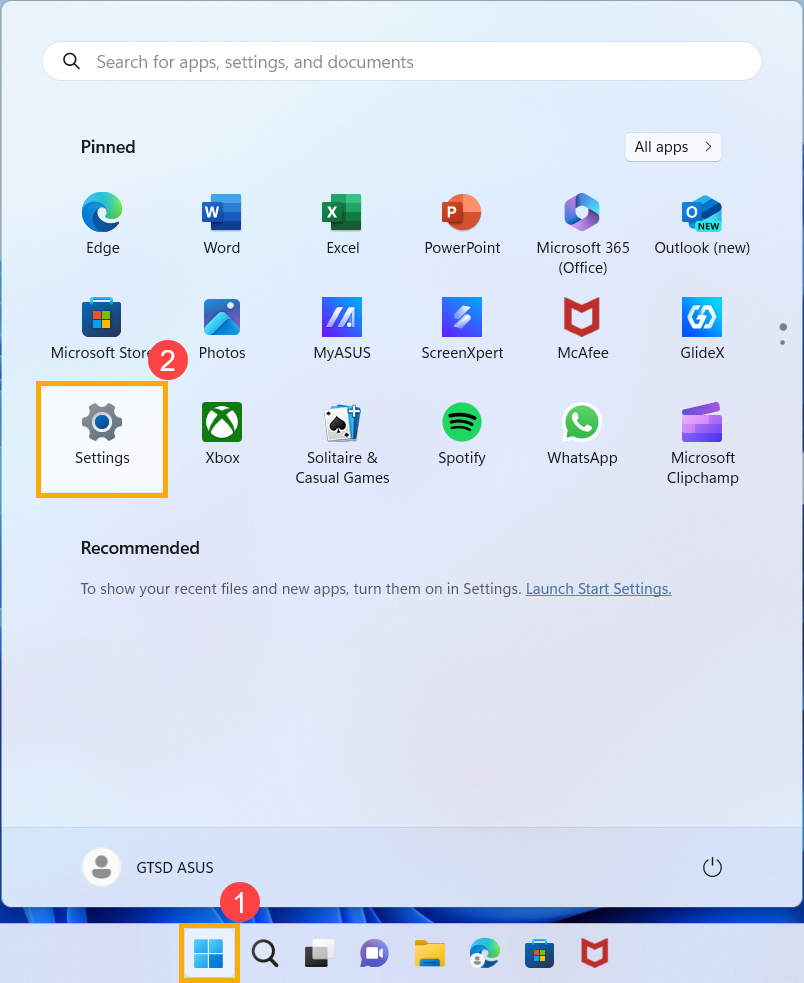
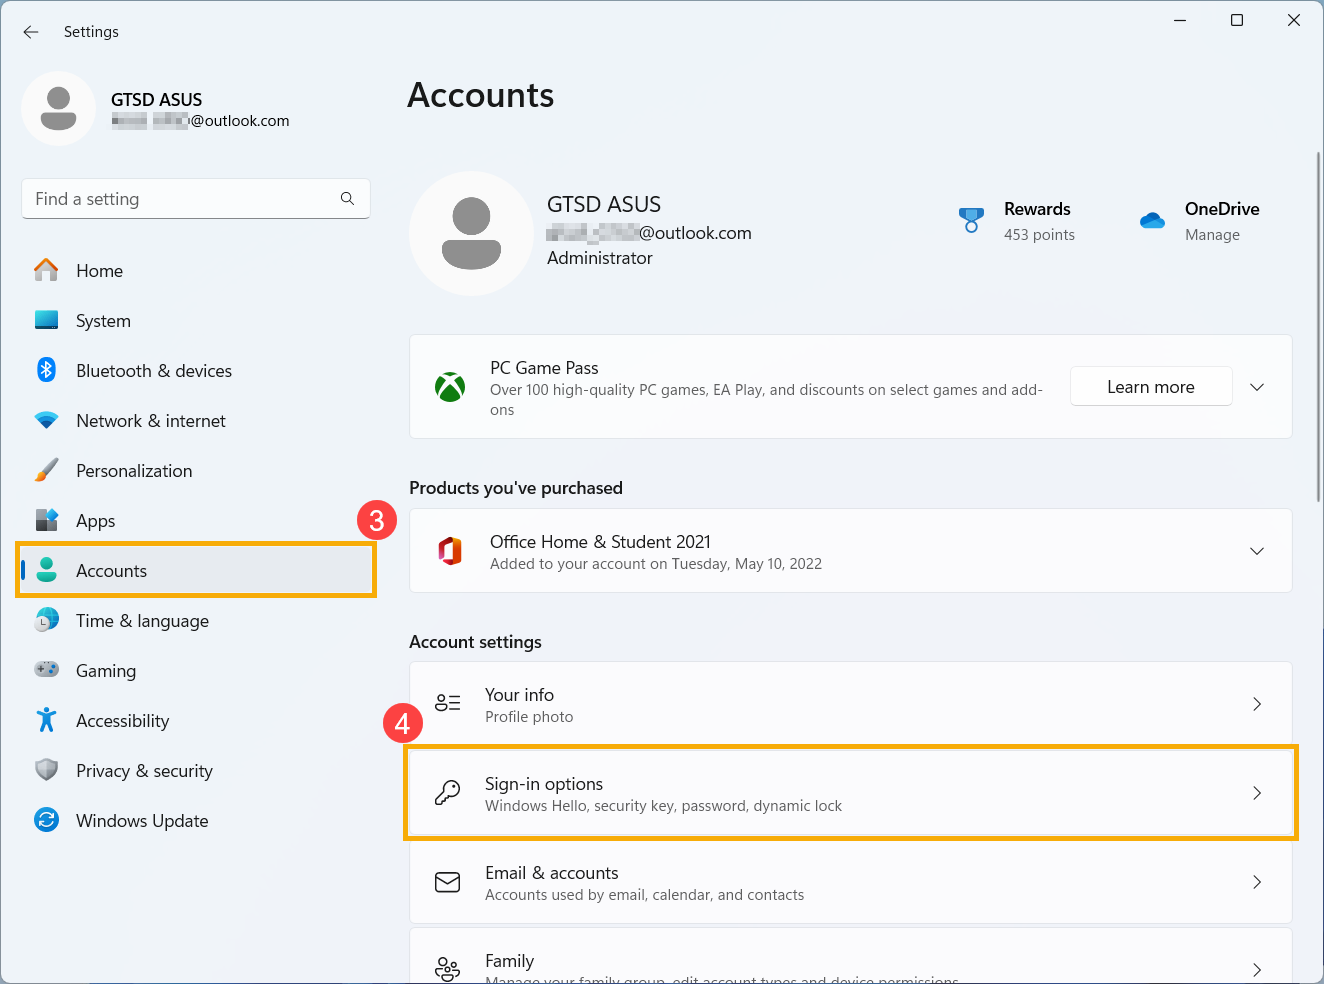
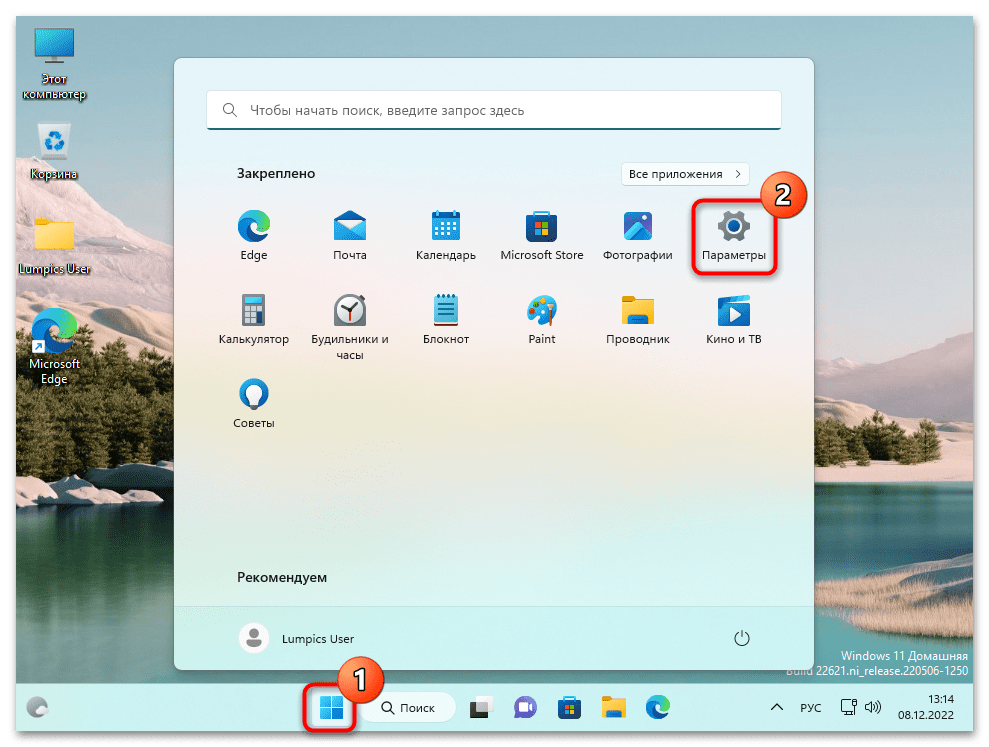
На своем устройстве Windows, войдите в систему, нажмите иконку [Начать] на Панели Задач ①, затем нажмите [Настройки] ②.
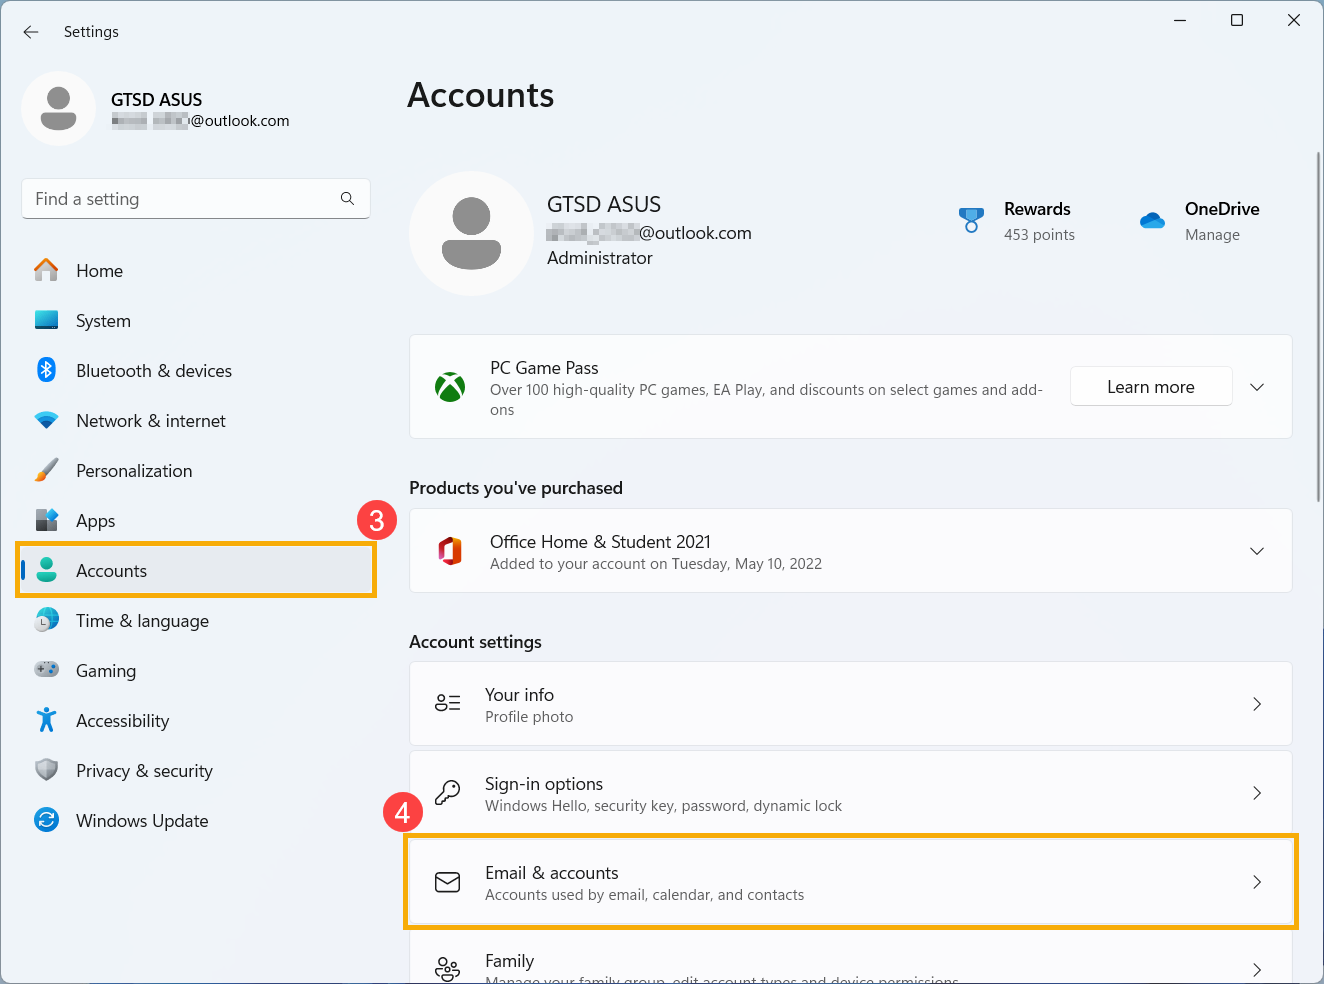
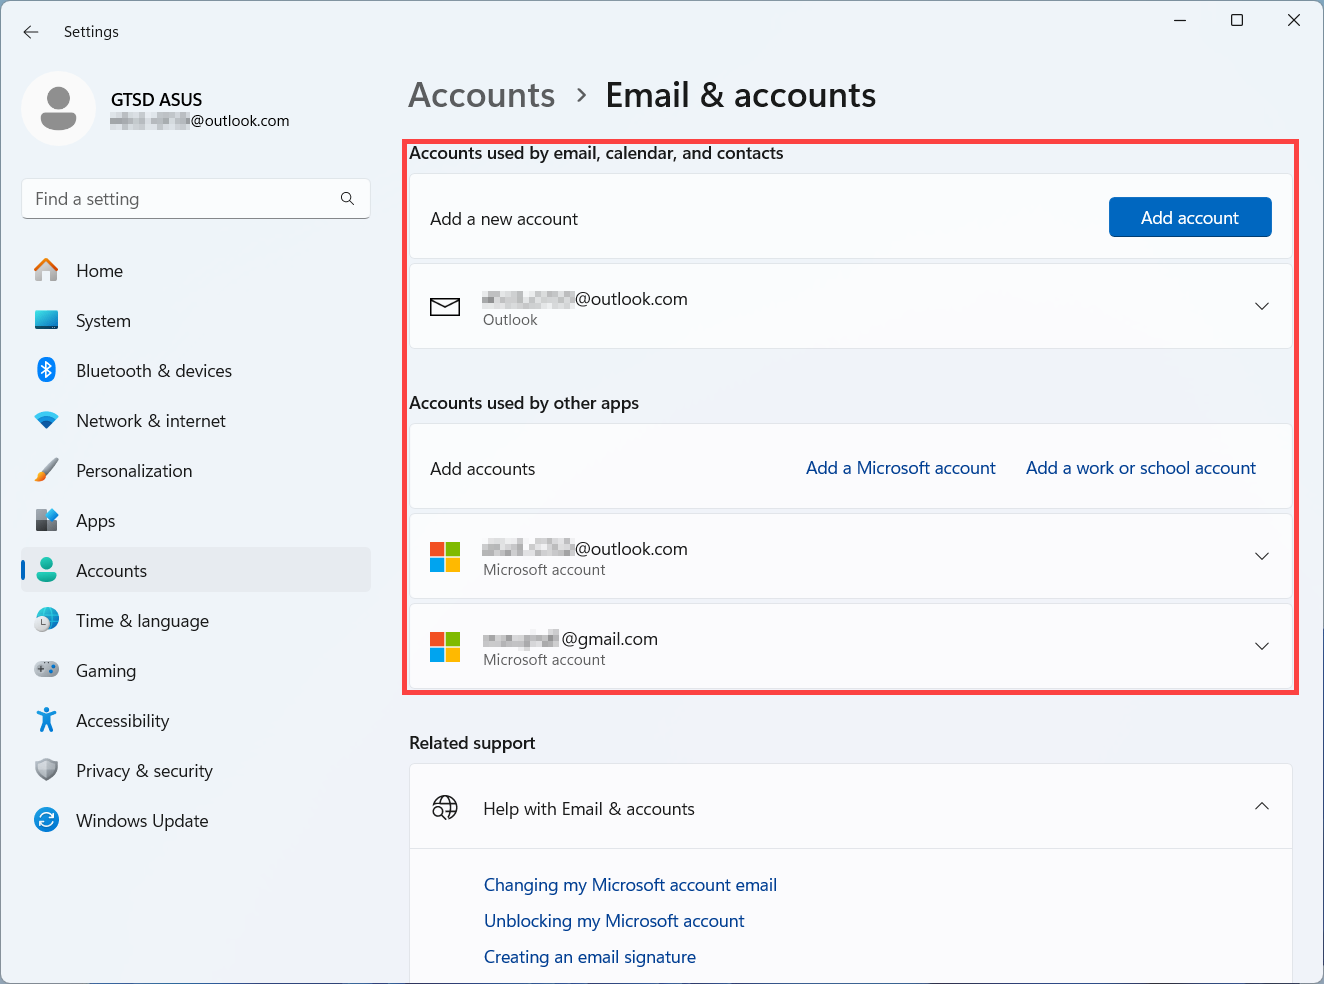
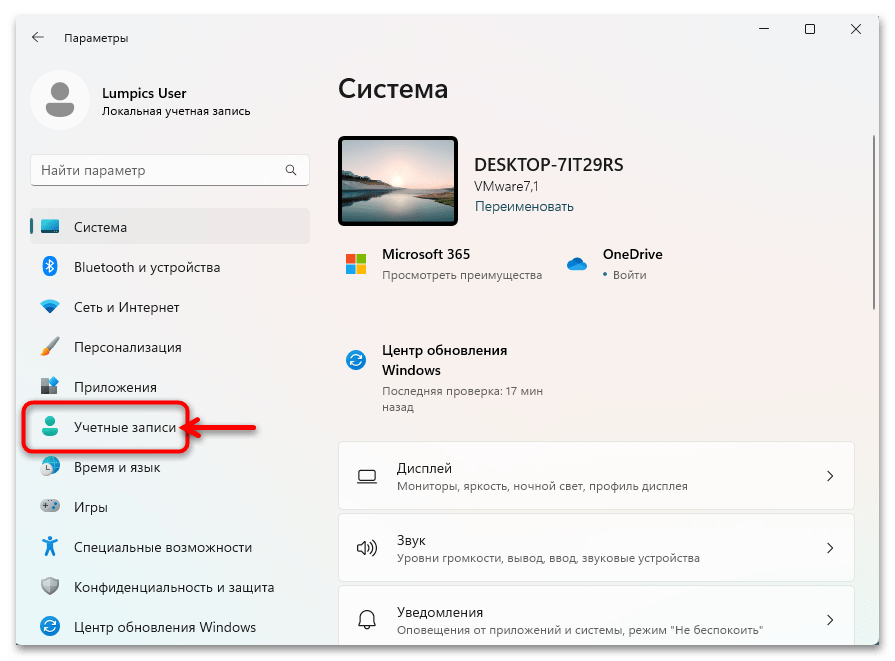
В окне настроек Windows нажмите [Аккаунты] ③ и выберите [Электронная почта & аккаунты] ④.
Ниже Электронная почта & аккаунты, Вы увидите имя пользователя, связанное с Вашим устройством.
- Офисные приложения
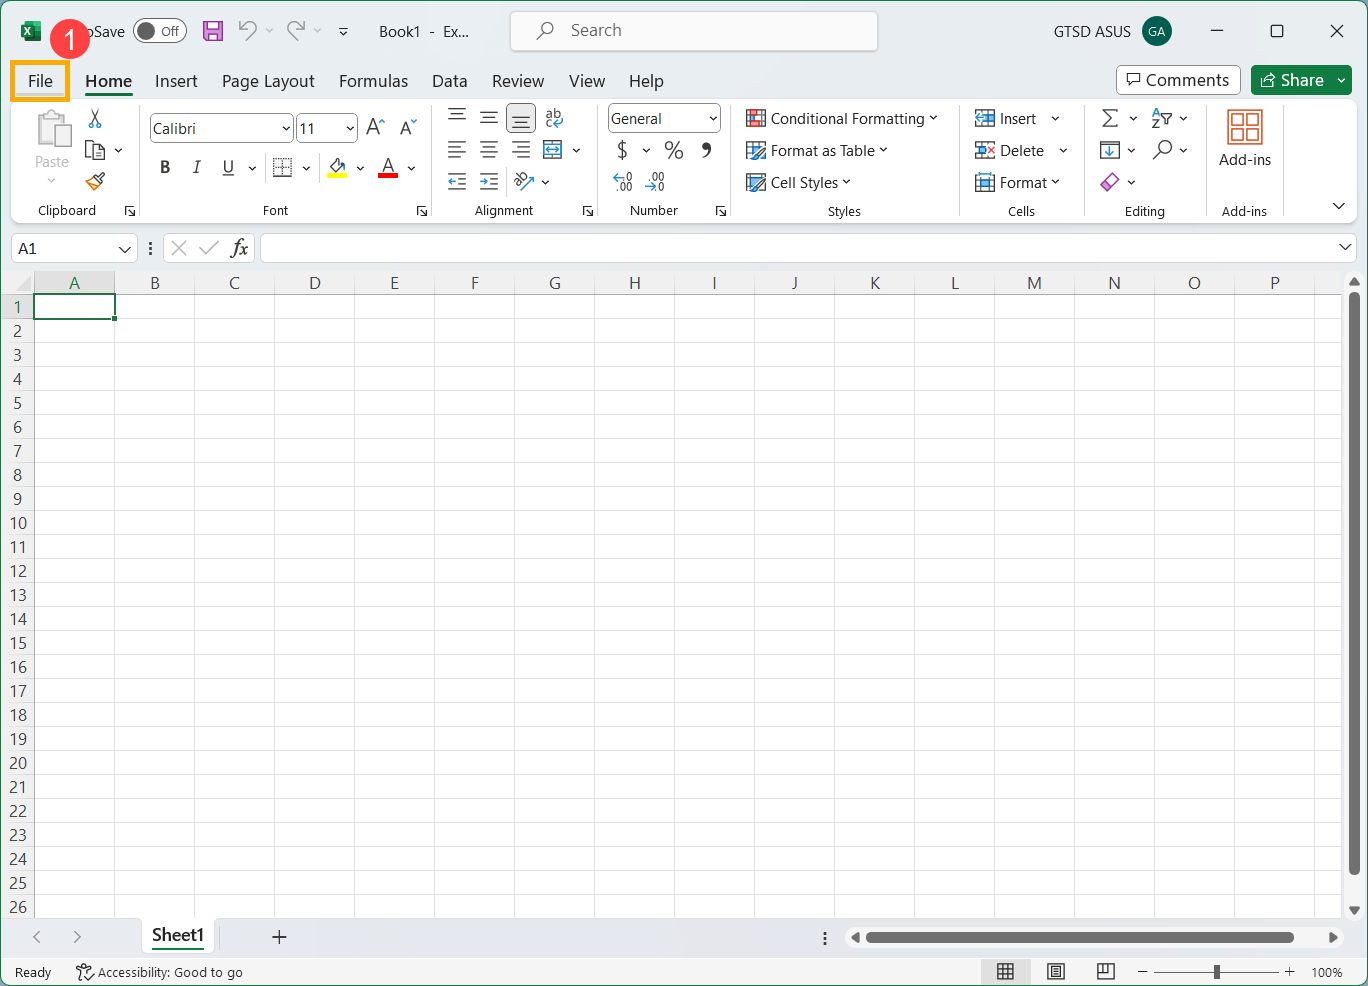
Microsoft 365 или Office 2016 и более поздние версии: откройте приложения Office, такие как Word или Excel. После открытия приложения Office нажмите [Файл] ①.
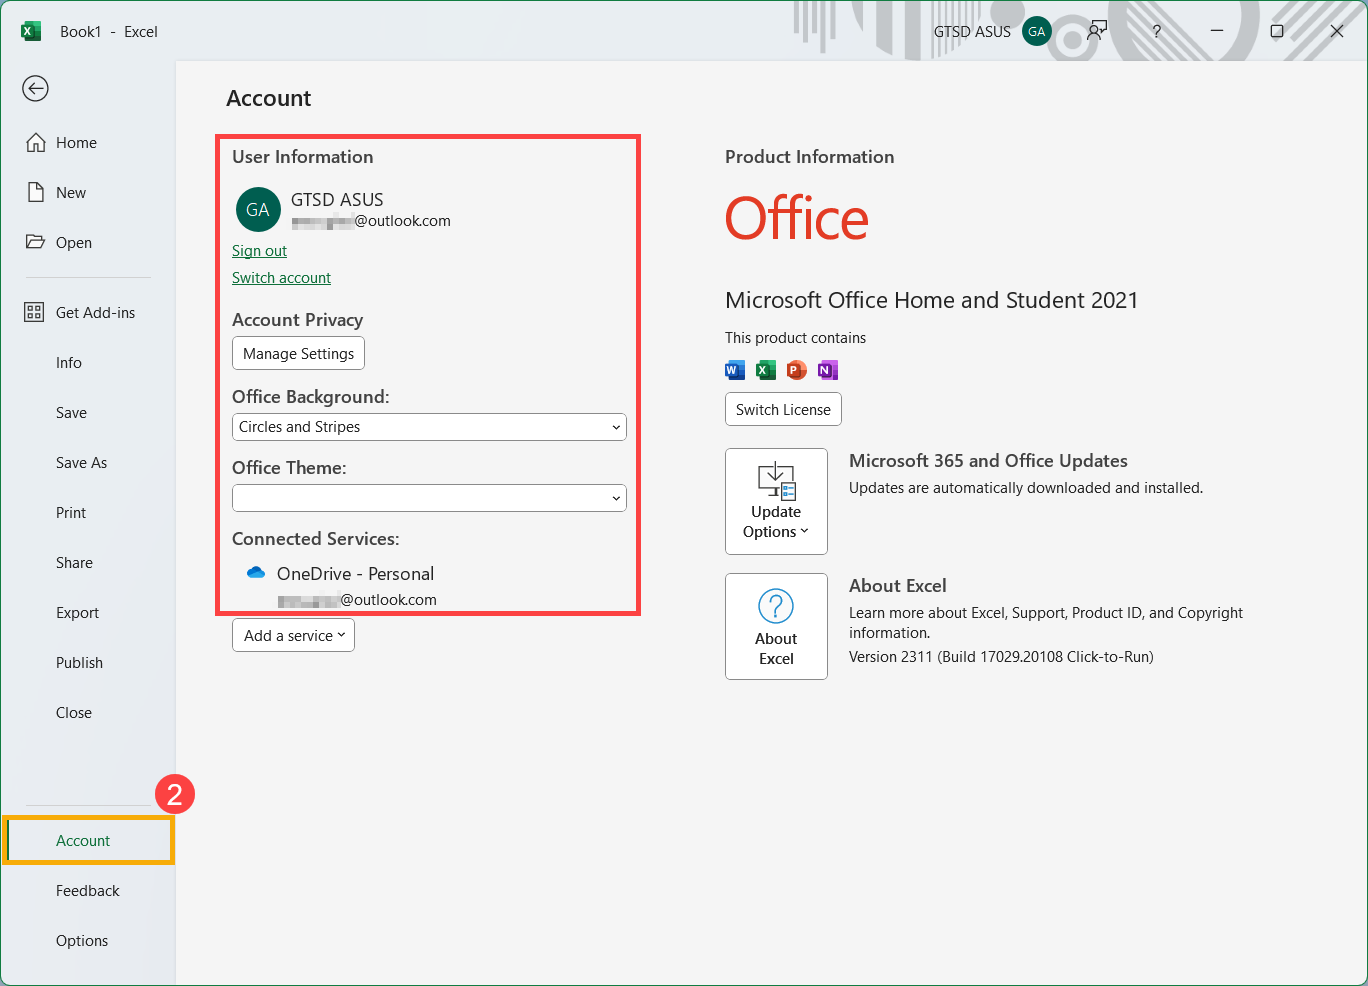
Нажмите [Аккаунт] ②. В разделе Информация о пользователе Вы найдете имя пользователя, принадлежащее Вашей Учетной Записи и связанное с ней.
Если Вы все еще не смогли найти свое имя пользователя, проверив продукты или услуги, указанные выше, перейдите к следующему шагу, чтобы определить, может Ваша Учетная Запись быть закрыта.
Метод 3: Проверьте, закрыта ли Ваша Учетная Запись Microsoft
Возможно, Вы не можете войти в свою Учетную Запись, поскольку она закрыта или удалена.
- Вы закрыли свой аккаунт: Если Вы закрыли свою Учетную Запись Microsoft, у Вас есть 60 дней с момента закрытия, чтобы войти в систему и снова открыть ее. По истечении этих 60 дней срок действия Вашей Учетной Записи и данных истекает.
- Ваш аккаунт был закрыт из-за неактивности: Если Вы не входили в свою Учетную Запись в течение длительного времени, срок ее действия может истечь из-за неактивности в соответствии со следующим графиком.
| Если в последний раз Вы входили в систему: | Срок действия Вашей Учетной Записи истекает через: |
| До июня 2014 г. | 1 год бездействия |
| После июня 2014 г. | 2 года бездействия |
Если Вы хотите повторно открыть закрытую Учетную Запись Microsoft, смотрите Повторное открытие Учетной Записи Майкрософт.
Забыли пароль Учетной Записи Microsoft
Если введенный Вами пароль не работает или Вы забыли свой пароль, сбросьте его, выполнив следующие действия.
Сбросить пароль Учетной Записи Microsoft
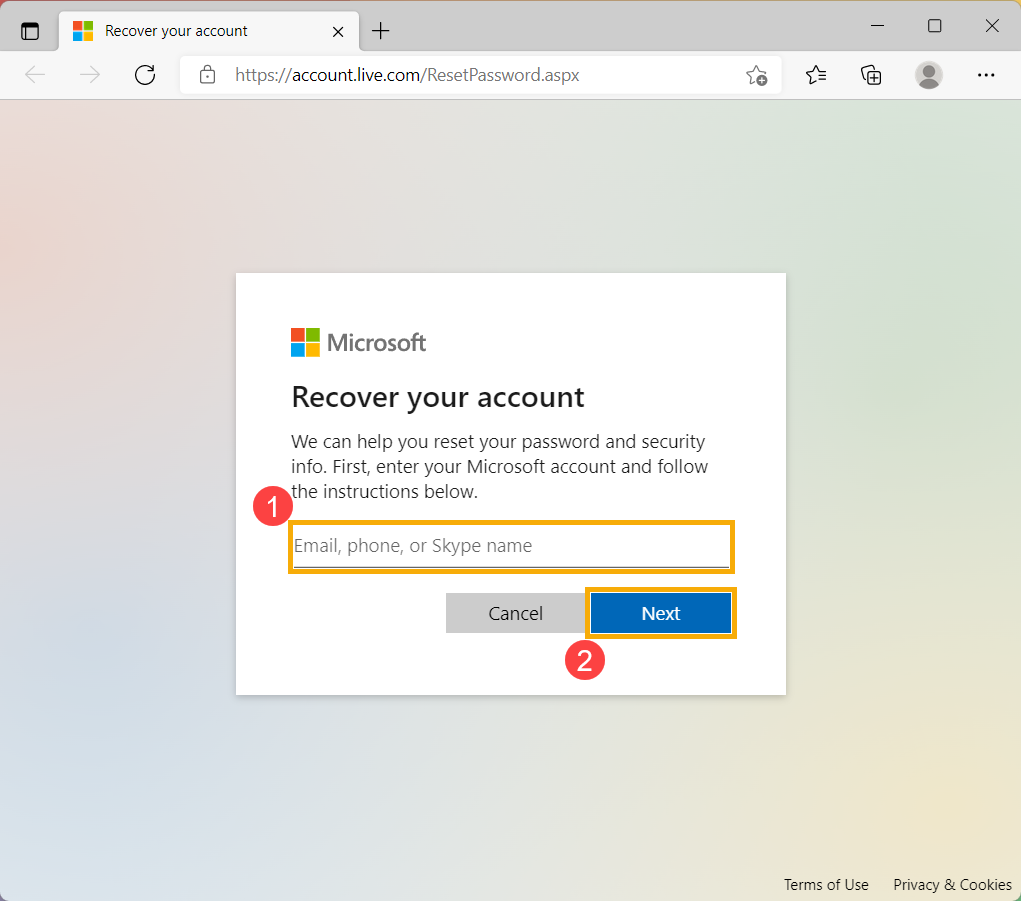
- Нажмите на эту ссылку, чтобы перейти на страницу сброса пароля Microsoft.
- Введите Ваш аккаунт Microsoft ①, например адрес электронной почты, телефон или имя Skype и нажмите [Далее] ②.
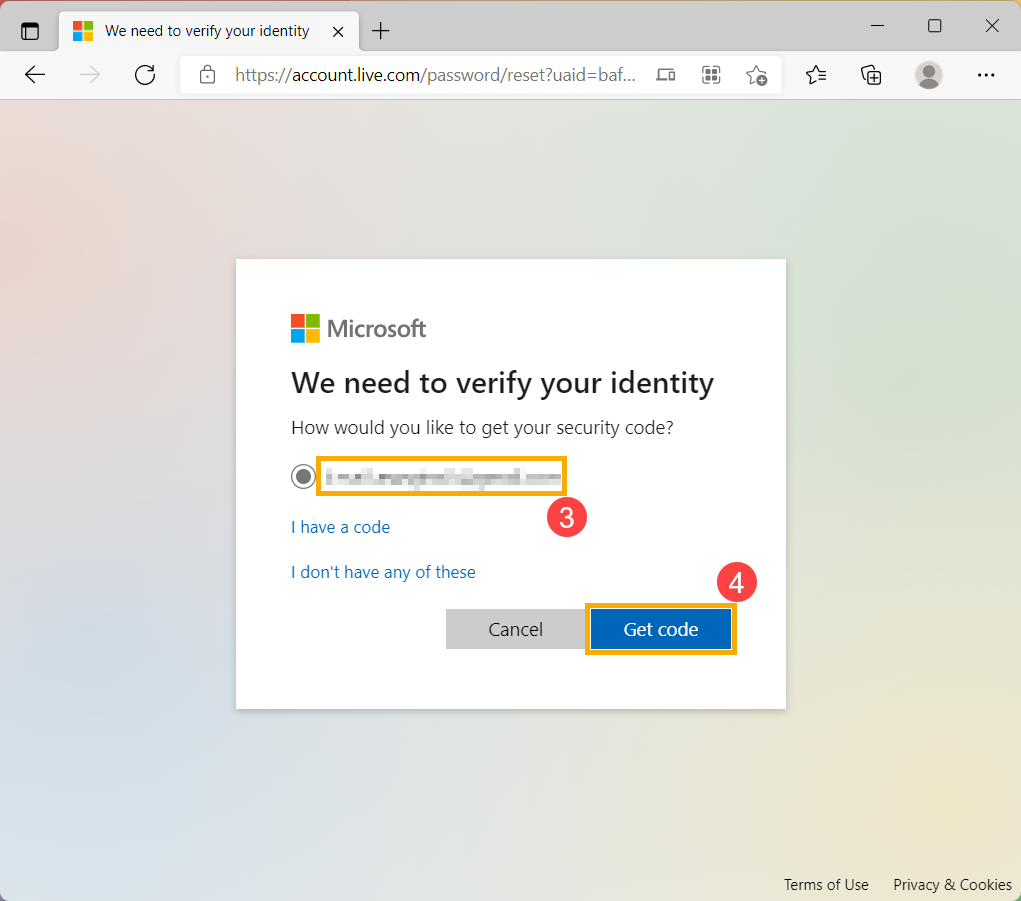
- В целях Вашей защиты Microsoft должна подтвердить Вашу личность, прежде чем Вы сможете приступить к сбросу пароля.
Выберите, как Вы хотите получить код подтверждения ③, например электронное письмо или текстовое сообщение и нажмите [Получить код] ④.
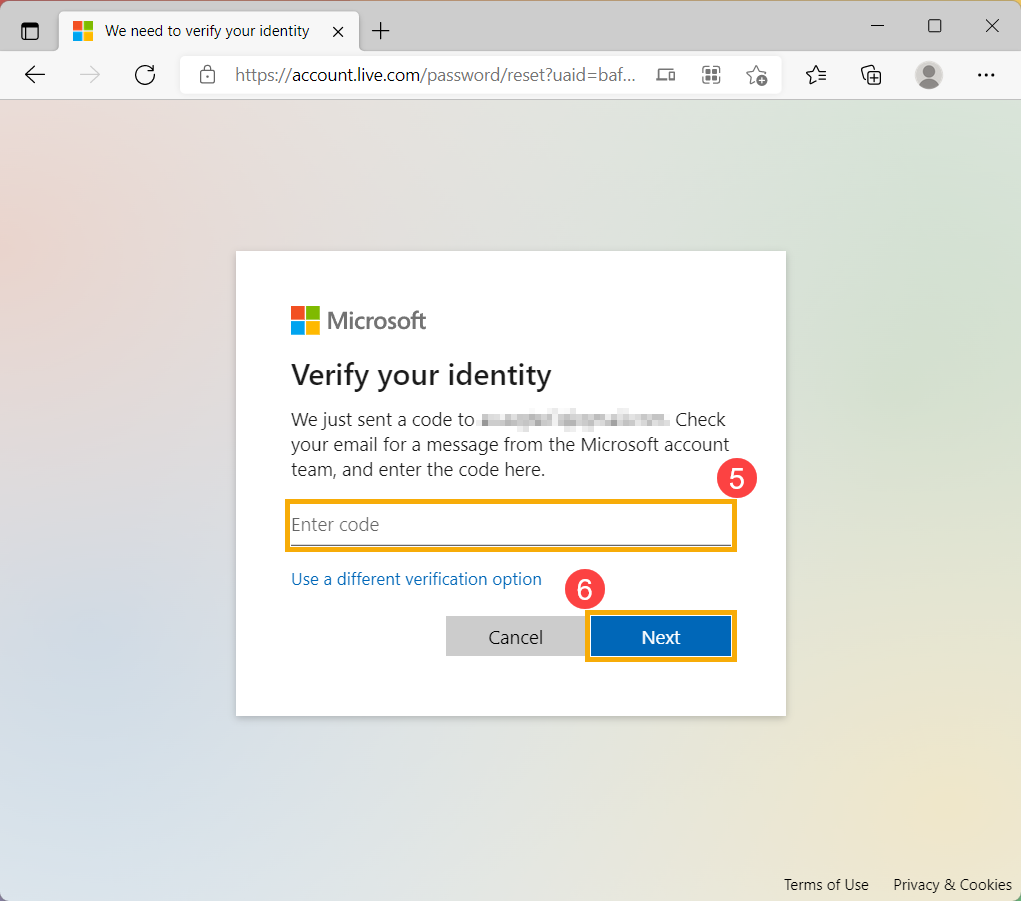
- Microsoft отправит код подтверждения на выбранный Вами адрес электронной почты или номер телефона. Проверьте на телефоне или в электронной почте наличие запрошенного кода. Введите проверочный код ⑤ и нажмите [Далее] ⑥.
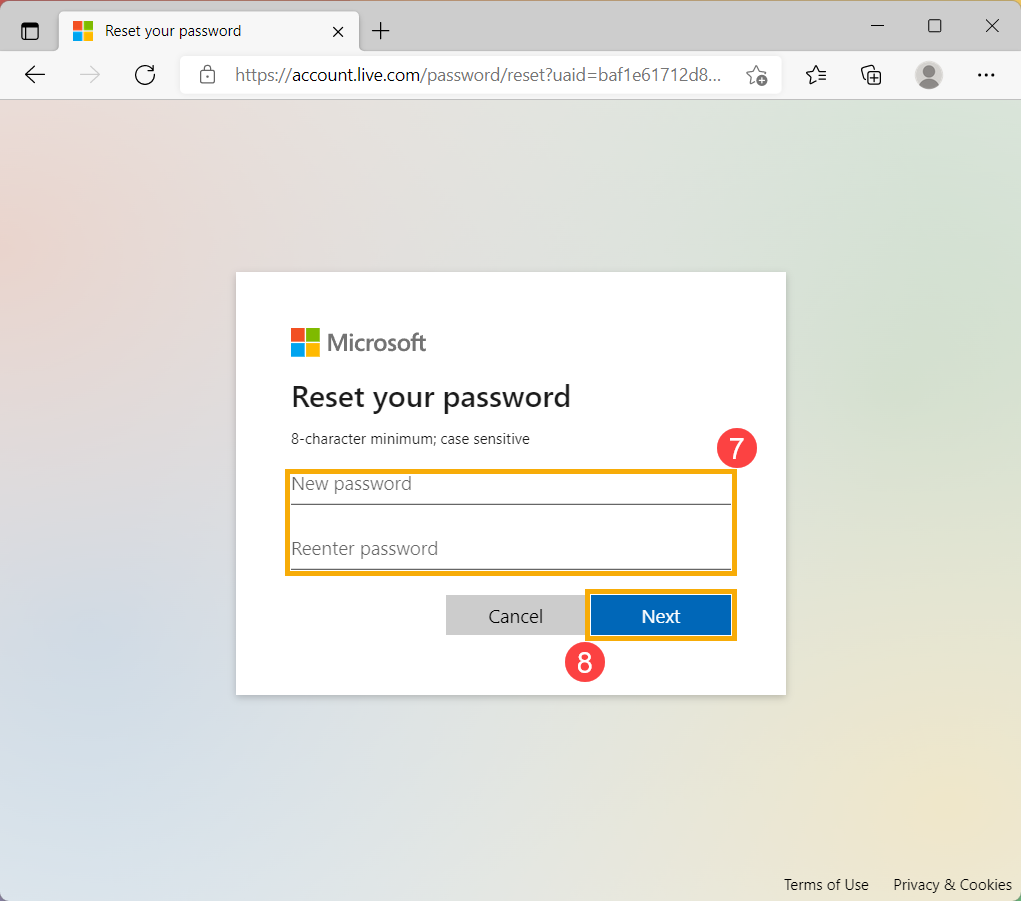
- После подтверждения проверочного кода установите новый пароль ⑦ и нажмите [Далее] ⑧.
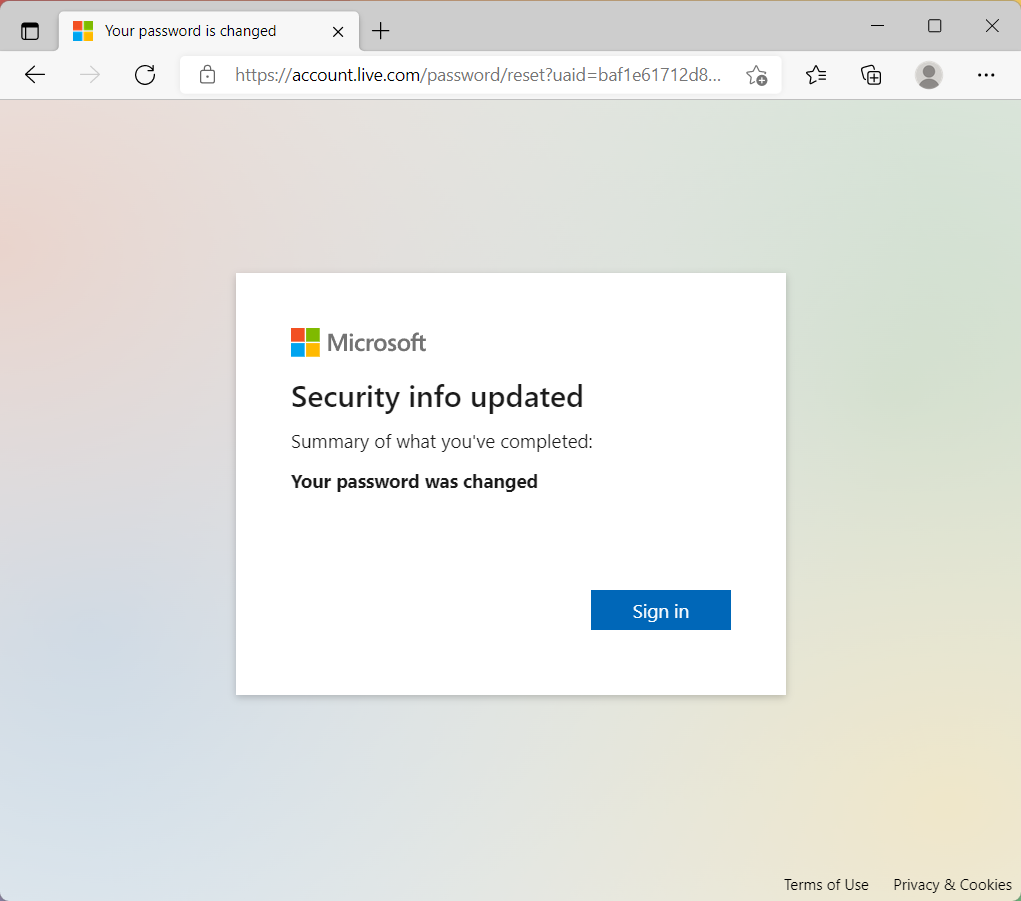
- Сброс пароля завершен.
Если сброс пароля не удался, попробуйте следующие методы:
- Если Вы не можете получить код подтверждения, обратитесь к официальным инструкциям службы поддержки Microsoft: Устранение проблем с кодом проверки.
- Если Вы попытались войти в свою Учетную Запись и получили сообщение о том, что она заблокирована, это связано с тем, что действия, связанные с Вашей Учетной Записью, могут нарушать Условия использования Microsoft. Обратитесь к официальным инструкциям поддержки Microsoft: Учетная Запись была заблокирована.
- Если у Вас включена двухэтапная аутентификация
После включения двухэтапной аутентификации или настройки приложения Authenticator у Вас могут возникнуть проблемы, если Вы используете приложения или старые устройства (например, Windows Phone 8 и Xbox 360), которые не поддерживают двухэтапную проверку.
Если у Вас включена двухэтапная аутентификация и приложение не запрашивает ввод кода безопасности при входе в систему, то Вы можете вместо этого войти в систему, используя пароль приложения. Пароль приложения — это длинный, случайно сгенерированный пароль, который Вы указываете только один раз вместо обычного пароля при входе в приложение или на устройство, не поддерживающее двухэтапную проверку.
Вам нужно создать пароль приложения только в том случае, если у Вас включена двухэтапная проверка и Вы используете приложение, которое ее не поддерживает. Для получения дополнительной информации обратитесь к официальным инструкциям службы поддержки Microsoft: Использование паролей в приложениях, которые не поддерживают двухфакторную проверку подлинности.
Забыли PIN-код для входа на устройство WindowsСбросить свой PIN-код, когда Вы вошли в систему на своем устройстве
Если Вы забыли свой PIN-код и вошли в систему с помощью пароля, отпечатка пальца, Ключа безопасности или других способов, то Вы можете выполнить следующие действия, чтобы получить новый PIN-код.
- Убедитесь, что Вы подключены к Интернету, чтобы изменения синхронизировались с Вашей Учетной Записью Microsoft.
- Нажмите иконку [Пуск] на Панели Задач ①, затем нажмите [Настройки] ②.
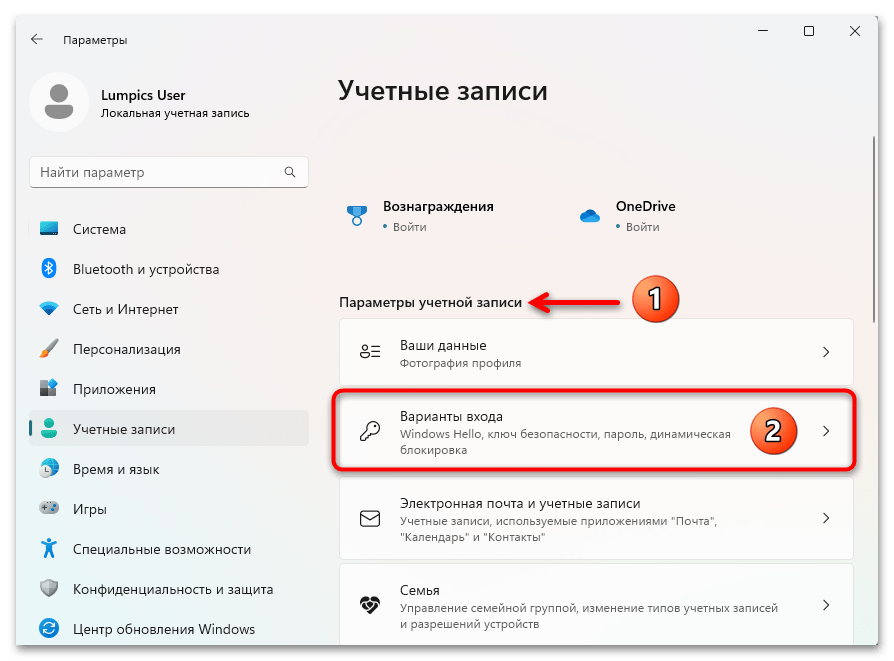
- В окне настроек Windows нажмите [Аккаунты] ③ и выберите [Варианты входа] ④.
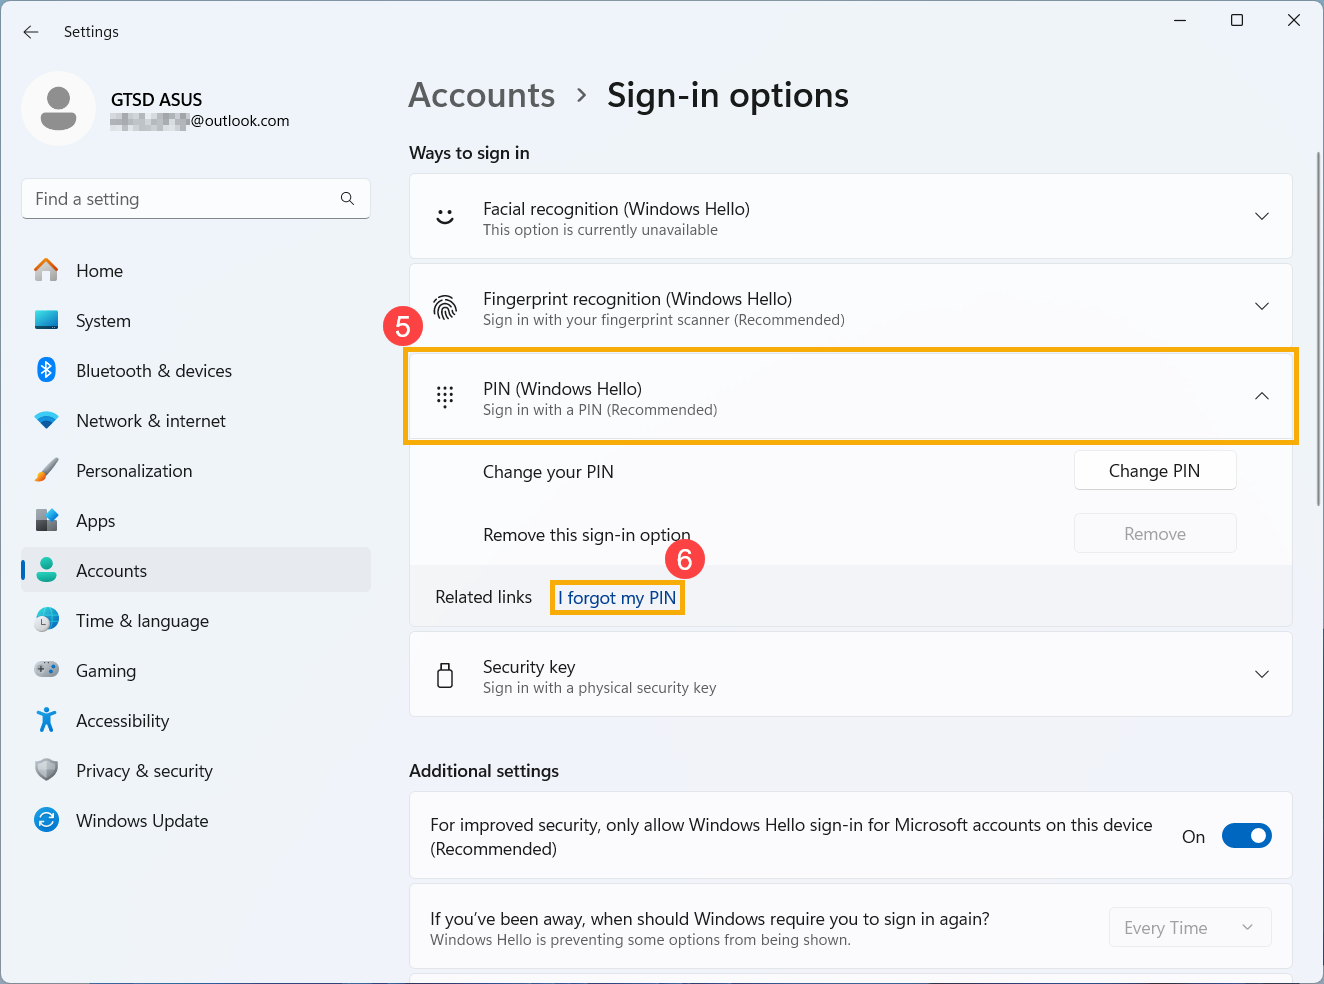
- Выберите [PIN-код (Windows Hello)] ⑤, чтобы развернуть дополнительные параметры, затем нажмите [Я забыл свой PIN-код] ⑥.
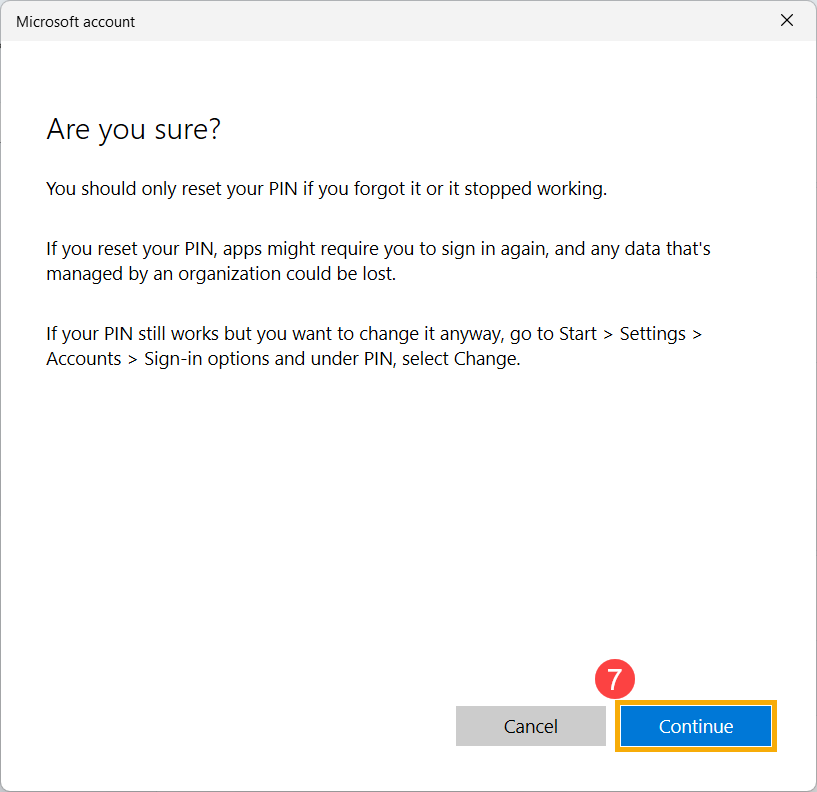
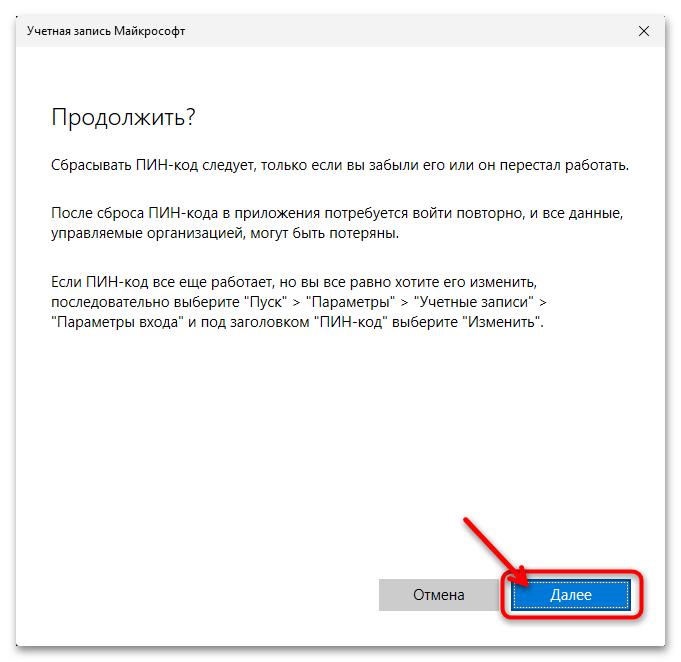
- После появления окна с подтверждением сброса PIN-кода нажмите [Продолжить] ⑦.
- Введите свой пароль Учетной Записи Майкрософт ⑧ и нажмите [Войти] ⑨.
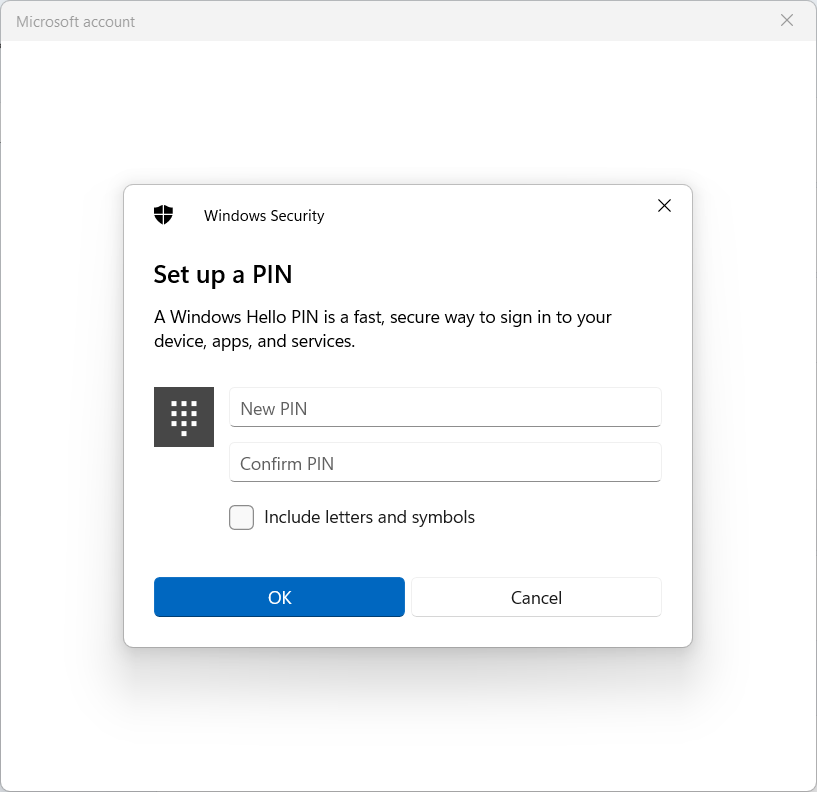
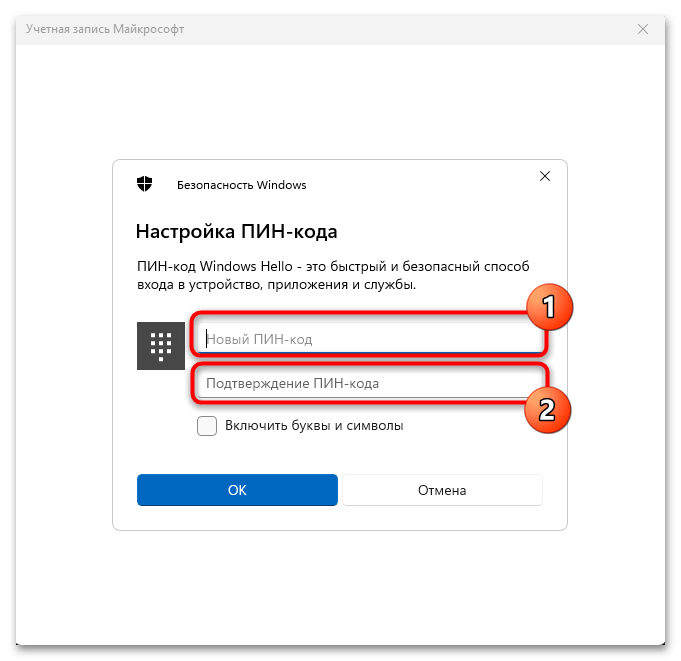
- После входа в систему Вы можете установить новый PIN-код.

Сбросить свой PIN-код, если Вы не вошли в Windows
Если Вы не вошли в систему на своем устройстве и хотите сбросить PIN-код, попробуйте следующий метод.
- На экране входа в Windows нажмите [Я забыл свой PIN-код] ①.
Примечание: Если Вы не видите сообщение Я забыл свой PIN-код, выберите Параметры входа и затем выберите Ввести свой пароль, чтобы войти в устройство, используя пароль своей Учетной Записи Microsoft.
- Введите Ваш пароль Учетной Записи Майкрософт ② и нажмите [Войти] ③.
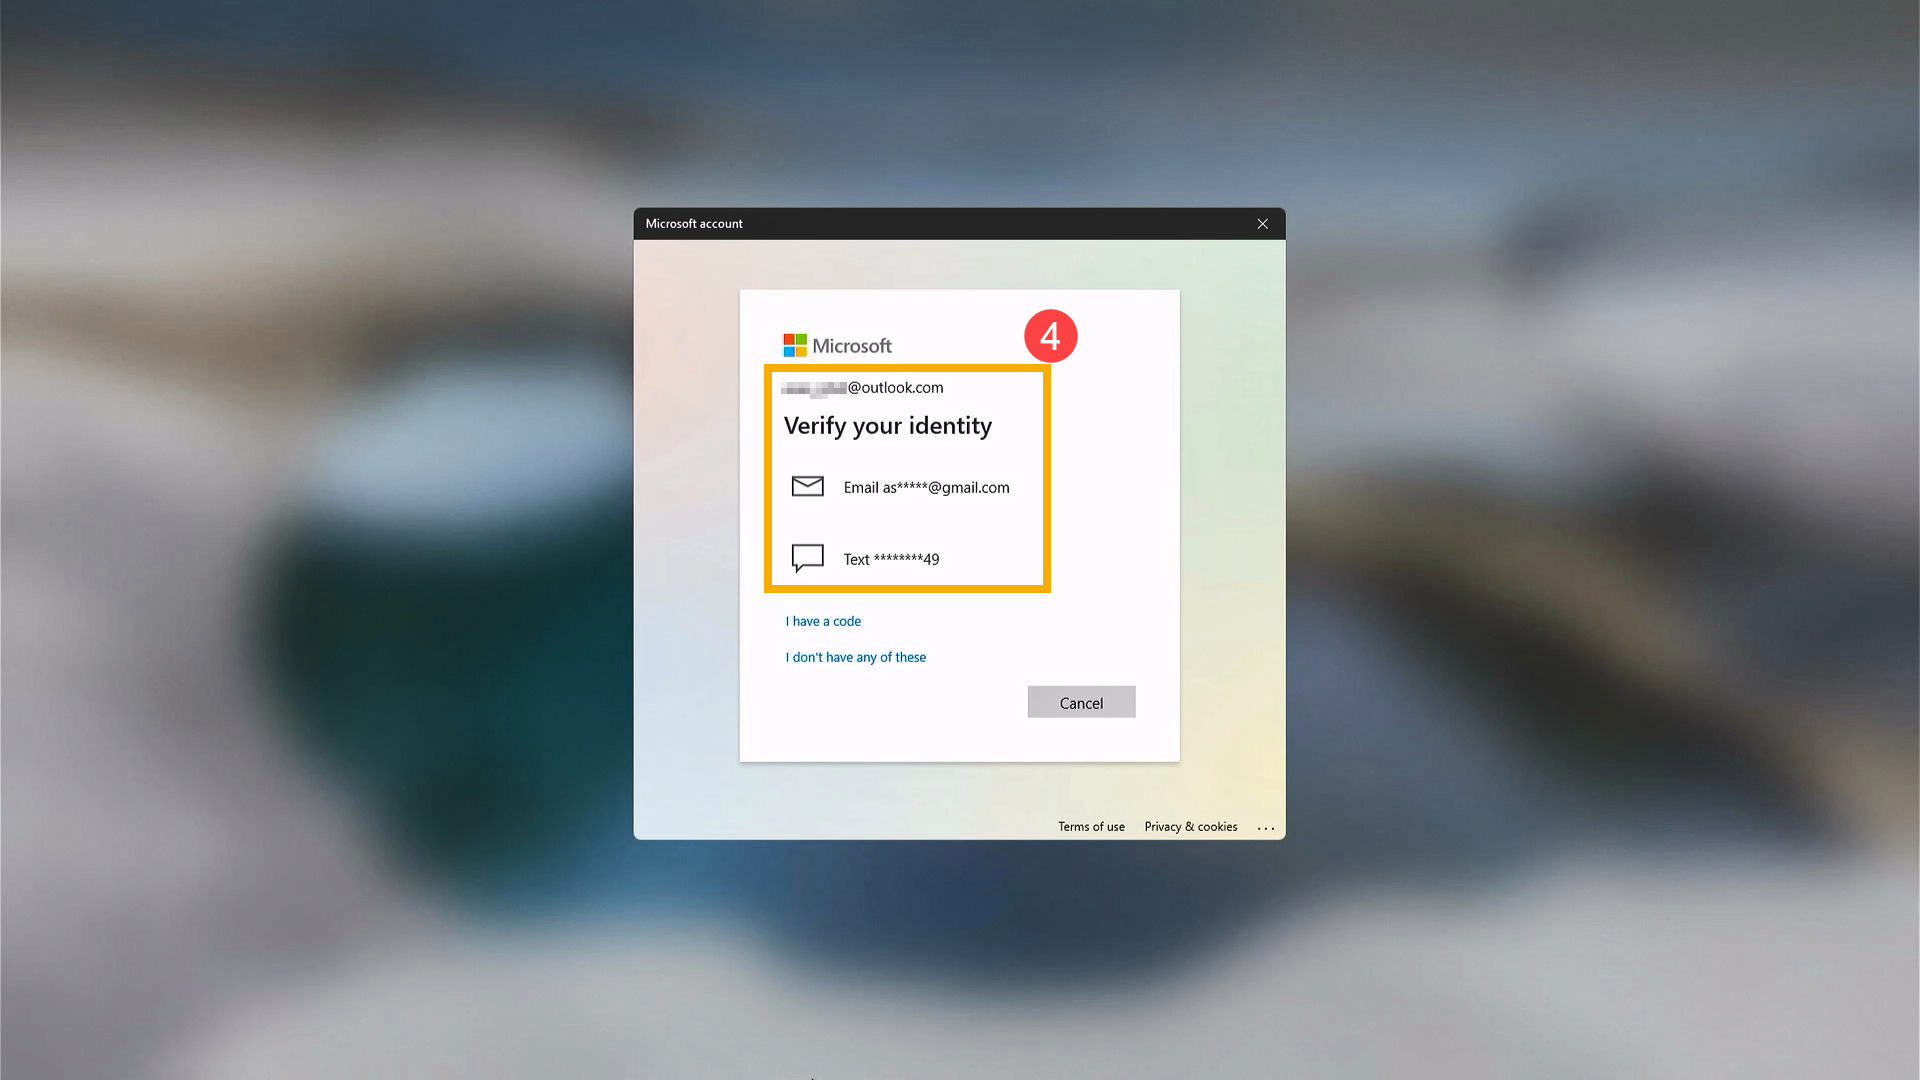
- В целях Вашей безопасности Microsoft должна подтвердить Вашу личность, прежде чем Вы сможете приступить к сбросу PIN-кода. Выберите, как Вы хотите получить код подтверждения ④.
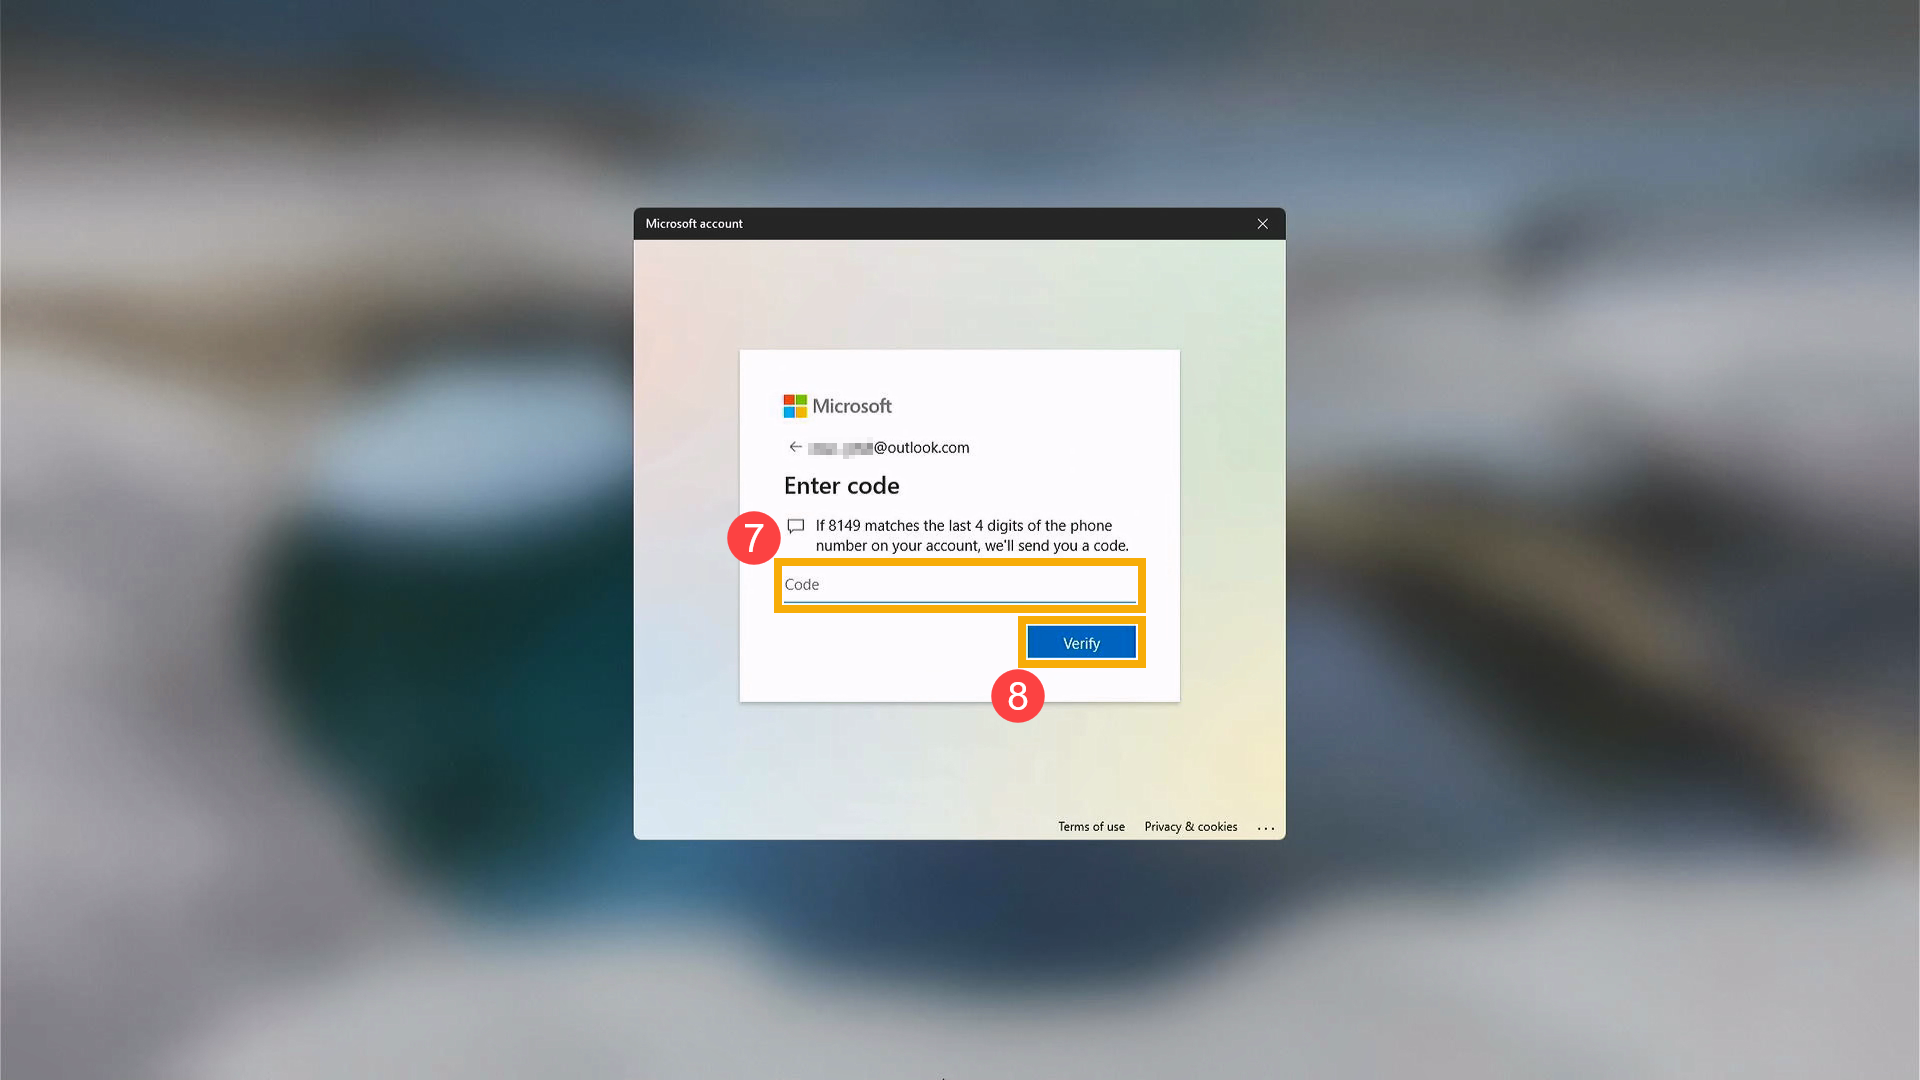
- В зависимости от выбранного Вами способа связи повторно введите первую часть адреса электронной почты или последние четыре цифры номера телефона, указанного в предыдущем окне ⑤, затем нажмите [Отправить код] ⑥.
- Microsoft отправит код подтверждения на выбранный Вами адрес электронной почты или номер телефона. Проверьте на телефоне или в электронной почте наличие запрошенного кода. Введите проверочный код ⑦ и нажмите [Проверить] ⑧.
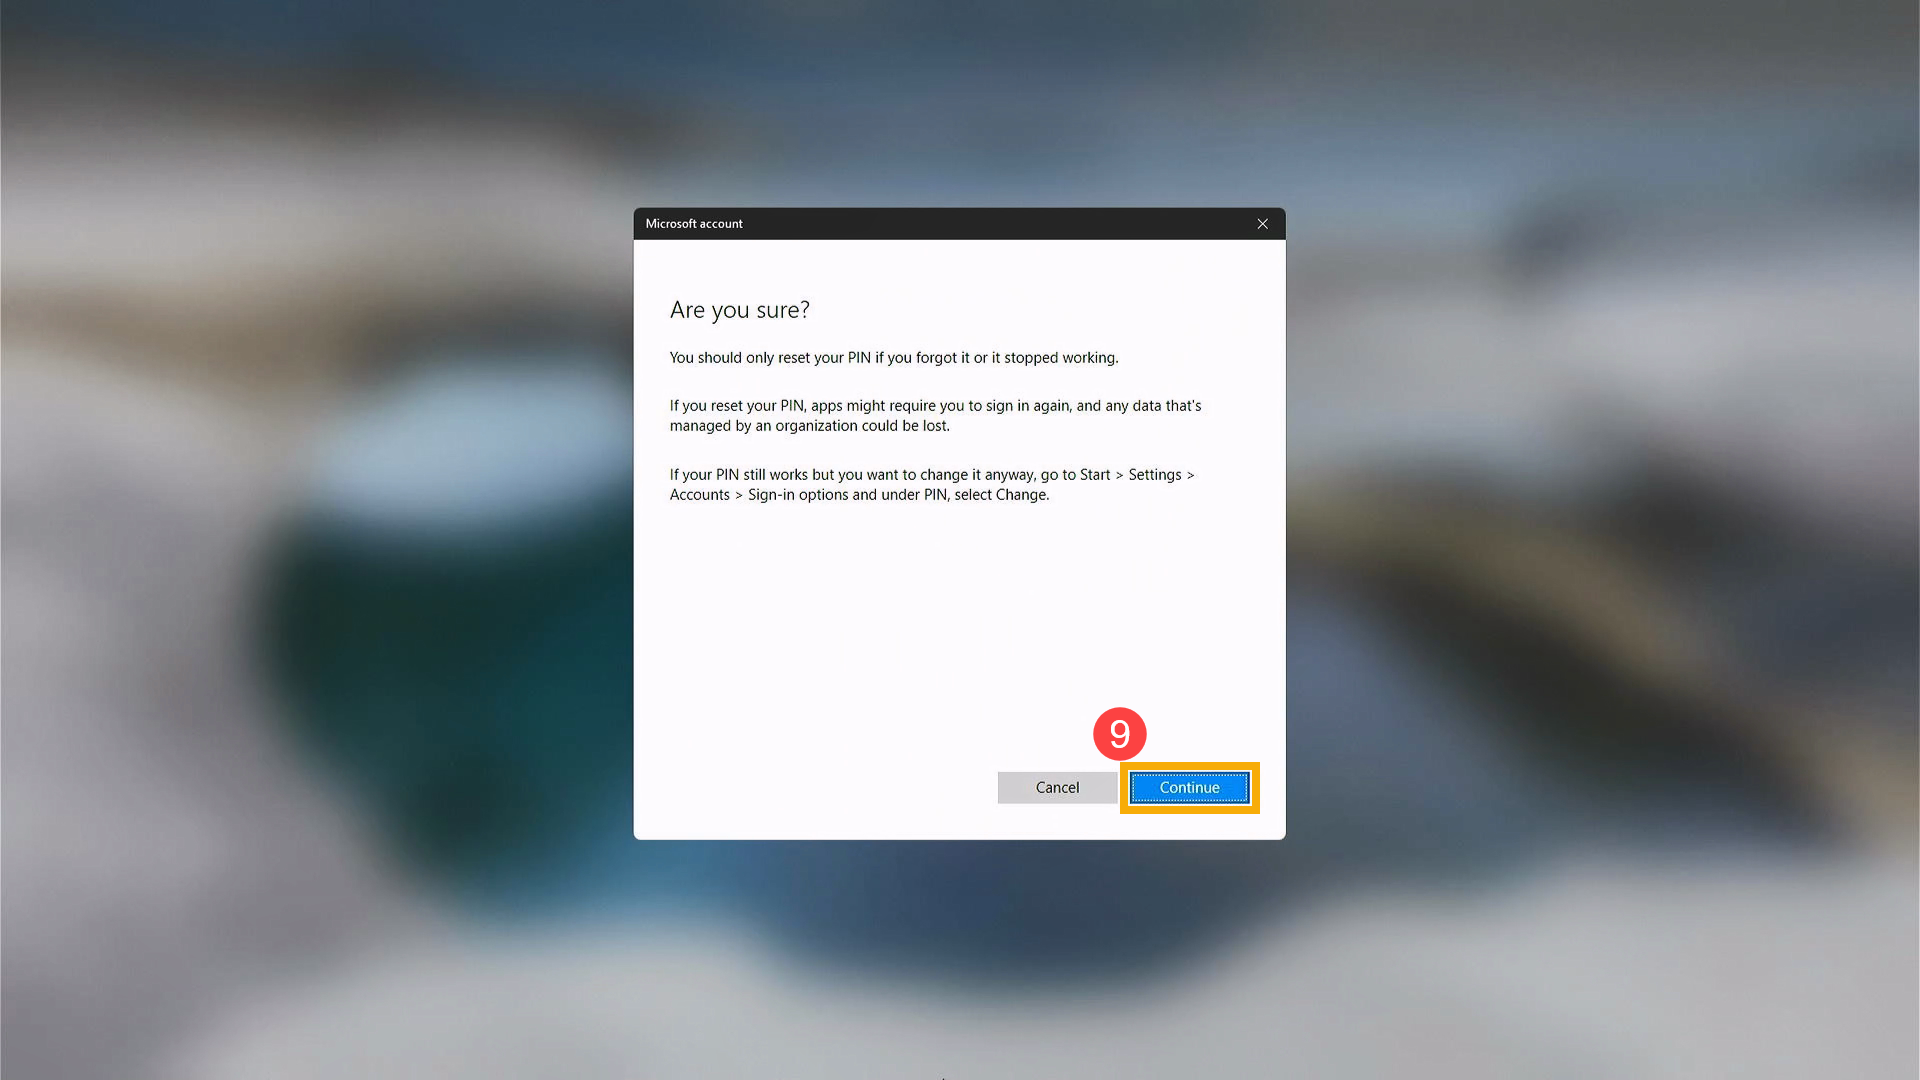
- После появления окна с подтверждением сброса PIN-кода нажмите [Продолжить] ⑨.
- Теперь Вы можете установить новый PIN-код.


Вышеуказанная информация взята из Инструкции по учетной записи Microsoft. Если проблемы с Вашей Учетной Записью Microsoft остаются нерешенными, обратитесь в Microsoft за дальнейшей помощью.
Эта информация была полезной?
Yes
No
- Приведенная выше информация может быть частично или полностью процитирована с внешних веб-сайтов или источников. Пожалуйста, обратитесь к информации на основе источника, который мы отметили. Пожалуйста, свяжитесь напрямую или спросите у источников, если есть какие-либо дополнительные вопросы, и обратите внимание, что ASUS не имеет отношения к данному контенту / услуге и не несет ответственности за него.
- Эта информация может не подходить для всех продуктов из той же категории / серии. Некоторые снимки экрана и операции могут отличаться от версий программного обеспечения.
- ASUS предоставляет вышеуказанную информацию только для справки. Если у вас есть какие-либо вопросы о содержании, пожалуйста, свяжитесь напрямую с поставщиком вышеуказанного продукта. Обратите внимание, что ASUS не несет ответственности за контент или услуги, предоставляемые вышеуказанным поставщиком продукта.
Способ 1: Аккаунт Microsoft
Ввиду того факта, что разработчики Windows 11 создали ситуацию, при которой привязка аккаунта Microsoft к операционной системе стала практически обязательным условием для получения возможности эксплуатации последней, следующий вариант действий по сбросу забытого PIN-кода Windows Hello следует считать основным и эффективным для большинства пользователей.
Для успешного прохождения процедуры замены ПИН-кода следующим способом потребуется знание пароля от введённой в операционку и предоставляемой её разработчиком учётной записи, а также, возможно, доступ к получению SMS-сообщений на привязанный к ней телефонный номер или другому средству подтверждения факта владения аккаунтом Microsoft.
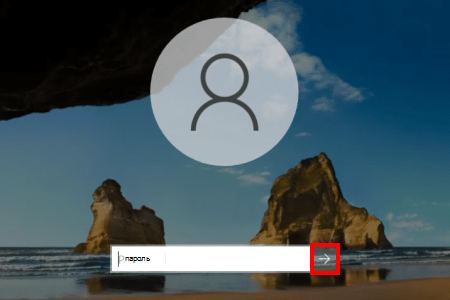
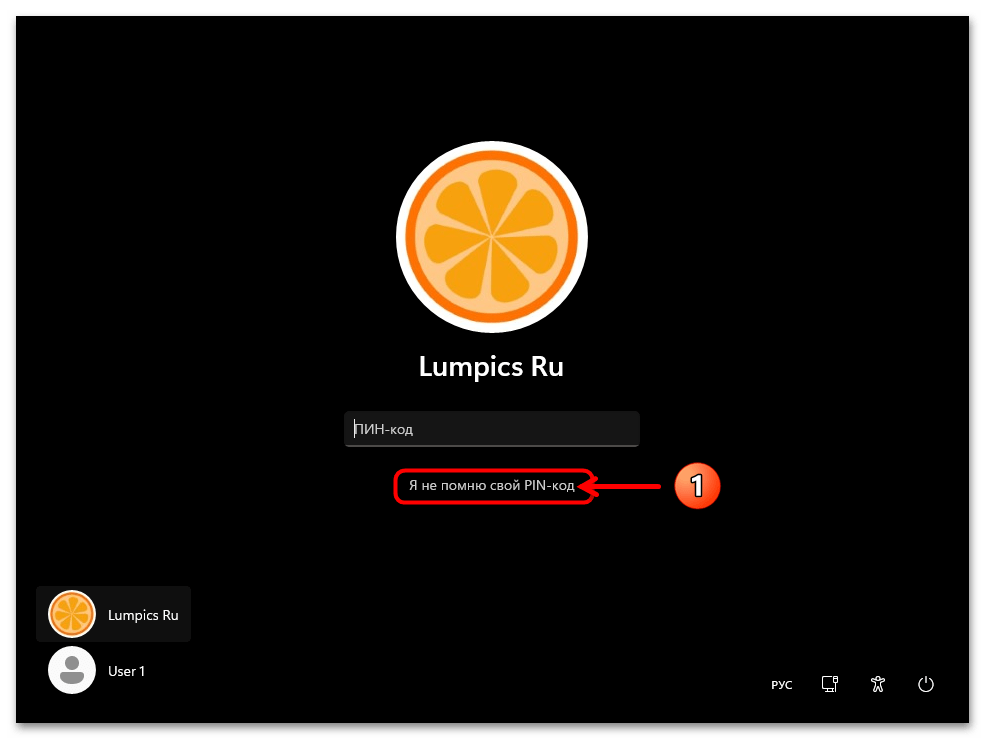
- На экране входа (или блокировки) в Виндовс 11 под полем для ввода ПИН-кода отображается ссылка «Я не помню свой PIN-код» — кликаем по ней мышкой,

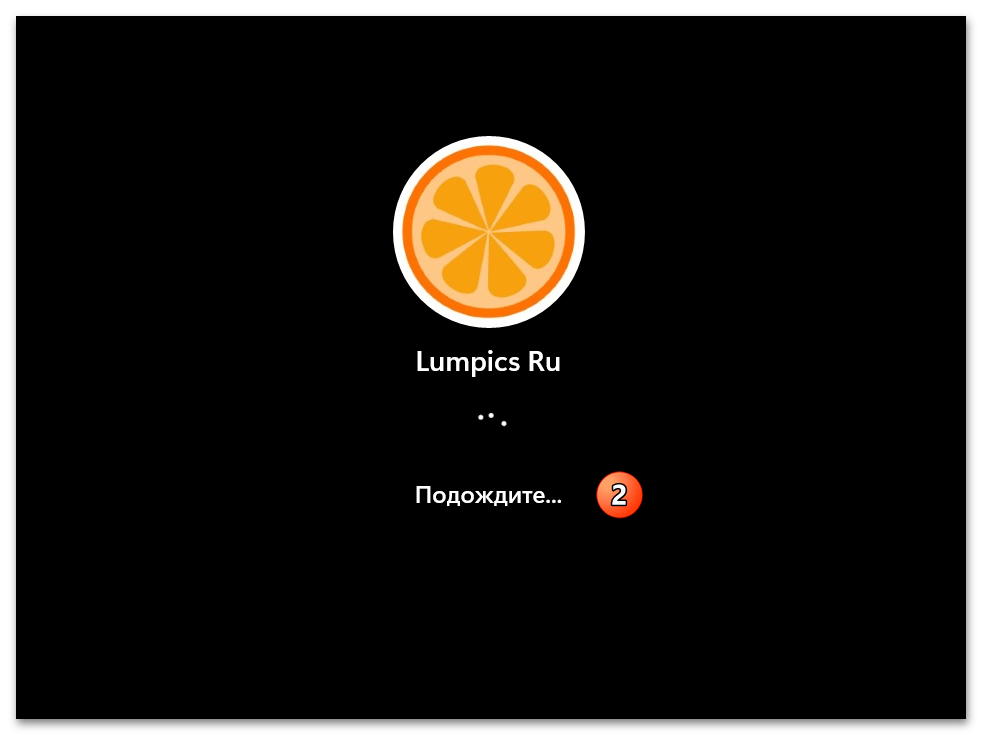
затем некоторое время ожидаем, пока система произведёт необходимые для сброса секретной комбинации подготовительные манипуляции.

В случае если авторизация в операционной системе выполнена, самым коротким путём к вызову целевой в нашем случае функции «Я не помню свой PIN-код» будет принудительный вызов экрана блокировки ОС – для этого нажимаем комбинацию «Win» + «L» на клавиатуре, после чего кликаем по нужной ссылке.
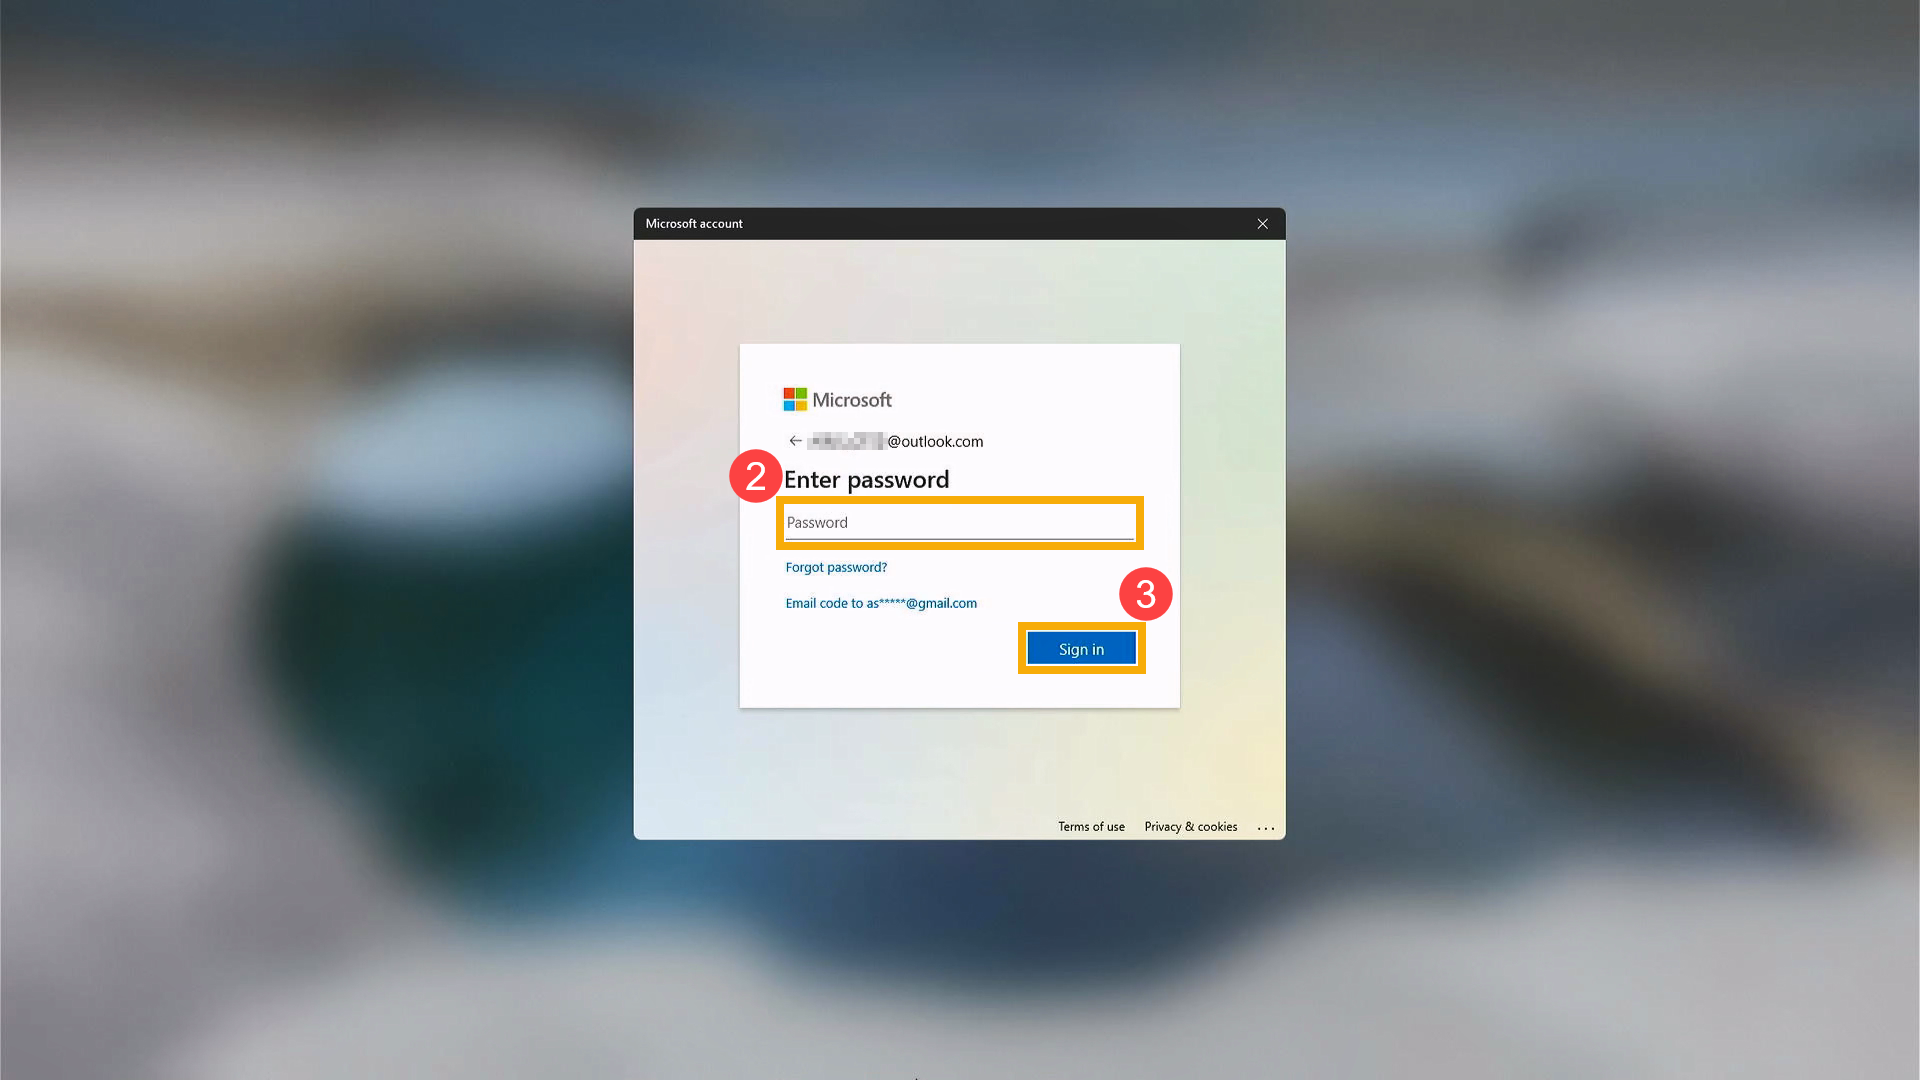
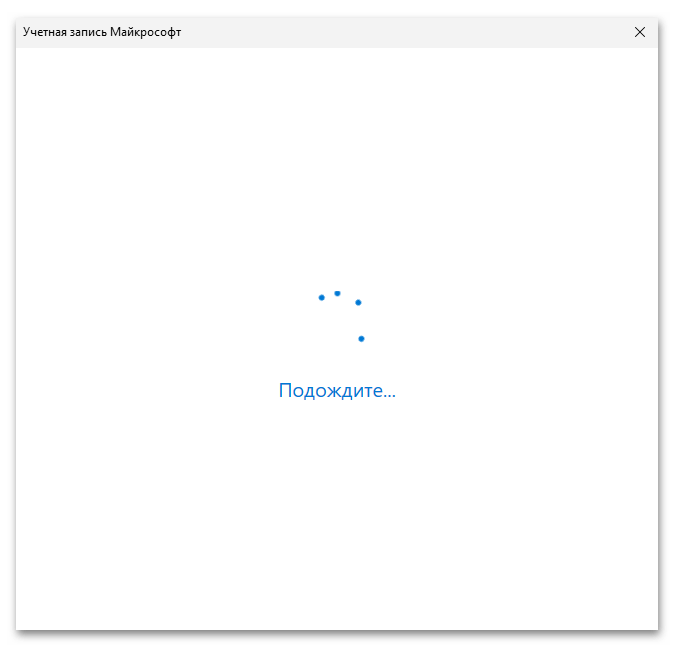
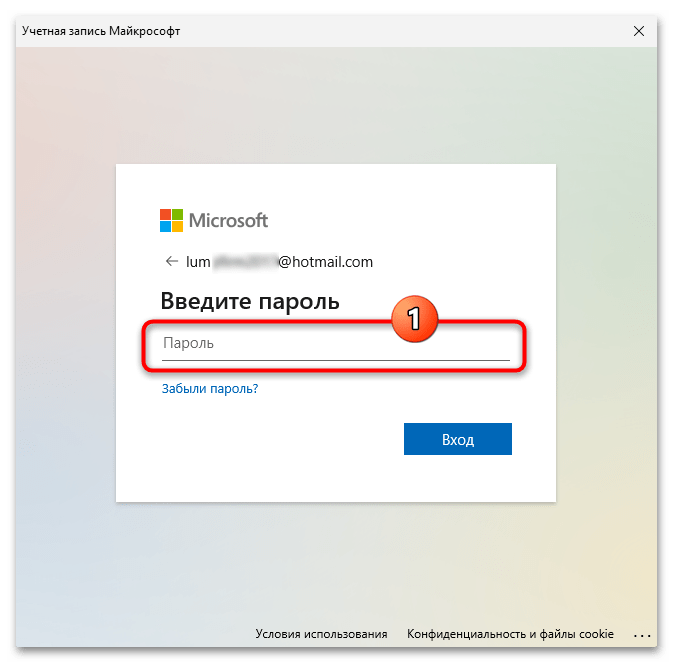
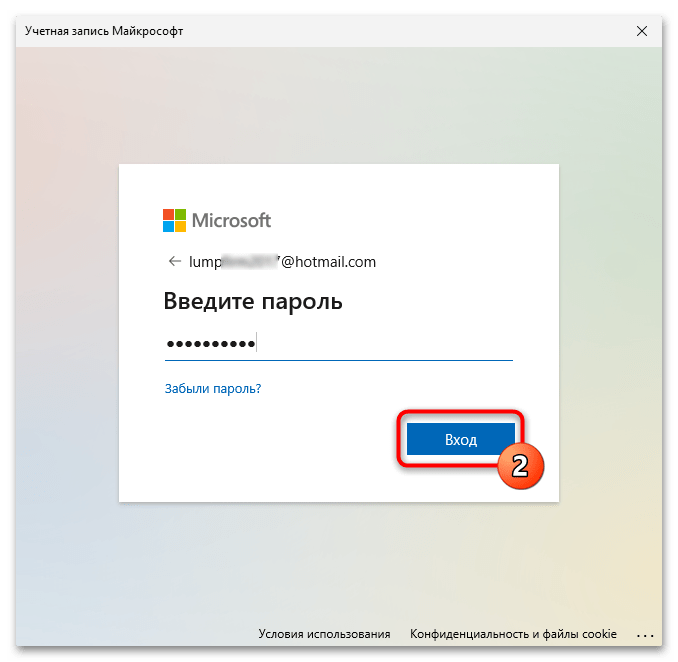
- На следующем этапе система потребует предоставить пароль от привязанного к ОС аккаунта в экосистеме Майкрософт.

Вводим секретную комбинацию в соответствующее поле отобразившегося окна «Учётная запись Microsoft»,

кликаем «Вход».

Примечание. Ввод данных в указанной ситуации изначально будет осуществляться в соответствии с выбранной основной в «Параметрах» ОС раскладке клавиатуры (русской), а переключить её (на английскую для написания содержащей латинские символы секретной комбинации) здесь возможно исключительно с клавиатуры ПК. По умолчанию для этого служит комбинация клавиш «Alt»+«Shift», также можно задействовать малоизвестное, но универсальное в деле переключения языка, сочетание «Windows»+«Пробел».

Читайте также: Смена сочетания клавиш переключения языка в Windows 11
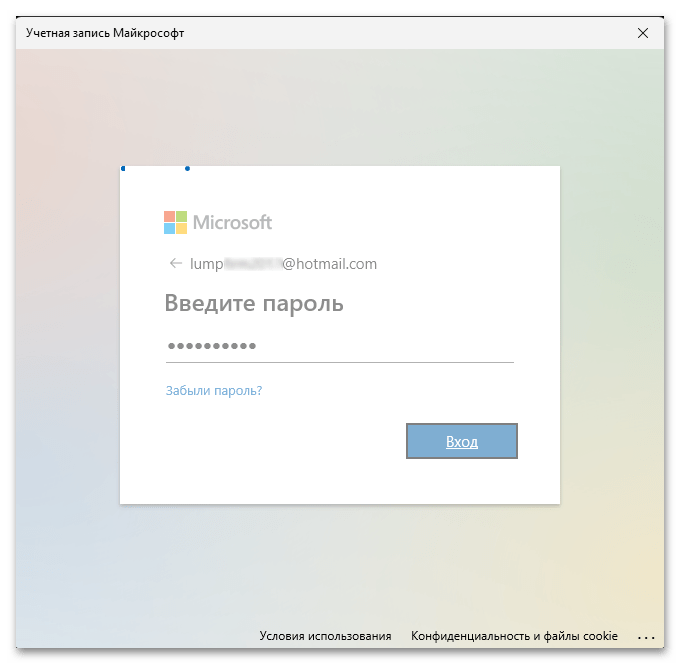
- Ожидаем, пока система проверит введённые сведения.

Далее (не всегда) потребуется подтвердить личность владельца учётной записи Майкрософт, и чаще всего это выполнимо путём получения кода верификации на привязанный к аккаунту телефонный номер:
- Изучаем представленную в открывшемся после авторизации в аккаунте Майкрософт окне информацию о последствиях следующих действий, щёлкаем по кнопке «Далее».
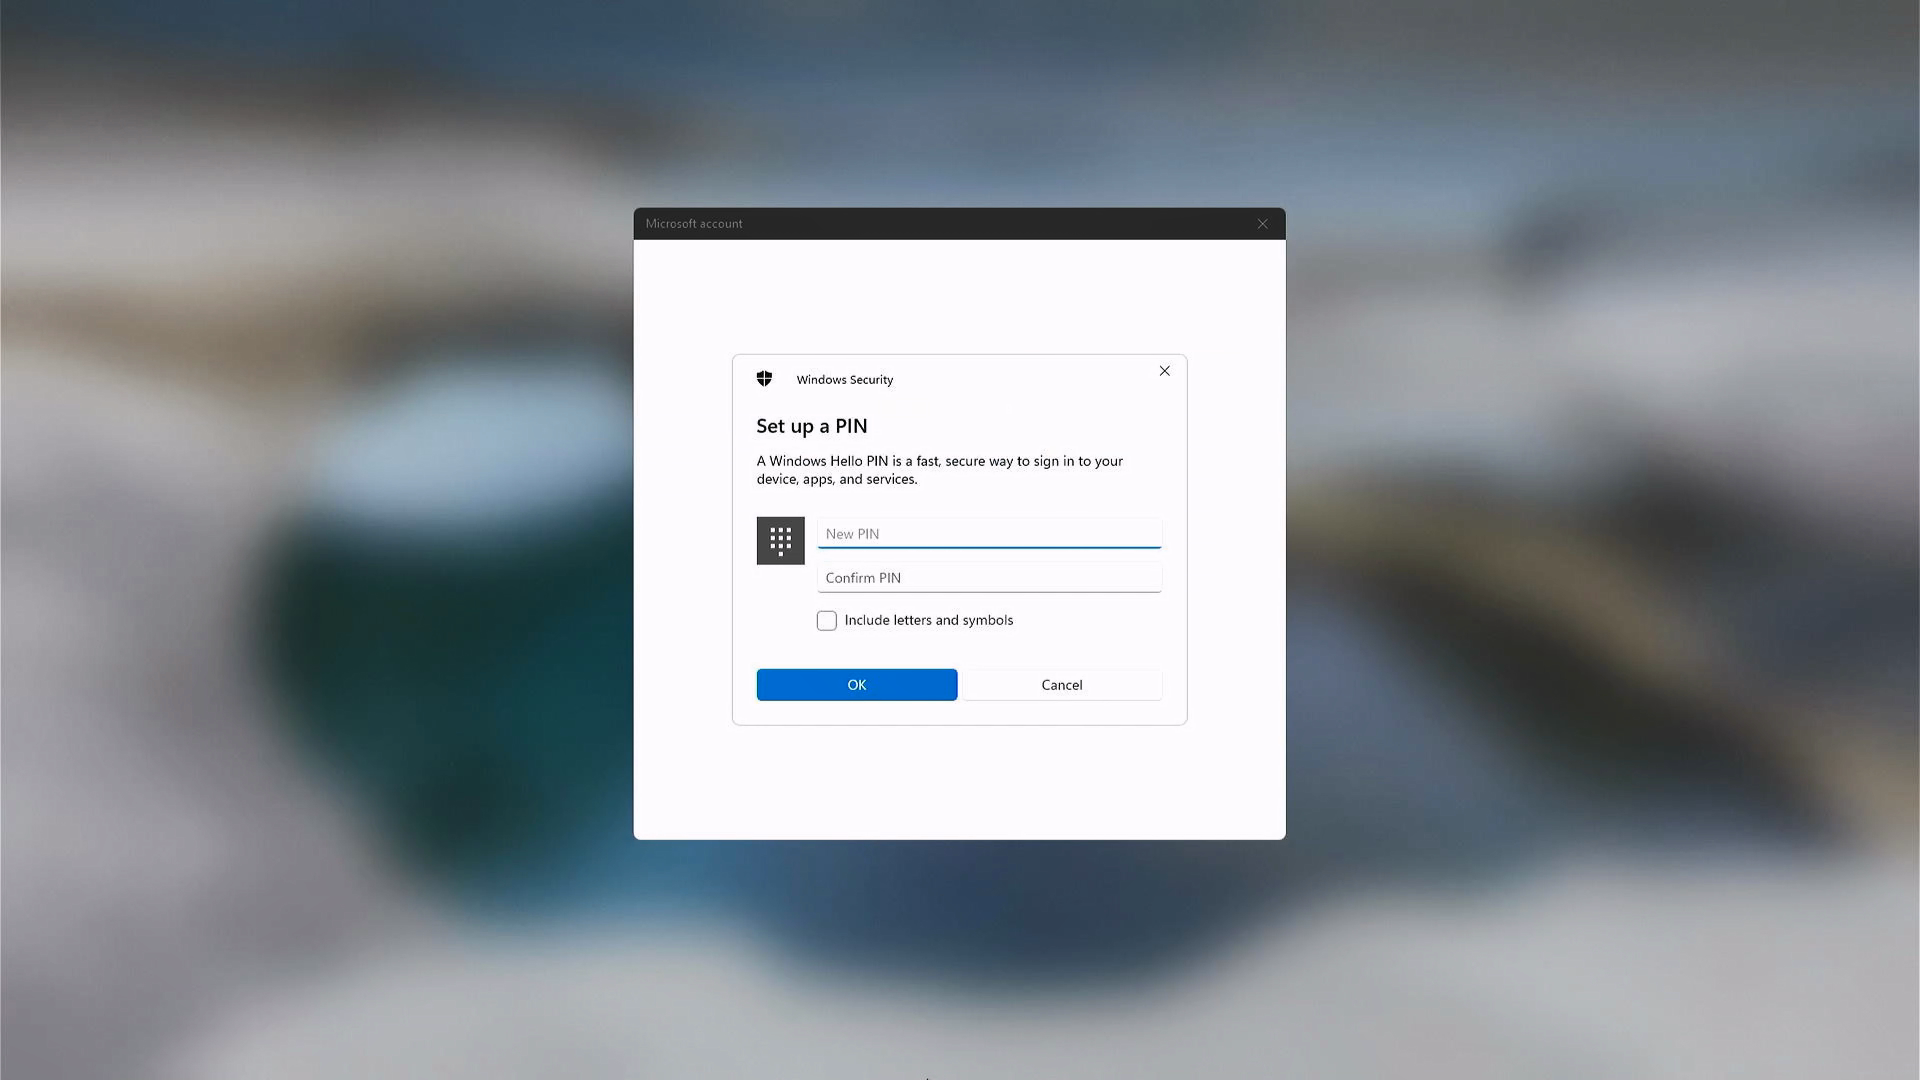
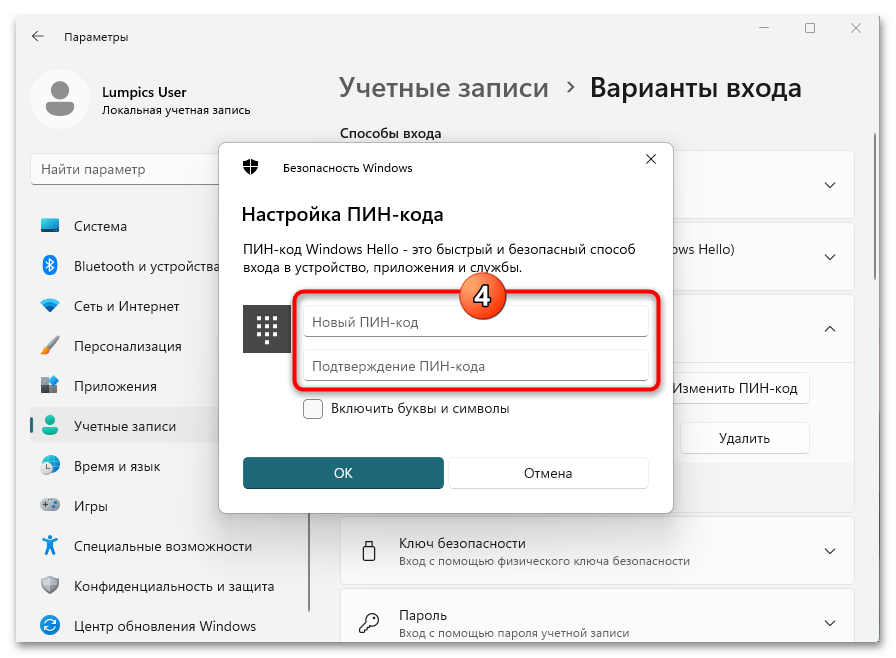
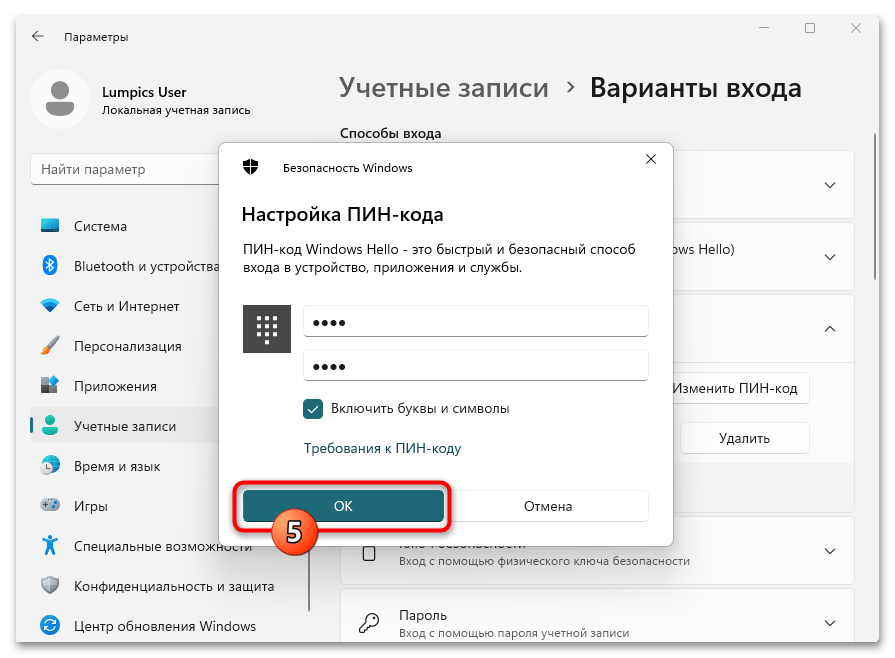
- Придумываем и запоминаем, а затем дважды пишем новый ПИН-код Виндовс Хелоу в поля отобразившегося окошка. Сделать это нужно по тем же правилам, что и при первоначальной установке данной защиты.
Подробнее: Включение Windows Hello в Windows 11

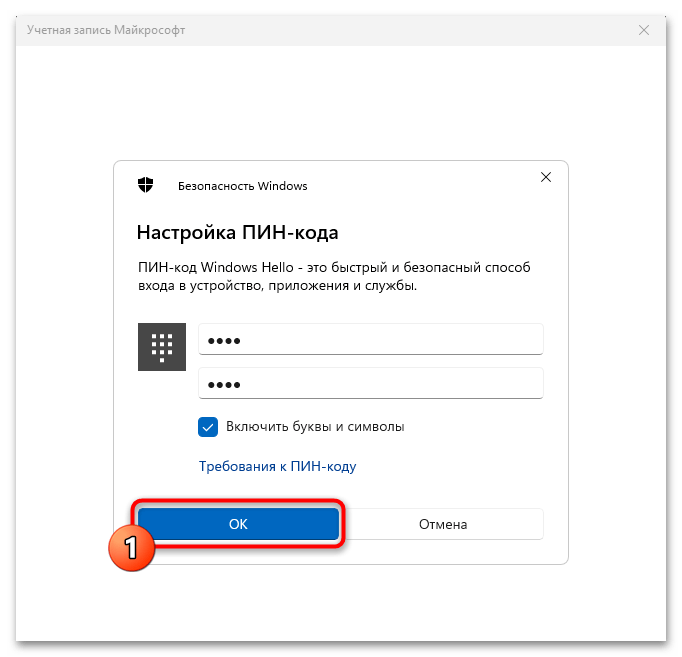
- Нажимаем «ОК» в окне «Настройка ПИН-кода»,

и в результате через непродолжительное время попадаем на Рабочий стол Windows 11.
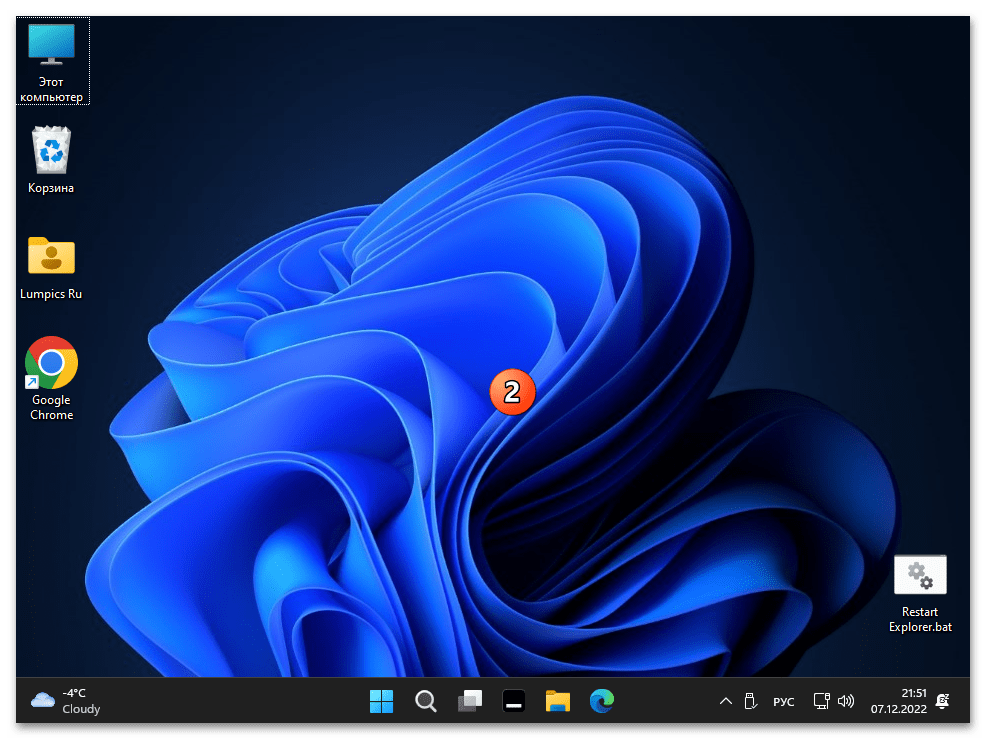
Далее можно эксплуатировать операционную систему в обычном режиме, все последующие входы в неё будут выполнимы путём ввода новой, заданной на шаге выше комбинации символов.
Читайте также: Отключение функции Windows Hello в Windows 11
Способ 2: Локальная учётная запись
В случае, когда утрачен ПИН-код, защищающий вход в эксплуатируемую под Локальной учётной записью пользователя Виндовс 11, действовать с целью его замены на новый необходимо таким образом:
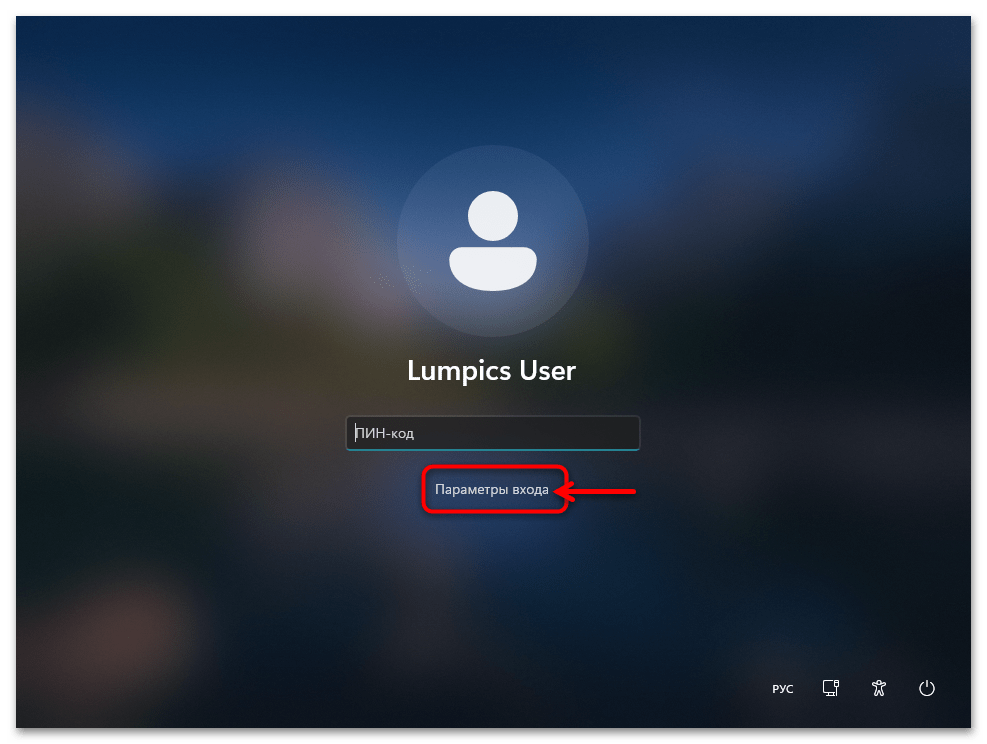
- Если учётка Microsoft в операционную систему не вводилась, на экране авторизации/блокировки ОС вместо описанной в пункте №1 предыдущей инструкции из этой статьи ссылки «Я не помню свой PIN-код» под полем ввода ПИН-кода отображается название функции «Параметры входа» — щёлкаем по нему.
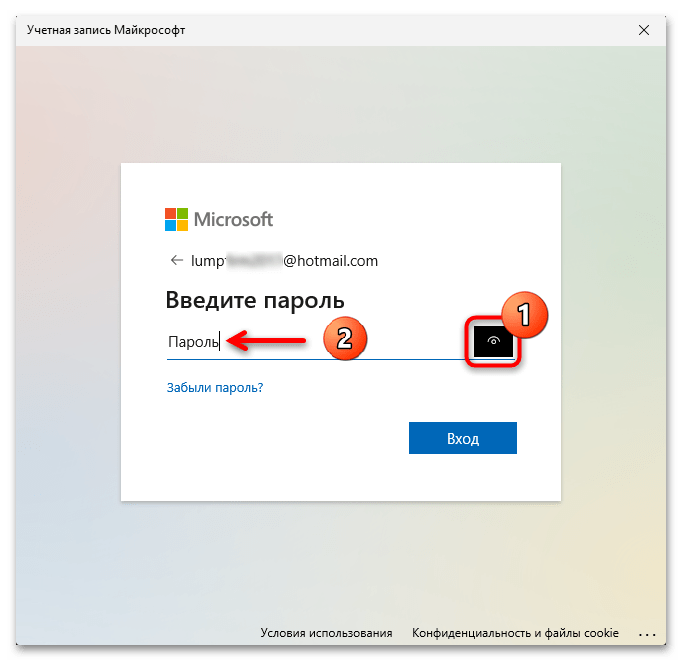
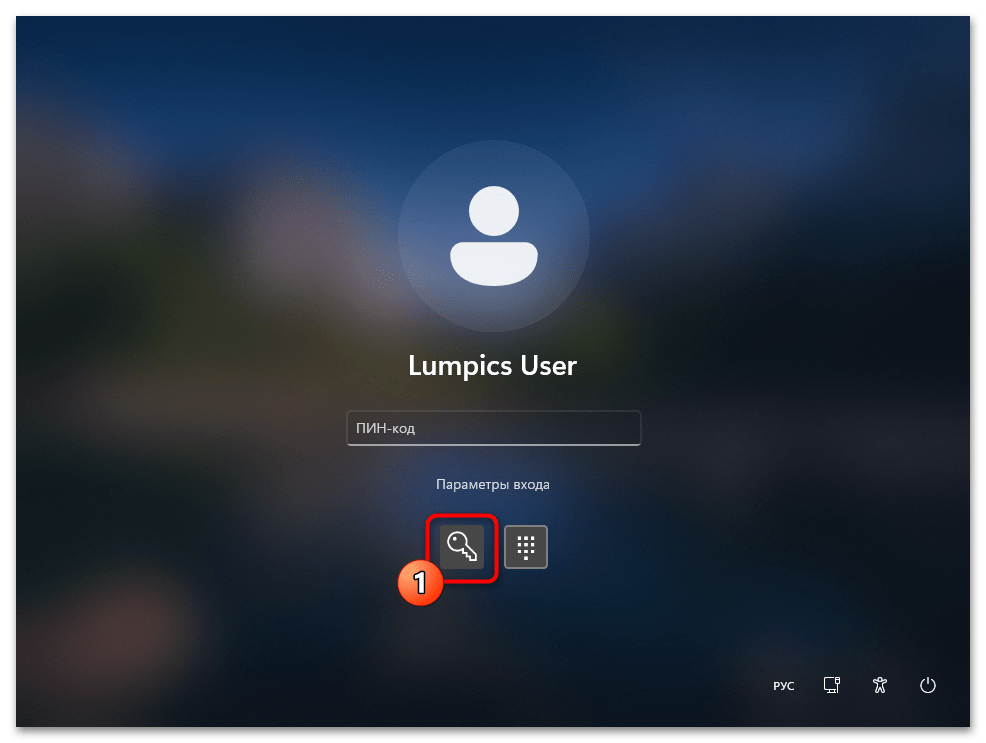
- Нажимаем на отобразившуюся кнопку с изображением ключа – «Вход по паролю».

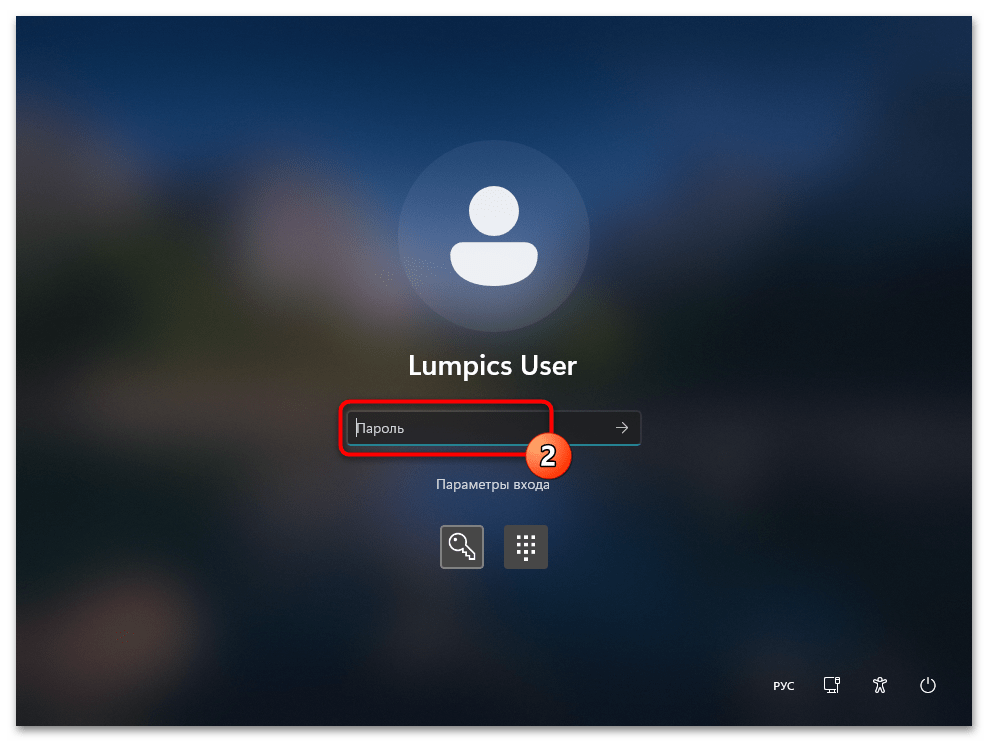
Пишем пароль от локальной учётки Win 11 в поле, где ранее требовалось ввести PIN-код Windows Hello,

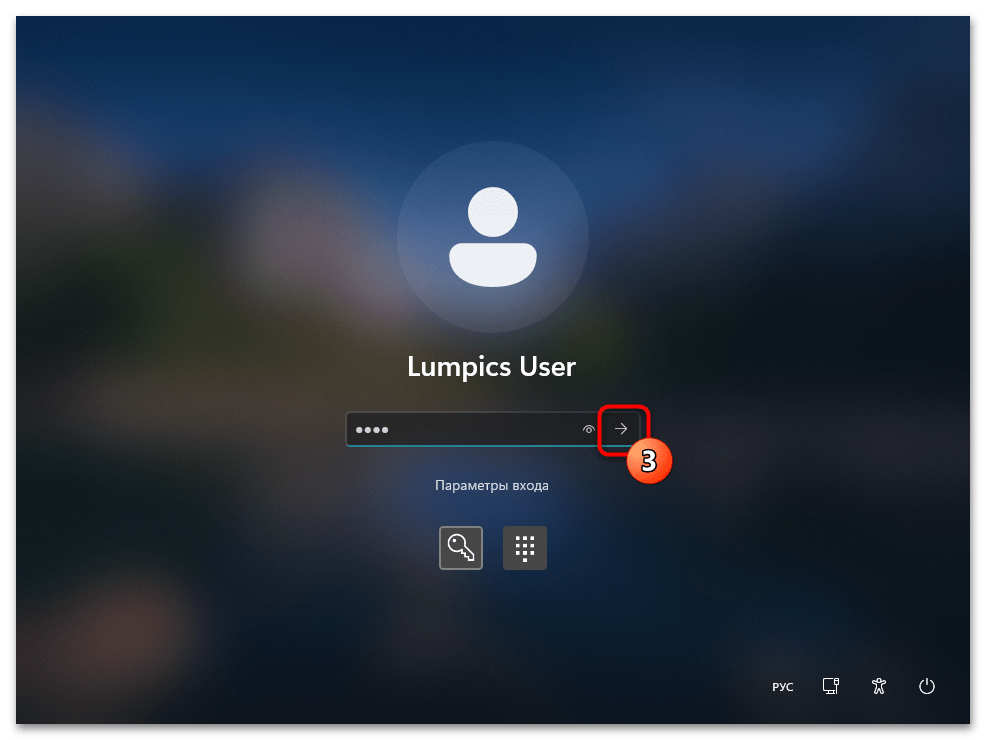
кликаем по стрелке «Войти»,

в результате чего авторизуемся в операционной системе.
- Далее переходим в «Параметры» ОС (нажатием «Win»+«I» на клавиатуре, из Главного меню Виндовс 11 или контекстного кнопки «Пуск» на её Панели задач, либо любым другим способом).
- Из меню в левой части окна приложения «Параметры» перемещаемся в раздел настроек операционки под названием «Учётные записи».
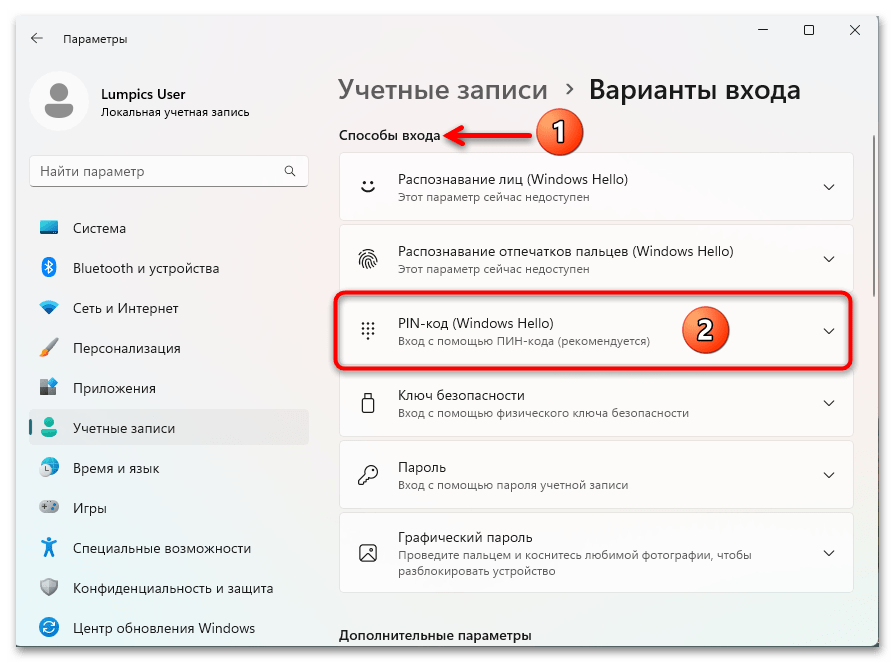
- В списке блоков настроек «Параметры учётной записи» нажимаем «Варианты входа».
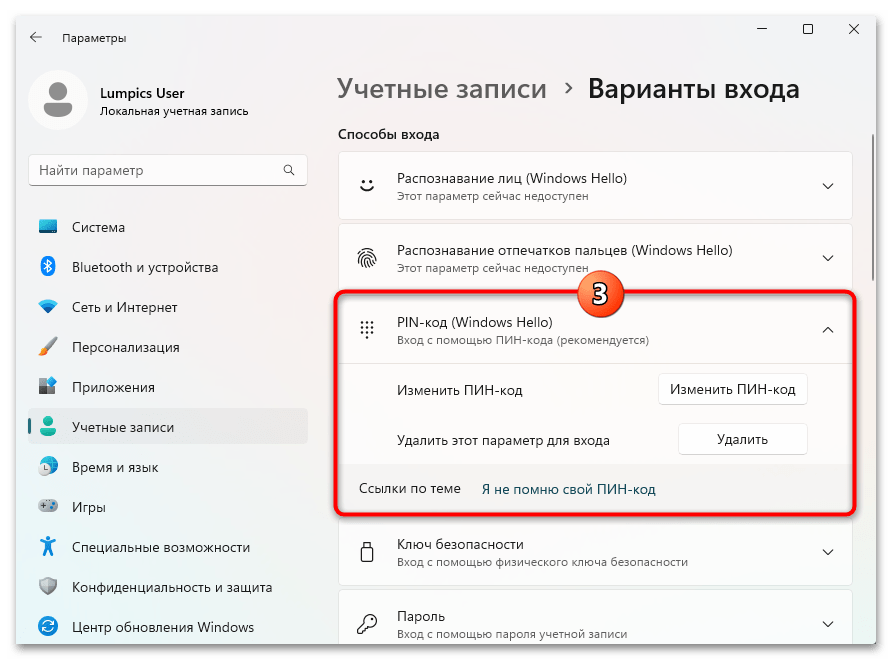
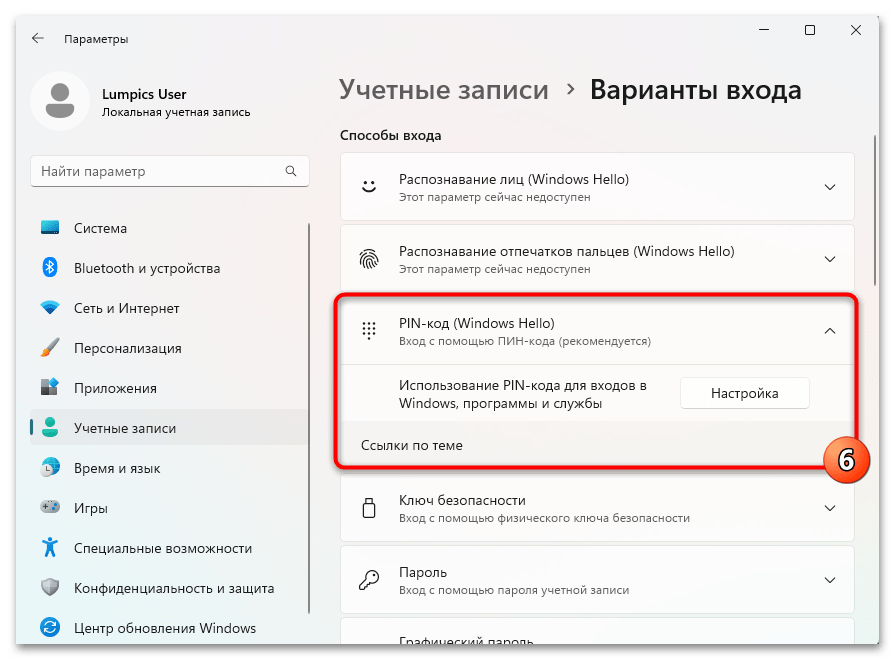
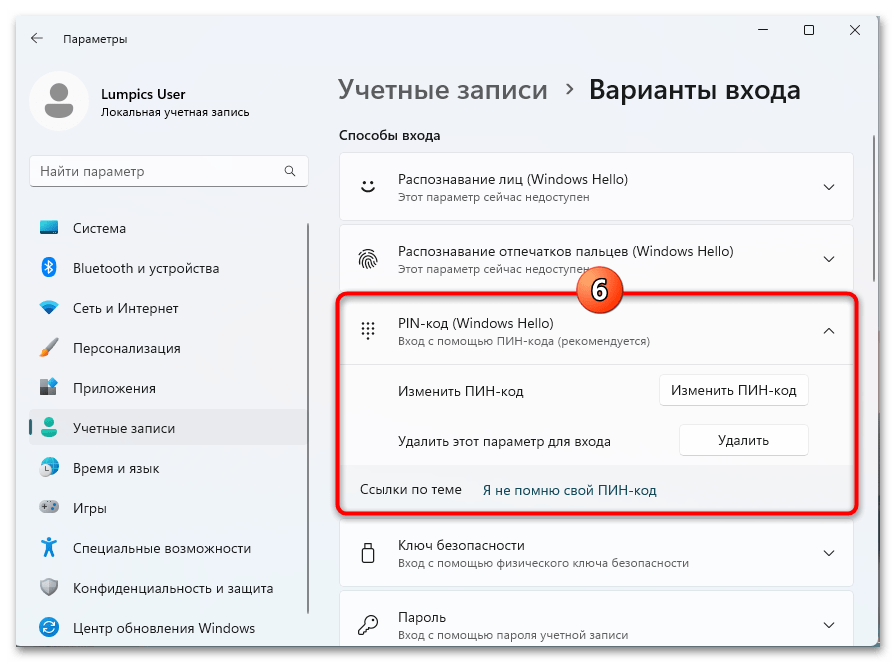
- Кликаем «PIN-код (Windows Hello)» в перечне «Способы входа»,

это откроет доступ к применимым в отношении рассматриваемого метода входа в ОС инструментам его настройки.
- Далее можно поступить двухвариантно: деактивировать возможность авторизации в системе с помощью ПИН-кода или же сразу установить новую секретную комбинацию:
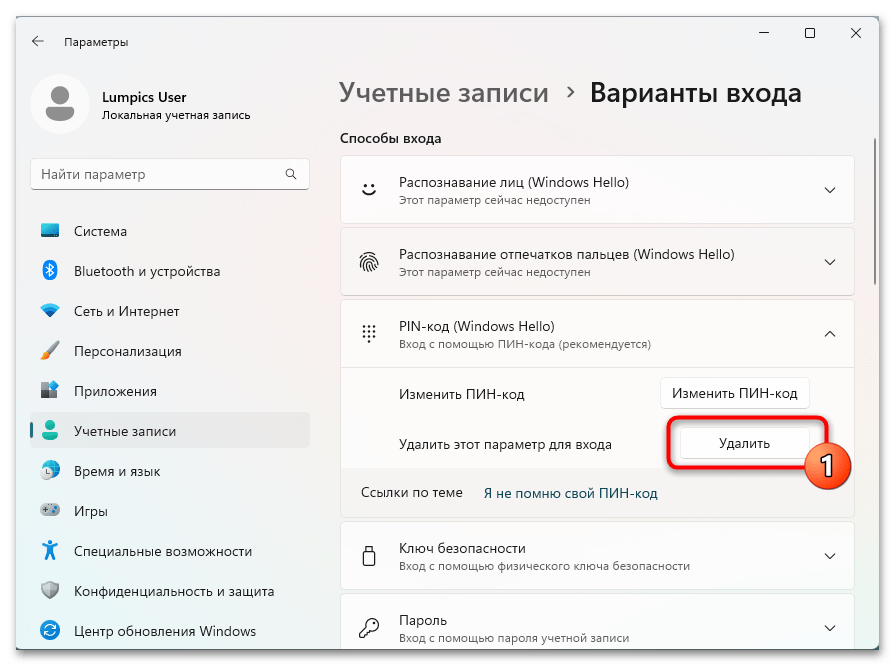
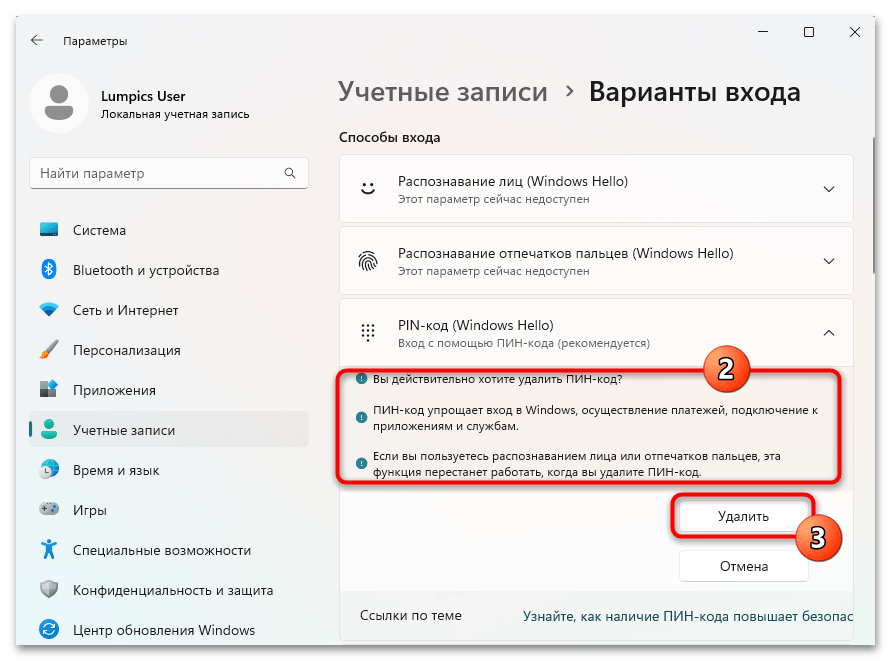
- Для отключения функции «PIN-код (Windows Hello)»: кликаем по кнопке «Удалить».

Далее ознакамливаемся с предупреждениями системы, а затем нажимаем на элемент «Удалить» ещё раз.

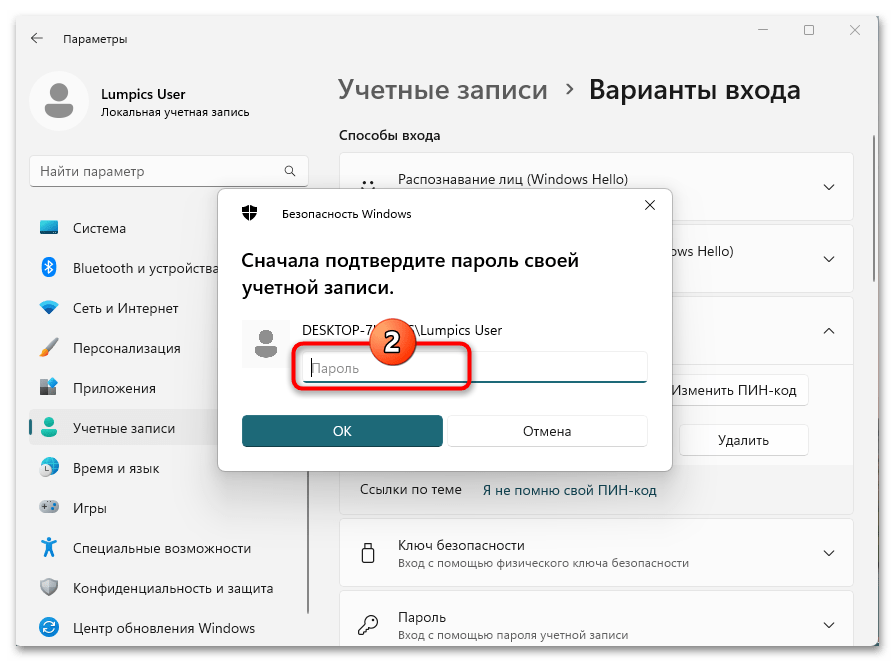
Вводим пароль от текущей локальной учётной записи Win 11,
щёлкаем «ОК».

Теперь можно продолжить использовать ОС уже без необходимости ввода ПИН-кода при авторизации в ней или же сразу задать новую комбинацию символов для разблокировки Виндовс 11 через Виндовс Хелоу.
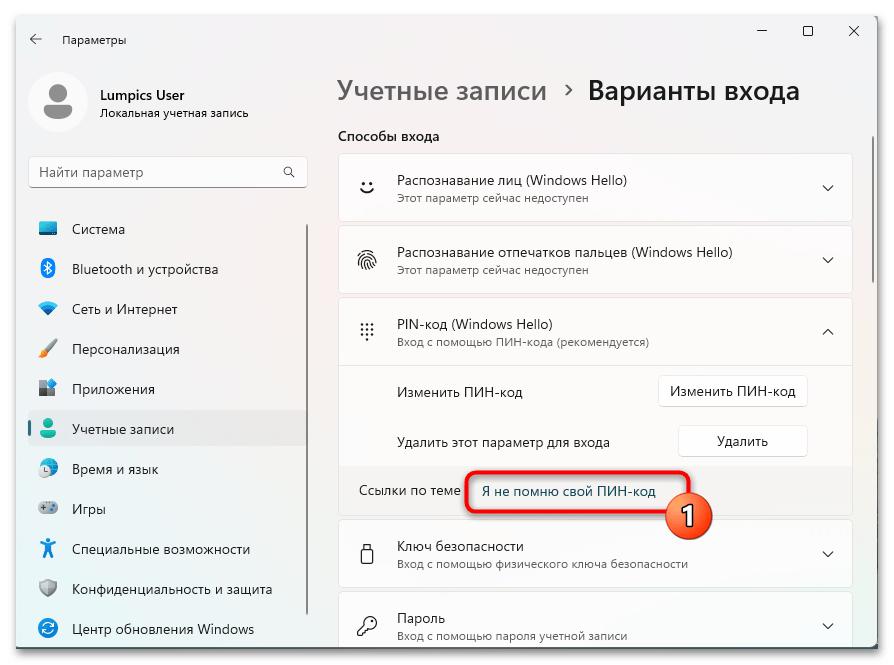
- Для быстрой замены забытого ПИН-кода щёлкаем по ссылке «Я не помню свой ПИН-код».

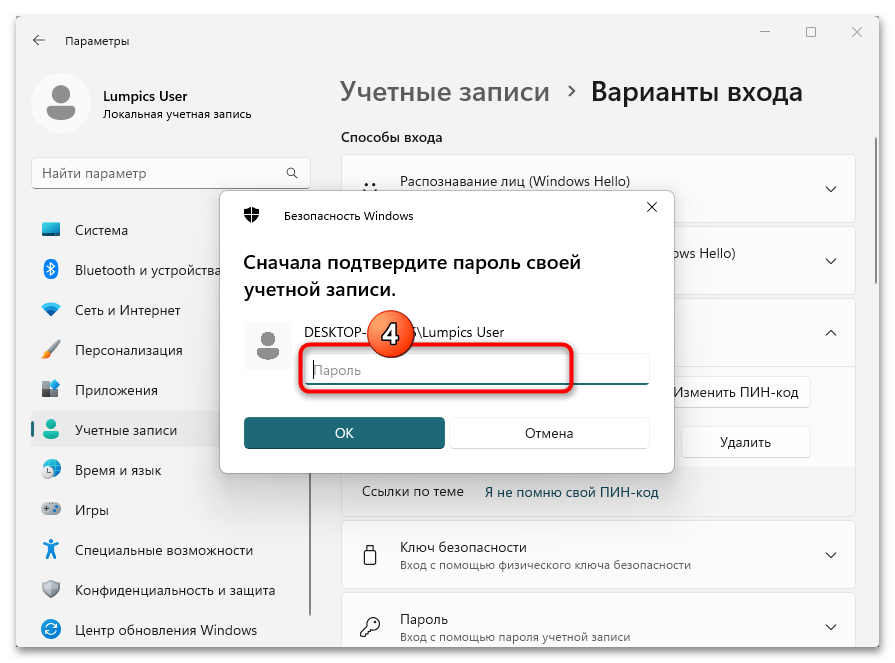
Вводим в поле отобразившегося окошка и

подтверждаем пароль пользователя системы.

Дважды пишем новую, открывающую доступ в Windows 11 через Windows Hello совокупность цифр (и символов, если есть такое желание) в поля окна «Настройка ПИН-кода».

Нажимаем «ОК»,

пару секунд ожидаем завершения рассмотренной операции.


- Для отключения функции «PIN-код (Windows Hello)»: кликаем по кнопке «Удалить».


Наша группа в TelegramПолезные советы и помощь
Windows 10 offers various ways to logon to your device. All of them have their pro’s and con’s. One thing is for sure, Microsoft loves the Windows Hello PIN. Even on an Active Directory Domain joined system – if you want to e.g. set up a Finger-Print login, you will be forced to generate a Windows Hello PIN, at least by default.
Funnily it can happen that you don’t even have the option to reset the PIN. What if the user forgot his PIN? No big deal? Well… it actually is a big deal. By default Windows goes back to the PIN if the Finger-Print reader does not work, what is especially common with the Microsoft Surface Keyboards, sure you can rip them off and re-attach to make it work again, but still your user-base / employee-base will say it asks for a PIN and I forgot it..
Fingerprints and PINs are stored locally on the device, in a secured vault. You can’t really alter it, but you can remove it.
In order to remove all locally stored PINs and possibly even Finger-Prints, you must delete all contents of %windir%\ServiceProfiles\LocalService\AppData\Local\Microsoft\NGC.
The quickest way to accomplish this is using the two following commands in an elevated Command Prompt / CMD (run as administrator).
|
takeown /f %windir%\ServiceProfiles\LocalService\AppData\Local\Microsoft\NGC /r /d y icacls %windir%\ServiceProfiles\LocalService\AppData\Local\Microsoft\NGC /grant administrators:F /t |
The first one will take ownership of the folder, the second one then will grant administrators rights to it.
Once this is done, you need to delete all contents of the folder. If you are logged on as an administrator you can just use Windows Explorer. If you are logged on as a regular user, you need to do it either more manual in CMD or use e.g. a tool like 7-zip in elevated mode and navigate to the folder, be aware that 7-zip might not be able to handle %windir%, either navigate manually to the folder or use C:\Windows\ServiceProfiles\LocalService\AppData\Local\Microsoft\NGC to get to the path. Delete all contents.
Reboot.
This sledgehammer method will delete all stored PINs and other information for all accounts known by the device. They will need to logon with their Active Directory password and start from scratch. You might also need to click on e.g. REMOVE in the Finger-Print configuration to start over.
Tags: accountactive directorycleanuplockoutpasswordsecuritywindows
8 October 2023 Specialist of Customer Service Dept.
Summary
Don’t let a forgotten Windows Hello PIN prevent you from accessing your device. Learn multiple ways to easily reset your PIN, whether at home or in a business/enterprise environment. Make security a top priority with this comprehensive guide.
Today, technology plays a crucial role in our daily lives, from smartphones to laptops, we rely heavily on these devices to carry out our tasks. With the rise of technology, security has become a major concern for users, especially when it comes to accessing their devices. That’s where Windows Hello PIN comes in, providing a secure and convenient way to access your Windows 10/11 device. However, there may be times when you need to reset your PIN due to forgetting it or other reasons. In this chapter, we will discuss Option 1: Resetting the PIN from the lock screen in detail, so you can easily reset your Windows Hello PIN and continue using your device without any hassle.
How to reset Windows Hello PIN in Windows 10/11 on Personal Computer/Laptop
Option 1: Reset PIN from lock screen
Forgetting your Windows Hello PIN can be frustrating, especially if it’s the only way you can log into your device. However, fear not, as there are multiple ways to reset your PIN and regain access to your Windows 10/11 device. In this guide, we will walk you through one of the easiest and quickest ways to do so – resetting your PIN directly from the lock screen.
Step 1: On your lock screen, click on the “Sign-in options” button located at the bottom right corner of the screen.
Step 2: You will be prompted to enter your current PIN. If you have forgotten it, click on the “I forgot my PIN” link located below the PIN field.
Step 3: This will bring up a new window where you will need to verify your identity by entering your Microsoft Account password. This is the same password you use to sign into your device.
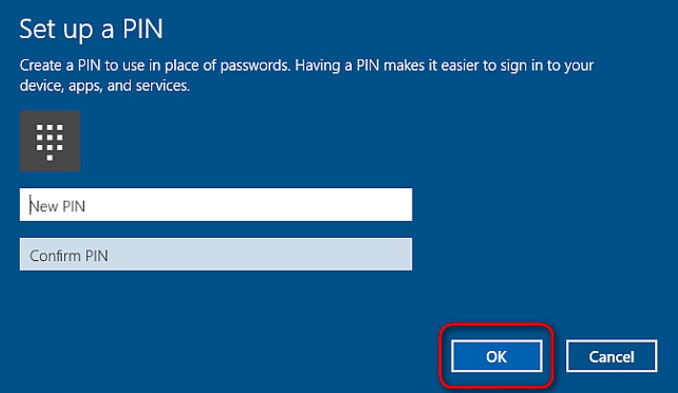
Step 4: After entering your correct password, you will be directed to a page where you can create a new PIN. Enter a new PIN and re-enter it to confirm. Click on “Ok” to save the new PIN.
Step 5: You will then receive a notification that your PIN has been successfully reset. You can now use your new PIN to log into your Windows 10/11 device.
Congratulations, you have successfully reset your Windows Hello PIN from the lock screen! Remember to use a PIN that is easy for you to remember, but difficult for others to guess to ensure the security of your device.
Option 2: Use Renee PassNow to reset your Windows Hello PIN
In the previous chapter, we discussed how to reset your Windows Hello PIN using the Settings app. However, if you are unable to access the Settings app or encounter errors while trying to reset your PIN, there is another option available to you – using Renee PassNow. This is a third-party software that can help you reset your Windows Hello PIN with ease. In this chapter, we will guide you through the process of using Renee PassNow to reset your Windows Hello PIN.
Tips:If your account is Microsoft Account, Renee PassNow will convert this account to Local account. After resetting login password, you need to connect your account to your Microsoft Account again.
To reset your Windows password using Renee PassNow, follow these steps:
Step 1: Download and Install Renee PassNow
Start by downloading Renee PassNow from the official website and install it on a different computer that you can access. You can choose the appropriate version based on your computer’s operating system.
Renee PassNow – Professional Windows System Rescue Tool
Remove Windows Login Password 3 steps for whole password remove process.
Recover the files Recover the deleted files without Windows system.
Transfer the data Transfer the important files of the computer with system.
Fix Windows startup error Fix various Windows startup failures or crashes.
Erase disk Completely erase disk files which will not be restored.
Remove Windows Login Password 3 steps for whole password remove process.
Recover the files Recover the deleted files without Windows system.
Transfer the data Transfer the important files of the computer with system.
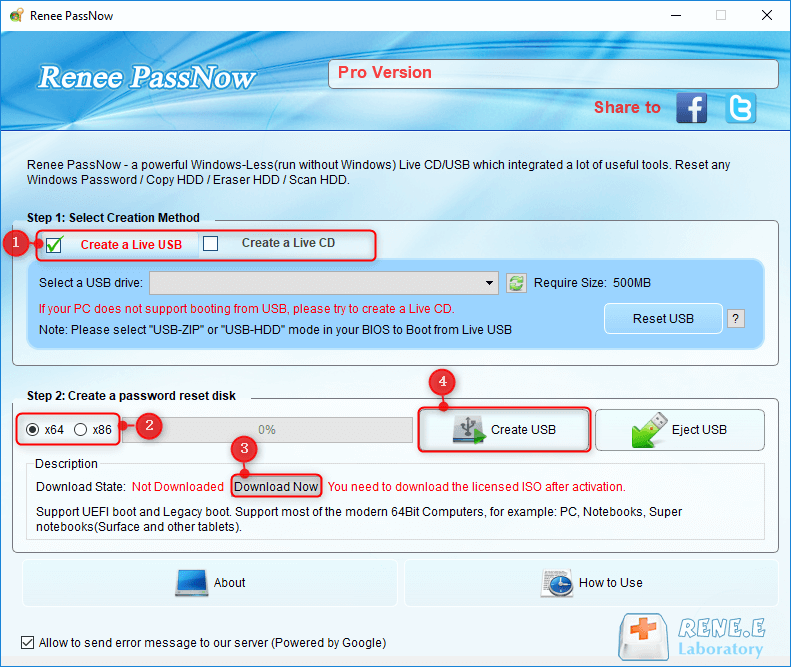
Step 2: Create a Bootable USB or CD/DVD
Launch Renee PassNow and insert a USB flash drive or blank CD/DVD into the computer. Select the option to create a bootable media. Follow the on-screen instructions to complete the process.
Step 3: Boot the Locked Server from the Bootable Media
Insert the bootable USB or CD/DVD into the locked Windows computer. Restart the computer and enter the BIOS settings by pressing the appropriate key (usually F2 or Delete). Configure the boot order to prioritize the bootable media.
| Server Type | Enter boot menu method |
|---|---|
| DELL | Press the F12 key repeatedly before the Dell logo appears on the screen. |
| HP | Press the F9 key multiple times when the HP logo is displayed. |
| BIOS Name | Enter boot menu method |
|---|---|
| ASRock | DEL or F2 |
| ASUS | DEL or F2 for PCs/ DEL or F2 for Motherboards |
| Acer | DEL or F2 |
| Dell | F12 or F2 |
| ECS | DEL |
| Gigabyte / Aorus | DEL or F2 |
| Lenovo (Consumer Laptops) | F2 or Fn + F2 |
| Lenovo (Desktops) | F1 |
| Lenovo (ThinkPads) | Enter then F1 |
| MSI | DEL |
| Microsoft Surface Tablets | Press and hold Power and Volume Up buttons |
| Origin PC | F2 |
| Samsung | F2 |
| Toshiba | F2 |
| Zotac | DEL |
| HP | Esc/ F9 for `Boot Menu`/ Esc/ F10/ Storage tab/ Boot Order/ Legacy Boot Sources |
| INTEL | F10 |

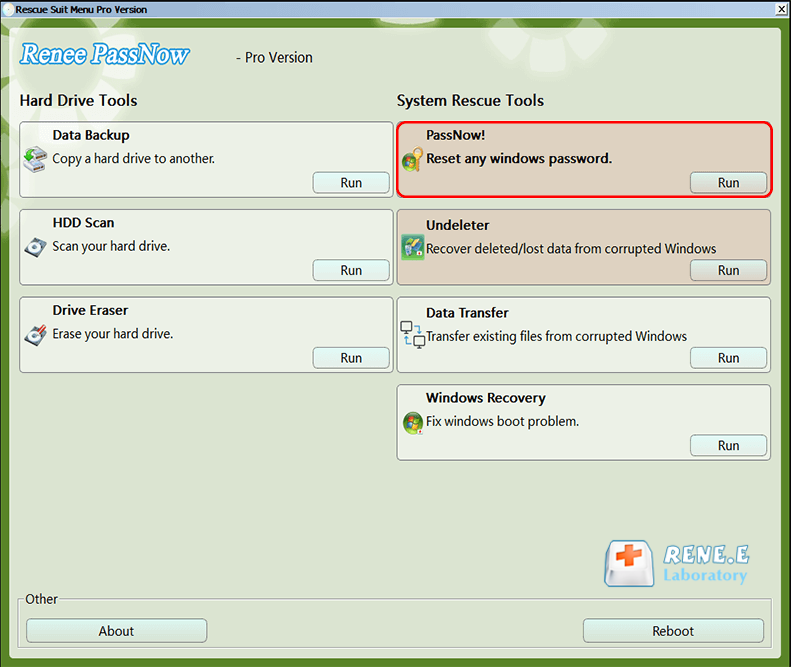
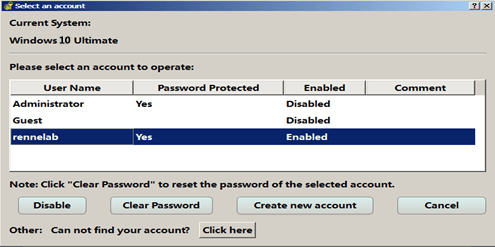
Step 4: Select password reset function
After successfully booting from the bootable media, Renee PassNow will load. Select “PassNow!” function after booting from the new created Windows password reset disk.
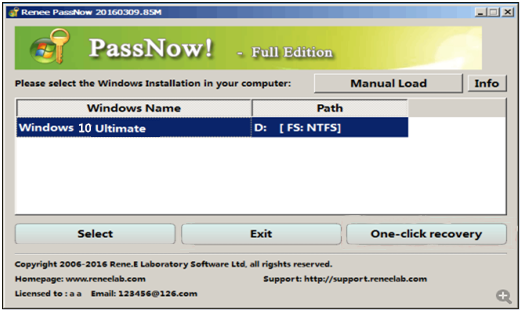
Step 5: Resetting the Password
Choose the user account for which you want to reset the password. Then, click on the “Clear Password” button. Renee PassNow will remove or reset the password for the selected user account.
Step 6: Reboot the PC
Once the password is reset, remove the bootable media from the PC and restart the computer. You will now be able to log in to Windows Account without a password.
Step 7: Switch to login with login password instead of PIN
Please click the password icon to login with password.
With the help of Renee PassNow, you can easily reset your Windows Hello PIN in just a few simple steps. This option is especially helpful if you are unable to access the Settings app or encounter errors while trying to reset your PIN. Keep this solution in mind in case you ever find yourself locked out of your Windows 10/11 computer due to a forgotten or malfunctioning Windows Hello PIN.
Reset your Windows Hello PIN in your organization’s settings
Confirm PIN recovery policy enforcement on the device
In an organizational setting, it is crucial to have control over the security measures in place, including the ability to reset Windows Hello PINs. To ensure that PIN recovery policies are enforced on devices, organizations can take advantage of the features provided by Microsoft. These features allow administrators to configure and manage PIN reset options for their users.
Enabling Non-Destructive PIN Reset
One of the options available for PIN reset in an organizational setting is the non-destructive PIN reset. This option allows users to reset their PIN without losing their Windows Hello for Business container and keys. However, in order to enable non-destructive PIN reset, organizations need to deploy the Microsoft PIN reset service and configure the client policy accordingly.
Configuring Device Policies
To ensure that PIN recovery is available on devices, administrators can use Group Policy, Microsoft Intune, or a compatible MDM solution to configure the client policy. By securely using the Microsoft PIN reset service, organizations can provide users with the ability to reset their forgotten PINs without the need for re-enrollment.
Comparing Destructive and Non-Destructive PIN Reset
When it comes to PIN reset options, organizations can choose between destructive and non-destructive methods. With destructive PIN reset, the user’s existing PIN and underlying credentials are deleted, and a new sign-in key and PIN are provisioned. On the other hand, non-destructive PIN reset preserves the user’s Windows Hello for Business container and keys while changing the PIN used for key authorization.
Requirements for Non-Destructive PIN Reset
In order to enable non-destructive PIN reset, organizations must have a hybrid or cloud-only Windows Hello for Business deployment. Additionally, Windows Enterprise, Education, and Pro editions are required. There is no licensing requirement specifically for the non-destructive PIN reset feature.
Confirming PIN Recovery Policy Enforcement
After configuring the necessary policies and deploying the Microsoft PIN reset service, it is crucial for administrators to confirm that PIN recovery policy enforcement is effectively working on devices. This can be done by running the command
from the Windows Command Prompt and checking the output in the user state section. The “CanReset” line item indicates whether destructive-only or non-destructive PIN reset is enabled.
Configuring Allowed URLs for Federated Identity Providers
If an organization has a federated environment and authentication is handled using AD FS or a third-party identity provider, it is important to configure the devices with a policy to allow a list of domains that can be reached during PIN reset flows. This ensures that authentication pages from the identity provider can be used during Azure AD joined PIN reset. The allowed URLs can be configured using Microsoft Intune or a custom policy with the Policy CSP.
MDM Policy Settings for Windows Hello for Business
Organizations can configure several MDM policy settings for Windows Hello for Business using the PassportForWork configuration service provider (CSP). These settings define the behavior and requirements for PIN complexity, biometrics usage, and more. By setting the appropriate values, organizations can enforce specific security measures and restrictions related to PIN recovery and usage.
Additional Considerations for Windows Hello for Business Policies
When configuring Windows Hello for Business policies, organizations should take into account various factors such as PIN complexity, expiration, history, and policy conflicts. It is important to set appropriate values for minimum and maximum PIN length, as well as PIN complexity requirements. Additionally, organizations can specify the expiration period for PINs and the number of past PINs that cannot be reused.
By confirming PIN recovery policy enforcement on devices in an organizational setting, administrators can ensure that users have the capability to reset their Windows Hello PINs securely and conveniently. Understanding the process of enabling non-destructive PIN reset, configuring device policies, and verifying PIN recovery policy enforcement is essential for maintaining a robust security posture within the organization.
Enable PIN recovery on the client
In an organizational setting, it is important to have a reliable and secure way to reset Windows Hello PIN for employees. This not only ensures that employees have access to their devices in case of forgotten PIN, but also maintains the security of sensitive data stored on the device.
As discussed in the previous chapter, confirming PIN Recovery policy enforcement on devices is the first step towards implementing a PIN reset solution. Once this is in place, the next step is to enable PIN recovery on the clients.
In order to enable PIN recovery, the first thing to do is to open the Group Policy Editor on the device by typing “gpedit.msc” in the Run window. Once the Group Policy Editor is open, navigate to Computer Configuration > Administrative Templates > Windows Components > Windows Hello for Business > PIN Complexity.
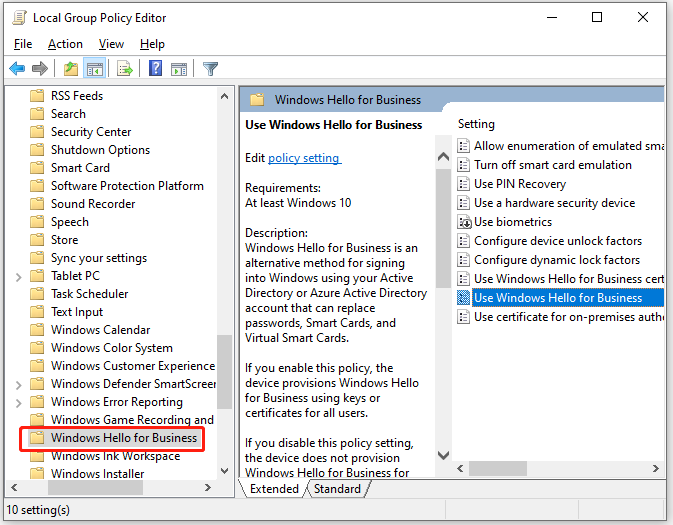
Here, double-click on the policy “Allow resetting Windows Hello PIN” and select “Enabled”. Under the “Options” section, choose “Allow users to reset Windows Hello PIN when they forgot their PIN” and click OK to save the changes.
After enabling PIN recovery, it is important to verify that it is functioning correctly on the device. This can be done by opening the Command Prompt and running the command
to force the Group Policy update. Once the update is completed, restart the device.
After the restart, go to Settings > Accounts > Sign-in options and click on “I forgot my PIN” option. This should prompt the user to enter their user account password and then allow them to reset their Windows Hello PIN. If the reset is successful, the user will be prompted to set a new PIN.
In conclusion, enabling PIN recovery on the clients is crucial in an organizational setting to ensure that employees have secure access to their devices. By following the steps outlined in this chapter, organizations can implement a reliable and secure solution for resetting Windows Hello PIN in case of forgotten PIN.
Configure allowed URLs for your federated identity provider on Azure AD-joined devices
When it comes to managing Windows Hello PINs in an organizational setting, it is essential to have a comprehensive understanding of how to configure allowed URLs for federated identity providers on Azure AD joined devices. This step is crucial in ensuring a secure and seamless experience for users when resetting their PINs. In this chapter, we will discuss the importance of configuring these URLs and how to do it effectively.
The Importance of Configuring Allowed URLs
Before we dive into the specifics of configuring allowed URLs, it is essential to understand why this step is necessary. As mentioned in the previous topic, enabling PIN recovery on clients allows users to reset their PINs when forgotten. However, to ensure the security of sensitive information, it is crucial to restrict the websites or services from which users can reset their PINs. This is where configuring allowed URLs for federated identity providers comes into play.
Configuring Allowed URLs for Federated Identity Providers
To configure allowed URLs for federated identity providers, you will need to have administrative access to the Azure AD portal. Once logged in, navigate to Azure Active Directory > Security > Conditional Access > Named Locations. Here, you will find a list of named locations that have been added to your organization’s Azure AD tenant.
Adding a New Named Location
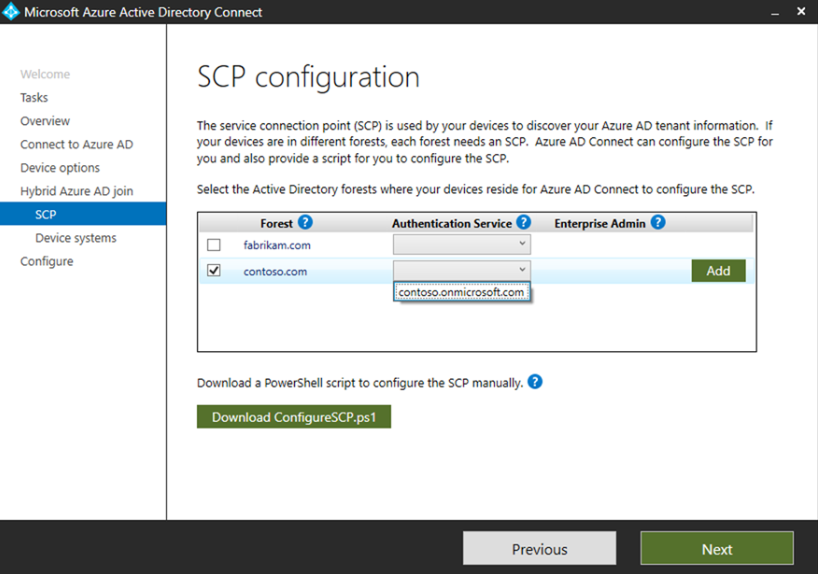
To add a new named location, click on the “New location” button and provide a name for the location. Next, you will need to specify the URL for the federated identity provider from which your users will be allowed to reset their PINs. This could be the URL for your organization’s identity management system, such as Azure AD Connect. Once done, click on “Create” to save the changes.
Assigning Named Locations to Users
Once you have created the named location, the next step is to assign it to the users who will have the privilege to reset their PINs from the specified URL. To do this, navigate to Azure Active Directory > Conditional Access > Policies. Here, click on “New policy” and provide a name for the policy. Next, under “Assignments,” select the user or group to whom you want to assign the named location. Under “Access controls “ select “Grant” and then choose the named location you created.
Configuring allowed URLs for federated identity providers is an essential step in managing Windows Hello PINs in an organizational setting. By restricting the websites or services from which users can reset their PINs, organizations can ensure the security of sensitive information. By following the steps outlined in this chapter, you can effectively configure allowed URLs for federated identity providers on Azure AD joined devices.
How to reset PIN in a business or enterprise environment
Method 1: Enable the Microsoft PIN reset service in your Azure AD tenant
In a business or enterprise environment, it is important to have a convenient and efficient method for resetting Windows Hello PINs. This is especially crucial for IT administrators who are responsible for managing multiple devices and users. One method that can be used in this setting is by enabling the Microsoft PIN Reset Service in your Azure AD tenant. This allows users to reset their Windows Hello PIN directly from their devices, without needing to go through the IT department.
Step 1 : Enabling the Microsoft PIN Reset Service
To enable the Microsoft PIN Reset Service, the first step is to ensure that your organization is using Azure AD for user authentication. Next, you will need to enable the feature in your Azure AD tenant by following the below steps:
1. Sign in to the Azure portal
To start, sign in to the Azure portal using your administrator credentials. This will give you access to the Azure AD tenant settings.
2. Navigate to the Azure Active Directory page
Once you are signed in, navigate to the Azure Active Directory page using the search bar.
3. Go to the “Sign-ins” section
In the Azure Active Directory page, go to the “Sign-ins” section. This will show you a list of all the user sign-ins in your organization.
4. Enable the “Pin Reset” option
Under the “Access controls” menu, you will see the option to “Enable Pin Reset.” Toggle this option to “Enabled.“
Step 2 : Resetting the Windows Hello PIN
Once the Microsoft PIN Reset Service is enabled, users can easily reset their Windows Hello PIN by following these steps:
The user must be signed in to the device to reset their Windows Hello PIN.
2. Go to the “Settings” menu
In the “Settings” menu, go to the “Accounts” section.
3. Select “Sign-in options”
Under the “Accounts” section, select “Sign-in options.“
4. Click on “Windows Hello PIN”
Under the “Sign-in options” menu, click on “Windows Hello PIN.” This will bring up the option to “Reset your PIN.“
The user will be prompted to verify their identity using their previously registered authentication method, such as a password or biometric scan.
Once the identity is verified, the user can create a new Windows Hello PIN, which will be used for future logins.
Enabling the Microsoft PIN Reset Service in your Azure AD tenant is a simple and effective way to allow users to reset their Windows Hello PIN in a business or enterprise environment. By following these steps, users can easily manage their Windows Hello PIN without disrupting IT administrators, allowing for a smoother and more efficient reset process.
Method 2: Use Microsoft Intune to reset your PIN
Microsoft Intune is a cloud-based device management tool that can be used to manage and secure devices in a business or enterprise environment. It offers a range of features, including the ability to remotely reset a Windows Hello PIN for a user. This method is useful for organizations that use Intune as their device management solution.
Resetting with Microsoft Intune
To reset a Windows Hello PIN using Microsoft Intune, follow these steps:
1. Open the Microsoft Intune console and navigate to the “Device configuration” tab.
2. Click on “Profiles” and then select “Windows“.
3. Click on “Create profile” and then choose “Windows Hello for Business” as the profile type.
4. Under “Settings“, select the option to “Reset PIN“.
5. Choose the appropriate settings for PIN complexity and expiration, and then save the profile.
6. Assign the profile to the appropriate group of users.
Once the profile has been applied, users will be able to reset their Windows Hello PIN by going to the “Sign-in options” menu in their device’s settings and clicking on the “Reset PIN” button. This will prompt them to create a new PIN and will enforce the settings configured in the Intune profile.
Benefits of using Microsoft Intune for PIN reset
Using Microsoft Intune to reset Windows Hello PINs offers several benefits for businesses:
— Centralized management: Intune allows for central management of PIN reset policies, making it easier for administrators to enforce secure and consistent settings across all devices.
— Increased security: By enforcing more complex PIN requirements and regular expiration, Intune helps to improve the security of Windows Hello PINs in an organization.
— Remote control: With Intune, administrators can reset a PIN for a user’s device remotely, without needing physical access to the device. This is useful for situations where a user has forgotten their PIN or if there are security concerns regarding the device.
Considerations for using Microsoft Intune for PIN reset
While using Microsoft Intune for PIN reset offers many benefits, there are a few things to consider before implementing this method:
— Intune requires a subscription: In order to use Intune for device management, a subscription is required. This may not be feasible for smaller businesses or organizations.
— User training: Users will need to be educated on the new PIN reset process, as it differs from the usual method of resetting through the Windows settings.
— Compatibility: This method is only compatible with devices running Windows 10 version 1703 or later.
In conclusion, using Microsoft Intune to reset Windows Hello PINs offers a secure and efficient way to manage PINs in a business or enterprise environment. With centralized management and remote control capabilities, Intune makes it easier for organizations to enforce strong PIN policies and maintain the security of their devices. However, it is important to consider the potential obstacles and ensure that Intune is the right solution for your organization’s needs.
Method 3: Follow the step-by-step guide to reset your Windows 10 device PIN
In today’s fast-paced business world, security is of the utmost importance. That’s why many companies and enterprises have chosen to implement Windows Hello, a biometric authentication feature in Windows 10 that allows users to sign in using facial recognition, a fingerprint, or a PIN. However, there may be instances where a user needs to reset their Windows Hello PIN, whether it’s due to a forgotten PIN or a security breach. In such cases, it’s crucial to have a step-by-step guide for resetting the PIN to ensure a smooth and secure process.
Previously, we discussed using Microsoft Intune as one of the methods for resetting the Windows Hello PIN in a business or enterprise environment. In this chapter, we’ll go over another method that involves following a step-by-step guide.
Step 1: The first step in resetting the Windows Hello PIN is to navigate to the Windows 10 settings. This can be done by clicking on the “Start” menu and selecting the gear icon for “Settings“.
Step 2: In the settings menu, select “Accounts” and then click on “Sign-in options” in the left sidebar.
Step 3: Under the “Sign-in options” section, scroll down until you see the “Windows Hello PIN” option. Click on the “I forgot my PIN” button below it.
Step 4: You’ll be prompted to enter your account password to confirm your identity. Once done, click on “Ok” to continue.
Step 5: You’ll then be asked to enter a new PIN. It’s important to choose a strong and unique PIN to ensure the security of your device. Enter the new PIN and then confirm it by re-entering it.
Step 6: Click on “Ok” to finalize the process. You’ll see a confirmation message stating that your PIN has been reset.
Note: If you don’t have the option to reset your Windows Hello PIN, it means that your device is managed by an organization. In such cases, please contact your IT department for assistance.
Following this step-by-step guide ensures that your Windows Hello PIN is reset smoothly and securely. It’s important to note that resetting the PIN will also remove any saved biometric data, so users will need to set up their facial or fingerprint recognition again.
In conclusion, having a step-by-step guide for resetting the Windows Hello PIN in a business or enterprise environment is essential for maintaining the security and efficiency of a company’s devices. It’s a simple process that can be easily followed by any user, ensuring a smooth and secure experience.
Tips and troubleshooting for resetting your Windows Hello PIN
How non-destructive PIN reset works
Understanding non-destructive PIN reset
The non-destructive PIN reset option allows users to change their Windows Hello for Business PIN without losing their existing container and keys. By default, PIN reset is a destructive process, where the existing PIN and underlying credentials, including keys and certificates, are deleted from the client. However, non-destructive PIN reset ensures that only the PIN used to authorize key usage is changed while keeping the container and associated credentials intact.
Configuring non-destructive PIN reset
To enable non-destructive PIN reset, you need to deploy and configure the Microsoft PIN reset service and client applications. Start by accepting consent for the Microsoft PinReset Service Production and Microsoft PinReset Client Production applications to access your organization. Confirm that both service principals are registered in your tenant by checking the Azure Active Directory > Applications > Enterprise applications section of the Microsoft Endpoint Manager admin center.
Enabling PIN recovery on the clients
To enable PIN recovery on the clients, you can use either Microsoft Intune/MDM or Group Policy. With Microsoft Intune, create a Settings catalog policy and configure the “Windows Hello For Business” category with the “Enable Pin Recovery” setting set to “True“. Assign this policy to the group containing the devices or users you want to configure. Alternatively, use a custom policy with the PassportForWork CSP to enable PIN recovery.
Confirming PIN Recovery policy enforcement on the devices
To confirm that the PIN Recovery policy is enforced on the devices, run the command
from the command line. Look for the “CanReset” line item in the user state section of the output. If “CanReset” reports as “DestructiveOnly“, only destructive PIN reset is enabled. If “CanReset” reports as “DestructiveAndNonDestructive“, non-destructive PIN reset is enabled.
Configuring allowed URLs for federated identity providers on Azure AD joined devices
In a federated environment using AD FS or a third-party identity provider, configure devices with a policy that allows a list of domains to be reached during PIN reset flows. This ensures that authentication pages from the identity provider can be used during Azure AD joined PIN reset. Use Microsoft Intune to create a Settings catalog policy with the “Authentication” category and the “Configure Web Sign In Allowed Urls” setting. Provide a semicolon-delimited list of domains needed for authentication during the PIN reset scenario. Alternatively, use a custom policy with the Policy CSP to configure these allowed URLs.
If you encounter any issues while using non-destructive PIN reset, ensure that the Microsoft PIN reset service is deployed and the client policy is properly configured. Check for any network connectivity issues with Azure AD, domain controllers, and federation services. Review the permissions and access granted to the Microsoft Pin Reset Service and Microsoft Pin Reset Client applications in your Azure AD tenant.
Windows Hello for Business eliminates the need for passwords by using asymmetric key pairs and biometric authentication. The PIN used in Windows Hello for Business is more secure than a traditional password, as it functions as user-provided entropy to unlock the private key stored in the Trusted Platform Module (TPM). Non-destructive PIN reset is a recommended feature to enable, as it allows users to change their PIN without affecting their existing credentials.
Frequently asked questions and solutions for resetting Windows Hello PIN
Incorrect PIN entry: One common issue when resetting the Windows Hello PIN is entering the incorrect PIN. It is essential to carefully enter the new PIN to avoid any mistakes. Double-check the characters you are entering and make sure they match the desired PIN.
Forgotten PIN: Another common issue is forgetting the PIN altogether. If you have forgotten your Windows Hello PIN, don’t worry. There are methods available to reset it. You can follow the steps outlined in the previous sections to reset your PIN using different options such as the lock screen, Settings app, or utilizing third-party software like Renee PassNow.
Failure to set up Windows Hello: If you encounter difficulties in setting up Windows Hello in the first place, it can prevent you from resetting the PIN. In such cases, it is recommended to check for Windows updates on your device. Updating your Windows operating system might resolve any compatibility issues that are preventing the successful setup of Windows Hello.
Error messages during PIN reset: Sometimes, when attempting to reset the Windows Hello PIN, you may encounter error messages. Common error codes and their corresponding mitigations include:
0×800905 (NTE_BAD_DATA): Unjoin the device from Azure AD and rejoin.
0x80090F (The container or key already exists): Unjoin the device from Azure AD and rejoin.
0×80090011 (The container or key was not found): Unjoin the device from Azure AD and rejoin.
0×80090027 (Caller provided a wrong parameter): Change the third-party code if receiving this error.
0x8009002A (NTE_NO_MEMORY): Close programs consuming memory and try again.
0x8009002D (NTE_INTERNAL_ERROR): Check for system errors or contact support.
0x801C01 (ADRS server response is not in a valid format): Sign out and then sign in again.
0x801C02 (Server failed to authenticate the user): Verify the user’s credentials and try again.
0x801C03 (User is not authorized to enroll): Check user permissions for the operation.
0x801C06 (Unhandled exception from server): Restart your device and try again.
0x801C0B (Redirection is needed and redirected location is not a well-known server): Verify the server’s validity and try again.
0x801C0C (Discovery failed): Retry the discovery process or reset the device.
0x801C0013 (Tenant ID is not found in the token): Verify the tenant ID and try again.
0x801C0014 (User SID is not found in the token): Verify the user’s credentials and try again.
0x801C0019 (The federation provider client configuration is empty): Check the federation provider client configuration.
0x801C001A (The DRS endpoint in the federation provider client configuration is empty): Verify the DRS endpoint in the federation provider client configuration.
0x801C001B (The device certificate is not found): Check the device certificate and try again.
0x801C03F0 (There is no key registered for the user): Sign out and then sign in again.
0x801C03F1 (There is no UPN in the token): Verify the user’s credentials and try again.
0x801C044C (There is no core window for the current thread): Close unnecessary windows and try again.
0x801C004D (DSREG_NO_DEFAULT_ACCOUNT): Ensure a default WAM account is available for provisioning.
0xCAA30193 (HTTP 403 Request Forbidden): Check server, proxy, or firewall settings.
Conclusion
In conclusion, resetting your Windows Hello PIN is an important step to ensure the security of your device and data. This can be done easily through the lock screen or settings app, or by using third-party tools like Renee PassNow. In organizational settings, it is crucial to confirm PIN recovery policy enforcement and enable PIN recovery for clients. Different methods, such as enabling the Microsoft PIN Reset Service or using Intune, can be used in business or enterprise environments. It is important to remember that non-destructive PIN reset preserves your files and settings, and common issues can be easily resolved by following step-by-step guides. As technology advances and security becomes more important, it is essential to stay updated on the methods and tips for resetting your Windows Hello PIN. With these tools and troubleshooting techniques, you can easily reset your Windows Hello PIN and keep your device and data safe.