
Трансферное обучение с предобученными моделями в Keras с Python
AI_Generated 06.05.2025
Суть трансферного обучения проста: взять модель, которая уже научилась решать одну задачу, и адаптировать её для решения другой, похожей задачи. Мозг человека работает по схожему принципу. Изучив. . .
Циклические зависимости в C#: методы управления и устранения
stackOverflow 06.05.2025
Если вы хоть раз работали над не самым тривиальным проектом на C#, то наверняка сталкивались с той ситуацией, когда компилятор вдруг начинает сыпать странными ошибками о невозможности разрешить. . .
Как перейти от Waterfall к Agile
EggHead 06.05.2025
Каскадная модель разработки Waterfall — классический пример того, как благие намерения превращаются в организационный кошмар. Изначально созданная для упорядочивания хаоса и внесения предсказуемости. . .
Оптимизация SQL запросов — Продвинутые техники
Codd 06.05.2025
Интересно наблюдать эволюцию подходов к оптимизации. Двадцать лет назад всё сводилось к нескольким простым правилам: «Избегайте SELECT *», «Используйте индексы», «Не джойните слишком много таблиц». . . .
Создание микросервисов с gRPC и Protobuf в C++
bytestream 06.05.2025
Монолитные приложения, которые ещё недавно считались стандартом индустрии, уступают место микросервисной архитектуре — подходу, при котором система разбивается на небольшие автономные сервисы, каждый. . .
Многопоточность и параллелизм в Python: потоки, процессы и гринлеты
py-thonny 06.05.2025
Параллелизм и конкурентность — две стороны многопоточной медали, которые постоянно путают даже бывалые разработчики.
Конкурентность (concurrency) — это когда ваша программа умеет жонглировать. . .
Распределенное обучение с TensorFlow и Python
AI_Generated 05.05.2025
В машинном обучении размер имеет значение. С ростом сложности моделей и объема данных одиночный процессор или даже мощная видеокарта уже не справляются с задачей обучения за разумное время. Когда. . .
CRUD API на C# и GraphQL
stackOverflow 05.05.2025
В бэкенд-разработке постоянно возникают новые технологии, призванные решить актуальные проблемы и упростить жизнь программистам. Одной из таких технологий стал GraphQL — язык запросов для API,. . .
Распознавание голоса и речи на C#
UnmanagedCoder 05.05.2025
Интеграция голосового управления в приложения на C# стала намного доступнее благодаря развитию специализированных библиотек и API. При этом многие разработчики до сих пор считают голосовое управление. . .
Реализация своих итераторов в C++
NullReferenced 05.05.2025
Итераторы в C++ — это абстракция, которая связывает весь экосистему Стандартной Библиотеки Шаблонов (STL) в единое целое, позволяя алгоритмам работать с разнородными структурами данных без знания их. . .
-
Home
-
News
- 3 Ways – Step-by-Step Guide on Disable Windows Hello
By Tina |
Last Updated
Windows Hello is a new feature in Windows 10 that allows users to sign into the operating system using biometric authentication. But some people do not use this feature and want to disable it. This post from MiniTool shows how to disable Windows Hello.
Windows Hello is a more personal, more secure way to get instant access to your Windows 10 devices using fingerprint, facial recognition or a secure PIN. Most PC’s with fingerprint readers already work with Windows Hello, making it easier and safer to sign into your PC.
Windows Hello feature also enables users to sign into the operating system using biometric authentication. But some users do not use this feature and wonder whether it is possible to disable it.
There is no doubt that you can disable Windows Hello. So, in this post, we will show you how to disable Windows Hello.
3 Ways – Step-by-Step Guide on Disable Windows Hello
In this section, we will show you how to disable Windows Hello. If you want to disable Windows Hello pin, the following methods would be very effective.
Way 1. Disable Windows Hello via Settings
At first, Windows Settings allows you to disable Windows Hello. Now, we will show you the tutorial.
- Press Windows key and I key together to open Settings.
- Then choose Accounts.
- On the left panel, choose Sign-in options.
- On the right side, click Remove under Windows Hello section.

When all steps are finished, you have successfully disabled Windows Hello. Some users may say that there is no Windows Hello option in the Windows Settings. So, in order to disable Windows Hello, you can try other ways.
Way 2. Disable Windows Hello via Group Policy
To disable Windows Hello, here is the second way. You can choose to disable it via Group Policy.
Now, here is the tutorial.
- Press Windows key and R key together to open Run box.
- Then type gpedit.msc in the box and click OK to continue.
- Navigate to this path: Computer Configuration -> Administrative Templates -> System -> Logon.
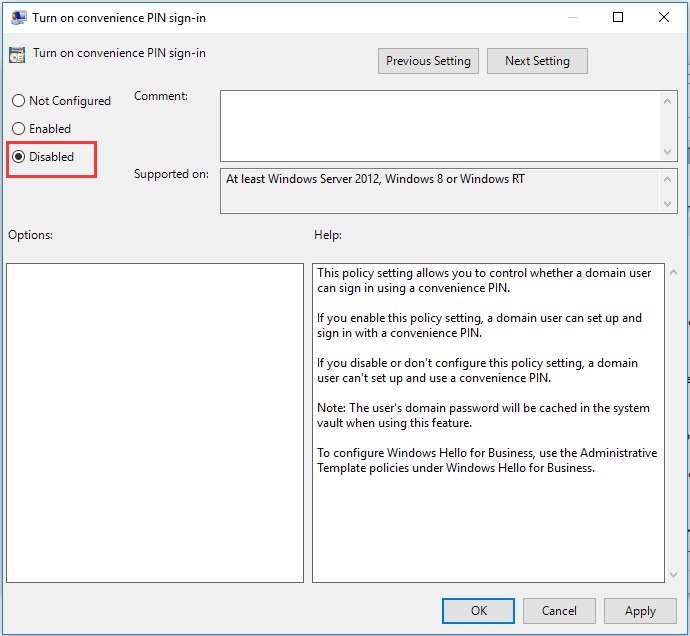
- On the right side, double-click on the Turn on convenience PIN sign in.
- In the pop-up window, click Disabled.
- Then click Apply and OK to save the changes.
Then disable other Windows Hello options. After that, exit the Group Policy window and reboot your computer to check whether the Windows Hello is disabled.
Tip: If your computers are connected to Azure Active Directory, the correct location for that in gpedit.msc is Computer Configuration | Administrative Templates | Windows Components | Windows Hello for Business. In the right side, set “Use Windows Hellow for Buiness” to Disabled.
Way 3. Disable Windows Hello via Registry
To disable Windows Hello, you can do that via the Registry. Now, here is the tutorial.
Tip: Modifying the registry may be a risky thing. So, before proceeding, please back up registries first.
- Press Windows key and R key together to open Run dialog.
- Type regedit in the box and click OK to continue.
- Navigate to the path: HKEY_LOCAL_MACHINE\SOFTWARE\Microsoft\PolicyManager\default\Settings\AllowSignInOptions.
- In the right panel, double-click on the DWORD entry named value and set it to 0.
When all steps are finished, reboot your computer and check whether the Windows Hello is disabled.
Final Words
To sum up, this post has shown 3 ways to disable Windows Hello. If you want to do that, try these solutions. If you have any better idea to disable Windows Hello PIN, you can share it in the comment zone.
About The Author
Position: Columnist
Tina is a technology enthusiast and joined MiniTool in 2018. As an editor of MiniTool, she is keeping on sharing computer tips and providing reliable solutions, especially specializing in Windows and files backup and restore. Besides, she is expanding her knowledge and skills in data recovery, disk space optimizations, etc. On her spare time, Tina likes to watch movies, go shopping or chat with friends and enjoy her life.
Maintaining security on your device has become more user-friendly and convenient than ever before. One such innovation is Microsoft’s Windows Hello, a biometric authentication system that allows users to log in to their Windows 10 or 11 computers using facial recognition, fingerprint, or PIN. However, there may come a time when you wish to revert to the traditional password method, in which case disabling Windows Hello becomes essential. Here’s a step-by-step guide on disabling Windows Hello, outlining what happens once you switch off this feature.
QUICK ANSWER
To remove Windows Hello, navigate to Start > Settings > Accounts > Sign-in options. Select the Windows Hello method you want to remove and then click Remove. Repeat the process for other Windows Hello methods.
JUMP TO KEY SECTIONS
- How to turn off Windows Hello
- What happens when you turn off Windows Hello?
Editor’s note: We used a HONOR MagicBook 14 running Windows 11 to formulate these instructions. Your steps or the way menus look may differ depending on your device and software version.
How to turn off Windows Hello
Follow these steps to disable Windows Hello. The pathway is the same on both Windows 10 and 11.
- Navigate to Start and select Settings.
- Click on the Accounts tab.
- Select Sign-in options.
- Here, you will see the Windows Hello methods you have previously set up. Select the one you want to remove and click Remove.

Adam Birney / Android Authority
Please note that if you set up Windows Hello using an external device, such as a USB fingerprint reader, you’ll need to connect it before starting this process.
What happens when you turn off Windows Hello?
When you disable Windows Hello, the system reverts to the traditional Microsoft password method for login purposes. You will be required to input your Microsoft account password each time you wish to access your device, which could be seen as a more complicated process than using biometrics or a PIN.
Your biometric data remains stored on your device after disabling Windows Hello. Still, after a significant period of inactivity, Windows will prompt you to confirm whether you want to continue storing this data. At this point, you can decide to remove your biometric data altogether.
Disabling Windows Hello can offer greater privacy for those who prefer not to store their biometric data on their devices or for users who find the traditional password method more reliable and straightforward.
FAQs
There could be several reasons why you can’t disable Windows Hello. One possible explanation could be that you’re using a work or school account, and your organization’s security policies may require Windows Hello.
Yes, Hello can be removed or disabled. You can do this by navigating to Settings > Accounts > Sign-in options and selecting Remove for the Windows Hello method you want to disable.
To disable the Hello face driver, you need to go to Device Manager and locate the Biometric Devices section. Here, you will find the drivers running your biometric systems, right-click it, and select Disable device.
No, using Windows Hello is not necessary. It is a feature that provides convenience and extra security by allowing you to unlock your device using a PIN, or facial and fingerprint recognition. However, you can use traditional methods to sign-in instead.
Quick Tips
- Turn off Windows Hello for filling passwords from Google Chrome Settings > Autofill and passwords > Google Password Manager > Settings.
- Disable Windows Hello from Windows 11 Settings > Accounts > Sign-in options > PIN (Windows Hello).
“Google Chrome Is Trying to Fill Your Password” Explained
The “Google Chrome is trying to fill your password” pop-up appears when Google Chrome uses Windows Hello to auto-fill saved passwords. To use it, you must verify your identity with facial recognition, a fingerprint scan, or a PIN via Windows Hello.

While the feature is convenient, it can be frustrating if you prefer to enter your passwords manually. Thankfully, you can turn it off by following these easy methods.
Method 1: Tweak Google Chrome Setting to Turn off Windows Hello
Google Chrome offers a nifty way to turn off Windows Hello for filling passwords nested in its settings.
Step 1: Click on the three-dot menu at the top right of Google Chrome and select Settings.

Step 2: Select Autofill and passwords from the left sidebar and click Google Password Manager.

Step 3: Expand Settings from the sidebar and toggle off Use Windows Hello when filling passwords.

Method 2: Alter Windows Settings to Turn off Windows Hello
If you still get the Windows Hello pop-up for Google Chrome passwords, turn off the feature altogether from the Windows Settings app.
Note: Once you disable Windows Hello, I recommend enabling a different security method, such as a Security key, to improve Windows 11 sign-in security.
Step 1: Press the Windows + I shortcut to open the Settings app, select Accounts from the left sidebar, and click Sign-in options.

Step 2: Select PIN (Windows Hello) and click Remove next to Remove this sign-in option.

Step 3: Confirm your action by clicking the Remove button.

Method 3: Reinstall Google Chrome
Lastly, if nothing works, uninstall Google Chrome on your PC and install it afresh to remove Windows Hello for filling in Google Chrome passwords.
Step 1: Open Windows Settings, select Apps from the left sidebar, and click Installed apps.

Step 2: Locate Google Chrome, click its three-dot menu, and select Uninstall.

Step 3: Finally, download and install the latest Google Chrome browser.
Was this helpful?
Thanks for your feedback!
The article above may contain affiliate links which help support Guiding Tech. The content remains unbiased and authentic and will never affect our editorial integrity.