

Remove Windows 10 Hello Face From PC Or Laptop
Windows Hello Face comes preinstalled with Windows 10 and uses your camera on your PC or laptop to use facial recognition to sign in to your device.
If you don’t use Hello Face in Windows 10 then there really is no need to have it installed.
Below we have listed the steps for removing Windows Hello Face.

How To Remove Windows Hello Face in Windows 10:
1. Right-click Windows start menu icon > Apps & Features
2. Now click “Optional features“

3. Search “hello” then Select “Windows Hello Face“

4. Click the “Uninstall” button
That’s how you remove Windows Hello Face from your Windows 10 PC or Laptop. There are lots of other features that come preinstalled with Windows 10 that you can also remove in the Optional features, just do the same steps as above but select a different feature to remove.
Don’t worry if you change your mind and want Hello Face back on your computer. It can be easily installed and you can check out how to do that here.
Check out our latest guides:
Disabling Windows Hello on Windows 11
Disabling Windows Hello on Windows 11 is quite simple and can be done in a few steps. First, open the Settings app, navigate to Accounts, and then to Sign-in options. From there, you can turn off various Windows Hello features like Face, Fingerprint, or PIN.
Step-by-Step Tutorial for Disabling Windows Hello on Windows 11
These steps will guide you through turning off Windows Hello features on your Windows 11 device. You’ll be able to disable Face, Fingerprint, and PIN sign-ins.
Step 1: Open Settings
Open the Settings app by clicking on the Start menu and selecting the gear icon.
Opening the Settings app is the first move. This app is where you can control most of your computer’s configurations.
Step 2: Navigate to Accounts
In the Settings app, click on ‘Accounts.’
Finding the ‘Accounts’ section is crucial because it houses all settings related to your user profile, including sign-in options.
Step 3: Go to Sign-in Options
Click on ‘Sign-in options’ under the Accounts menu.
The ‘Sign-in options’ section is where all Windows Hello features are managed. This includes Face, Fingerprint, and PIN.
Step 4: Disable Windows Hello Face
Under ‘Windows Hello Face,’ click ‘Remove.’
Disabling Windows Hello Face will stop your device from using facial recognition for sign-ins. If you don’t see this option, it means it’s not set up.
Step 5: Disable Windows Hello Fingerprint
Under ‘Windows Hello Fingerprint,’ click ‘Remove.’
If you have a fingerprint set up, this will remove it, stopping your device from using fingerprint recognition.
Step 6: Disable Windows Hello PIN
Under ‘Windows Hello PIN,’ click ‘Remove.’
Removing the PIN will disable this quick sign-in method. Make sure you remember your Microsoft account password, as you’ll need it to sign in now.
After you complete these actions, your computer will no longer use Windows Hello for sign-ins. You’ll revert to the traditional password method.
Tips for Disabling Windows Hello on Windows 11
- Backup Your Data: Before making changes, always back up important data.
- Remember Your Password: Ensure you remember your Microsoft account password since you’ll use it to sign in.
- Verify Settings: Double-check that all Windows Hello features are disabled to avoid any issues.
- Check Device Compatibility: Some devices might not show all Windows Hello options due to hardware limitations.
- Consider Security: Disabling Windows Hello might reduce your device’s security, so weigh the pros and cons.
Frequently Asked Questions
Can I disable only one Windows Hello feature?
Yes, you can choose to disable just one feature, like Face or Fingerprint, and keep others enabled.
Will disabling Windows Hello affect my Microsoft account?
No, it only affects how you sign in on your device, not your Microsoft account itself.
Is it possible to re-enable Windows Hello later?
Yes, you can re-enable Windows Hello anytime by going back to the Settings and setting it up again.
Do all Windows 11 devices support Windows Hello?
Not all devices support Windows Hello features like Face or Fingerprint due to hardware requirements.
Will I lose my data by disabling Windows Hello?
No, disabling Windows Hello will not affect your data. It only changes your sign-in method.
Summary
- Open Settings
- Navigate to Accounts
- Go to Sign-in options
- Disable Windows Hello Face
- Disable Windows Hello Fingerprint
- Disable Windows Hello PIN
Conclusion
Disabling Windows Hello on Windows 11 is straightforward and can be completed in just a few steps. Whether you’re looking to revert to a traditional sign-in method for simplicity or security reasons, knowing how to manage your sign-in options is always handy. Remember, you can always re-enable Windows Hello if you change your mind.
It’s also worth considering the security implications of disabling these features. While traditional passwords are functional, they may not offer the same level of security as biometric methods. For those interested in learning more about Windows Hello and other security features, Microsoft’s official documentation provides a wealth of information.
So, go ahead, tweak your settings, and use this newfound knowledge to optimize your Windows experience.
Matt Jacobs has been working as an IT consultant for small businesses since receiving his Master’s degree in 2003. While he still does some consulting work, his primary focus now is on creating technology support content for SupportYourTech.com.
His work can be found on many websites and focuses on topics such as Microsoft Office, Apple devices, Android devices, Photoshop, and more.
Bienvenido al blog de uninstall apps, en esta ocasión aprenderemos cómo deshabilitar Windows Hello asociado a tu cuenta. ¡Descubre cómo mejorar la seguridad y privacidad en tu dispositivo!
Disabling Windows Hello for Your Account: Eliminate Unwanted Features during Uninstall Apps Process
Disabling Windows Hello for your account can help eliminate unwanted features during the uninstall apps process. Windows Hello is a biometric security feature that allows you to log in to your computer using facial recognition or fingerprint scanning. However, some users may not need or want this feature and prefer to uninstall it along with other unnecessary apps.
To disable Windows Hello, follow these steps:
1. Open Settings: Click on the Start button and select the gear icon to open Windows Settings.
2. Go to Accounts: In the Settings window, click on “Accounts” to access your account settings.
3. Select Sign-in options: On the left pane, click on “Sign-in options” to configure your login preferences.
4. Disable Windows Hello: Under the Windows Hello section, you will see options for facial recognition and fingerprint scanning. Click on each option and select “Remove” to disable them.
5. Confirm your changes: A confirmation message will appear, asking if you’re sure you want to remove Windows Hello. Click “Yes” to confirm.
Once you’ve successfully disabled Windows Hello, it will no longer be a part of the uninstall apps process. This helps streamline the procedure and allows you to focus on removing other unnecessary features or applications from your system.
How To Remove Windows Hello Pin From Windows 10 Laptop
✅Disable User Account Control Windows 11, 10, 8.1, 7 Disable UAC Windows 10 PromptSimply & Easily
What is use Windows Hello with your account?
In the context of uninstalling apps, Windows Hello is a feature that provides a more personal and secure way to sign in to your Windows 10 device using your account. It uses biometric authentication methods, such as facial recognition, iris scanning, or fingerprint recognition, to verify your identity.
When you use Windows Hello with your account, you can add an extra layer of protection to your device and data. Uninstalling apps may sometimes be necessary for security reasons, especially if an app poses potential threats or conflicts with the functionality of Windows Hello. In this case, it’s crucial to keep your device safe by uninstalling problematic apps to ensure that Windows Hello continues to work seamlessly, providing secure access to your device and data.
Can you use Windows Hello without a Microsoft account?
Yes, you can use Windows Hello without a Microsoft account in the context of uninstall apps. However, using Windows Hello without a Microsoft account may limit some features and synchronization options across devices.
If you want to uninstall apps while using Windows Hello, follow these steps:
1. Start by signing in to your device with your local Windows account.
2. Click on the Start button, then select Settings (gear icon).
3. Go to Apps and click on Apps & features.
4. Locate the app you want to uninstall and click on it.
5. Press the Uninstall button that appears.
Your app will be uninstalled, and you can continue using Windows Hello with your local account. Keep in mind that some system and pre-installed apps may not allow uninstallation.
To disable Windows Hello in Windows 11, follow these steps:
1. Press the Windows key on your keyboard or click on the Start menu button.
2. Click on the Settings gear icon to open the Windows Settings app.
3. In the Settings window, click on Accounts located in the left-side menu.
4. Under Accounts, click on Sign-in options.
5. In the Sign-in options page, locate the Windows Hello section. You’ll find options for Windows Hello Face, Windows Hello Fingerprint, and Windows Hello PIN.
6. Click on each of the Windows Hello options you have enabled, such as Face or Fingerprint, and then click on Remove. This will disable those specific Windows Hello features.
7. To disable Windows Hello PIN, click on the Change button under Windows Hello PIN, and a new window will appear. There, click on Remove and follow the on-screen instructions to disable the PIN.
After following these steps, you will have successfully disabled Windows Hello in Windows 11.
How can I permanently disable Windows Hello while uninstalling apps on my device?
To permanently disable Windows Hello while uninstalling apps on your device, follow these steps:
1. Press the Windows key on your keyboard or click on the Windows icon at the bottom-left corner of the screen to open the Start menu.
2. Type “Settings” in the search bar and press Enter to open the Settings app.
3. In the Settings app, click on “Accounts”.
4. Now, select “Sign-in options” from the left sidebar.
5. Scroll down and locate Windows Hello. Depending on your device, there might be multiple Windows Hello options like Fingerprint, Face, or PIN.
6. For each Windows Hello option available, click on it and then click on “Remove”. This will remove and disable that specific Windows Hello feature.
7. To disable Windows Hello permanently, you need to set up a group policy. Press the Windows key + R to open the Run dialog box. Type “gpedit.msc” and press Enter. This will open the Local Group Policy Editor. Note that this step is applicable only for Windows 10 Pro, Enterprise, and Education editions.
8. In the Local Group Policy Editor, navigate to the following path: Computer Configuration > Administrative Templates > Windows Components > Biometrics.
9. In the right pane, double-click on “Allow the use of biometrics”. Change its setting to “Disabled”, then click “Apply” and “OK”. This will permanently disable Windows Hello on your device.
Now that Windows Hello is disabled, you can proceed with uninstalling apps without worrying about this feature interfering with your process.
What are the steps to prevent Windows Hello from interfering with the app uninstallation process?
To prevent Windows Hello from interfering with the app uninstallation process, follow these steps:
1. Disable Windows Hello: Before attempting to uninstall the app, make sure to disable the Windows Hello feature temporarily. To do this, open the “Settings” app and navigate to “Accounts” > “Sign-in options”. Locate the “Windows Hello” section and click on the option to remove or manage any biometric sign-in data (e.g., fingerprint, facial recognition, or PIN). Follow the on-screen instructions to turn off Windows Hello.
2. Close all running applications: Make sure that no other applications are running in the background while you uninstall the app to avoid any potential conflicts or interference. Press “Ctrl + Shift + Esc” to open the Task Manager, then go through the list of running applications and processes, ending any unnecessary ones.
3. Uninstall the app: Once Windows Hello has been disabled and all running applications are closed, proceed with the app uninstallation process. Go to “Settings” > “Apps” > “Apps & features”, locate the app you want to uninstall, click on it, and select “Uninstall.” Follow the on-screen instructions to complete the uninstallation.
4. Restart your computer: After successfully uninstalling the app, restart your computer to apply any changes and clear any residual files related to the app. This ensures that Windows Hello and other features can function properly once re-enabled.
5. Re-enable Windows Hello: Lastly, don’t forget to re-enable Windows Hello after completing the app uninstallation process. To do this, return to the “Settings” app and navigate to “Accounts” > “Sign-in options”. Reconfigure your preferred biometric sign-in options (e.g., fingerprint, facial recognition, or PIN) to resume using the Windows Hello feature.
Can disabling Windows Hello improve the success rate of uninstalling apps, and what’s the procedure to do so?
Disabling Windows Hello is unlikely to improve the success rate of uninstalling apps, as it mainly focuses on providing biometric authentication for the user. However, if you suspect that it might be conflicting with the uninstall process, you can try disabling it. Here’s the procedure to do so:
1. Press the Windows key + I to open the Settings app.
2. Click on Accounts.
3. In the left pane, click on Sign-in options.
4. Under the Windows Hello section, locate the type of Windows Hello (Fingerprint, Face, or PIN) you have enabled.
5. Click on the Remove button beneath the type of Windows Hello you want to disable.
Keep in mind that this action will remove the current biometric or PIN associated with your device. Once you’ve disabled Windows Hello, you can proceed to uninstall any problematic apps, but remember to re-enable Windows Hello when you’re finished if necessary.
Post Views: 1,260
-
Home
-
News
- 3 Ways – Step-by-Step Guide on Disable Windows Hello
By Tina |
Last Updated
Windows Hello is a new feature in Windows 10 that allows users to sign into the operating system using biometric authentication. But some people do not use this feature and want to disable it. This post from MiniTool shows how to disable Windows Hello.
Windows Hello is a more personal, more secure way to get instant access to your Windows 10 devices using fingerprint, facial recognition or a secure PIN. Most PC’s with fingerprint readers already work with Windows Hello, making it easier and safer to sign into your PC.
Windows Hello feature also enables users to sign into the operating system using biometric authentication. But some users do not use this feature and wonder whether it is possible to disable it.
There is no doubt that you can disable Windows Hello. So, in this post, we will show you how to disable Windows Hello.
3 Ways – Step-by-Step Guide on Disable Windows Hello
In this section, we will show you how to disable Windows Hello. If you want to disable Windows Hello pin, the following methods would be very effective.
Way 1. Disable Windows Hello via Settings
At first, Windows Settings allows you to disable Windows Hello. Now, we will show you the tutorial.
- Press Windows key and I key together to open Settings.
- Then choose Accounts.
- On the left panel, choose Sign-in options.
- On the right side, click Remove under Windows Hello section.

When all steps are finished, you have successfully disabled Windows Hello. Some users may say that there is no Windows Hello option in the Windows Settings. So, in order to disable Windows Hello, you can try other ways.
Way 2. Disable Windows Hello via Group Policy
To disable Windows Hello, here is the second way. You can choose to disable it via Group Policy.
Now, here is the tutorial.
- Press Windows key and R key together to open Run box.
- Then type gpedit.msc in the box and click OK to continue.
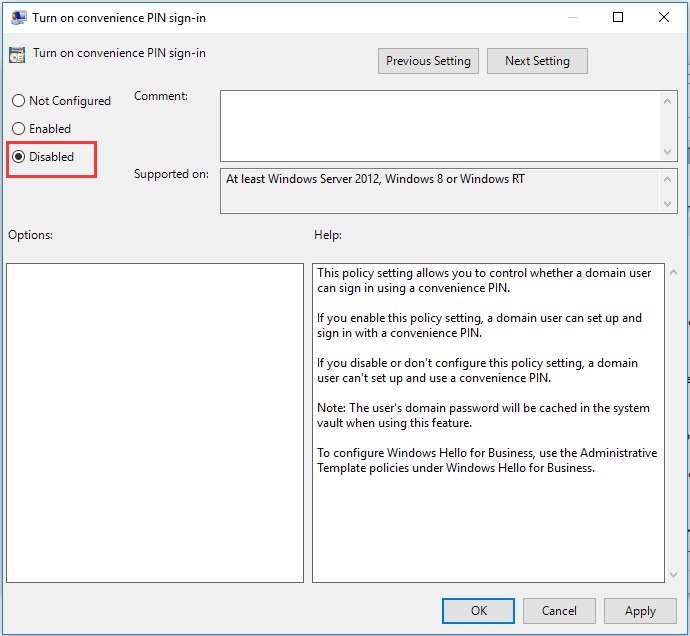
- Navigate to this path: Computer Configuration -> Administrative Templates -> System -> Logon.
- On the right side, double-click on the Turn on convenience PIN sign in.
- In the pop-up window, click Disabled.
- Then click Apply and OK to save the changes.
Then disable other Windows Hello options. After that, exit the Group Policy window and reboot your computer to check whether the Windows Hello is disabled.
Tip: If your computers are connected to Azure Active Directory, the correct location for that in gpedit.msc is Computer Configuration | Administrative Templates | Windows Components | Windows Hello for Business. In the right side, set “Use Windows Hellow for Buiness” to Disabled.
Way 3. Disable Windows Hello via Registry
To disable Windows Hello, you can do that via the Registry. Now, here is the tutorial.
Tip: Modifying the registry may be a risky thing. So, before proceeding, please back up registries first.
- Press Windows key and R key together to open Run dialog.
- Type regedit in the box and click OK to continue.
- Navigate to the path: HKEY_LOCAL_MACHINE\SOFTWARE\Microsoft\PolicyManager\default\Settings\AllowSignInOptions.
- In the right panel, double-click on the DWORD entry named value and set it to 0.
When all steps are finished, reboot your computer and check whether the Windows Hello is disabled.
Final Words
To sum up, this post has shown 3 ways to disable Windows Hello. If you want to do that, try these solutions. If you have any better idea to disable Windows Hello PIN, you can share it in the comment zone.
About The Author
Position: Columnist
Tina is a technology enthusiast and joined MiniTool in 2018. As an editor of MiniTool, she is keeping on sharing computer tips and providing reliable solutions, especially specializing in Windows and files backup and restore. Besides, she is expanding her knowledge and skills in data recovery, disk space optimizations, etc. On her spare time, Tina likes to watch movies, go shopping or chat with friends and enjoy her life.
Windows 11 offers facial recognition sign-in as part of the Windows Hello suite, providing a quick and secure way to access your device. However, there may be situations where you need to remove the facial recognition sign-in , whether for security reasons, troubleshooting, or switching to another authentication method. This tutorial will guide you through multiple methods to disable or remove facial recognition on your Windows 11 account.
While facial recognition provides convenient access, you may want to remove it to enhance security, switch to another sign-in method, or troubleshoot issues with the camera or recognition system. Disabling this feature doesn’t remove other sign-in options, allowing you to use a PIN, password, or fingerprint instead.
Method 1: Using the Settings App
The Settings app is the simplest way to remove facial recognition from your account. Here’s how:
- Open Settings by pressing Winkey + I.
- Navigate to Accounts on the left sidebar.
- Select Sign-in options.

Open Sign in options in Windows Settings
- Under Face Recognition (Windows Hello), click on Remove.

Removing the Facial Recognition.

Remove Facial Recognition
- Confirm your action if prompted, and the facial recognition data will be deleted.
Note: Removing facial recognition will not impact other Windows Hello options like PIN or fingerprint.
Method 2: Using Local Group Policy Editor
Note: This method is available only in Windows 11 Pro, Enterprise, and Education editions.
The Local Group Policy Editor provides an advanced way to disable facial recognition, particularly useful if you want to prevent it from being re-enabled:
- Press Winkey + R, type
gpedit.msc, and press Enter to open the Group Policy Editor.

Open Local GP Editor from Run Window
- Go to the following path:
Computer Configuration > Administrative Templates > Windows Components > Biometrics

Navigating to the desired directory
- Locate Facial Features and double-click on Turn off face recognition.
- Select Enabled to disable face recognition, then click Apply and OK.
This policy change prevents users from enabling facial recognition on the device, providing a more permanent solution.
Method 3: Using Device Manager to Disable Camera
Another way to remove access to facial recognition is by disabling the camera device through Device Manager. Here’s how:
- Open Device Manager by typing “Device Manager” in the Windows search bar and selecting it.

Opening Device Manager from Start Menu
- Expand the Cameras section.
- Right-click your camera device and select Disable device.

Disable Camera Driver in Device Manager
- Confirm if prompted.
Important: Disabling the camera will also affect other applications that rely on the camera.
This method effectively disables facial recognition but may limit the camera’s availability for other uses.
Method 4: Using Registry Editor
Warning: Editing the Windows registry can be risky. Always back up your registry before making changes.
If you’re comfortable with advanced settings, you can use the Registry Editor to disable facial recognition:
- Press Winkey + R, type
regedit, and press Enter.

Running Regedit Command in Run Window
- Navigate to the following path:
HKEY_LOCAL_MACHINE\SOFTWARE\Microsoft\PolicyManager\default\Biometrics\AllowFacialRecognition

Navigate to the desired directory
- Locate Value named
AllowFacialRecognition. If it doesn’t exist, create a new DWORD (32-bit) Value with this name. - Set the Value data to
0to disable facial recognition.

Setting DWORD 32 value as 1 to enable AllowFacialRecognition
- Restart your computer for the changes to take effect.
This method provides a permanent way to disable facial recognition but should only be attempted by experienced users.
Conclusion
Removing facial recognition sign-in in Windows 11 is simple and can be done through several methods, including the Settings app , Local Group Policy Editor , Device Manager , and Registry Editor. Whether you’re looking to switch to another authentication method or improve security, these steps will help you remove facial recognition effectively.