
Applies ToWindows 11 Windows 10
Windows Hello — это более личный и безопасный способ входа на устройство с Windows. Вместо пароля с Windows Hello вы можете войти с помощью распознавания лиц, отпечатков пальцев или ПИН-кода.
Эти параметры упрощают и безопаснее вход в компьютер, так как ВАШ ПИН-код связан только с одним устройством и резервную копию для восстановления с учетной записью Майкрософт.
Вы можете использовать приложение «Параметры» для настройки Windows Hello и управления ими.
-
В приложении «Настройки» на устройстве с Windows, выберите Учетные записи > параметры входа или воспользуйтесь следующим сочетанием клавиш:
Параметры входа
-
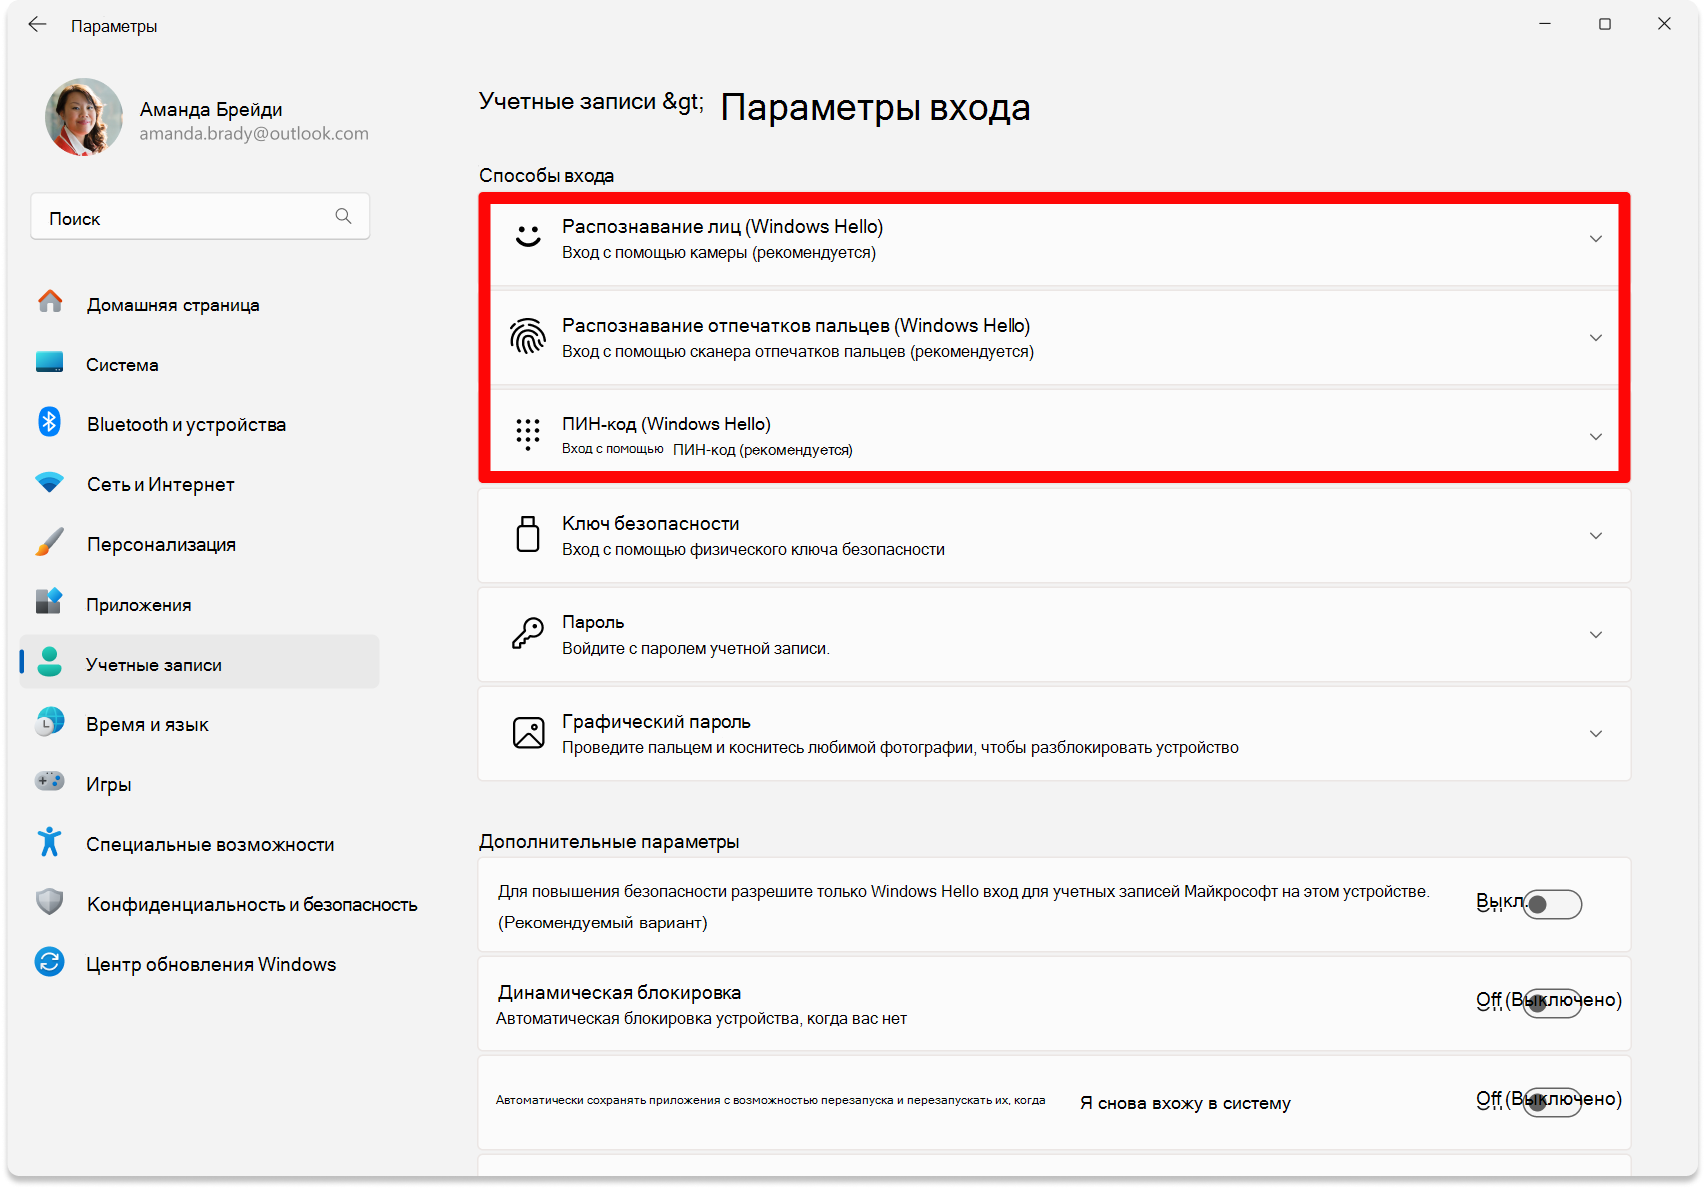
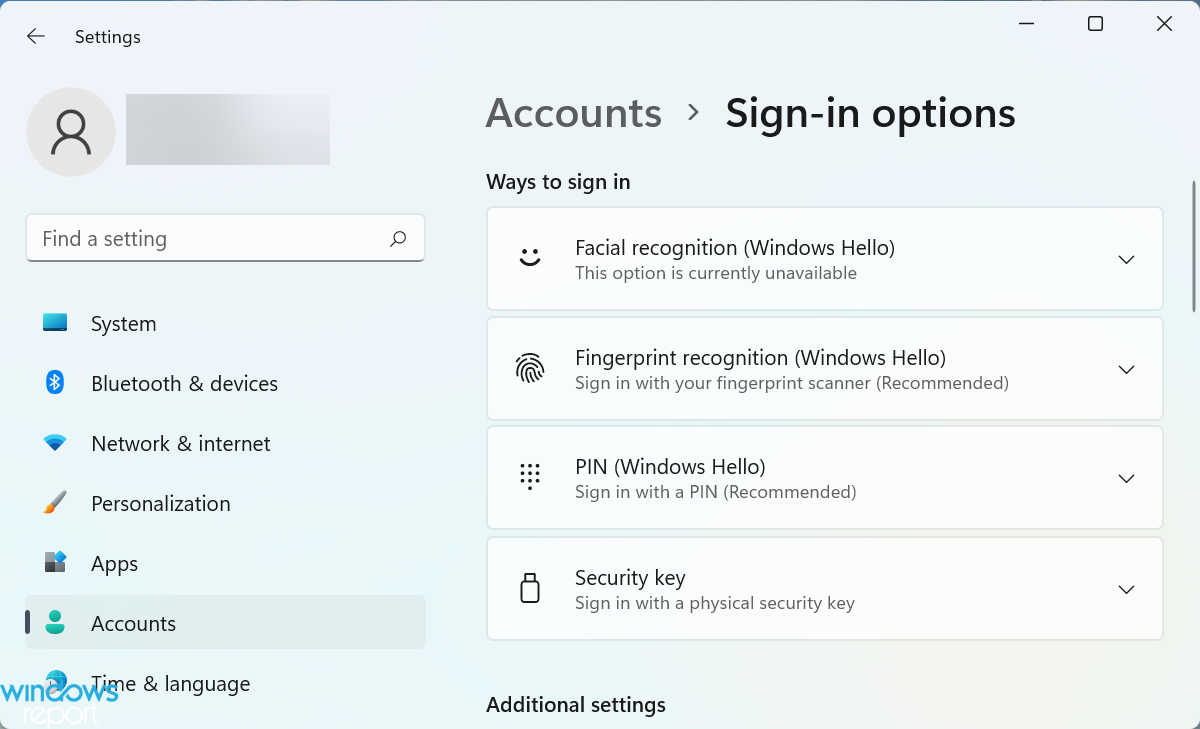
В разделе Способы входа можно выбрать три варианта входа с помощью Windows Hello:
-
Выберите Распознавание лиц (Windows Hello), чтобы настроить вход с помощью инфракрасной камеры компьютера или внешней инфракрасной камеры.
-
Выберите Распознавание отпечатков пальцев (Windows Hello), чтобы настроить вход с помощью сканера отпечатков пальцев.
-
Выберите ПИН-код (Windows Hello), чтобы настроить вход с помощью ПИН-кода.

Важно: Для входа с помощью лица требуется камера, совместимая с Hello. Для входа с помощью отпечатка пальца на устройстве должно быть устройство считывания отпечатков пальцев.
Если ваше устройство не поставляются с одним из них, вы можете приобрести его, который может быть подключен к вашему устройству через USB у любого из ряда популярных розничных торговцев.
-
-
Выберите параметр , выберите Настроить
-
Следуйте инструкциям, чтобы завершить настройку Windows Hello
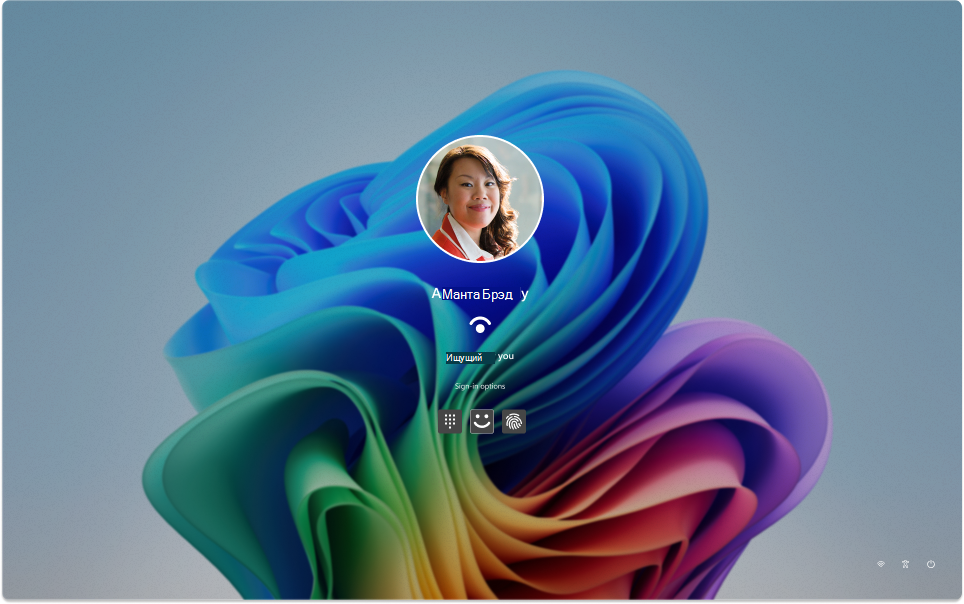
Интерфейс входа
При следующем входе на устройство вы можете использовать распознавание лиц, идентификацию отпечатков пальцев или ПИН-код вместо пароля.
Нужна дополнительная помощь?
Нужны дополнительные параметры?
Изучите преимущества подписки, просмотрите учебные курсы, узнайте, как защитить свое устройство и т. д.
Readers help support Windows Report. We may get a commission if you buy through our links.
Read our disclosure page to find out how can you help Windows Report sustain the editorial team. Read more
Signing in to your device has to be secure yet simple, and Windows Hello has solved the problem perfectly. It allows you to sign in with a PIN, fingerprint, or facial recognition. Let’s find out how you can install the Hello face driver for Windows 11.
How can I install the Windows Hello Face in Windows 11?
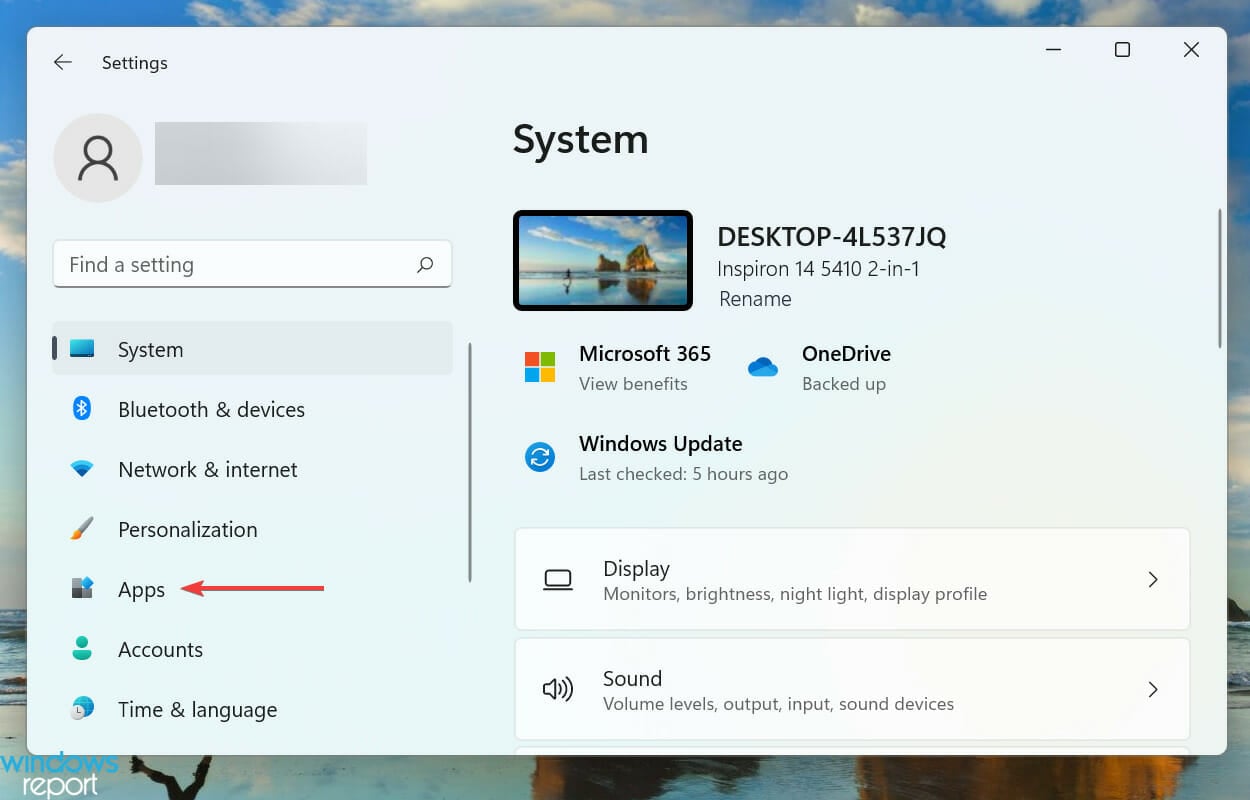
- Press Windows + I to launch the Settings, and then select Apps from the list of tabs in the left navigation pane.

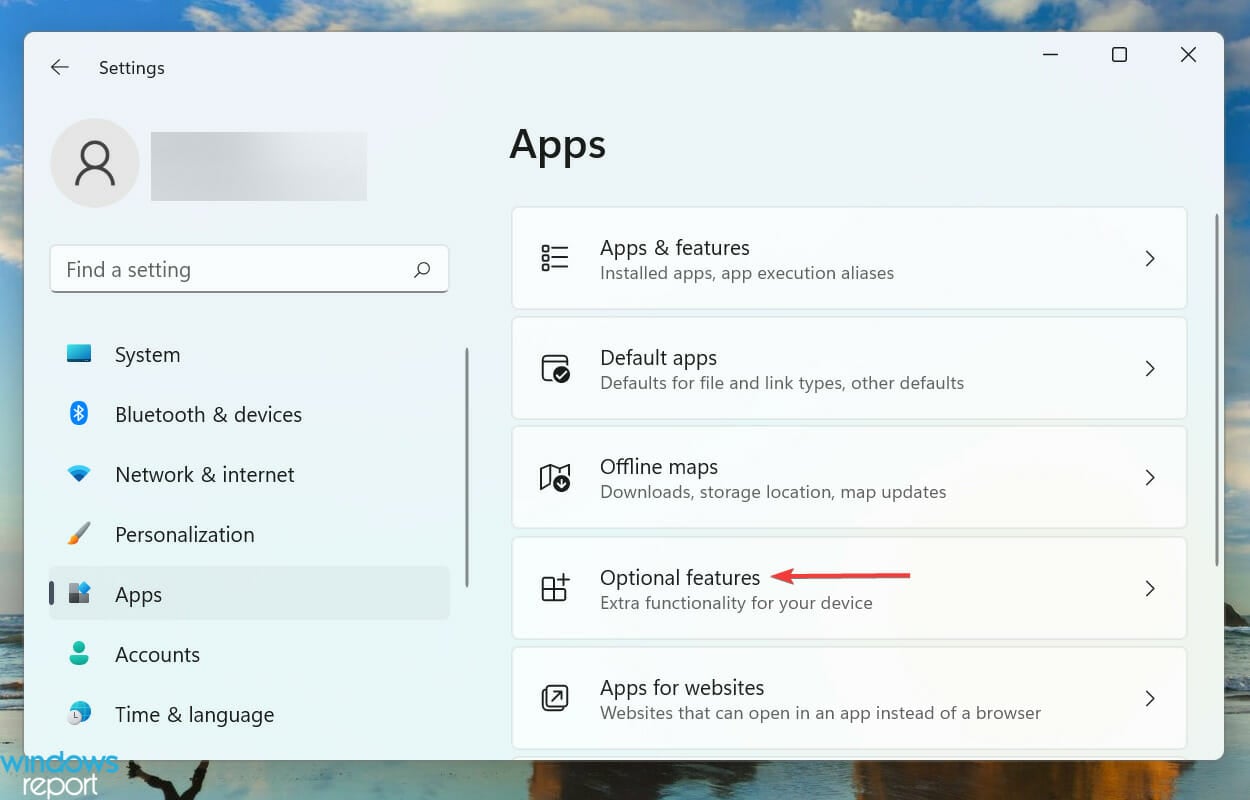
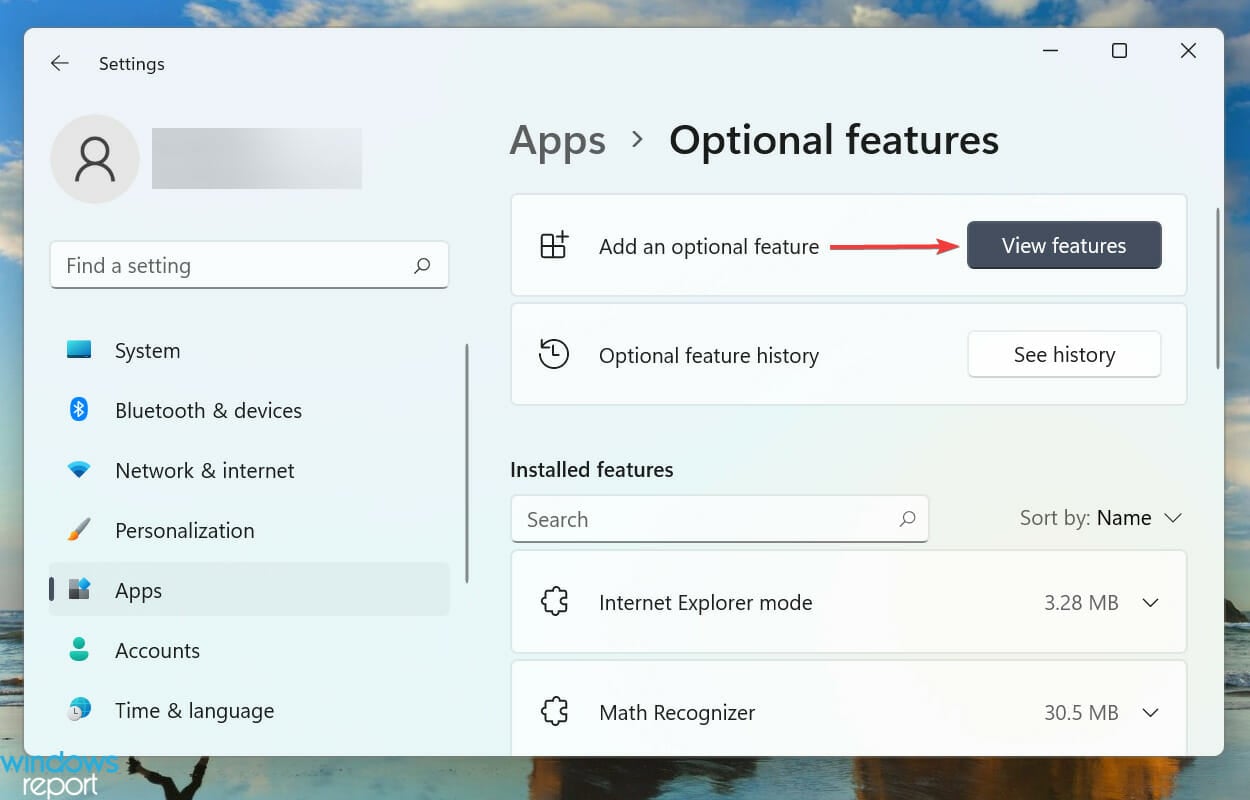
- Click on Optional features on the right.
- Next, click the View features button next to the Add an optional feature option.
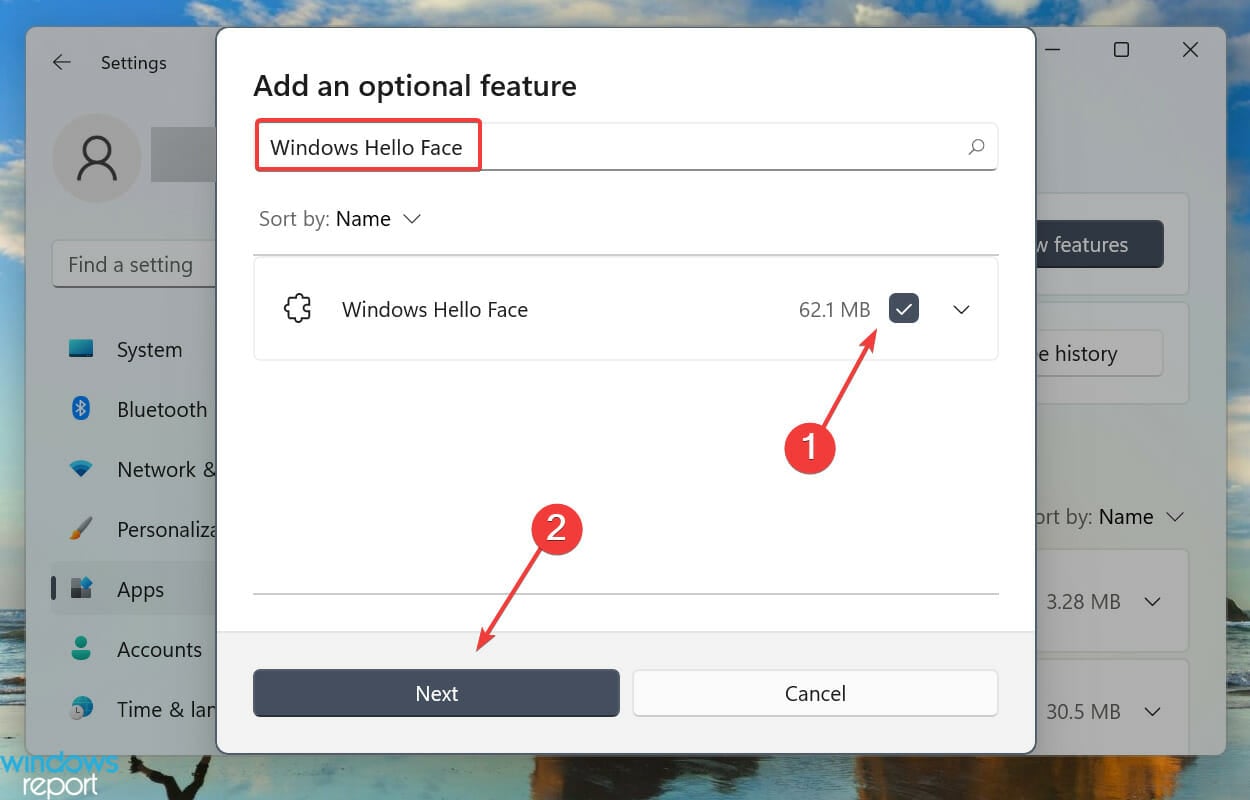
- Enter Windows Hello Face in the text field at the top, tick the checkbox for the appropriate option, and click on Next at the bottom.
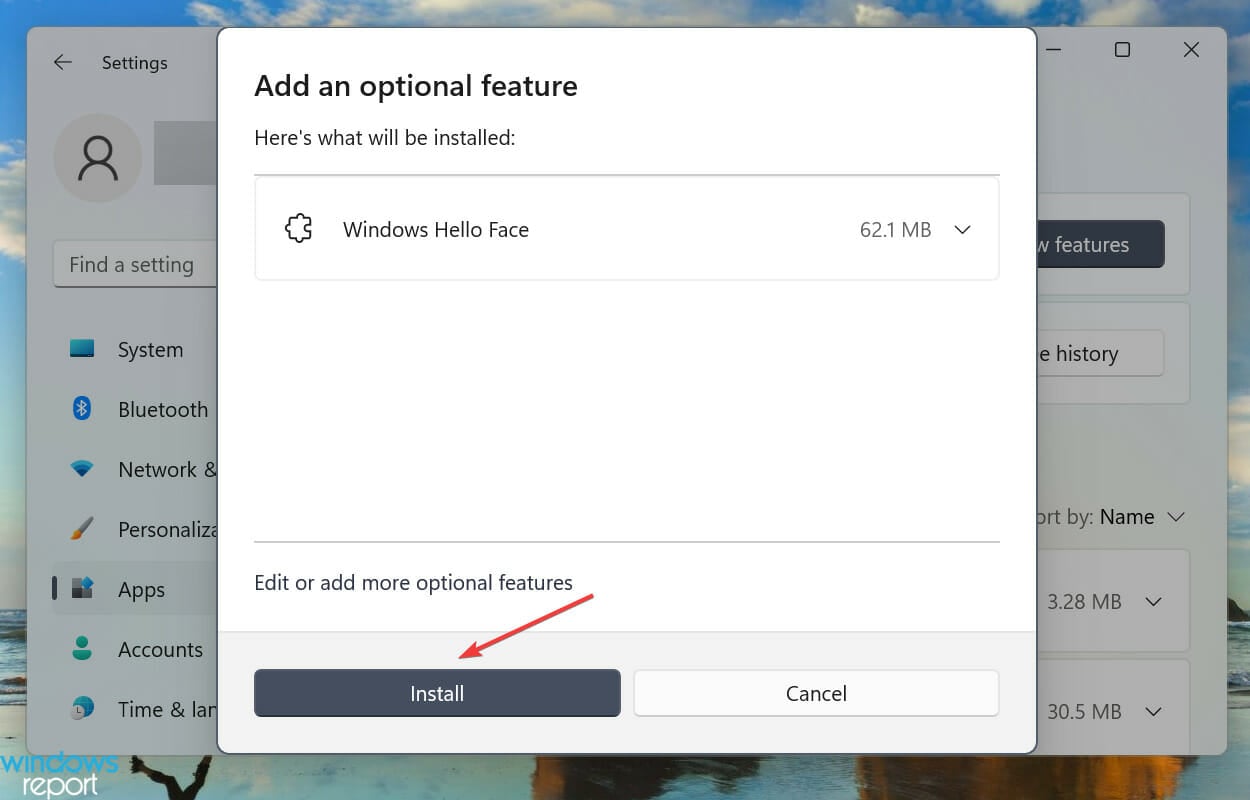
- Next, click on Install and wait for the process to complete.
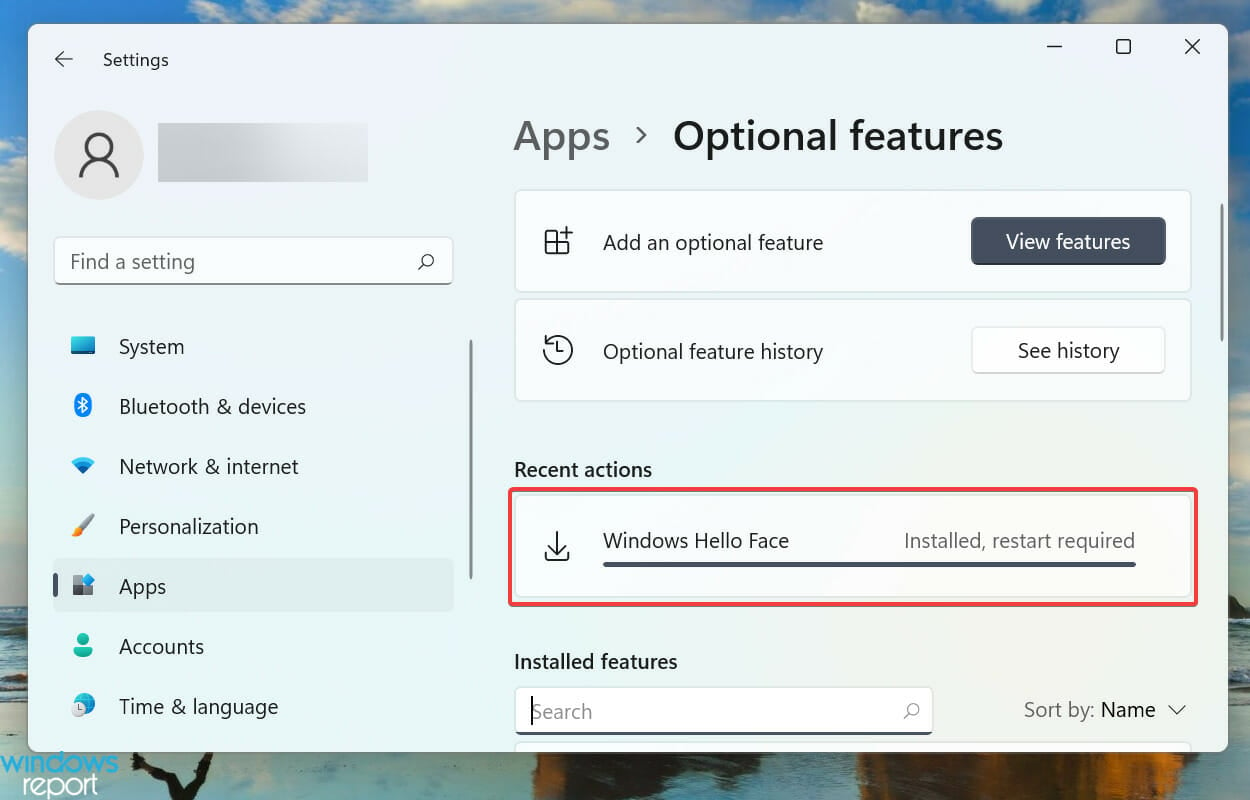
- After you have installed Windows Hello Face in Windows 11, restart the computer for the changes to come into effect.
Once you have installed the feature, learn how to activate Facial Recognition in Windows 11.
Windows Hello Face Camera drivers
Once your device is connected, Windows should have detected it and automatically installed the drives. You can check by going to Device Manager> Cameras and identify your compatible device – usually tagged 3D Camera or IR Camera.
Suppose your device is missing the relevant driver. In that case, you can look up the Hello face driver for Windows 11 on the manufacturer’s official website or try specialized driver updating software, which automatically scans your PC for missing or outdated drivers and updates them.
- Recent Windows 11 update lets you disable profanity filter in voice typing
- Microsoft wants Windows 10 users to upgrade to Windows 11 or Copilot + PCs
How does Windows Hello work?
If you check the Windows Hello sign-in options, it will list Facial recognition, Fingerprint recognition, and PIN. But you can’t set up the first two without configuring the last one, though the PIN alone can be configured and used to log in.
Making the PIN mandatory for using biometric means to sign in to your device ensures that you are never locked out.
Say you received an injury on your face or finger. It’s likely to affect the recognition process, and thus the need for a PIN arises.
Apart from that, your PIN is only associated with one device, not the others, where you may have used the same Microsoft account. This, in turn, ensures high security because even if one device is compromised, the others will remain secure.
Does Windows Hello work with Windows 11?
Windows Hello is one of the sign-in options on Windows 11. It works well, provided you have set it up correctly.
But to set it up, you need to install it foremost. And that is what we will discuss in detail in this article’s ensuing section.
What camera is required for Windows Hello Face?
Regular cameras for online meetings and all do not meet the requirements for Windows Hello Face. You need cameras like an Intel RealSense or a 3D camera to use this feature.
If your camera does not meet this requirement, it is not compatible with the Windows Hello Face feature. Hence, you might get we couldn’t find a camera compatible with windows hello face windows 11 notification.
How do I fix issues with Windows Hello in Windows 11?
Several users who have set up biometrics as a medium to sign in have reported that Windows Hello is not working in Windows 11. This could be due to outdated or corrupt drivers, or missing PINs, among other issues.
We went through several forums and identified many users who came across this problem, along with many posting the best solutions for it. So, do not hesitate to check out our dedicated guide to fix the Windows 11 Hello Face recognition not working issue.
How do I automatically sign in to a Windows 11 device?
Another common question by users is whether they can automatically sign in to Windows 11 without any authentication. There are several built-in ways to do that and use dedicated third-party tools.
Check this guide to find out how to auto-log into Windows 11. But, we do not recommend disabling the authentication if you share the computer with others or if there are critical data stored on it. Though if you use it as a standalone device, go ahead.
Also, you can learn how to remove the login password in Windows 11. Applying the procedure is easier than you might imagine.
That’s all there’s to Windows Hello Facial recognition in Windows 11. You now know how to enable the feature, the various troubleshooting techniques in case it’s throwing errors, and automatically log in to the system.
Besides, find out what you should do if the sign-in options are not working in Windows 11.
Tell us your experience with Windows Hello in the comments section below.
Kazim Ali Alvi
Windows Hardware Expert
Kazim has always been fond of technology, be it scrolling through the settings on his iPhone, Android device, or Windows PC. He’s specialized in hardware devices, always ready to remove a screw or two to find out the real cause of a problem.
Long-time Windows user, Kazim is ready to provide a solution for your every software & hardware error on Windows 11, Windows 10 and any previous iteration. He’s also one of our experts in Networking & Security.
Guide to Setting Up Face Recognition on Windows 11
Published
6 min read
How to Set Up Face Recognition on Windows 11
As technology continues to evolve, biometric authentication methods have gained popularity for enhancing security and user convenience. One such method that has made waves in recent years is face recognition. Windows 11, Microsoft’s latest operating system, comes equipped with the capability to use facial recognition for logging in or unlocking your device. In this detailed guide, we will walk you through the steps to set up face recognition on Windows 11. We will also discuss essential prerequisites, benefits, troubleshooting tips, and additional methods for managing device security.
1. Understanding Face Recognition on Windows 11
Face recognition is a biometric authentication method that utilizes facial features to verify the identity of users. This feature enhances security compared to traditional passwords or PINs, as it’s unique to the individual and harder to replicate or steal. With Windows 11, Microsoft has integrated face recognition into the operating system, allowing users to log in quickly and securely without having to remember complex passwords.
2. Prerequisites for Setting Up Face Recognition
Before diving into the setup process, there are specific requirements your device must meet for face recognition to function correctly:
-
Compatible Hardware: Make sure your device has an infrared (IR) camera or a compatible camera that supports facial recognition. Standard webcams typically won’t work for this feature. Many laptops with Windows Hello support come equipped with IR cameras designed for accurate face recognition.
-
Operating System: Ensure your device is running Windows 11. Face recognition is a feature included in this version of the operating system, so you’ll need it for setup.
-
Administrator Account: You will need to have administrative rights to set up Windows Hello and the face recognition feature.
-
Latest Drivers: Ensure your camera drivers are up to date. You can check for updates in the Device Manager: Right-click on the Start button -> Device Manager -> Cameras -> Right-click on your camera to update the driver.
-
Microsoft Account or Local Account: While you can generally set up face recognition with either account type, using a Microsoft Account may provide a more seamless experience, especially if you’re using other Microsoft services.
3. Step-by-Step Guide to Setting Up Face Recognition
Now that you’ve verified that your system meets the necessary requirements, let’s dive into the setup process:
Step 1: Open Settings
- Click on the Start Menu (the Windows icon on the taskbar).
- Select Settings (the gear icon).
Step 2: Navigate to Accounts
- In the Settings window, click on Accounts in the left sidebar.
- Under the Accounts section, find Sign-in options on the right side and click on it.
Step 3: Set Up Windows Hello Face
- In the Sign-in options menu, you should see a section titled Windows Hello Face. If this option is available for your device, you’re good to proceed.
- Click on the Set up button next to Windows Hello Face.
Step 4: Get Started
- A pop-up window will appear explaining Windows Hello Face. Click on the Get started button to continue.
Step 5: Verify Your Identity
- You will be prompted to verify your identity using your existing sign-in method (such as your PIN or password).
Step 6: Position Yourself
- The next screen will instruct you to position your face in front of the camera. Make sure your face is well-lit and clear of obstructions (like hats, sunglasses, or masks).
- Follow the on-screen instructions to frame your face within the designated area.
Step 7: Capture Your Face
- After positioning yourself, the system will capture a series of images of your face using the camera.
- This process helps the system learn and remember your facial features for future logins.
Step 8: Set Up a Backup Method
- Once the face capturing process is complete, Windows 11 will prompt you to set up a backup sign-in method, such as a PIN or password.
- Choose a secure method, as this will be essential in case face recognition fails (e.g., if you’re in low light or wearing something that obstructs your face).
Step 9: Finalizing Setup
- After everything is set, click on the Close button.
- Face recognition is now set up, and you can use it to log in to your Windows 11 device.
4. Benefits of Using Face Recognition
Adopting face recognition for device security comes with several advantages:
-
Speed: Logging in becomes swift and seamless, allowing you to access your device almost instantly.
-
Security: Biometric data, such as facial features, is unique to each individual, making it far more secure than traditional passwords.
-
Convenience: You won’t need to remember complex passwords, which often result in user frustration and potential security risks.
-
Enhanced Experience: With Windows Hello, you can enjoy an enhanced user experience across Microsoft services without constantly entering your credentials.
5. Troubleshooting Common Issues
Face recognition generally works seamlessly, but there may be instances where you encounter challenges. Below are some troubleshooting tips:
Issue 1: The Camera Isn’t Detected
- Solution: Make sure your camera is properly connected if it’s an external device. Check Device Manager for any driver issues as mentioned before, and install updates as necessary.
Issue 2: Face Recognition is Not Working
- Solution: Ensure that your face is well-lit and unobstructed. Also, try reconfiguring Windows Hello by removing the existing face data and setting it up again.
Issue 3: System Doesn’t Recognize Face
- Solution: If you are wearing glasses or have changed your appearance significantly (new hairstyle, facial hair), try to retrain Windows Hello to recognize your new look.
Issue 4: Logging in with Windows Hello Fails
- Solution: Use your backup method (PIN or password) to access your device. After logging in, consider re-evaluating the camera’s positioning and lighting conditions.
6. Additional Security Measures
While face recognition is a robust security method, consider implementing additional strategies for enhanced security:
-
Two-Factor Authentication (2FA): Activate 2FA for your Microsoft account, adding an extra layer of protection. This will require both your password and a secondary verification method.
-
Keep Your OS Updated: Regularly check for updates for both your operating system and applications. These updates often include important security patches.
-
Secure Lock Screen: Customize your lock screen settings to limit notifications and access when the device is locked.
-
Use a Password Manager: Password managers can generate and store secure passwords for your various accounts, making it easier to use strong passwords without needing to remember each one.
7. Future of Facial Recognition Technology
Face recognition technology, while already embraced in environments like smartphones and laptops, is continuing to mature. Advancements in machine learning and artificial intelligence are promising greater accuracy, speed, and security. As you incorporate such technology into your daily life, consideration of ethical implications, privacy concerns, and regulatory frameworks will become increasingly important.
Conclusion
Setting up face recognition on Windows 11 is a straightforward process that significantly enhances your user experience and security. By following this guide, you can take advantage of this innovative technology, providing both convenience and protection for your device. As with any technology, remember to stay informed about updates and best practices to keep your system secure.
By implementing biometric methods alongside other security measures, you can create a robust defense against unauthorized access, ensuring that your data remains safe in an increasingly digital world. Prepare to enjoy the ease of logging in without the hassle of passwords while relishing the peace of mind that comes with advanced security features.
[Windows 11/10] Настройка Windows Hello (биометрия, распознавание лица, сканер отпечатков пальцев)
[Windows 11/10] Настройка Windows Hello (биометрия, распознавание лица, сканер отпечатков пальцев)
Windows Hello — это более персональный и безопасный способ получить мгновенный доступ к устройствам Windows 11/10 с помощью отпечатков пальцев или распознавания лица. Вы сможете просто показать лицо или коснуться пальцем, не вводя пароль, чтобы разблокировать устройство.
Примечание: Варианты входа в Windows 11/10 могут отличаться в зависимости от разных устройств. Если Вы хотите войти с помощью отпечатков пальцев или распознавания лица, Ваш компьютер должен быть оснащен сканером отпечатков пальцев или камерой с инфракрасным (ИК) датчиком. Если Вы еще не настроили PIN-код, Вам нужно добавить PIN-код перед использованием других вариантов входа.
Пожалуйста, перейдите к соответствующей инструкции, исходя из текущей операционной системы Windows на Вашем компьютере:
- Windows 11
- Windows 10
Windows 11
Содержание:
- Вход с помощью распознавания лица
- Удалить распознавание лица
- Вход с помощью отпечатка пальца
- Удалить отпечаток пальца
- Настроить динамическую блокировку
Войти с помощью распознавания лица
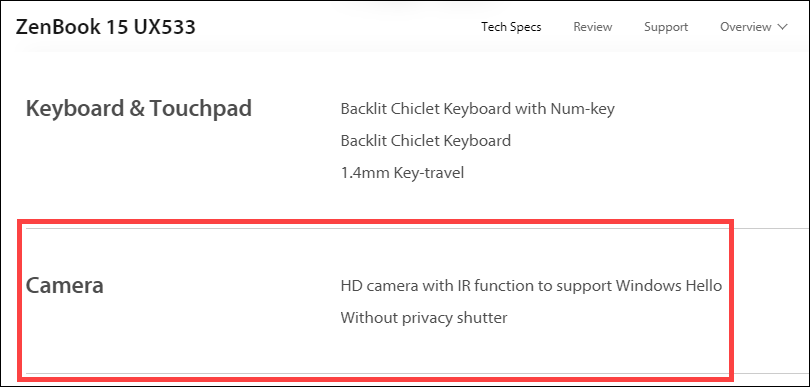
Эта функция доступна только в некоторых моделях, оснащенных ИК-камерой. Если Вы не видите параметр входа в систему по лицу или этот параметр недоступен, это означает, что на Вашем компьютере нет ИК-камеры.
Вы можете найти технические характеристики Вашего компьютера на сайте ASUS

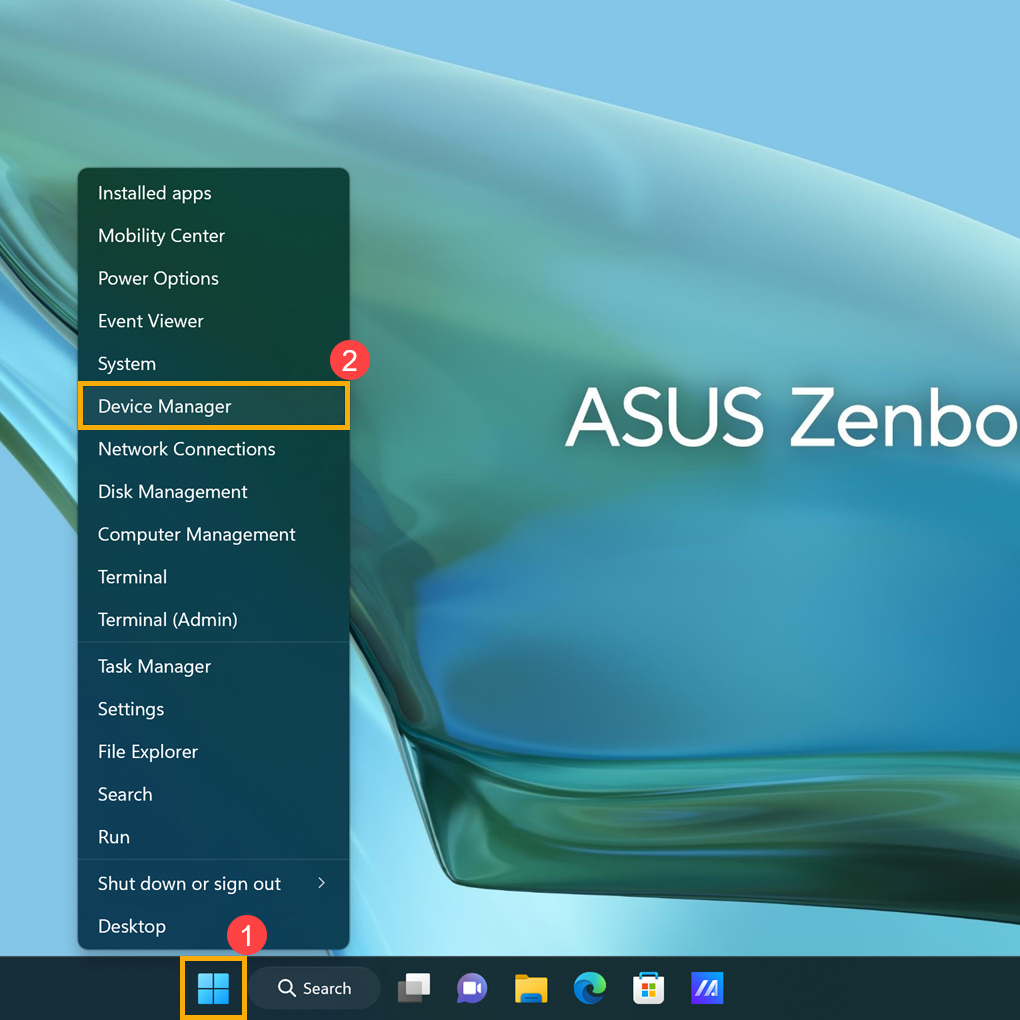
Также Вы можете проверить Диспетчер Устройств, чтобы узнать, оснащен ли Ваш компьютер ИК-камерой. Щелкните правой кнопкой мыши значок [Пуск] на Панели Задач ① и выберите [Диспетчер Устройств] ②.
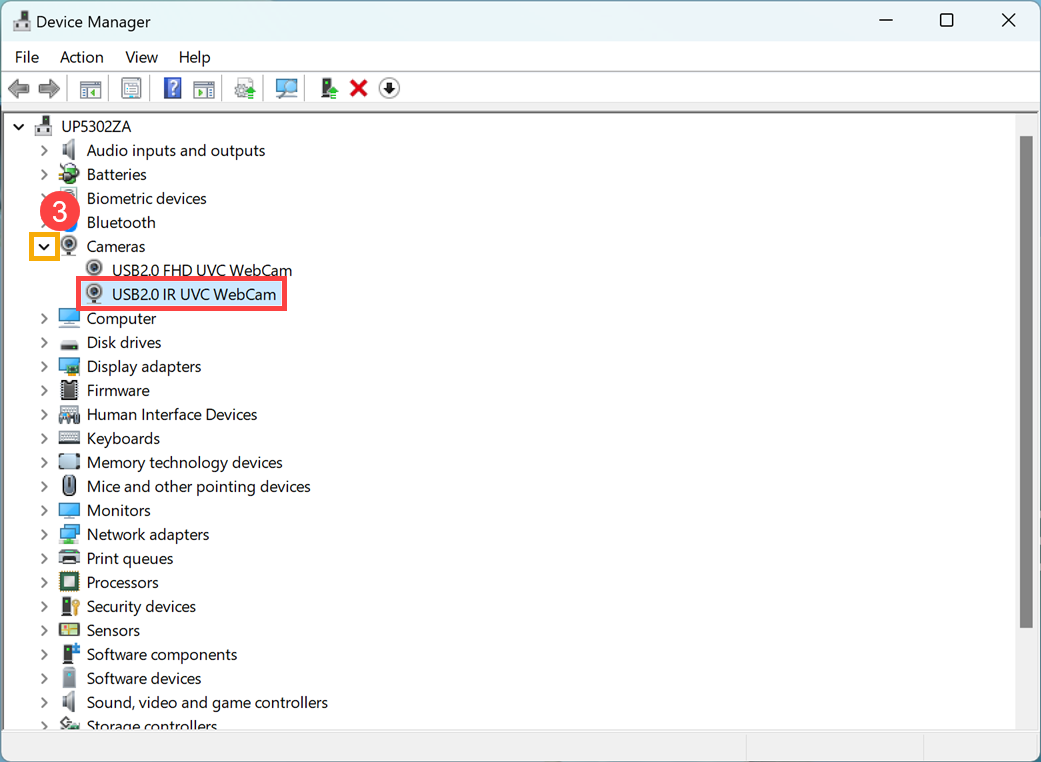
Откройте раздел [Камеры] ③, чтобы увидеть, есть ли на Вашем компьютере ИК-камера
Настройка распознавания лица
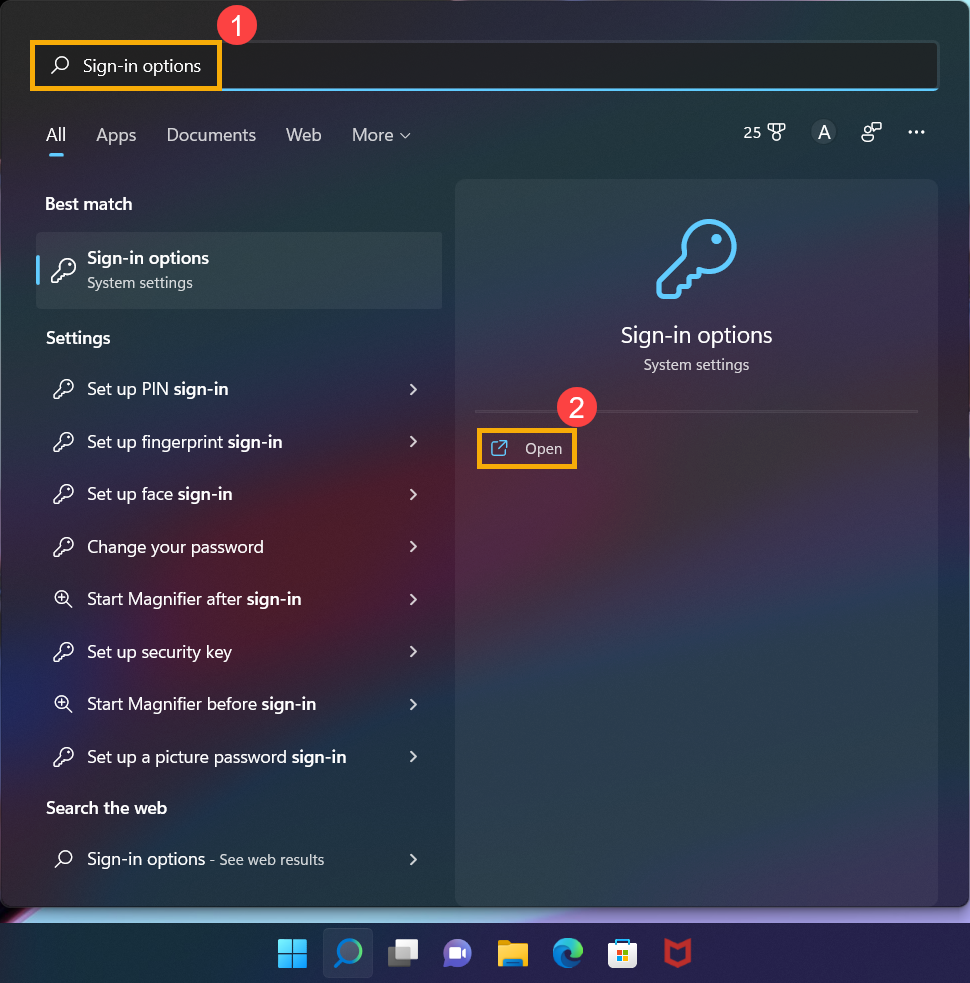
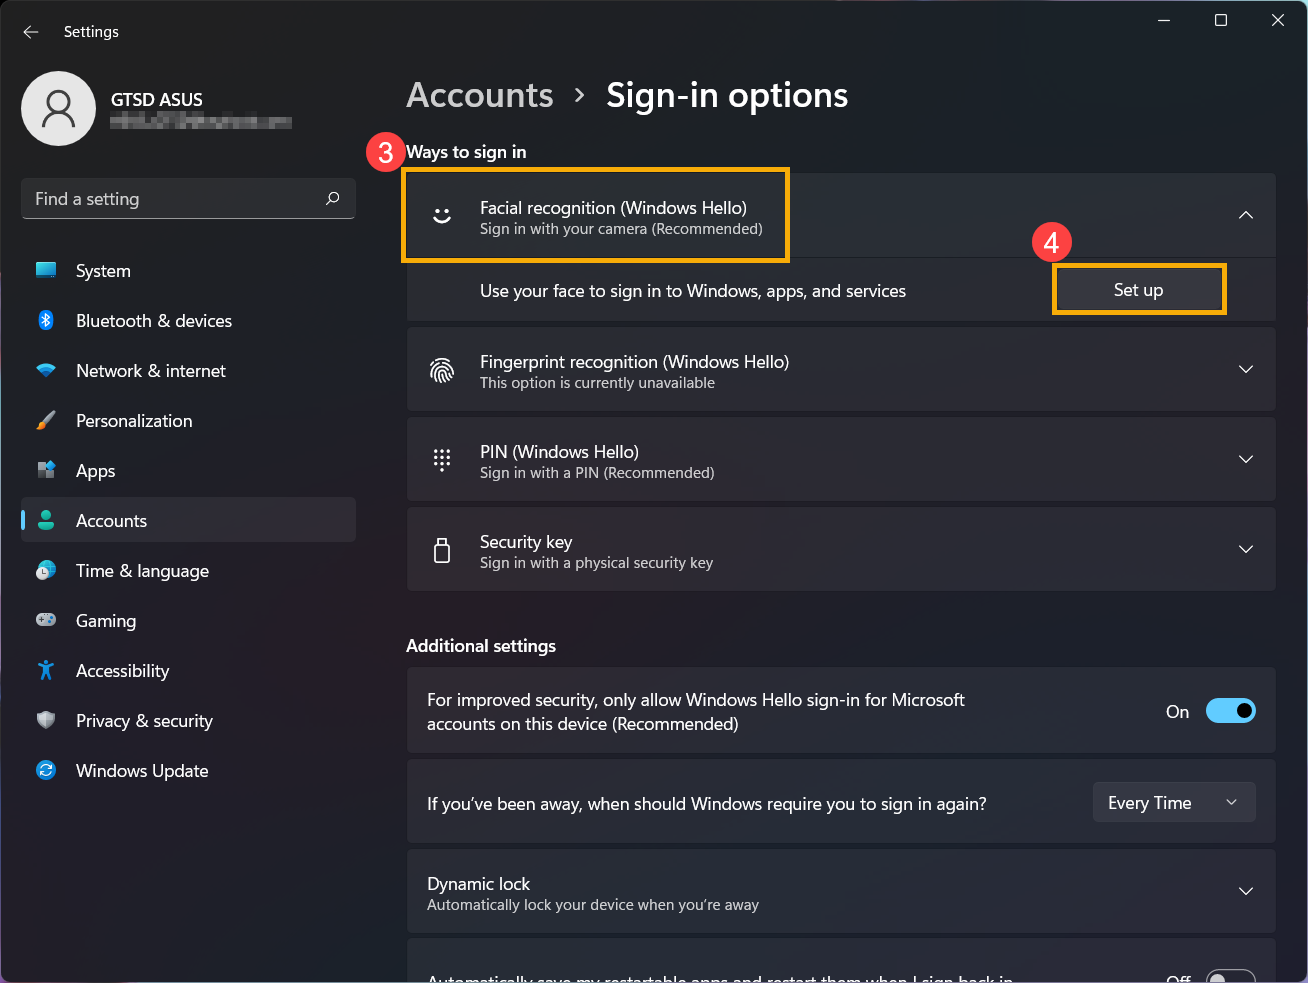
- Введите и найдите [Параметры входа] ① в строке поиска Windows, затем нажмите [Открыть] ②.

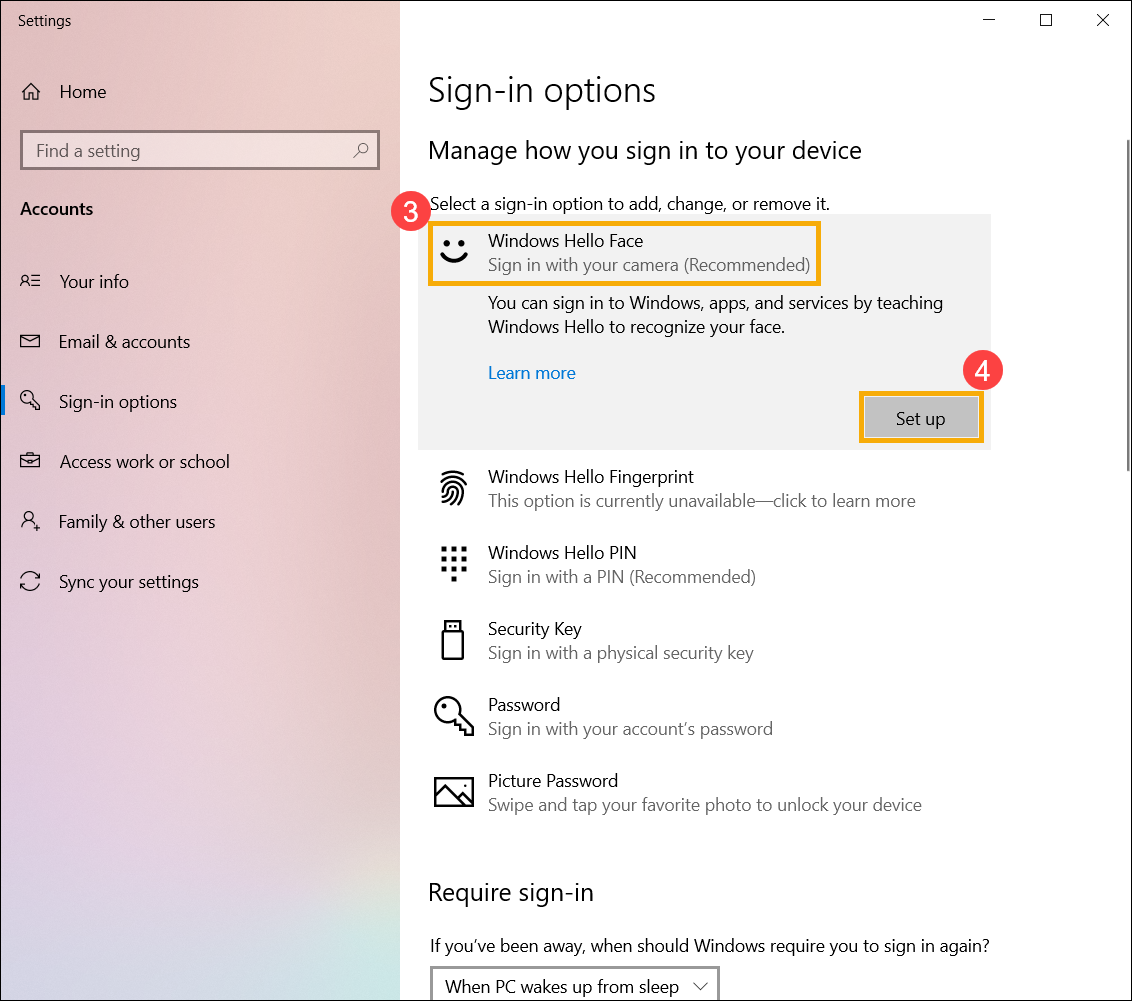
- Выберите [Распознавание лиц (Windows Hello)] ③ и нажмите [Настроить] ④.
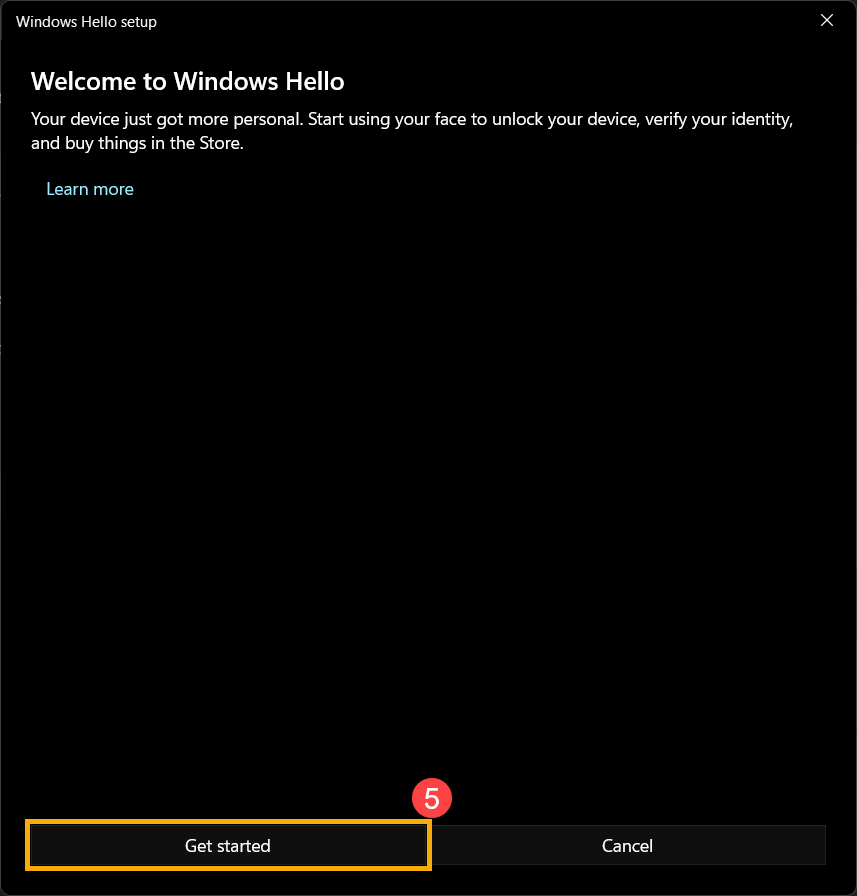
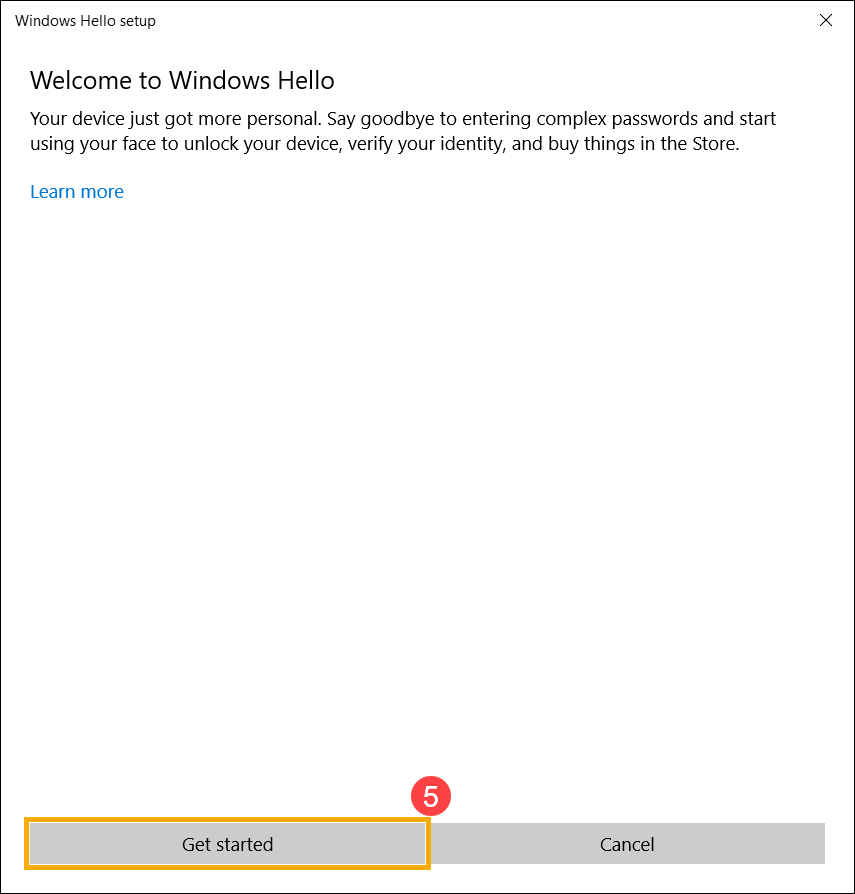
- Выберите [Начать] ⑤.
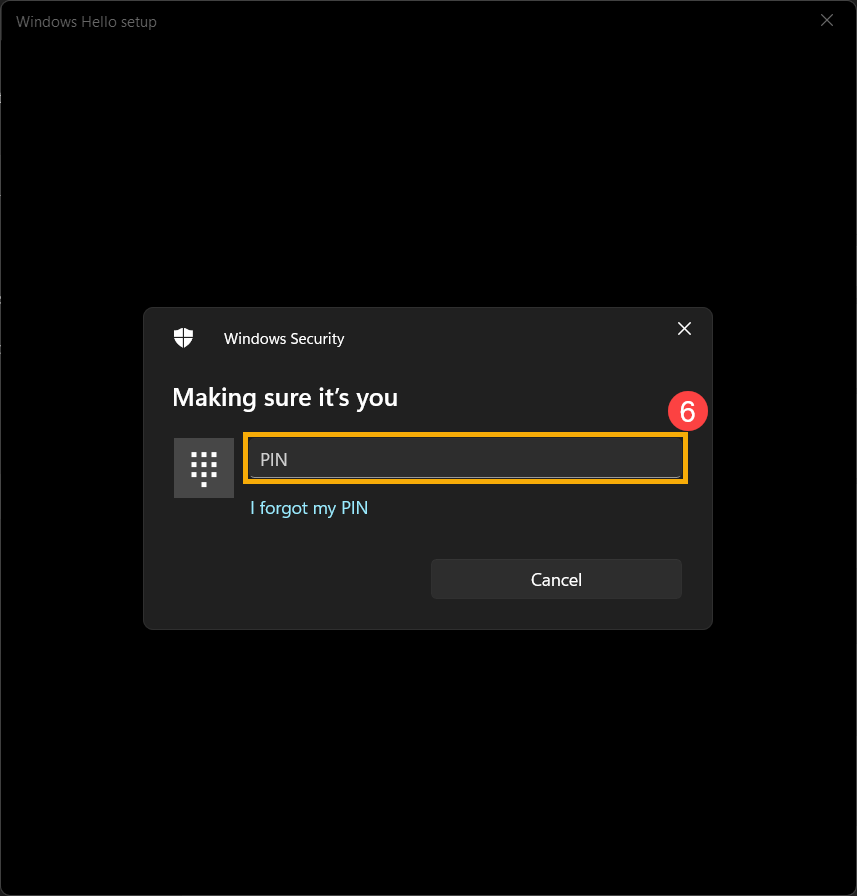
- Введите PIN-код, который Вы используете в настоящее время для подтверждения Вашей личности ⑥.
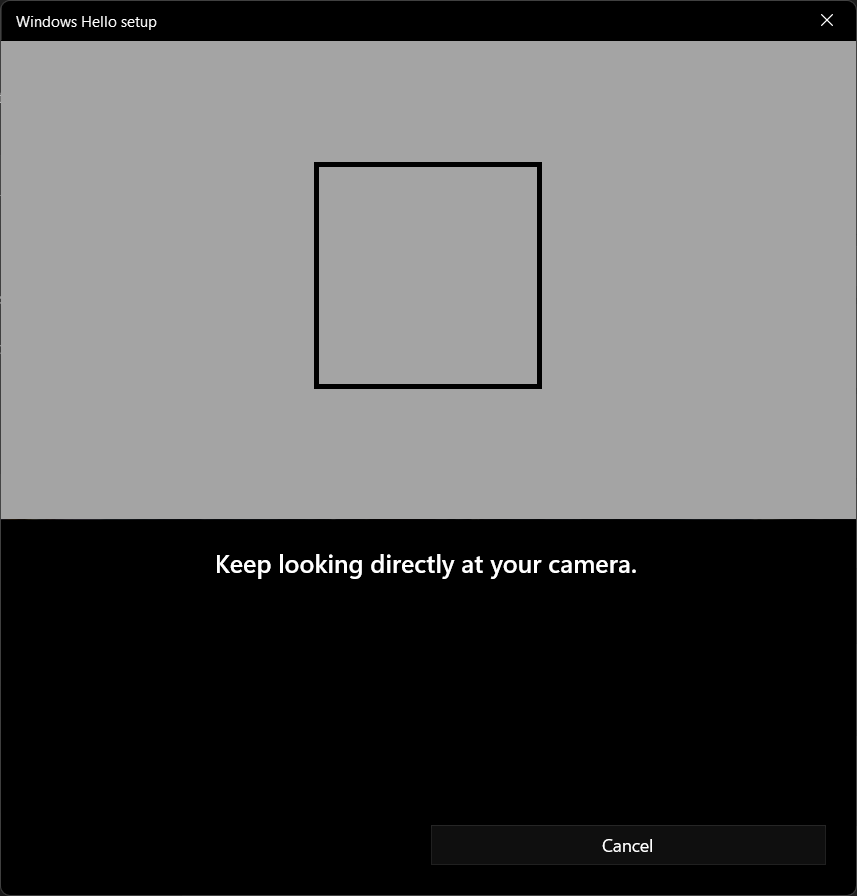
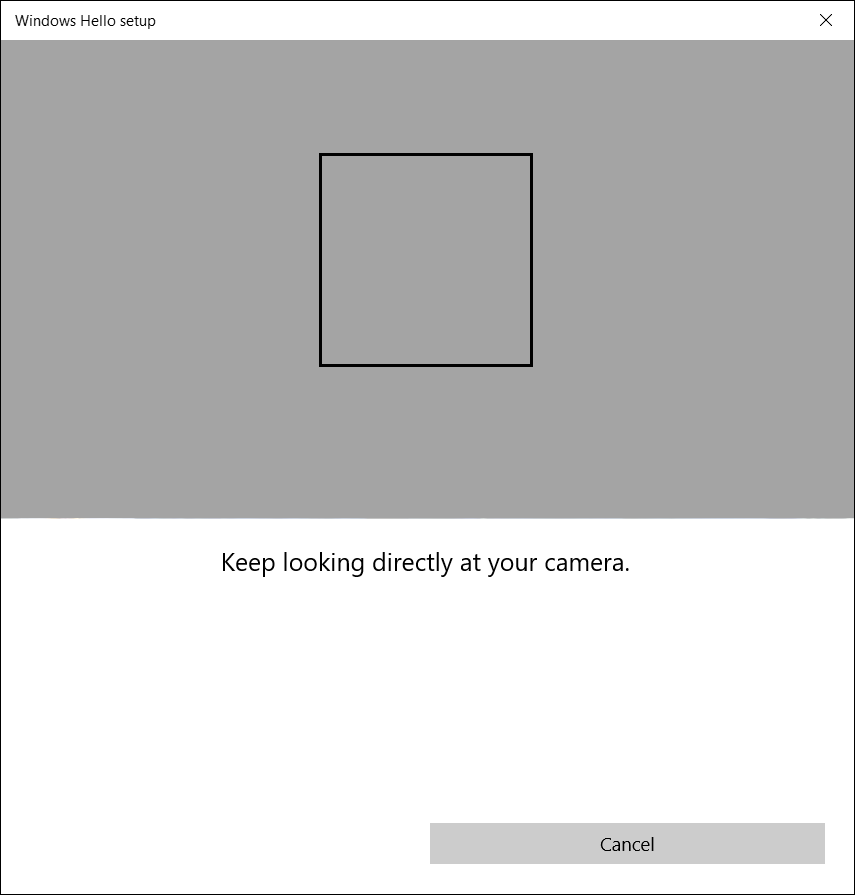
- Пожалуйста, поместите свое лицо в центр кадра, который появится на экране, чтобы камера захватила Ваши черты лица.
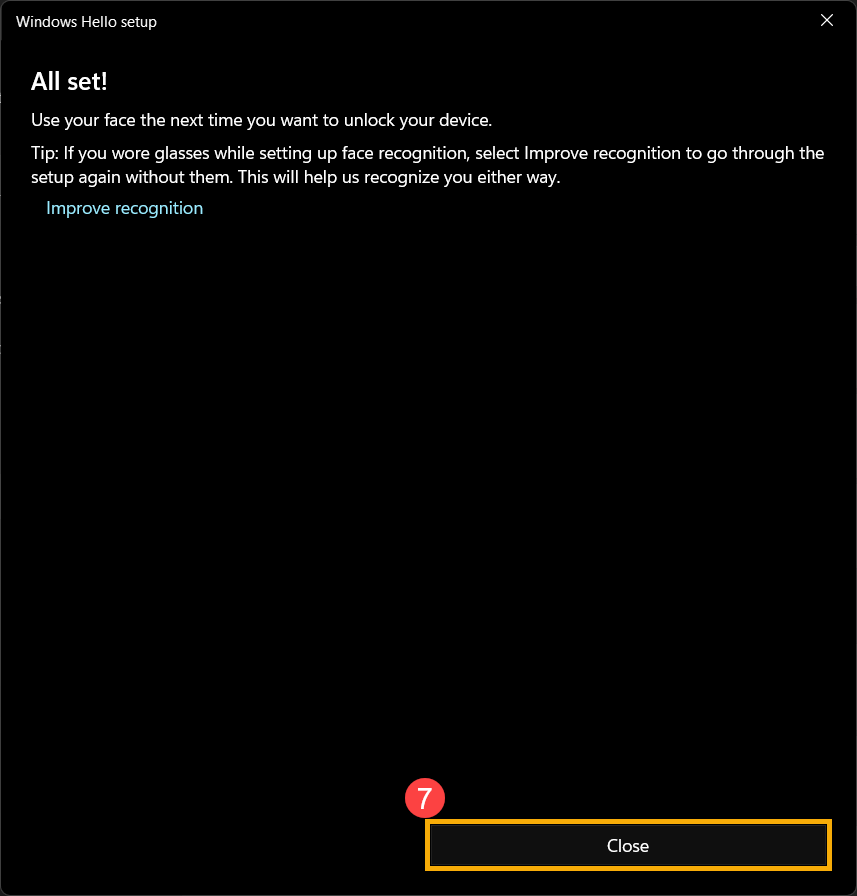
- Распознавание Вашего лица завершено, нажмите [Закрыть] ⑦.
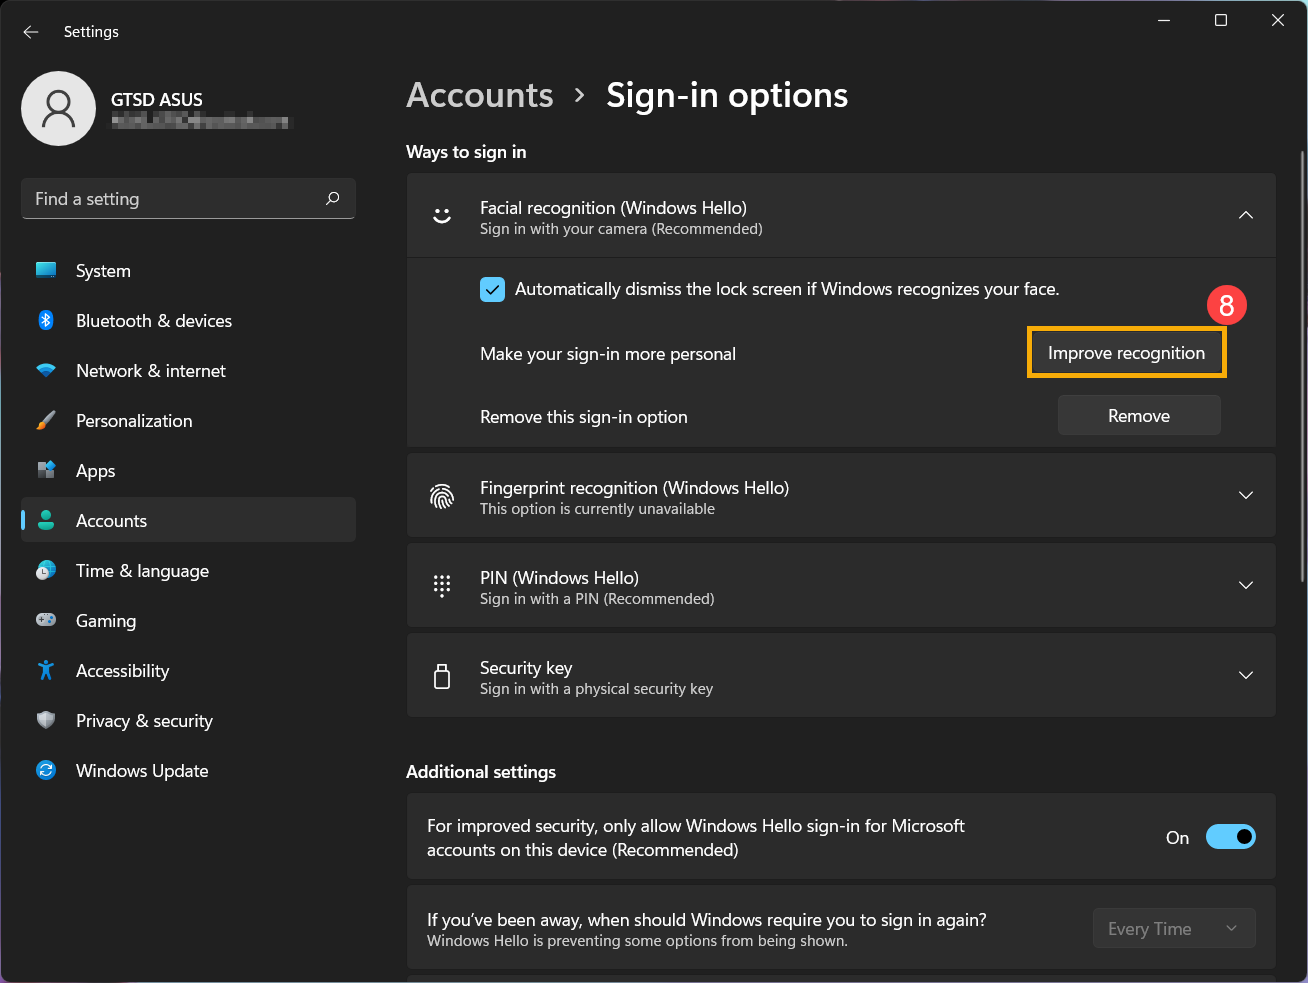
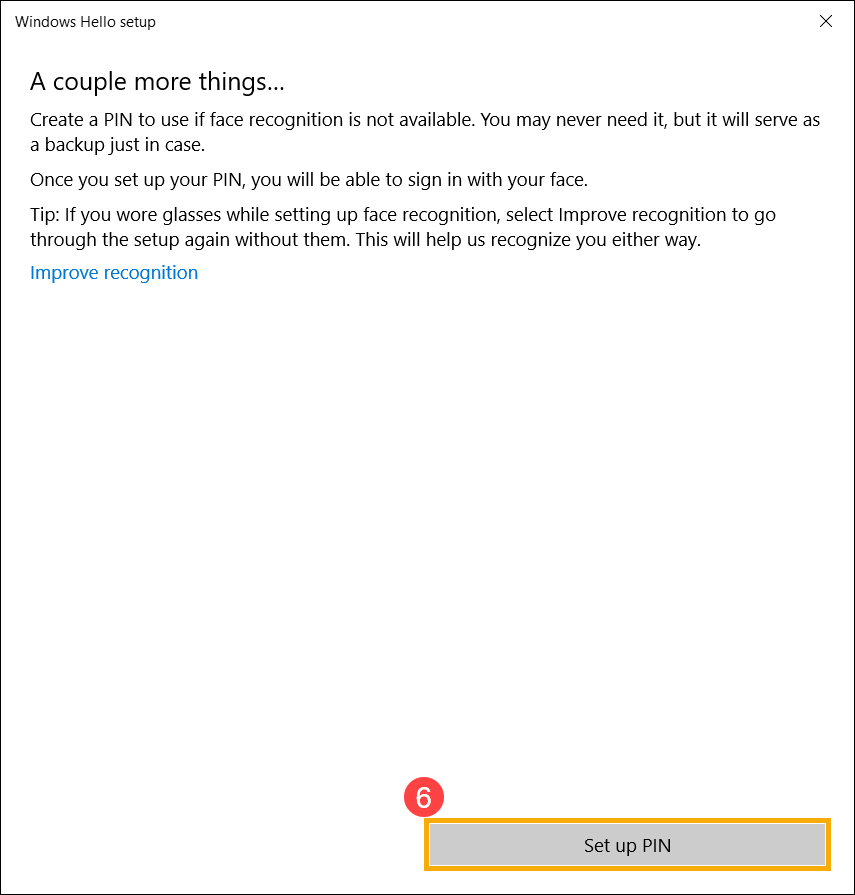
- Настройка лицевого входа завершена. Существует еще одна опция [Улучшить распознавание] ⑧, эта функция позволяет Вам сохранять фото в очках и без них. Если во время настройки распознавания лиц Вы были в очках, выберите этот параметр, чтобы снова выполнить настройку без них. Это поможет Windows распознавать Вас независимо от того, носите Вы очки или нет.
Вернуться в начало
Удалить распознавание лица
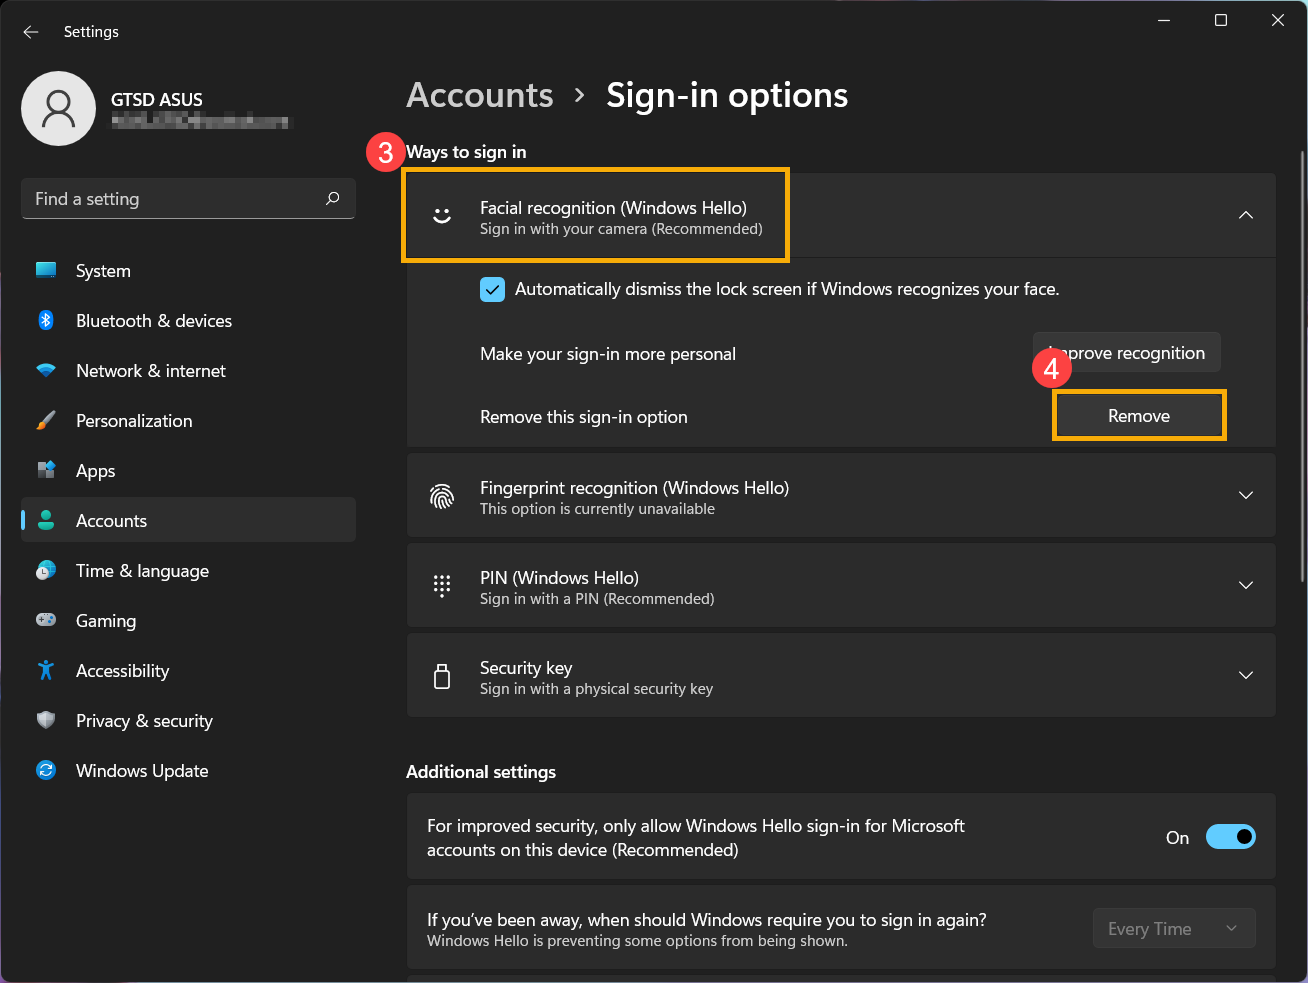
- Введите и найдите [Параметры входа] ① в строке поиска Windows, затем нажмите [Открыть] ②.
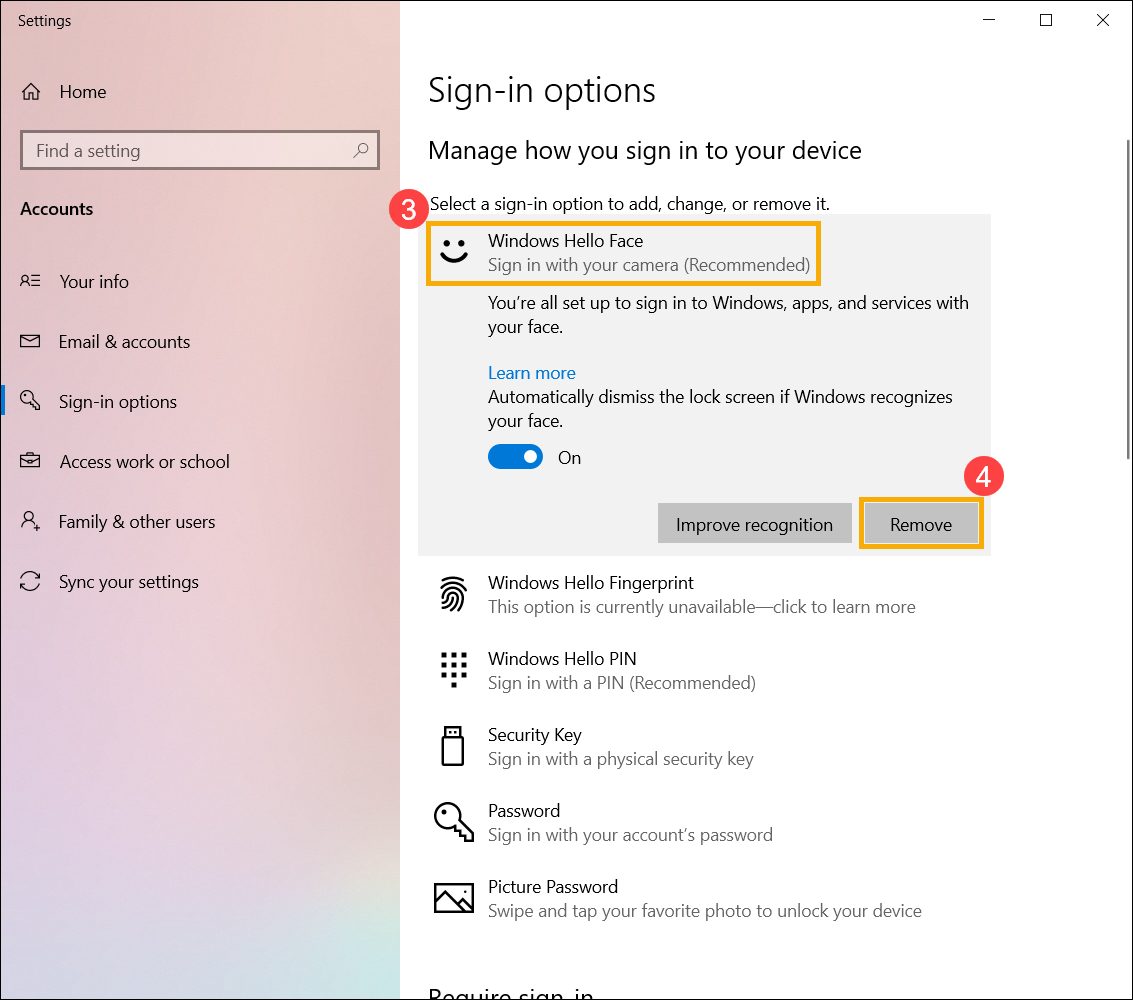
- Выберите [Распознавание лиц (Windows Hello)] ③ и нажмите [Удалить] ④, функция входа по лицу будет удалена.

Вернуться в начало
Вход с помощью отпечатка пальца
Эта функция доступна только на некоторых моделях, оснащенных сканером отпечатков пальцев. Если Вы не видите параметр входа по отпечатку пальца или этот параметр недоступен, это означает, что на Вашем компьютере нет сканера отпечатков пальцев.
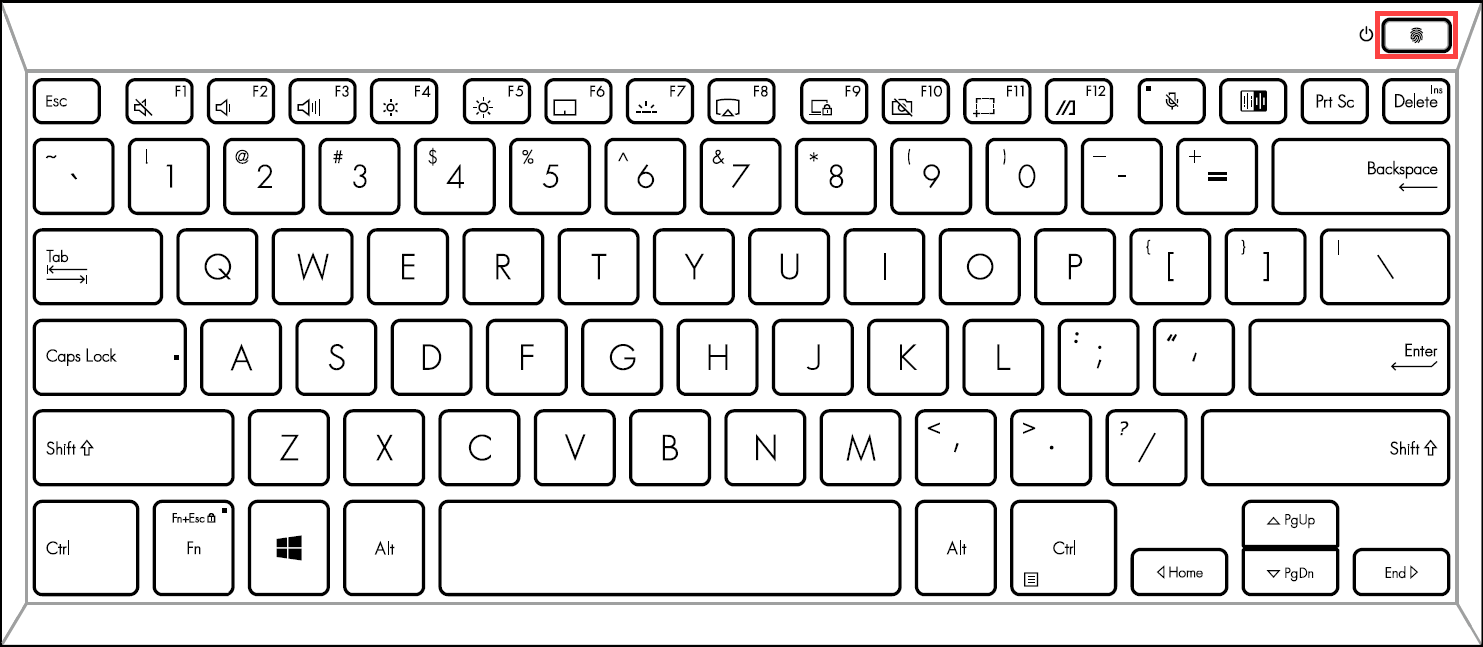
Пожалуйста, найдите сканер отпечатков пальцев Вашего компьютера. Сканер отпечатков пальцев большинства ноутбуков ASUS расположен на сенсорной панели.
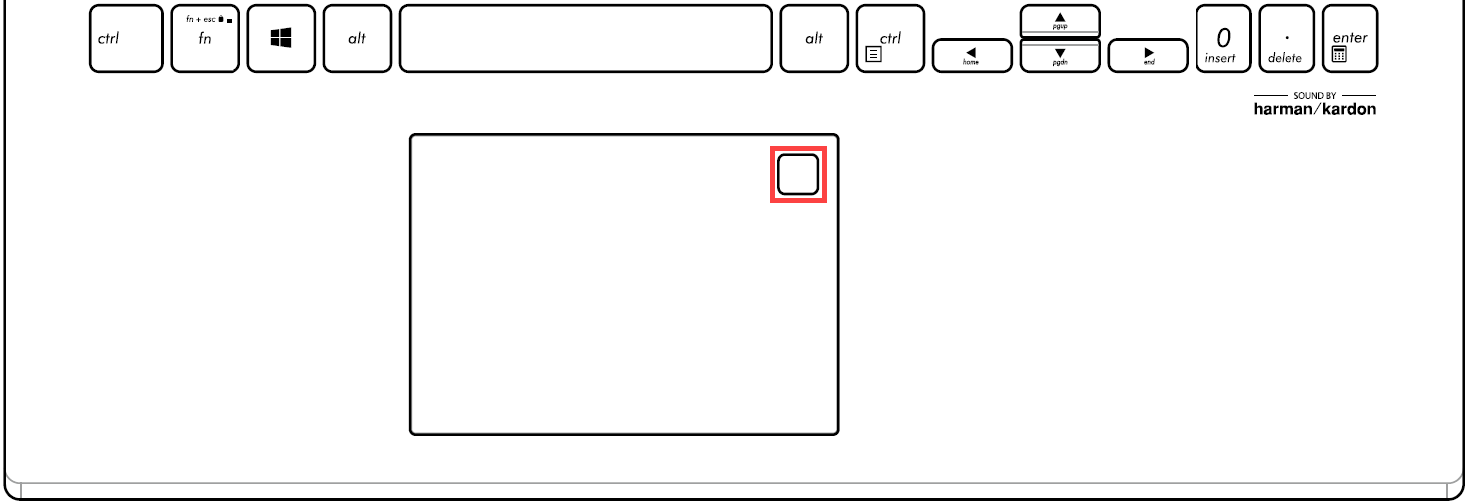
Датчик отпечатков пальцев был интегрирован в клавишу питания на некоторых ноутбуках ASUS.
- Введите и найдите [Параметры входа] ① в строке поиска Windows, затем нажмите [Открыть] ②.
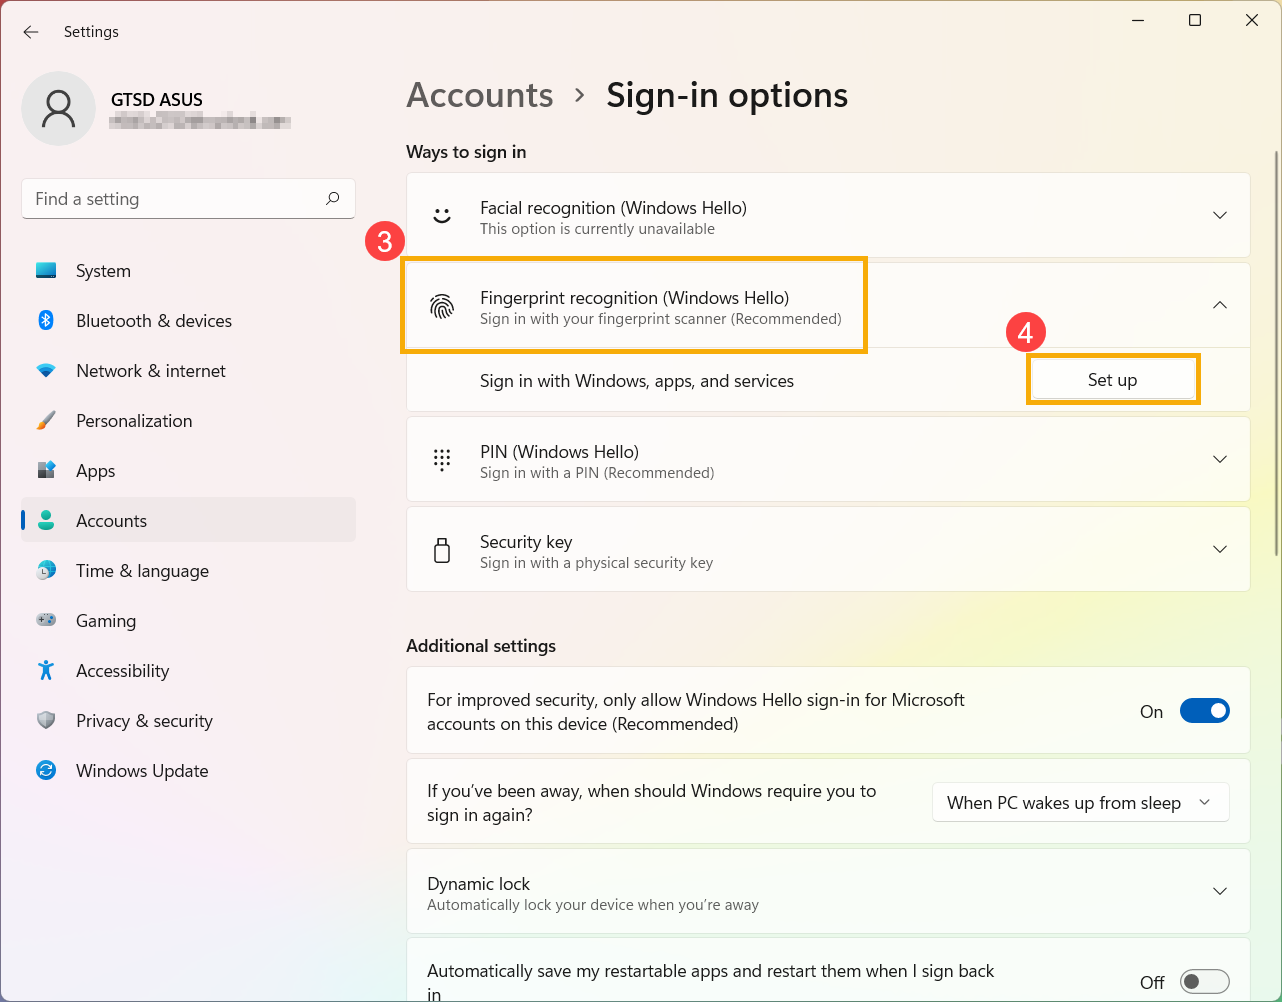
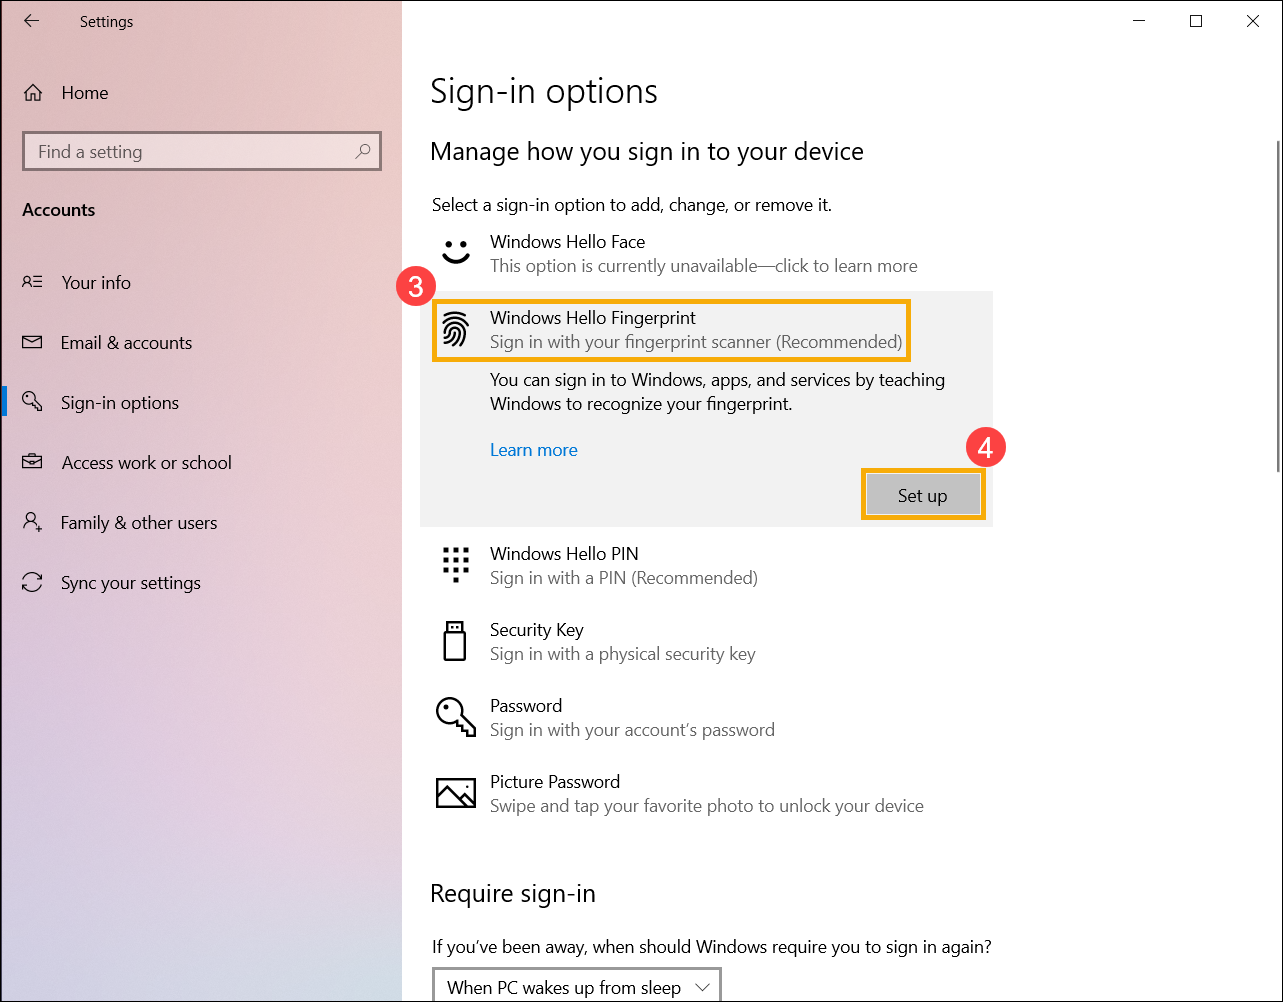
- Выберите [Распознавание отпечатков пальцев (Windows Hello)] ③ и нажмите [Настроить] ④.
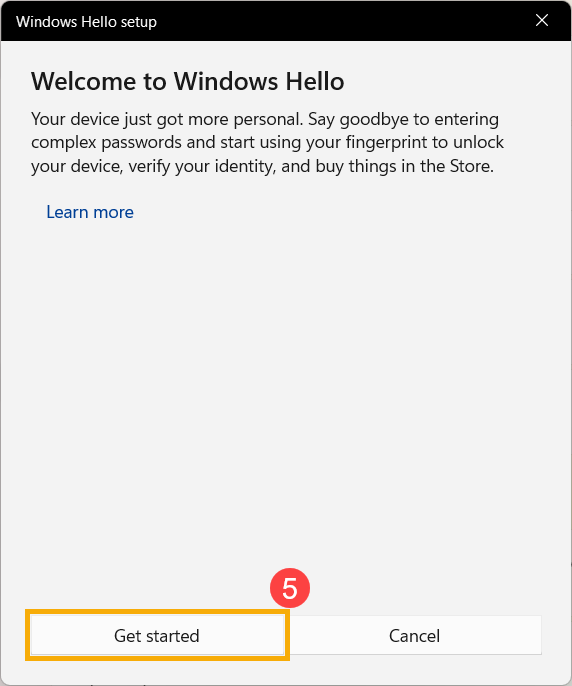
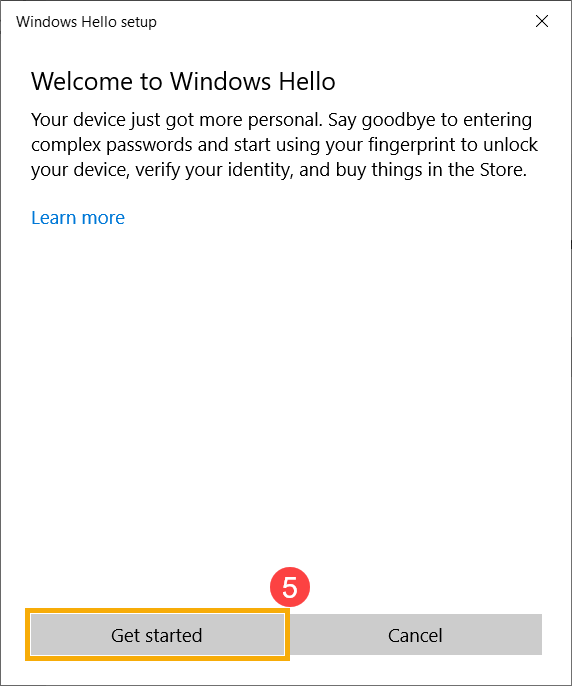
- Выберите [Начать] ⑤.
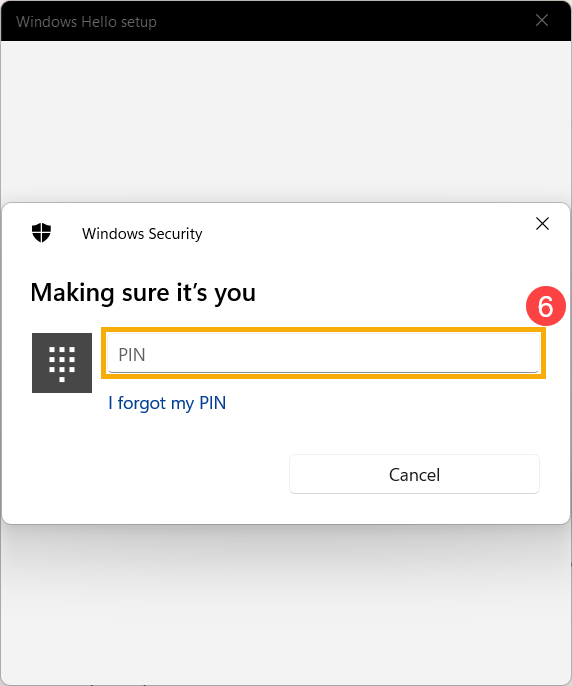
- Введите PIN-код, который Вы используете в настоящее время для подтверждения Вашей личности ⑥.
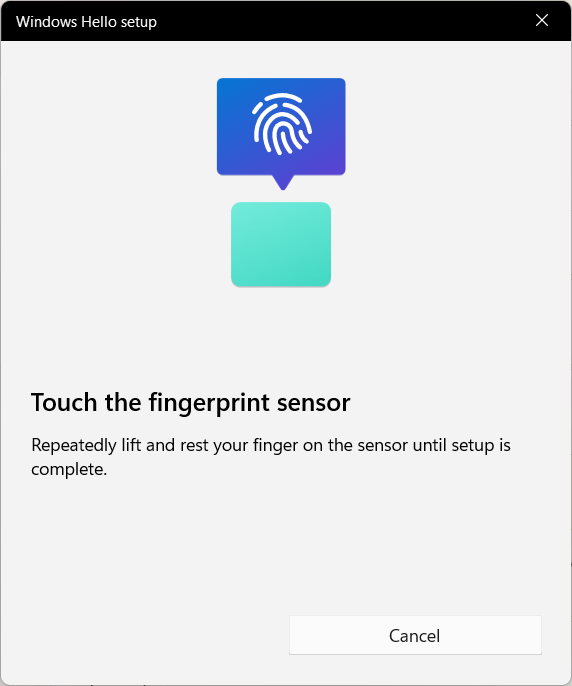
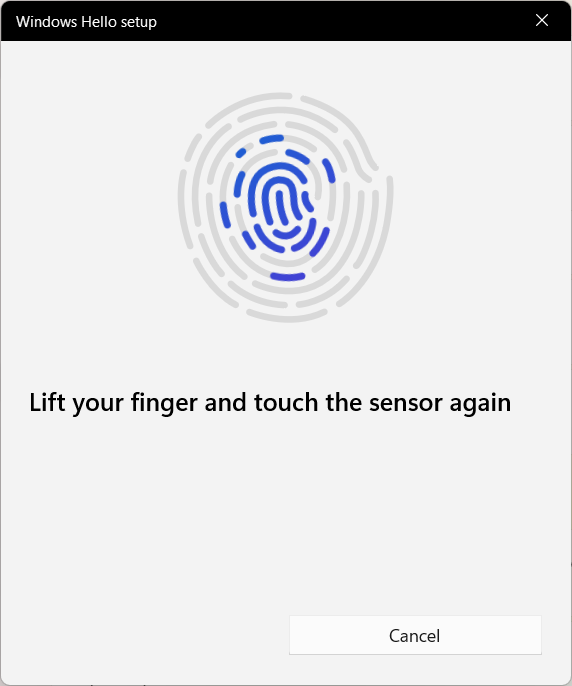
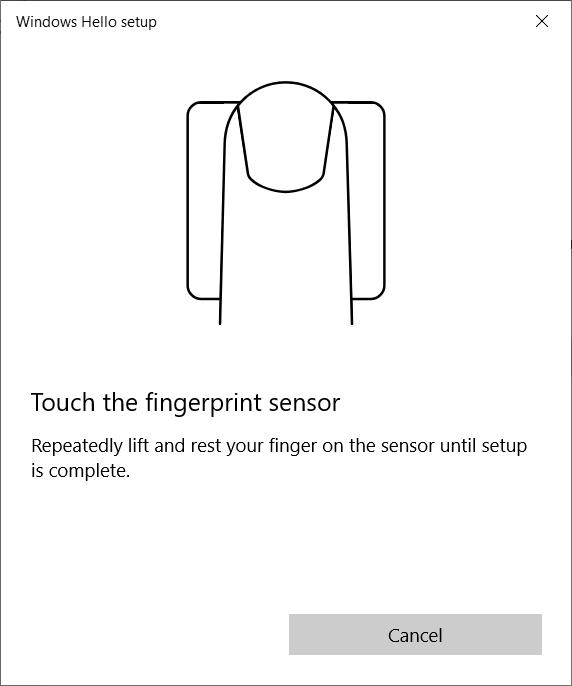
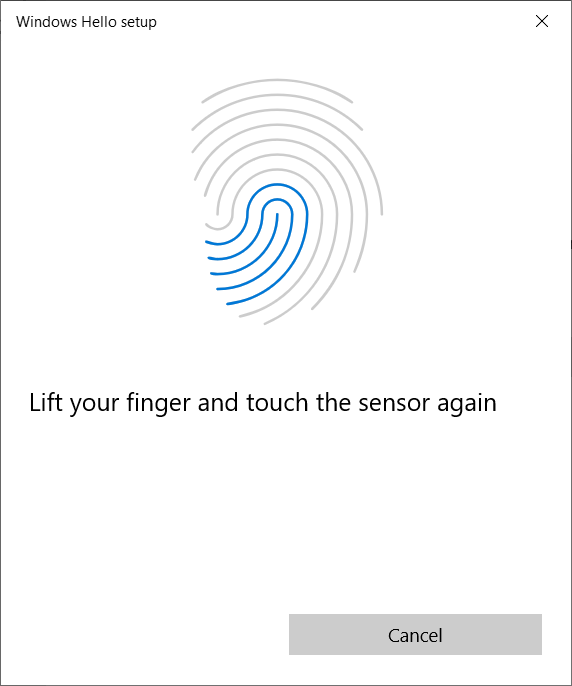
- Убедитесь, что Ваши пальцы чистые и сухие, затем поднимите и положите только один палец на датчик.
- Следуйте инструкциям на экране, чтобы несколько раз поднять и положить палец на датчик.
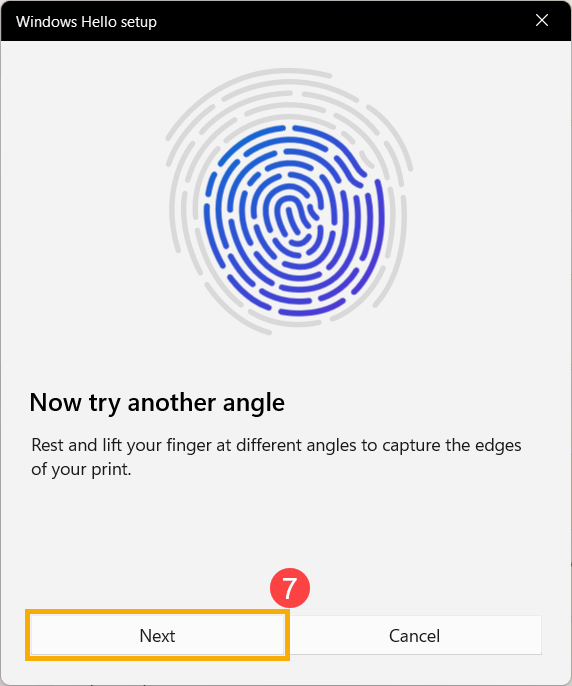
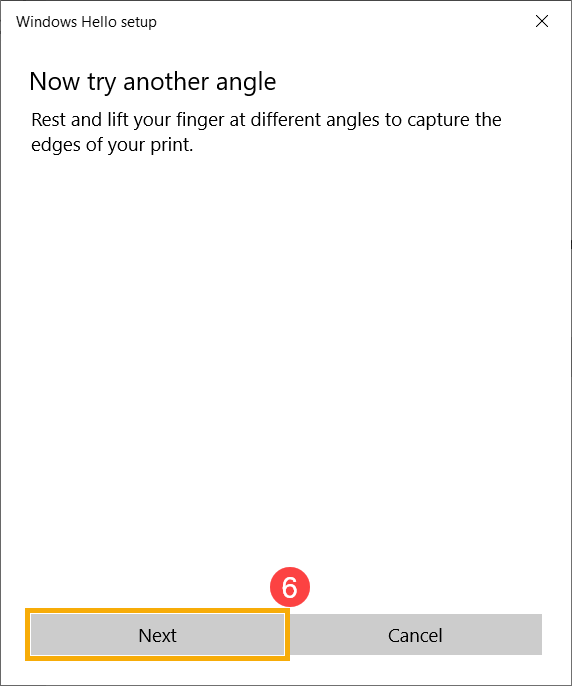
- Выберите [Далее] ⑦ и попробуйте использовать разные углы наклона пальца, чтобы захватить края отпечатка пальца при нажатии на датчик.
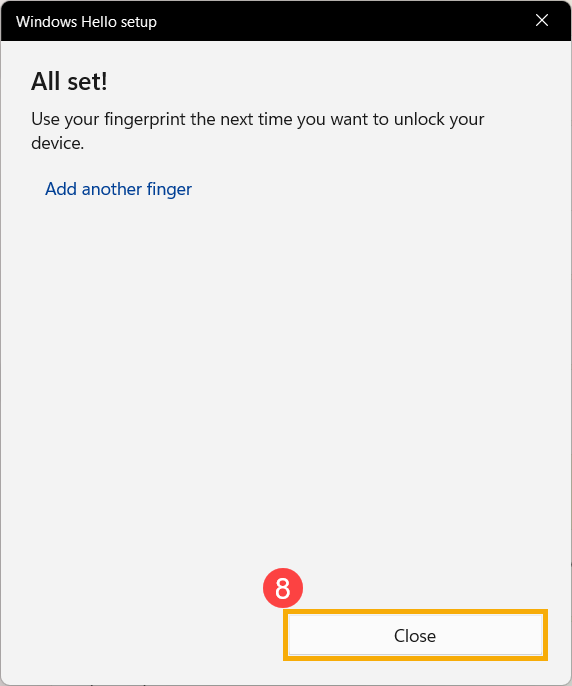
- Распознавание Вашего отпечатка пальца завершено, нажмите [Закрыть] ⑧.
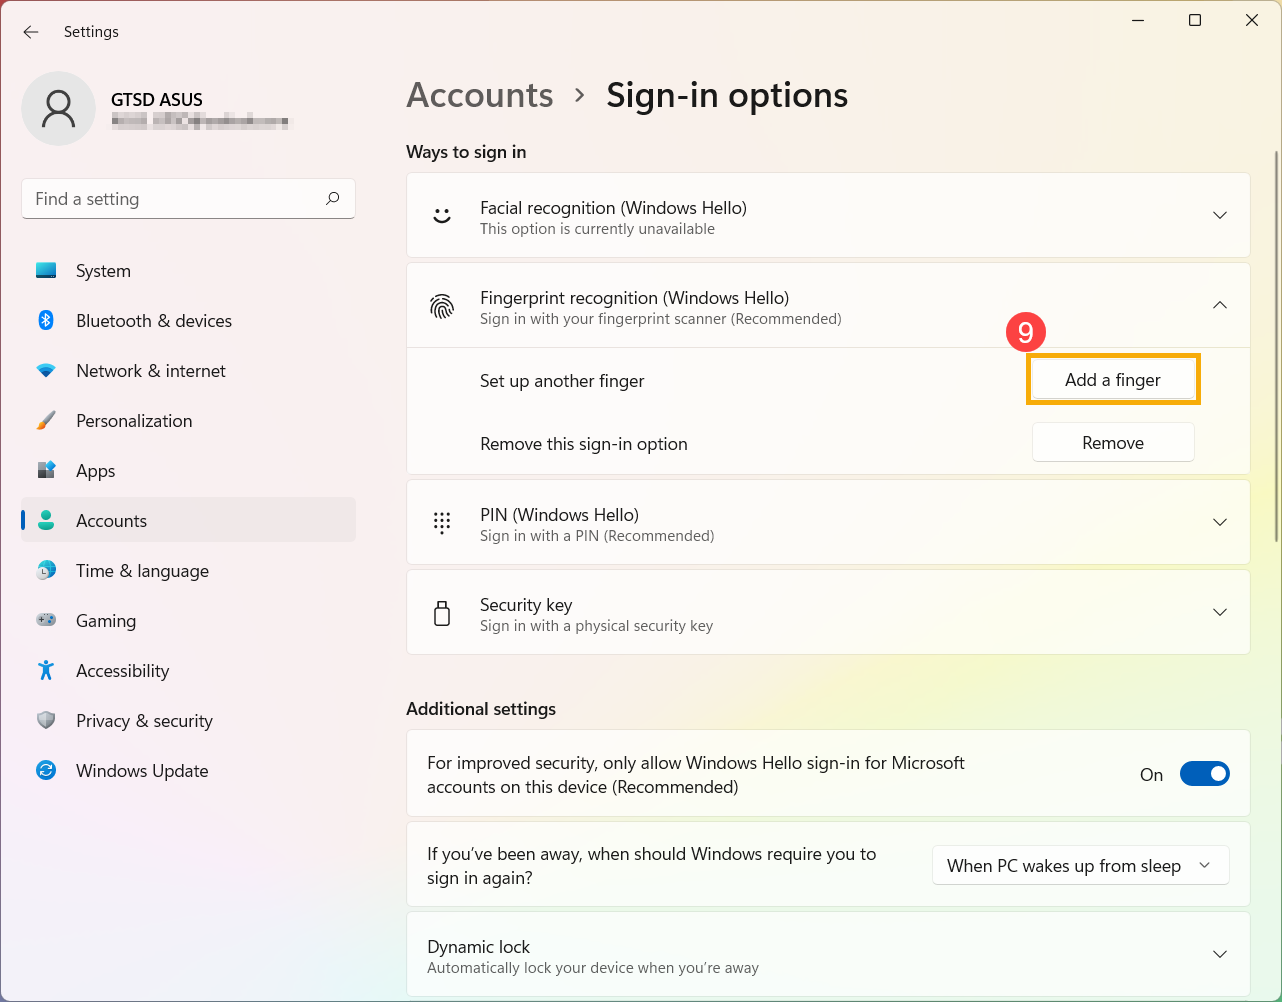
- Настройка входа по отпечатку пальца завершена. Существует еще одна опция [Добавить палец] ⑨, Вы можете настроить отпечатки пальцев других пальцев.

Вернуться в начало
Удалите сканнер отпечатка пальца
- Введите и найдите [Параметры входа] ① в строке поиска Windows, затем нажмите [Открыть] ②.
- Выберите [Распознавание отпечатков пальцев (Windows Hello)] ③ и нажмите [Удалить] ④, функция входа по отпечатку пальца будет удалена.


Вернуться в начало
Настройка динамической блокировки
Динамическая блокировка позволяет использовать устройства, сопряженные с Вашим компьютером, чтобы определить, когда Вы отсутствуете, и заблокировать компьютер вскоре после того, как сопряженное устройство выйдет за пределы диапазона Bluetooth. Эта функция усложняет доступ к Вашему устройству, если Вы отойдете от компьютера и забудете заблокировать его.
- Введите и найдите [Параметры входа] ① в строке поиска Windows, затем нажмите [Открыть] ②.
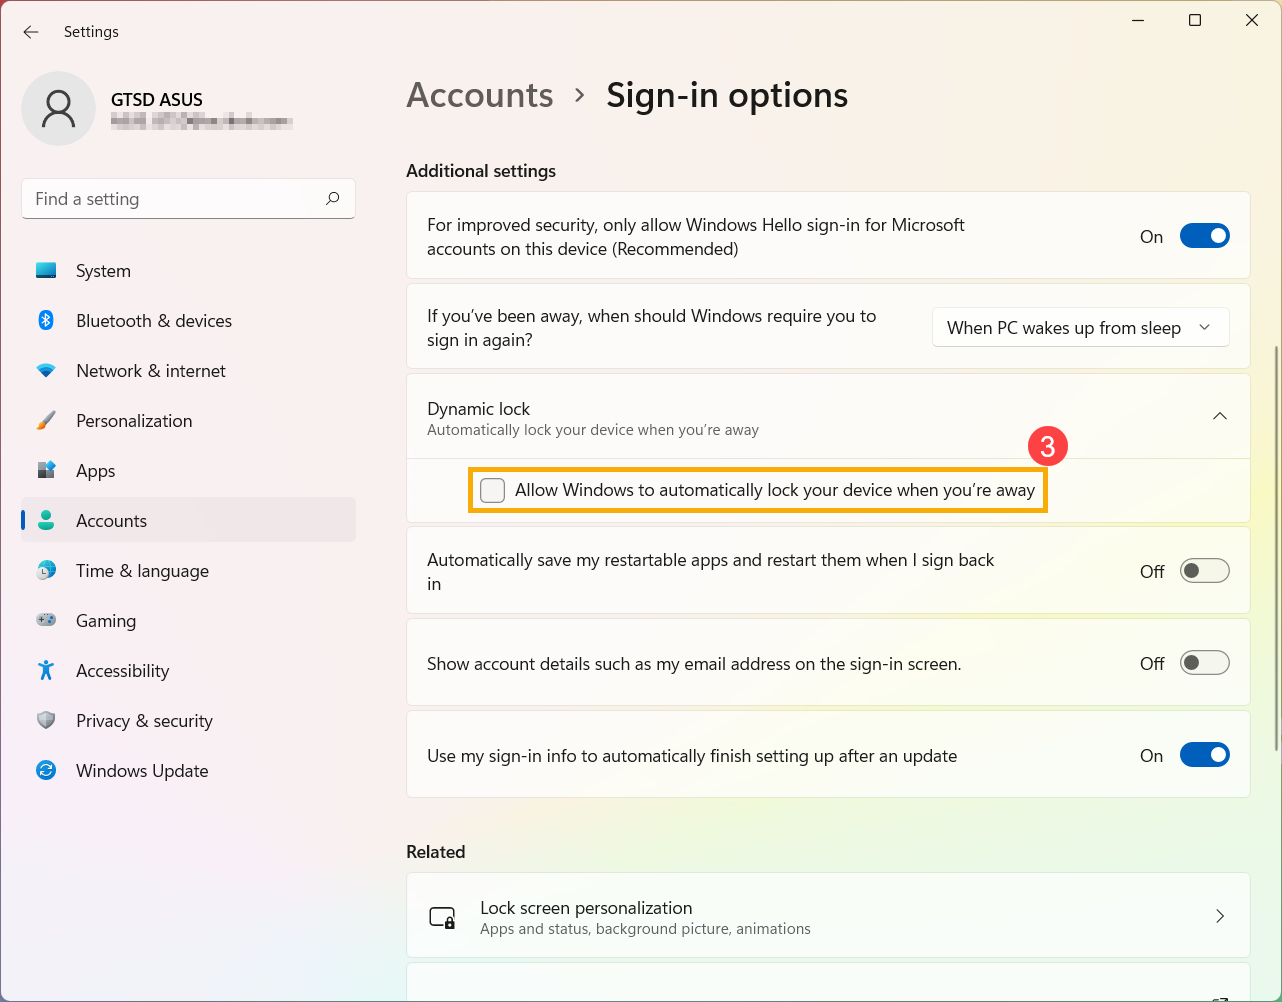
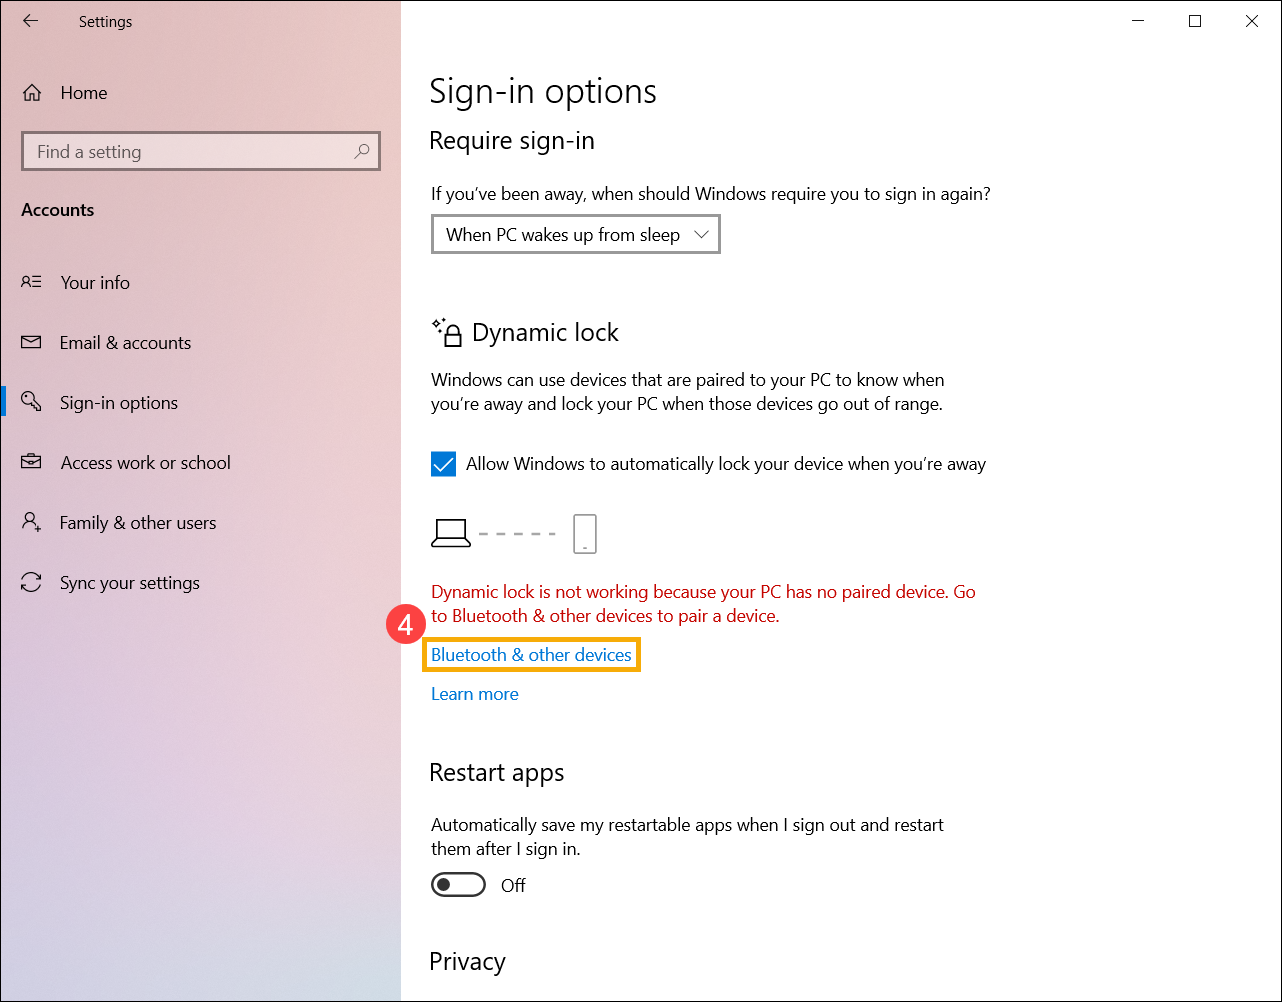
- В параметрах входа прокрутите вниз до раздела «Динамическая блокировка» и установите флажок [Разрешить Windows автоматически блокировать устройство, когда Вас нет] ③.
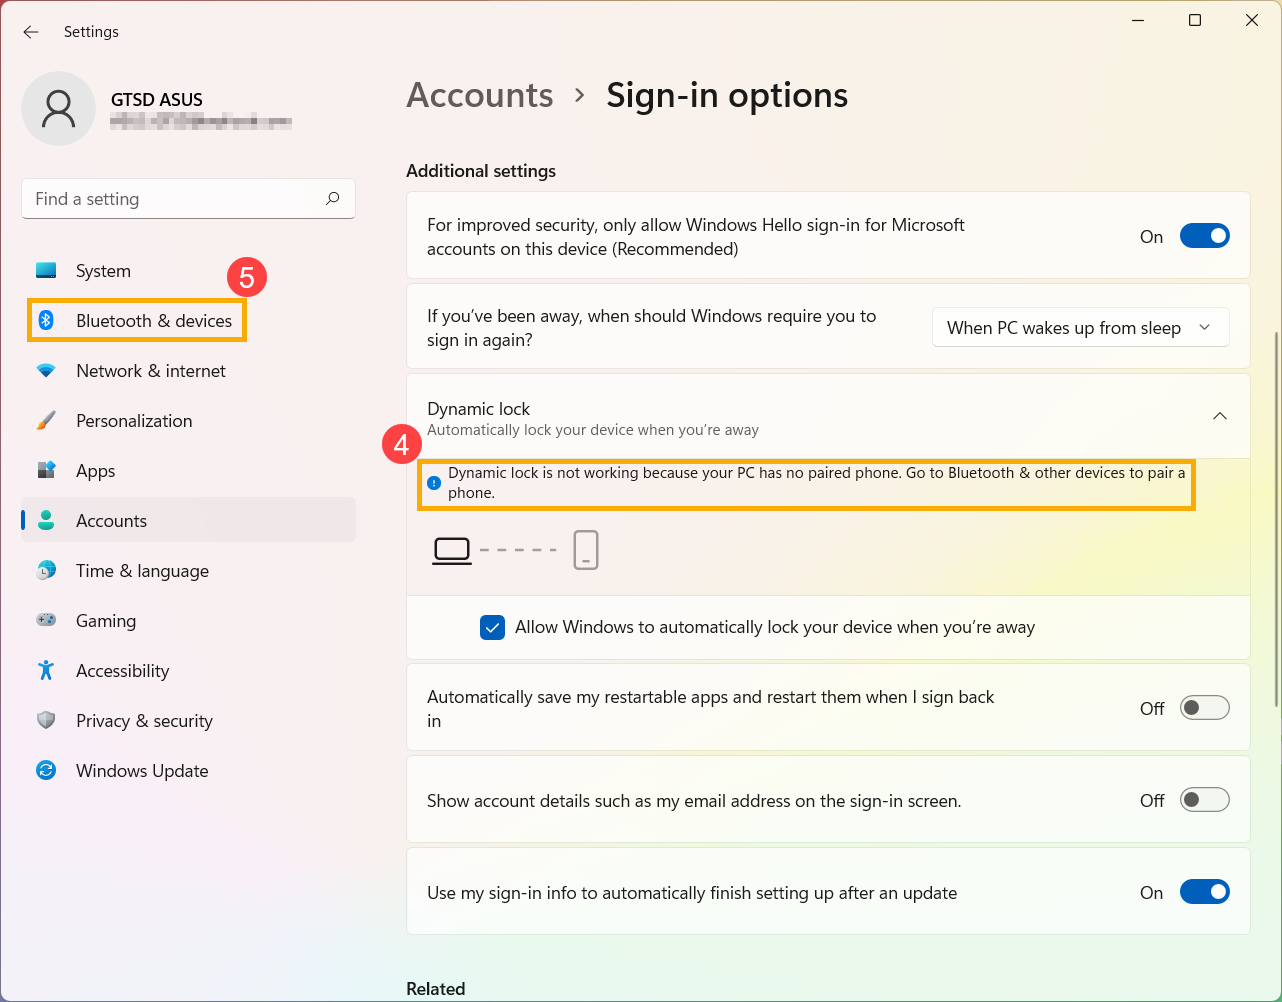
- Если Вы видите уведомление о том, что динамическая блокировка не работает, потому что на Вашем ПК нет сопряженного телефона ④, выберите [Bluetooth и устройства] ⑤ для сопряжения телефона с компьютером. Здесь Вы можете узнать больше о том, как установить сопряжение с Bluetooth.
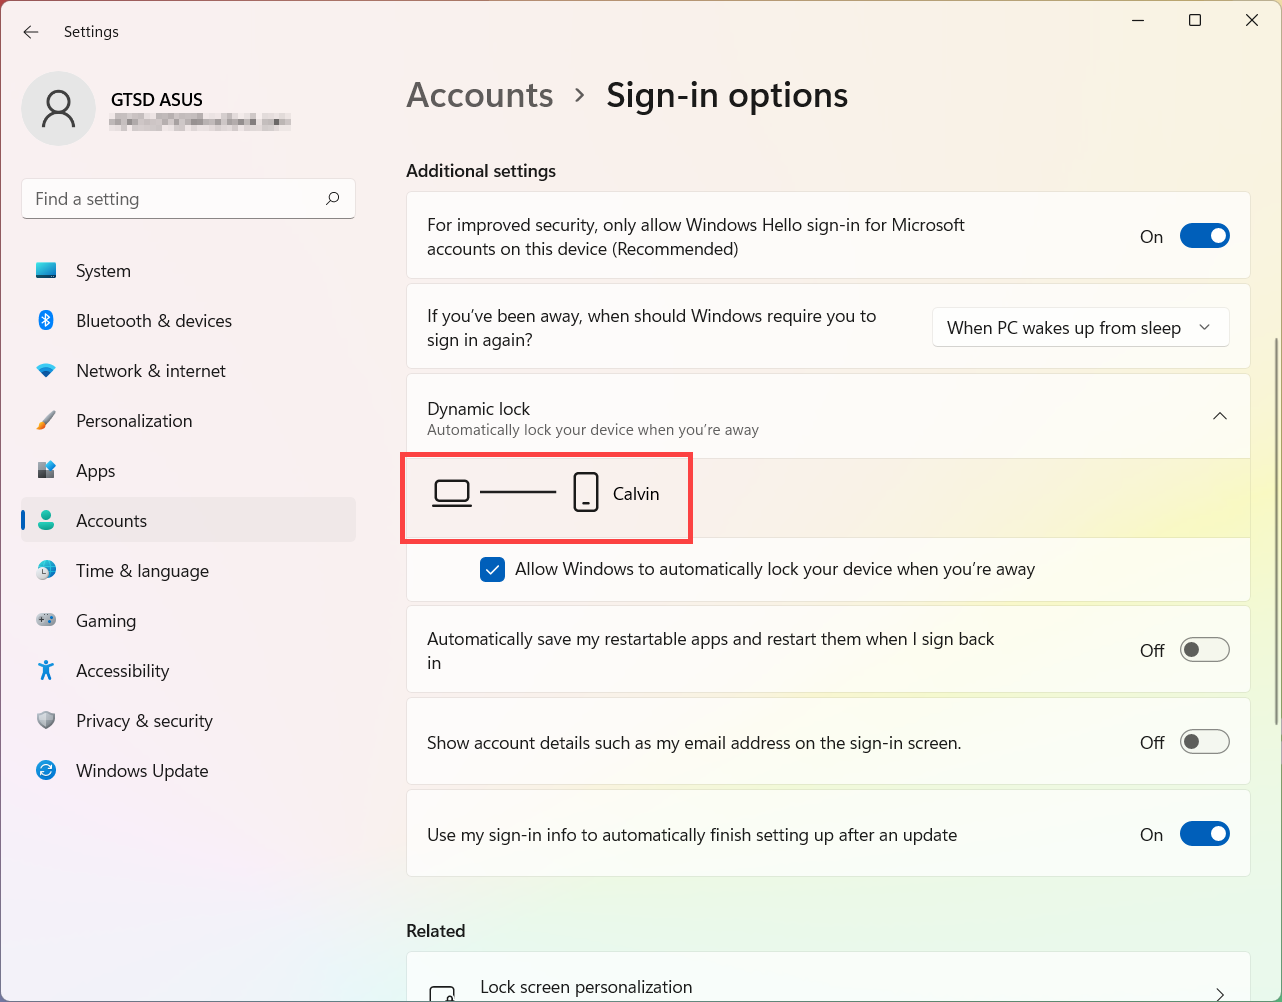
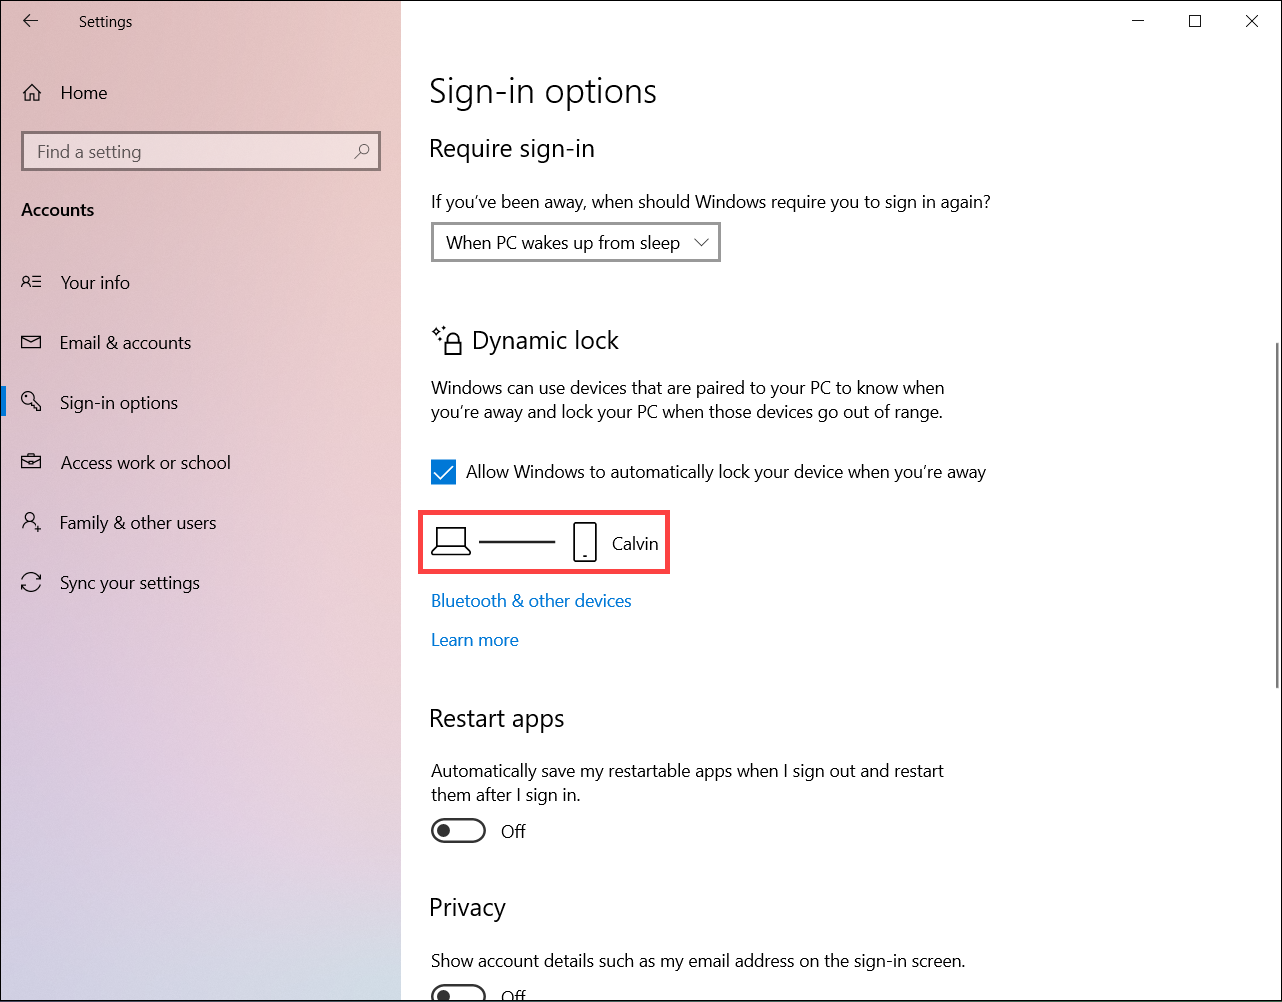
- После того, как сопряжение будет завершено, оно будет отображаться, как показано ниже. Пожалуйста, возьмите с собой телефон, когда уходите, и Ваш компьютер автоматически заблокируется примерно через минуту после того, как Вы выйдете из зоны действия Bluetooth.

Вернуться в начало
Windows 10
Содержание:
- Вход с помощью распознавания лица
- Удалить распознавание лица
- Вход с помощью отпечатка пальца
- Удалить отпечаток пальца
- Настроить динамическую блокировку
Вход с помощью распознавания лица
Эта функция доступна только на некоторых моделях, оснащенных ИК-камерой. Если Вы не видите параметр входа в систему по лицу или этот параметр недоступен, это означает, что на Вашем компьютере нет ИК-камеры.
Вы можете найти спецификацию Вашего устройства на официальном сайте ASUS
Также Вы можете проверить Диспетчер Устройств, чтобы узнать, оснащен ли Ваш компьютер ИК-камерой. Щелкните правой кнопкой мыши значок [Пуск] на Панели Задач ① и выберите [Диспетчер Устройств] ②.

Откройте раздел [Камеры] ③, чтобы увидеть, есть ли на Вашем компьютере ИК-камера
Настройка распознавания лица
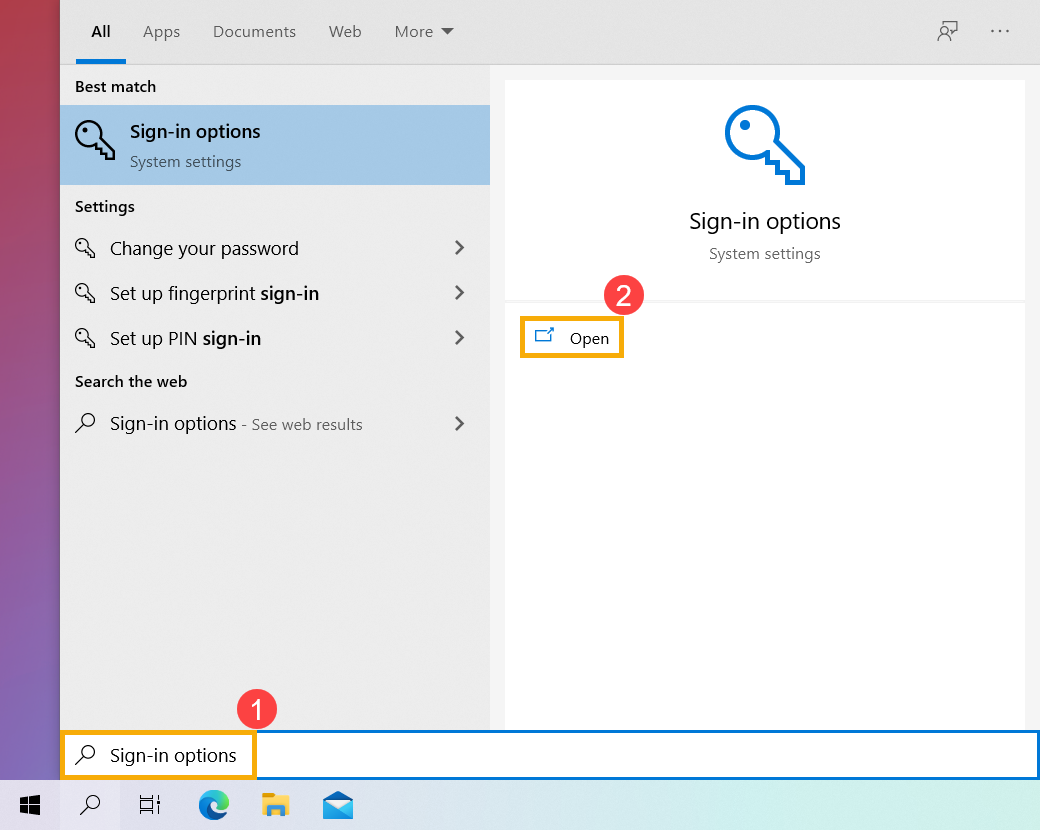
1. Укажите в поисковой строке Windows [Варианты входа] ① и нажмите [Открыть] ②.

2. Выберите [Распознавание лиц Windows Hello] ③ и нажмите [Настройка] ④.
3. Выберите [Начать] ⑤.
4. Расположите свое лицо в центре кадра, который появится на экране, и камера сохранит Ваши черты лица.
5. Распознавание Ваших черт лица завершено, выберите [настроить PIN] ⑥ чтобы создать PIN-код для входа, если функция распознавания лиц недоступна.
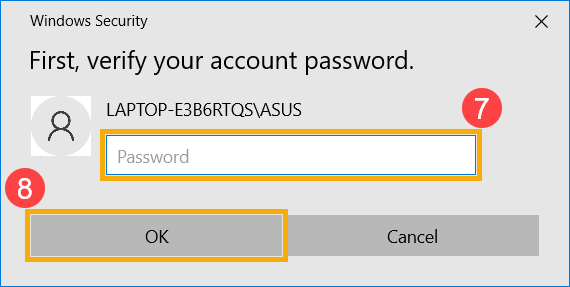
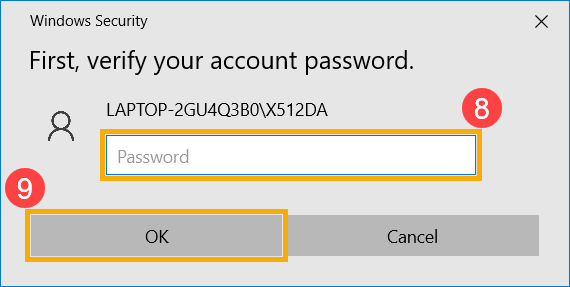
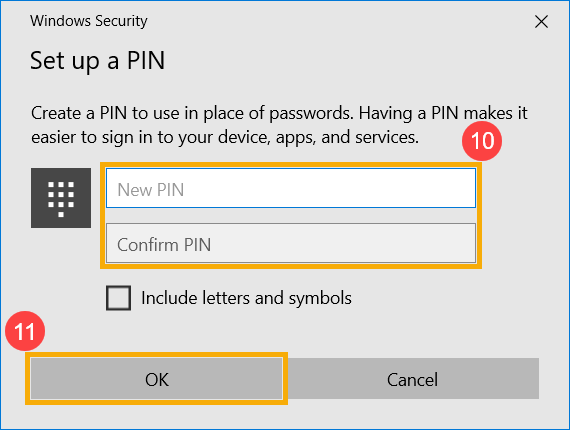
6. Укажите пароль от аккаунта ⑦, нажмите [OK] ⑧.
7. Пожалуйста, укажите новый PIN для настройки ⑨ и нажмите [OK] ⑩.

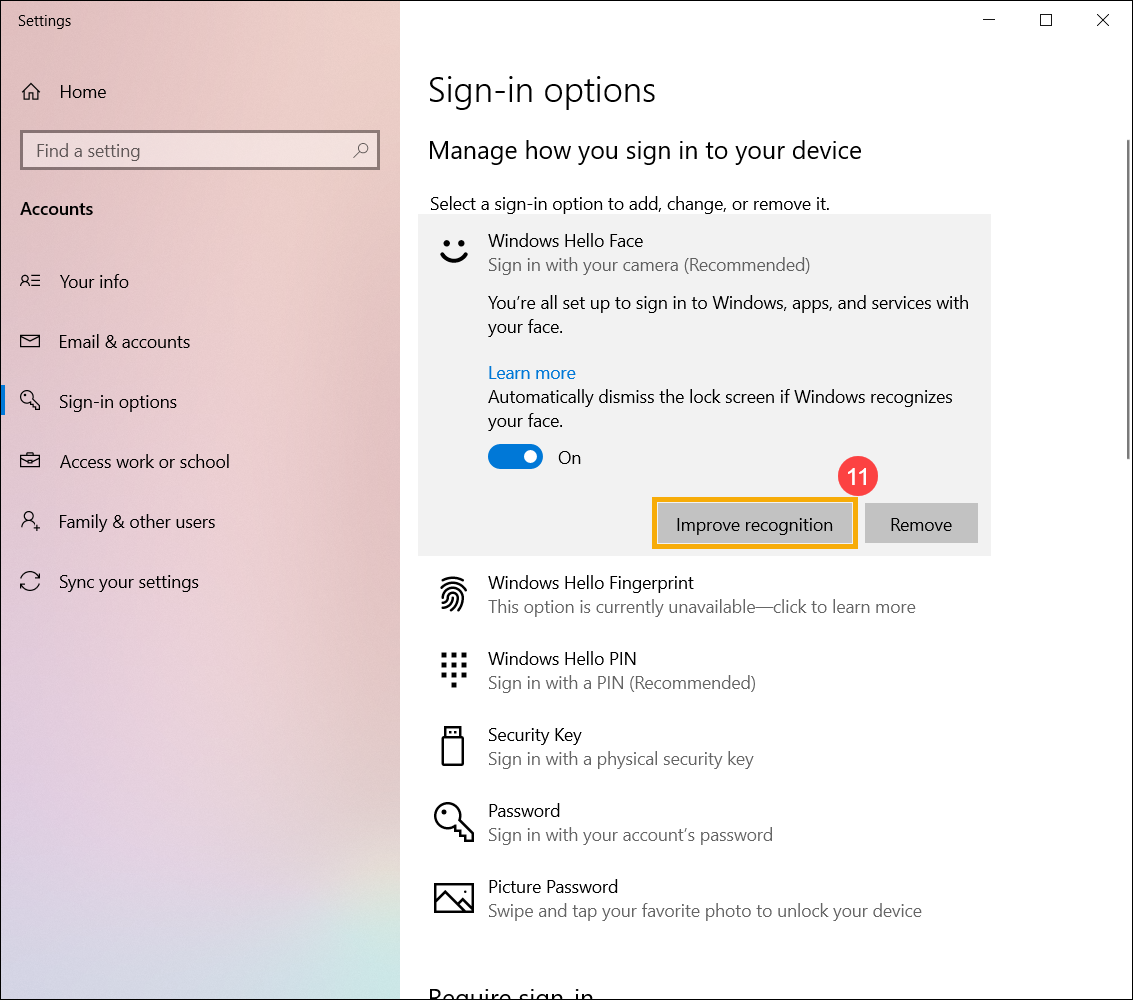
8. Настройка завершена. Есть еще вариант [Улучшить распознавание] ⑪, эта функция позволяет зафиксировать распознавание как в очках, так и без них. Если Вы носили очки во время настройки распознавания лиц, выберите этот параметр, чтобы снова выполнить настройку без них. Это поможет Windows узнать Вас независимо от того, в очках Вы или нет.
Вернуться в начало
Удалить распознавание лица
1. Укажите в поисковой строке Windows [Варианты входа] ① и нажмите [Открыть] ②.
2. Выберите [Распознавание лиц Windows Hello] ③ и нажмите [Удалить] ④, распознавание лица будет удалено.
Вернуться в начало
Вход с помощью отпечатка пальца
Эта функция доступна только на некоторых моделях, оснащенных сканером отпечатков пальцев. Если Вы не видите параметр входа по отпечатку пальца или этот параметр недоступен, это означает, что на Вашем компьютере нет сканера отпечатков пальцев.
Найдите сканер отпечатков пальцев на своем компьютере. Сканер отпечатков пальцев у большинства ноутбуков ASUS расположен на сенсорной панели.

Датчик отпечатков пальцев был интегрирован в клавишу питания на некоторых ноутбуках ASUS.
1. Укажите в поисковой строке Windows [Варианты входа] ① и нажмите [Открыть] ②.

2. Выберите [Распознавание отпечатков пальцев Windows Hello] ③ и нажмите [Настройка] ④.
3. Выберите [Начать] ⑤.
4. Убедитесь, что Ваши пальцы чистые и сухие, затем поднимите палец и положите его на датчик.
5. Следуйте инструкциям на экране, чтобы несколько раз приподнять и положить палец на датчик.
6. Выберите [Далее] ⑥ и попробуйте использовать разные углы Вашего пальца, чтобы захватить края Вашего отпечатка пальца при нажатии на датчик.
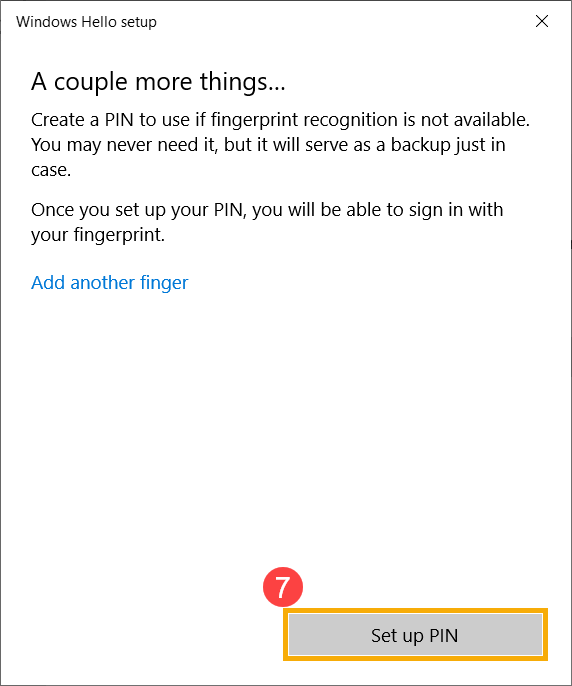
7. Распознавание Вашего отпечатка пальца завершено, выберите [настроить PIN] ⑦ для создания ПИН-кода для входа, если распознавание отпечатков пальцев недоступно.
8. Укажите пароль от аккаунта ⑧, затем нажмите [OK] ⑨.
9. Укажите новый PIN для настройки ⑩, нажмите [OK] ⑪.
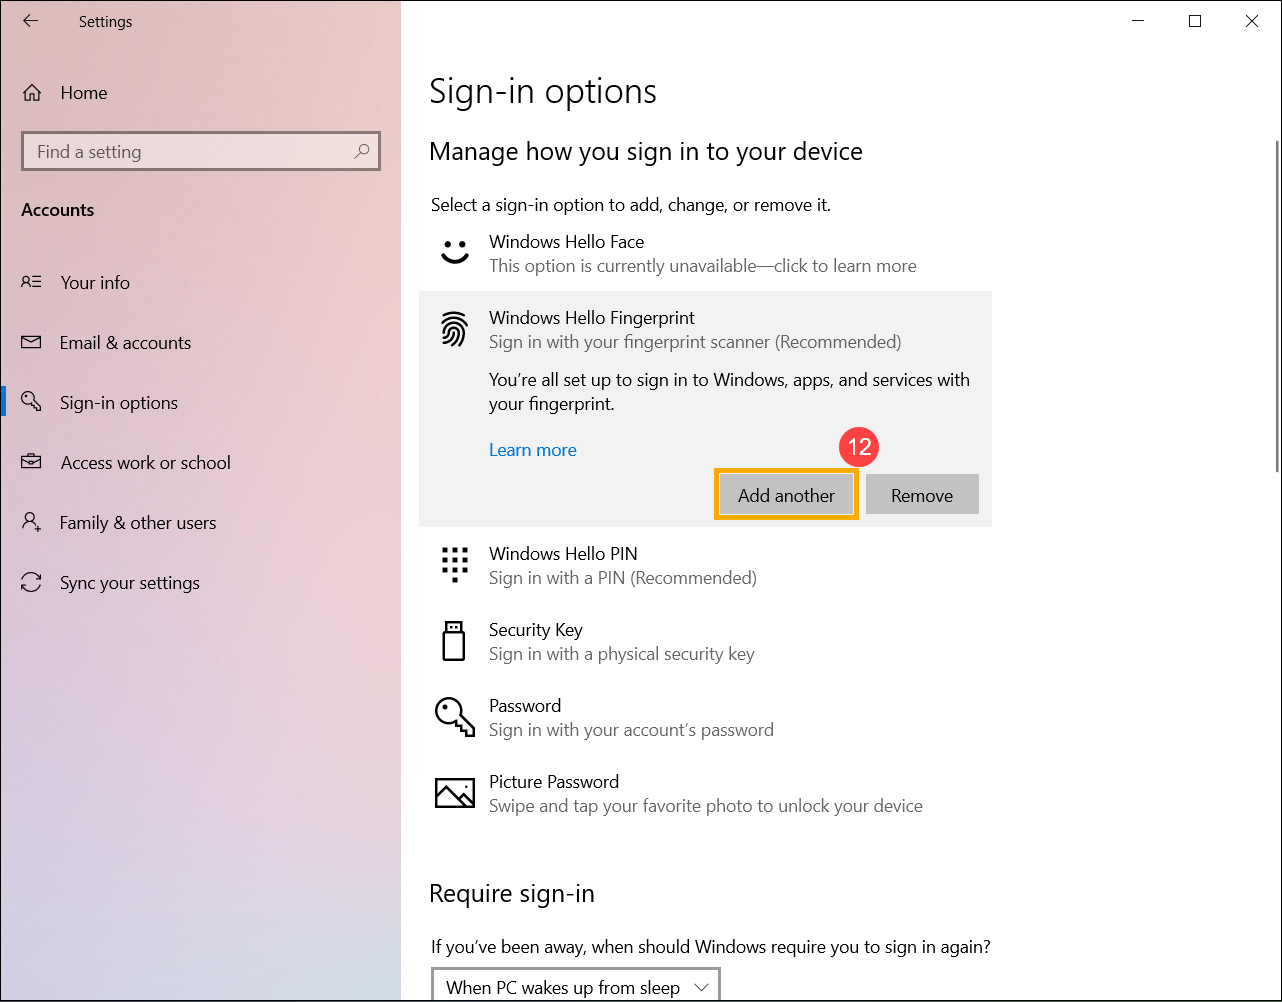
10. Настройка входа по отпечатку пальца завершена. Есть еще вариант [Добавить еще] ⑫, Вы можете настроить отпечаток других пальцев.
Вернуться в начало
Удалить отпечаток пальца
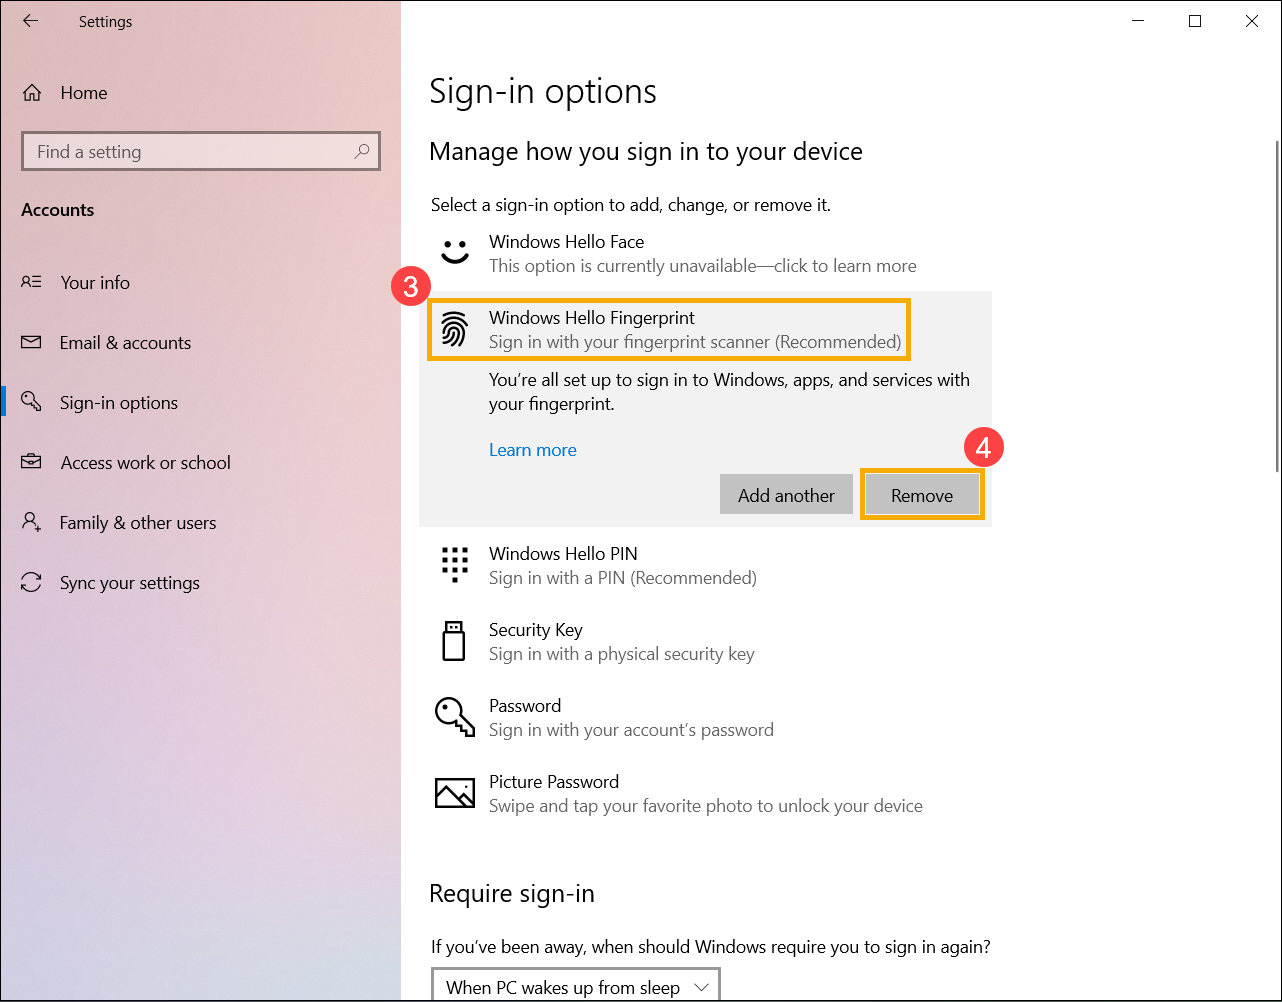
- Укажите в поисковой строке Windows [Варианты входа] ① и нажмите [Открыть] ②.
- Выберите [Распознавание отпечатков пальцев Windows Hello] ③, затем выберите [Удалить] ④, возможность входа по отпечатку пальца будет удалена.

Вернуться в начало
Настроить динамическую блокировку
Динамическая блокировка позволяет Вам использовать устройства, сопряженные с Вашим компьютером, чтобы определять Ваше отсутствие и блокировать компьютер вскоре после того, как сопряженное устройство выйдет за пределы диапазона Bluetooth. Благодаря этой функции кому-либо будет сложнее получить доступ к Вашему устройству, если Вы отойдете от компьютера и забудете заблокировать его.
1. Укажите в поисковой строке Windows [Варианты входа] ① и нажмите [Открыть] ②.

2. В параметрах входа прокрутите вниз до раздела Динамическая блокировка и установите флажок [Разрешить Windows автоматически блокировать Ваше устройство, когда Вас нет] ③.
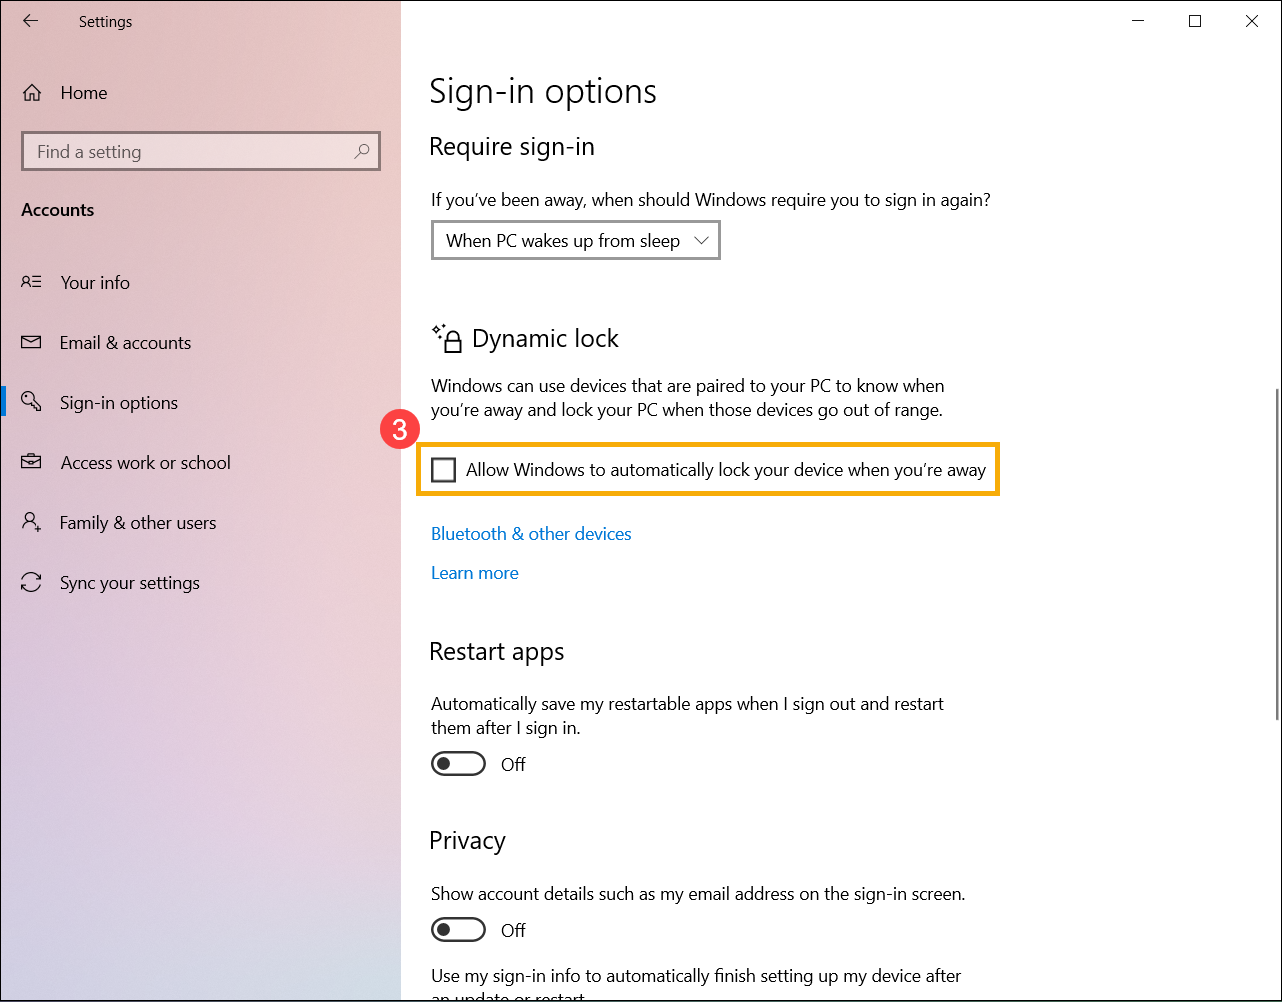
3. Если Вы видите уведомление о том, что динамическая блокировка не работает, потому что на Вашем компьютере нет сопряженного устройства, выберите [Bluetooth и другие устройства] ④, чтобы выполнить сопряжение устройства Bluetooth с Вашим компьютером. Здесь Вы можете узнать больше: Как установить сопряжение с устройством Bluetooth.
4. После завершения сопряжения блокировка будет отображаться, как показано ниже. Когда Вы отойдете от ПК, возьмите с собой устройство Bluetooth, и Ваш компьютер автоматически заблокируется примерно через минуту после того, как Вы окажетесь вне зоны действия Bluetooth.
Вернуться в начало
Unlocking your device using face recognition is a super-easy way of accessing your tablet, laptop, or PC. With Windows Hello Face, Microsoft has refined this type of authentication and has enhanced its security. This article explains what Windows Hello Face is and how to enable or get rid of it, should you choose to. But should you even use Windows Hello Face in Windows 11? Read on to find out:
What is Windows Hello Face? Should I use Windows Hello Face?
Windows Hello Face is the face recognition component of the authentication system used by Windows. It is a very welcome alternative to passwords, allowing quick user sign-ins. Moving away from passwords has many benefits: greater accessibility, a reduction in vulnerabilities related to human errors and limitations, increased usability, etc. Also, Microsoft clearly states that the biometric data used by Windows Hello is stored only on your local device, so you shouldn’t be concerned about your privacy.
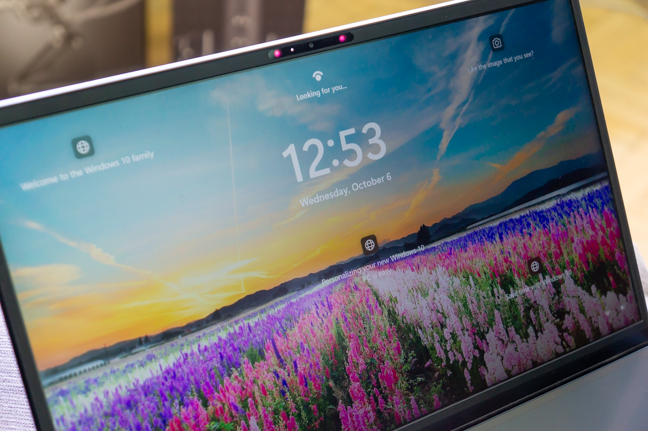
Windows Hello Face in action
The only potential downside of using Windows Hello Face on your laptop or other type of battery-powered devices is that it may affect battery life. Nevertheless, we recommend using Windows Hello Face if your Windows 11 device supports it.
Is my camera compatible with Windows Hello Face?
Windows Hello Face requires your system to have a camera specially configured for infrared imaging, so not every Windows device with a camera supports this feature. Thus, you first need to make sure you have a compatible camera on your device. Start by opening the Settings app on your device. One way to do it is by pressing Windows + I on your keyboard. Next, select Accounts in the left pane. On the right pane, select Sign-in options.
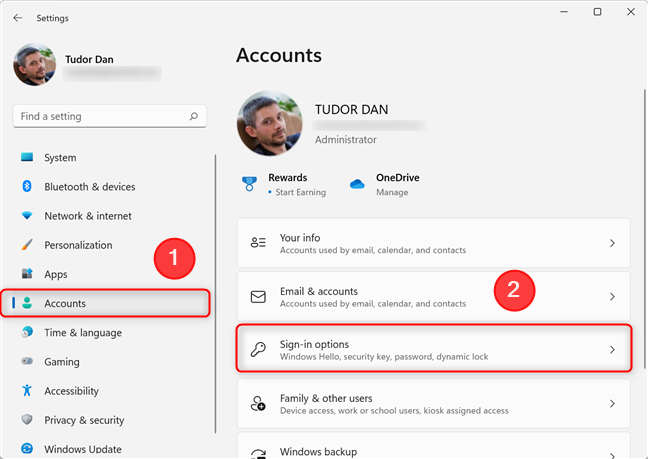
Go to Sign-in options in the Accounts section of Settings
Click or tap on Facial recognition (Windows Hello) to expand the section. If the message “We couldn’t find a camera compatible with Windows Hello Face” is displayed, and Windows Hello Face is not working, your camera is incompatible, you don’t have the correct drivers installed, or there is a configuration problem.
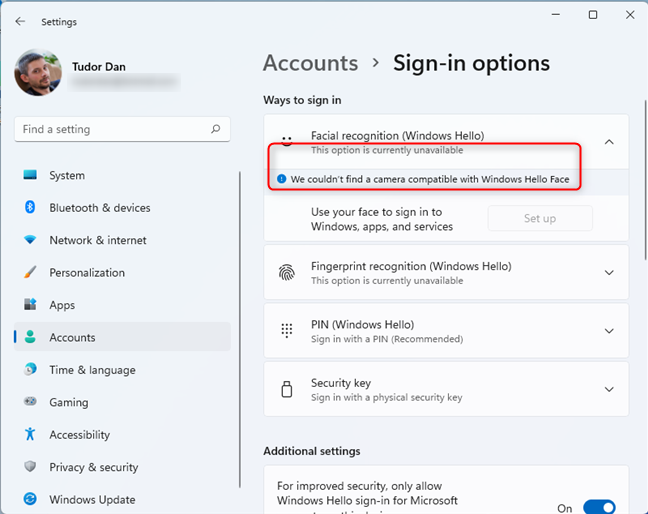
Windows Hello Face incompatibility message
If the message below Facial recognition (Windows Hello) says “Sign in with your camera (Recommended)”, Windows has detected a compatible camera and you can move on to the next section, enrolling your face into the system.
How to set up Windows Hello Face in Windows 11
Okay, now you know you have a compatible system. But how do you actually enable Windows Hello Face in Windows 11? Start by opening the Sign-in options page as described above. Depending on your device capabilities, you have several options for signing in. Click or tap on “Facial recognition (Windows Hello)” to expand the section. Then, click or tap on Set up.
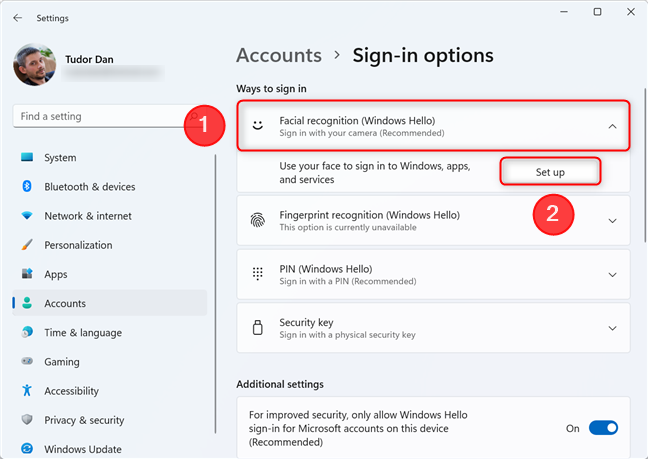
Press Set up to start the Windows Hello setup wizard in Windows 11
On the first page of the Windows Hello setup wizard, press Get started.
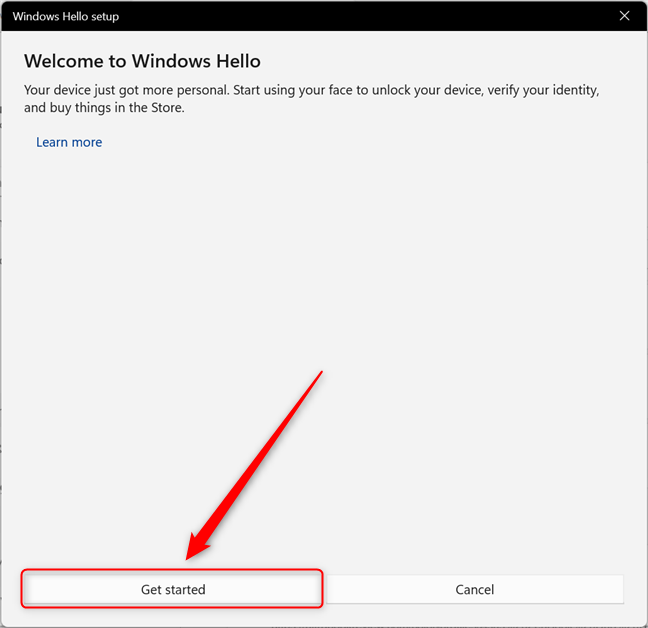
Click or tap on Get Started
On the next step, you have to enter your PIN. Then, press Enter or click on OK, and your camera starts enrolling your face.
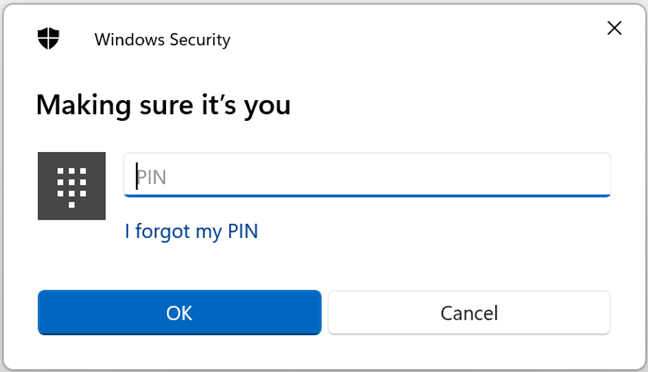
Enter your PIN to continue setting up Hello Face
Make sure you are in a well-lit environment and look directly at the webcam. The registration takes a few seconds to complete.
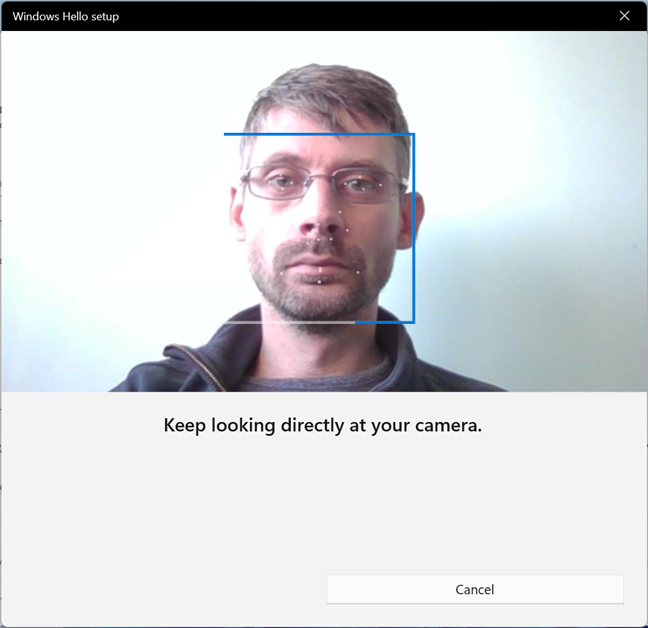
Look at the camera until the wizard finishes registering your face
The wizard confirms that your face has been enrolled. If you usually wear accessories like glasses, a topper, or monocles (classy!), click or tap on Improve recognition while wearing them, so that Windows recognizes you both with and without accessories. When you’re done, click or tap on Close.
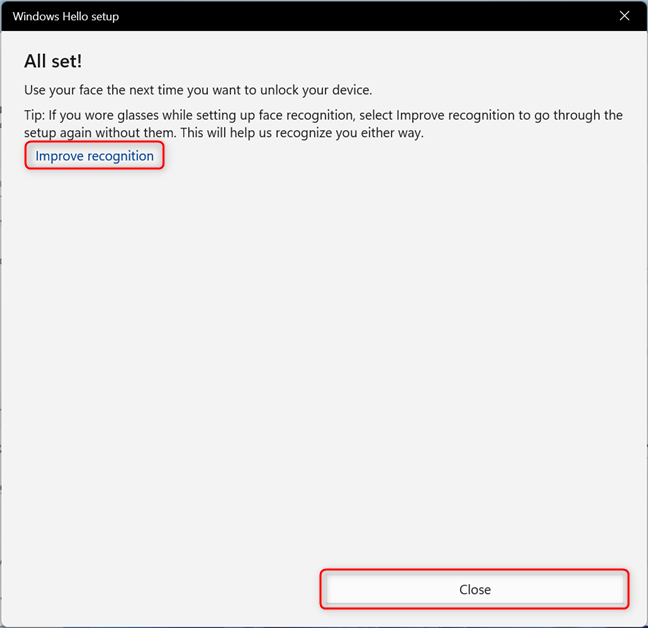
Close the wizard or improve recognition
You can now unlock your device by just being in front of the camera.
TIP: Here are other ways to sign in to Windows 11.
How to disable Hello Face in Windows 11
If you notice that the battery of your Windows 11 laptop or tablet drains too fast, you can try to get rid of Windows Hello Face and see if it makes a difference. To do this, first start the Settings app (Windows + I), then go to Accounts in the left sidebar. On the right pane, select Sign-in options. Now, click or tap on “Facial recognition (Windows Hello)” to expand the section and then on Remove.
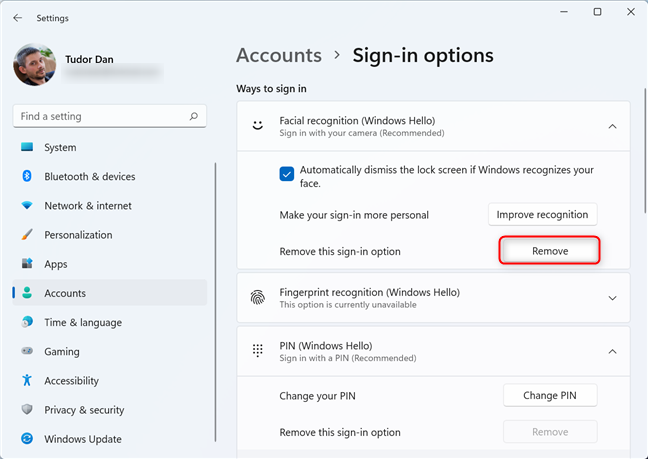
Removing facial recognition in Windows 11
Disabling Windows Hello Face stops your device from powering on the camera each time you want to log in or unlock it. You can still sign in and unlock the device with other methods (PIN, fingerprint, password, etc).
Do you use facial recognition on your Windows 11 laptop, tablet, or PC?
We think Windows Hello Face is a safe and reliable authentication method. Also, the fact that we don’t have to enter long and complicated passwords every time we unlock our Windows 11 devices makes Windows Hello Face a useful tool for us. What’s your take on Windows Hello Face? Are you planning to use it? Are you already using it? Let us know in the comments.