В случае, если системный раздел восстановления с диска был удален вами, либо в результате каких-либо действий на компьютере, его при желании можно восстановить: это даст доступ ко всем инструментам среды восстановления, которые иногда могут оказаться полезными.
В этой инструкции пошагово о том, как создать раздел восстановления на диске в Windows 11 и Windows 10 средствами системы.
Процесс создания раздела восстановления на диске

Далее речь пойдет о повторном создании раздела восстановления Windows 11/10, который автоматически создается при чистой установке ОС на компьютер и содержит необходимые файлы для запуска среды восстановления, из которой можно использовать точки восстановления, выполнять сброс Windows к заводским настройкам и другие действия для восстановления работоспособности ОС.
В случае если вас интересует создание раздела восстановления, содержащего полный образ установленной системы со всеми программами для быстрого возврата к сохраненному состоянию, одним из лучших решений будет Aomei OneKey Recovery.
Перед началом действий по созданию раздела восстановления рекомендую проверить состояние среды восстановления: в командной строке, запущенной от имени администратора, введите команду
reagentc /info
и нажмите Enter.

- Если в поле «Состояние среды восстановления Windows» указано Disabled, можно продолжать.
- Если же указано «Enabled», похоже, среда восстановления все-таки присутствует, но находится не на отдельном разделе восстановления, а, вероятнее всего, в папке C:\Windows\System32\Recovery. Текущее расположение можно определить в пункте «Расположение образа для восстановления». Вы можете оставить всё как есть, либо использовать команду
reagentc /disable
а затем шаги, описанные далее для создания отдельного раздела восстановления на диске.
Порядок действий для возврата стандартного раздела восстановления в Windows:
- Включите показ скрытых и системных (это две разных опции) файлов в Проводнике.
- Проверьте, присутствует ли файл с именем Winre.wim в папке
C:\Windows\System32\Recovery
При его наличии перейдите к 4-му шагу.
- Если файла нет, подключите образ ISO Windows 11 или 10 (смонтируйте образ в системе), либо подключите флешку/диск c файлами установки Windows 11/10, после чего откройте файл install.esd или install.wim, находящийся в папке Sources (открывать его умеет архиватор 7-Zip) после чего извлеките из него файл winre.wim находящийся в папке Windows\System32\Recovery или 1\Windows\System32\Recovery\ и скопируйте его в папку
C:\Windows\System32\Recovery
на вашем компьютере.
- Запустите командную строку от имени администратора. Сделать это можно, используя поиск в панели задач: начните вводить «Командная строка», а затем нажмите правой кнопкой мыши по результату и выберите «Запуск от имени администратора».
- По порядку используйте следующие команды:
diskpart
list disk
вторая команда отобразит список дисков, в следующей команде потребуется ввести номер диска с системным разделом, я укажу его как N, вам потребуется заменить на свой номер диска:
select disk N
list partition
Это отобразит список разделов на диске, в следующей команде вам потребуется номер раздела, от которого вы готовы «отнять» часть пространства для раздела восстановления, в примере — M, вам потребуется заменить на свой номер раздела (внимание: в команде установки id диска используем set id=27 для MBR диска, для GPT — как в примере далее):
select partition M
shrink desired=650
create partition primary
format fs=ntfs quick
set id=de94bba4-06d1-4d40-a16a-bfd50179d6ac
exit
reagentc /enable

В результате выполнения трех последних команд, для раздела будет установлен идентификатор раздела восстановления, после чего на него будут распакованы необходимые файлы среды восстановления Windows из файла winre.wim и среда восстановления будет работать как обычно с наличием всех необходимых дополнительных параметров восстановления.

При этом в «Управлении дисками» он может не иметь пометки «Раздел восстановления», но в сведениях о разделе в diskpart эта информация будет отображаться:

Ещё один вариант действий для создания раздела восстановления:
- Как и в предыдущем случае убедиться в наличии файла Winre.wim в C:\Windows\System32\Recovery
- После создания пустого раздела для среды восстановления на диске (можно сделать и в управлении дисками, рекомендуемый размер — 650-700 Мб) назначить ему букву.
- Вручную создать папку с именем Recovery на этом разделе.
- Использовать команды (здесь следует поменять букву диска D на фактическую букву раздела восстановления)
reagentc /setreimage /path D:\Recovery
reagentc /enable
- Удалить букву раздела.
Это так же вернёт вам рабочую среду восстановления с необходимыми инструментами, при этом раздел не будет помечен как раздел восстановления.
A healthy recovery partition in Windows 11 is a partition on your computer’s hard drive that contains the necessary files and tools to help you recover your operating system in case of a system failure or other issues. Here’s an explanation of what a healthy recovery partition is and its importance:
1. System recovery: The recovery partition contains a complete copy of the Windows operating system, including all the necessary files and settings. In the event of a system failure, like a critical error or corruption, you can use the recovery partition to restore the operating system without the need for external installation media.
2. Troubleshooting tools: The recovery partition also includes various troubleshooting tools that can help diagnose and fix common issues with your computer. These tools allow you to perform tasks such as system restore, startup repair, and system image recovery.
3. Refresh and reset options: Windows 11 provides the option to refresh or reset your PC, which can be initiated from the recovery partition. Refreshing your PC allows you to keep your personal files and apps while reinstalling Windows and fixing any issues. On the other hand, resetting your PC removes all personal files, settings, and apps, returning your computer to its original state.
4. Accessibility: Having a recovery partition can make the recovery process more accessible and convenient. It eliminates the need to carry around external recovery media or rely on downloading recovery tools from the internet. With a healthy recovery partition, you have access to all necessary recovery options directly on your computer.
5. Protection against data loss: A recovery partition serves as an added layer of protection against data loss. If your computer encounters critical issues, having a recovery partition with up-to-date system files and tools ensures that you can recover your operating system without losing important data.
It’s important to note that a healthy recovery partition relies on regularly updating your operating system. Keeping your Windows 11 installation up-to-date with the latest security patches and system updates ensures that your recovery partition is equipped to handle any potential issues you might encounter.
In conclusion, a healthy recovery partition in Windows 11 provides a simplified and efficient way to recover your operating system in case of system failure. It offers various troubleshooting tools, refresh and reset options, and eliminates the need for external recovery media. Regularly updating your system ensures that your recovery partition remains effective in times of need.
Video Tutorial:Why do I have 3 recovery partitions?
What size recovery drive for Windows 11?
When it comes to creating a recovery drive for Windows 11, the size required can vary depending on a few factors. Here’s what you should keep in mind:
1. Storage Capacity: The size of the recovery drive should be large enough to accommodate the necessary system files, boot files, and recovery tools. It is recommended to use a USB flash drive with a minimum capacity of 16GB. This will allow enough space to create a bootable recovery drive and include all the required files.
2. File Size: The size of the Windows 11 recovery image can vary depending on the specific version, updates, and included components. While the installation media for Windows 11 can be around 4-5GB, the recovery image can take up additional space. To ensure you have enough room for future updates and system files, it’s advisable to use a USB drive with a larger capacity, such as 32GB or 64GB.
3. Recovery Drive Usage: If you plan to use the recovery drive for additional purposes, such as storing backups or creating a portable Windows installation, you may require more storage space. In such cases, it is best to use a USB drive with a larger capacity, depending on your specific needs.
4. Additional Considerations: Keep in mind that the size requirements can vary in different scenarios. If you are creating a recovery drive for a specific computer model or brand, it’s a good idea to check the manufacturer’s guidelines or support documentation for any specific recommendations or requirements.
In summary, it’s recommended to use a USB flash drive with a minimum capacity of 16GB for creating a recovery drive for Windows 11. However, using a larger capacity drive, such as 32GB or 64GB, can allow for future updates and accommodate additional usage requirements.
How do I clean my recovery partition Windows 11?
Cleaning the recovery partition in Windows 11 is a useful step to reclaim some storage space on your computer. Here’s a step-by-step guide to help you achieve that:
1. Open the Start menu and search for «Disk Cleanup» or «Storage Settings«. Click on the appropriate result to launch the disk cleaning tool.
2. When the Disk Cleanup window opens, you’ll see a list of files to delete. Click on the «Clean up system files» button, and if prompted, enter your administrator password or confirm your selection.
3. In the new window, you’ll find a list of various types of files you can clean up. Scroll down and check the «Previous Windows installation(s)» or «Windows upgrade log files» option.
4. If you want to remove other unnecessary files, such as temporary files or system error memory dump files, you can select those options as well.
5. Once you’ve made your selection, click the «OK» button, and then confirm by clicking «Delete Files» in the subsequent dialog box. Windows will then start cleaning up the selected files, including the recovery partition.
6. The cleanup process may take several minutes, depending on the amount of data to be deleted and the performance of your computer.
7. After the cleanup is completed, you can close the Disk Cleanup tool.
Please note that by cleaning the recovery partition, you will remove any potential rollback options to previous versions of Windows. This means you won’t be able to revert to a previous installation if any issues arise. Therefore, it’s essential to backup your important data before proceeding with this cleanup process.
Remember to regularly clean up your system and keep unnecessary files at a minimum to optimize storage space on your Windows 11 computer.
As a tech blogger, I can provide you with professional advice on whether you can delete the healthy recovery partition on Windows 11. Here are the steps and reasons to consider:
1. Determine the purpose of the recovery partition: The recovery partition contains important system files and tools that can help restore your operating system in the event of a critical failure or error. Its primary purpose is to facilitate troubleshooting and recovery processes.
2. Evaluate the need for additional storage space: If your device has limited storage capacity, and you require extra space for applications, files, or other data, you might consider deleting the recovery partition.
3. Create a backup: Before making any changes to your system, it is crucial to back up your important files and data to ensure they are safe in case something goes wrong during the deletion process.
4. Assess your technical skills and confidence: Deleting the recovery partition requires a good understanding of disk management tools and some technical knowledge. If you are not familiar with such tasks or feel unsure about proceeding, it is advisable to consult with a professional or refrain from making any modifications.
5. Explore alternative options: If storage space is your main concern, you can consider other methods to free up storage, such as removing unnecessary applications, transferring data to an external storage device, or utilizing cloud services to store some of your files.
6. Proceed with caution: If you decide to go ahead and delete the recovery partition, follow these steps:
– Open the Disk Management tool by right-clicking the Start menu and selecting «Disk Management.«
– Locate the recovery partition and ensure it is labeled as «Healthy.«
– Right-click on the partition and choose the option «Delete Volume.«
– Confirm your decision when prompted.
7. Verify the changes: After deleting the recovery partition, it is essential to ensure that your system functions correctly. Restart your computer and monitor its performance. Additionally, you may want to create a new recovery drive using the built-in Windows tools or consider alternative methods for system recovery, such as creating a system image or using external recovery media.
Remember that modifying system partitions can have implications on your device’s functionality and recovery options. Always exercise caution, make appropriate backups, and be aware of the potential risks involved.
Is it OK to remove Healthy recovery partition?
As a tech blogger, I would approach the question of removing the Healthy recovery partition with caution. Here are a few steps and reasons to consider:
1. Understand the purpose of the recovery partition: The recovery partition contains essential files and tools to troubleshoot and recover your operating system in case of critical issues. It allows you to access recovery options to restore or repair your system if it becomes unbootable. Removing this partition could limit your ability to recover from certain software or system failures.
2. Evaluate your specific needs: If you are running low on disk space and need to free up some storage, removing the recovery partition may seem tempting. However, it’s important to assess whether the gains in disk space outweigh the potential risks. Consider whether you have other backup methods or external recovery options in place.
3. Consider alternative options: Instead of removing the recovery partition entirely, you can explore other ways to manage disk space. For example, you can use disk cleanup tools to remove temporary files, uninstall unnecessary applications, or move personal files to external storage devices.
4. Backup your important data: Before making any changes to your system, it’s crucial to back up your important files and data. This step ensures that you have a copy of your data in case anything goes wrong during the partition removal process.
5. Seek expert advice: If you’re uncertain about removing the recovery partition or its implications, it’s always a good idea to consult with an expert or seek advice from the official support channels. They can provide you with specific guidance based on your system’s configuration and any potential risks involved.
Remember, altering system partitions can have significant consequences, and it’s essential to carefully weigh the advantages and drawbacks before making any decisions.
What is healthy recovery partition for?
A healthy recovery partition plays a crucial role in maintaining the integrity and functionality of your device. Here’s why it is important:
1. System Recovery: A recovery partition is primarily designed to assist in system recovery. It stores key files and data required to restore your device to its original factory settings in case of software or system failures.
2. Troubleshooting Assistance: When your device encounters any software-related issues, the recovery partition allows you to access various troubleshooting tools and options. This includes performing system restores, repairing corrupt files, and resolving booting problems.
3. Operating System Reinstallation: In situations where your operating system becomes unstable or needs to be reinstalled, the recovery partition can facilitate the process. It contains the necessary installation files, allowing you to restore the operating system easily without requiring external media.
4. Data Backup and Restoration: Some recovery partitions allow for the creation and restoration of system backups. By utilizing this feature, you can safeguard your important files and settings, enabling a swift recovery after a reinstallation or system restore.
5. Time-Saving Solution: Having a recovery partition eliminates the need for external recovery media, such as DVDs or USB drives. This saves time and effort, particularly in critical situations where immediate action is required.
6. Increased Reliability: By having a dedicated partition for system recovery, the risk of accidental deletion or corruption of critical system files is minimized. This enhances the overall stability and reliability of your device.
It’s important to note that the steps to access and utilize the recovery partition may vary slightly depending on the device and operating system you are using. Therefore, referring to the specific documentation or support resources provided by the manufacturer is advisable in order to maximize the potential benefits of the recovery partition.
What is the recommended recovery partition size?
When considering the recommended recovery partition size, there are several factors to take into account. Here are the steps to determine the appropriate size:
1. Assess the system requirements: The recovery partition contains essential files for system recovery in case of any issues or failures. To determine the recommended size, it’s important to consider the system requirements of the operating system and any software installed. Check the official documentation or manufacturer’s guidelines for these specifications.
2. Estimate the space needed for system restoration: Consider the space required to store a complete backup of your operating system, including all essential files, configurations, and potentially installed applications. This estimation can vary depending on the operating system version and your specific usage patterns.
3. Evaluate available storage capacity: Assess the overall storage capacity of your device and allocate a reasonable proportion to the recovery partition. It should be large enough to accommodate system recovery needs while not significantly impacting your primary storage requirements.
4. Account for future updates and upgrades: Take into consideration the potential growth of the operating system and any updates or upgrades that might be released in the future. A recovery partition that’s too limited in size might hinder the ability to restore updated versions of the OS effectively.
5. Consider additional recovery options: Besides the recovery partition, modern operating systems offer other recovery options such as bootable USB drives or network-based recovery. If you regularly backup your system or have alternative recovery methods, you might not need an excessively large recovery partition.
Ultimately, there is no one-size-fits-all answer to the recommended recovery partition size. It depends on your specific setup, the operating system requirements, and your personal preferences. It’s crucial to strike a balance between allocating sufficient space for system recovery and optimizing your overall storage capacity.
A healthy Windows recovery partition is essential for a stable system. It helps your computer recover quickly when things go wrong. For instance, Windows 10 automatically creates a 450 MB partition on SSD drives. This is key for fixing and restoring your system.
Brands like Dell and HP add their own recovery partitions. These often have more space than the standard Windows recovery ones. These tools let you reset your system easily to its original settings.
It might be tempting to delete recovery partitions to free up disk space. But, this can cause problems. You might lose access to important recovery tools. That’s why making a backup, like a recovery disk, is crucial. It’s a safety net to prevent losing your data.
Introduction to Healthy Recovery Partitions
Knowing the parts of your system’s hard drive is key for great performance. A healthy recovery partition is vital for keeping your computer working well, especially when unexpected troubles happen. We will explain what recovery partitions are and why they’re so important.
Definition and Purpose
A recovery partition is a special space on your system hard drive for fixing your system. Its main job is to reset the Windows operating system back to how it was originally. This lets you fix and troubleshoot your computer without extra tools.
Types of Recovery Partitions
There are mainly two kinds of recovery partitions in Windows systems:
- Windows Recovery Environment (WinRE): This is like a helper operating system for fixing problems, installed next to Windows. It lives in a separate partition and helps with starting problems, restoring the PC, and more. WinRE is usually placed right after the main Windows partition.
- OEM Factory Recovery Partition: This is made by the computer’s maker and has the original system, drivers, and apps. Its goal is to put the system back to how it was when you first got it. This partition is set up by the manufacturer to restore the original settings.
A healthy recovery partition is key for modern operating systems. It’s a backup to restore the system if big problems arise. The Windows Recovery Environment (WinRE) and OEM Factory Recovery Partition are crucial. Let’s explore why these parts are so important.
Windows Recovery Environment (WinRE)
WinRE is crucial for operating systems like Windows 11 and others down to Windows 7. It helps fix common issues and helps start the system when it won’t boot normally. With WinRE, you can get to tools like system reset and command prompts. These help fix major problems without needing to reinstall the software. Right-click options and commands like Windows PowerShell (Admin) help use WinRE effectively.
OEM Factory Recovery Partition
An OEM Factory Recovery Partition is set up by the computer’s makers, like HP and Dell. It lets you reset your computer back to how it was when you first got it. This erases all changes made since it was set up. You use a special key at startup to reach this option. It usually needs more disk space than a standard Windows partition. This reset is great for solving big issues and getting your computer working like new again.
In short, WinRE and OEM Factory Recovery Partition are vital for a viable recovery partition. They offer both minor and major solutions for fixing your system. Knowing and using these options can save you a lot of headaches. They keep your operating system working well and reliable.
Key Benefits of Having a Healthy Recovery Partition
A healthy recovery partition has many key benefits for users and IT experts. It keeps a special area on your hard drive for fixing your system. This helps keep your system stable and your data safe.
System Restoration
A big plus of a healthy recovery partition is easy system restore. If you hit a major system snag, a recovery partition can be a lifesaver. It lets you reset your system quickly, wiping current data and settings but getting your device back to working order.
This ensures you don’t wait too long to fix problems. It returns your system to a stable, known state fast.
Data Protection
Better data protection is another huge benefit. The recovery partition acts as an important backup, keeping your info safe during system crashes. It has drivers, apps, and important files for your device, offering a safety net if problems arise.
Users can access this partition by restarting their computer and entering a special mode. This makes sure your data is safe, even in emergencies.
Managing Recovery Partitions: Best Practices
Managing recovery partitions well is key to keeping your system healthy and ready for any situation. It’s about doing things like backing up often and using tools for managing disks smartly. This avoids losing data or having system problems.
Regular Backups
It’s crucial to back up your system often. By creating a system image, you can bring your system back to a known good point if needed. This is great for when systems fail or get infected. It saves your personal info and the state of your system, offering a strong way to recover.
Such backups do more than the default recovery partition. They give you wider protection.
Using Disk Management Tools
Using disk management tools rightly is a must for managing recovery partitions. Windows has tools like Disk Management and DiskPart for tasks like deleting and managing partitions. The mbr2gpt tool, found in Windows 10 1809 and Windows Server 2019, makes switching from MBR to GPT easy. This is good for UEFI and Secure Boot.
Third-party tools like AOMEI Partition Assistant offer even more options. They come in handy when Windows tools aren’t enough. For example, they help move the WinRE partition for better system performance. Being careful with these tools prevents data loss and keeps recovery options safe.
About 75% of users think about removing the Windows Recovery Partition. But, it’s important to know what that means. Deleting these without understanding can block system restoration. So, being informed and careful with disk management tools is crucial for your system’s well-being.
Conclusion
A healthy recovery partition is key for your computer’s repair and data protection strategies. It helps fix your system and keeps your data safe. To keep your computer ready for any problems, manage your recovery partition well. Using tools like AOMEI Partition Assistant Professional for regular backups and disk management is a smart move.
Recovery partitions usually need about 18GB, more so with Windows 11. While removing it might seem like a good idea to get more space, think carefully about the risks. For those getting messages that the recovery drive is full, using AOMEI Partition Assistant Professional to adjust space is a wise choice. It helps with tasks like scheduling defrags and making quick partitions.
Experts often say not to delete recovery partitions. They’re your backup plan for fixing system problems. Tools like 4DDiG Partition Manager make it safe to handle disk partitions. By keeping an eye on your recovery partition and managing disk space well, you’ll make your system more efficient and reliable.
I want to extend C because there is a healthy (recovery partition) ‘in-between’ the 8GB that is not allocated. I’ve read that a partition exists between C and the unallocated disk, hence, I can’t extend the C drive. I have Windows 10 Insider. How can I make the C drive bigger? What will happen if I remove the Healthy (Recovery Partition)?
Best Answered by
Cici· Answered on Apr 01, 2025
No, you can’t delete it. A healthy recovery partition is used to store vital system recovery data(such as a copy of the operating system, system restore points, and device drivers) that can restore your system to its original state or perform system repairs. Removing Thus, it’s not recommended to delete the healthy if you don’t want to encounter any system failure or malfunction.
Don’t worry. I will provide a perfect partition manager, EaseUS Partition Master Professional, which can extend the system C drive with non-adjacent unallocated space or even no unallocated space.
Option 1. Extend the C drive with Non-adjacent Unallocated Space
1. Launch EaseUS Partition Master, right-click the C partition, and select «Resize/Move.»
2. To add space to the C drive, drag its end into the unallocated space. Click «OK».
3. Click the «Execute Task» > «Apply» options to execute the operations.
Option 2. Extend the C drive without Unallocated Space
1. Choose and right-click a partition with significant free space on the system disk, and choose «Allocate Space.»
2. Select the system drive in the Allocate Space From (*) To box, and drag the end of the C drive into the unallocated space. Click «OK» to continue.
3. Click «Execute Task» and «Apply.»
If you already did a full backup for your system disk, you can refer to the tutorial below to delete the healthy recovery partition:
🔥Further Reading: Fix Can’t Delete the Healthy Recovery Partition
A Recovery Partition is a crucial partition for Windows 11/10. Windows creates this partition automatically when you perform a Clean Installation of Windows OS or Upgrade Windows OS. It contains the system image and other crucial operating system files that are required to restore the Windows OS to a working state when a problem occurs. This article shows how to add a Recovery Partition in Windows 11/10.
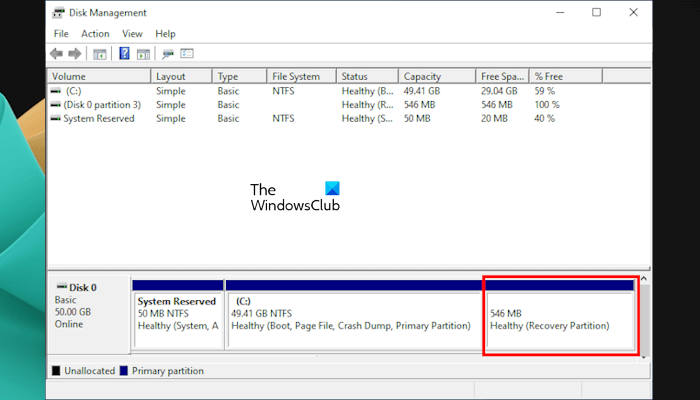
Recovery Partition in Windows 11
The Recovery Partition does not have a drive letter. Therefore, it is not visible in the File Explorer. You can view it in the Disk Management app. However, some users found the Recovery Partition missing from their computers. If this is the case with you, you can add a Recovery Partition in Windows 11/10 manually. This article shows how to do that.
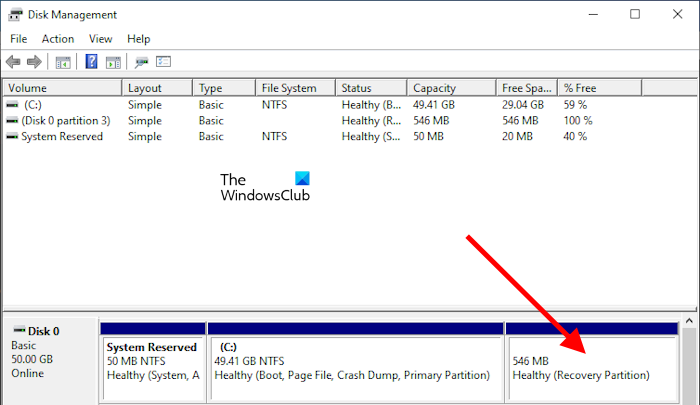
If you are a Windows user, you might have heard about Windows Recovery Environment, and some of you might have accessed it. WinRE is the short term used for Windows Recovery Environment. If the Recovery Partition is missing on your system or you have accidentally deleted it, you cannot boot into the Windows Recovery Environment.
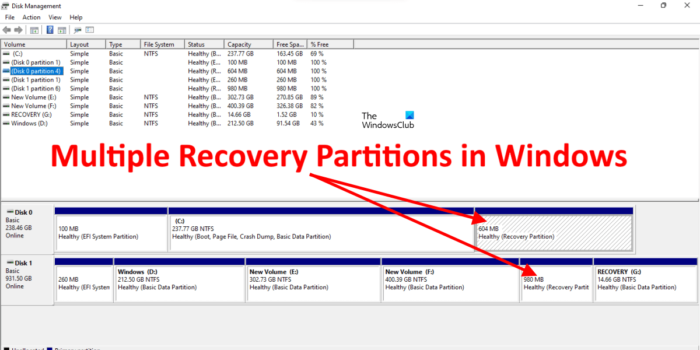
Some reports also show that users found more than one Recovery Partition on their computer systems. This happens when you upgrade the Windows operating system from a lower version to a higher version, say from Windows 10 to Windows 11, and there is not enough space on the existing Recovery Partition for the upgrade. In this case, Windows creates another Recovery Partition and leaves the previous Recovery Partition as it is. In such cases, you can delete the older Recovery Partition.
You will also find two Recovery Partitions on your computer if the OEM creates one and the other is created while installing the Windows OS.
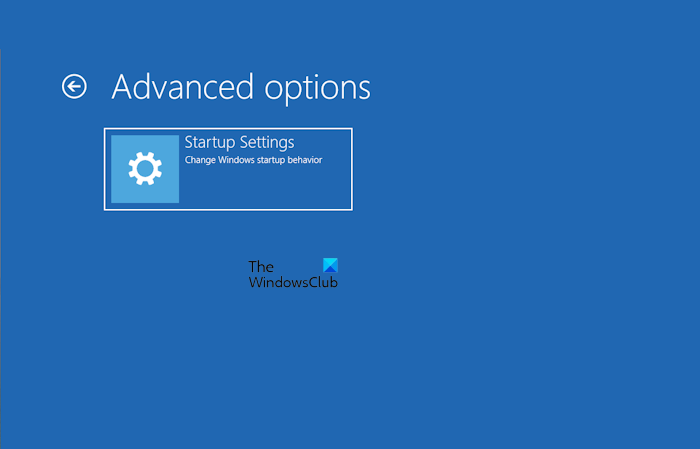
When the Recovery Partition is missing, you will not find the Advanced Recovery Options in the Windows Recovery Environment (refer to the above image).
How to view Windows Recovery (WinRE) file on Windows 11/10
The WinRE file is the Windows Recovery Environment file that contains the system image and other crucial operating system files needed to perform required actions in the Windows Recovery Environment. This file is located in the root directory but is hidden. To view this file, you have to force Windows 11/10 to show the hidden files and protected system files.
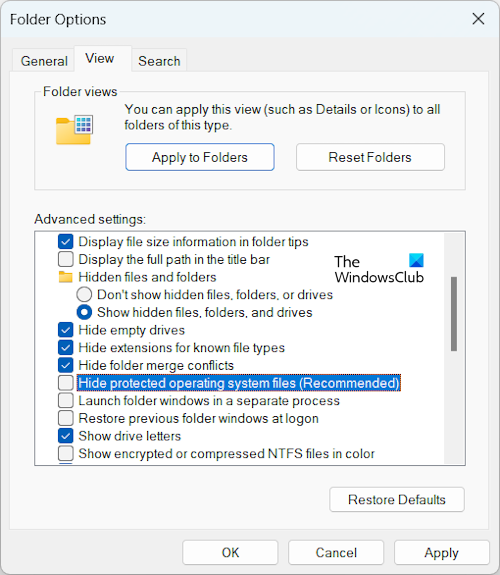
To force Windows to display the protected operating system files, follow the steps provided below:
- Open File Explorer.
- In Windows 11, click on the three dots and select Options. In Windows 10, go to View > Options.
- Select the View tab.
- Uncheck the Hide protected operating system files (recommended) checkbox.
- Click Apply and then click OK.
Now, go to the following location in File Explorer:
C:\Windows\System32\Recovery
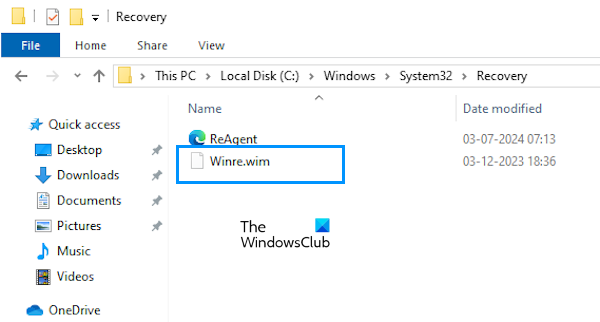
You will see the Winre.wim file there. It is the Windows Recovery Environment file.
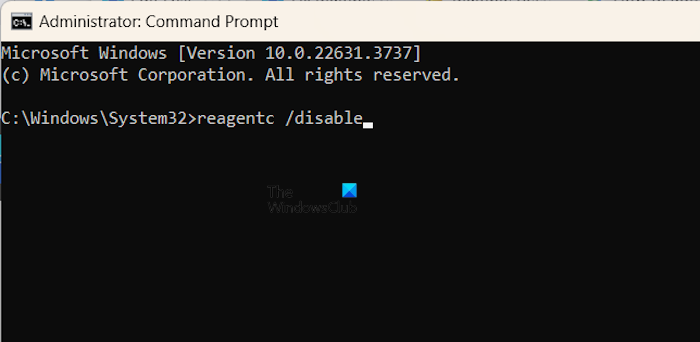
If you do not see this file, disable the Windows Recovery Environment by executing the following command in the elevated Command Prompt window.
reagentc /disable
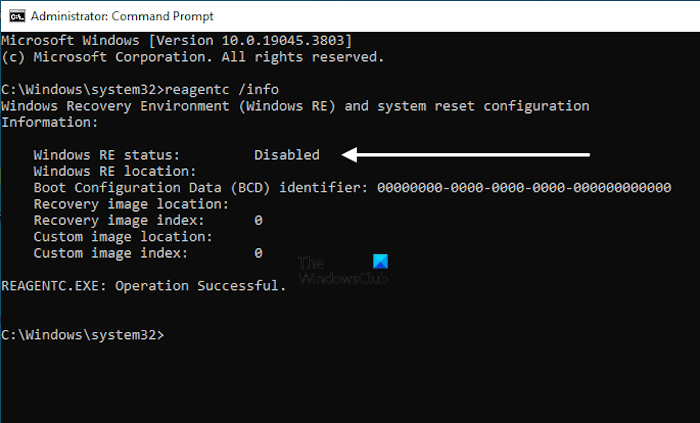
As you run the above command, the Winre.wim file will appear on the above-mentioned location on your C drive. The following command will show you the status of the Windows Recovery Environment.
reagentc /info
To create or add a Recovery Partition on Windows 11/10, you have to create a new partition on your C drive without assigning a drive letter, then assign it the ID of Recovery Partition based on the partition style of your hard disk.
To view your hard disk’s partition table, open the Disk Management app, right-click on your hard disk, and select Properties. Then, go to the Volumes tab to view its partition style.
Let’s see this process.
First, create a new Recovery Partition in Disk Management. Follow the steps provided below:
- Open Disk Management.
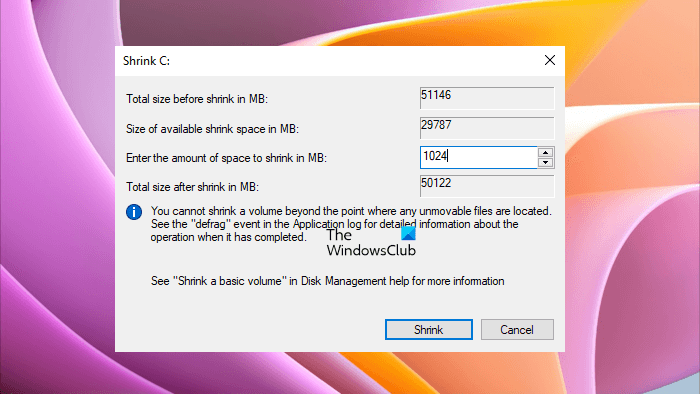
- Right-click on your C drive and select Shrink Volume.
- Enter 1024 and click Shrink. This will create a new Unallocated volume of 1 GB next to your C drive.
- Now, right-click on the Unallocated volume and select New Simple Volume.
- Click Next and select the Do not assign a drive letter or drive path option.
- Click Next and select the Format this volume option. Name this partition as Recovery Partition, and click next.
- Click Finish.
After performing the above steps, a new partition with the name Recovery Partition has been created. However, this partition does not contain the system image needed for the Windows Recovery Environment.
Now, open Command Prompt as an administrator and type the following command. Hit Enter after that.
diskpart
The above command will launch the Diskpart tool in the Command Prompt. Enter the following commands and hit Enter after entering each command:
list disk

select disk #

list partition

select partition #
In the above commands, replace # with the correct Disk number and Partition number. The Recovery Partition has an ID 27 (if the hard disk is MBR) and it is displayed as Type in the cmd. You have to assign this ID to the newly created Recovery Partition.
Now, type the following command and hit Enter:
detail partition
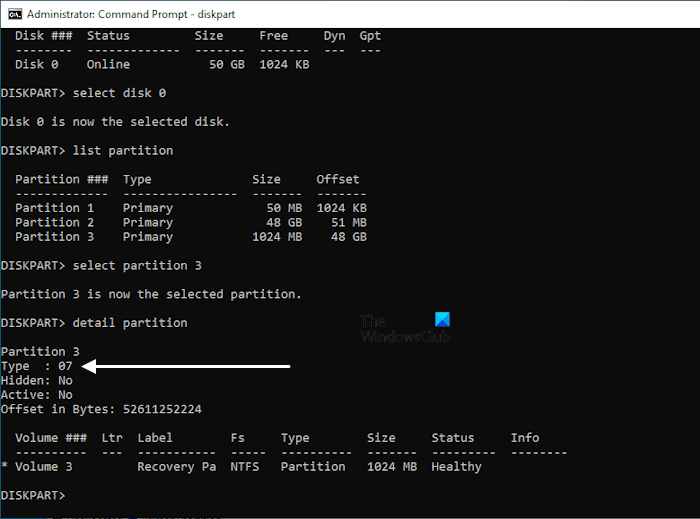
The above command will show you the details of the newly created Recovery Partition. That partition does not have ID 27 (refer to the above image). Set the ID=27 if the partition style of your hard disk is MBR.
Change the partition ID of the new Recovery Partition by executing the following command:
set id=27
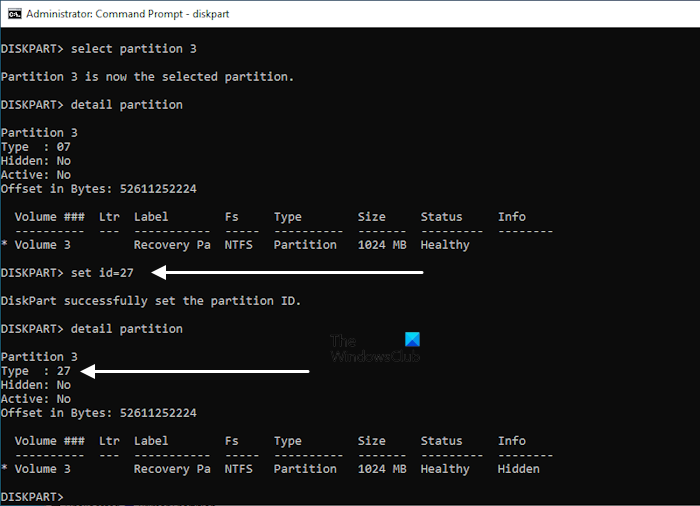
After the successful execution of the above command, the Winre.wim file will be copied to the new Recovery Partition. To confirm, you can view the details of the Recovery Partition. First, exit the Diskpart then type the following command:
reagentc /info
If your hard disk has a GPT partition style, you need to replace the ID 27 with the following ID:
de94bba4-06d1-4d40-a16a-bfd50179d6ac
Hence, in this case, the command will be:
set id=de94bba4-06d1-4d40-a16a-bfd50179d6ac
Those who have a GPT partition style have to execute one more command.
gpt attributes=0X8000000000000001
Now, the Recovery Partition has been created on your GPT hard disk.
That’s it. I hope this helps.
These posts will help you if you receive errors:
- REAGENTC.EXE The Windows RE image was not found
- REAGENTC.EXE Operation failed, An error has occurred
How to enable Recovery Partition in Windows?
The Recovery Partition is enabled or active by default on Windows 11/10. You need not enable it manually. You can check its status by executing the reagentc /info command in the elevated Command Prompt window. If it shows the status of the Recovery Partition disabled, you can enable it by running the reagentc /enable command in the Command Prompt as administrator.
Is recovery partition necessary?
A Recovery Partition contains a file called Winre.wim. This file contains the system image and other necessary files required to restore your system to a working state if any problem occurs. Recovery Partition also allows you to repair corrupted Windows OS. Therefore, a Recovery partition is necessary on Windows.
Read next: How to use Recovery Drive to restore Windows.


