
С помощью HDR в Windows 11 можно добиться наилучших результатов при использовании режима HDR на телевизоре или мониторе компьютера. При подключении телевизора или дисплея с поддержкой HDR10 к компьютеру с Windows, который поддерживает режимы HDR и WCG, можно получить более яркое, насыщенное и детализированное изображение по сравнению с дисплеем в стандартном динамическом диапазоне (SDR).
В Microsoft Store появляется все больше HDR-приложений и игр. Чтобы найти игры с поддержкой HDR, посетите веб-магазин Microsoft Store. Для просмотра фильмов и видео в режиме HDR в Интернете вам может понадобиться изменить некоторые параметры. Чтобы вы могли играть в HDR-игры и пользоваться HDR-приложениями, ваши компьютер и дисплей должны соответствовать определенным аппаратным требованиям. Подробные сведения см. в разделе Требования к отображению видео в формате HDR.
Если компьютер и дисплей поддерживают режим HDR, включите его, чтобы начать работу.
-
Нажмите кнопку Пуск и введите параметры. Выберите Параметры > Системный > Дисплей .
-
Если к вашему компьютеру подключено несколько экранов, выберите экран с поддержкой HDR в верхней части страницы.
-
Включите параметр Использовать HDR.
Параметры электропитания мониторов с поддержкой HDR
Воспроизведение содержимого в формате HDR при работе ноутбука от батареи может уменьшить время ее работы. Поэтому производитель вашего компьютера мог по умолчанию отключить режим HDR при питании от батареи.
Если при подключении к ноутбуку включен режим HDR, функция HDR будет отключена, чтобы сэкономить заряд аккумулятора при его отключении. Если вы снова подключите ноутбук к электросети, режим HDR включается автоматически.
Примечание: Экран может временно стать черным при включении и отключении HDR или после подключения или отключения ноутбука от электросети.
-
Нажмите кнопку Пуск и введите параметры. Выберите Параметры > Системный > Дисплей .
-
Выберите дисплей с поддержкой HDR в верхней части экрана.
-
Выберите HDR.
-
Выберите раздел Использование HDR, чтобы развернуть его, а затем снимите флажок Отключить HDR с компьютером, работающим от батареи проверка или Отключить потоковую передачу видео в ФОРМАТЕ HDR, когда мой компьютер работает от аккумулятора проверка.
Если режим HDR уже был включен, когда ноутбук подключен к электросети, режим HDR останется включенным, если вы отключите компьютер от электросети и он будет работать от батареи.
Устранение распространенных проблем
Многие современные HDR-дисплеи предназначены в основном для просмотра фильмов и видео в режиме HDR. Поэтому иногда нужно выполнить некоторые действия, чтобы добиться максимального результата при использовании дисплея HDR в Windows. Если вы собираетесь приобрести новый дисплей HDR, рекомендуется выбрать дисплей с сертификатом HDR. Эти дисплеи разработаны и протестированы для всесторонней работы в режиме HDR на компьютере, включая HDR-игры и HDR-приложения.
Если у вас возникли проблемы с отображением содержимого в формате HDR на компьютере, вы можете попытаться устранить их с помощью приведенных здесь инструкций. Выберите любой элемент, и он откроется для отображения дополнительных сведений:
-
Убедитесь, что на вашем мониторе или телевизоре включен режим HDR. Способ доступа к экранному меню на телевизоре HDR или дисплее зависит от модели и модели. Посетите веб-сайт производителя вашего монитора или телевизора, чтобы ознакомиться с документацией.
-
Перейдите в раздел Параметры > Система > Дисплей и убедитесь, что параметр Потоковое видео в режиме HDR включен.
-
Убедитесь, что компьютер с Windows соответствует требованиям, предъявляемым к аппаратному обеспечению для отображения содержимого в формате HDR, и узнайте, поддерживает ли ваш дисплей формат HDR10. Ниже описано, как это сделать.
-
Нажмите клавишу Windows + R, введите dxdiag и выберите OK.
-
Нажмите Да в окне запроса.
-
В средстве диагностики DirectX на вкладке Система просмотрите область Сведения о системе.
-
Чтобы сохранить данные в файл, нажмите Сохранить все сведения, а затем укажите имя текстового файла и сохраните его.
-
Откройте текстовый файл и найдите значение параметра Дополнительные цвета. Здесь содержатся сведения о конфигурации и состоянии HDR вашего экрана. Вам нужно найти следующие значения.
-
AdvancedColorSupported. Это означает, что ваш дисплей и установленный драйвер дисплея поддерживают HDR10.
-
AdvancedColorEnabled. Это означает, что режим HDR для вашего экрана в настоящее время включен.
-
-
Проверьте значение параметра Возможности монитора. Там содержатся более подробные сведения о возможностях вашего экрана.
-
Если значением является HDR поддерживается, это означает, что ваш экран поддерживает HDR10. Дополнительные значения могут быть заключены в скобки.
-
BT2020RGB или BT2020YCC. Одно из этих цветовых пространств должно отображаться для дисплея, который считается дисплеем с поддержкой HDR10.
-
Eotf2084Supported. Экран может считаться совместимым с HDR только в случае, если присутствует это значение.
-
-
Если значением является HDR не поддерживается, это означает, что экран не соответствует требованиям для HDR10.
-
-
На ноутбуках с поддержкой HDR параметры управления питанием по умолчанию отключают HDR при питании от батареи. Чтобы включить HDR, выполните одно из следующих действий.
-
Подключите свой ноутбук к сети питания (рекомендуется).
-
Разрешите потоковую передачу видео в формате HDR, если компьютер работает от аккумулятора.
Обратите внимание, что если разрешить HDR при работе от батареи, уровень заряда будет расходоваться быстрее.
При первом подключении внешнего монитора к ноутбуку, Windows по умолчанию дублирует рабочий стол на обоих мониторах. Однако режим HDR в этой конфигурации не поддерживается. Для просмотра содержимого HDR на внешнем мониторе или телевизоре с поддержкой HDR расширьте рабочий стол на оба монитора.
-
Нажмите кнопку Пуск и введите параметры. Выберите Параметры > Система > Дисплей.
-
В верхней части экрана выберите Расширить эти экраны.
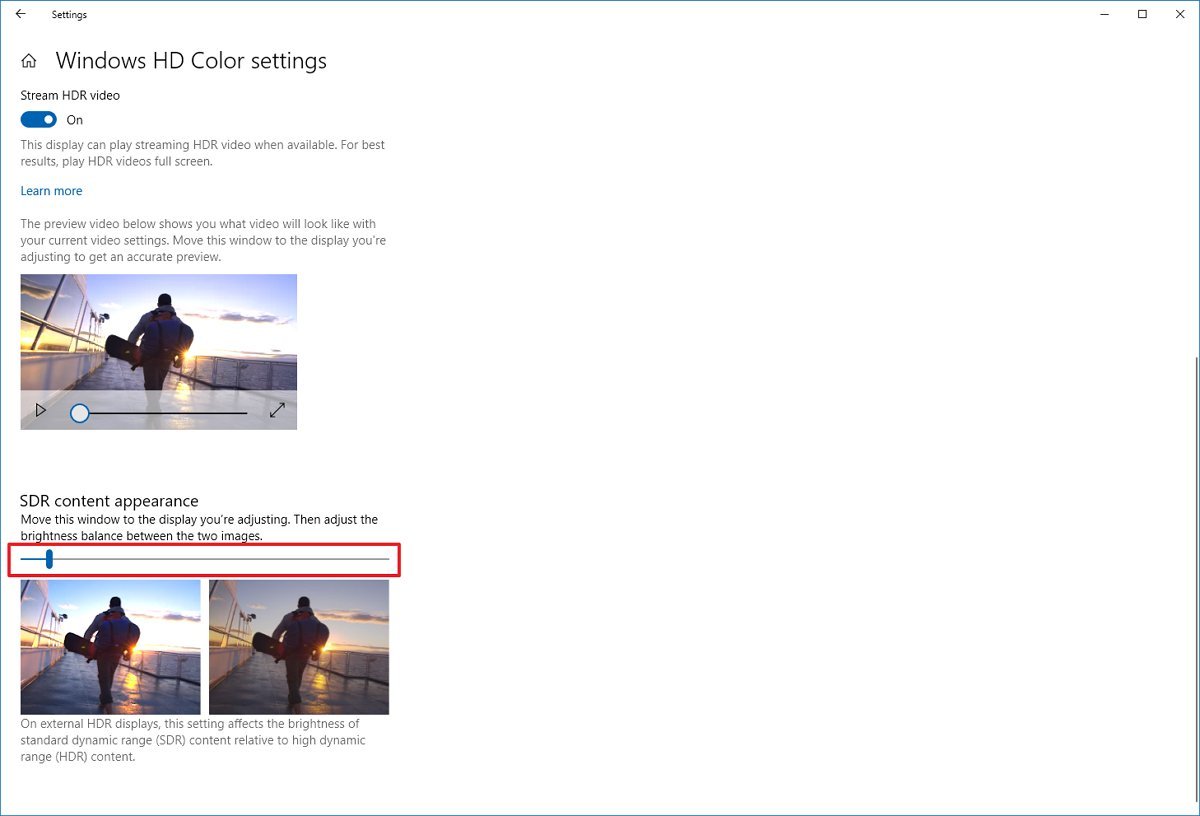
Может потребоваться настроить относительный уровень яркости содержимого в режимах SDR и HDR для вашего дисплея с поддержкой HDR. Это связано с тем, что дисплей по-разному интерпретирует сигнал HDR и SDR, и эти результаты будут отличаться в зависимости от производителя и модели.
-
Нажмите кнопку Пуск и введите «параметры». Выберите Параметры > Система > Дисплей.
-
Если к вашему компьютеру подключены несколько дисплеев, выберите дисплей с поддержкой HDR в верхней части экрана и переместите окно приложения «Параметры» на HDR-дисплей, который вы настраиваете.
-
На экране параметров Дисплей выберите Потоковое видео в режиме HDR.
-
В разделе Яркость SDR-содержимого или Яркость HDR-содержимого перетащите ползунок, чтобы добиться правильного баланса яркости между содержимым в режимах HDR и SDR.
Примечания.
-
При изменении параметра Яркость SDR-содержимого для внешнего дисплея с поддержкой HDR или параметра Яркость HDR-содержимого для встроенного дисплея с поддержкой HDR эффект, оказываемый им на SDR-содержимое, зависит от того, какой дисплей используется — внешний или встроенный дисплей с поддержкой HDR.
-
На внешнем дисплее с поддержкой HDR этот параметр будет изменять уровень яркости SDR-содержимого относительно HDR-содержимого.
-
На встроенном дисплее с поддержкой HDR за контроль уровня яркости SDR-содержимого отвечает отдельный параметр яркости либо он может контролироваться автоматически. (Дополнительные сведения см. в разделе Изменение яркости экрана в Windows 10.) Так как уровень яркости SDR-содержимого уже задан, параметр Яркость HDR-содержимого будет изменять яркость HDR-содержимого относительно яркости SDR-содержимого.
-
-
Для встроенных HDR-дисплеев, например на ноутбуках, поддерживающих HDR, на внешний вид HDR-содержимого влияют и параметр яркости, и параметр Яркость HDR-содержимого.
-
Параметр яркости. При просмотре HDR-содержимого при ярком свете может потребоваться увеличить уровень яркости для просмотра изображения на дисплее. Однако это сократит как эффективный динамический диапазон для HDR-содержимого в приложениях, так и общий контраст, поскольку темные пиксели будут ярче. Для улучшения отображения HDR-содержимого просматривайте HDR-содержимое при слабом освещении и используйте довольно низкие настройки яркости. Если выбран очень низкий уровень яркости, это увеличивает общую контрастность между яркими и темными участками содержимого. Однако это приводит к меньшей детализации темных участков изображений. Например, если в фильме есть сцена, в которой показана тускло освещенная комната ночью, в этой сцене, возможно, будет видно меньше деталей.
-
Параметр Яркость SDR-содержимого или Яркость HDR-содержимого. В большинстве случаев использование параметра яркости SDR- или HDR-содержимого по умолчанию либо близких к ним настроек дает хороший результат. Вы можете повысить параметр яркости SDR- или HDR-содержимого, чтобы улучшить общую контрастность между яркими и темными участками изображений. Однако это снизит детализацию темных участков содержимого, например сцены в темном помещении ночью.
-
Некоторые приложения в SDR выглядят темнее на дисплее с поддержкой HDR по сравнению с другими приложениями в SDR, отображаемыми на том же дисплее. Это может происходить с приложениями, которые не поддерживают параметр Яркость SDR-содержимого или Яркость HDR-содержимого. Вот несколько способов решения этой проблемы:
-
Если у вас одновременно настроены несколько дисплеев для работы с дисплеями с поддержкой SDR и HDR, переместите приложение на дисплей с поддержкой SDR.
-
Если вы используете внешний дисплей с поддержкой HDR, переместите ползунок Яркость SDR-содержимого в сторону уменьшения. Это приведет к тому, что более яркое содержимое SDR будет выглядеть темнее, чтобы у всего содержимого SDR был одинаковый уровень яркости. После этого используйте экранное меню на телевизоре или дисплее с поддержкой HDR, чтобы увеличить яркость до нужного уровня.
Примечание. Если вы настроили параметр яркости SDR- или HDR-содержимого, но яркость содержимого SDR в некоторых приложениях не изменилась, попробуйте перезапустить приложение.
-
Если вы используете ноутбук со встроенным дисплеем с поддержкой HDR, переместите ползунок Яркость HDR-содержимого в сторону уменьшения. Это приведет к тому, что приложения, которые выглядели слишком темными, будут выглядеть светлее, чтобы у всех приложений SDR был одинаковый уровень яркости.
Примечание. Если вы изменили параметр Яркость SDR-содержимого или Яркость HDR-содержимого, но яркость некоторых приложений не изменилась, или если содержимое SDR выглядит слишком ярким и с минимальным уровнем насыщенности, попробуйте перезапустить приложение.
-
Убедитесь, что установлены последние графические драйверы (WDDM). Чтобы получить последние версии драйверов, перейдите в Центр обновления Windows в разделе Параметры или посетите веб-сайт изготовителя компьютера.
-
Если вы используете подключение через HDMI, а ваш дисплей поддерживает HDR через DisplayPort, соедините компьютер и дисплей через DisplayPort.
-
Если единственным вариантом подключения является HDMI, используйте его, а затем выполните одно из следующих действий:
Уменьшите частоту обновления
-
В приложении «Параметры» выберите Система > Дисплей > Дополнительный дисплей.
-
В параметрах Дополнительный дисплей в разделе Выберите частоту обновления выберите 30 Гц (если доступно).
— ИЛИ —
Уменьшите разрешение
-
В разделе Параметры выберите Системный > Дисплей > Дополнительно, а затем выберите Свойства адаптера отображения.
-
На вкладке Адаптер выберите Список всех режимов.
-
В разделе Список всех режимов выберите параметр с разрешением 1920 x 1080, 60 Гц, а затем нажмите кнопку OK.
На ноутбуках с поддержкой HDR параметры управления питанием по умолчанию отключают HDR при питании от батареи. Это может привести к недостаточно насыщенным цветам после перезагрузки компьютера. Чтобы избежать этого, подключите ноутбук перед его перезапуском или измените параметры питания, чтобы обеспечить включение HDR при работе от аккумулятора.
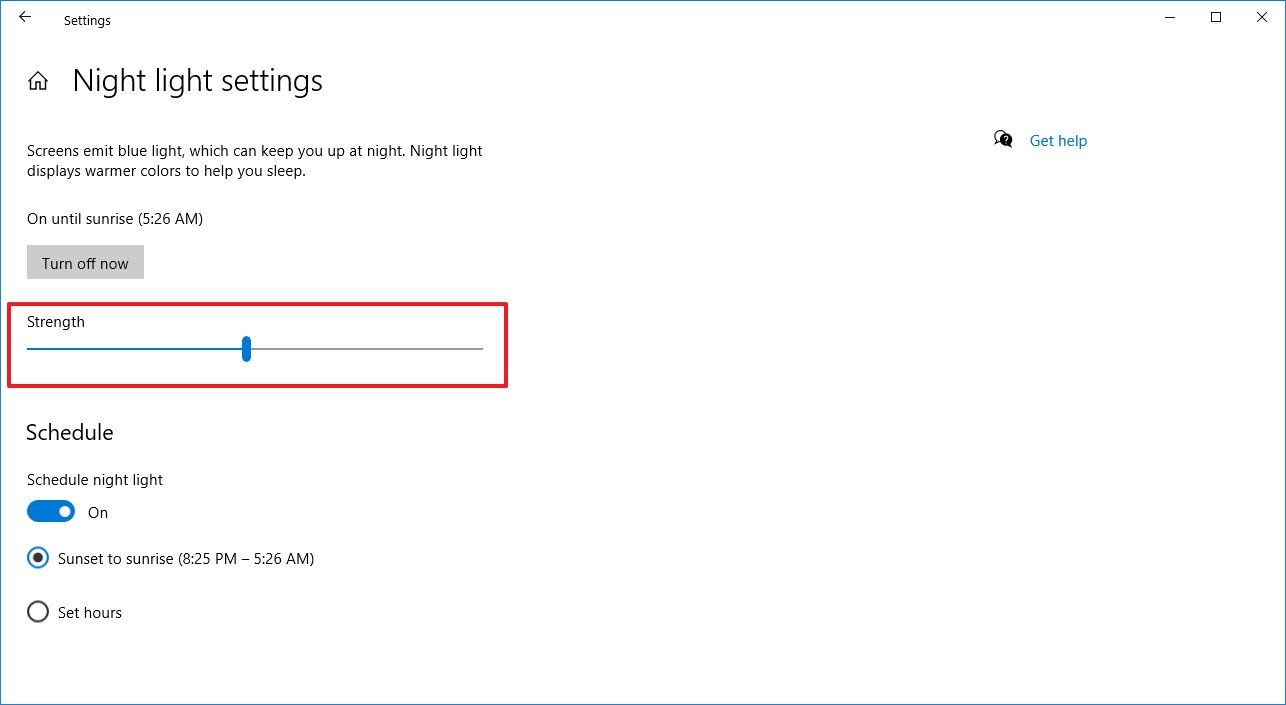
Если ночной свет включен, цвета на экране могут иметь красный оттенок, а содержимое может быть нечитаемым. Это зависит от уровня ночного света. Вот как можно обойти эту проблему.
Возможное решение:
-
Перейдите в раздел Параметры > Система > Дисплей > Ночной свет.
-
В параметрах Ночной свет выполните одно из следующих действий.
-
Если ночной свет включен, перетащите ползунок Интенсивность влево, чтобы уменьшить затемнение красного цвета на дисплее.
-
Выберите Выключить сейчас, чтобы выключить ночной свет.
-
Дополнительные сведения о ночном свете см. в разделе Настройка ночного света для дисплея в Windows.
Многие дисплеи с поддержкой HDR поддерживают более широкую цветовую палитру, чем sRGB. Если функция HDR включена, дисплей HDR должен правильно воспроизводить цвета sRGB, используемые в классических приложениях. Однако некоторые дисплеи с поддержкой HDR делают это неправильно. При покупке дисплея с поддержкой HDR выбирайте дисплей с сертификатом HDR и предварительно ознакомьтесь с отзывами о точности передачи цвета этим дисплеем.
Мы внимательно отслеживаем отзывы клиентов, связанные с HDR, и знаем о отчетах о новых мониторах, которые поддерживают как VESA DisplayHDR, так и DolbyVision, но, по-видимому, предоставляют различные возможности воспроизведения цвета, что не ожидается. DolbyVision можно считать надмножеством гарантий сертификации, предоставляемых DisplayHDR, и это основная причина, по которой Windows автоматически выбирает DolbyVision, когда он доступен.
Содержимое HDR10 в Windows должно отображаться точно независимо от того, настроен ли монитор компьютера в сертифицированном режиме DisplayHDR или DolbyVision. В обоих режимах монитора сопоставление тонов происходит на GPU с использованием цветовой информации, полученной с монитора, перед составлением окончательного изображения рабочего стола, которое может объединять содержимое нескольких окон приложений, отображаемых в разных цветовых пространствах. Windows использует GPU для применения этого сопоставления тонов с использованием связанных метаданных содержимого. Это сопоставление тонов всегда выполняется для исходного содержимого перед композицией, и от монитора в режиме DisplayHDR или DolbyVision не ожидается дополнительного сопоставления тон на основе содержимого. Это верно независимо от того, отображается ли содержимое в развернутом окне. Обратите внимание, что на платформах, отличных от Windows, сопоставление тонов может быть реализовано по-разному и может полагаться на монитор для выполнения сопоставления тонов на основе содержимого.
Мы знаем о мониторах, которые могут ограничить максимальную яркость около 450 нит в режимах DolbyVision и DisplayHDR, но в некоторых случаях может существовать параметр конфигурации, доступный в меню экранного дисплея монитора (OSD), чтобы включить не сертифицированный режим HDR10, который разблокирует максимальные уровни яркости до 1000 нит.
(Image credit: Windows Central)
On Windows 10, you can play high dynamic range (HDR) content on an HDR10 compatible built-in display or external monitor (or TV) connected to your computer.
HDR is a technology that has been designed to improve the contrast and color of the content you see on the screen. Unlike standard dynamic range (SDR), high dynamic range offers brighter, more vibrant, and a wide range of color details for better image quality on supported videos, games, and apps.
Although on capable smart TVs, the HDR technology just works, on desktop computers and laptops running Windows 10, it’s not that simple. You have to make sure that your device meets the minimum requirements. You have to turn on HDR on display and the OS manually, and you may come across several problems.
In this Windows 10 guide, we’ll walk you through the steps to resolve common problems using HDR displays for games and apps.
- How to fix HDR display not working on Windows 10
- How to fix HDR option not available on Windows 10
- How to fix HDR color not showing correctly on Windows 10
- How to fix HDR color problems with night light on Windows 10
- How to fix HDR brightness problems on Windows 10
- How to fix SDR brightness problems on HDR display on Windows 10
How to fix HDR display not working on Windows 10
Before you can start using your display for HDR content, you have to make sure the display is HDR-compatible, and you have to enable the feature on the external display (if applicable) and on Windows 10.
Confirm HDR compatibility
To check if the display is capable of HDR content on Windows 10, use these steps:
- Open Start.
- Search for dxdiag and click the top result to open the app.
- Click the System tab.
- Click the Save All Information button.
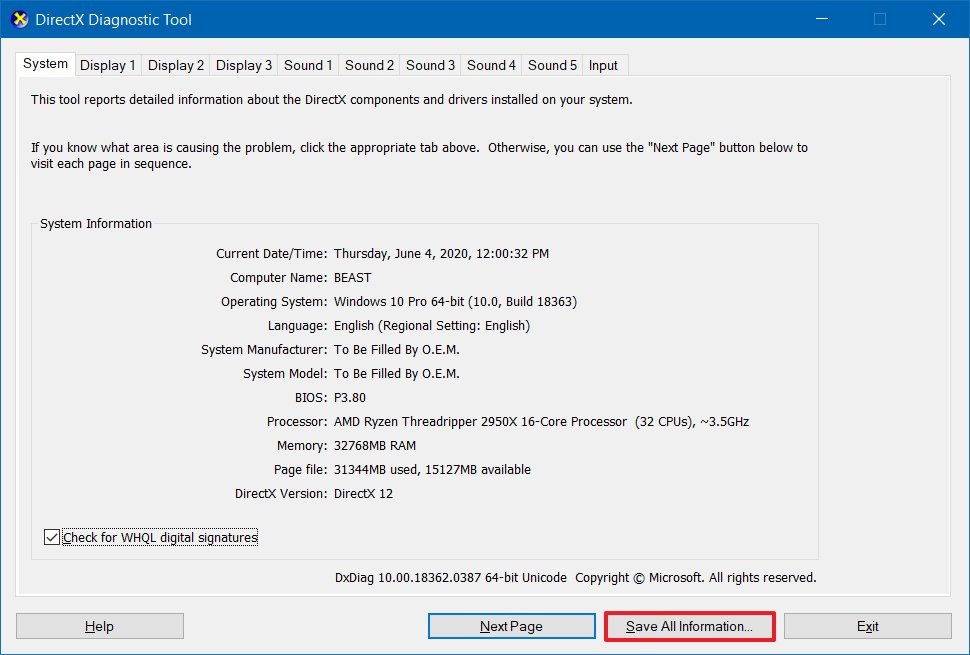
- Select a location to save the output file.
- Click the Save button.
- Open the file with Notepad.
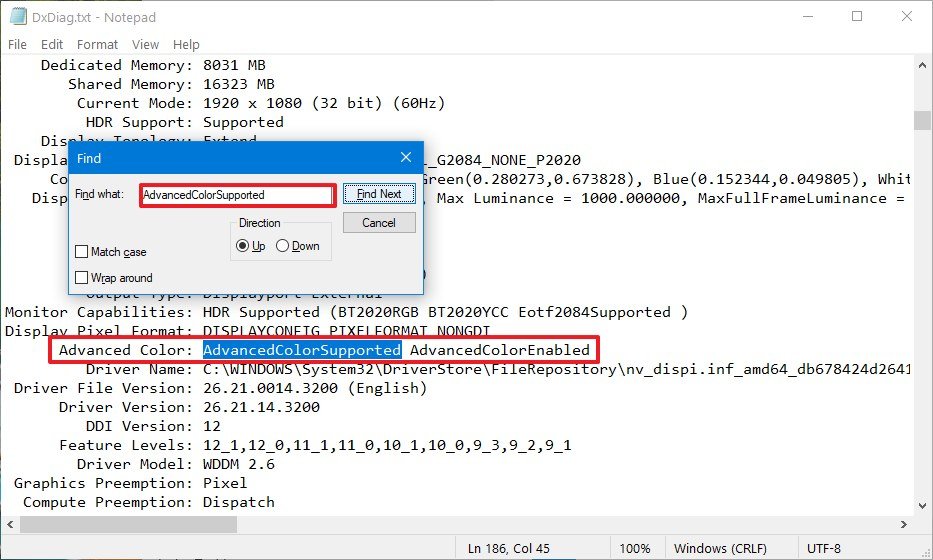
- Search for Advanced Color and determine if HDR is supported:
- AdvancedColorSupported – indicates display driver with support for HDR10 is installed.
- AdvancedColorEnabled – indicates that HDR is enabled.
Quick tip: To search on Notepad, use the Ctrl + F keyboard shortcut, type the search query in the «Find what» box, and click the Find Next button. You can also use the «Direction» option to look up or down from where you’re in the file.
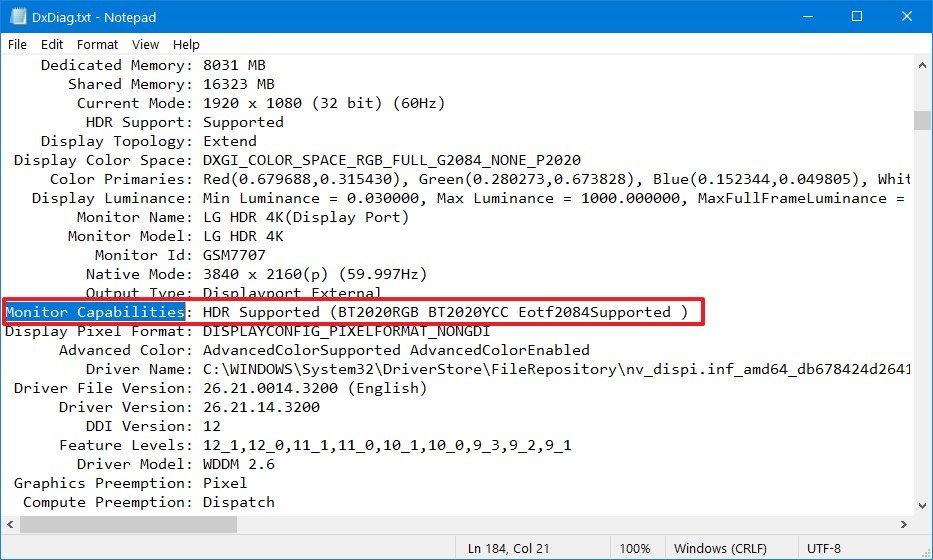
- Search for Monitor Capabilities and confirm it reads HDR Supported to determine that HDR10 is supported. If one or more requirements are missing, then you’ll see the HDR Not Supported message.Quick note: If you also see «BT2020RGB» or «BT2020YCC», then the panel is capable of HDR10, and the «Eotf2084Supported» indicates that the display is capable of HDR.
Once you complete the steps, you can check and enable high dynamic range on the screen and Windows 10.
All the latest news, reviews, and guides for Windows and Xbox diehards.
If the display isn’t ready for HDR, Microsoft recommends choosing from VESA Certified DisplayHDR displays.
Minimum requirements for HDR
The minimum requirements to stream HDR video on Windows 10 are:
On a laptop:
- The built-in display needs to have a minimum resolution of 1080p and a max brightness of 300 nits (more is better).
- The integrated graphics card has to have PlayReady support and codecs for 10-bit video decoding.
On a PC:
- The monitor has to support HDR10, and HDMI 2.0 or DisplayPort 1.4 or higher.
- The graphics card has to have PlayReady 3.0 support. For example, AMD Radeon RX 400 series or higher, NVIDIA GeForce 1000 series or higher, or Intel UHD Graphics 600 series or higher support the HDR requirements.
- Windows 10 must-have codecs for 10-bit video decoding and latest graphics drivers (WDDM) installed.
Enable HDR on display
If the panel isn’t showing HDR, then make sure to enable the feature on the peripheral.
The steps to enable HDR on a monitor is different per manufacturer and even per model. As a result, you’ll need to check your manufacturer support website for more specific details.
Enable HDR on Windows 10
In the case of Windows 10, you can enable HDR using these steps:
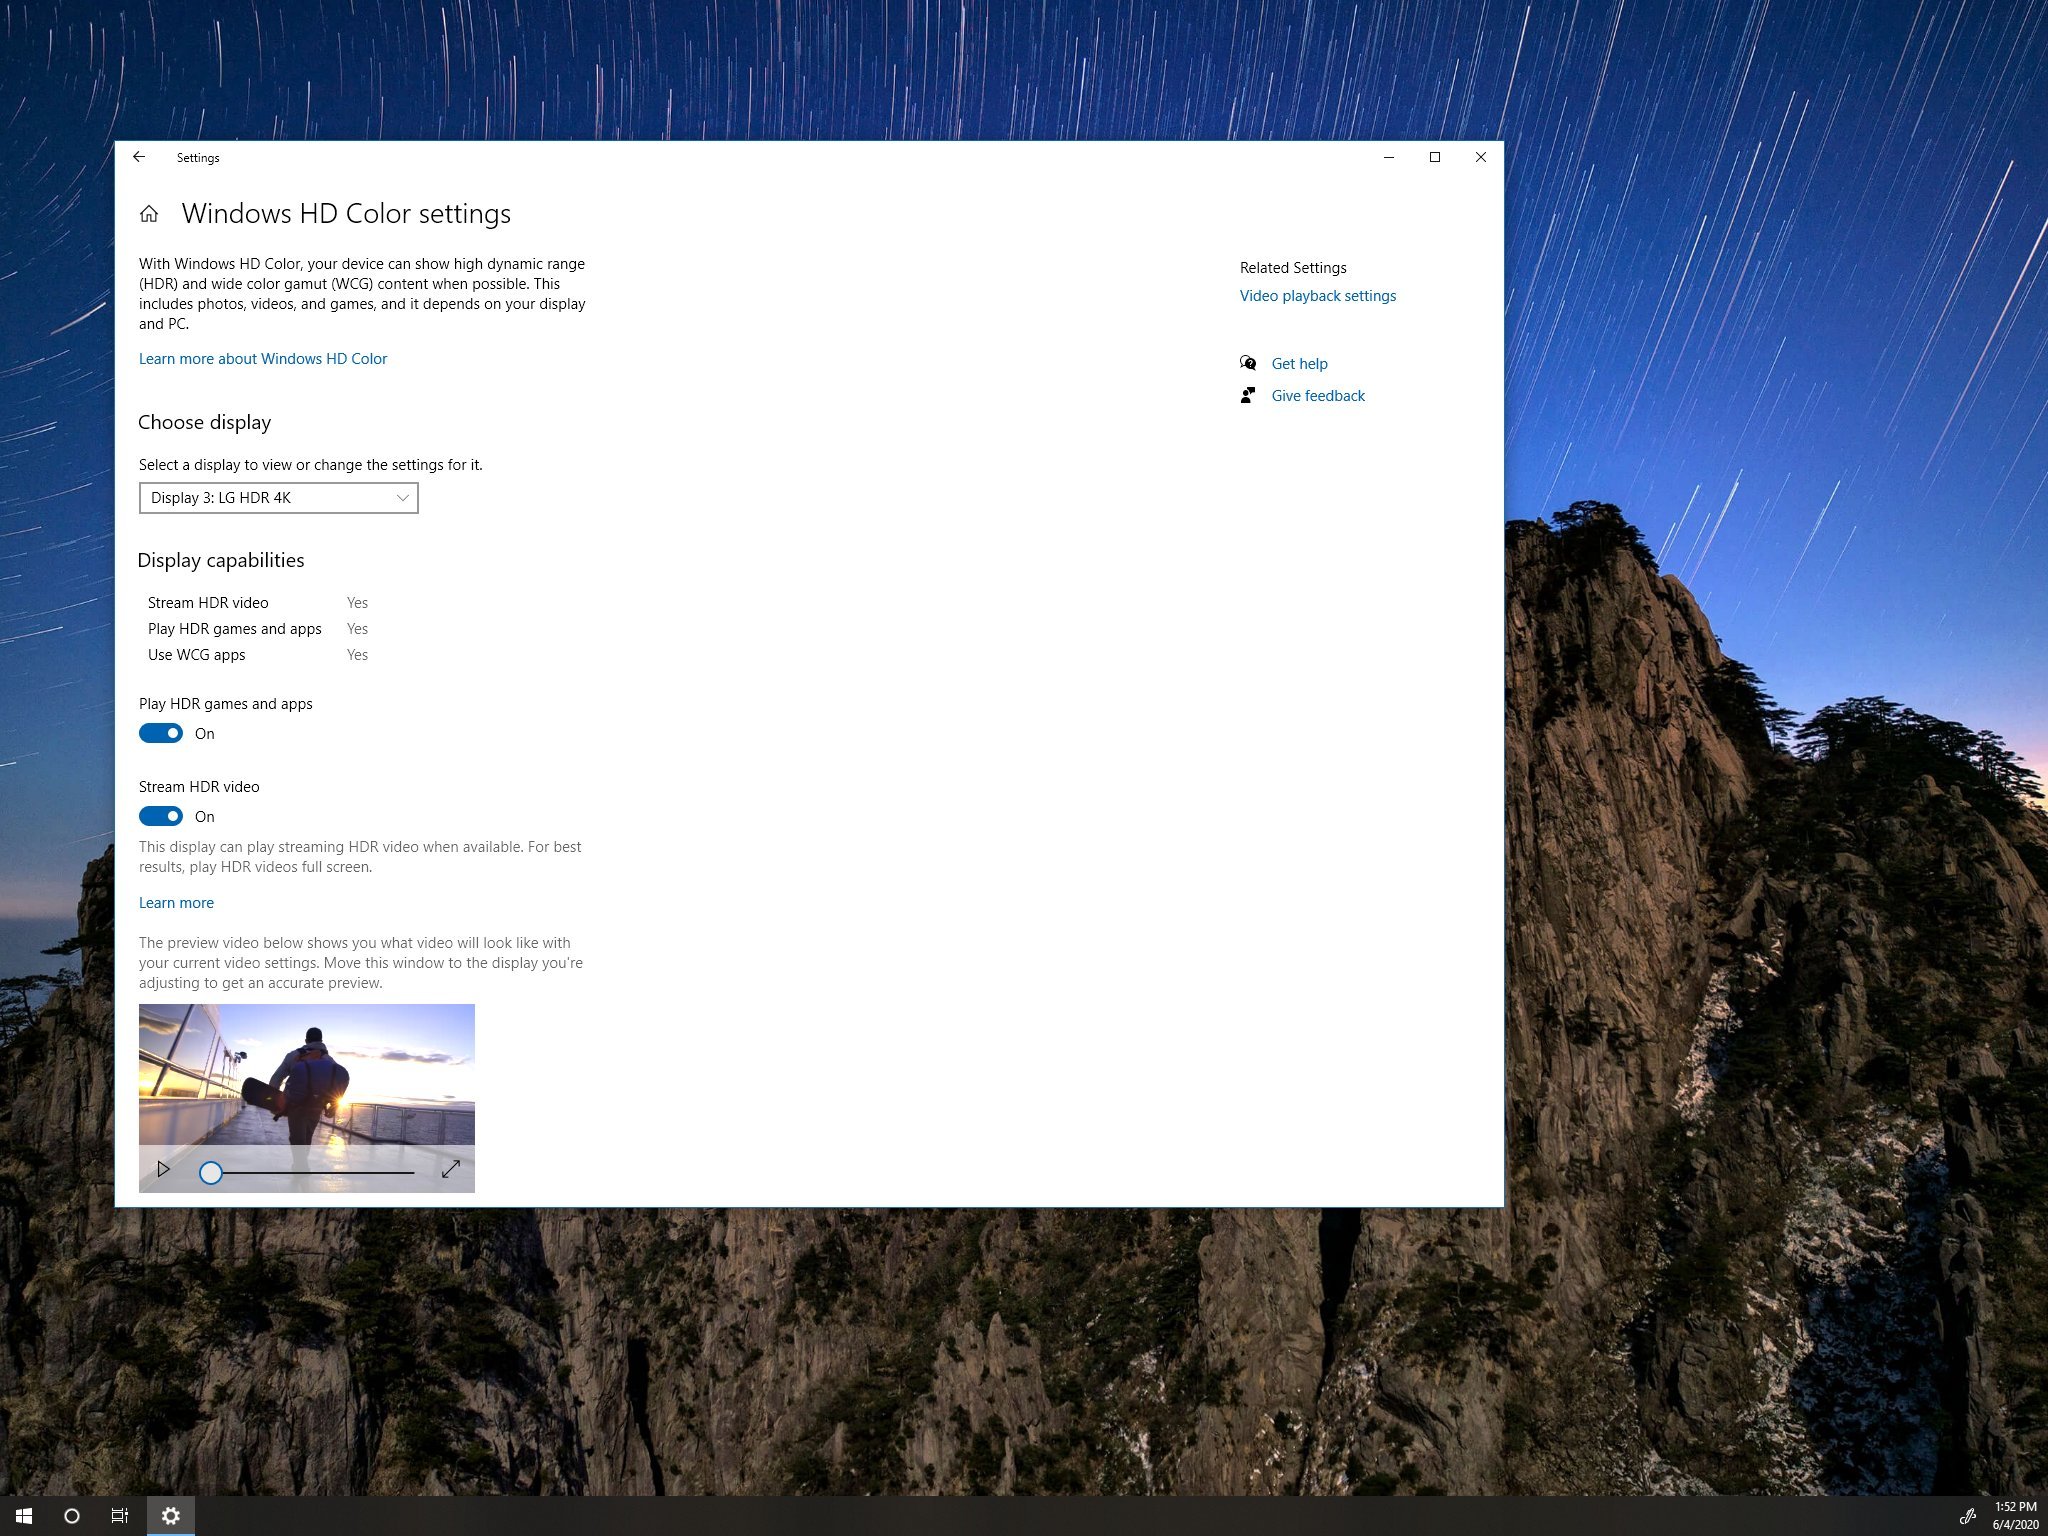
- Open Settings.
- Click on System.
- Click on Display.
- Under the «Rearrange your displays» section, select the external monitor.
- Under the «Windows HD Color» section, turn on the Play HDR games and apps toggle switch.
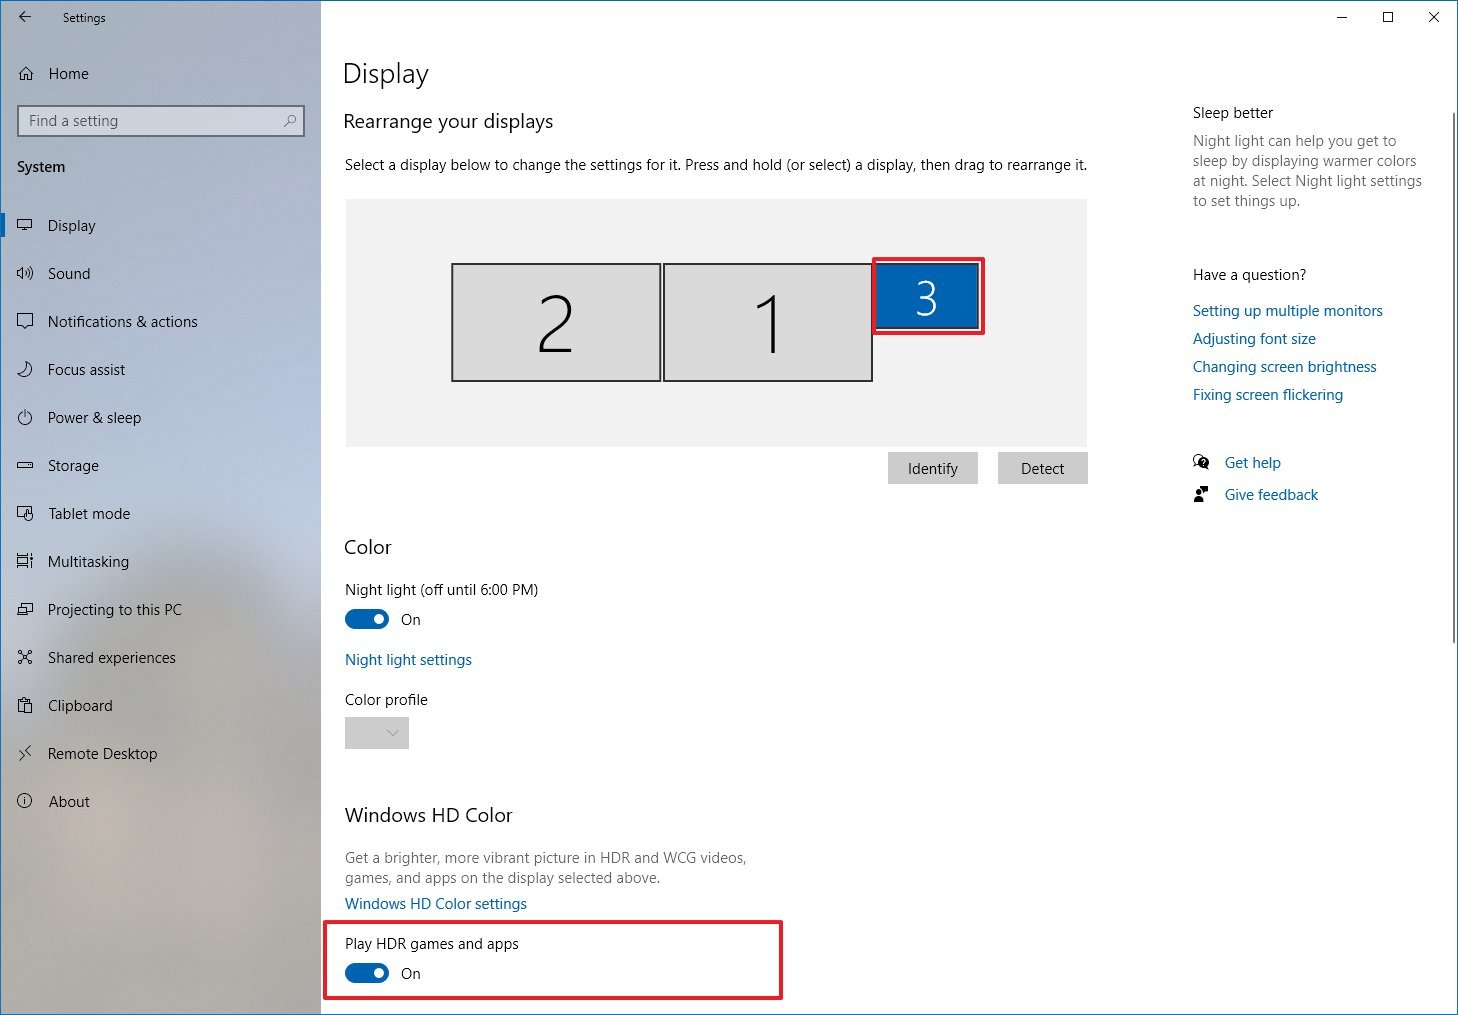
After you complete the steps, HDR will enable allowing you to play compatible games and apps.
How to fix HDR option not available on Windows 10
When trying to turn on high dynamic range from the Windows HD Color settings, you might see the option. However, it’ll appear grayed out. Or the option won’t be available after connecting an external HDR-capable monitor.
Multi-monitor setup HDR not available
If you connected an external HDR display, and you don’t see the option to enable HDR in the Windows HD Color settings, then it is likely because Windows 10 is duplicating the desktop on both screens, which is not a supported configuration.
To play HDR content on the external monitor, use these steps:
- Open Settings.
- Click on System.
- Click on Display.
- Under the «Rearrange your displays» section, select the external monitor.
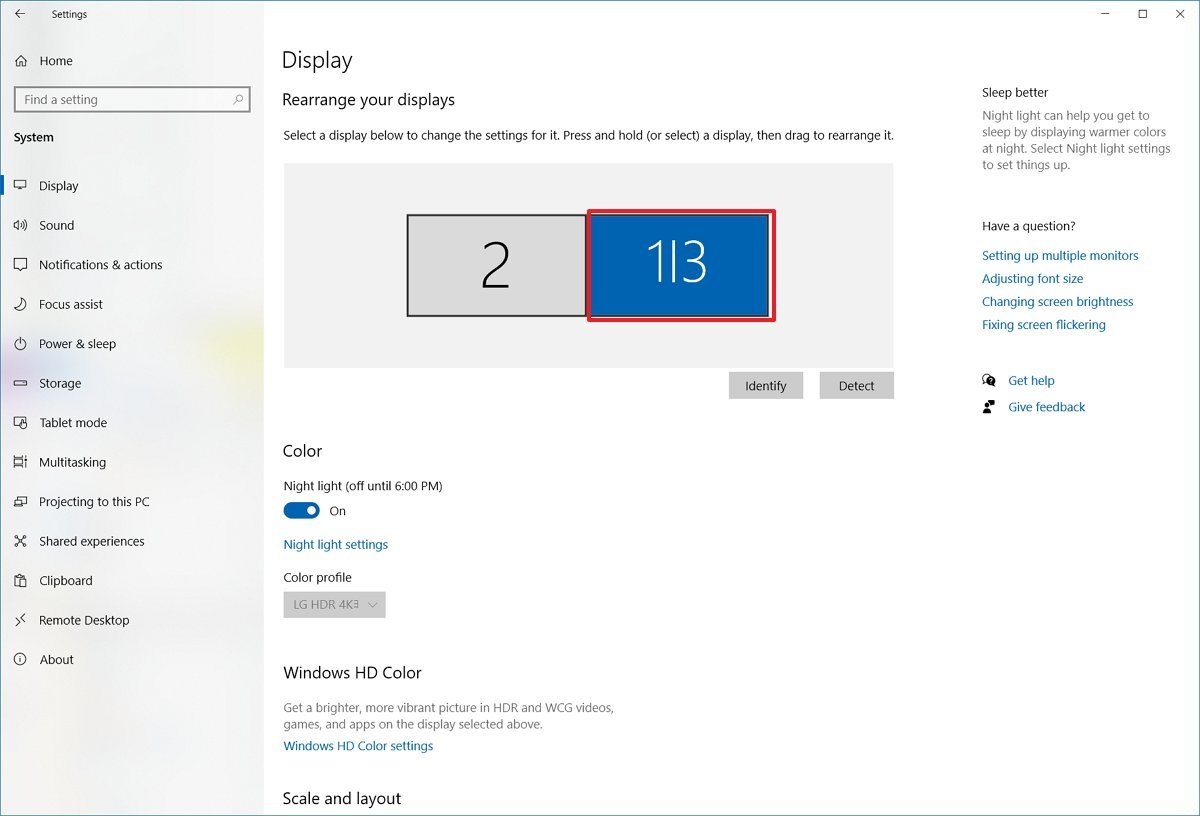
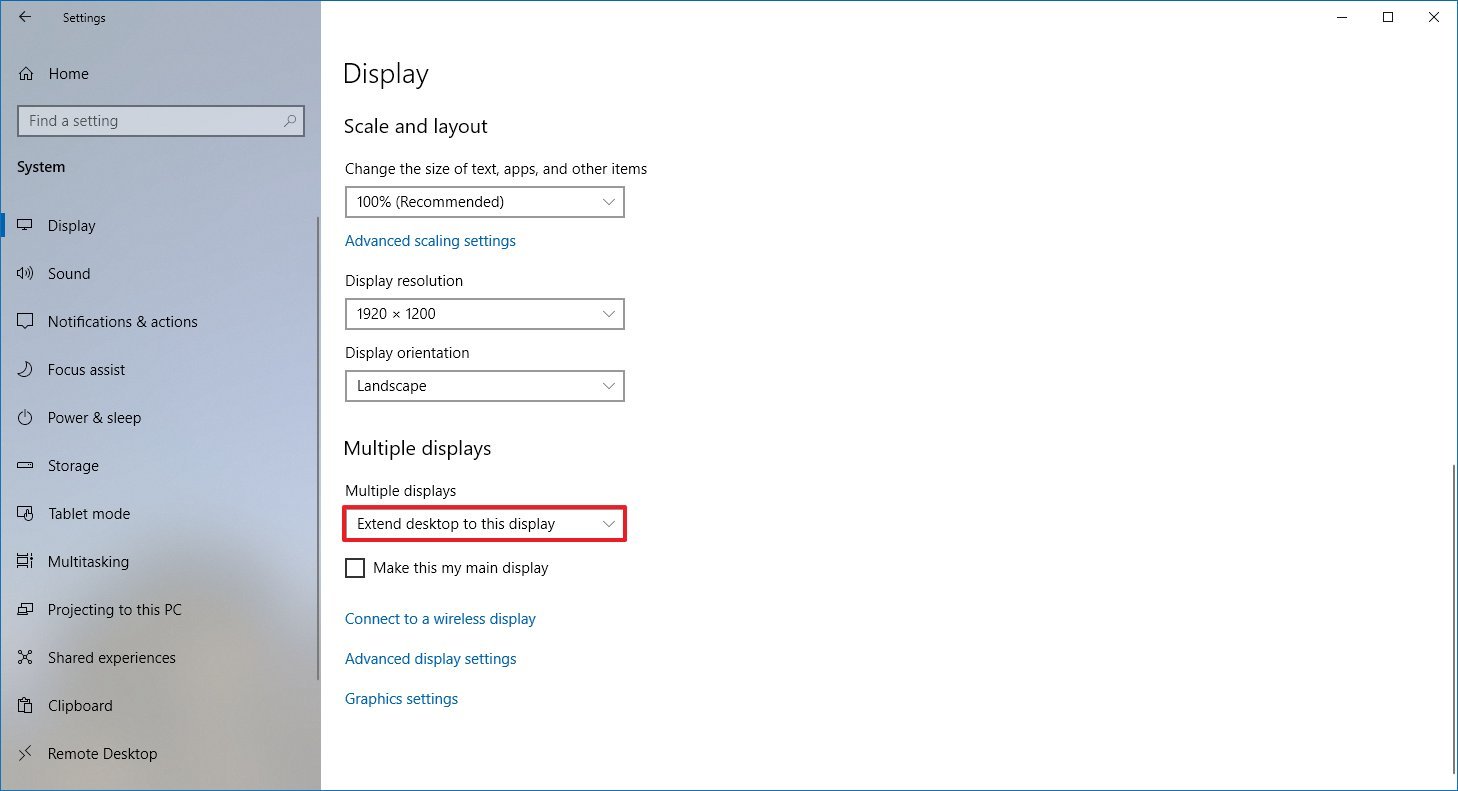
- Under the «Multiple displays» section, select the Extend these displays option.
- Click the Windows HD Color settings option.
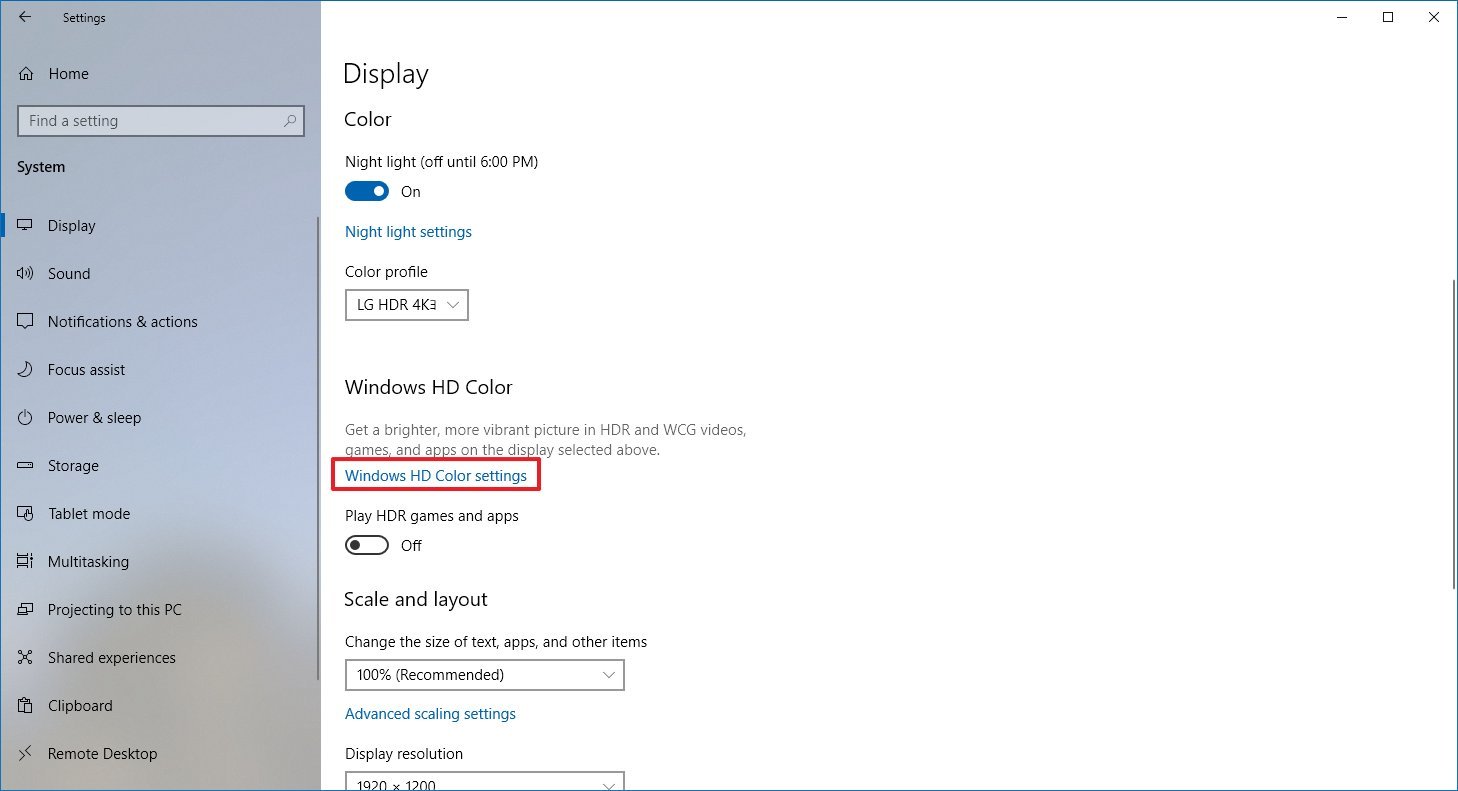
- Turn on the Play HDR games and apps toggle switch.
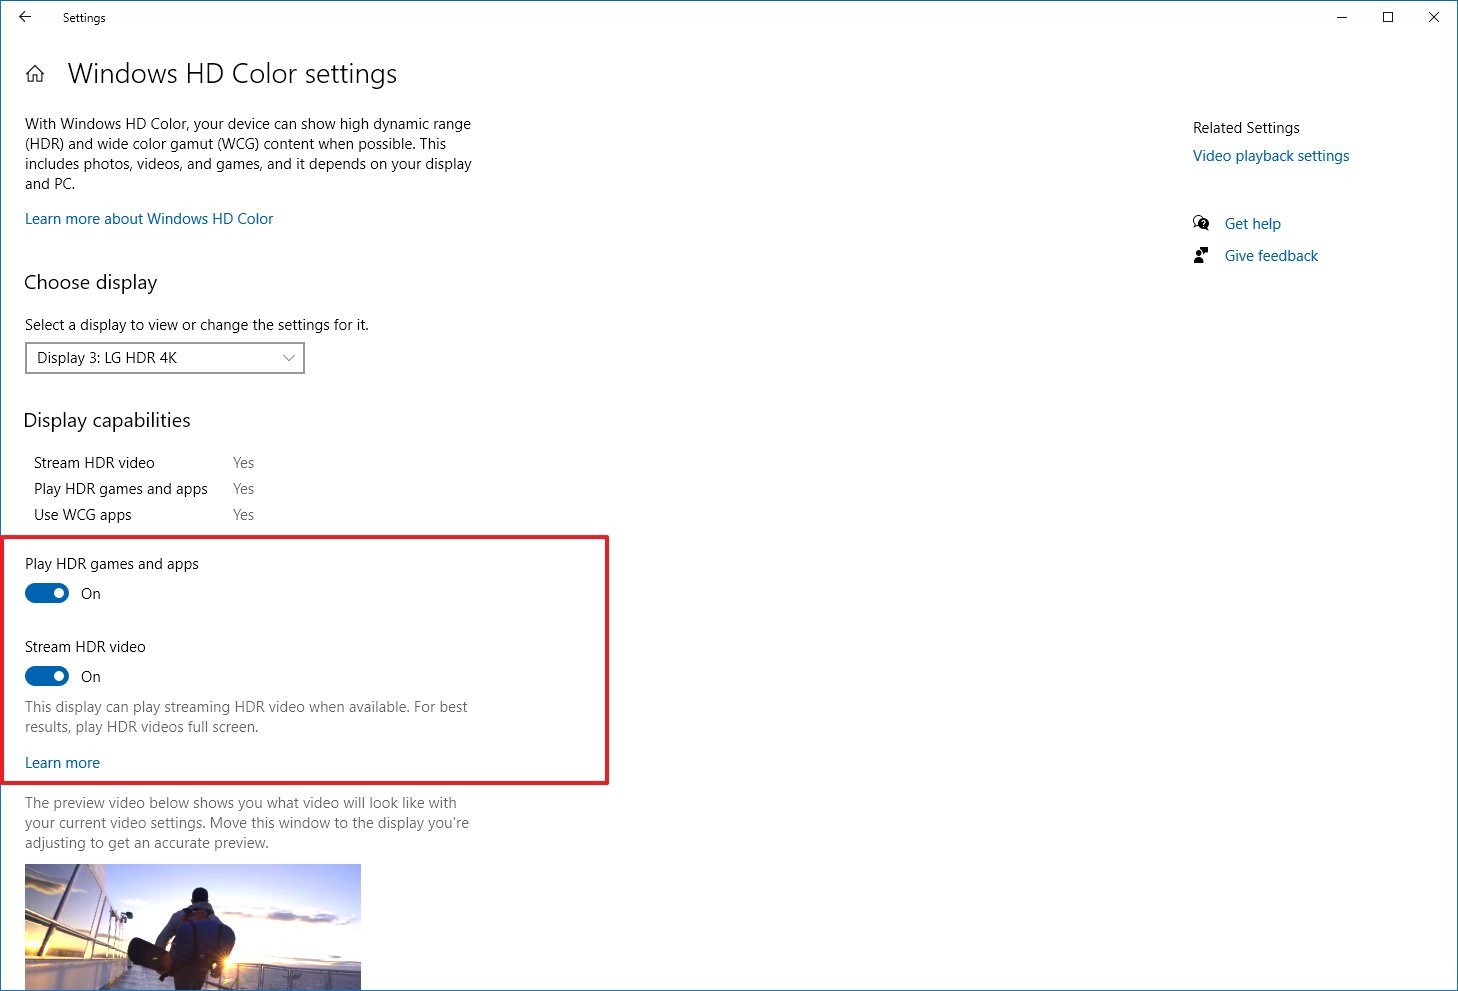
- Turn on the Stream HDR video toggle switch (if applicable).
Once you complete the steps, you should now be able to turn on the monitor’s HDR feature.
Grayed-out HDR option
If the Windows HD Color settings page shows that the built-in display of a laptop with support for HDR, but the option to enable the feature isn’t accessible, then it’s because the power default settings are disabling HDR when running on battery.
To resolve this issue, connect the laptop to a power source, or change the settings to allow HDR content to play while on battery.
To turn on HDR while a laptop is running on battery, use these steps:
- Open Settings.
- Click on System.
- Click on Display.
- Click the Windows HD Color settings option.
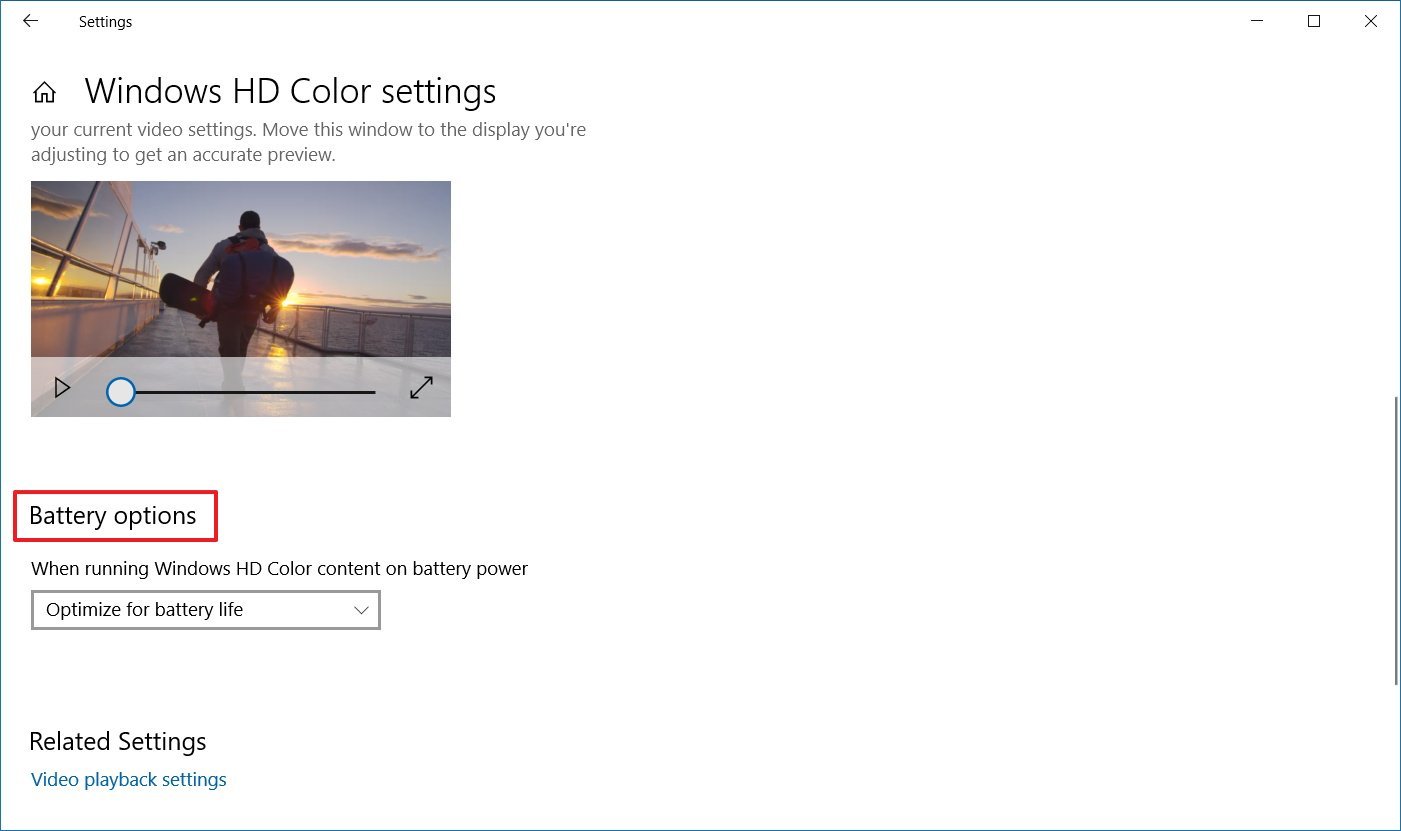
- Under the «Battery options» section, clear the Don’t allow HDR games and apps on battery option.Quick note: If you don’t see the option, the feature isn’t available on the device.
After you complete the steps, you should be able to turn on HDR on the laptop.
How to fix HDR color not showing correctly on Windows 10
When using an HDR display on a desktop computer, you may see problems displaying colors. For example, black text not rendering correctly on a white background.
If you’re experiencing color problems with an external monitor, you should check your computer to determine if the latest graphics driver is installed. If you need assistance updating the video driver, you can use these steps.
It’s always recommended to use a DisplayPort connection to connect an HDR monitor instead of an HDMI connection.
If you’re stuck with an HDMI connection, you can reduce the frame rate to 30Hz with these steps:
- Open Settings.
- Click on System.
- Click on Display.
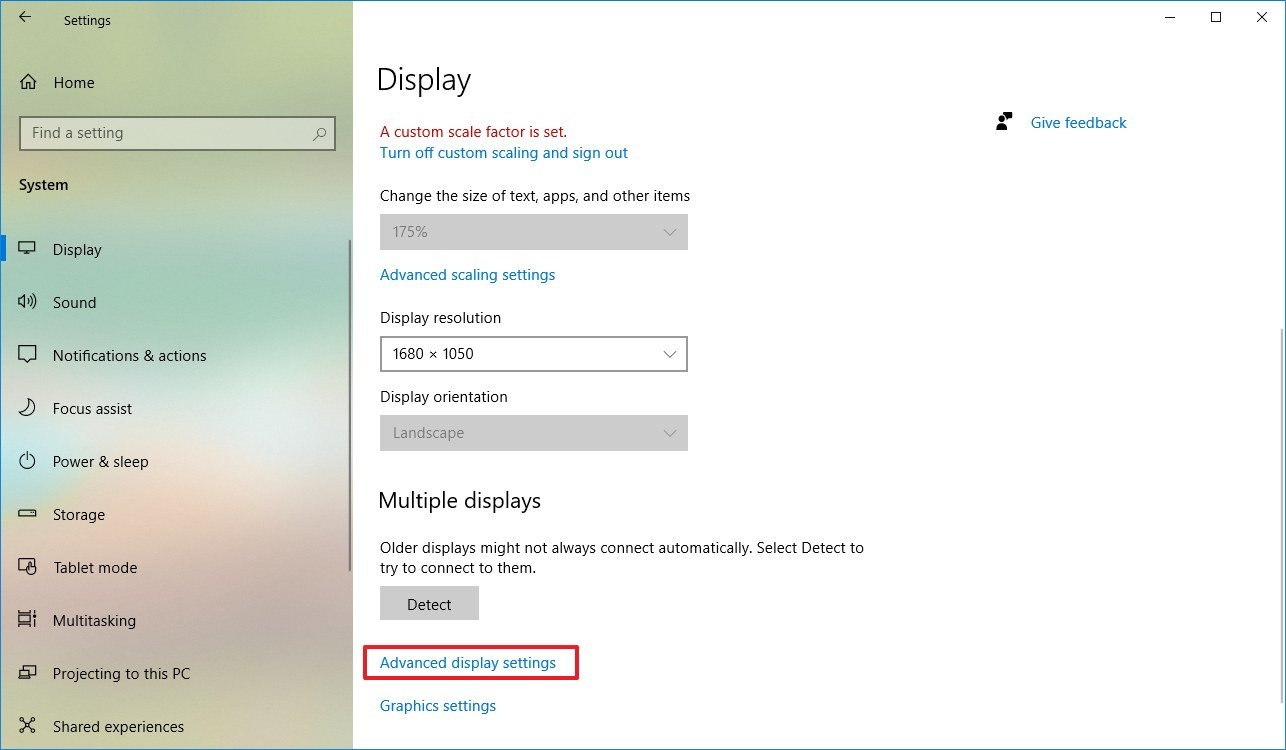
- Click the Advanced display settings option.
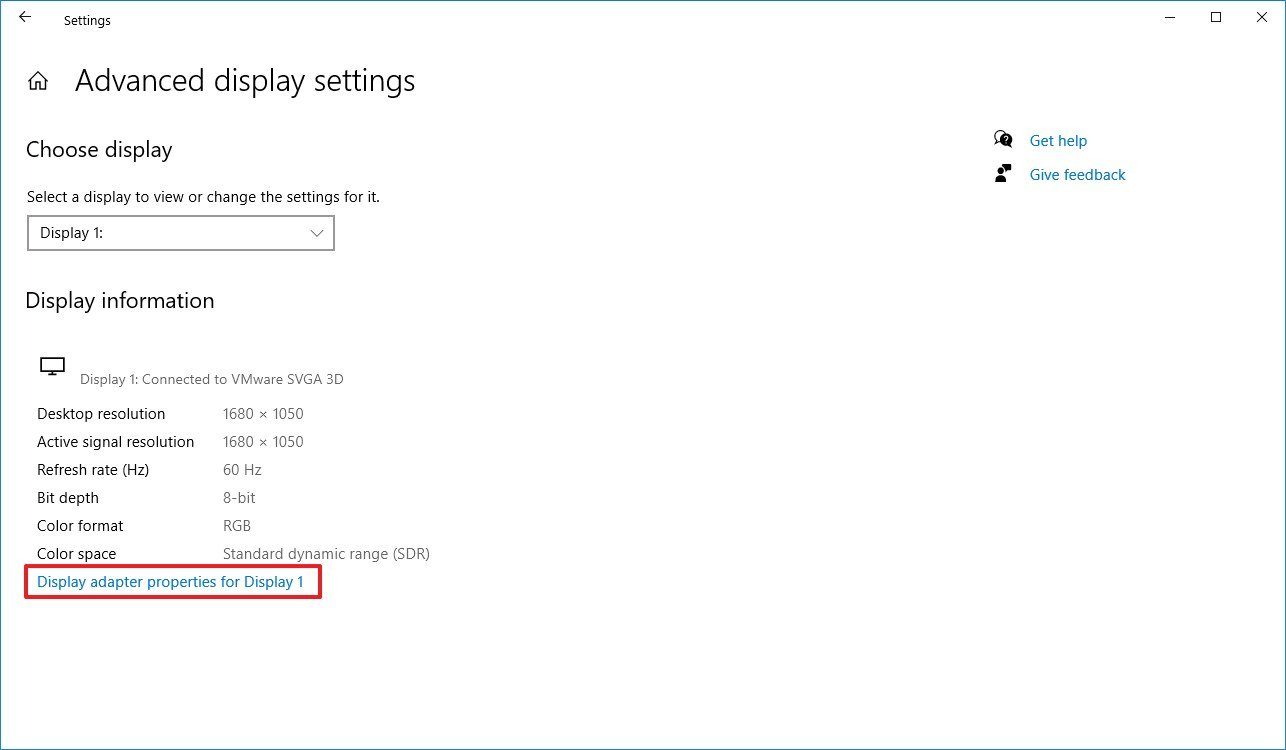
- Click the Display adapter properties option.
- Click the Monitor tab.
- Use the «Screen refresh rate» drop-down menu and select the 30 Hertz option (if available).
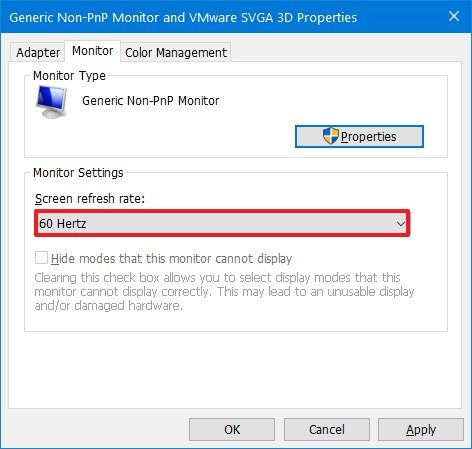
- Click the Apply button.
- Click the OK button.
Once you complete the steps, the HDR display will start rendering colors more accurately.
How to fix HDR color problems with night light on Windows 10
On Windows 10, if the night light feature is enabled, colors on the screen may look red tint making content unreadable.
The solution is to adjust the night light strength or disable the feature when using HDR content with these steps:
- Open Settings.
- Click on System.
- Click on Display.
- Click the Night light settings option.
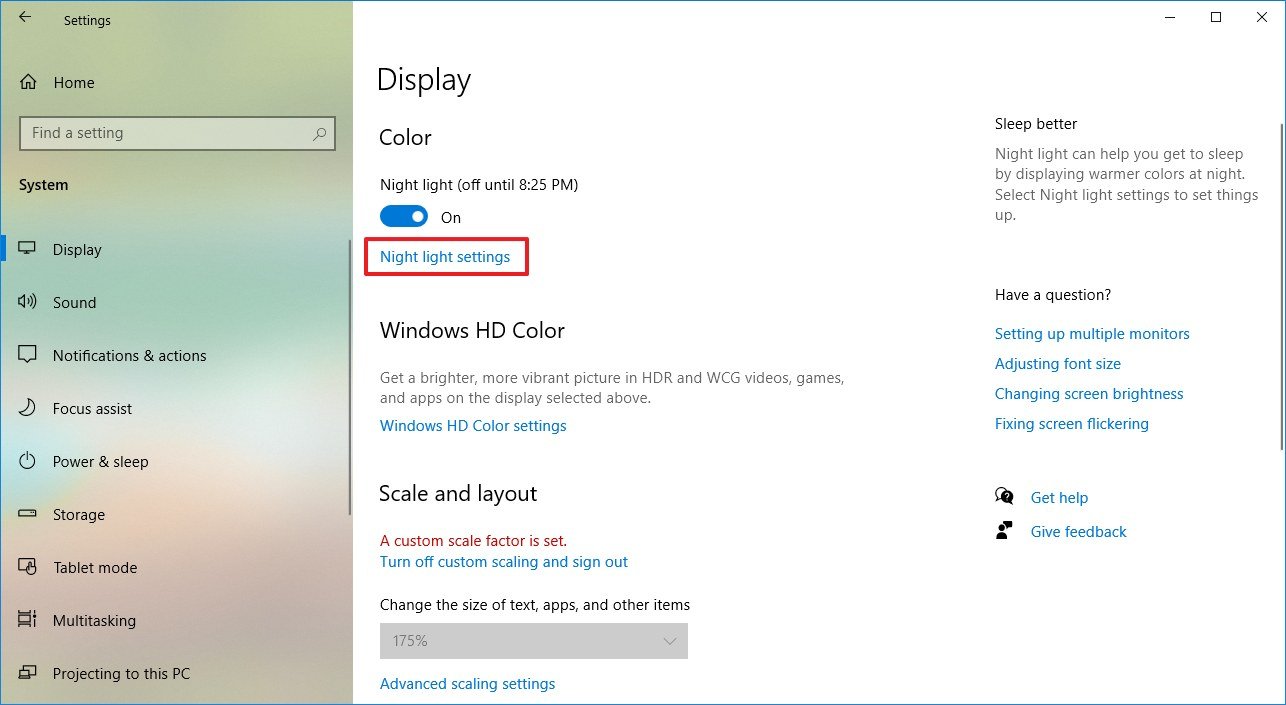
- Use the slider to minimize the strength of night light to improve HDR on Windows 10.
- (Optional) Click the Turn off now button.
After you complete the steps, content in the HDR display will not be readable, and without red tint, depending on the resolution you applied.
How to fix HDR brightness problems on Windows 10
When you use a laptop with an HDR screen, you may run into several brightness issues depending on how the system is configured and whether it’s plugged into a power source or running on battery.
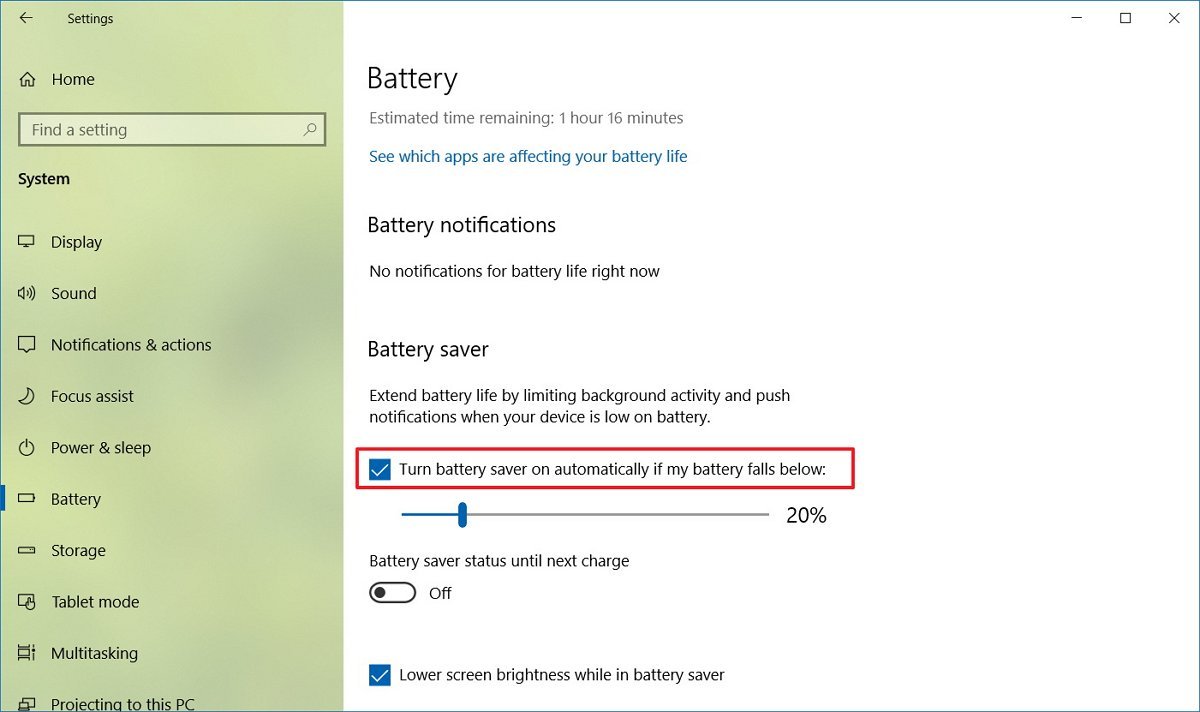
Laptop with battery saver on
In the case that the battery saver feature is enabled and brightness changes unexpectedly on a laptop, for example, a screen turns brighter or brightness level changes on wake when running on battery, then you’ll need to adjust the brightness settings manually.
To mitigate these issues, use these steps:
- Open Settings.
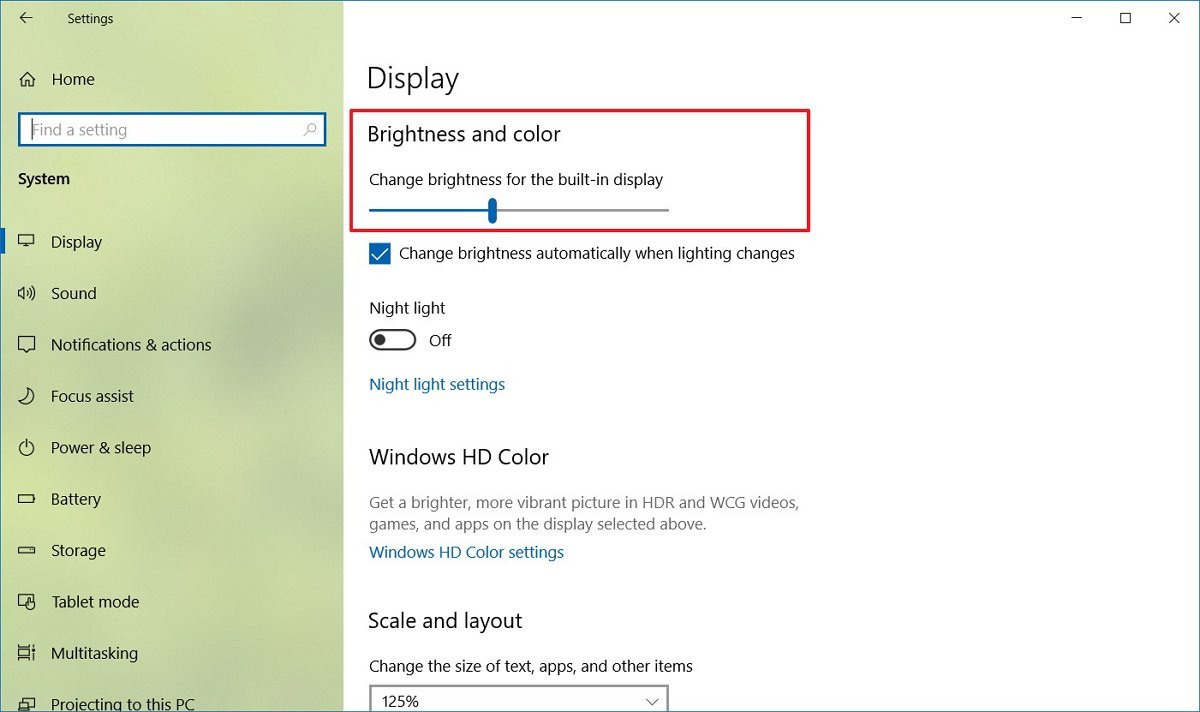
- Click on System.
- Click on Display.
- Use the «Brightness and color» slider to lower the brightness on the HDR screen.
Or if you see a sudden change of brightness level, you can disable battery saver feature on Windows 10 using these steps:
- Open Settings.
- Click on System.
- Click on Battery.
- Clear the Turn battery saver on automatically if my battery falls below option.
Once you complete the steps, the brightness problem due to the battery saver option should now be resolved.
Laptop with do nothing when closing lid
If you have the option to close the lid on a laptop to «Do nothing,» then you may experience lower brightness on the built-in HDR screen while the brightness setting still showing the level unchanged.
To resolve this issue set a different option for closing the lid with these steps:
- Open Settings.
- Click on System.
- Click on Power & sleep.
- Under the «Related settings» section, click the Additional power settings option.
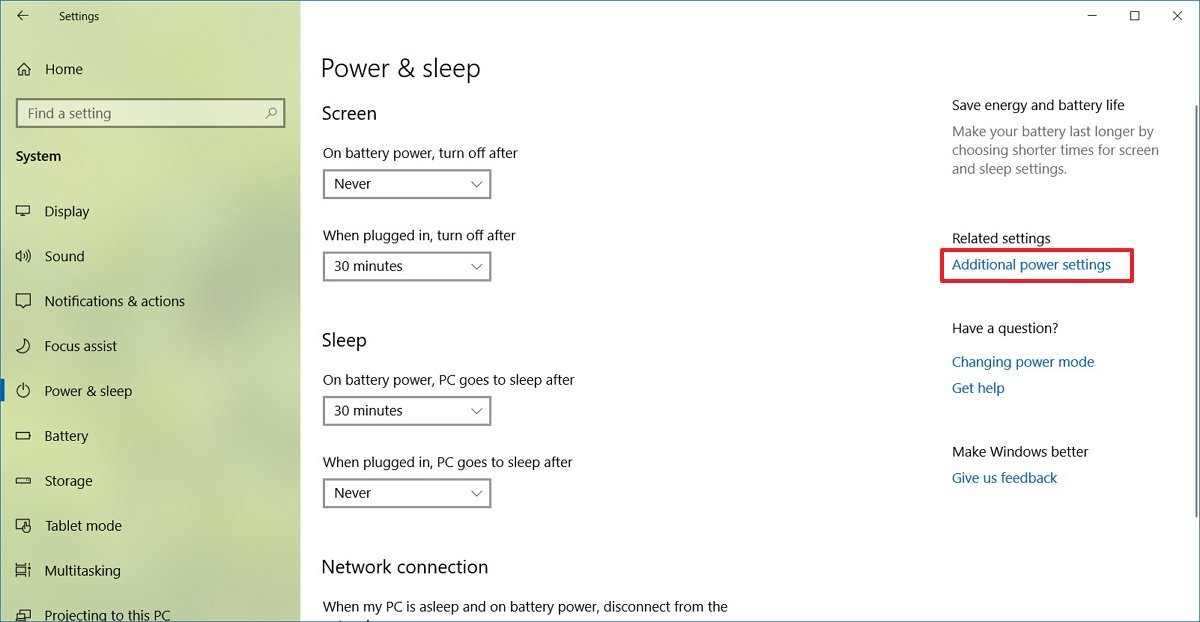
- Click the Choose what closing the lid does option from the left pane.

- Use the When I close the lid drop-down menus and select another option other than «Do nothing.»
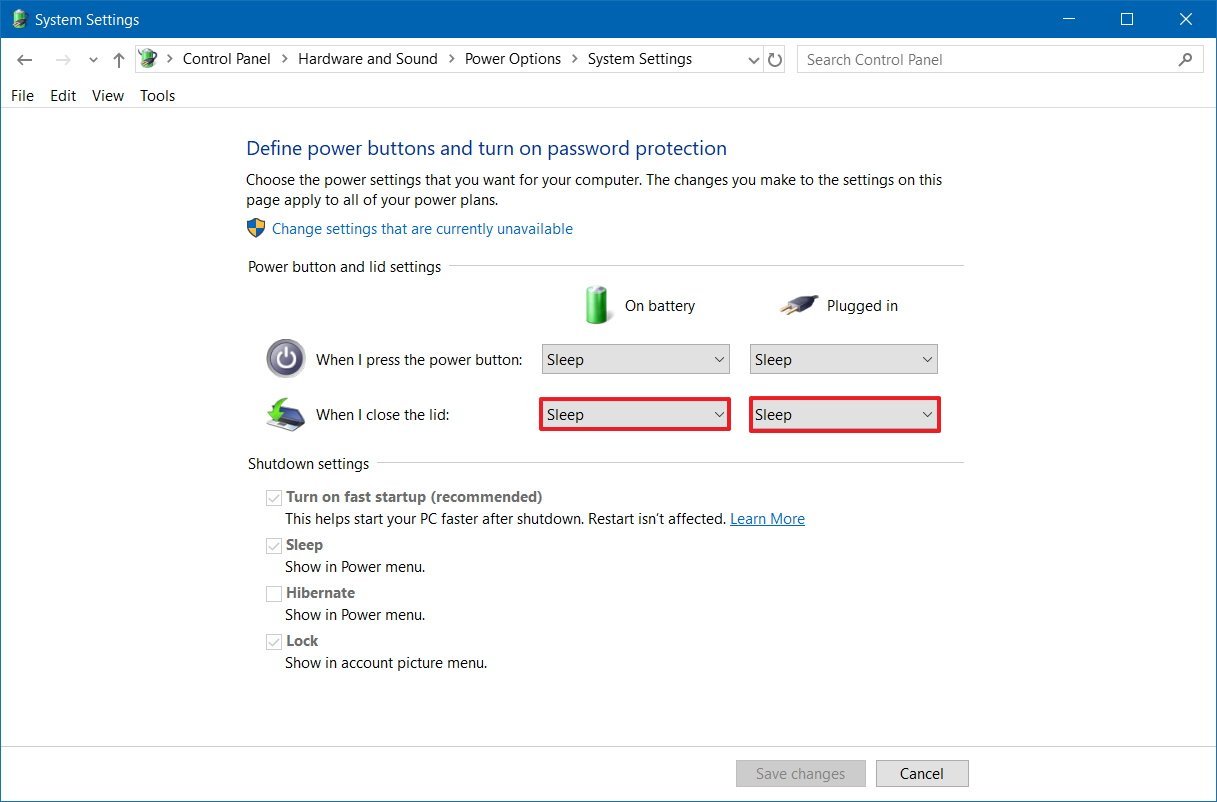
- Click the Save changes button.
Also, to correct the screen brightness, use these steps:
- Open Settings.
- Click on System.
- Click on Display.
- Use the «Brightness and color» slider to adjust the brightness to the desired level.
After you complete the steps, the brightness should no longer change when closing the laptop lid.
Laptop with switch from DC to AC power
On an HDR display, the brightness can suddenly change when switching from battery power to outlet power.
To resolve this issue simply adjust the brightness manually:
- Open Settings.
- Click on System.
- Click on Display.
- Use the «Brightness and color» slider to adjust the brightness on the HDR screen to the desired level.
Once you complete the steps, you may need to repeat the steps in the future, if you run into the same situation.
How to fix SDR brightness problems on HDR display on Windows 10
When you use an HDR display, standard dynamic range (SDR) content may appear with very low or very high brightness. This happens because displays identify SDR and HDR signals differently, which can cause brightness problems.
All SDR content and apps
To resolve this problem, you need to adjust the relative brightness with these steps:
- Open Settings.
- Click on System.
- Click on Display.
- Click the Windows HD Color settings option.
- Under the «Windows HD Color» section, use the SDR content appearance slider to adjust the brightness until you find the right balance.
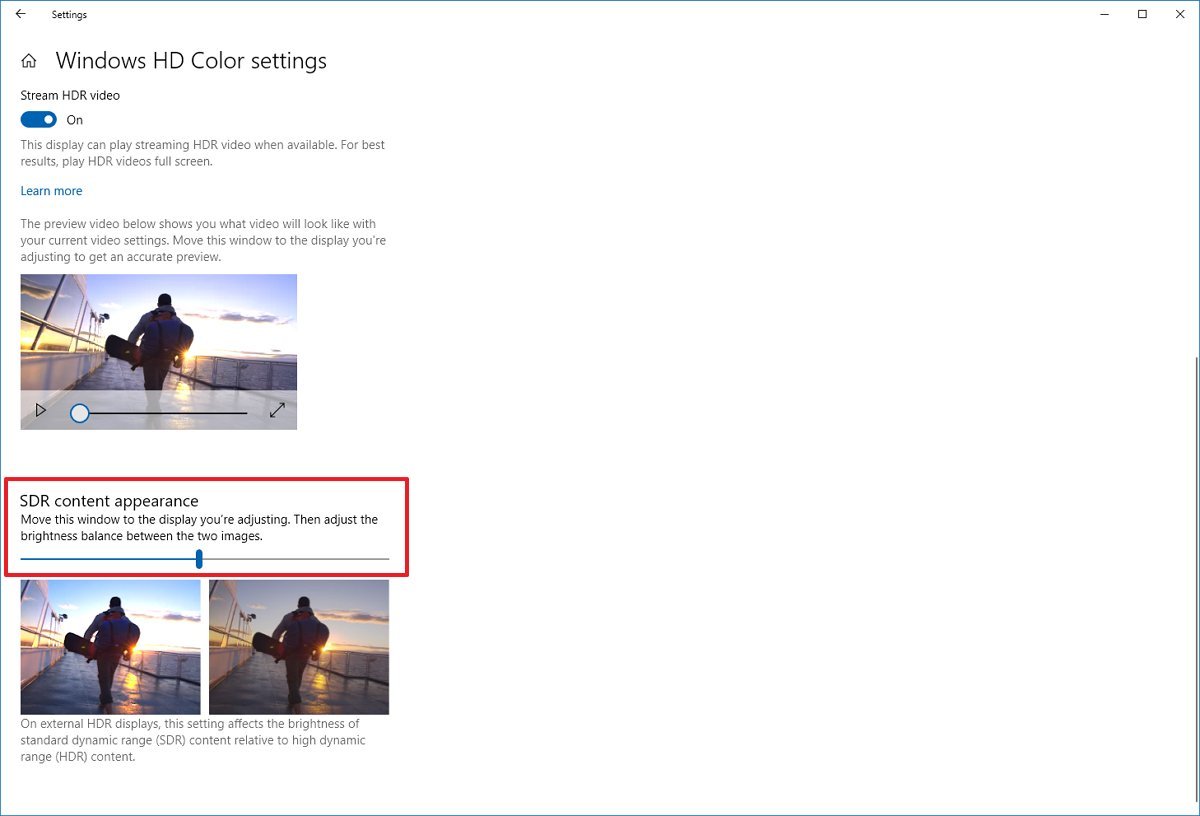
Once you complete the steps, SDR content should appear with an improved brightness level.
Some SDR apps appear darker
Sometimes, apps that haven’t been designed to work with the HDR brightness settings will cause them to appear darker on HDR displays.
One solution to this problem is to run the SDR apps on an SDR display. If you have a multi-monitor setup, you can disable HDR on one of the displays to make apps brighter.
If you have an HDR-compatible display, you can try lowering the SDR content appearance brightness level using these steps:
- Open Settings.
- Click on System.
- Click on Display.
- Click the Windows HD Color settings option.
- Under the «Windows HD Color» section, use the SDR content appearance slider to lower the brightness until the SDR content looks brighter.
- (Optional) Use the monitor’s on-screen settings to increase the brightness to the preferred level.
After you complete the steps, apps should no longer look dimmed.
Mauro Huculak has been a Windows How-To Expert contributor for WindowsCentral.com for nearly a decade and has over 15 years of experience writing comprehensive guides. He also has an IT background and has achieved different professional certifications from Microsoft, Cisco, VMware, and CompTIA. He has been recognized as a Microsoft MVP for many years.
На современных игровых консолях и телевизорах HDR работает буквально по нажатию кнопки. Стоит зайти на стриминговый сервис или запустить совместимую игру и все заработает. С компьютерами же все немного сложнее.
Какой дисплей нужен для HDR
Какие видеокарты поддерживают HDR
Какой кабель нужен
Какой контент можно воспроизводить
Как включить HDR в Windows 10
Какой дисплей нужен для HDR
Какие видеокарты поддерживают HDR
Какой кабель нужен
Какой контент можно воспроизводить
Как включить HDR в Windows 10
Какой дисплей нужен для HDR
Стоит уяснить, что во многих моделях телевизоров и мониторов поддержка HDR номинальная. Важно смотреть на характеристики, в частности — максимальную яркость. Чем выше пиковая яркость, тем лучше для отображения HDR-контента.

В характеристиках мониторов можно найти сертификацию DisplayHDR 400, DisplayHDR 600 и т. п. Это означает пиковую яркость, достижимую на данном дисплее. Яркость измеряется в нитах или канделах на квадратный метр (Кд/м2). DisplayHDR 400 означает, что пиковая яркость составляет 400 нит или 400 Кд/м2. Яркость мониторов без сертификации DisplayHDR может быть еще ниже. Поддержка HDR есть у моделей с 250−300 нит. Этого, разумеется, недостаточно. На сайте displayhdr.org можно найти список сертифицированной продукции. С другой стороны, это вовсе не означает, что монитор без такой сертификации однозначно плохой.

Для телевизоров значения яркости можно смотреть в характеристиках товара, но ее не всегда указывают. Ищите спецификации на сайте производителя или на специализированных ресурсах вроде displayspecifications.com. Есть также и своя сертификация Ultra HD Premium, согласно которой, яркость для HDR должна составлять 1000 нит и более, а уровень черного 0,05 нит и менее.
Какие видеокарты поддерживают HDR
Видеокарты NVIDIA 9-й серии поддерживают вывод HDR по интерфейсу HDMI, начиная с 10-й серии — по HDMI и DisplayPort. Связано это с тем, что поддержка HDR появилась в DisplayPort только с версии 1.4, а в видеокартах 9-й серии используется DisplayPort 1.2.

Что касается видеокарт AMD, то поддержка HDR была представлена с 300-й серией (R9 380 и т. д.). Соответственно все более поздние видеокарты Radeon также поддерживают HDR.
Какой кабель нужен
В зависимости от того, к чему вы будете подключать ноутбук или системник, зависит и выбор кабеля. На телевизорах это HDMI, на мониторах чаще DisplayPort, но HDMI тоже не редкость. Также может понадобиться переходник с DisplayPort на HDMI, если разъемов не хватает.
В любом случае нужно определить версию портов на вашем оборудовании. Как входа на телевизоре, так и выхода на видеокарте или ноутбуке. На видеокартах, поддерживающих HDR, это HDMI 1.4, 2.0 или 2.1. В случае DisplayPort это версия 1.4. Разница будет в максимальной частоте обновления:
- HDMI 1.4 — 4K@30 Гц,
- HDMI 2.0 — 4K@60 Гц,
- HDMI 2.1 — 4K@120 Гц,
- DP 1.4 — 4K@144 Гц.
При этом для HDR пропускной способности кабеля (в зависимости от версии, разрешения и частоты обновления) может не хватать. Поэтому формат цвета можно установить только YCbCr 422 или YCbCr 420, что для игр или фильмов не критично. Но в формате монитора мелкий текст будет нечетким. Если же будет использоваться 1440p или 1080p, то режимы работы будут другие. Так, например, по HDMI 2.0 можно передавать сигнал 1080p@120 Гц.
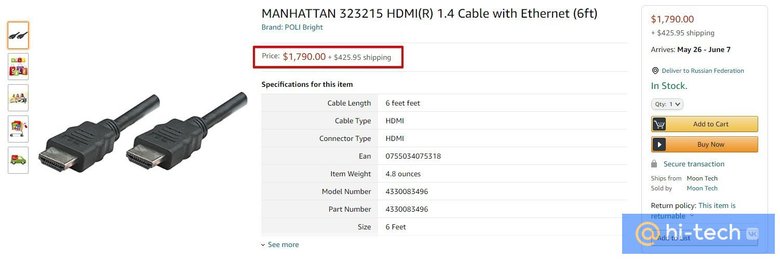
Стоит отметить, что кабель HDMI версии не имеет, роль играет в основном пропускная способность. То есть качественный кабель, купленный в эпоху HDMI 1.4, вполне может выдавать видео 4К@60 Гц. А вот если у вашей видеокарты выход только HDMI 1.4, то вывод видео будет ограничен 30 Гц. Поэтому если кабель уже есть в наличии, то нужно проверить, будет ли он нормально передавать сигнал в нужном вам формате и с HDR.
Для удобства на многих площадках версия для кабеля HDMI все же указывается. Не на самом устройстве, а в каталоге. В этом случае сверяйтесь с характеристиками и заявленными форматами передачи изображения. Также смотрите на сертификацию Premium High Speed для 2.0 или Ultra High Speed для 2.1. В случае DisplayPort все аналогично — нужно смотреть в первую очередь на поддержку нужного вам формата передачи видео. Также своя сертификация есть и для DisplayPort.
Какой контент можно воспроизводить
В первую очередь HDR нужен для просмотра фильмов и запуска игр с поддержкой расширенного динамического диапазона.
Фильмы в формате HDR можно воспроизводить, например, с помощью плеера VLC версии 3.0.0 Vetinari и выше. Так как VLC имеет встроенные кодеки, дополнительно устанавливать ничего не придется. В случае других плееров, например PotPlayer или MPC, нужно установить рендер MadVR. Также можно смотреть потоковое видео, например, YouTube и Netflix. Для онлайн-кинотеатров, скорее всего, придется установить платный кодек HEVC Video Extensions из Microsoft Store.
Что касается игр, то HDR включается в настройках, если игра это поддерживает. Список игр с поддержкой HDR можно найти на сайте pcgamingwiki.com или, например, у куратора HDR Games в Steam. В последнем случае удобно отслеживать новые релизы. В некоторых играх HDR нужно предварительно включить в Windows, в других — это происходит автоматически. Стоит отметить, что HDR не всегда работает корректно. Так, в играх серии Resident Evil невозможно включить HDR, если используется несколько мониторов.
Как включить HDR в Windows 10
В настройках телевизора должна быть активирована функция Deep Color. У разных производителей она может называться по-разному: расширенный формат сигнала HDMI, HDMI UHD Color и т. п.
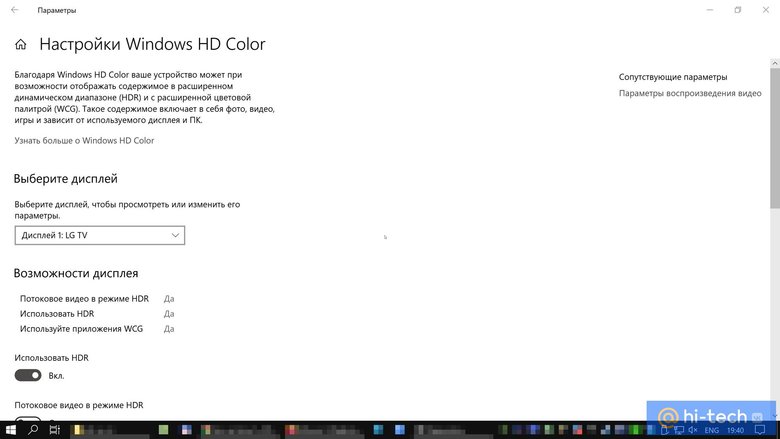
В Windows 10 нажмите Win + I, чтобы открыть параметры, и перейдите в пункт «Система», далее «Дисплей». Найдите строку Windows HD Color. Активируйте переключатель «Использовать HDR». Также кликните на ссылку «Параметры Windows HD Color» и активируйте «Потоковое видео в режиме HDR».
Обратите внимание, что система должна быть обновлена. Поддержка HDR появилась только в осеннем обновлении 2017 года.
- Почему нет звука на телевизоре через HDMI
- Как подключить ноутбук к телевизору?
Windows provide several display settings, which makes it easy to enjoy media-rich graphics. But what if you are not able to use it? There can be several problems or reasons due to which HDR display might have stopped working on Windows. In this post, we are going to discuss all the common problems with HDR displays on Windows 10.
Fixes For Common Problems With HDR Display On Windows 10
HDR or high dynamic range provides you with an enhanced colour range than SDR ( Standard Definition range). HDR enables you to enjoy the games, videos in better quality. This comes naturally with smart TVs, but with computers, you have to adjust the Windows HDR settings.
What to do if HDR Display is not working on Windows 10?
Suppose you want to find out if your Windows HDR settings is enabled or not. Start with the easy steps to locate the HDR display settings on your computer.
Step 1: Open Start Menu and type dxdiag on the search bar.

Step 2: Click on the Open, and the DirectX Diagnostic Tool opens.

Step 3: Go to the System Tab and click on the Save All Information.
Step 4: Now, all you need to do is find a location to save it on your computer.
Step 5: Now open this file with the Notepad and search for Advanced Color.
Step 6: Check if the Advanced Color says Not Supported, this might be the reason why HDR is not working on your computer.

Step 7: If it does support, you have to locate AdvancedColorSupported. This will also show you the driver support available or not.
Step 8: Now look for AdvancedColorEnabled which will confirm whether HDR settings are enabled or not.
Step 9: Next check for Monitor Capabilities which must say HDR is supported. If any of the required things (Advanced Color Enabled and AdvancedColorSupported) are missing, then you will see HDR not supported message.
How To Enable HDR on Windows 10
Step 1: Open Start Menu, go to the Settings icon and click on it.
Step 2: Go to System.
Step 3: Go to Display from the left panel.
Step 4: Select the monitor from the Rearrange your displays section. This is undoubtedly a great help when you have a separate screen connected to your computer.
Step 5: Locate Play HDR games and apps under the Windows HD Color Click on the toggle button to turn it on.
What to do if Windows 10 HDR night light is not working?
Something which is commonly seen as a problem with Windows HDR is that night light makes it hard to read the screen in the dark. The red tint appears on the screen, which must be turned off to avoid HDR problems on your computer. Here’s how you can quickly fix the issue.
Step 1: Open Start Menu, go to the Settings icon and click on it.
Step 2: Go to System.
Step 3: Go to Display from the left panel.
Step 4: Click on Night Light Settings under the Color section.

Step 5: Here, you can see that the slider is shown to improve the strength of the Night Light. Use it to adjust the screen settings for your Display.

Additionally, you can turn it off to avoid any Windows HDR issues.
How To fix HDR brightness problems?
The computer has HDR brightness issues when it is set on the battery saver. This disrupts the screen resolution to minimize power. If you are facing any such problems, one must go through the settings with the following steps.
Step 1: Open Start Menu, go to the Settings icon and click on it.
Step 2: Go to System.
Step 3: Go to Display from the left panel.
Step 4: Under the section Brightness and color, decrease the brightness using the slider.
If you wish to turn off the battery saver for the time being, you can go through the process with the steps given below.
Step 1: Open Start Menu, go to the Settings icon and click on it.
Step 2: Go to System.
Step 3: Go to Battery from the right panel.
Step 4: Under the Battery Saver section, uncheck the box in front of the Turn battery saver on automatically if my battery falls below.
This will solve the problem for you for Windows HDR not working optimally.
Another thing to remember is that when you plug the battery on your laptop, the screen brightness might change. So always make sure you follow the steps to adjust it to your level.
What to do if Windows 10 HDR is still not working?
When you have tried the above methods, and none of them helps you with HDR display not working on Windows 10. Another reason might be that a display driver failed in that case you can use this solution. It can be an issue with the device drivers; therefore, we suggest you get a driver updater for your system.
Smart Driver Care is one of the best for driver care on Windows. This will automatically keep updating all device drivers on your computer. It has an extensive database which enables it to update multiple drivers at once. It is easy to use a third-party tool, which starts with a system scan and provides you with a one-click solution.
To update drivers, you must follow these steps:
- Download Smart Driver Care and install it.

- Launch the application and click on Start Scan.
- Once the scan is complete, you will see a list of outdated drivers.

- Click on Update beside the display driver’s name to update it and resolve the HDR display not working


If you have pro version of the app, then click Update All to update all outdated drivers.
Conclusion
With all sorts of issues on your display, HDR Windows might be fixed with the solutions mentioned above. If you have faced any other issues, write to us in the comments section, and we would like to find you a solution.
We hope this article will be helpful to understand how to fix common problems with HDR displays on Windows 10. We would like to know your views on this post to make it more useful. Your suggestions and comments are welcome in the comment section below. Share the information with your friends and others by sharing the article on social media.
We love to hear from you!
For any queries or suggestions, please let us know in the comments section below. We love to get back to you with a solution. We regularly post tips and tricks, along with solutions to common issues related to technology. Turn on the alerts for the website to get regular updates on the latest published articles.
Related Topics:
7 Best HDR Software For Mac In 2020
Best HDR Software For Windows 10
10 Best Game Recorder Software For Windows
Home
Windows
By
Anup Thapa

HDR is supposed to convey more details and color shades and give things a lifelike look and feel. But many users have had the opposite experience instead, where enabling HDR makes things look washed out.
This often happens due to misconfigured settings, but there are also many misconceptions around HDR, leading to false expectations.
So, in this article, we’ve attempted to clear away all confusion regarding HDR, as well as detailed how to fix the Windows HDR washed out issue.
HDR Requirements and Misconceptions
There are a bunch of display requirements for HDR, but the two main ones you should be concerned with are a good HDR monitor and HDR content.
Most content is SDR. This includes parts of the Windows interface, most games, videos, etc. When you enable HDR, all the content on the screen will appear darker. The HDR content will display better highlights and details, which make it look much better, but the SDR content will, by comparison, look dull.
This is why, if you were watching an HDR movie, for instance, the video would look amazing, but once you close or minimize the video, other parts of Windows would look washed out. Or why it’s better to stick to SDR on games that aren’t properly configured for HDR.
Second, there’s the matter of actual HDR-capable monitors. For a proper HDR experience, an OLED or Mini-LED display with the DisplayHDR 1000 certification (minimum 1000 nits) is recommended. The reality is that such displays are expensive and hard to come by.
Marketers often stick the HDR tag onto monitors and TVs that fall far below these specifications. So, when you attempt to play some HDR content on the lower-end displays, there’s barely any difference from SDR, and sometimes the content looks even worse.
Why Does HDR Make Things Look Washed Out?
As stated, the monitor and content could be possible reasons why HDR makes things look washed out. In those scenarios, you can either upgrade the display or only use HDR when playing HDR content.
But aside from these, another common reason for this issue is a misconfigured setting such as color bit depth. In such cases, you can troubleshoot and fix the issue without shelling out the big bucks to upgrade your display.
How to Fix the Windows HDR Washed Out Issue?
Most users have had success with enabling HDR via Windows, monitor, and in-app settings. But the other solutions, such as adjusting the color bit depth or installing a color profile, can also be helpful.
Enable HDR on Windows / Monitor / App
Generally, the HDR feature is automatically enabled wherever applicable. But in some cases, it may be enabled via Windows and Monitor settings, while it’s disabled in the In-App settings of the game you’re playing or something similar. In such cases, you can easily resolve the issue by manually enabling it everywhere with the following steps:
- Press the buttons on your monitor to go through the monitor settings.
- Locate the HDR settings and ensure it’s enabled.

- Press Win + I, and navigate to System > Display.
- On Windows 11, toggle ON Use HDR. Additionally, you can enable Auto HDR as well.
On Windows 10, click on Windows HD Color Settings first, then enable Use HDR.
- While you’re here, it’s also worth adjusting the brightness slider to max, as that has helped a few users.
- Finally, go to the in-app settings and ensure the HDR option is enabled there as well.


Change Color Bit Depth
SDR typically uses 8 Bit Depth, whereas HDR uses 10 Bit Depth. A bit depth of 10 is capable of producing 64 times the colors compared to 8 Bit. Basically, if your system is currently configured to only use 8 Bit color depth, you’re missing out.
NVIDIA
Here are the steps to change the color depth for NVIDIA GPUs:
- Right-click on your desktop and select the NVIDIA Control Panel.
- Under Display in the left pane, click on Change Resolution.

- Under Output color depth, select 10 bpc (bits per color) and press Apply. If the 10 bpc option is not available, change the frame rate first, then try again.

- Additionally, change the Output Dynamic Range to Full if it isn’t already so. If this blows out the colors and makes the content excessively bright, you can always change it back to Limited later.


AMD
Here are the steps to change the color depth for AMD GPUs:
- Right-click and launch AMD Radeon Settings.
- In the display tab, change the color depth to 10 bpc.

- Additionally, it’s also worth going to Preferences > Radeon Additional Settings and changing the Pixel Format to RGB 4:4:4 Pixel Format PC Standard (Full RGB).

- Close Radeon Settings and test out the new config.


Adjust Color Settings
A lot of users have had success with manually configuring the color settings according to their preferences. Alternatively, you can download a color profile from your display manufacturer’s site and use that as well. Here are the steps to do so:
- Press the buttons on your monitor and look for the COLOR or similar setting.
- Play around with it and see if you can find a configuration you’re satisfied with.
- Next, right-click on the desktop and select Intel Graphics Settings.
- Navigate to Display > Color Settings and adjust the Brightness, Contrast, Hue, Saturation, Temperature, and Gamma to your liking.

- Alternatively, if you’ve downloaded a color profile, use the Run command
colorcpl. - Select your display and press Add > Browse.

- Import the ICC file that you downloaded.
- Press Add again, select the imported color profile under ICC Profiles, and press OK. Now select it from the list and press Set as Default Profile.
- Close the Color Management utility and restart your PC.


Update Monitor Driver
Updating drivers is a generally good practice, and the same applies here as well. You can download the updated driver from the manufacturer’s site and install it directly or via Device Manager. Here are the steps to do so:
- Press Win + X and select Device Manager.
- Expand the monitors section, right-click the display, and select Update Driver.

- Select Search automatically for drivers first and follow the on-screen instructions.
- If it doesn’t update with this method, select Browse my computer for drivers instead and use the driver file you downloaded from the manufacturer’s site for a manual installation.

- Additionally, it’s also a good idea to update your display drivers in the same manner.

