
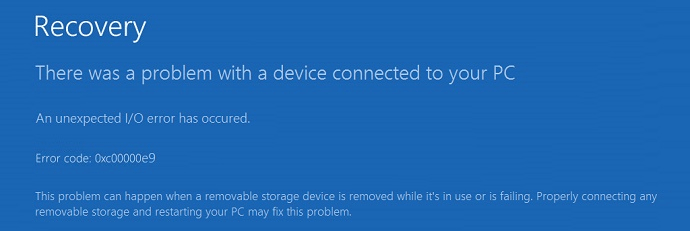
Ошибка 0xc00000e9 «Возникла неожиданная ошибка ввода-вывода» (иногда с указанием файла, например: \Boot\BCD\ или «An unexpected I/O error has occurred» — достаточно распространенная проблема, возникающая при загрузке Windows 10 (здесь она появляется на синем экране «Восстановление»), 8.1 или Windows 7, а в некоторых случаях и при чистой установке системы с флешки или компакт диска.
В этой инструкции подробно о том, чем может быть вызвана неожиданная ошибка ввода-вывода 0xc00000e9 и как её исправить в зависимости от причин возникновения. Если ошибка с этим кодом сообщает о том, что «не удалось загрузить операционную систему, так как файл системного реестра отсутствует или содержит ошибки», используйте методы из этой статьи, лучше — точки восстановления при их наличии: Восстановление реестра Windows 10.
Возникла неожиданная ошибка ввода-вывода 0xc00000e9 — как исправить
Наиболее частой причиной появления ошибки 0xc00000e9 во время загрузки или установки Windows является проблема с работой SATA-устройств или ошибки/неисправности жесткого диска. Чаще всего речь идет о системном жестком диске, но это не всегда так: например, неисправность второго физического диска или DVD-привода также может приводить к такому же результату.

В зависимости от того, при каких условиях возникает «Неожиданная ошибка ввода-вывода» или что предшествовало её появлению, возможны следующие подходы к решению:
- Если ошибка возникает однократно после завершения работы, а при повторном включении не появляется, а на компьютере или ноутбуке установлена Windows 10 или 8.1, попробуйте отключить быстрый запуск, см. Быстрый запуск Windows 10 (тот же метод подойдет и для 8-ки).
- Попробуйте отключить все накопители, кроме системного диска (включая привод DVD, флешки, карты памяти), а если внутри ПК или ноутбука проводились какие-либо работы (например, после чистки от пыли, установки нового оборудования или просто в тех случаях, когда корпус ПК всегда открыт) — перепроверить подключение системного жесткого диска или SSD (при SATA-подключении — как со стороны самого диска, так и со стороны материнской платы, при возможности также следует попробовать использовать другой кабель и разъем SATA на материнской плате).
- На экране с ошибкой вам будет предложено нажать F8 для того, чтобы открыть параметры загрузки. Нажмите F8 (или Fn+F8) и проверьте, загружается ли компьютер в безопасном режиме. Если загрузка прошла успешно, откройте свойства «Диска C» и выполните проверку на вкладке «Сервис».
- Если безопасный режим не запускается, можно попробовать загрузиться с загрузочной флешки с Windows, нажать клавиши Shift+F10 (или Shift+Fn+F10 на некоторых ноутбуках) и использовать командную строку для проверки жесткого диска на ошибки с помощью chkdsk (учитывайте, что при загрузке диск может иметь букву, отличающуюся от C, используйте Diskpart, чтобы определить текущую букву системного раздела диска, также в некоторых случаях может быть необходимым выполнить проверку скрытых разделов). Также вы можете использовать утилиты проверки жестких дисков с какого-либо LiveCD.
- Попробуйте использовать загрузочную флешку с вашей версией Windows для восстановления загрузчика системы, см.: Восстановление загрузчика Windows 10, Восстановление загрузчика Windows 7.
- Перепроверьте параметры БИОС, в частности, режим работы SATA (обычно — AHCI) и режим загрузки (ошибка может быть вызвана переключением из режима UEFI в Legacy или наоборот, когда система на диске установлена в ином режиме).
- По сообщению в комментариях, иногда помогает сброс модуля TPM в БИОС компьютера или ноутбука. Важно: при включенном шифровании Bitlocker и отсутствии ключей восстановления это может сделать недоступными данные на диске.
Обычно, что-то из перечисленного помогает в решении проблемы, однако, если в вашем случае этого не произошло, возможно, имеет смысл попробовать переустановить Windows на компьютере.
Также учитывайте тот факт, что ошибка может быть и следствием аппаратных проблем с жестким диском, особенное если вы роняли ноутбук, жесткий диск в последнее время часто издавал странные звуки или вам регулярно приходилось экстренно выключать компьютер (из розетки или кнопкой питания) во время работы.
В случае, если описанные сценарии появления ошибки 0xc00000e9 — это не то, что происходит в вашем конкретном случае, опишите, как, в какой системе и при каких условиях проблема проявилась у вас, а я постараюсь подсказать возможное решение.
,
Error 0x00000e9 is usually related to a bad HDD (with corrupted system files) or due to invalid BIOS settings. The error 0x00000e9 appears at Windows boot process on a Windows 8-8.1, 7 or Vista based system and the full error message is:
«Windows has encountered a problem communicating with a device connected to your computer.
…………
File: \Boot\BCD
Status: 0x00000e9
Info: An unexpected I/O error has occurred.»
In fact the 0Xc00000e9 error message is telling you that the computer is having problems in communicating properly with your hard drive.

In this tutorial you can find detailed instructions on how to fix the 0x00000e9 error in Windows 8, 7 or Vista boot process.
How to fix Error 0x00000e9 on Windows 8, 7 Vista Startup.
Step 1. Modify BIOS Settings
Step 2. Repair Windows.
Additional help to fix error 0x000009.
Step 1. Modify – Load Default – BIOS Settings.
1. Start your computer and press the appropriate key (DEL or F1 or F2 or F10) to enter BIOS settings. *
* The way to enter into BIOS Settings depends on the computer manufacturer. To Enter into your BIOS Settings, pay attention at the first screen as your computer starts and try to find a message like this:
«DEL to enter setup»
«Press ESC to Enter Setup»
«BIOS Configuration: F2»
«F10 to Enter Setup»
2. Load Default Settings (Load Optimal Defaults)

3. Then look at all BIOS screens to locate the SATA Configuration setting.*
* Note: This setting is usually found under the Advanced section and can be named (depending on manufacturer) as: «SATA Mode» or «SATA Controller Mode» or «SATA Operation» or «Configure SATA as«.
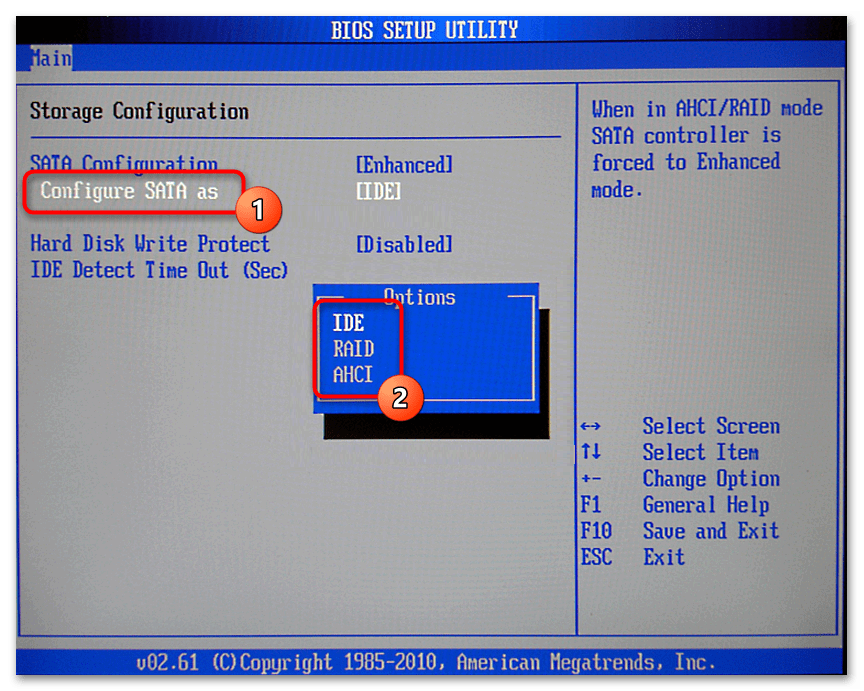
4. Make sure that the SATA Mode (Type) is set to AHCI or IDE and NOT in RAID.*
* Notes:
1. Caution: If you have configured two or more Hard Drives in RAID mode, then leave this setting as is, exit from BIOS setup without saving and continue to the next solution.
2. If the SATA Mode is set to AHCI then change it to IDE. If the SATA Mode is set to IDE then change it to AHCI.

5. Save Changes and Exit BIOS Settings and boot on Windows.

6. If your computer doesn’t boot again, and you receive the same error 0x00000e9 , then revert the SATA setting back to what it was and proceed to to Step 2.
Step 2. Repair Windows Startup problems.
1. From another computer download a Windows installation ISO image according to your OS version.
2. Burn the downloaded ISO image to a DVD disk.
3. Insert the Windows installation media (e.g. the Windows 8 Install DVD) you created before, at the system with the 0x00000e9 error and boot the system from it.
4. Press any key to boot from DVD when prompted.

5. At Windows Setup screen press Next.

6. Choose Repair your computer:

7. Then proceed to repair the Windows startup problems according to your OS:
For Windows 7 or Vista OS: (Windows 8 instructions).
Case No1: Windows can find the problems and can repair them. If this happens:
- Remove the Recovery disk from the DVD drive.
- Press the “Repair and restart your computer” button.
- See if your computer can boot on Windows normally. *

* Notes if the Startup repair cannot fix boot problem(s) automatically:
a. Try to run the “Startup Repair” process two more times, because “Startup Repair” in most cases must run three (3) times until it fixes all problems.
b. If the Startup Repair, cannot fix the 0x00000e9 error, then proceed to the steps at Case No2 below.
Case No2: Startup Repair could not detect (or fix) the problem. If this happens, then:
- Choose the View Advanced options for system recovery and support link.
2. Click at System Restore option to restore your computer to a previous working state.![windows-could-not-detect-problems[3]](data:image/svg+xml,%3Csvg%20xmlns='http://www.w3.org/2000/svg'%20viewBox='0%200%20435%20336'%3E%3C/svg%3E "windows-could-not-detect-problems[3]") 3. Follow the instructions in this tutorial on How to Restore Windows 7 or Vista to a previous working state.
3. Follow the instructions in this tutorial on How to Restore Windows 7 or Vista to a previous working state.
For Windows 8 or 8.1 OS:
Case No1: Automatic Repair finds the problems and can repair them. If this happens:
- Remove the Recovery disk from the DVD drive.
- Press the “Repair and restart your computer” button.
- See if your computer can boot to Windows normally.** Notes if the Startup repair cannot fix the boot problem(s):
a. Try to run the “Startup Repair” process two more times, because “Startup Repair” in most cases must run three (3) times until it fixes all problems.
b. If the Startup Repair cannot fix the 0x00000e9 error, then proceed to steps at Case No2 below.
Case No2: Automatic Repair couldn’t repair your PC. If this happens, then:
1. Choose Advanced options.

2. Select the Troubleshoot option at the following screen:

3. Then choose Advanced options.

4. Choose System Restore.

5. (If asked) Select an account with administrative privileges. Type the password for that account and click Continue.

6. Follow the instructions in this tutorial on How to restore Windows 8 or Windows 8.1 to an earlier working state.
Additional help:
– If you cannot bypass the «0Xc00000e9″ error, by using the above steps, then try the following:
1. Boot again from the Windows installation media and at Advanced options chose Command Prompt. At command prompt, type and execute the following command to check and fix hard disk problems: chkdsk /f /r C:
When the operation is completed Restart your computer and see if Windows can boot normally. If Windows still cannot boot:
2. Backup your personal data and then perform a clean Windows installation.
After installation don’t forget to diagnose the hard disk for hardware errors. If the disk is damaged, then you have to replace the hard disk.
Good luck!

![windows-could-not-detect-problems[3]](https://www.wintips.org/wp-content/uploads/2013/12/windows-could-not-detect-problems3_thumb.jpg "windows-could-not-detect-problems[3]")


If this article was useful for you, please consider supporting us by making a donation. Even $1 can a make a huge difference for us in our effort to continue to help others while keeping this site free:
- Author
- Recent Posts
Konstantinos is the founder and administrator of Wintips.org. Since 1995 he works and provides IT support as a computer and network expert to individuals and large companies. He is specialized in solving problems related to Windows or other Microsoft products (Windows Server, Office, Microsoft 365, etc.).
Are you facing error 0xc00000e9 now? Don’t worry. This post will give you 9 solutions to solve this issue. You can adopt one of them according to your situation to boot up your computer. Please read on to get them!
What Is 0xc00000e9?
Some users may encounter error code 0xc00000e9 when they power on computers. This error will prevent the computer from booting up. They may receive messages shown like the following pictures. Sometimes, “File: Boot BCD” will appear above the error code 0xc00000e9.
Many people will search how to fix 0xc00000e9 boot BCD in Google or seek help in forums. Fortunately, the status 0xc00000e9 will indicate the causes of the BSOD problem. The error code 0xc00000e9 may be caused by an unexpected I/O error that is related to storage devices, a missing or corrupt system registry file, or something else.
Then, how many factors will cause error code 0xc00000e9? Here are some of them:
- Loose or damaged connection of removable storage devices.
- Missing or corrupt system files such as the registry file.
- Out-of-date drivers.
- Hard drive problems such as corrupted MBR, bad sectors, hard drive failure, etc.
- Problematic Windows update.
- Virus attack.
How to fix error code 0xc00000e9 Windows 10? This may be a question for many of you. If so, please read on to get solutions.
Tip: These methods are only applied when the Automatic Repair fails to fix your computer.
Method 1. Run SFC and DISM
If 0xc00000e9 boot BCD error is caused by missing or corrupt system files, you can run SFC and DISM to replace or repair them.
SFC (System File Checker) is a Windows built-in tool used for replacing damaged, lost, or changed system files with good system files. DISM (Deployment Image Servicing and Management) is a tool used to restore system files.
Here is a tutorial for running the SFC command.
Step 1: Enter WinRE. You can enter it through two consecutive failed attempts to start Windows.
Step 2: Navigate to Troubleshoot>Advanced options>Command Prompt.
Step 3: Type “sfc /scannow” and press the Enter key. Then, wait until the procedure ends.
If SFC fails to repair system files, you can run DISM.To run DISM, you should type the following commands one by one.
- exe /Online /Cleanup-image /Scanhealth
- exe /Online /Cleanup-image /Restorehealth
Finally, you can close the Command Prompt window after the procedure ends and test whether the error is solved.
Method 2. Uninstall Incompatible Windows Update
It is possible that status 0xc00000e9 is caused by a problematic Windows update. If so, you can uninstall it in Safe Mode.
Here is the tutorial for uninstalling Windows update in Safe Mode.
Step 1: Enter WinRE and navigate to Troubleshoot>Advanced options>Startup Settings.
Step 2: Click F5 key to choose Enable Safe Mode with Networking option, thus booting into Safe Mode with networking.
Step 3: Open File Explorer. Right-click on This PC and choose Properties.
Step 4: Click Control Panel Home at upper the left corner of the pop-up window. Then, select Programs and Features in the next pop-up window.
Step 5: Click View installed updates on the program uninstalling interface.
Step 6: Right-click a problematic update to uninstall.

Method 3. Update Drivers
A device driver is a special program that allows computers and devices to communicate. The operating system can only control the operation of the hardware device through this interface. If drivers of hard drives are not properly installed, they will not work properly.
So, you can try updating disk drivers to fix 0xc00000e9 Windows 10.This method is available when users can boot in Safe Mode. You can refer to the following tutorial.
Step 1: Press “Windows + X” keys and select Device Manager in the pop-up menu.
Step 2: Expand Disk drivers directory and right-click on these hard drive drivers one by one to select Update driver.
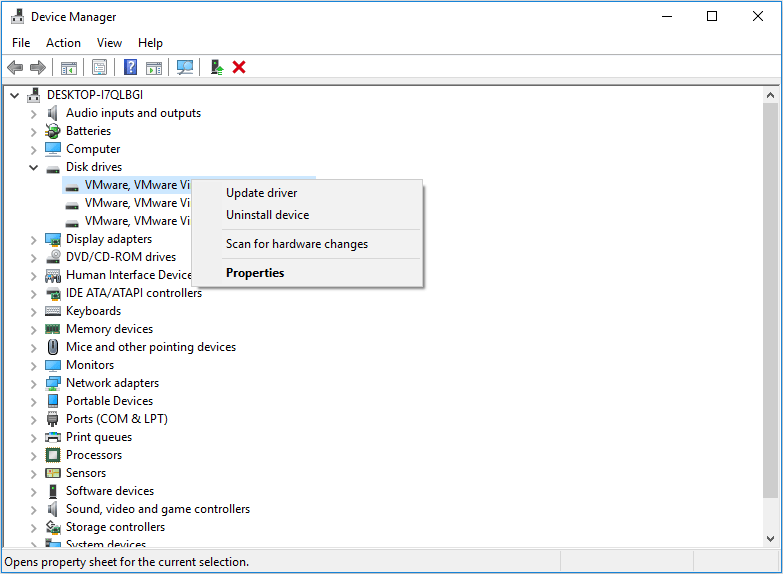
Step 3: Select Search automatically for updated driver software in the pop-up window.
Tip: If Windows can’t find a new driver, you can find a proper driver on the device manufacturer’s website and follow its instruction to perform the operation.
Method 4. System Restore
System restore can revert your computer’s state to that of a previous point in time with a restore point created before. Restore points contain Windows system files, installed applications, Windows Registry, and system settings. You can use it to delete problematic changes you have made to your computer.
Therefore, you can system restore your PC to solve the “an unexpected i/o error has occurred 0xc00000e9” issue. System restore won’t affect your personal files, so it won’t cause data loss. If you find your data is lost after system restore, it must be caused by Windows errors.
Click How to Restore Computer to Earlier Date in Windows 10/8/7 to get a detailed tutorial.
Method 5. Check the Connection of Removable Storage Devices
As mentioned above, error 0xc00000e9 may be caused by the loose or damaged connection of removable storage devices. So, you should make sure the storage devices are properly connected to your PC.
You can refer to the following tutorial.
Step 1: Remove all external storage devices like USB drives, external hard drives, RAID, etc.
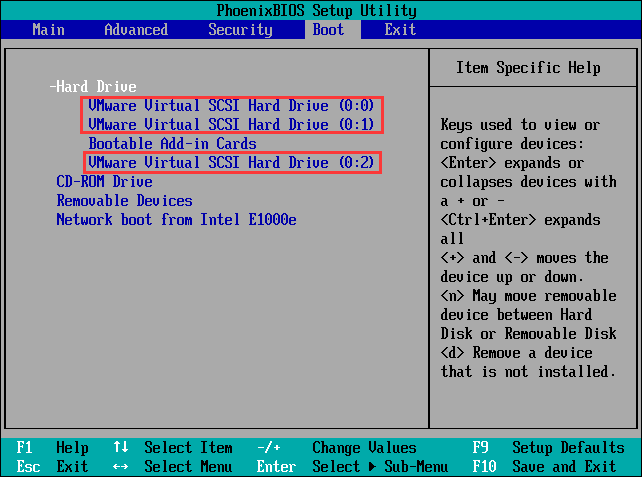
Step 2: Enter into BIOS or use the DiskPart command to check the number of hard drives connected to the PC.
Check the connection in BIOS:
- Follow the wizard that appears on the screen when you power on the system to enter BIOS.
- Skip to Boot Expand Hard Drive directory to see how many disks your PC can detect.
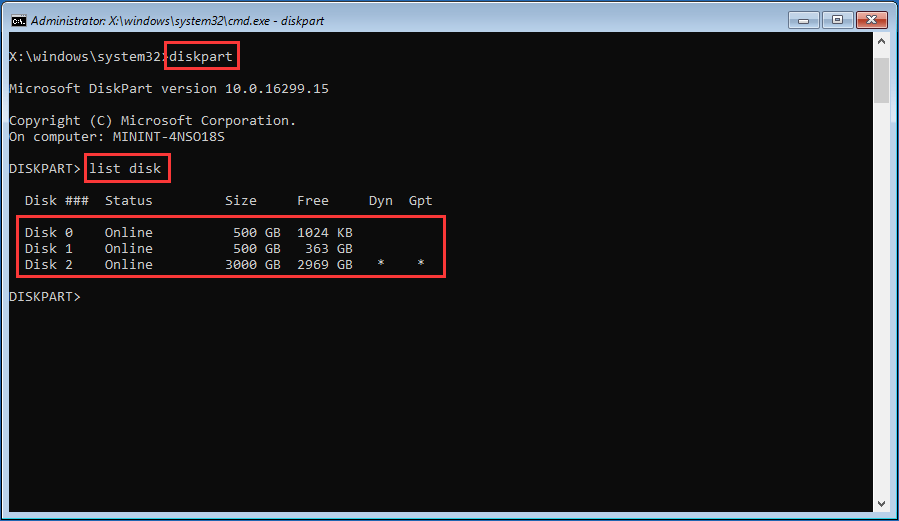
Check connection with DiskPart:
Open the Command Prompt window from WinRE and enter the following commands one by one. Then, you can see the number of hard drives detected by your PC.
- Diskpart
- List disk
Step 3: Remove the internal hard drives and plug them in correctly if the hard drives can’t be detected by your PC. If the hard drives still can’t be detected by your PC after you reconnect them, you should check whether there are problems with cables or the hard drives.
If there is a problem with your hard drives, but they are still detected by your computer, you can get them repaired through method 6 to 7.
Note: If the hard drive fails to be repaired, you can apply method 9 to recover data and replace the problematic disk.
If your computer can’t detect the hard drive, you should send it to a data recovery lab to get your data back.
Method 6. Rebuild MBR
MBR (Master Boot Record) is the first sector on the hard drive accessed by a computer in booting process. MBR records the relevant information about the hard disk itself and the size and location information of each partition on the hard disk.
If it is destroyed, the basic data structure information on the hard disk will be lost. Error 0xc00000e9 may happen and the computer won’t start. Fortunately, you can rebuild MBR through Bootrec.exe. This tool allows you to repair the Master Boot Record (MBR) issue, boot sector issue, and Boot Configuration Data storage issue (including 0xc00000e9 boot BCD error).
Here is the tutorial on how to rebuild MBR.
Note: This method is only applied to a bootable disk. You can make a Windows installation media or a MiniTool Partition Wizard bootable disk. However, MiniTool Partition Wizard is recommended because you need to use it to scan for bad sectors.
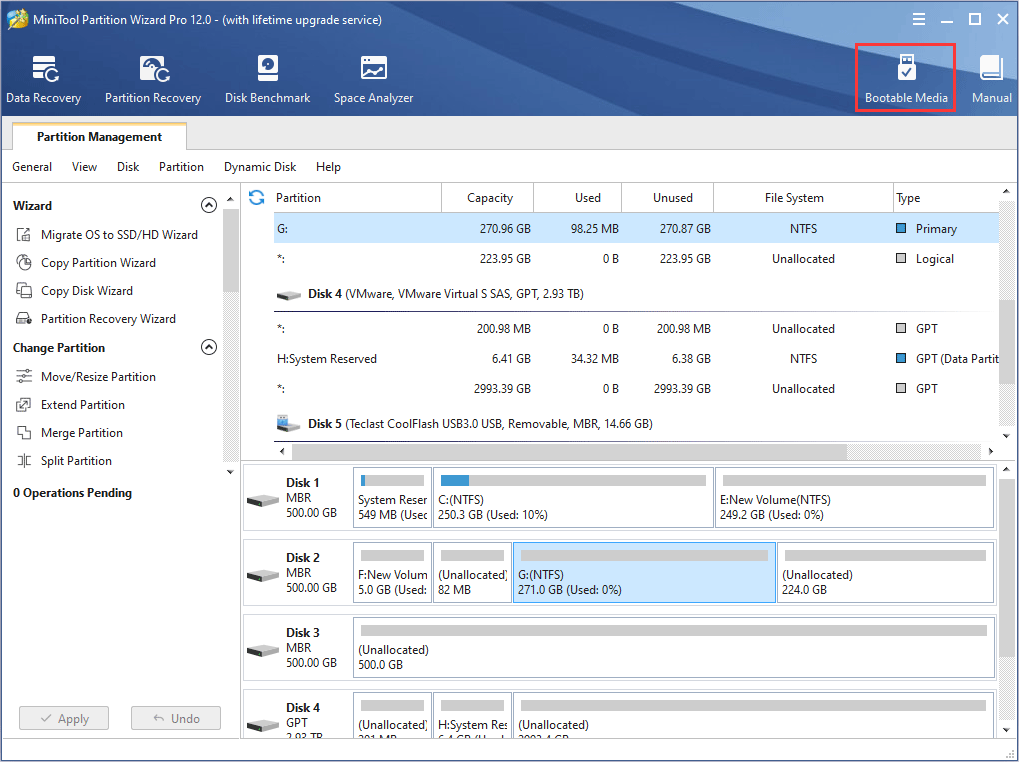
Step 1: Buy MiniTool Partition Wizard and launch it on a normal running computer.Click Bootable Media on the toolbar.
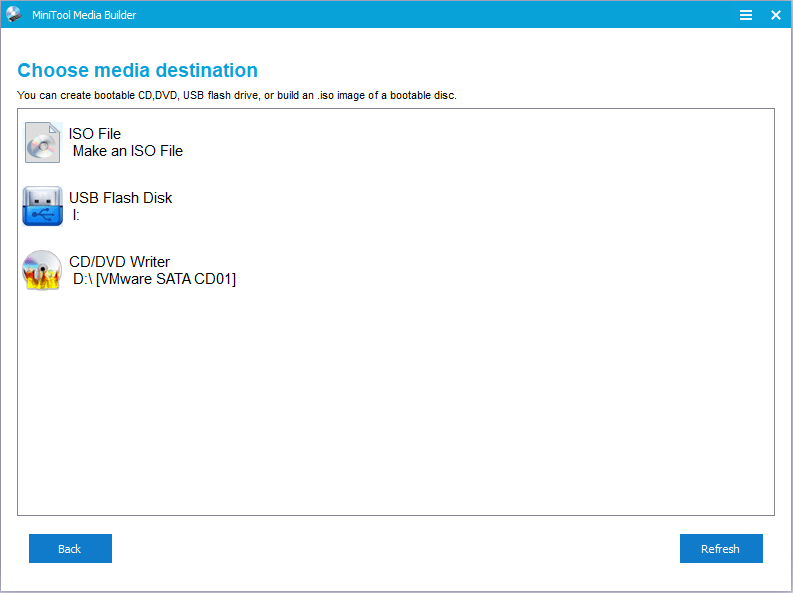
Step 2: Follow the wizard and choose USB Flash Drive as the media destination. The boot.iso file will be burnt into the USB drive directly to complete a bootable disk.
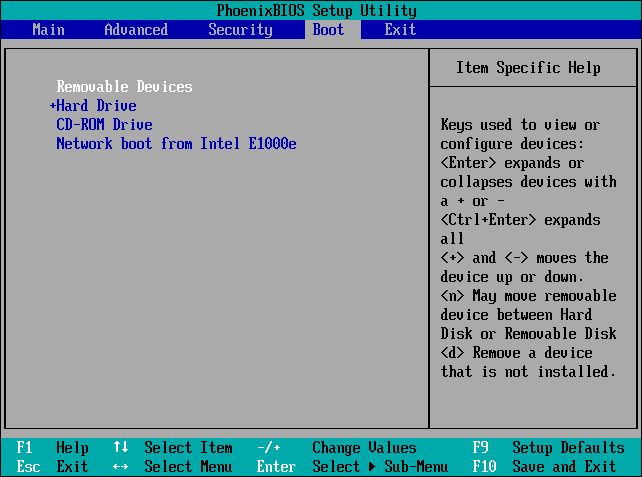
Step 3: Set the Firmware to make the computer boot from the bootable disk.
- Plug the bootable disk into the computer that can’t boot.
- Enter BIOS.
- Set Removable Devices at the first place of the boot sequence. Then, boot the computer.
Step 4:Wait a few secondswithout any operations and go to the following interface. Click Command Console to open Command Prompt input windows.
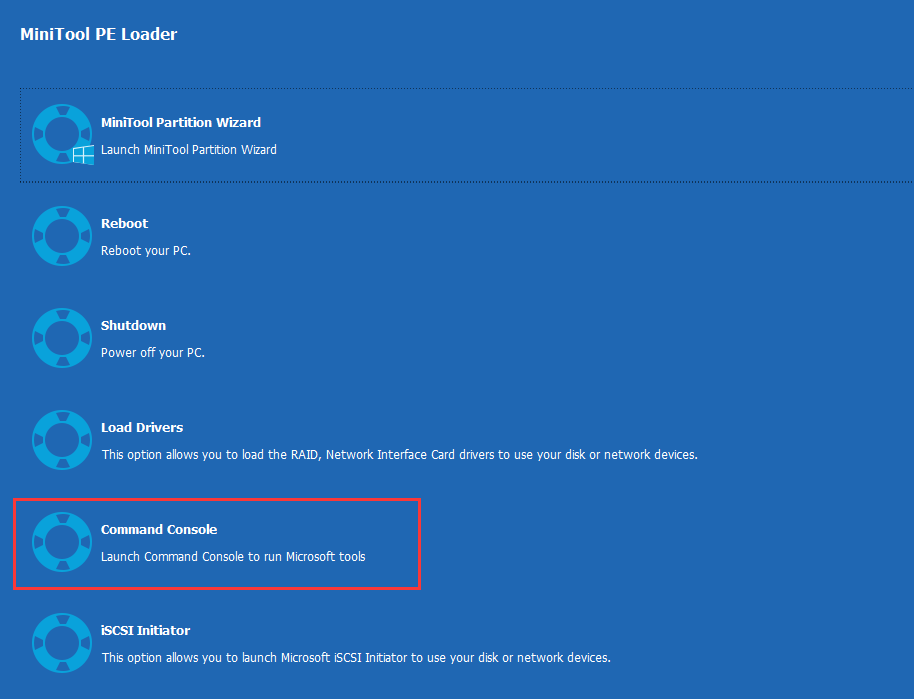
Step 5: Execute the following command lines one by one.
- bootrec /fixmbr
- bootrec /fixboot
- bootrec /rebuildbcd
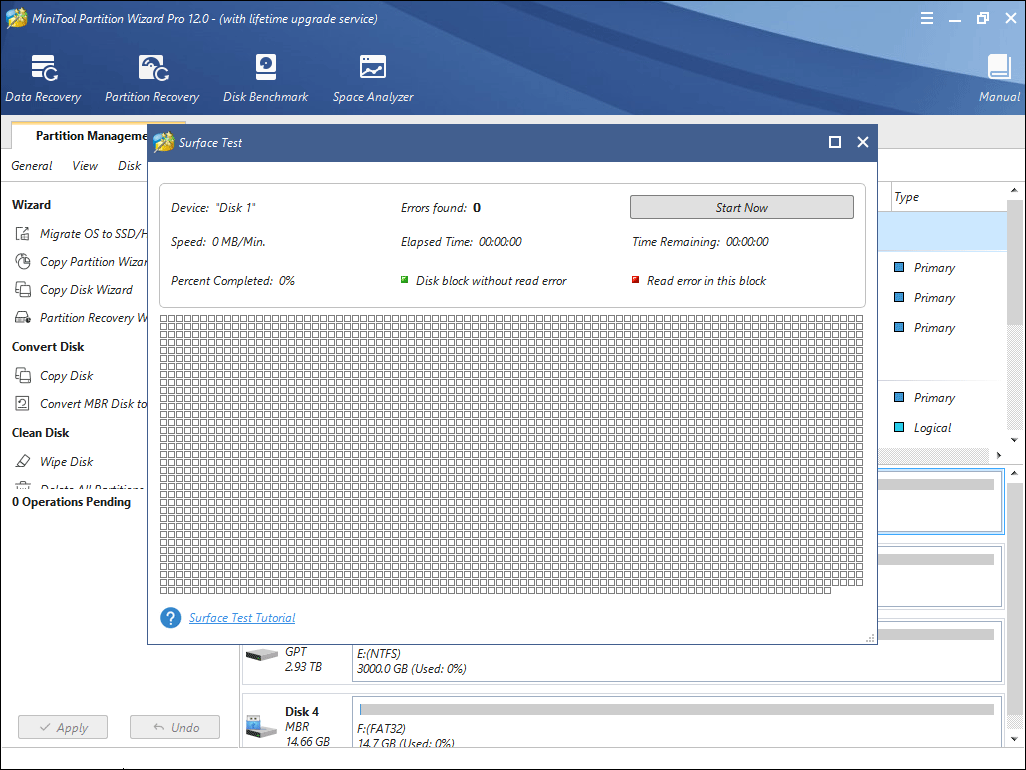
Method 7. Scan for Bad Sectors
If a hard disk serves for a long time, it may generate bad sectors, which will probably cause the error “an unexpected i/o error has occurred 0xc00000e9,” making the computer not bootable. If so, you can use MiniTool Partition Wizard to scan for bad sectors. If there are many bad sectors on the hard drive, replacing it is recommended.
Here is the tutorial on how to scan for bad sectors.
Step 1: Make a bootable disk of MiniTool Partition Wizard.
Step 2: Boot the computer with the MiniTool Partition Wizard bootable disk.
Step 3: Wait a few seconds without any operations to make MiniTool Partition Wizard open automatically. Then, click Partition & Disk Management to go to its main interface.
Step 4: Right-click the system disk and choose Surface Test.
Step 5: Click Start Now to begin. If there are bad sectors, they will be marked with red blocks.
Method 8. Replace Hard Drive
If the above methods can’t repair your hard drive, you should consider replacing it. Before you replace the hard drive, you may want to recover data first.
As for data recovery software, you should choose a reliable one, which also allows you to recover data when the computer fails to boot.
MiniTool Partition Wizard is such a piece of software. I will show you how to recover data with it. Of course, if there are no important files on your computer, you can skip the data recovery work.
Here is the tutorial on how to recover data when the computer can’t boot.
Step 1: Boot the computer with MiniTool Partition Wizard bootable media.
Step 2: Go to its main interface and click Data Recovery.
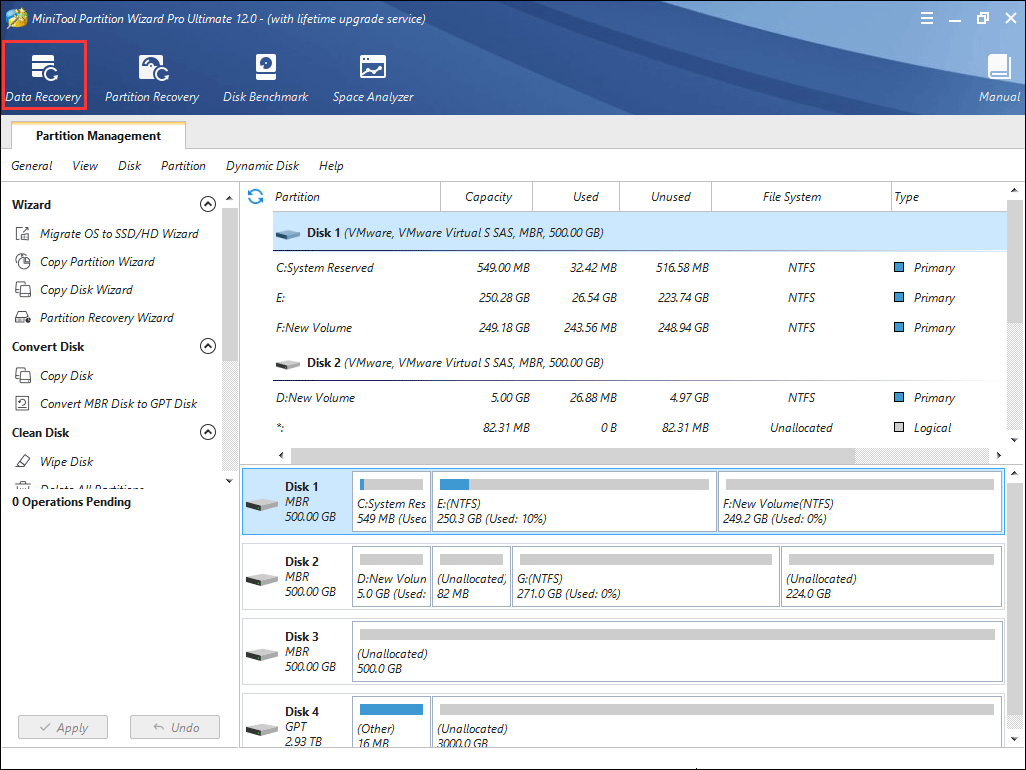
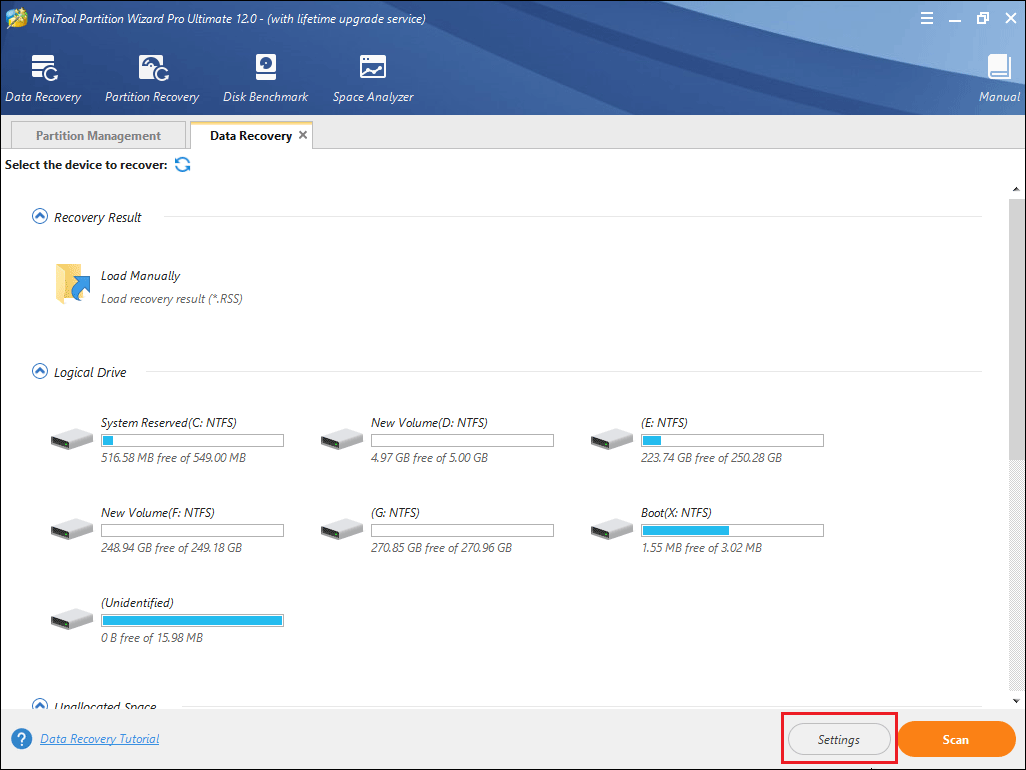
Step 3: Choose the system disk and then click Scan.
Settings: This feature allows you to limit the scanning range by selecting file systems and file types.
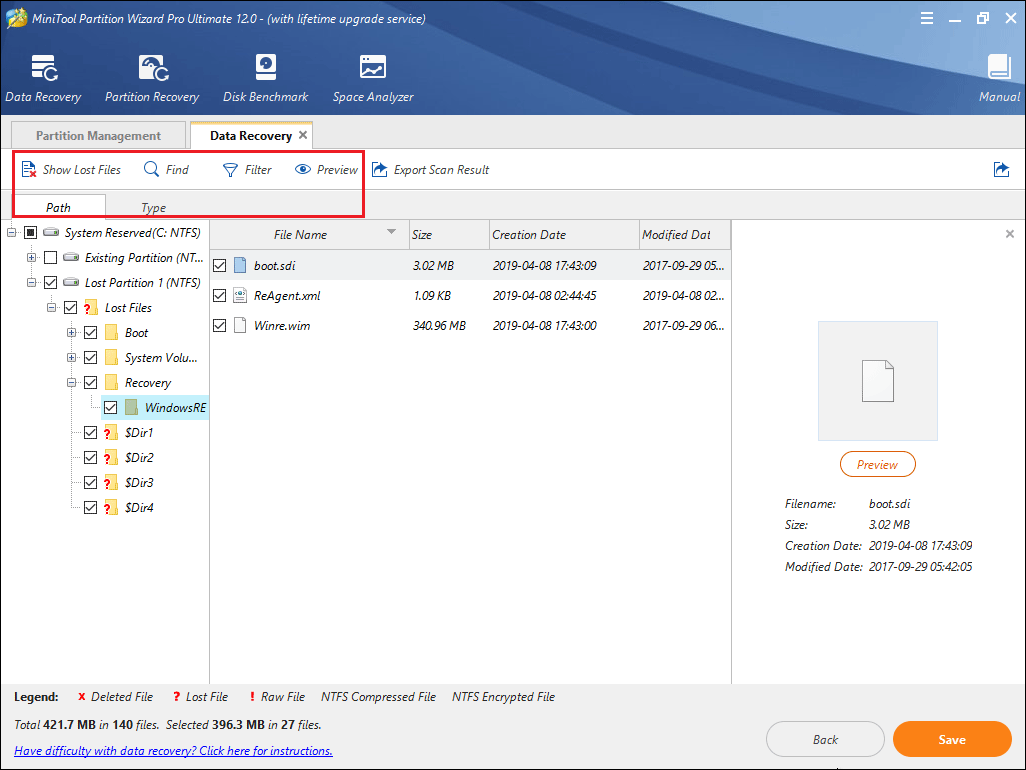
Step 4: Find the lost files with built-in tools.
- You can find files according to their paths, and file types.
- Show Lost Files feature only displays the lost files.
- Find feature allows you to find files by typing continuous parts of their file names.
- Filter feature allows you to find files through narrowing down the files range according to filename/extension, file size, creation/modification date, etc.
- Preview allows you to preview the files that don’t exceed 100 MB before the data is recovered.
Step 5: Select files and then Save them into a safe position.
Then, you can replace your hard drive. Please click How to Install Windows 10 on a New Hard Drive (with Picture) to get a detailed guide.
Method 9. Kill Virus
The error code 0xc00000e9 may be caused by a virus. If so, you can run an antivirus to fix this problem. But, please note that a virus attack may cause data loss. You should recover important files first. Then, you should make a bootable antivirus disk and kill the virus according to its instruction.
0xc00000e9 FAQ
What is 0xc00000e9?
0xc00000e9 is a Windows error preventing your computer from booting up. This error may be caused by loose or damaged connection of removable storage devices, missing or corrupt system files, out-of-date drivers, hard drive problems, problematic Windows update, virus attack, etc.
What is an unexpected I/O error?
An unexpected I/O error is one of the causes of the error 0xc00000e9. The error message may be shown like the following: “Windows has encountered a problem communicating with a device connected to your computer; File BootBCD; Error code: 0xc00000e9; An unexpected I/O error has occurred.”
This error is usually related to storage devices. Click What Is I/O Device Error to know more.
How do I fix error 0xc00000e9?
- Run SFC and DISM.
- Uninstall incompatible Windows update.
- Update drivers.
- Restore system.
- Check the connection of removable storage devices.
- Rebuild MBR.
- Scan for bad sectors.
- Replace hard drive.
- Kill virus.
Here are 9 solutions to error code 0xc00000e9. If your computer won’t boot due to this error, this article will help you out.Click to tweet
Bottom Line
Has this article been helpful for you? We need your feedback. If you have problems in performing any of the above methods, you can leave a comment below or email us at [email protected]. We will reply to you as soon as possible. If you have any better solutions, please also leave a comment below to share.
Все способы:
- Способ 1: Отключение «Быстрого запуска»
- Способ 2: Проверка подключения накопителя
- Способ 3: Отключение периферии
- Способ 4: Проверка дисков на ошибки
- Способ 5: Изменение настроек BIOS
- Способ 6: Использование точки восстановления
- Вопросы и ответы: 0
Ошибка загрузки Windows 10 чаще всего вызывается неполадками в работе SATA-устройств, наличием bad-блоков на жестком диске либо его неисправностью. Также возможно повреждение реестра, но в этом случае причина будет указана в описании ошибки.
Способ 1: Отключение «Быстрого запуска»
Если неполадка носит разовый характер и появляется она после завершения работы Windows, отключите в настройках электропитания функцию «Быстрый запуск» и понаблюдайте за поведением системы.
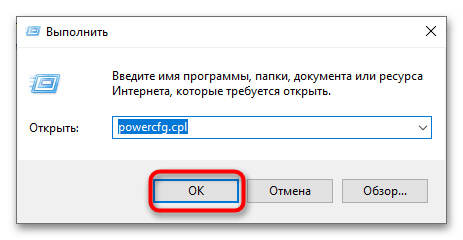
- Откройте нажатием Win + R диалоговое окошко быстрого выполнения команд и выполните команду
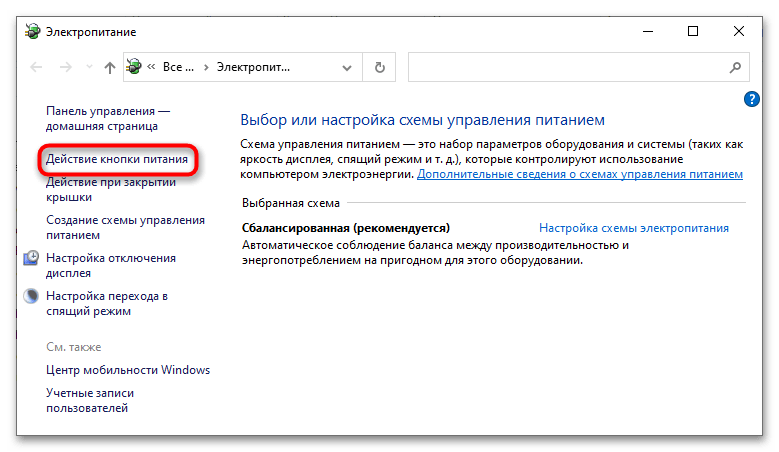
powercfg.cpl, чтобы перейти к параметрам электропитания. - Слева в меню нажмите «Действие кнопок питания».
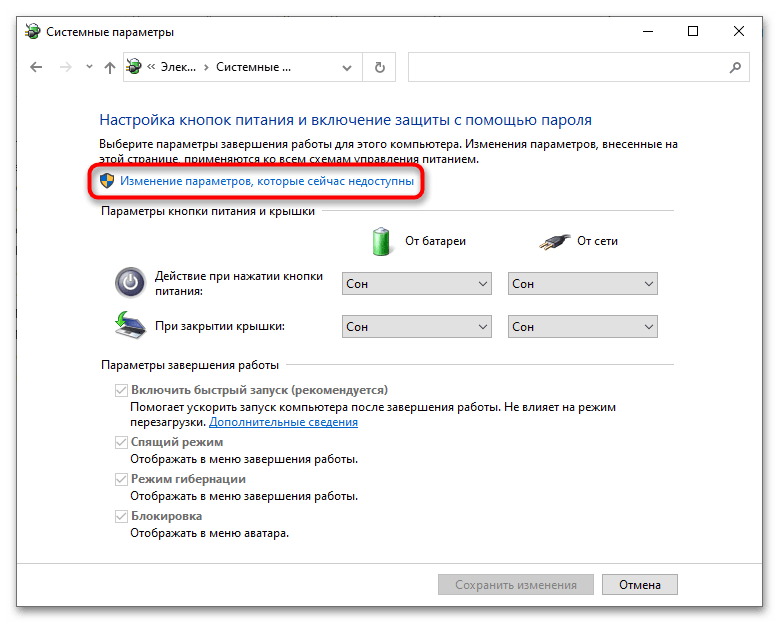
- В следующем окне нажмите ссылку «Изменение параметров, которые сейчас недоступны».
- Разблокируются опции блока «Параметры завершения работы» в этом же окне. Снимите флажок с чекбокса «Включить быстрый запуск (рекомендуется)» и сохраните настройки.
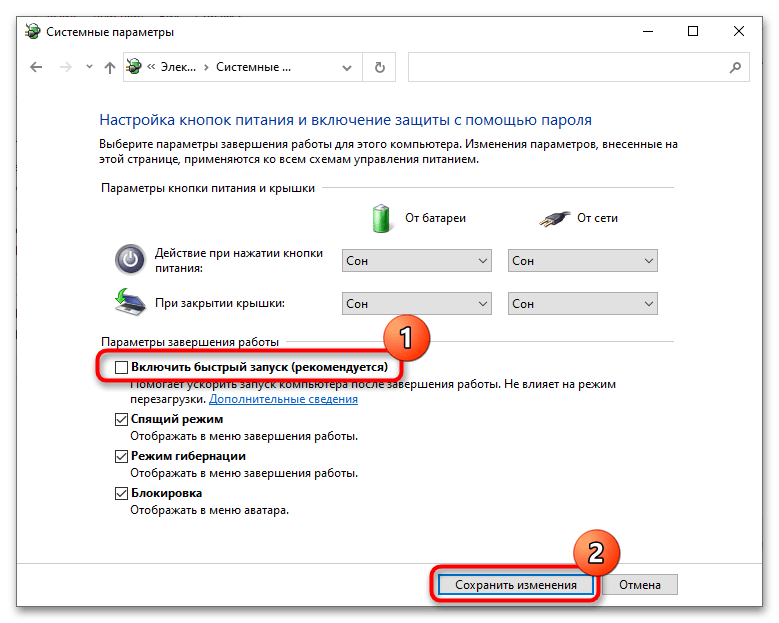
Отключение функции несколько увеличит время загрузки операционной системы, зато ошибка 0xc00000e9 больше не станет вас беспокоить.
Способ 2: Проверка подключения накопителя
Если незадолго до появления ошибки вы проводили апгрейд компьютера или чистили системный блок, проверьте состояние подключения жестких дисков через SATA. Убедитесь в плотности контактов как со стороны накопителя, так и со стороны материнской платы, не будет лишним убедиться в исправности разъемов и SATA-кабеля. При наличии другого кабеля подключите накопитель через него, попробуйте выбрать другой SATA-разъем. Обратите внимание и на USB-порты.
Если к компьютеру подключены внешние носители, например флешки, вытащите их и включите ПК. Успешная загрузка укажет на возможную неисправность порта USB или носителя. Как вариант, можно попробовать подключить съемный накопитель через порт на задней панели системного блока.
Способ 3: Отключение периферии
Если к ПК подключены флешки, карты памяти, дополнительные HDD (внешние или внутренние), отключите их. Исчезновение неполадки с большей долей вероятности укажет на неисправность одного из устройств или интерфейса, к которому оно было подключено.
Способ 4: Проверка дисков на ошибки
Проверьте подключенные к компьютеру жесткие диски и внешние накопители на предмет логических и физических ошибок. Если имеется такая возможность, снимите накопители, подключите их ко второму рабочему ПК и проверьте их средствами штатной утилиты «chkdsk».
- Определите буквы разделов подключенных дисков в «Проводнике».
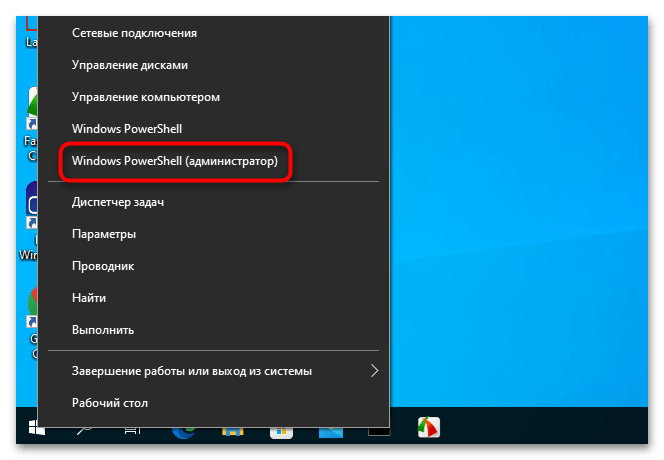
- Откройте от имени администратора «Командную строку» или «Windows PowerShell».
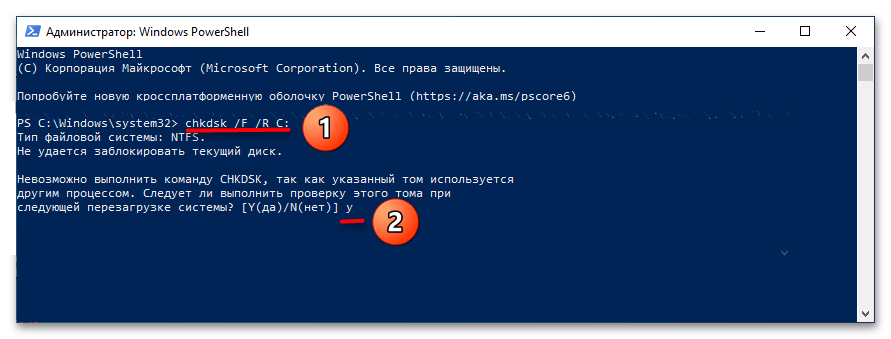
- Выполните команду
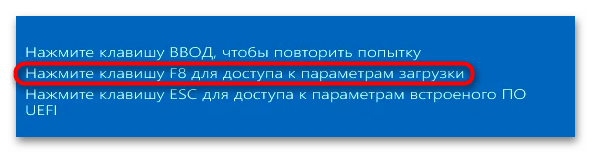
chkdsk /f /r X:, где X — буква проверяемого раздела. В случае обнаружения bad-блоков и ошибок файловой системы последние будут исправлены. - При отсутствии возможности проверить диски на втором компьютере попробуйте загрузить ПК в «Безопасном режиме», для чего на экране с ошибкой 0xc00000e9 нажмите клавишу F8.
Читайте также: Вход в «Безопасный режим» в Windows 10
- В случае удачной загрузки выполните проверку как было показано в пунктах 2 и 3.
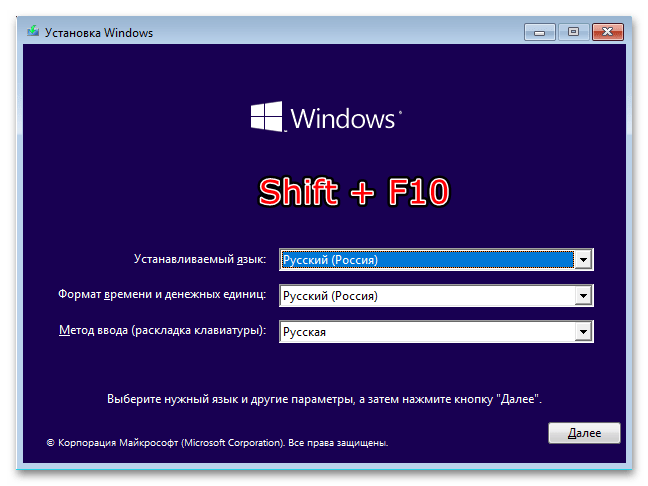
- Если компьютер не загружается, используйте для его загрузки установочную флешку с Windows. Когда на экране появится окно мастера установки, нажмите Shift + F10, чтобы запустить «Командную строку».
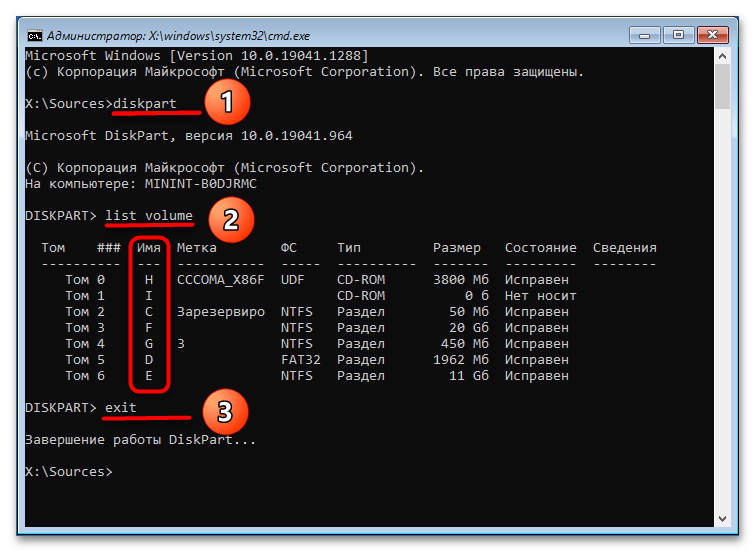
- Определите буквы разделов, для чего в окне консоли последовательно выполните команды
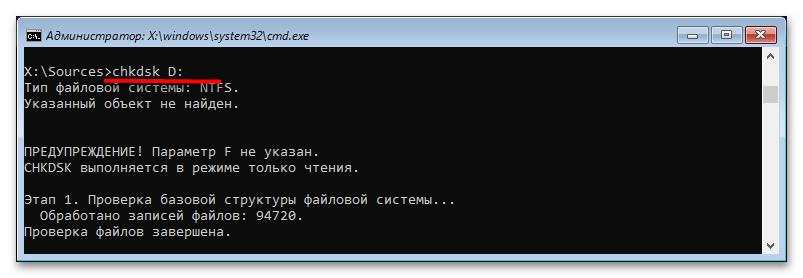
diskpart,list volumeиexit. - Выполните команду
chkdsk /f /r X:, где X – буква проверяемого тома. - Аналогичным образом проверьте другие разделы.
Для диагностики HDD и переназначения физически поврежденных секторов также можно использовать программу Victoria, способную работать как в загруженной Windows 10, так и из-под спасательного загрузочного диска, например из-под LiveDisk by Sergei Strelec, в состав которого она входит.
Читайте также: Восстанавливаем жесткий диск программой Victoria
Способ 5: Изменение настроек BIOS
Отмечены случаи, когда ошибка 0xc00000e9 появлялась после изменения режима SATA-контроллера жесткого диска и/или режима загрузки. В этом случае необходимо восстановить настройки по умолчанию.
- Зайдите в BIOS вашего компьютера и переключитесь в раздел конфигурации устройств, только учтите, что в разных моделях и версиях БИОС название раздела и самой опции переключения может отличаться.
Читайте также: Как попасть в BIOS
- в разделе «Main» ищите опцию «SATA Mode» или «Configure SATA as»;
- в разделе «Advanced» ищите настройку «System Configuration» → «SATA Controller Mode».
В большинстве случаев рекомендуется выбирать режим «AHCI» или «Compatibility», если используется новая прошивка «IDE».
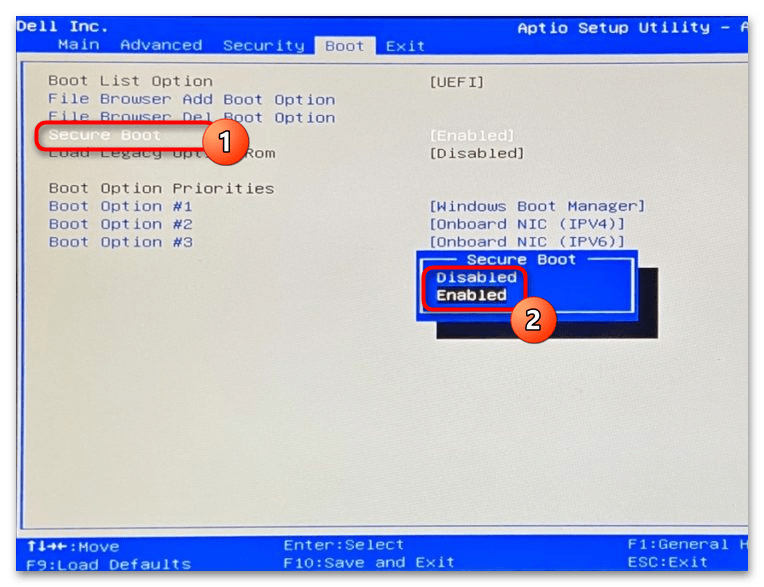
- Чтобы изменить режим загрузки, зайдите в BIOS в раздел «Boot», найдите там опцию «Secure Boot» и выставьте для нее значение «Disabled» или «Enabled» (можно попробовать тот и другой вариант).

В некоторых моделях материнских плат опция переключения между режимами загрузки располагается в разделе «Startup» и называется «UEFI/Legacy Boot». В этом случае нужно выбрать значение «Legacy Only».
Если вы сомневаетесь в правильности действий, сбросьте BIOS к заводским настройкам.
Подробнее:
Сбрасываем настройки BIOS
Способ 6: Использование точки восстановления
Если ошибка загрузки, предположительно, вызвана повреждением системного реестра, выполните откат Windows 10 к ближайшей точке восстановления.
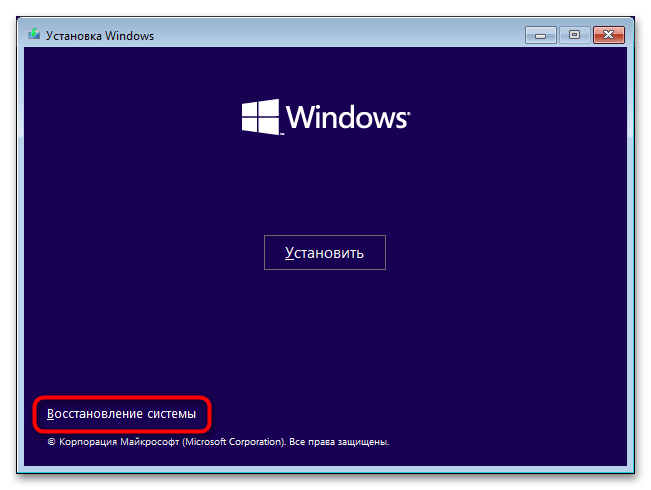
- Загрузите ПК с установочной флешки и нажмите в окне мастера установки «Далее» → «Восстановление системы».
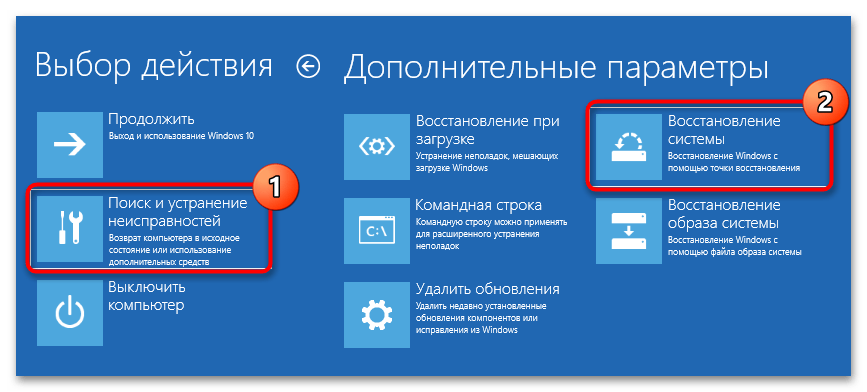
- При этом вы попадете в среду WinPE, выберите в ней «Поиск и исправление неисправностей» → «Восстановление системы».
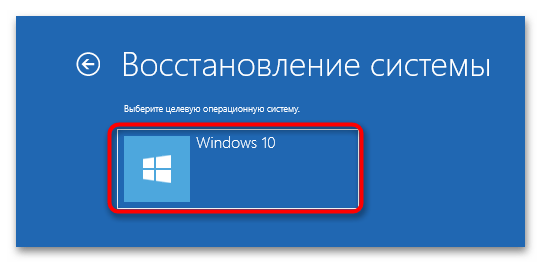
- Укажите целевую операционную систему.
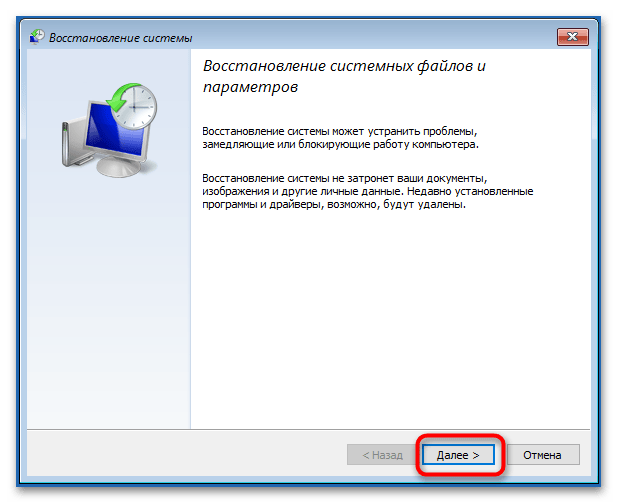
- Нажмите в окне утилиты «Восстановление системы» кнопку «Далее» и проследуйте указаниям пошагового мастера.
Если приведенные выше решения оказались неэффективными, переустановите операционную систему или сбросьте ее к исходному состоянию.
Читайте также:
Возвращаем Windows 10 к заводскому состоянию
Способы переустановки операционной системы Windows 10
Наша группа в TelegramПолезные советы и помощь