
I needed to run git natively in windows (no wsl) for a recent project. I use ssh certificates with passphrases to authenticate with my git provider.
Ssh requires the certificate passphrase every time you use a connection. It’s annoying typing this passphrase in to terminal when using a git command.
The Problem
On most *nix systems there is an ssh-agent installed that will store your pass phrases so you don’t have to enter them when using Git with ssh.
Ssh-agent is harder to configure on windows because some of the default settings and paths are different to *nix systems.
I didn’t want to use Git for Windows because it uses GitBash. I couldn’t use WSL because I wanted git to work on any terminal in windows.
These are the steps I had to research to use Git on Windows with the built in Windows ssh-agent.
Note: You must be an administrator to perform the required actions.
Open ssl on Windows
If you use Windows 10 or higher there is a built-in openssl instance. You can turn it on in the Optional Features settings pane.
Microsoft provide more instructions here: https://learn.microsoft.com/en-us/windows-server/administration/openssh/openssh_install_firstuse?tabs=gui
Follow the instructions to install it if you don’t have it.
A note on certificates
I’ll assume that you have ssh certificates available and any ssh aliases are set in the config file
The default location for the config file on windows is
$HOME\.ssh\config
You should create that file if you need ssh aliases. You can read more about this in my article on ssh for git accounts — /2021/05/04/configure-multiple-github-accounts-one-computer/
Enabling Ssh agent
Open a powershell terminal as administrator and run the following to have ssh-agent available.
# Have ssh agent start automatically
Get-Service ssh-agent | Set-Service -StartupType Automatic

# Start ssh agent now
Start-Service ssh-agent

# Should work successfully
Get-Service ssh-agent
Configure git to use Windows ssh
# tell git to use ssh.exe
git config --global core.sshCommand "'C:\Windows\System32\OpenSSH\ssh.exe'"
Load keys into ssh agent
Copy your keys into a folder that ssh-agent can access. Anywhere in the $HOME/.ssh should be ok.
Then add the key to ssh-agent. You will be prompted for a password and ssh agent will remember it for you.
ssh-add "C:\Users\darragh\.ssh\authorized_keys\darraghPersonalGithub"
22 Sep 2019
Reading time ~4 minutes
Table Of Contents
- Pre-requisites
- When to use SSH keys instead of HTTPS
- Git Bash
- Github Desktop Application
- Generate new SSH key
- Add public SSH key to your GitHub account
- Add private SSH key to the ssh-agent
- Use SSH over HTTPS
- Verification
- References
Pre-requisites
- Git Bash
When to use SSH keys instead of HTTPS
- Your corporate firewall blocks port 22, then even if you have set the remote origin to use HTTPS url, the authentication will fail as it is done via SSH.
Remedy is to set up SSH keys and use SSH over HTTPS port 443.
Below are some of the errors different applications throw when the port is blocked and HTTPS remote url is used.
Git Bash
When you try to push your changes, both Github Login and OpenSSH prompt asking for your username and password will fail with error remote no anonymous write access. fatal authentication failed for github.
Github Desktop Application
You will be able to login to your github desktop application as the authentication is done via HTTPS. However, when you try to push your changes it will result in authentication failure.
Below is the logs captured by the desktop application showing that the git push is trying to authenticate via SSH.
2019-09-22T13:16:46.927Z - info: [ui] Executing push: git -c credential.helper= -c protocol.version=2 push origin master:master --progress (took 21.740s)
2019-09-22T13:16:46.927Z - error: [ui] `git -c credential.helper= -c protocol.version=2 push origin master:master --progress` exited with an unexpected code: 128.
stderr:
ssh: connect to host github.com port 22: Connection timed out
fatal: Could not read from remote repository.

Please make sure you have the correct access rights
and the repository exists.

(The error was parsed as 2: Authentication failed. Some common reasons include:

- You are not logged in to your account: see File > Options.
- You may need to log out and log back in to refresh your token.
- You do not have permission to access this repository.
- The repository is archived on GitHub. Check the repository settings to confirm you are still permitted to push commits.
- If you use SSH authentication, check that your key is added to the ssh-agent and associated with your account.)
Generate new SSH key
-
Run Git Bash.
-
Generate SSH key with your email id as comment.
$ ssh-keygen -t rsa -b 4096 -C "your_email@example.com"
-
When you’re prompted to “Enter a file in which to save the key,” press Enter to save the key in the default location (/c/Users/username/.ssh/id_rsa). Your public key will also get saved here.
-
Copy the public key to clipboard.
$ clip < ~/.ssh/id_rsa.pub
Add public SSH key to your GitHub account
Go to Settings in your Github account to add the SSH public key.
Under SSH keys tab, select New SSH key.
Give a title and paste the key in the text area.

Like the content ?
Add private SSH key to the ssh-agent
Git bash tool comes with a ssh-agent.
Create a new ~/.profile (or) ~/.bashrc file by running below command in git bash.
Paste below script into your ~/.profile (or) ~/.bashrc file to auto launch the ssh-agent whenever you run your git bash shell.
env=~/.ssh/agent.env

agent_load_env () { test -f "$env" && . "$env" >| /dev/null ; }

agent_start () {
    (umask 077; ssh-agent >| "$env")
    . "$env" >| /dev/null ; }

agent_load_env

# agent_run_state: 0=agent running w/ key; 1=agent w/o key; 2= agent not running
agent_run_state=$(ssh-add -l >| /dev/null 2>&1; echo $?)

if [ ! "$SSH_AUTH_SOCK" ] || [ $agent_run_state = 2 ]; then
    agent_start
    ssh-add
elif [ "$SSH_AUTH_SOCK" ] && [ $agent_run_state = 1 ]; then
    ssh-add
fi

unset env
This script will load the identities in the ssh agent from your default location ~/.ssh/id_rsa.
Identity added: /c/Users/username/.ssh/id_rsa (your_email@example.com)
Use SSH over HTTPS
This step is required only if your corporate firewall is blocking port 22.
Create a new config file in your .ssh directory i.e. /c/Users/username/.ssh/config
Paste below contents in the file to use port 443 for SSH connections to host ssh.github.com.
Host github.com
  Hostname ssh.github.com
  Port 443
Run below command in git bash to verify that the configuration is working. Ignore any authentication failures.
$ ssh -vT git@github.com

OpenSSH_8.0p1, OpenSSL 1.1.1c  28 May 2019
debug1: Reading configuration data /c/Users/username/.ssh/config
debug1: /c/Users/username/.ssh/config line 1: Applying options for github.com
debug1: Connecting to ssh.github.com [192.30.253.122] port 443.
debug1: Connection established.
You can see that the SSH connection is now established via port 443.
Verification
To check if everything works as expected perform below steps:
-
Run new git bash shell.
-
Check if the identity has been added to the ssh agent.
- Check that the key is being used by trying to connect to git@github.com.
$ ssh -vT git@github.com

OpenSSH_8.0p1, OpenSSL 1.1.1c  28 May 2019
debug1: Reading configuration data
debug1: Offering public key
debug1: Server accepts key
debug1: Authentication succeeded (publickey).
Authenticated to ssh.github.com
- Clone the repo using the SSH url.
Going forward, every push/pull will use the SSH keys to authenticate with Github.
Like the content ?
References
https://help.github.com/en/articles/connecting-to-github-with-ssh
https://help.github.com/en/articles/using-ssh-over-the-https-port
Время на прочтение2 мин
Количество просмотров114K
Много статей (в том числе и на Хабре) посвящено подключению к Git по SSH-ключам. Почти во всех из них используется один из двух способов: либо с помощью puttygen.exe, либо командами ssh-keygen или ssh-add.
Вчера на одном из компьютеров у меня не получилось сделать это для msysgit ни одним из описанных в интернете способов, и я потратил несколько часов на попытки настроить SSH-доступ, так ни чего и не добившись.
Как я решил эту проблему — под катом.
BitBucket всё время ругался на то, что ему требуется подключение с помощью ключа:
Permission denied (publickey).
fatal: Could not read from remote repository.
Please make sure you have the correct access rights and the repository exists.
Мои попытки сгенерировать ключи, указать пути в переменных среды, привязать ключи к гиту были бесполезны. Либо гит ругался крякозябрами (в случае ssh-agent cmd.exe), либо просто игнорировал всё предложенное.
Решение оказалось куда удобнее и проще. Достаточно запустить в локальном репозитории GIT GUI Here, и в меню перейти в
Help -> Show SSH Key:
Скрины

Если вы столкнулись с такой проблемой, то скорее всего у вас там ни чего не будет:
Окно генерации SSH Key
Ну а дальше читать будут, скорее всего, только самые педантичные… Жмём Generate key, видим окно запроса пароля (два раза) для приватного ключа:
Запрос пароля
И видим сгенерировавшийся публичный ключ:
Публичный ключ
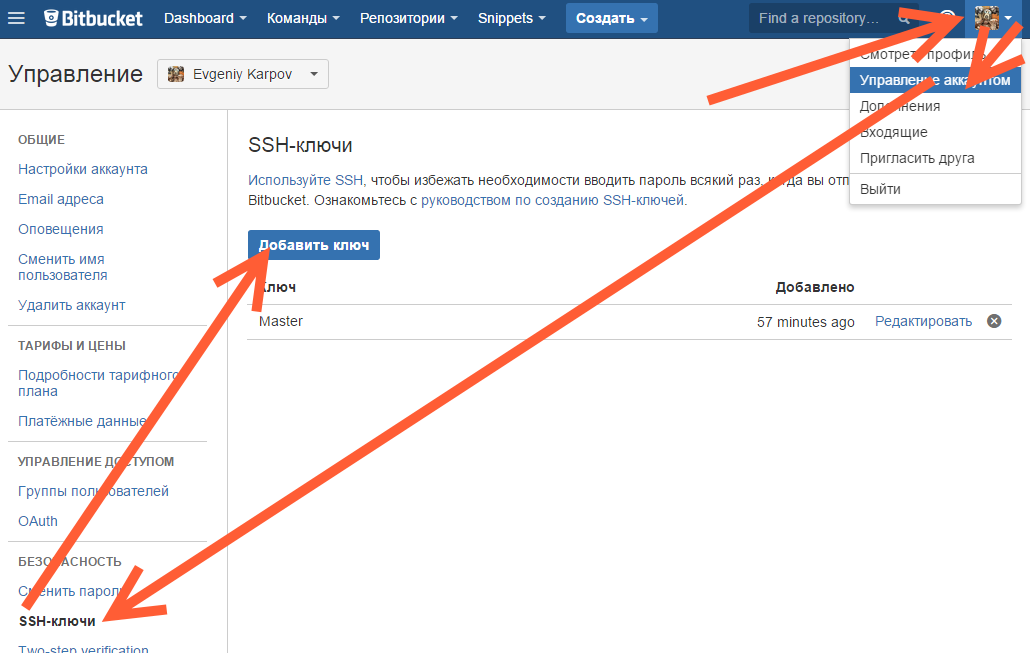
Копируем его, и добавляем вэб-морду ГИТа (в моём случае это BitBucket; ключи там можно добавить в двух местах — в настройках аккаунта и в настройках проекта, нам первый вариант, ибо второй — для деплоя проекта) [Аккаунт] — Управление аккаунтом — SSH-ключи — Добавить ключ:
Добавление ключа в BitBucket
Ну, а дальше — просто делаем что нужно — или пуш, или клон (предполагается, что git remote add вы уже сделали сами). Git спросит, можно ли добавить хост к доверенным, и запросит passphrase (пароль приватного ключа). Всё, можно работать.
Удачных разработок!
PS: Большое спасибо за наводку на решение моему коллеге Ивану!
Инструменты
Git SSH Windows — пошаговое руководство
Дата размещения статьи 08/12/2019 👁31067
Git SSH Windows — пошаговое руководство
Настроим пошагово Git SSH для Windows 10. Это позволит вам выполнять команды git без ввода пароля от своей учетной записи GitHub.
Порядок действий:
- Генерация ключа SSH.
- Добавление SSH-ключа в ssh-agent.
- Добавление ключа SSH в учетную запись GitHub.
Генерация ключа SSH
Откройте bash/терминал. Добавьте следующий текст, подставив свой адрес электронной почты GitHub.
ssh-keygen -t rsa -b 4096 -C "ваша@почта.com"Будет создан ключ ssh, используя e-mail в качестве метки.
Когда вам будет предложено «Введите файл, в котором вы хотите сохранить ключ», нажмите Enter. Это установит в местоположение по умолчанию.
Enter a file in which to save the key (/c/Users/you/.ssh/id_rsa):[Press enter]
Далее введите безопасную фразу-пароль дважды или просто нажмите Enter.
Enter passphrase (empty for no passphrase): [Type a passphrase]
Enter same passphrase again: [Type passphrase again]
Добавление SSH-ключа в ssh-agent
Чтобы запустить ssh-агент введите следующую команду.
На экране отобразится похожая строка.
Agent pid 31724
Добавим свой закрытый ключ SSH в ssh-agent. Если вы создали свой ключ с другим именем (или добавляете существующий ключ с другим именем), замените в команде id_rsa на имя вашего файла закрытого (приватного) ключа.
Ключ будет успешно добавлен в ssh-агент.
Добавление ключа SSH в учетную запись GitHub
Мы сгенерировали у себя на компьютере закрытый ключ SSH и добавили его в ssh-агент. Теперь нам необходимо добавить SSH ключ в учетную запись GitHub.
Сейчас нам необходимо скопировать SSH ключ в буфер обмена.
Способов есть несколько, но я же вам предлагаю следующее решения для Windows 10: введите команду ниже.
Прямо в терминале вы увидите содержимое необходимого файла с ключем. Скопируйте его в буфер.
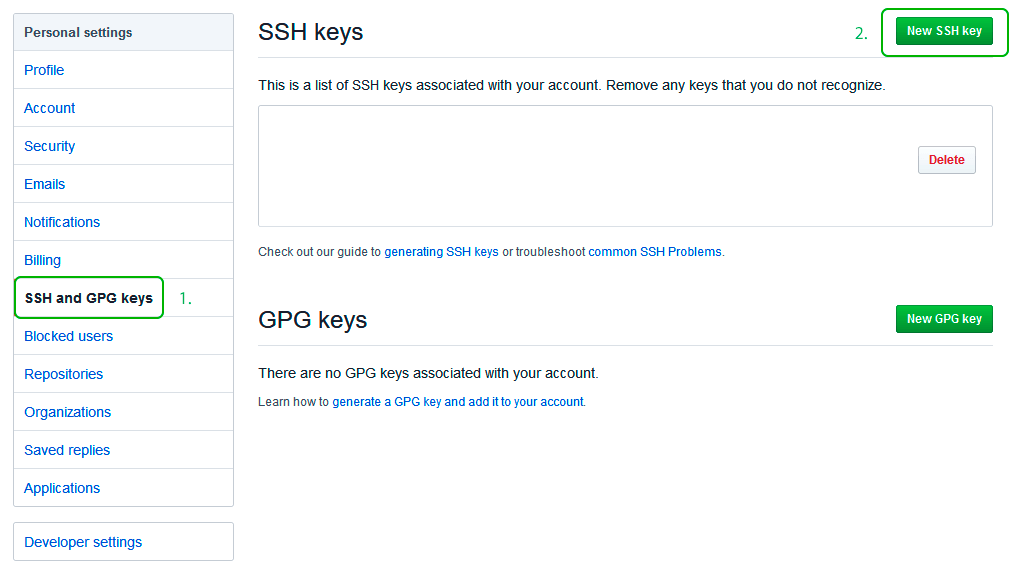
Теперь зайдите на вашу страницу GitHub » Settings.
Перейдите во вкладку SSH and GPG keys и нажмите на кнопку New SSH key для добавления SSH ключа в вашу учетную запись GitHub.
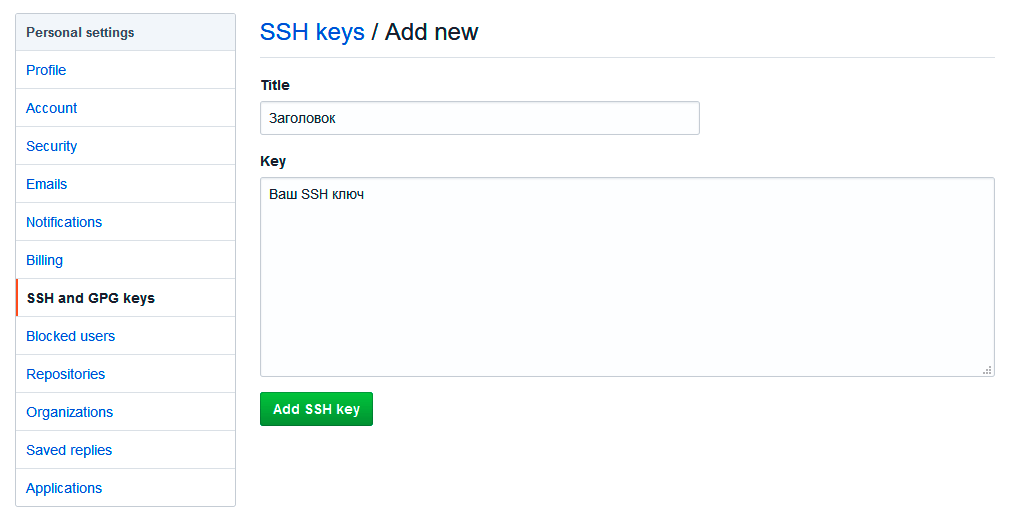
В поле Title добавьте заголовок для данного ключа. Например, если вы захотите настроить SSH доступ на нескольких устройствах, то вы будите понимать какой ключ принадлежит какому устройству.
В поле Key добавьте свой ssh-ключ, который вы скопировали в буфер обмена на предыдущем шаге.
Нажмите Add SSH key.
Для подтверждения вам потребуется ввести свой пароль от учетной записи GitHub.
На этом настройка SSH для вашего устройства завершена, теперь вы можете работать с git без ввода пароля от своей учетной записи.
Если вам понравилась данная статья, можете прочитать как настроить моментальную загрузку сайта на хостинг и синхронизацию файлов.
JavaScript: Window Location Checkbox Checked — Проверка Состояния Чекбокса ✔️
Надеюсь, вам понравилась данная информация. Если вам интересна тема web-разработки,
то можете следить за выходом новых статей в Telegram.
- Настройка Gulp Babel
- Микроразметка сайта
- Как перенести сайт WordPress на хостинг
- Настройте показ всего текста во время загрузки веб-шрифтов
- Сниппеты в VS Code
- Не удается проверить так как не задан исполняемый PHP-файл
OpenSSH, the open source version of the Secure Socket Shell (SSH) tools, is a standard part of the Windows 10 and Windows Server 2019 operating systems. This greatly simplifies how to connect to GitHub with SSH on Windows.
Step-by-step Windows GitHub SSH example
To connect to GitHub with SSH from Windows, follow these steps:
- Open PowerShell
- Run the ssh-keygen command to create SSH keys
- Copy the value of the SSH public key
- Save the public key in your GitHub account settings
- Perform a Git clone operation using your repo’s SSH URL
Create SSH Keys for GitHub
To start, store a public SSH key on GitHub. This is validated against a locally stored private key that Git uses to validate and establish a connection. GitHub SSH keys are created with the ssh-keygen tool that comes prepackaged with updated versions of Windows.
In Windows PowerShell, issue the following ssh-keygen command to create GitHub SSH keys:
PS C:\github\ssh\example> ssh-keygen -o -t rsa -C "[email protected]"
You will be asked for an optional passphrase. It’s permissible to click enter and leave this blank.
| ssh-keygen flags | Purpose | Suggested |
|---|---|---|
| -C | Comments or metadata to add to the public key | Email address |
| -t | The type of GitHub SSH key to create | RSA |
| -o | Use the newest OpenSSH format | Leave blank |
You will also be asked for a location to save the GitHub SSH keys on Windows. Again, just click enter to accept the default location, which is the .ssh folder under the user’s home directory.
| Git and SSH tutorials |
|---|
|
Need to setup SSH for GitHub, GitLab, or CodeDeploy? These SSH Key tutorials will help:
These quick tutorials will get you working with Git and the secure shell in no time. |
The Windows GitHub SSH keys live in the .ssh folder under the current user’s home directory. The following directory listing under the .ssh folder of a user named Cameron shows the two files created by the ssh-keygen tool:
PS C:\Users\Cameron\.ssh> dir
LastWriteTime      Name
-------------      ----
1/1/2022           id_rsa
1/1/2022           id_rsa.pub
GitHub SSH config
Open the SSH public key in a text editor such as Notepad++, perform a Select All, and copy the key.
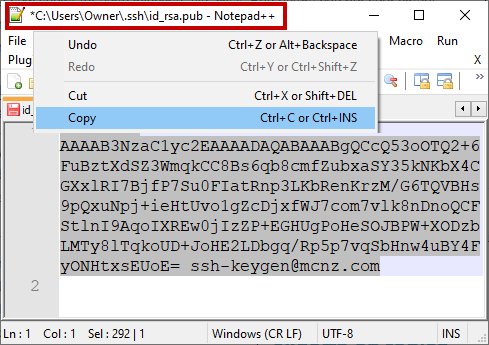
Copy the public GitHub SSH key and store this value as a registered SSH key in your GitHub account.
With the SSH key copied, log into GitHub, navigate to your account settings, and paste the public key as a new SSH key.
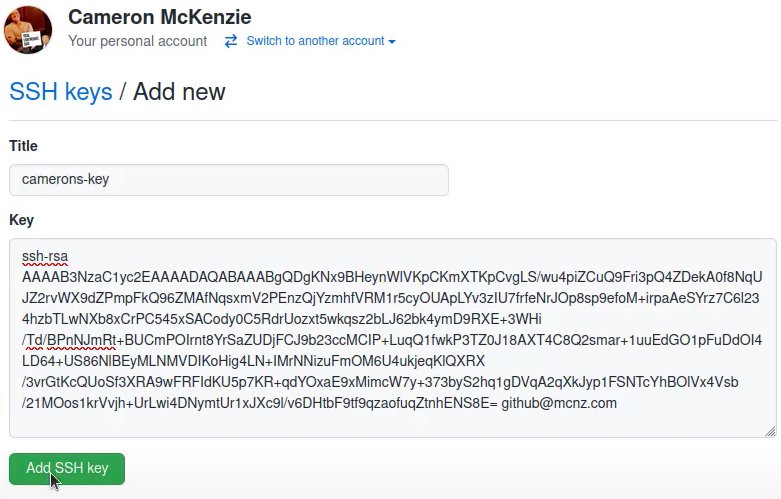
To obtain a secure, GitHub SSH Windows connection, you must register the public key in your online account settings.
SSH to GitHub on Windows
With the SSH keys generated, and the public key registered in your GitHub account, you can now use Git to connect to GitHub over SSH on Windows.
Simply copy the SSH URL from the GitHub page of the repository you wish to clone, and then provide that SSH link to the Git clone command:
PS C:\github\ssh\example> git clone [email protected]:cameronmcnz/java-jakarta-ee.git
Cloning GitHub SSH Windows into ‘java-jakarta-ee’…
Host authenticity cannot be established.
Do you still want to connect(yes or no)? yes
Receiving objects: 100% (55/55),5.78 MiB | 1.32 MiB/s, Windows GitHub SSH done.
Resolving deltas: 100% (66/66), Windows GitHub SSH done.
Notice the initial git clone with GitHub SSH on Windows complains about being unable to establish the host authenticity. That warning message is expected. Just type yes and allow the GitHub SSH clone operation to continue.
Once the remote repository is cloned, you can continue to use Git as you normally would, issue commits, add submodules, rebase branches and push back and forth with GitHub. All operations that use the network will automatically use an SSH connection.
And that’s how easy it is to connect to GitHub over SSH on Windows based machines.