
Provide feedback
Saved searches
Use saved searches to filter your results more quickly
Sign up
Appearance settings
Инструменты
Git SSH Windows — пошаговое руководство
Дата размещения статьи 08/12/2019 👁31067
Git SSH Windows — пошаговое руководство
Настроим пошагово Git SSH для Windows 10. Это позволит вам выполнять команды git без ввода пароля от своей учетной записи GitHub.
Порядок действий:
- Генерация ключа SSH.
- Добавление SSH-ключа в ssh-agent.
- Добавление ключа SSH в учетную запись GitHub.
Генерация ключа SSH
Откройте bash/терминал. Добавьте следующий текст, подставив свой адрес электронной почты GitHub.
ssh-keygen -t rsa -b 4096 -C "ваша@почта.com"Будет создан ключ ssh, используя e-mail в качестве метки.
Когда вам будет предложено «Введите файл, в котором вы хотите сохранить ключ», нажмите Enter. Это установит в местоположение по умолчанию.
Enter a file in which to save the key (/c/Users/you/.ssh/id_rsa):[Press enter]
Далее введите безопасную фразу-пароль дважды или просто нажмите Enter.
Enter passphrase (empty for no passphrase): [Type a passphrase]
Enter same passphrase again: [Type passphrase again]
Добавление SSH-ключа в ssh-agent
Чтобы запустить ssh-агент введите следующую команду.
На экране отобразится похожая строка.
Agent pid 31724
Добавим свой закрытый ключ SSH в ssh-agent. Если вы создали свой ключ с другим именем (или добавляете существующий ключ с другим именем), замените в команде id_rsa на имя вашего файла закрытого (приватного) ключа.
Ключ будет успешно добавлен в ssh-агент.
Добавление ключа SSH в учетную запись GitHub
Мы сгенерировали у себя на компьютере закрытый ключ SSH и добавили его в ssh-агент. Теперь нам необходимо добавить SSH ключ в учетную запись GitHub.
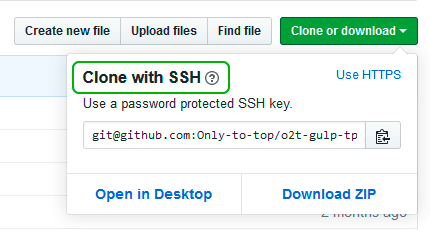
Сейчас нам необходимо скопировать SSH ключ в буфер обмена.
Способов есть несколько, но я же вам предлагаю следующее решения для Windows 10: введите команду ниже.
Прямо в терминале вы увидите содержимое необходимого файла с ключем. Скопируйте его в буфер.
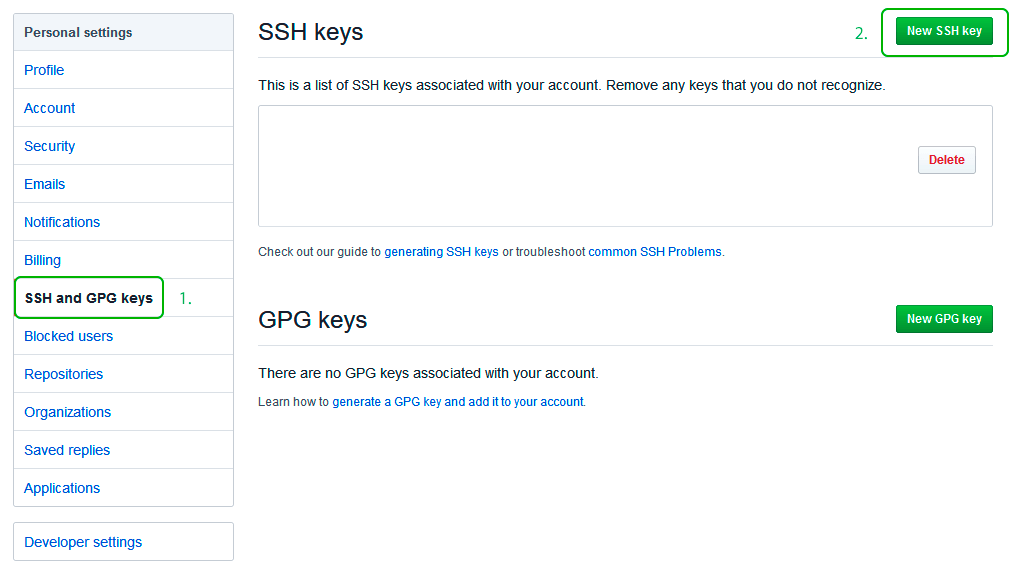
Теперь зайдите на вашу страницу GitHub » Settings.
Перейдите во вкладку SSH and GPG keys и нажмите на кнопку New SSH key для добавления SSH ключа в вашу учетную запись GitHub.
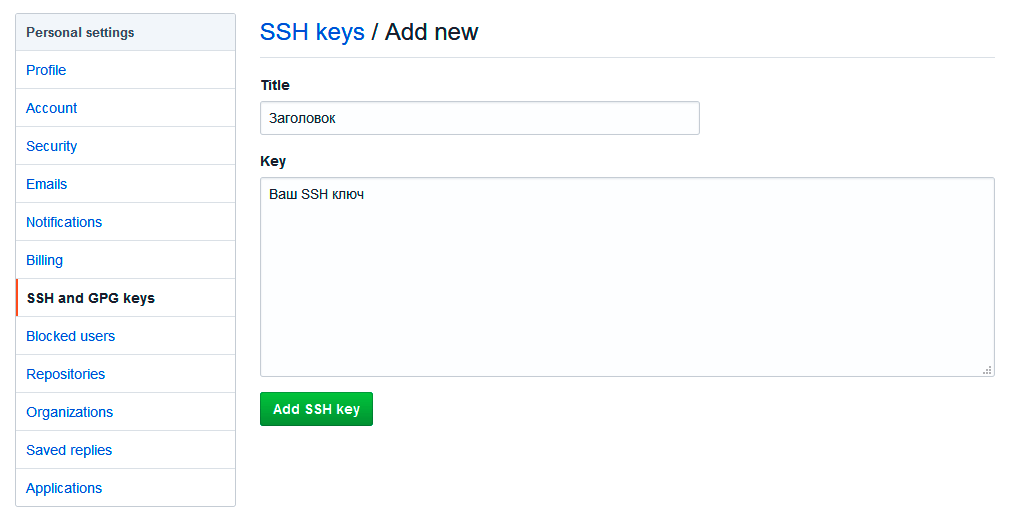
В поле Title добавьте заголовок для данного ключа. Например, если вы захотите настроить SSH доступ на нескольких устройствах, то вы будите понимать какой ключ принадлежит какому устройству.
В поле Key добавьте свой ssh-ключ, который вы скопировали в буфер обмена на предыдущем шаге.
Нажмите Add SSH key.
Для подтверждения вам потребуется ввести свой пароль от учетной записи GitHub.
На этом настройка SSH для вашего устройства завершена, теперь вы можете работать с git без ввода пароля от своей учетной записи.
Если вам понравилась данная статья, можете прочитать как настроить моментальную загрузку сайта на хостинг и синхронизацию файлов.
JavaScript: Window Location Checkbox Checked — Проверка Состояния Чекбокса ✔️
Надеюсь, вам понравилась данная информация. Если вам интересна тема web-разработки,
то можете следить за выходом новых статей в Telegram.
- Настройка Gulp Babel
- Микроразметка сайта
- Как перенести сайт WordPress на хостинг
- Настройте показ всего текста во время загрузки веб-шрифтов
- Сниппеты в VS Code
- Не удается проверить так как не задан исполняемый PHP-файл
SSH-Agent and OpenSSH are tools in Windows that can be used to authenticate to remote Git repositories, such as GitLab, GitHub, Azure DevOps, etc. Once set up as a service that stores your various SSH keys, this can facilitate authentication without entering a password each time, removing the irritation of entering a password every time you wish to push/pull/etc. from a Git repository.
Prerequisites
- The OpenSSH Client optional service must be enabled on your machine, and OpenSSH must be added to your PATH environment variable. You can read how to do that here.
- A remote Git repository that you wish to access. We will use a GitLab repository for this article; however, the process will be similar for other Git management providers.
- Git must be installed on your machine.
How to Install the SSH-Agent Service in Windows
Using an elevated PowerShell window (run as admin), execute the following command to install the SSH-Agent service and configure it to start automatically when you log into your machine:
Get-Service ssh-agent | Set-Service -StartupType Automatic -PassThru | Start-Service

To avoid needing to restart your system to get the service running for the first time, execute this command:
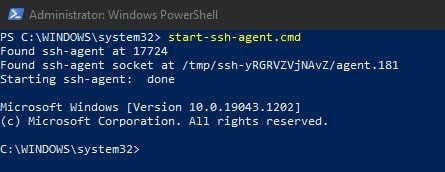
start-ssh-agent.cmd
Setting up an SSH Key Pair to Access a Git Remote Provider
Using a command line tool such as Bash or PowerShell, you should be able to follow these steps to create a local SSH key pair. For our example, we will create an ED25519 key, but you can create other keys such as an RSA.
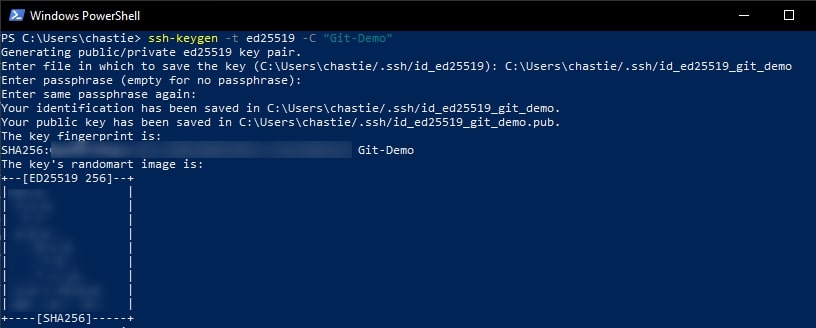
Create a new SSH ED25519 key, giving it a useful comment:
ssh-keygen -t ed25519 -C "Git-Demo"
By default, the file will be stored in your local user’s SSH repository in Windows. You can choose another storage location if you wish or rename the file by entering a new file path to save the key. Leave it blank to stick with the default.
In our example, we rename the file from the default id_ed25519 to id_ed25519_git_demo:

You can also add a password if you like or leave this blank:

You will then be shown the key’s randomart image to confirm creation:
Copy the contents of the public key to your clipboard. You can read this key with the following command:
cat path\to\ssh\key.pub
For example, our code is likely:
cat C:\Users\chastie/.ssh\id_ed25519_git_demo.pub
Note: We access the public key with the .pub suffix.
A sample is shown here. You can then select this and copy it with a right-click of your mouse:

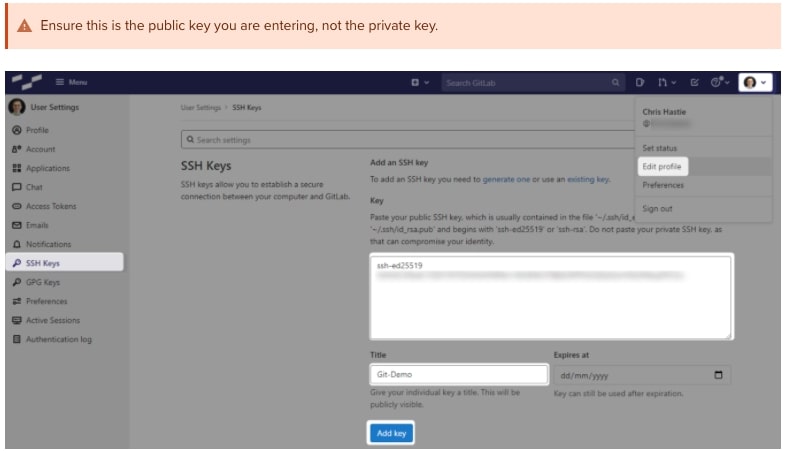
In GitLab (or the appropriate location of your Git remote repository), you can now add this public key to your user profile. In GitLab, you can do this by adding it under the SSH Keys section of your user settings:
Test that you can connect to the repository when using the SSH private key directly with this command:
ssh -i path/to/ssh/private/key -T git@host
For example, our command could be:
ssh -i C:\Users\chastie/.ssh\id_ed25519_git_demo -T git@gitlab.mycompany.com

or

ssh -i C:\Users\chastie/.ssh\id_ed25519_git_demo -T git@github.com

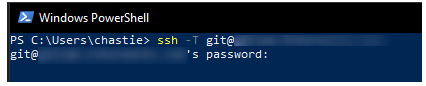
We have now established an SSH key pair that can authenticate to our Git remote provider. It remains to set this up in the SSH-Agent service to automatically provide access. We can demonstrate the issue by attempting the same connection, but without specifically naming the SSH key, with the command below:
ssh -T git@host
As we can see, if we execute this command without specifying an SSH key, we are prompted for a password:
Adding the SSH Key to the SSH-Agent Service
Our goal is to be able to connect to a Git repository without entering a password. At this stage, we have a working SSH key pair and the SSH-Agent service installed and running.
Execute the following command to add your SSH key to your SSH-Agent service:
ssh-add path/to/ssh/private/key
For our example, our command could be:
ssh-add C:\Users\chastie/.ssh\id_ed25519_git_demo

We can now test our connection to our Git remote provider without specifying a key and connect successfully:
ssh -T git@host

Configuring Git to Leverage the Windows SSH-Agent

In an elevated console (run as admin), execute the following command to modify your existing Git configuration to leverage the windows OpenSSH service as the core SSH command:
git config --global core.sshCommand C:/Windows/System32/OpenSSH/ssh.exe

Congratulations! You have now set up your environment to automatically authenticate to your Git remote provider through an SSH key pair, without using passwords. If you wish to facilitate access to any other Git remote providers, simply follow the same steps to generate a key pair ( as outlined above) and add it to your existing SSH-Agent service.
OpenSSH, the open source version of the Secure Socket Shell (SSH) tools, is a standard part of the Windows 10 and Windows Server 2019 operating systems. This greatly simplifies how to connect to GitHub with SSH on Windows.
Step-by-step Windows GitHub SSH example
To connect to GitHub with SSH from Windows, follow these steps:
- Open PowerShell
- Run the ssh-keygen command to create SSH keys
- Copy the value of the SSH public key
- Save the public key in your GitHub account settings
- Perform a Git clone operation using your repo’s SSH URL
Create SSH Keys for GitHub
To start, store a public SSH key on GitHub. This is validated against a locally stored private key that Git uses to validate and establish a connection. GitHub SSH keys are created with the ssh-keygen tool that comes prepackaged with updated versions of Windows.
In Windows PowerShell, issue the following ssh-keygen command to create GitHub SSH keys:
PS C:\github\ssh\example> ssh-keygen -o -t rsa -C "[email protected]"
You will be asked for an optional passphrase. It’s permissible to click enter and leave this blank.
| ssh-keygen flags | Purpose | Suggested |
|---|---|---|
| -C | Comments or metadata to add to the public key | Email address |
| -t | The type of GitHub SSH key to create | RSA |
| -o | Use the newest OpenSSH format | Leave blank |
You will also be asked for a location to save the GitHub SSH keys on Windows. Again, just click enter to accept the default location, which is the .ssh folder under the user’s home directory.
| Git and SSH tutorials |
|---|
|
Need to setup SSH for GitHub, GitLab, or CodeDeploy? These SSH Key tutorials will help:
These quick tutorials will get you working with Git and the secure shell in no time. |
The Windows GitHub SSH keys live in the .ssh folder under the current user’s home directory. The following directory listing under the .ssh folder of a user named Cameron shows the two files created by the ssh-keygen tool:
PS C:\Users\Cameron\.ssh> dir
LastWriteTime      Name
-------------      ----
1/1/2022           id_rsa
1/1/2022           id_rsa.pub
GitHub SSH config
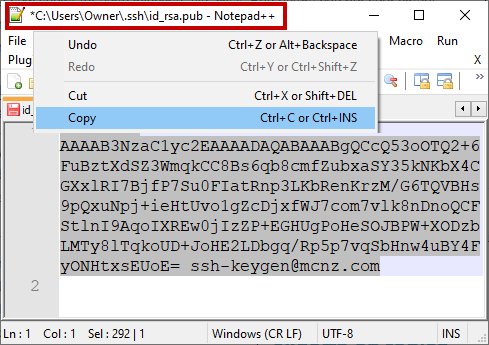
Open the SSH public key in a text editor such as Notepad++, perform a Select All, and copy the key.
Copy the public GitHub SSH key and store this value as a registered SSH key in your GitHub account.
With the SSH key copied, log into GitHub, navigate to your account settings, and paste the public key as a new SSH key.
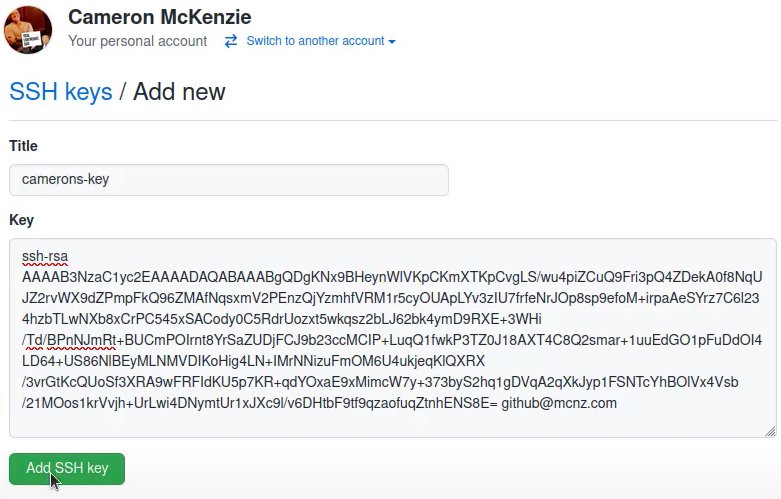
To obtain a secure, GitHub SSH Windows connection, you must register the public key in your online account settings.
SSH to GitHub on Windows
With the SSH keys generated, and the public key registered in your GitHub account, you can now use Git to connect to GitHub over SSH on Windows.
Simply copy the SSH URL from the GitHub page of the repository you wish to clone, and then provide that SSH link to the Git clone command:
PS C:\github\ssh\example> git clone [email protected]:cameronmcnz/java-jakarta-ee.git
Cloning GitHub SSH Windows into ‘java-jakarta-ee’…
Host authenticity cannot be established.
Do you still want to connect(yes or no)? yes
Receiving objects: 100% (55/55),5.78 MiB | 1.32 MiB/s, Windows GitHub SSH done.
Resolving deltas: 100% (66/66), Windows GitHub SSH done.
Notice the initial git clone with GitHub SSH on Windows complains about being unable to establish the host authenticity. That warning message is expected. Just type yes and allow the GitHub SSH clone operation to continue.
Once the remote repository is cloned, you can continue to use Git as you normally would, issue commits, add submodules, rebase branches and push back and forth with GitHub. All operations that use the network will automatically use an SSH connection.
And that’s how easy it is to connect to GitHub over SSH on Windows based machines.

bdbch
Posted on
• Edited on
Welcome to my first official guide on Dev.to. Today I want to explain how you can setup SSH and Git on your Windows 10 computer.
Note: This is not about 100% securing your keys but about how to generate keys for use with GitHub.
Thanks to garethdd for his constructive feedback.
What is SSH?
SSH stands for Secure Shell and is an awesome way to authenticate yourself on remote servers (for example the Github server) without typing in a password everytime.
SSH works via two keys, the Private Key and the Public Key. While the private key should always stay private and safe, the public key can be shared around the internet without any problems.
The private key allows you to get access to servers that have your public key registered, so your access can only be stolen if the attacker somehow gets your Secret Key so keep it safe!
SSH should be preinstalled on new Windows 10 machines.
What is Git?
Git is a free version management tool that helps you to versionize your code and potentially save it on a remote server (for example Github, Gitlab or Bitbucket).
You can install Git from here:
https://git-scm.com/download/win
You can also install Git via chocolatey:
choco install git -Y
Enter fullscreen mode
Exit fullscreen mode
Create a SSH Key
The first step is to generate a new SSH key. Use cmd or Powershell and run the following command:
ssh-keygen -t rsa -b 4096 -C "your_email@example.com"
Enter fullscreen mode
Exit fullscreen mode
You can but don’t need to give it a passphrase since you should never share your secret key around but using one will secure your keys. Keep in mind that everybody can have as many private keys as they want.
This generates a new private SSH key with rsa encryption and 4096 bits. It also generates a public key from the secret key which you can share around.
There will be a new folder and files in your Windows user folder.
In general you can create as many keys as you want. The id_rsa key is the default key generated by ssh and will be automatically be used by your ssh-agent if you don’t tell it to use another key.
What is an ssh-agent?
An ssh-agent is the agent process used to actually authenticate yourself with ssh. There are a few out there (PuTTY with Pageant for example) but for this example we’ll use the ssh-agent provided by the native and default Windows 10 ssh-agent.
If you want to you can use PuTTY and Pageant to make your keys even more secure. Read this post on Digital Ocean for more information.
If you want to change the key used by your ssh-agent, you must first start the service. The service will be disabled on Windows 10 by default. Search for Services and open the Services settings and look for the «OpenSSH Authentication Agent» and Activate it:

Now you will be able to access the ssh-agent from your console via ssh-agent.
For this example we’re going to try to load another key called example into our agent and use it instead of the id_rsa key. To do this you can run the following command:
ssh-add example
Enter fullscreen mode
Exit fullscreen mode
Now you will have both keys available for this session.
Register your SSH Key on Github
The next step is to register your generated SSH key on Github. For that, run the following command:
type C:\Users\your_user_name\.ssh\id_rsa.pub
Enter fullscreen mode
Exit fullscreen mode
and copy the output string into your clipboard. Now go to your Github keys settings and add a new SSH key with your public key and save it.
Congratulations! You now are able to get and push code to Github without any password!
Note: There should also be a C:\Users\your_user_name\.ssh\id_rsa file. This is your private key, don’t share this around!
Setup Github in your Shell
Now it’s time to setup Git on your machine. After installing it from the link above, open a new cmd or Powershell window. Now we need to set your public Git name and Git email address. This will always be public when pushing code.
Luckily Github gives you a privatized email address for use. Go to https://github.com/settings/emails and you will find a @users.noreply.github.com email address for your account. Copy this email address.
Next register your name and email in Git:
git config --global user.name "Your Name"
git config --global user.email your_email@users.noreply.github.com
Enter fullscreen mode
Exit fullscreen mode
Congratulations! Now all your Commits will be registered as being commited from your Github user.
Signing your GitHub commits (Optional Step)
To sign your commits you first must install the GPG command line tools. After you installed the GPG toolkit, you can run the following command to generate a new gpg key:
gpg --full-generate-key
Enter fullscreen mode
Exit fullscreen mode
This will ask you what kind of key you want. Go for RSA and RSA.
Now you need to enter a bit length. The recommendation is 4096 bits.
After that you can specify a expiration length or if the key should never expire. Pick as you want. Expiring keys are more secure in general because you have to renew them every now and then.
Now enter your personal informations to verifying your identity with your gpg key.
When you’re done you will be asked for a passphrase. Give it a secure passphrase and you will be done with your gpg-key generation.
After that you will be able to find your key in your users .gnupg folder as specified in the success message.
If you want to list your gpg keys, simply run
// short version
gpg --list-secret-keys

// long version
gpg --list-secret-keys --keyid-format LONG
Enter fullscreen mode
Exit fullscreen mode
Your GPG key you can share with Github is the key coming after sec rsa4096/ so for example in
/Users/hubot/.gnupg/secring.gpg
------------------------------------
sec   4096R/3AA5C34371567BD2 2016-03-10 [expires: 2017-03-10]
uid                          Hubot
ssb   4096R/42B317FD4BA89E7A 2016-03-10
Enter fullscreen mode
Exit fullscreen mode
the gpg key would be 3AA5C34371567BD2
To get your public key block, simply run
gpg --armor --export YOUR_GPG_KEY
Enter fullscreen mode
Exit fullscreen mode
which will output your public GPG Key Block. Copy it and paste it to your GitHub Account here.
From now on your commits will be signed when commited.
Use Git
Now you’re ready to actually use Git. From now you can clone repositories via git clone or push new code to Github. Here is a quick reference:
# Clone a repository to the current directory
git clone [REPOSITORY_CLONE_URL]

# Create a new commit with a message
git commit -m "Your commit message"

# Add files to the commit
git add .
git add ./filename.ext

# Push your commits to Github
git push origin master
git push origin [YOUR_BRANCH_NAME]

# Reset your repo to the last version
git reset --hard

# Create a new branch
git checkout -b [YOUR_BRANCH_NAME]

# Switch branches
git checkout [YOUR_BRANCH_NAME]
git checkout master

# Reset a single file
git checkout ./filename.ext
Enter fullscreen mode
Exit fullscreen mode
Conclusion
Thanks for reading this post. I hope it helped you with the setup. If you need help or have questions let me know!