
on October 24, 2011
In Windows environment, each user is assigned a unique identifier called Security ID or SID, which is used to control access to various resources like Files, Registry keys, network shares etc. We can obtain SID of a user through WMIC USERACCOUNT command. Below you can find syntax and examples for the same.
Get SID of a local user
wmic useraccount where name='username' get sid
For example, to get the SID for a local user with the login name ‘John’, the command would be as below
wmic useraccount where name='John' get sid
Get SID for current logged in user
To retrieve the SID for current logged in user we can run the below command. This does not require you to specify the user name in the command. This can be used in batch files which may be executed from different user accounts.
wmic useraccount where name='%username%' get sid
Get SID for current logged in domain user
Run the command ‘whoami /user’ from command line to get the SID for the logged in user.
Example:
c:\>whoami /user
USER INFORMATION
----------------
User Name      SID
============== ==============================================
mydomain\wincmd S-1-5-21-7375663-6890924511-1272660413-2944159
c:\>
Get SID for the local administrator of the computer
wmic useraccount where (name='administrator' and domain='%computername%') get name,sid
Get SID for the domain administrator
wmic useraccount where (name='administrator' and domain='%userdomain%') get name,sid
Find username from a SID
Now this is tip is to find the user account when you have a SID. One of the readers of this post had this usecase and he figured out the command himself with the help of the commands given above. Adding the same here.
wmic useraccount where sid='S-1-3-12-1234525106-3567804255-30012867-1437' get name
When you need to find the security identifier (SID) of a user in Windows environments, understanding the right tools and methods becomes essential. While Microsoft has refined this identification system since Windows NT, administrators need reliable methods to locate and verify these identifiers for effective system management and troubleshooting.
Core methods to find a Windows user’s Security Identifier (SID)
There are several ways to retrieve a SID, depending on your access level and Windows version. Let’s look at the most effective methods.
Command prompt techniques
The command prompt provides straightforward, reliable methods to retrieve SID information across all Windows versions. These commands work efficiently in both standalone and domain-joined environments.
- Open Command Prompt as an administrator.
- Type “whoami /user” to see your current user SID.
- Use “wmic useraccount get name,sid” to list all user accounts and their SIDs.
- Enter “psexec -s cmd” to access system context if needed.
- Run “dir /q” in user directories to view SID ownership.
PowerShell get user SID
You can use PowerShell to get the user SID. These commands offer advanced flexibility and automation capabilities for SID retrieval, making them ideal for managing multiple systems or performing bulk operations.
- Execute “Get-WmiObject win32_useraccount” to retrieve a complete list of user accounts and their associated SIDs.
- Run “$objUser = New-Object System.Security.Principal.NTAccount($env:USERNAME)” for current user details.
- Use “Get-LocalUser | Select-Object Name,SID” to display local user accounts.
- Access Active Directory user SIDs with “Get-ADUser -Identity username -Properties SID.”
- Query remote computers using “Invoke-Command” with SID retrieval scripts.
GUI-based discovery
For those who prefer visual navigation, Windows provides built-in graphical tools to locate SID information. This method proves particularly useful during one-off queries or when training new team members.
- Access Computer Management through Windows Administrative Tools.
- Navigate to Local Users and Groups.
- Right-click the user account and select Properties.
- Choose the Security tab.
- Click Advanced to view the SID.
- Document the SID for future reference.
In Windows operating systems, security identifiers act as digital passports for every user and group, enabling precise access control and system management. For administrators tasked with maintaining security across enterprise environments, understanding these unique identifiers unlocks powerful capabilities for permission management and user tracking.
SID structure explained
The structure of a security identifier follows a precise format that Microsoft developed for the Windows NT architecture. Each SID contains multiple components: a revision level, an authority identifier, and a variable number of sub-authority values.
These components work together to create an identifier that remains unique across your entire domain infrastructure. You might see a typical SID displayed as S-1-5-21-3623811015-3361044348-30300820-1013.
Breaking it down:
- S: Stands for SID
- 1: The revision level
- 5: The identifier authority
- 21-3623811015-3361044348-30300820: A domain or computer-specific identifier
- 1013: The unique relative identifier (RID) assigned to a user or group
Why SIDs matter in Windows security?
Windows security relies on SIDs as the foundation of its access control system. Rather than depending on usernames or group names — which users can modify — the system tracks permissions and access rights through these unchangeable identifiers.
When a user attempts to access a resource, Windows examines the SID associated with their account against the access control list of the requested resource. This verification process occurs seamlessly in the background, maintaining security without disrupting user workflow.
The importance of a unique identifier
It is often necessary to find the SID of a user during security audits, access control updates, or troubleshooting scenarios. These permanent identifiers provide stability in user management, remaining unchanged even when usernames get modified.
Organizations operating across multiple domains or implementing complex security policies rely on these identifiers to maintain consistent access control and conduct thorough user activity audits.
Windows SID location map
Registry path navigation
The Windows Registry serves as a central database for storing critical system information, including SID data. Use these steps to safely navigate and locate the SID information you need.
- Launch the Registry Editor by typing “regedit” in the Run dialog.
- Navigate to HKEY_LOCAL_MACHINE\SOFTWARE\Microsoft\Windows NT\CurrentVersion\ProfileList.
- Look for subkeys that start with S-1-5.
- Expand each key to view the ProfileImagePath value.
- Match the profile path to identify the correct user.
- Record the SID from the subkey name for reference.
Locating SIDs in system files
Windows stores SID information across various system files and directories, creating a complex web of security relationships. Your operating system maintains these identifiers in both the Security Accounts Manager database and the NTUSER.DAT files within user profiles.
When Windows creates a new user account, it generates a unique SID and stores this information in multiple locations to support various security functions. The system also maintains backup copies of this data through Volume Shadow Copy Service, providing redundancy for these mission-critical identifiers.
Access permission setup
Configuring proper access permissions requires precise SID mapping. Follow these steps to establish appropriate security controls.
- Open Windows Explorer and locate the target resource.
- Right-click and select Properties.
- Navigate to the Security tab.
- Click Advanced to view SID-based permissions.
- Select Add to include new permissions.
- Choose Principal to specify the user or group.
- Enter the SID in the object name field.
- Set appropriate permission levels.
- Apply changes and verify access.
Advanced SID management tools
Managing SIDs in enterprise environments requires sophisticated tools and methodologies. Whether you need to track user activities, implement domain-wide policies, or create security templates, choosing the right approach streamlines your administrative tasks.
Domain controller methods
If your system operates in an Active Directory (AD) environment, you can manage SIDs using these methods:
- Active Directory Users and Computers (ADUC): A centralized GUI for managing user accounts and their SIDs.
- NTDSUTIL: A command-line tool for database maintenance and SID history management.
- Group Policy Objects (GPOs): Helps enforce SID-based security policies across the domain.
- Replication Health Checks: Ensures SID synchronization across domain controllers.
- SID Filtering: Restricts cross-domain authentication to prevent unauthorized access.
Network user tracking
Continuous SID monitoring helps track user activity and detect anomalies or security threats. The tracking system maintains detailed logs of SID usage, providing valuable data for both real-time security monitoring and forensic analysis.
Security template options
Security templates provide structured approaches to implementing standardized SID management policies. These templates serve as the foundation for consistent security implementation across your organization.
Security templates provide structured frameworks for implementing consistent SID management policies throughout your organization. You can develop customized templates that align with your security requirements while maintaining compatibility with existing systems.
SID security best practices
Proper SID access control forms the foundation of your Windows security infrastructure. Regular audits of access patterns help identify potential vulnerabilities and opportunities to strengthen your security controls.
Your granular permission settings create trackable access paths throughout your network infrastructure. Setting up role-based access control with SIDs enables precise management of resource permissions across departments.
Backup documentation methods
Documentation serves as your security blueprint, providing records of SID configurations and changes. These records prove invaluable during audits, system recovery, and security investigations.
- Generate automated SID mapping reports on a scheduled basis.
- Store offline copies of SID assignments in secured locations.
- Document changes to SID configurations through version control systems.
- Maintain detailed logs of SID modifications and access pattern changes.
- Create standardized templates for SID backup procedures.
Managing SID security requires a strategic balance of documentation, access controls and troubleshooting protocols. Your organization’s security posture depends on implementing and maintaining these best practices effectively.
A Security Identifier (SID) is a unique identifier assigned to each user account in Windows, used to control permissions and manage user access. Knowing the SID of a user can be helpful for various administrative tasks, including troubleshooting permissions issues or configuring settings for specific users. This tutorial provides a step-by-step explanation of how to find the SID of a user in Windows 11 , covering multiple methods for accuracy and convenience.
The SID is crucial in Windows because it uniquely identifies user accounts within the system. If you’re managing permissions, accessing specific settings, or configuring user-specific policies, the SID helps ensure that the correct permissions are applied to the correct user.
Available Methods:
We can find the SID of a user in windows 11 using PowerShell command, Command Prompt Commands, & Registry editor.
| PowerShell Commands | Command Prompt Commands |
|---|---|
| GetCurrent | WhoAmI |
| Get-WmiObject | wmic useraccount (Current User) |
| Get-LocalUser | wmic useraccount (Specific User) |
| Get-CimInstance | wmic useraccount (User Name) |
| — | wmic useraccount (SID of All Users) |
Method 1: Find SID of Current User Using the whoami Command:
- Open Command Prompt by typing “cmd” in the Windows search bar and selecting Run as administrator.

Open Command Prompt using Run as Administrator
- Enter the following command and press Enter:
whoami /user

Whoami user command to find SID value
The command will display the Username and SID of the currently active user.
Method 2: Find SID of Current User Using wmic useraccount Command:
- Open Command Prompt by typing “cmd” in the Windows search bar and selecting Run as administrator.
Open Command Prompt using Run as Administrator
- Enter the command below, replacing
UserNamewith the currently logged-in user’s name:wmic useraccount where name="UserName" get sid

wmic useraccount command to display current user SID Value
- Press Enter, and the SID for the specified user will be displayed.
Method 3: Find SID of Specific User Using wmic useraccount Command:
- Open Command Prompt by typing “cmd” in the Windows search bar and selecting Run as administrator.
Open Command Prompt using Run as Administrator
- Type the following command, replacing
UserNamewith the username of the account you wish to query:wmic useraccount where name="UserName" get sid

Finding other accounts SID value using command
- The SID for the specified user will appear.
Method 4: Find Username for a Given SID Using wmic useraccount Command:
- Open Command Prompt by typing “cmd” in the Windows search bar and selecting Run as administrator.
Open Command Prompt using Run as Administrator
- Enter the following command, replacing
SIDValuewith the actual SID:wmic useraccount where sid="SIDValue" get name

Using SID value to find the Username
- You can get the SID value from the above methods.
- The command will output the Username associated with the specified SID.
Method 5: Find SID of All Users Using wmic useraccount Command:
- Open Command Prompt by typing “cmd” in the Windows search bar and selecting Run as administrator.
Open Command Prompt using Run as Administrator
- Enter this command:
wmic useraccount get name,sid

Command to display all available users and their SID values
- This command will display a list of all users and their corresponding SIDs.
Method 6: Find SID of Current User Using GetCurrent in PowerShell:
- Open PowerShell as Administrator by right-clicking the Start button and selecting Windows Terminal (Admin).

Opening PowerShell as Admin Mode
- Enter the following command:
[System.Security.Principal.WindowsIdentity]::GetCurrent().User.Value
 user command to display current user SID value")
GetCurrent() user command to display current user SID value
- This command will output the SID of the currently logged-in user.
Method 7: Find SID of All Users Using Get-WmiObject in PowerShell:
- Open PowerShell as Administrator by right-clicking the Start button and selecting Windows Terminal (Admin).
Opening PowerShell as Admin Mode
- Run the following command:
Get-WmiObject -Class Win32_UserAccount | Select-Object Name, SID

Command will display all list of users and SID values
- PowerShell will output a list of usernames along with their corresponding SIDs.
Method 8: Find SID of All Users Using Get-LocalUser in PowerShell:
- Open PowerShell as Administrator by right-clicking the Start button and selecting Windows Terminal (Admin).
Opening PowerShell as Admin Mode
- Run this command:
Get-LocalUser | Select-Object Name, SID

Get-LocalUser command to display all users and their SID values
- The output will show each user along with their SID.
Note: This command works for local accounts on Windows 11 and is suitable if you don’t require domain user accounts.
Method 9: Find SID of All Users Using Get-CimInstance in PowerShell:
- Open PowerShell as Administrator by right-clicking the Start button and selecting Windows Terminal (Admin).
Opening PowerShell as Admin Mode
- Now you need to execute the following command:
Get-CimInstance -ClassName Win32_UserAccount | Select-Object Name, SID

Get-CimInstance command to display all users and their SID values
Method 10: Find SID of Users in the Registry Editor:
The Registry Editor stores SIDs for each user profile, which can be accessed manually.
- Press Winkey + R, type
regedit, and press Enter to open the Registry Editor.

Running Regedit Command in Run Window
- Navigate to the following path:
HKEY_LOCAL_MACHINE\SOFTWARE\Microsoft\Windows NT\CurrentVersion\ProfileList

Navigate to the desired directory in Registry editor
- Under ProfileList , you’ll find a list of SIDs. Each SID corresponds to a user profile on the system.

UNder Profile list you can find SID values
- Click on each SID folder and check the ProfileImagePath entry to identify which user profile corresponds to each SID.
Caution: Be careful when using the Registry Editor, as making incorrect changes can affect system performance.
Conclusion
Finding the Security Identifier (SID) of a user in Windows 11 is essential for administrators and advanced users who need precise control over permissions and configurations. This tutorial covers several methods to retrieve a user’s SID, including Command Prompt , PowerShell , Registry Editor , and the whoami command. By following these methods, you’ll be able to quickly and accurately identify SIDs for any user account on your system.
Commonly Asking Queries:
Can I change the SID of a user in Windows 11?
No , the SID is unique to each user and is assigned automatically. Changing it can cause access issues and is not recommended.
Is it safe to use the Registry Editor to find SIDs?
Yes , it’s safe to view SIDs in the Registry. However, avoid editing registry entries unless necessary, as incorrect changes can impact system performance.
Does each user have a unique SID across different computers?
No , SIDs are unique within each Windows installation. A user on one computer will have a different SID on another computer.
Why can’t I find a specific SID in the Registry Editor?
If the user account doesn’t have a local profile on the computer, their SID may not appear in the Registry under ProfileList.
What should I do if I accidentally delete or modify a SID in the registry?
Restoring from a recent registry backup or system restore point can often resolve issues if an SID is accidentally modified.
Any user, group or computer in Windows has a unique SID (security identifier) assigned.
The SIDs are used to control access to various Windows resources like files, registry keys, network shares, etc.
Below i will show you how to get the user’s SID and how to do the reverse SID lookup (get the user name by SID) using the Windows command prompt or PowerShell.
Cool Tip: How to determine whether the current user is a Domain User account or a Local User account! Read more →
Get the SIDs of the all local user accounts:
C:\> wmic useraccount get name,sid
- sample output -
Name                SID
admin               S-1-5-21-615456588-3658538152-758053764-1009
myUser              S-1-5-21-615456588-3658538152-758053764-1008
Get the SID of the current user:
C:\> whoami /user
- or -
C:\> wmic useraccount where name='%username%' get sid
Find the user’s SID by name:
C:\> wmic useraccount where name='<username>' get sid
- example -
C:\> wmic useraccount where name='myUser' get sid
- sample output -
SID
S-1-5-21-615456588-3658538152-758053764-1008
Find the user by SID (reverse SID lookup):
C:\> wmic useraccount where sid='<sid>' get name
- example -
C:\> wmic useraccount where sid='S-1-5-21-615456588-3658538152-758053764-1008' get name
- sample output -
Name
myUser
Was it useful? Share this post with the world!
A SID or a Security Identifier is a unique code that helps identify any user or group and computer accounts across Windows Operating Systems. They are created as soon as a user account is created and being the unique identifiers, no two SIDs are the same on a common computer, ever. It is also referred to as a Security ID. This unique identification is used internally in the operating system instead of displaying names that we set like, Personal, Dad or anything else. This also means that, even if you change your display name, it will not affect anything pre-configured for that account as every configuration is tied up to the SID, which remains constant even when you change your display name or even your username.
SIDs are crucial to systems because every user account is associated with an unchangeable alphanumeric character string. Any changes to the username will not affect the user’s access to the system resources, and in case if you delete a username and later someone tries to create an account with your old username, it’s impossible to regain access to the resources as the SIDs are always unique to every username and in this case it isn’t the same.
Let us see how to find the Security Identifier (SID) of any User in Windows 11/10.
1] Using WMIC
Finding a user’s SID or Security Identifier is really easy. We must use the Windows Management Instrumentation Command Line (WMIC) to do this.
So first of all, start by, opening the Command Prompt. You can do this by searching for Command Prompt in the Cortana Search Box. Or if you are using Windows 8 or newer, hit the WINKEY + X button combination to launch a context menu on the Start Button and click on Command Prompt (Admin).
Now, type in the following command,
wmic useraccount get name,sid
And then hit the Enter key.
Now you will get results like in the screen snippet below. You will get the User Account with the SID of the same.
 of any User")
Filtering out SID for your desired user
Readers who are used to be using SQL queries might relate to this. But this command helps the user to get SID of a particular user and ignore all the hassle. This is most useful when a large system (like a server) is logged in and used simultaneously by multiple users, this command will save a lot of your time. But will only work if you know the username of the user.
Now, the command you are gonna use is-
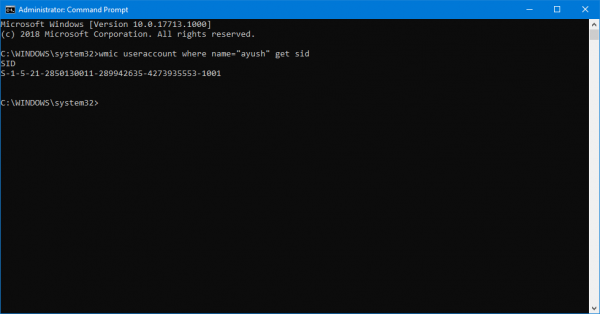
wmic useraccount where name="USER" get sid
Now, you have to replace USER with the actual username of the user inside the quotes in the command above.
For example, it should be like-
wmic useraccount where name="Ayush" get sid
In case, you get an error while using the command above, try changing the path to C:\Windows|System32|wbem instead of C:\Windows\System32\
The result of the above command would look something like this,
2] Using Whoami
Find SID of Current User using Command Prompt or PowerShell
Open a PowerShell/CMD window and type the following command:

whoami/user
Press Enter.
Another way to find SID of a Current user is using the command wmic useraccount as below
Open a PowerShell/CMD window and type the following command:
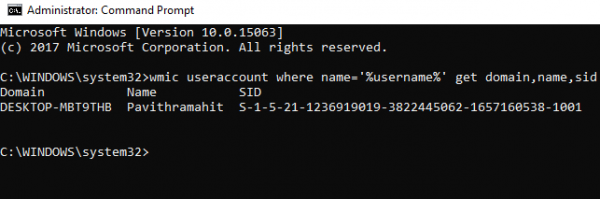
wmic useraccount where name='%username%' get domain,name,sid
Press Enter.
Find SID of All Users using Command Prompt or PowerShell
Open a Command Prompt/PowerShell window and type the following command:
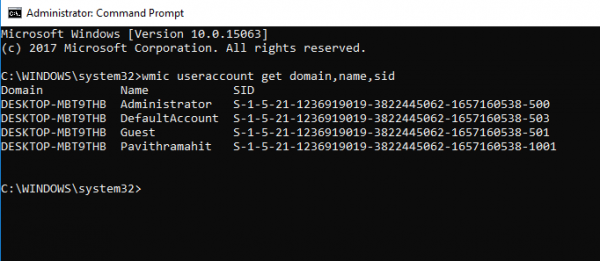
wmic useraccount get domain,name,sid
Press Enter.
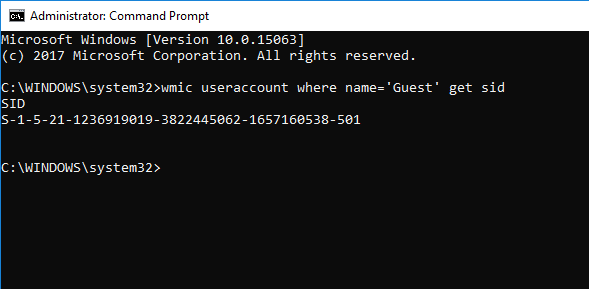
Find SID of a Specific User using CommandPrompt or PowerShell
Open a Command Prompt/PowerShell and type the following command:
wmic useraccount where name='username' get sid
Give the actual name of the user in place of username in the above command.
Press Enter.
Find Username of SID using Command Prompt or PowerShell
Open a Command Prompt/PowerShell and type the following command
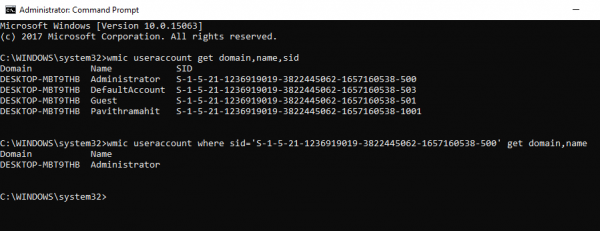
wmic useraccount where sid='<sid>' get domain,name
Give the actual SID value in place of <sid> in the above command.
Press Enter.
3] Use PowerShell
Another way to find SID of all user is using the command Get-WmiObject in the PowerShell.
Open PowerShell and type the following command:
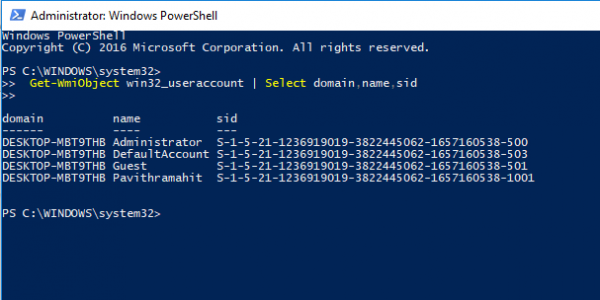
Get-WmiObject win32_useraccount | Select domain,name,sid
Press Enter.
4] Using the Registry Editor
Here, start by opening the Registry Editor. You can do it by searching for it in the Cortana Search box or just hit WINKEY + R combination to launch start and type in regedit and then hit Enter.
Once you have opened the Registry Editor, navigate to the following path,
HKEY_LOCAL_MACHINE\SOFTWARE\Microsoft\Windows NT\CurrentVersion\ProfileList
Now, inside the ProfileImagePath values for each SID under the folder of ProfileList, you can find the desired SIDs and other details like Usernames. The page would look similar to this screen snippet below.
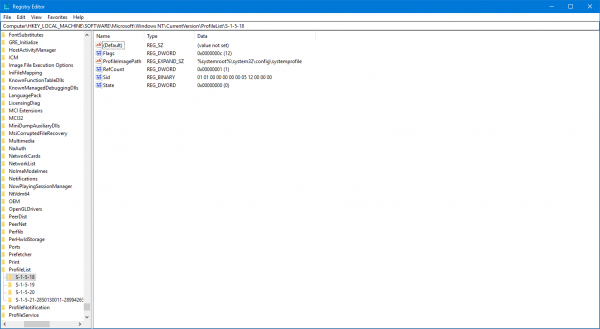
It is worth noting that you can find the SIDs for the users who are already logged in to the computer. Either they should be accessing their account remotely or their account should be logged in and then switched to another user on whose account this activity is being done. This is the only drawback of this method but the Method 1 of using WMIC, it is not an issue at all.
Identifying SIDs
A SID in the format of S-1-0-0 is called as a Null SID. It is assigned to a SID when its value is unknown or it is assigned to a group without any members.
Also, a SID in the format of S-1-1-0 is a World SID. It is assigned to a group of every user.
Finally, a SID in the format of S-1-2-0 is called as a Local SID. It is assigned to a user who is supposed to be logged in from a local terminal.
You can learn more about these System Identifiers here on Microsoft Developer Network.
With inputs from Pavithra Bhat