
Last Updated :
14 Aug, 2024
To get the hash of a file using CMD in Windows, you can use the built-in `certutil` tool. This command generates a unique hash value for the file, which helps in verifying its integrity. For example, you can compute SHA-256, MD5, or SHA-1 hashes depending on your needs. This method is convenient as it doesn’t require additional software.
What is Hash Value?
A hash value, also known simply as a hash, is a fixed-size numerical or alphanumeric value generated from input data using a hash function. Hash functions take an input (or “message”) and produce a unique output that represents the data. Here’s a detailed look at hash values:
A cryptographic hash is a fixed-size work string (or text) that is used as an identifier/fingerprint of some data. These are particularly useful in determining the integrity of files after they are transferred over a communication channel. Hashes are even utilized by certain OS-level processes for their work. The command processor of Windows OS (cmd.exe) provides the user with the ability to compute hashes on files/Directories via a utility command named Certutil. In this article, we will learn about computing hashes on a command prompt (cmd).
Description of Command
The command Certutil is primarily used for working with digital certificates and not hashes. The ability to hash files is due to the presence of a -hashfile switch in it.
> Certutil -hashfile
-hashfile  -- Generate and display cryptographic hash over a file
Where certutil is the command, and -hashfile is a switch provided to it.
Syntax
The -hashfile switch takes in two arguments. Firstly, the path to the file in which we are interested in getting the hash. And then the hash algorithm that we are interested in.
Creating a Syntax
Certutil -hashfile (Path_to_file) [HashAlgo]
Where Path_to_file is mandatory (should be provided) argument and HashAlgo is optional argument (If not provided, defaults to SHA1). If HashAlgo is provided it should either be from SHA (Secure Hash Algorithms) or from MD (Message Digest) Cryptographic Hash families. Some of the hash algorithms allowed in the command are MD4, MD5, SHA1, SHA256, SHA512.
Usage of the Command
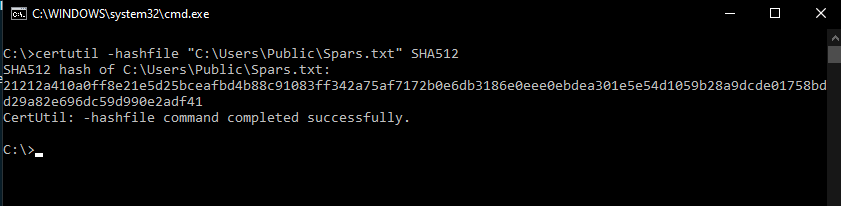
To demonstrate the usage of the command, we would be running the command on a file. Our example file will be at the location
C:\Users\Public\spars.txt"

That contains some text data. So to get the MD5 (Message Digest 5) hash of the file, we would have to execute the command.
certutil -hashfile "C:\Users\Public\spars.txt" MD5
The command upon execution would produce an output similar to this.
MD5 hash of spars.txt:
cb21e6741817a2d3020e02bb94301ae4
CertUtil: -hashfile command completed successfully.
To get SHA512 hash of the above file the command and the output would appear as following :
Conclusion
Hash values are essential tools for ensuring data integrity and security in various computing scenarios. A hash value, generated by a hash function, serves as a fixed-size representation of input data, making it easier to verify the authenticity and consistency of that data. Cryptographic hashes, in particular, are used to identify and verify the integrity of files and other data, helping to detect any unauthorized changes or corruption.
The Certutil command in Windows provides a straightforward way to compute hash values for files using different hash algorithms. By leveraging Certutil with the -hashfile switch, users can generate hash values for files and validate their integrity effectively. Understanding how to use this command can be useful for system administrators, developers, and security professionals who need to manage and verify data integrity in their workflows.
In Windows you can make a checksum of a file without installing any additional software.
For this you can use the certUtil – built-in command-line tool that works both in Windows CMD and PowerShell.
In this note i will show the examples of how to make md5sum and sha256sum of a file in Windows from the command line.
Cool Tip: zip and unzip from the command line in Windows! Read more →
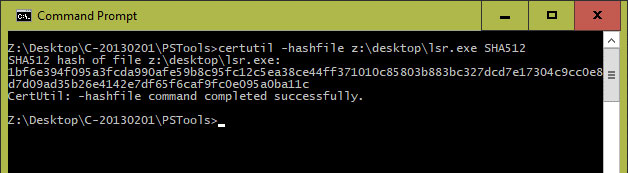
Checksum a file in Windows using the built-in certUtil command-line utility:
C:\> certUtil -hashfile <PATH_TO_FILE> <HASH_ALGORITHM>
MD5 checksum example (md5sum):
C:\> certUtil -hashfile C:\file.img MD5
SHA256 checksum example (sha256sum):
C:\> certUtil -hashfile C:\file.img SHA256
Get only hash value:
# Windows CMD:
C:\> CertUtil -hashfile C:\file.img MD5 | findstr /v "hash"

# Windows PowerShell:
PS C:\> $(CertUtil -hashfile C:\file.img MD5)[1] -replace " ",""
Available hash algorithms:
MD2 MD4 MD5 SHA1 SHA256 SHA384 SHA512
Hash Algorithms: Note that on Windows 7, the hash algorithms are case-sensitive. Be sure to type, for example, not “md5” but “MD5”. In the subsequent versions of Windows the case doesn’t matter.
Get help:
C:\> certutil -hashfile -?
Was it useful? Share this post with the world!
Do you wonder how to generate a MD5 file checksum? You are at the best place, in this article, I’ll show you 7 methods to do this, so you’ll necessarily find one that works for you.
As a general rule, the MD5 checksum for a file can be generated with a command line or third-party applications like Hash Generator or MD5 Checksum utility. The goal of a MD5 checksum is to detect any kind of corruption, especially after a file transfer.
The goal of this article is not to explain the MD5 algorithm, so if you need more details about, please take a look at this article first. It will explain everything you need to know before using MD5 file checksums.
Let’s get back to our main topic now, there are a number of ways to generate the MD5 File Checksum, and I’ll give you a bunch of them right now.

Master Linux Commands
Your essential Linux handbook
Want to level up your Linux skills? Here is the perfect solution to become efficient on Linux. 20% off today!
Download now
In the command prompt
A command line tool is built-in in the Microsoft Windows 10 operating system, as a certificate service, which is “CertUtil”. This command line offers a switch, “Hashfile”, thanks to this, a hash string can be generated. Here a specified algorithm can be used, such as MD5:
certutil -hashfile <file> <algorithm>
certutil -hashfile myfile.zip MD5
With PowerShell
There is also a command in PowerShell.
This is the most efficient and the easiest method, as it does not include any kind of coding. If the PowerShell 4.0 is used then a command line, i.e., cmdlet exists in it. This cmdlet is also known as “Get-FileHash”. Thanks to this command line, a hash file can be easily generated :
Get-FileHash -Path <file> -algorithm <name>
Get-FileHash -Path myfile.zip -algorithm MD5

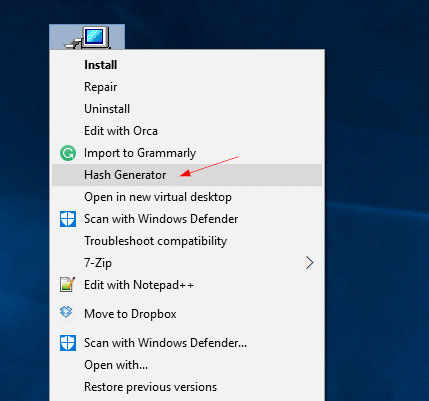
Hash generator: right click to generate a MD5 checksum
You can also find tools that can be use in the right-click menu on a file. Hash Generator in one of them, we’ll get back to it very soon. But unlike the other, it add a nice option on your system.
After its installation, if a right click is done on this windows application then a context menu is opened. In this drop down menu, there is an option named as Hash Generator, which helps to generate the desired hashes in the file.
Download here
3 Third Party Tools Methods
Not everybody is a coding person and thus not everybody uses the command lines therefore a few third-party tools are available that can serve the purpose in a better way.
These third-party apps have built-in command lines and the code hidden in them and thus when a command is entered to them to generate the MD5 Checksum for a file, they do so within a few instants and no extra hard work is required.
Such third-party apps are mentioned below, for instance:
Hash Generator
There is a free universal hash generating tool available in the market for Windows 10, namely the Hash Generator. Thanks to this software, the generation of fourteen different types of checksum or hashes is done easily. It supports a number of function families, including the MD5.
Download here

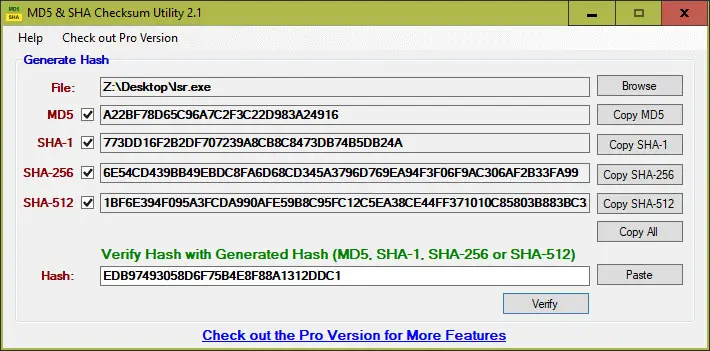
MD5 Checksum Utility
This is another tool, which is used to generate different types of checksum or hashes: MD5 & SHA Checksum Utility.
This MD5 Checksum Utility is different from the Hash Generator in a sense that it lets you match the actual file with the hash file to verify and ensure the integrity of the file.
Download here
HashMyFiles
Compared to the MD5 Checksum Utility and the Hash Generator, the HashMyFiles tool is a smaller and a portable tool.
It serves the same purpose as that of the MD5 Checksum Utility and the Hash Generator, i.e., the generation of different types of checksum or hashes. It is different from the other two in a sense that it is fast and lets you check the hashes of a number of files at an instant.
Download here.
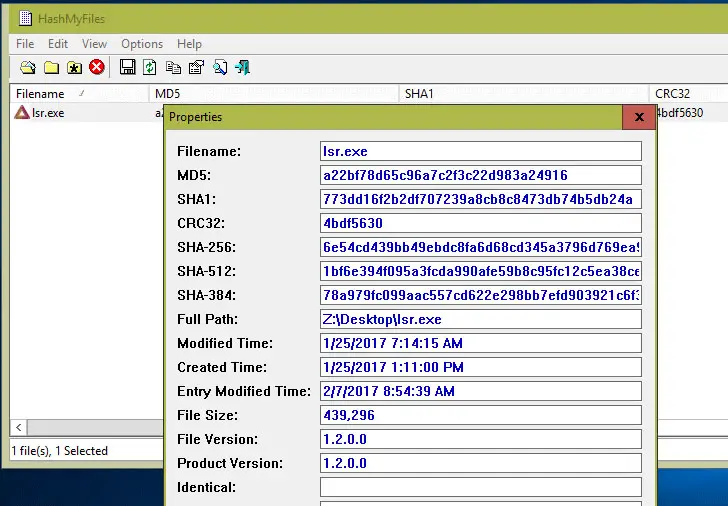
If the three options are compared then HashMyFiles is the best option available in the market as it is smaller, it is faster, it is portable and the most important fact of all these, it lets a person check a number of files an instant. Therefore, this HashMyFiles is most commonly used by a number of people looking for this feature.
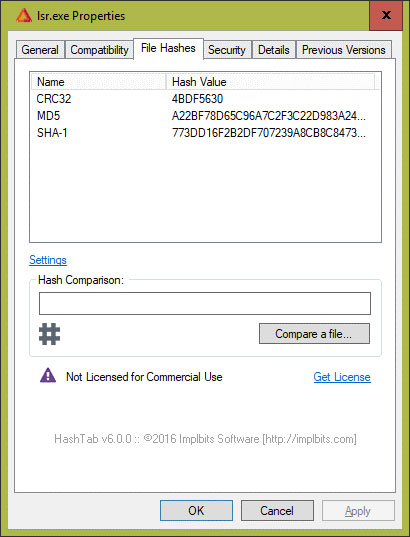
The Tab from File’s Property Method
A “File hashes” Tab in the properties of the file is another free tool that helps you generate the checksum and hashes of a number of functions and files.
This Tab in the File Property comes after the installation of a free tool named as “HashTab”. Thanks to this tool, a separate tab is added in the dialogue box of the File Properties. If this tab is clicked in the dialogue box of file properties, it lets one display the hashes of the clicked file, of which the dialogue box of the file properties was opened for.
Download here.
This part is intended for programmers, but can help you if you are in this case.
Hide your IP address and location with a free VPN:
Try it for free now, with advanced security features.
2900+ servers in 65 countries. It’s free. Forever.
First method
First of all, to generate and check the checksum and hashes of the desired file, the file is converted to a string. After converting to a string, the following methodology or the code is used, as below:
Code:
public static String getMD5EncryptedString ( String encTarget )
{
   MessageDigest mdEnc = null;
   Try         {
      mdEnc = MessageDigest.getInstance ( "MD5" ) ;
   }
   catch ( NoSuchAlgorithmException e )
  {
      System.out.println( "Exception while encrypting to md5" );
      e.printStackTrace () ;
   }

   mdEnc.update(encTarget.getBytes () , 0, encTarget.length () ) ;
   String md5 = new BigInteger ( 1, mdEnc.digest () ).toString ( 16 ) ;
   while ( md5.length () < 32 ) {
      md5 = "0" + md5;
   }
   Return md5;
}
This method is good enough for the small sized files or strings and not for the bigger sized strings.
Second Method
With the help of the following code just, the checksum for MD5 in android Operating System can be achieved, as:
MessageDigest md = MessageDigest.getInstance( "MD5" ) ;
InputStream is = new FileInputStream ( "file.txt" ) ;
try {
   is = new DigestInputStream ( is, md ) ;
}

finally {
   is.close () ;
}

byte [] digest = md.digest () ;
More methods and notes on Android files hash here.
The above methods are used to generate MD5 checksum and hashes. The above seven mentioned methods are usable by different operating systems, which were mentioned along. For instance, the first five methods are for Windows 10 operating system and the next two, i.e., sixth and seventh methods are for android operating system.
Hi, my name is Patrick, I’m a web developer and network administrator. I have always been interested in security, and I created this website to share my findings with you.
This guide shows you how to check the MD5 or SHA256 checksum (or other hashing algorithms) of any file in Windows 11 or Windows 10 using only Command Prompt or Windows Terminal.
What is checksum and why do we use it?
A checksum is a unique set of numbers and letters generated for a file using a hash algorithm such as MD5 or SHA-256 (the most commonly used checksum algorithms) to verify if the file has not been modified during transmission (e.g. downloading the file).
Most software vendors display the checksum of their downloadable files (such as installers and zip files) so that users can check the integrity of the file using the checksum after download. This is to ensure that the file has not been altered in any way during transfer.
After downloading a file, you can generate the checksum of the downloaded file and see if it matches the checksum provided by the software vendor. If it matches, this means that there were no errors or alternations during the transfer and that the files were identical before and after the transfer.
See also: How to Compare Two Folders in Windows 11
How to check MD5 or SHA256 checksum of a file in Windows 11
To verify the MD5 checksum or SHA256 checksum of a file in Windows 11, follow the steps below.
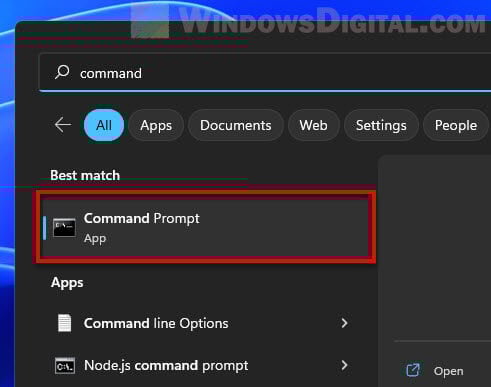
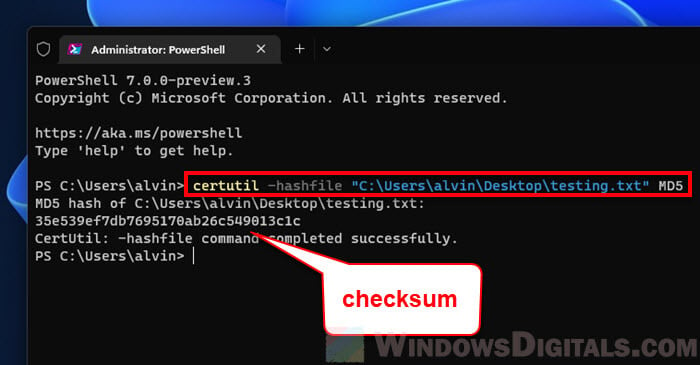
- First, right-click the file you want to verify the checksum for and select “Copy as path“. You will need this path later.

- Next, open Command Prompt (search for “CMD” via Start) or Windows Terminal (right-click Start and select Windows Terminal).

- To check the MD5 checksum of a file, type the following command in the Command Prompt or Windows Terminal window.
certutil -hashfile filepath MD5
Replace filepath with the actual path to the file that you want to check the checksum for. You can highlight the filepath and press Ctrl + V to paste the path you’ve copied in step 1. For example:
certutil -hashfile "C:\Users\alvin\Desktop\testing.txt" MD5

To check the SHA256 checksum of the file, replace MD5 with SHA256. For example:
certutil -hashfile "C:\Users\alvin\Desktop\testing.txt" SHA256

- Press Enter to execute the command. The checksum of the file will then be shown.


Related: How to Password Protect a Folder in Windows 11
Verify different checksum algorithms
To check the checksum of a file using a different hashing algorithm, replace the MD5 in the command line with the checksum algorithm that you want to use. The following are the hashing functions that the certutil command-line tool supports.
- MD2
- MD4
- MD5
- SHA1
- SHA256
- SHA384
- SHA512
What to do if the checksums do not match?
If the checksum of the file you generated on your computer do not match the one provided by the software vendor, it indicates that the file is corrupted, incomplete or has been altered.
In most circumstances, if the checksums do not match, you should not open the file because the data may have been tampered with and could pose a security risk if you run the file.
- If you suspect that the file is corrupted or incomplete, try to download the file again from the same source.
- If the checksum still does not match on your second try, you may want to contact and notify the source from which you download the file. The cause of the problem may be on their side.
- Try to download the file from a different trusted source.
- Clear your browser’s cache (if you use your browser to download the file) and history before downloading the file again. This is to ensure that the browser will request new download from the source again instead of re-downloading the corrupted file from your browser’s cache.
- Before you re-download the file, delete the old one whose checksum does not match.
Содержание статьи:
- Узнаем контрольную сумму
- Способ 1
- Способ 2
- Способ 3
- Способ 4
- Способ 5
- Вопросы и ответы: 0
Вводная (зачем это нужно): когда вы скачиваете из сети какую-нибудь программу, архив, образ ISO (особенно больших размеров) — есть определенная вероятность, что у вас может оказаться битый файл (или поддельный, т.е. кем-то измененный, например, вирусами).
Чтобы убедиться, что перед вами оригинальный файл (а не подделка) — нужно сравнить контрольные суммы* своего файла на диске, с контрольными суммами файла на сайте его разработчика (они их обычно всегда приводят). Если совпадут — значит все OK!
* Важный момент: контр. сумма (или хэш-сумма) представляет из себя текстовую строку с буквами и цифрами, которая уникальна для каждого файла (как подпись у человека). И если содержимое файла изменится хоть на один байт — контрольная сумма тоже изменится! Разумеется, если хэш-сумма вашего файла не совпадает с оригиналом — лучше его не открывать, и перезагрузить информацию…
*
Узнаем контрольную сумму
Способ 1
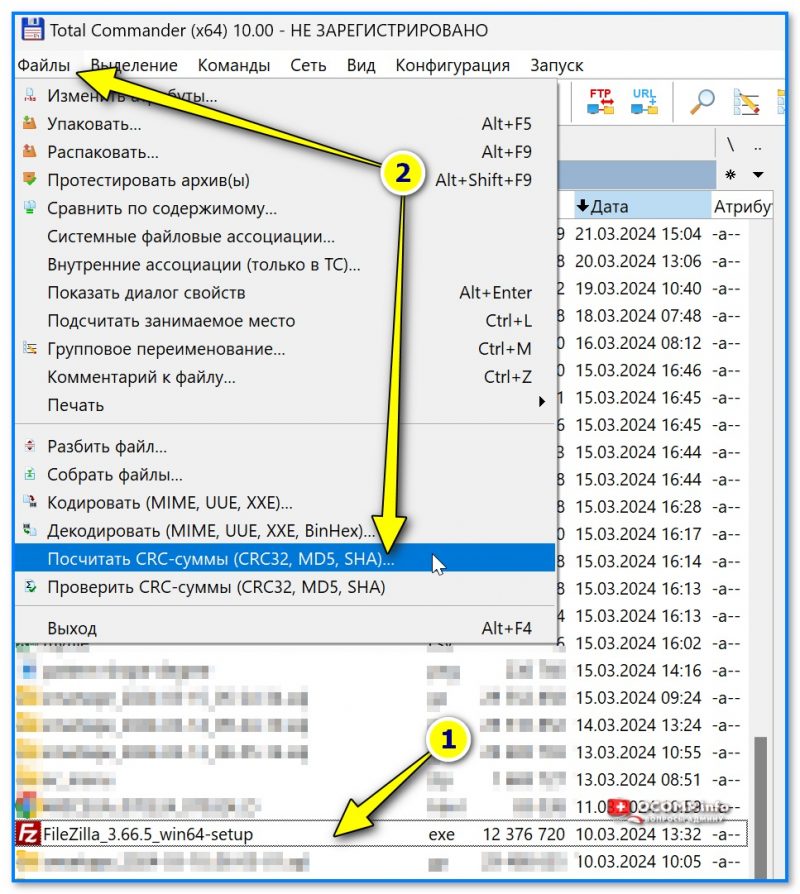
Пожалуй, наиболее быстрый и удобный способ — воспользоваться программой Total Commander (ссылка на сайт разработчика: https://www.ghisler.com/download.htm). Это аналог проводника, который сильно упрощает взаимодействие с большим кол-вом файлов.
Что делать:
- скачивание, установка, запуск у Total Commander стандартны, и поэтому я их не рассматриваю;
- далее в панели нужно выбрать тот файл, для которого вам требуется контрольная сумма, и перейти в меню «Файл — посчитать CRC суммы». См. скриншот ниже; 👇

Файл — посчитать CRC суммы
- затем указать тип контрольной суммы: MD5, SHA256, SHA1 и др. (обычно выбирают тот тип, который указан на сайте, с которого вы загрузили файл. Иначе как сравнивать-то? 😉);

Тип контрольной суммы
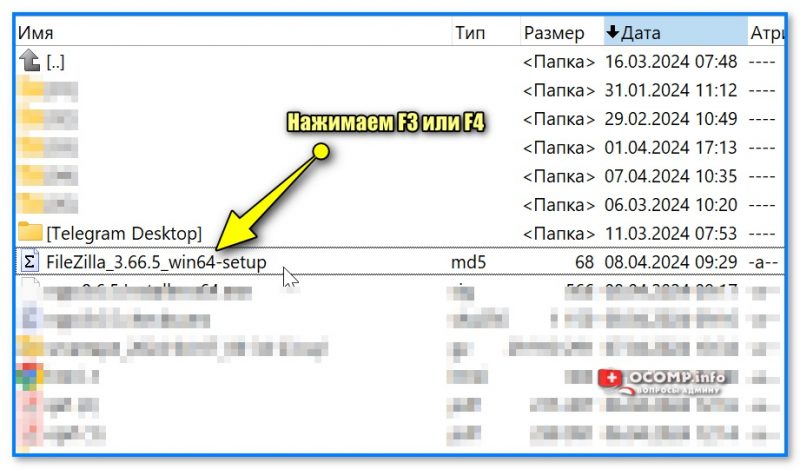
- после этого у вас в этой же папке с файлом появится новый текстовый файл (в моем случае с расширением MD5). Необходимо открыть его: для этого нужно его выбрать и нажать F3 (на ноутбуках возможно Fn+F3);

Открываем полученный текстовый файл
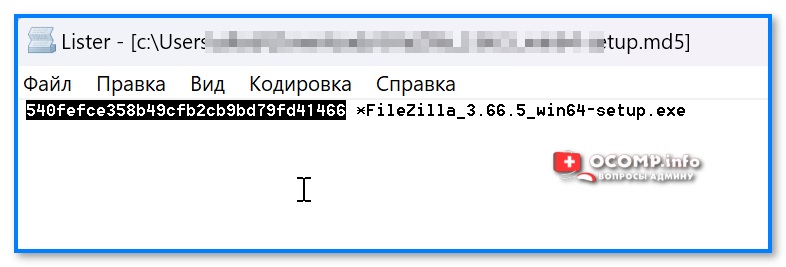
- ву-а-ля, перед вами контрольная сумма! Эту строку теперь можно скопировать и сравнить со строкой от разработчиков вашего файла: если совпадает — значит ваш файл никто не изменил… (не подделка…).

Напротив каждого файла своя контр. сумма

*
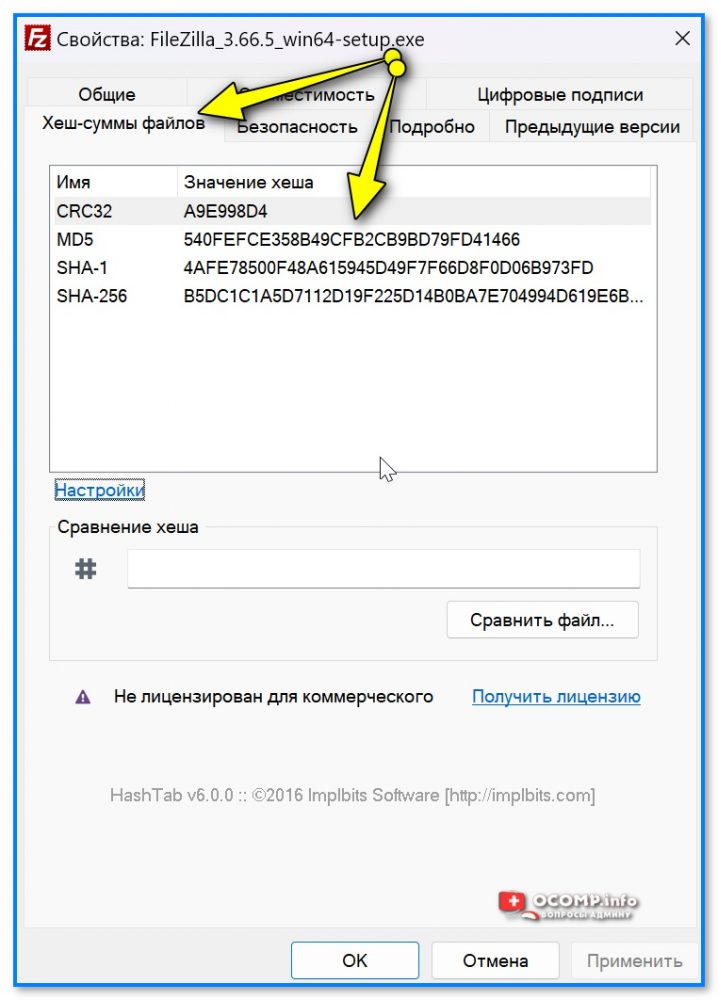
Способ 2
Если вы достаточно часто что-то качаете и загружаете (и нужно постоянно проверять хеш-суммы) — возможно, вам придется по душе дополнение для проводника HashTab V 6.0 (ссылка на сайт разработчика).
После его установки — достаточно просто открыть свойства нужного файла и перейти во вкладку «Хеш-суммы файлов». В ней будут представлены следующие типы контр. сумм: CRC32, MD5, SHA-1, SHA-256 (в настройках можно добавить и другие).
Удобно?! 👌👇👇
Свойства файла
Хеш-суммы файлов
*
Способ 3
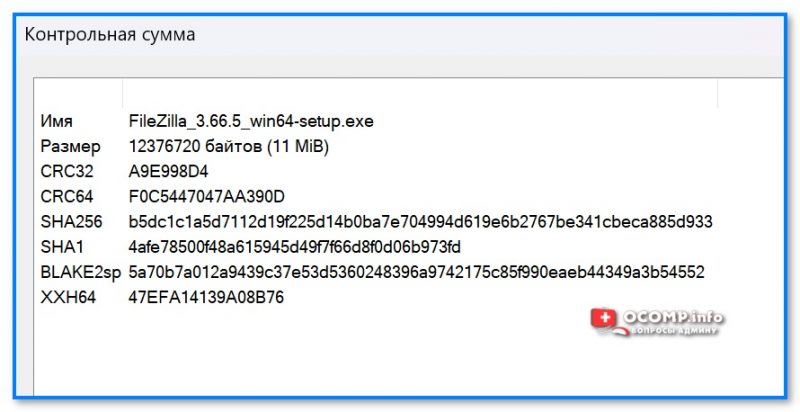
Есть еще одна достаточно удобная утилита для подсчета хеш-сумм — File Checksum Calculator (сайт разрабочтика: https://vovsoft.com/software/file-checksum-calculator/).
После запуска File Checksum Calculator — нужно-то лишь указать расположение файла: через 1-2 сек. вы получите всё необходимое (строки CRC32, MD5, SHA1, SHA256, SHA512)! См. скрин ниже. 👇
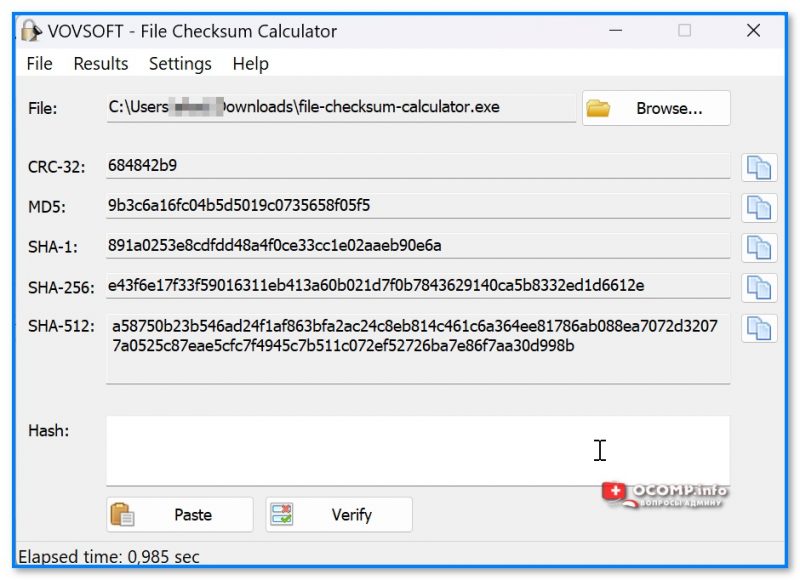
File Checksum Calculator — скрин окна приложения
*
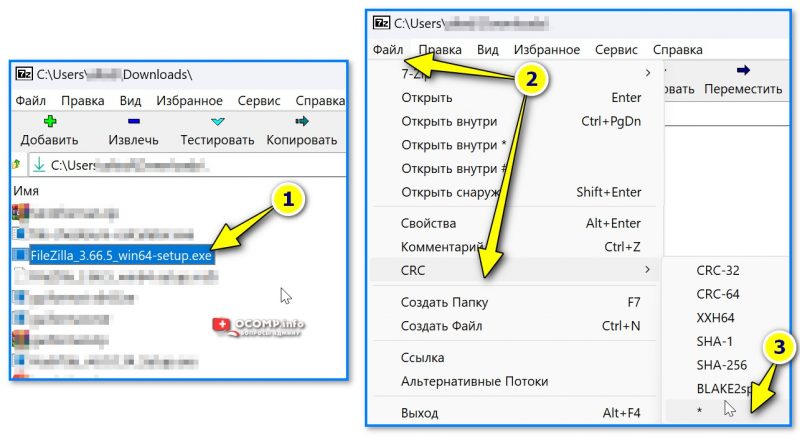
Способ 4
Если вы пользуетесь архиватором 7ZIP (ссылка на офиц. сайт: https://www.7-zip.org/) — то достаточно просто узнать хэш-суммы в нем:
- для этого нужно открыть сам архиватор (через ярлык в меню ПУСК, например);
- выбрать в нем файл и перейти в меню «Файл / CRC / *» (см. стрелку 3 на скрине ниже);

7ZIP — файл — CRC
- архиватор тут же представит неск. типов контрольных сумм (CRC32, 64, SHA256, SHA1 и др.). Задача выполнена?!

7zip — контрольные суммы
*
Способ 5
Можно также воспользоваться встроенной в Windows утилитой CertUtil (для этого понадобиться 📌запустить командную строку, ввести в нее нижеприведенную команду и нажать Enter).
certutil -hashfile C:\Users\alex\Downloads\FileZilla_3.66.5_win64-setup.exe MD5
Обращаю внимание на то, что:
- вместо моего пути к программе (C:\Users\alex\Downloads\FileZilla_3.66.5_win64-setup.exe) — вам нужно указать свой путь!
- вместо MD5 — можно указать другой тип контр. суммы (SHA1 или SHA256, например).
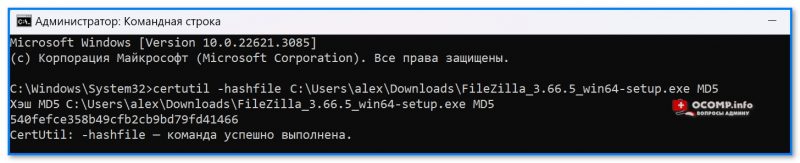
Командная строка — хэш-сумма // в качестве примера
✏️ Кстати!
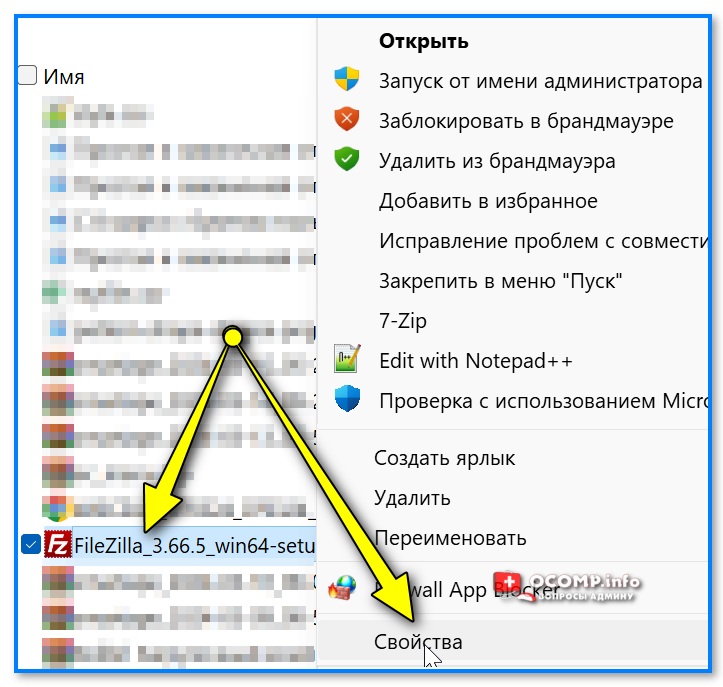
Чтобы узнать имя и расположение своего файла — нажмите по нему правой кнопкой мыши и откройте его свойства: во вкладке «Общие» эти сведения указаны (см. скрин ниже). 👇
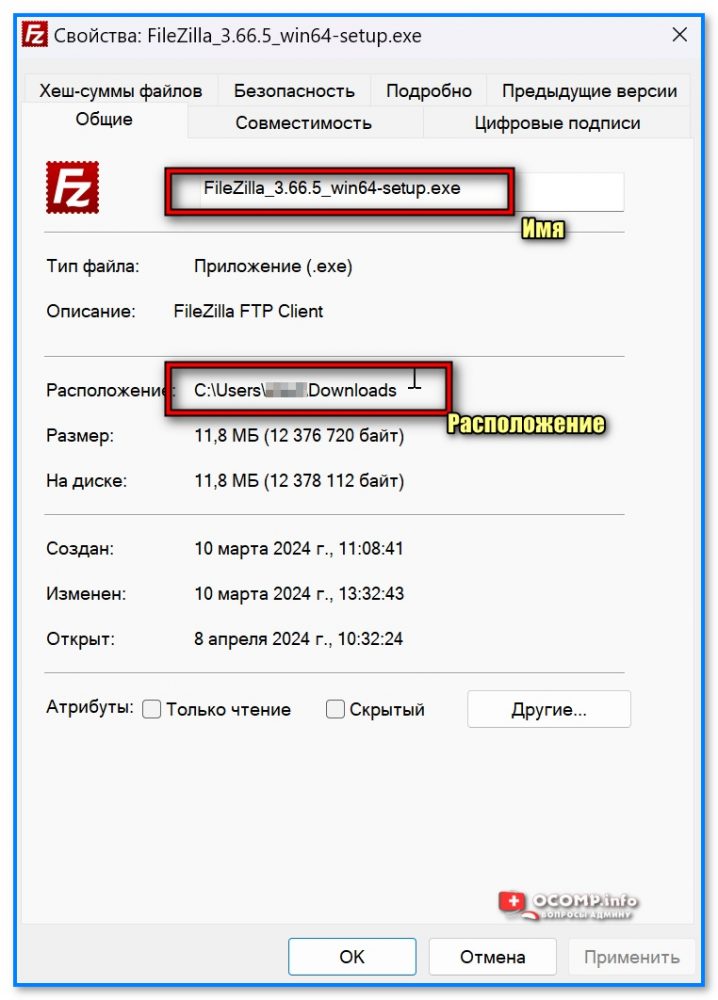
Свойства файла — имя и расположение
*
Иные (более простые) способы — приветствуются в комментариях ниже.
Всего доброго!
👋