
- Tier: Free, Premium, Ultimate
- Offering: GitLab.com, GitLab Self-Managed, GitLab Dedicated
Git is a distributed version control system, which means you can work locally,
then share or push your changes to a server. In this case, the server you push to is GitLab.
GitLab uses the SSH protocol to securely communicate with Git.
When you use SSH keys to authenticate to the GitLab remote server,
you don’t need to supply your username and password each time.
What are SSH keys
SSH uses two keys, a public key and a private key.
- The public key can be distributed.
- The private key should be protected.
It is not possible to reveal confidential data by uploading your public key. When you need to copy or upload your SSH public key, make sure you do not accidentally copy or upload your private key instead.
You can use your private key to sign commits,
which makes your use of GitLab and your data even more secure.
This signature then can be verified by anyone using your public key.
For details, see Asymmetric cryptography, also known as public-key cryptography.
Prerequisites
To use SSH to communicate with GitLab, you need:
- The OpenSSH client, which comes pre-installed on GNU/Linux, macOS, and Windows 10.
- SSH version 6.5 or later. Earlier versions used an MD5 signature, which is not secure.
To view the version of SSH installed on your system, run ssh -V.
Supported SSH key types
To communicate with GitLab, you can use the following SSH key types:
- ED25519
- ED25519_SK
- ECDSA_SK
- RSA
- ECDSA (As noted in Practical Cryptography With Go, the security issues related to DSA also apply to ECDSA.)
Administrators can restrict which keys are permitted and their minimum lengths.
ED25519 SSH keys
The book Practical Cryptography With Go
suggests that ED25519 keys are more secure and performant than RSA keys.
OpenSSH 6.5 introduced ED25519 SSH keys in 2014, and they should be available on most
operating systems.
ED25519 keys might not be fully supported by all FIPS systems. For more information, see issue 367429.
ED25519_SK SSH keys
To use ED25519_SK SSH keys on GitLab, your local client and GitLab server
must have OpenSSH 8.2 or later installed.
ECDSA_SK SSH keys
To use ECDSA_SK SSH keys on GitLab, your local client and GitLab server
must have OpenSSH 8.2 or later installed.
RSA SSH keys
Available documentation suggests ED25519 is more secure than RSA.
If you use an RSA key, the US National Institute of Standards and Technology in
Publication 800-57 Part 3 (PDF)
recommends a key size of at least 2048 bits. Due to limitations in Go,
RSA keys cannot exceed 8192 bits.
The default key size depends on your version of ssh-keygen.
Review the man page for your installed ssh-keygen command for details.
See if you have an existing SSH key pair
Before you create a key pair, see if a key pair already exists.
- Go to your home directory.
- Go to the
.ssh/subdirectory. If the.ssh/subdirectory doesn’t exist,
you are either not in the home directory, or you haven’t usedsshbefore.
In the latter case, you need to generate an SSH key pair. - See if a file with one of the following formats exists:
Algorithm Public key Private key ED25519 (preferred) id_ed25519.pubid_ed25519ED25519_SK id_ed25519_sk.pubid_ed25519_skECDSA_SK id_ecdsa_sk.pubid_ecdsa_skRSA (at least 2048-bit key size) id_rsa.pubid_rsaDSA (deprecated) id_dsa.pubid_dsaECDSA id_ecdsa.pubid_ecdsa
Generate an SSH key pair
If you do not have an existing SSH key pair, generate a new one:
-
Open a terminal.
-
Run
ssh-keygen -tfollowed by the key type and an optional comment.
This comment is included in the.pubfile that’s created.
You may want to use an email address for the comment.For example, for ED25519:
ssh-keygen -t ed25519 -C "<comment>"For 2048-bit RSA:
ssh-keygen -t rsa -b 2048 -C "<comment>" -
Press Enter. Output similar to the following is displayed:
Generating public/private ed25519 key pair. Enter file in which to save the key (/home/user/.ssh/id_ed25519): -
Accept the suggested filename and directory, unless you are generating a deploy key
or want to save in a specific directory where you store other keys.You can also dedicate the SSH key pair to a specific host.
-
Specify a passphrase:
Enter passphrase (empty for no passphrase):
Enter same passphrase again:
A confirmation is displayed, including information about where your files are stored.
A public and private key are generated. Add the public SSH key to your GitLab account
and keep the private key secure.
Configure SSH to point to a different directory
If you did not save your SSH key pair in the default directory,
configure your SSH client to point to the directory where the private key is stored.
-
Open a terminal and run this command:
eval $(ssh-agent -s) ssh-add <directory to private SSH key> -
Save these settings in the
~/.ssh/configfile. For example:# GitLab.com Host gitlab.com PreferredAuthentications publickey IdentityFile ~/.ssh/gitlab_com_rsa # Private GitLab instance Host gitlab.company.com PreferredAuthentications publickey IdentityFile ~/.ssh/example_com_rsa
For more information on these settings, see the man ssh_config page in the SSH configuration manual.
Public SSH keys must be unique to GitLab because they bind to your account.
Your SSH key is the only identifier you have when you push code with SSH.
It must uniquely map to a single user.
Update your SSH key passphrase
You can update the passphrase for your SSH key:
-
Open a terminal and run this command:
ssh-keygen -p -f /path/to/ssh_key -
At the prompts, enter the passphrase and then press Enter.
Upgrade your RSA key pair to a more secure format
If your version of OpenSSH is between 6.5 and 7.8, you can save your private
RSA SSH keys in a more secure OpenSSH format by opening a terminal and running
this command:
ssh-keygen -o -f ~/.ssh/id_rsaAlternatively, you can generate a new RSA key with the more secure encryption format with
the following command:
ssh-keygen -o -t rsa -b 4096 -C "<comment>"Generate an SSH key pair for a FIDO2 hardware security key
To generate ED25519_SK or ECDSA_SK SSH keys, you must use OpenSSH 8.2 or later:
-
Insert a hardware security key into your computer.
-
Open a terminal.
-
Run
ssh-keygen -tfollowed by the key type and an optional comment.
This comment is included in the.pubfile that’s created.
You may want to use an email address for the comment.For example, for ED25519_SK:
ssh-keygen -t ed25519-sk -C "<comment>"For ECDSA_SK:
ssh-keygen -t ecdsa-sk -C "<comment>"If your security key supports FIDO2 resident keys, you can enable this when
creating your SSH key:ssh-keygen -t ed25519-sk -O resident -C "<comment>"-O residentindicates that the key should be stored on the FIDO authenticator itself.
Resident key is easier to import to a new computer because it can be loaded directly
from the security key byssh-add -K
orssh-keygen -K. -
Press Enter. Output similar to the following is displayed:
Generating public/private ed25519-sk key pair. You may need to touch your authenticator to authorize key generation. -
Touch the button on the hardware security key.
-
Accept the suggested filename and directory:
Enter file in which to save the key (/home/user/.ssh/id_ed25519_sk): -
Specify a passphrase:
Enter passphrase (empty for no passphrase):
Enter same passphrase again:
A confirmation is displayed, including information about where your files are stored.
A public and private key are generated.
Add the public SSH key to your GitLab account.
Generate an SSH key pair with a password manager
Generate an SSH key pair with 1Password
You can use 1Password and the 1Password browser extension to either:
- Automatically generate a new SSH key.
- Use an existing SSH key in your 1Password vault to authenticate with GitLab.
- Sign in to GitLab.
- On the left sidebar, select your avatar.
- Select Edit profile.
- On the left sidebar, select SSH Keys.
- Select Add new key.
- Select Key, and you should see the 1Password helper appear.
- Select the 1Password icon and unlock 1Password.
- You can then select Create SSH Key or select an existing SSH key to fill in the public key.
- In the Title box, enter a description, like
Work Laptopor
Home Workstation. - Optional. Select the Usage type of the key. It can be used either for
AuthenticationorSigningor both.Authentication & Signingis the default value. - Optional. Update Expiration date to modify the default expiration date.
- Select Add key.
For more information about using 1Password with SSH keys, see the 1Password documentation.
Add an SSH key to your GitLab account
To use SSH with GitLab, copy your public key to your GitLab account:
-
Copy the contents of your public key file. You can do this manually or use a script.
For example, to copy an ED25519 key to the clipboard:macOS
tr -d '\n' < ~/.ssh/id_ed25519.pub | pbcopyLinux (requires the
xclippackage)xclip -sel clip < ~/.ssh/id_ed25519.pubGit Bash on Windows
cat ~/.ssh/id_ed25519.pub | clipReplace
id_ed25519.pubwith your filename. For example, useid_rsa.pubfor RSA. -
Sign in to GitLab.
-
On the left sidebar, select your avatar.
-
Select Edit profile.
-
On the left sidebar, select SSH Keys.
-
Select Add new key.
-
In the Key box, paste the contents of your public key.
If you manually copied the key, make sure you copy the entire key,
which starts withssh-rsa,ssh-dss,ecdsa-sha2-nistp256,ecdsa-sha2-nistp384,ecdsa-sha2-nistp521,
ssh-ed25519,sk-ecdsa-sha2-nistp256@openssh.com, orsk-ssh-ed25519@openssh.com, and may end with a comment. -
In the Title box, type a description, like
Work Laptopor
Home Workstation. -
Optional. Select the Usage type of the key. It can be used either for
AuthenticationorSigningor both.Authentication & Signingis the default value. -
Optional. Update Expiration date to modify the default expiration date.
- Administrators can view expiration dates and use them for
guidance when deleting keys. - GitLab checks all SSH keys at 01:00 AM UTC every day. It emails an expiration notice for all SSH keys that are scheduled to expire seven days from now.
- GitLab checks all SSH keys at 02:00 AM UTC every day. It emails an expiration notice for all SSH keys that expire on the current date.
- Administrators can view expiration dates and use them for
-
Select Add key.
Verify that you can connect
Verify that your SSH key was added correctly.
The following commands use the example hostname gitlab.example.com. Replace this example hostname with your GitLab instance’s hostname, for example, git@gitlab.com.
By default, GitLab uses git username to authenticate. It can be different if it was changed by the administrator.
-
To ensure you’re connecting to the correct server, check the server’s SSH host keys fingerprint. For:
- GitLab.com, see the SSH host keys fingerprints documentation.
- GitLab.com or another GitLab instance, see
gitlab.example.com/help/instance_configuration#ssh-host-keys-fingerprintswheregitlab.example.comisgitlab.com(for
GitLab.com) or the address of the GitLab instance.
-
Open a terminal and run this command, replacing
gitlab.example.comwith your
GitLab instance URL:ssh -T git@gitlab.example.com -
If this is the first time you connect, you should verify the
authenticity of the GitLab host. If you see a message like:The authenticity of host 'gitlab.example.com (35.231.145.151)' can't be established. ECDSA key fingerprint is SHA256:HbW3g8zUjNSksFbqTiUWPWg2Bq1x8xdGUrliXFzSnUw. Are you sure you want to continue connecting (yes/no)? yes Warning: Permanently added 'gitlab.example.com' (ECDSA) to the list of known hosts.Type
yesand press Enter. -
Run the
ssh -T git@gitlab.example.comcommand again. You should receive a Welcome to GitLab,@username! message.
If the welcome message doesn’t appear, you can troubleshoot by running ssh
in verbose mode:
ssh -Tvvv git@gitlab.example.comUse different keys for different repositories
You can use a different key for each repository.
Open a terminal and run this command:
git config core.sshCommand "ssh -o IdentitiesOnly=yes -i ~/.ssh/private-key-filename-for-this-repository -F /dev/null"This command does not use the SSH Agent and requires Git 2.10 or later. For more information
on ssh command options, see the man pages for both ssh and ssh_config.
View your SSH keys
To view the SSH keys for your account:
- On the left sidebar, select your avatar.
- Select Edit profile.
- On the left sidebar, select SSH Keys.
Your existing SSH keys are listed at the bottom of the page. The information includes:
- The title for the key
- Public fingerprint
- Permitted usage types
- Creation date
- Last used date
- Expiry date
Remove an SSH key
You can revoke or delete your SSH key to permanently remove it from your account.
Removing your SSH key has additional implications if you sign your commits with the key. For more information, see Signed commits with removed SSH keys.
Revoke an SSH key
If your SSH key becomes compromised, revoke the key.
Prerequisites:
- The SSH key must have the
SigningorAuthentication & Signingusage type.
To revoke an SSH key:
- On the left sidebar, select your avatar.
- Select Edit profile.
- On the left sidebar, select SSH Keys.
- Next to the SSH key you want to revoke, select Revoke.
- Select Revoke.
Delete an SSH key
To delete an SSH key:
- On the left sidebar, select your avatar.
- Select Edit profile.
- On the left sidebar, select SSH Keys.
- Next to the key you want to delete, select Remove (
remove ). - Select Delete.
Use different accounts on a single GitLab instance
You can use multiple accounts to connect to a single instance of GitLab. You
can do this by using the command in the previous topic.
However, even if you set IdentitiesOnly to yes, you cannot sign in if an
IdentityFile exists outside of a Host block.
Instead, you can assign aliases to hosts in the ~/.ssh/config file.
- For the
Host, use an alias likeuser_1.gitlab.comand
user_2.gitlab.com. Advanced configurations
are more difficult to maintain, and these strings are easier to
understand when you use tools likegit remote. - For the
IdentityFile, use the path the private key.
# User1 Account Identity
Host <user_1.gitlab.com>
  Hostname gitlab.com
  PreferredAuthentications publickey
  IdentityFile ~/.ssh/<example_ssh_key1>

# User2 Account Identity
Host <user_2.gitlab.com>
  Hostname gitlab.com
  PreferredAuthentications publickey
  IdentityFile ~/.ssh/<example_ssh_key2>
Now, to clone a repository for user_1, use user_1.gitlab.com in the git clone command:
git clone git@<user_1.gitlab.com>:gitlab-org/gitlab.gitTo update a previously-cloned repository that is aliased as origin:
git remote set-url origin git@<user_1.gitlab.com>:gitlab-org/gitlab.gitPrivate and public keys contain sensitive data. Ensure the permissions
on the files make them readable to you but not accessible to others.
Configure two-factor authentication (2FA)
You can set up two-factor authentication (2FA) for
Git over SSH. You should use
ED25519_SK or ECDSA_SK SSH keys.
Use EGit on Eclipse
If you are using EGit, you can add your SSH key to Eclipse.
Use SSH on Microsoft Windows
If you’re running Windows 10, you can either use the Windows Subsystem for Linux (WSL)
with WSL 2 which
has both git and ssh preinstalled, or install Git for Windows to
use SSH through PowerShell.
The SSH key generated in WSL is not directly available for Git for Windows, and vice versa,
as both have a different home directory:
- WSL:
/home/<user> - Git for Windows:
C:\Users\<user>
You can either copy over the .ssh/ directory to use the same key, or generate a key in each environment.
If you’re running Windows 11 and using OpenSSH for Windows, ensure the HOME
environment variable is set correctly. Otherwise, your private SSH key might not be found.
Alternative tools include:
- Cygwin
- PuTTYgen 0.81 and later (earlier versions are vulnerable to disclosure attacks)
Overriding SSH settings on the GitLab server
GitLab integrates with the system-installed SSH daemon and designates a user
(typically named git) through which all access requests are handled. Users
who connect to the GitLab server over SSH are identified by their SSH key instead
of their username.
SSH client operations performed on the GitLab server are executed as this
user. You can modify this SSH configuration. For example, you can specify
a private SSH key for this user to use for authentication requests. However, this practice
is not supported and is strongly discouraged as it presents significant
security risks.
GitLab checks for this condition, and directs you
to this section if your server is configured this way. For example:
$ gitlab-rake gitlab:check

Git user has default SSH configuration? ... no
  Try fixing it:
  mkdir ~/gitlab-check-backup-1504540051
  sudo mv /var/lib/git/.ssh/id_rsa ~/gitlab-check-backup-1504540051
  sudo mv /var/lib/git/.ssh/id_rsa.pub ~/gitlab-check-backup-1504540051
  For more information see:
  doc/user/ssh.md#overriding-ssh-settings-on-the-gitlab-server
  Please fix the error above and rerun the checks.
Remove the custom configuration as soon as you can. These customizations
are explicitly not supported and may stop working at any time.
Verify GitLab SSH ownership and permissions
The GitLab SSH folder and files must have the following permissions:
- The folder
/var/opt/gitlab/.ssh/must be owned by thegitgroup and thegituser, with permissions set to700. - The
authorized_keysfile must have permissions set to600. - The
authorized_keys.lockfile must have permissions set to644.
To verify that these permissions are correct, run the following:
stat -c "%a %n" /var/opt/gitlab/.ssh/.Set permissions
If the permissions are wrong, sign in to the application server and run:
cd /var/opt/gitlab/
chown git:git /var/opt/gitlab/.ssh/
chmod 700  /var/opt/gitlab/.ssh/
chmod 600  /var/opt/gitlab/.ssh/authorized_keys
chmod 644 /var/opt/gitlab/.ssh/authorized_keys.lock Introduction
Git connects to remotes by default via HTTPS, which requires you to enter your login and password every time you run a command like Git pull or git push, using the SSH protocol. You may connect to servers and authenticate to access their services. The three services listed allow Git to connect through SSH rather than HTTPS. Using public-key encryption eliminates the need to type a login and password for each Git command.
Make sure a Git is installed
Make sure Git is installed before you start. Run the following command in your Windows terminal to see if Git is installed on your computer:
git --version
Enter fullscreen mode
Exit fullscreen mode
Install Git
To install Git, you can download the latest version from the official Git website. You can also install Git using Chocolatey or Winget package manager.
Install Git official website
To install Git from the official website, follow the steps below:
- Go to the official Git website and download the latest version of Git for Windows.
- Run the installer and follow the steps below:
- Click Next on the first two screens to accept the default options.
- Click Next on the Select Components screen.
- Click Next on the Choosing the default editor used by Git screen.
- Click Next on the Choosing the default terminal emulator screen.
- Select the Use Git from the Windows Command Prompt option.
- Select the Checkout Windows-style, commit Unix-style line endings option.
- Select the Use Windows’ default console window option.
- Click Next on the Configuring the line ending conversions screen.
- Click Next on the Configuring the terminal emulator to use with Git Bash screen.
- Click Install on the Choosing HTTPS transport backend screen.
- Click Finish on the Completing the Git Setup screen.
- Open a new command prompt window and verify that Git is installed correctly by typing
git --version.
Install Git using Chocolatey
To install Git using Chocolatey, follow the steps below:
- Open Windows Terminal.
- Run the following command to install Git:
choco install git -y
Enter fullscreen mode
Exit fullscreen mode
- Verify that Git is installed correctly by typing
git --version.
Install Git using Winget
To install Git using Winget, follow the steps below:
- Open Windows Terminal.
- Run the following command to install Git:
winget install --id=Git.Git -e
Enter fullscreen mode
Exit fullscreen mode
- Verify that Git is installed correctly by typing
git --version.
Note: Don’t forget to specify global Git settings using the following command after installing git:
git config --global user.name 'USERNAME'
git config --global user.email 'YOUR_EMAIL@EXAMPLE.COM'
Enter fullscreen mode
Exit fullscreen mode
Generate SSH keys
To generate SSH keys, follow the steps below:
- Open Windows Terminal.
- Run the following command (change your
YOUR_EMAIL@EXAMPLE.COMwith your email address) to establish a new SSH key pair:
ssh-keygen -t rsa -b 4096 -C "YOUR_EMAIL@EXAMPLE.COM"
Enter fullscreen mode
Exit fullscreen mode
- It will ask you where you want to save the private key (id rsa), and you may accept the default location by pressing Enter.
Whether you already have a private key, it will ask if you want to override it:
Overwrite (y/n)?
Enter fullscreen mode
Exit fullscreen mode
- If this happens, hit Enter and type y. Then, enter and re-enter the following passcode (think of it as a password):
Enter a file in which to save the key (/c/Users/you/.ssh/id_rsa): [Press enter]
Enter fullscreen mode
Exit fullscreen mode
- Enter a secure passphrase.
Enter passphrase (empty for no passphrase): [Type a passphrase]
Enter same passphrase again: [Type passphrase again]
Enter fullscreen mode
Exit fullscreen mode
- The SSH key pair is created in ~/.ssh, and the whole interaction should look like this:
Enter fullscreen mode
Exit fullscreen mode
- Verify that the SSH key was created by running the following command:
ls .\.ssh\
Enter fullscreen mode
Exit fullscreen mode
Add SSH key to the ssh-agent to your account
Copy the SSH key to your clipboard by running the following command:
Get-Content .\.ssh\id_rsa.pub | Set-Clipboard
Enter fullscreen mode
Exit fullscreen mode
GitHub
Sign in to your GitHub account using a browser by going to github.com and entering your username and password. Click your profile photo in the upper-right corner of the page, then Settings:
Select SSH and GPG keys from the user settings sidebar. Then select New SSH key from the drop-down menu. Put a descriptive label for the new key in the Title area (for example, your computer’s name) and paste your public key into the Key field. Last but not least, click Add SSH key:

The key is now visible in the list of SSH keys linked to your account:

GitLab
Sign in to your GitLab account using a browser by going to gitlab.com and entering your username and password. Click your profile photo in the upper-right corner of the page, then Settings:
Click SSH Keys in the User Settings sidebar. In the Key area, paste your public key. Fill in the Title area for the new key with a descriptive term (for example, the name of your computer). Finally, click the Add key:

The key is now visible in the list of SSH keys linked to your account:
Bitbucket
Log in to your Bitbucket account using a browser by going to bitbucket.org and entering your username and password. Click your profile photo in the lower-left corner of the website, then Bitbucket settings:

SSH keys may be found in the Settings sidebar’s Security section. After that, select Add key from the drop-down menu. Fill up the Description box with a descriptive label for the new key (such as your computer’s name), and then paste your public key into the Key field. Last but not least, choose to Add key:

The key has now been added to your account’s list of SSH keys:
Test connecting via SSH
Before utilizing SSH with Git, GitHub, GitLab, and Bitbucket allow you to verify whether the connection has been set up successfully.
GitHub Test Connecting via SSH
Open the terminal once you’ve added your SSH key to your GitHub account and type:
ssh -T git@github.com
Enter fullscreen mode
Exit fullscreen mode
If you’re connecting to GitHub over SSH for the first time, the SSH client will ask if you trust the GitHub server’s public key:
The authenticity of host 'github.com (140.82.113.4)' can't be established.
RSA key fingerprint is SHA256:a5d6c20b1790b4c144b9d26c9b201bbee3797aa010f2701c09c1b3a6262d2c02.
Are you sure you want to continue connecting (yes/no)?
Enter fullscreen mode
Exit fullscreen mode
Press Enter after typing yes. GitHub has been added to the list of trustworthy hosts in the SSH client:
Warning: Permanently added 'github.com,140.82.113.4' (RSA) to the list of known hosts.
Enter fullscreen mode
Exit fullscreen mode
You won’t be asked about GitHub’s public key again once you’ve added it to the list of known hosts.
The server notifies you that you have successfully authenticated and ends the connection: Because this remote access through SSH is offered by GitHub only for testing purposes and not for practical usage, the server informs you that you have successfully authenticated and terminates the connection:
Hi YOUR_USER_NAME! You've successfully authenticated, but GitHub does not provide shell access.
Enter fullscreen mode
Exit fullscreen mode
If you passed the test, you may now utilize SSH with GitHub.
The entire interaction should look something like this:
ssh -T git@github.com

The authenticity of host 'github.com (140.82.113.4)' can't be established.
RSA key fingerprint is SHA256:a5d6c20b1790b4c144b9d26c9b201bbee3797aa010f2701c09c1b3a6262d2c02.
Are you sure you want to continue connecting (yes/no)? yes
Warning: Permanently added 'github.com,140.82.113.4' (RSA) to the list of known hosts.
Hi your_user_name! You've successfully authenticated, but GitHub does not provide shell access.
YOUR_USER_NAME@YOUR_HOST_NAME:~>
Enter fullscreen mode
Exit fullscreen mode
GitLab Test Connecting via SSH
The test is pretty similar if you’ve added your SSH key to your GitLab account:
ssh -T git@gitlab.com

The authenticity of host 'gitlab.com (35.231.145.151)' can't be established.
ECDSA key fingerprint is SHA256:4ac7a7fd4296d5e6267c9188346375ff78f6097a802e83c0feaf25277c9e70cc.
Are you sure you want to continue connecting (yes/no)? yes
Warning: Permanently added 'gitlab.com,35.231.145.151' (ECDSA) to the list of known hosts.
Welcome to GitLab, @YOUR_USER_NAME!
Enter fullscreen mode
Exit fullscreen mode
If you passed the test, you may now utilize SSH with GitLab.
Bitbucket Test Connecting via SSH
The test is pretty similar if you’ve added your SSH key to your Bitbucket account:
ssh -T git@bitbucket.org

The authenticity of host 'bitbucket.org (104.192.143.1)' can't be established.
RSA key fingerprint is SHA256:fb7d37d5497c43f73325e0a98638cac8dda3b01a8c31f4ee11e2e953c19e0252.
Are you sure you want to continue connecting (yes/no)? yes
Warning: Permanently added 'bitbucket.org,104.192.143.1' (RSA) to the list of known hosts.
logged in as YOUR_USER_NAME.

You can use git or hg to connect to Bitbucket. Shell access is disabled.
Enter fullscreen mode
Exit fullscreen mode
If you passed the test, you may now utilize SSH with Bitbucket.
References
- GitHub SSH Key Setup
- GitLab SSH Key Setup
- Bitbucket SSH Key Setup
The Secure Socket Shell (SSH) is the preferred connection mechanism, especially when compared to HTTPS, to connect from Git to a remote server such as GitLab, GitHub or BitBucket.
In this GitLab SSH Keys tutorial, we show you how to configure SSH keys to securely connect your local Git instance with your remote GitLab repositories.
How to setup GitLab SSH keys
To setup and configure GitLab SSH keys for secure Git fetch, pull, push and clone operations, follow these steps:
- Generate a GitLab SSH key pair on your personal computer.
- Copy the value of the public SSH key.
- Log into GitLab and navigate to your account’s Preferences tab.
- Click the ‘Add new key’ button in the SSH Keys tab.
- Paste the public key in as the value and set an expiration date.
- Copy the SSH URL of the GitLab repo you wish to clone.
- Issue a git clone command with the SSH URL.
How to generate GitLab SSH keys
Both Ubuntu and Windows machines have built-in SSH support through the inclusion of the ssh-keygen tool.
Updated versions of Windows 10 and Windows Server have built-in support since 2018, so there is no need to download Putty, PuttyGen or Plink to create RAS keys or to SSH in to GitLab.
| Git and SSH tutorials |
|---|
|
Need to setup SSH for GitHub, GitLab, or CodeDeploy? These SSH Key tutorials will help:
These quick tutorials will get you working with Git and the secure shell in no time. |
Just open PowerShell in Windows or a Linux terminal window on Ubuntu and issue the following command:
C:\gitlab\ssh\example> ssh-keygen -o -t rsa -C "[email protected]"
The options provided to the ssh-keygen command force the tool to create an RSA-compatible key using the latest OpenSSL standards. The -C switch simply adds a comment to the end of the public file.
When you’re prompted for a passphrase or a special storage location, accept all the defaults.
By default, all GitLab SSH keys must go in an .ssh folder under the user’s home directory. Furthermore, a blank passphrase is acceptable unless your organization’s compliance rules state otherwise.
This operation creates Git SSH keys named id_ras.pub and id_rsa respectively.
Copy the public GitLab SSH key
You must configure the value of the public key for Git in GitLab. Open the public key in a text editor and copy the value to the clipboard:
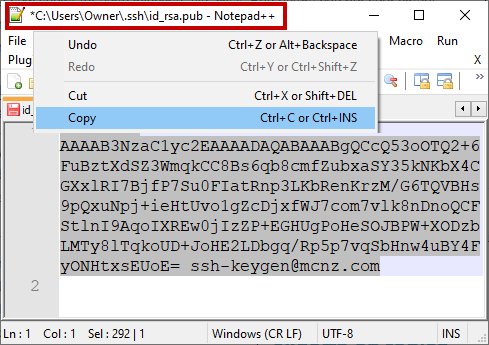
Copy the .pub key produced from the GitLab SSH key generation operation and configure it into GitLab.
Add your SSH Key to GitLab
Log into GitLab and click on your account preferences.
Click the SSH Keys link and paste the copied value into the text field.
Set an expiration date, and then click the blue button to persistently add the GitLab SSH key.
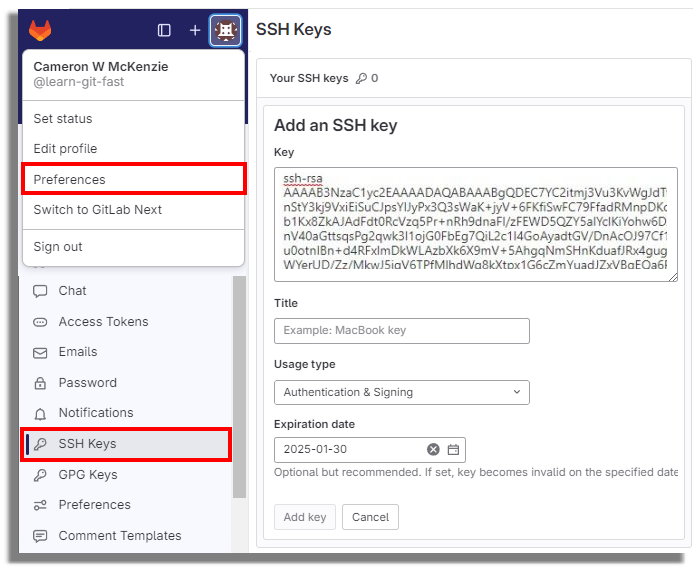
GitLab SSH keys are configured under your account preferences.
Clone GitLab with SSH
With the SSH key configured in GitLab, you can now perform regular Git operations such as clone, push, pull and fetch over SSH. Simply clone your repository of choice with the SSH URL, which is found on the landing page of your GitLab project. My GitLab SSH URL is structured as follows:
[email protected]:cameronmcnz/five-commits.git
Now that you’ve configured GitLab SSH and copied the SSH URL, issue a clone command in PowerShell. The GitLab SSH clone operation asks you to confirm the authenticity of the keys being used. Type in yes and allow the operation to continue.
PS C:\gitlab\ssh\example> git clone [email protected]:cameronmcnz/five-commits.git
Cloning into ‘five-commits’ from GitLab over SSH…
Authenticity of GitLab SSH Key can’t be established.
Do you still want to connect to GitLab over SSH (yes or no)? yes
Clone from GitLab over SSH: 100% (222/222), 2.23 MiB | 3.41 MiB/s, done.
Resolving deltas from GitLab over SSH: 100% (111/111), done.
Pull and push to GitLab over SSH
Once the clone operation is successful, continue to use Git as you normally would. All future pull and push operations to GitLab will happen over a secure SSH connection.
And that’s how easy it is to configure GitLab SSH keys to ensure all distributed Git operations occur over a secure channel.
Check out this Git and GitLab tutorial for beginners to learn more.
Creating an SSH key is a fundamental step for securely connecting to GitLab repositories. This guide will walk you through the process of generating an SSH key on a Windows system, ensuring a seamless and secure connection to your GitLab account.
Key Takeaways
- Understanding the importance and benefits of SSH keys for GitLab.
- Preparing your Windows environment by installing necessary tools like Git for Windows and GitBash.
- Step-by-step instructions to generate a new SSH key using GitBash.
- Guidance on adding the generated SSH key to your GitLab account.
- Tips for managing multiple SSH keys and troubleshooting common issues.
Understanding SSH Keys and Their Importance
What is an SSH Key?
In order to communicate over SSH (Secure Shell), you must have an SSH key pair. Each SSH key pair has a public and a private key.
- Public Key – Can be used to encrypt data in such a way so only the holder of the corresponding private key can decrypt it.
- Private Key – Can be used as proof of identity, and is used to authenticate a user’s connection to the server.
The public key can be distributed freely, while the private key should be protected and never shared.
Why Use SSH Keys for GitLab?
Aside from the comfort provided by not having to submit your username and password for each action you take, SSH keys are generally much more secure than a username and password. Humans aren’t very good at remembering a large number of secure passwords, so they tend to reuse passwords over multiple sites, resulting in many vulnerabilities. No system connected to the internet is truly secure, but with an SSH key you greatly reduce the chance of human error giving away your access privileges.
Security Benefits of SSH Keys
Using SSH keys for GitLab, especially with GitLab Premium, offers several security benefits:
- Enhanced Security: SSH keys provide a higher level of security compared to traditional username and password authentication.
- Reduced Risk of Human Error: By eliminating the need to remember and enter passwords, the risk of password-related vulnerabilities is minimized.
- Automated Access Management: SSH keys can be easily managed and rotated, ensuring that access remains secure over time.
SSH keys are a critical component in securing your GitLab interactions, providing both convenience and robust security.
Preparing Your Windows Environment for SSH Key Generation
Installing Git for Windows
To get started with SSH key generation, you first need to install Git for Windows. This package includes GitBash, a terminal emulator that allows you to run Git commands. Download the installer from the official Git website and follow the on-screen instructions to complete the installation.
Setting Up GitBash
Once Git for Windows is installed, you can set up GitBash. Open GitBash from the Start menu or by searching for it in the Windows search bar. This terminal will be your primary tool for generating and managing SSH keys.
Verifying Existing SSH Keys
Before generating a new SSH key, it’s a good idea to check if you already have one. Open GitBash and run the following command:
type %userprofile%\.ssh\id_rsa.pub
If the system cannot find the path specified, it means you don’t have an existing SSH key, and you can proceed to generate a new one. If a key does exist, you can either use it or back it up and create a new one.
Tip: It’s always a good practice to back up your existing SSH keys before generating new ones.
Generating a New SSH Key Using GitBash
Launching GitBash
To begin, open GitBash on your Windows machine. This terminal emulator allows you to use Git command line features and is essential for generating SSH keys.
Running the ssh-keygen Command
Once GitBash is open, you can generate a new SSH key by running the ssh-keygen command. Use the following syntax:
ssh-keygen -t rsa -b 2048 -C "your_email@example.com"
-t rsa: Specifies the type of key to create, in this case, RSA.-b 2048: Sets the key length to 2048 bits.-C "your_email@example.com": Adds a comment, typically your email, to the key.
This command will prompt you to specify a file to save the key. Press Enter to accept the default location.
Setting a Passphrase
After specifying the file location, you’ll be prompted to enter a passphrase. Setting a passphrase adds an extra layer of security to your SSH key. You can leave this blank, but it’s recommended to set one for enhanced security, especially if you’re using GitLab Ultimate.
A passphrase is like a password for your SSH key. It ensures that even if someone gains access to your private key, they can’t use it without the passphrase.
Locating Your Generated SSH Key

Navigating to the .ssh Directory
After generating your SSH key, the next step is to locate it. By default, SSH keys are stored in the .ssh directory within your user profile. To navigate to this directory, open GitBash and run the following command:
cd ~/.ssh
This command will take you directly to the .ssh directory where your keys are stored.
Identifying Your Public and Private Keys
In the .ssh directory, you will find your public and private keys. The public key usually has a .pub extension, while the private key does not. For example:
id_ed25519(private key)id_ed25519.pub(public key)
It’s crucial to keep your private key secure and never share it with anyone. Your public key, however, can be shared freely.
Backing Up Your SSH Keys
To avoid losing access to your repositories, it’s a good practice to back up your SSH keys. You can copy the keys to a secure location, such as an external hard drive or a cloud storage service. Here are the steps to back up your keys:
- Navigate to the
.sshdirectory:
cd ~/.ssh
- Copy the keys to your backup location:
cp id_ed25519* /path/to/backup/location/
Regularly backing up your SSH keys ensures that you can quickly recover them in case of data loss or hardware failure.
Adding Your SSH Key to GitLab
Once you’ve generated your SSH key, the next step is to add it to your GitLab account. This will allow you to establish a secure, passwordless connection between your local machine and GitLab.
Accessing GitLab Settings
To begin, log in to your GitLab account. In the top-right corner, click on your avatar and select Settings from the dropdown menu. This will take you to your account settings page.
Navigating to the SSH Keys Section
In the settings menu on the left-hand side, find and click on the SSH Keys option. This section is where you can manage all your SSH keys associated with your GitLab account.
Pasting Your Public Key
Now, open the file containing your public SSH key. Copy the entire key and paste it into the Key field in GitLab. Add a descriptive title to help you identify this key later. Finally, click the Add Key button to save your new SSH key. You should now see the fingerprint, title, and creation date of your added key.
Adding your SSH key to GitLab is a crucial step in setting up a secure, passwordless connection for your projects.
Testing Your SSH Connection to GitLab
Testing your SSH connection to GitLab ensures that your SSH key was added correctly and that you can securely connect to your GitLab instance. This step is crucial to verify that everything is set up properly before you start interacting with your repositories.
Managing Multiple SSH Keys
Managing multiple SSH keys can be a bit tricky, but with the right tools and configuration, it becomes a seamless process. This section will guide you through using ssh-agent, configuring your SSH config file, and switching between different SSH keys efficiently.
Common Issues and How to Resolve Them
Permission Denied Errors
One of the most common issues when trying to connect to a GitLab server is encountering a Permission Denied error. This usually happens when the SSH key is not correctly configured or recognized by the server. To resolve this, ensure that your public key is correctly added to your GitLab account. You can also check the permissions of your SSH key files to make sure they are set correctly.
SSH Key Not Recognized
If your SSH key is not recognized, it could be due to several reasons. First, verify that the key has been added to your GitLab account. If it has, make sure that the SSH agent is running and has your key loaded. You can use the ssh-add -l command to list the keys currently loaded in the agent.
Connection Timeouts
Connection timeouts can be frustrating and are often caused by network issues or incorrect SSH configurations. Ensure that your network allows SSH traffic and that your firewall settings are not blocking the connection. Additionally, double-check your SSH configuration files for any errors.
Troubleshooting SSH issues can be complex, but following these steps can help you identify and resolve the most common problems.
Advanced Tips for SSH Key Management
Managing SSH keys effectively is crucial for maintaining the security and efficiency of your GitLab operations. Here are some advanced tips to help you optimize your SSH key management.
Using Hardware Security Keys
Hardware security keys, such as YubiKey, provide an additional layer of security by storing your SSH keys on a physical device. This makes it significantly harder for malicious actors to gain access to your keys. Using hardware security keys can be particularly beneficial for sensitive projects.
Setting Key Expiration Dates
To reduce the risk of your SSH keys falling into the wrong hands, consider setting expiration dates for your keys. This practice ensures that old keys are no longer valid and new keys need to be generated periodically. You can set expiration dates using the ssh-keygen command:
ssh-keygen -p -f /path/to/ssh_key
Regularly Rotating Your SSH Keys
Regularly rotating your SSH keys is a good security practice. It involves generating new keys and replacing the old ones at regular intervals. This minimizes the risk of key compromise and ensures that your SSH communications remain secure. Make it a habit to rotate your keys every few months.
For a complete guide on cloning GitLab repositories using SSH, focus on setting up SSH keys, configuring Git, troubleshooting issues, and optimizing performance for secure and efficient operations.
Alternative Methods for Generating SSH Keys
When it comes to generating SSH keys on Windows, there are several alternative methods you can use. These methods can be particularly useful if you prefer not to use GitBash or if you are looking for a different approach to suit your workflow.
Using Windows PowerShell
Windows PowerShell is a powerful tool that comes pre-installed on most Windows systems. To generate an SSH key using PowerShell, follow these steps:
- Open Windows PowerShell.
- Run the command
ssh-keygen -t rsa -b 2048 -C "your_email@example.com". - Follow the prompts to save the key in the desired location and set a passphrase.
Note: Ensure that you have OpenSSH installed on your system, as it is required for generating SSH keys using PowerShell.
Generating Keys with PuTTYgen
PuTTYgen is a popular SSH key generation tool that is part of the PuTTY suite. Here’s how to use it:
- Download and install PuTTY from the official website.
- Open PuTTYgen from the Start menu.
- Select the type of key you want to generate (e.g., RSA, ED25519).
- Click the ‘Generate’ button and move your mouse around to create randomness.
- Save the generated public and private keys to your system.
Employing WSL for SSH Key Generation
Windows Subsystem for Linux (WSL) allows you to run a Linux distribution on your Windows machine. This can be a convenient way to generate SSH keys using familiar Linux commands:
- Install a Linux distribution from the Microsoft Store (e.g., Ubuntu).
- Open the WSL terminal.
- Run the command
ssh-keygen -t ed25519 -C "your_email@example.com". - Follow the prompts to save the key and set a passphrase.
Using WSL can be particularly beneficial if you are already comfortable with Linux environments and commands.
By exploring these alternative methods, you can find the one that best fits your needs and preferences. Whether you choose PowerShell, PuTTYgen, or WSL, each method provides a reliable way to generate SSH keys for your GitLab projects.
Conclusion
Creating an SSH key for GitLab on Windows is a straightforward process that significantly enhances the security and efficiency of your development workflow. By following the steps outlined in this guide, you can easily generate and configure your SSH keys, ensuring a secure connection to your GitLab repositories. Remember, the key to a smooth setup is careful attention to each step, from generating the key to adding it to your GitLab account. With your SSH key in place, you can now focus on what truly matters: writing great code and collaborating seamlessly with your team. Happy coding!
Frequently Asked Questions
What is an SSH Key?
An SSH Key is a secure access credential used in the SSH (Secure Shell) protocol. It consists of a pair of cryptographic keys used for authenticating and establishing a secure connection between a client and a server.
Why use SSH Keys for GitLab?
Using SSH keys for GitLab provides a secure way to authenticate and interact with your GitLab repositories without needing to enter your username and password every time. It enhances security and simplifies the workflow.
How do I generate an SSH Key on Windows?
To generate an SSH key on Windows, you can use GitBash. Open GitBash and run the command `ssh-keygen`. Follow the prompts to create your SSH key pair.
Where can I find my generated SSH Key?
Your generated SSH key will typically be located in the `.ssh` directory within your user profile folder. The default path is usually `C:\Users\\.ssh`.
How do I add my SSH Key to GitLab?
To add your SSH key to GitLab, log in to your GitLab account, navigate to your account settings, and find the SSH keys section. Paste your public key into the provided field and save the changes.
What should I do if my SSH Key is not recognized by GitLab?
Ensure that you have correctly added your public SSH key to your GitLab profile. Check for any typos or extra spaces. You can also try reloading your SSH agent or restarting your GitBash terminal.
How can I test my SSH connection to GitLab?
You can test your SSH connection to GitLab by running the command `ssh -T [email protected]`. This command will attempt to authenticate with GitLab using your SSH key.
What are the security benefits of using SSH Keys?
SSH keys provide a higher level of security compared to traditional password-based authentication. They are resistant to brute-force attacks, and the private key never leaves your machine, reducing the risk of exposure.
1. Install Git
Download and install Git based on your operating system:
- Windows: Download Git for Windows
- macOS/Linux: Use your system’s package manager.
macOS/Linux Installation Commands
# macOS
brew install git

# Linux (Debian/Ubuntu)
sudo apt update && sudo apt install git

# Linux (Fedora)
sudo dnf install git
Confirm Git Installation
git --version2. Generate an SSH Key Pair
Generate a new SSH key pair to securely connect to GitLab or GitHub.
SSH Key Generation Command
ssh-keygen -t rsa -b 4096 -C "your.email@example.com"- Replace
your.email@example.comwith your email associated with GitLab or GitHub. - Save the key in the default location:
- Windows:
C:\Users\<YourUsername>\.ssh\id_rsa - macOS/Linux:
~/.ssh/id_rsa
- Windows:
Optional Passphrase Setup
Set a passphrase during key generation for enhanced security.
3. Add the SSH Key to the SSH Agent
Start the SSH agent and add your private key.
Start SSH Agent
Different platforms have different ways to start SSH Agent.
SSH Agent on Windows (Git Bash)
eval "$(ssh-agent -s)"SSH Agent on macOS
eval "$(ssh-agent -s)"For macOS 10.12 and later:
ssh-add --apple-use-keychain ~/.ssh/id_rsaSSH Agent on Linux
eval "$(ssh-agent -s)"Add the SSH Key to the Agent
ssh-add ~/.ssh/id_rsaThis code depends on the SSH dependencies installed and correctly configured and might not work on Windows.
4. Add the SSH Key to GitLab or GitHub
Copy your public key and add it to your GitLab or GitHub account.
Copy the Public Key
cat ~/.ssh/id_rsa.pubAdd Key to GitLab
- Log in to GitLab.
- Navigate to Preferences > SSH Keys.
- Paste the public key and click Add key.
Add Key to GitHub
- Log in to GitHub.
- Navigate to Settings > SSH and GPG keys > New SSH key.
- Paste the public key and click Add SSH key.
5. Test the SSH Connection
Verify the SSH connection to ensure everything is configured correctly.
Test Connection for GitLab
ssh -T git@gitlab.comExpected output:
Welcome to GitLab, <username>!
Test Connection for GitHub
ssh -T git@github.comExpected output:
Hi <username>! You've successfully authenticated.
Notes
Some things to consider and keep in mind.
Default SSH Key Path
Ensure the SSH key is saved in the default location (~/.ssh/id_rsa). If using a custom path, specify it when adding the key to the SSH agent or connecting.
Multiple SSH Keys Configuration
Use an ~/.ssh/config file to manage multiple SSH keys.
Example configuration:
Host github.com
  HostName github.com
  User git
  IdentityFile ~/.ssh/id_rsa_github

Host gitlab.com
  HostName gitlab.com
  User git
  IdentityFile ~/.ssh/id_rsa_gitlab