
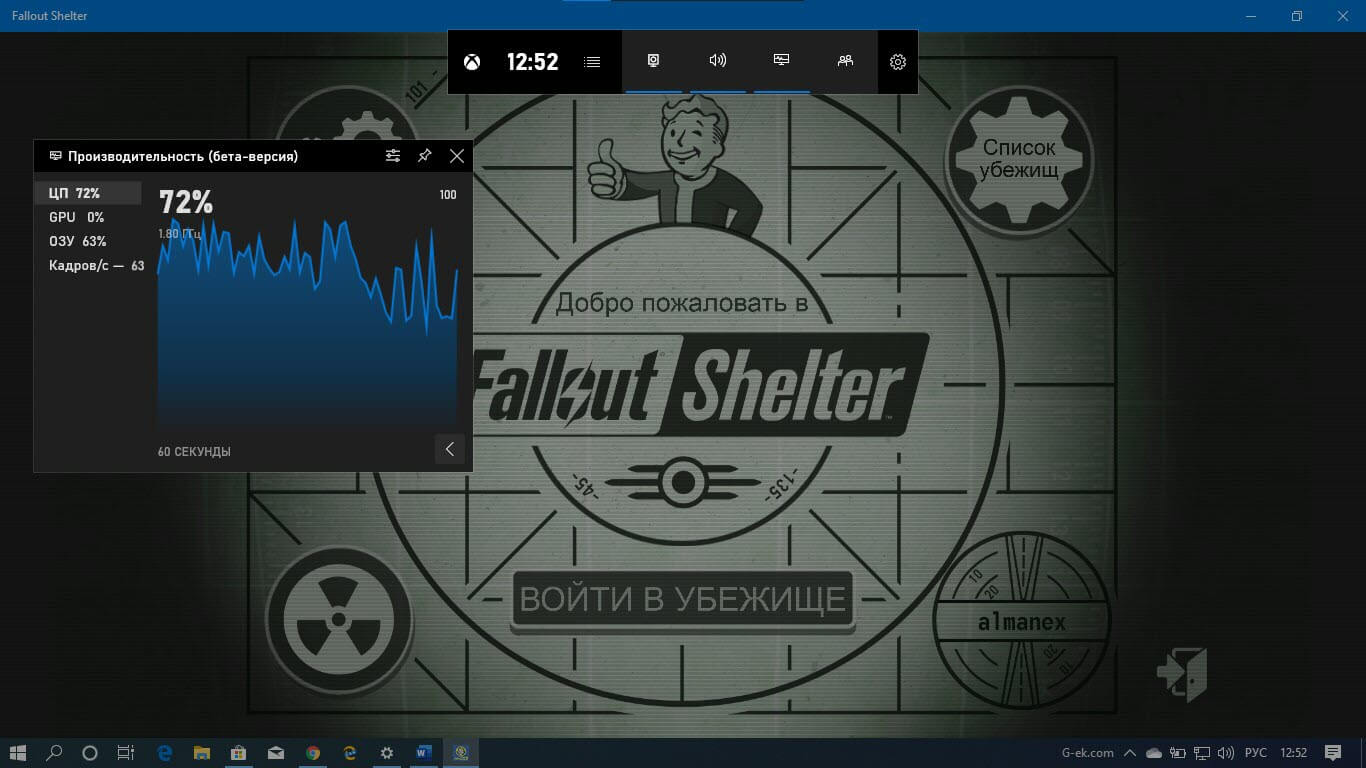
Windows 10 имеет так называемую функцию записи игрового процесса, которая является частью приложения Xbox. Начиная с Windows 10 Creators Update, запись игрового процесса напрямую интегрируется в операционную систему. Ниже приведен список сочетаний клавиш, которые можно использовать для управления функциями Игровой Панели (Game Bar).
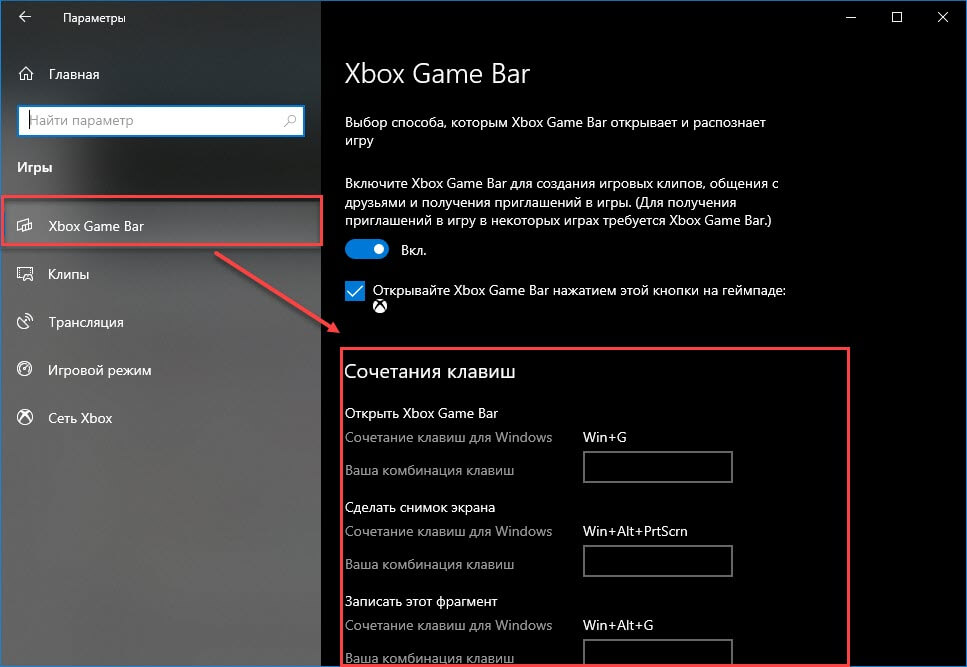
Игровая панель, часть встроенного приложения Xbox в Windows 10. Начиная с Windows 10 build 15019, это отдельная опция в приложении «Параметры» Windows.
Функция предоставляет специальный графический пользовательский интерфейс, который можно использовать для записи содержимого экрана, захвата игрового процесса и сохранения его в виде видео, скриншотов и т. д. Захваченные видео сохраняются с расширением .mp4, а скриншоты сохраняются в виде изображения с расширением .jpg, в папке
C: \ Пользователи \ Имя \ Видео \ Клипы.
Сочетание клавиш для Игровой Панели Windows 10
- Win+ G — Открыть Игровую панель игры (во время игры).
- Win+ Alt+ R — Старт или остановка записи.
- Win+ Alt+ G — Записать последние 30 секунд.
- Win+ Alt+ Print Screen — Сделать скриншот текущей игры.
- Win+ Alt+ T — Показать или скрыть таймер записи.
- Win+ Alt+ W — Показать камеру в трансляции
- Win+ Alt+ B — Запись и приостановка трансляции.
- Win+ Alt+ M — Включение и отключение микрофона.
Рекомендуем:
Windows 10 Xbox Game Bar получает счетчик FPS и отслеживание достижений
Download Windows Speedup Tool to fix errors and make PC run faster
Game Bar in Windows 11/10 includes some useful changes. The app, for instance, now allows you to configure shortcuts of your choice. We know, the app helps you record your gameplay in the background. The newly added capability to the app enhances its utility by manifolds. What’s unique about the new change is that although the app allows you to configure your own shortcuts, the standard shortcuts still continue to work.
Let us in this post see how to set custom keyboard shortcuts for Game Bar in Windows 11/10.
In Game Bar, shortcuts can be configured for the following:
- Open Game bar (Windows logo key+G) – It opens the Game bar while you’re playing your game.
- Record that (Windows logo key+Alt+G)– Instantly captures the last few moments of gameplay as a video if you have enabled the Background recording.
- Start/stop recording (Windows logo key+Alt+R)– It begins or ends a video capture.
- Take Screenshot (Windows logo key+Alt+Print Screen) – Takes a screenshot. There’s now support for a full-screen view for an additional 88 titles.
- Show/hide recording timer (Windows logo key+Alt+T) – Displays the length of the current recording, or hides it to avoid distraction.
- Microphone recording on/off (Windows logo key+Alt+M) – Helps you record audio from your microphone, so you can add commentary to your video.
To set custom keyboard shortcuts, do the following:
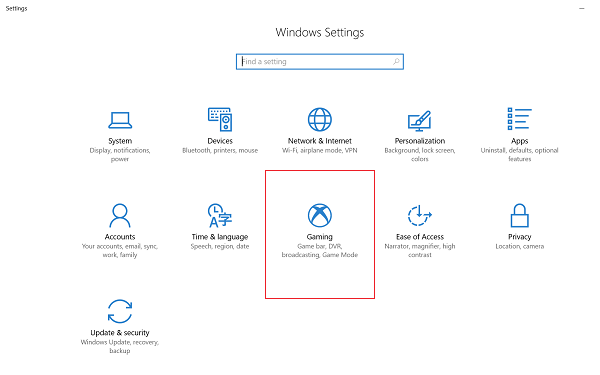
Open Setting. Navigate to Gaming > Game bar.
Now, to set your own shortcut, select the Your shortcut field, and press the keys you want to use for that function. Please note that whatever shortcuts you set, it must include at least one of Control (Ctrl), Shift, or Alt plus at least one other key press.
If you press keys that are already assigned to a common function, like Control+C for copy, they won’t appear in the field.
To remove one of your shortcuts, select the Cancel icon next to the shortcut.
To save the changes, select Save at the end of the Keyboard shortcuts.
How do I change keyboard shortcuts on Xbox Game Bar?
To change the keyboard shortcuts on Xbox Game Bar on Windows 10, you need to follow the aforementioned steps. However, if you use Windows 11, you need to press Win+G to open the Game Bar first. Then, you can open the Settings panel and switch to the Shortcuts tab. From here, you can change any shortcut related to the Game Bar.
Which keyboard shortcut opens the Game Bar?
By default, you need to press Win+G to open the Game Bar. Whether you use Windows 11 or Windows 10, this keyboard shortcut is fixed. However, you can change the shortcuts by following the aforementioned guide. In other words, you can open the Settings panel and switch to the Shortcuts tab to find all the options.
That’s it!
See this post if you are interested in knowing how to enable or disable Game DVR or Game Bar in Windows 11/10.
Anand Khanse is the Admin of TheWindowsClub.com, a 10-year Microsoft MVP (2006-16) & a Windows Insider MVP (2016-2022). Please read the entire post & the comments first, create a System Restore Point before making any changes to your system & be careful about any 3rd-party offers while installing freeware.
Hey, welcome back to another Windows 10 Shots blog post. I hope you read my last post, Windows 10 Shots – Microsoft Edge Keyboard Shortcuts.
As I have mentioned in previous posts, with most shots, after about a handful, things will start to get a little hazy. But, with Windows 10 Shots (this new series of posts), the hope would be that the opposite would happen. That clarity and insight into the highly anticipated release would free your mind to great new features and power of Windows 10.
I have worked with a lot of Windows users over the years, and one thing I have noticed is that there are users who love to use the mouse and there are users who love to use the keyboard. Sure there are those in the middle, and I actually prefer to use the mouse most of the time, but you have to admit, when you watch someone who has the keyboard down to a science, windows, screens, emails, etc. are flashing all of the screen like a firework show. It can be confusing to those watching, but for the person who has become proficient with the keyboard, productivity is the name of the game.
This is the final post in a series dedicated to those who love to wield the keyboard like a sword and chop up all work or play tasks that dare to stand in their way.
I will attempt to keep this short by explaining as quickly has I can the shortcut we are going to use, what it does and a quick description with an occasional screen shot to drive it home. That being said, the General Window 10 and Microsoft Edge posts will have more content. So, let’s get typing …
Game Bar Keyboard Shortcuts
With Windows 10, you can now record games you play and share them with your friends online. Using the Xbox app, you can go back and review recordings, edit them and share them on the Xbox Live network.
Guess what? You can also use the Game bar to record the usage of other applications as well. Pretty slick. Check out the shortcuts to start recording and sharing.
NOTE: In the future, I will do a post on the Windows 10 Xbox app and the Game Bar, but for now, let’s just keep to the basics.
Action – Open Game Bar
Shortcut Key – Windows Key + G
Description: If you would like to open the Game Bar for a game, this combination will do it for you. For example, if you were playing the Windows 10 game, Jetpack Joyride, you would see something like this:

From the Game Bar, you can open the Xbox application, record the last 30 seconds, take a screenshot, start recording your game and adjust your settings.
If you start recording from the Game Bar, you will see the following:

The bar will shortly hide itself and you can bring it up again by hitting the shortcut again, Windows Key + G. If you want to stop it, you can hit the stop button on the Game Bar.

If you were to attempt to open the Game Bar on an application that it doesn’t recognize as a game, you will get prompted with the following.
If you select yes, it will register it as a game and you will be able to use the game DVR functionality with that application as well.
Action – Record Last 30 Seconds
Shortcut Key – Windows Key + Alt + G
Description: While playing a game, hitting this keyboard sequence, Windows Key + Alt + G, the last 30 seconds of game play will be recorded. You will see a popup on your screen when it has been captured.

NOTE: If there isn’t at least 30 seconds to capture, it will only capture the amount available. Notice in the screenshot above, there was only 22 seconds in the game at that point.
Action – Start/Stop Recording
Shortcut Key – Windows Key + Alt + R
Description: If you would like to start recording your game, you can simply press Windows Key + Alt + R. Once you hit this combination, you will see a counter on the top of the screen that looks like this:
This will show you how much you have currently recorded. If you would like to stop recording, just hit the keyboard shortcut again and the counter will go away.
Action – Take a Screenshot
Shortcut Key – Windows Key + Alt + Print Screen
Description: This probably doesn’t need much explanation. Hit Windows Key + Alt + Print Screen, and it will take a screenshot of the current games, save it to your Videos/Captures folder and then show you a little notification saying that the screenshot was saved.

Action – Show/Hide Recording Timer
Shortcut Key – Windows Key + Alt + T
Description: If you want to show or hide the recording time to see how much you have recorded up to this point, simply enter the combination Windows Key + Alt + T and you will see the current time recorded in the upper left part of your game.
Xbox Application
So, you might be asking, those who are new to Windows 10, “Where are my recorded snippets?” Well, that is a great question. By default, your video captures and screenshots will be saved to the following directory:
C:\Users\[username]\Videos\Captures
You can also view your captured videos in your Xbox Application in your Game DVR section.

Summary
So, all you keyboard crazies out there, I hope this post helps you by identifying the some of the keyboard shortcuts in Windows 10 that will help you navigate your desktops. This way, you can blaze a path of productivity using the most productive operating system in the world, Windows 10.
The Xbox Game Bar is a great screenshot and clip-recording utility for gamers, but its default keyboard shortcuts are awkward. Fortunately, it’s easy to modify these shortcuts to your liking.
The game bar shortcuts can trigger all tool functions, from firing up the Xbox game bar to recording gameplay clips. And once you set them to better keys, you can access these features with the tap of a button.

The default method to customize the Xbox game bar keyboard shortcuts is through its settings. This works on both Microsoft Windows 10 and 11, allowing you to get rid of those annoying Windows logo key combinations.
This still does not let you remap the functions to just a single key, though—you need to pair a secondary key like Ctrl or Shift. And it needs to be a unique combination.
- Open Xbox Game Bar by hitting Win + G (don’t worry, we will be changing that soon) or searching for it in the Start Menu.

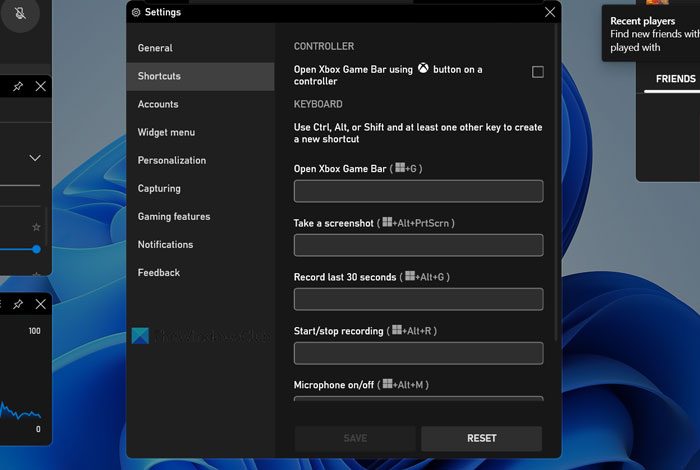
- Click on the gear icon on the top right to open Settings.

- Switch to the Shortcuts tab, giving you a look at all the available shortcuts and their default keymaps.

- You can enter your new keys in the text boxes provided, but you need to use a key combination. Trying to enter a single key throws up an error, reminding you to use Ctrl, Shift, or Alt in conjunction with another key.

- This time we enter Ctrl + G, and it goes through without a hitch. Enter similar keyboard combinations for the other features, like taking screenshots or recording videos, and click on the Save button. You can always select Reset to get the default keyboard shortcuts again.

Note that this does not disable the original shortcut but only provides an additional option to trigger it. And while easy to set up, it still requires multiple keypresses, which isn’t always convenient.
To go beyond the default limitations and trigger the shortcuts with a single key, we will use AutoHotkey.
Remap Xbox Game Bar Shortcuts Using AutoHotkey
AutoHotkey (AHK) is an excellent program for creating custom keyboard shortcuts on Windows. You can remap any button on your keyboard or mouse to trigger a different action or even a whole set of instructions.
The best part is that you toggle individual AHK scripts on and off, allowing you to create individual profiles for specific games or applications. Even this action can be mapped to a hotkey, giving you complete control over the script.
- To begin creating custom shortcuts with AutoHotkey, download the software from its official website.

- Run the setup to install AHK on your computer, and select Exit.

- Now we will create a new AHK script. Head to any folder on your PC (or even the desktop). Right-click on the empty space and select New > AutoHotkey Script.

- This gives us an empty AHK script file. Right-click on it and select Open with > Notepad to edit the script.

- The syntax for remapping a key is surprisingly simple – the key and the triggered key combination with a colon in between. For example, g:#g remaps the Win + G shortcut to the G key, giving you a quick way of bringing up the Xbox Game Bar.

- Save the script and run it by double-clicking on the file. This usually works, though some games can be fussy and interfere with it. In that case, right-click on the script and select Run as administrator.
- Try out your new hotkey – pressing G will open the Xbox Game Bar. Pretty nifty, right? But it doesn’t have an off button yet. Let’s fix that. Open the script with Notepad again and insert the following:
`::
Suspend
return
As you might have guessed, this sets the tilde key (the key beside 1 on the keyboard) as the hotkey toggle. Pressing it will turn the script on or off, letting you regain the use of the G button when you need it.

- But saving the script alone won’t activate the changes since the old script is still running. Click on the upward arrow near the system tray at the bottom right of the taskbar to bring up icons of all active apps, including AHK.
- Right-click on the green H icon and select Exit to terminate the currently running script.
- Alternatively, you can just run the new script, prompting AutoHotkey to ask you if you would like to replace the older version with it. Clicking on Yes starts up the new script immediately. Now you can toggle the hotkey on and off with the tilde key.

We only remapped a single key in our script, though you can easily extend this process to cover every shortcut you want. Make sure to use keys not used in the games you play or create separate load-outs for different titles.
What is the Best Way to Set Custom Shortcuts for Xbox Game Bar in Windows?
Entering new key combinations in the game bar settings is the easiest way of customizing the shortcuts of the Xbox Game Bar on Windows 11. This lets you ditch the pesky Windows key shortcuts in favor of a more common combination.
But if you are looking for even greater customization than simply swapping out one combination for another, AutoHotkey is the tool you need. With AHK, you can create custom hotkeys that trigger Xbox Game Bar features with a single key press.
Of course, there’s a reason why Windows doesn’t let you do that itself – single key shortcuts block normal usage of the key. This is why it is recommended to create a toggle hotkey in AHK as well, giving you the ability to enable and disable the new keyboard shortcuts easily.
Related Posts
- How to Fix a “This file does not have an app associated with it” Error on Windows
- How to Fix an Update Error 0x800705b4 on Windows
- How to Resolve “A JavaScript error occured in the main process” Error on Windows
- How to Fix the Network Discovery Is Turned Off Error on Windows
- How to Change Folder Icons in Windows
Before the Creators Update came around I was always hesitant to use the Game Bar in Windows 10. It always slowed my budget gaming PC to a crawl, but in the Creators Update it’s a usable feature.
Now that I’m turning to the Game Bar more often, I want to be able to customize the keyboard shortcuts that call up various commands such as opening the Game Bar, taking a screenshot, recording a game highlight, and starting a broadcast. Microsoft makes it easy to customize those shortcuts in the Creators Update.
You can’t choose just any keyboard shortcut you want, but if, for example, taking a screenshot with Windows key + Alt + PrtScrn doesn’t work for you, here’s how to change that.
Ian Paul/IDG Customize the Game Bar shortcuts in the Settings app.
Open the Settings app by clicking on Start and selecting the cog icon in the lower-right corner of the Start menu. Once Settings is open go to Gaming > Game bar. Our work starts under the sub-heading Keyboard shortcuts. Here you can enter a new shortcut for eight different commands.
Windows will only let you change the shortcut if you start it with Shift, Ctrl, or Alt. Going back to our screenshot example, I’m used to Steam’s quick and easy F12 shortcut. So I went with something close in Shift + F11. Most of the time your shortcuts should work out, but keep in mind that they may not if those shortcuts conflict with any others from software running with your game like Nvidia’s GeForce Experience or Uplay.
Ian Paul/IDG Don’t forget to click Save once you’ve customized your shortcuts.
Once you’ve selected the shortcuts that you want to change, scroll down to the bottom of the list and click Save. Even though you’ve selected your own shortcut, Windows’ standard Game Bar shortcuts will still work.
If you ever want to remove your shortcuts, you can do it manually by clicking on the ones that you want to remove and deleting them. Once that’s done, scroll down to the bottom again and click Save.
That’s all there is to it.