
Applies ToWindows 11 Windows 10
If your PC is running low on free space, you might not be able to install important Windows updates, and your PC’s performance may be affected. Here are some ways to free up space so you can keep your PC up to date and running smoothly. These suggestions are listed in order, so start with the first one, see if that helps, and then continue to the next one if it doesn’t.
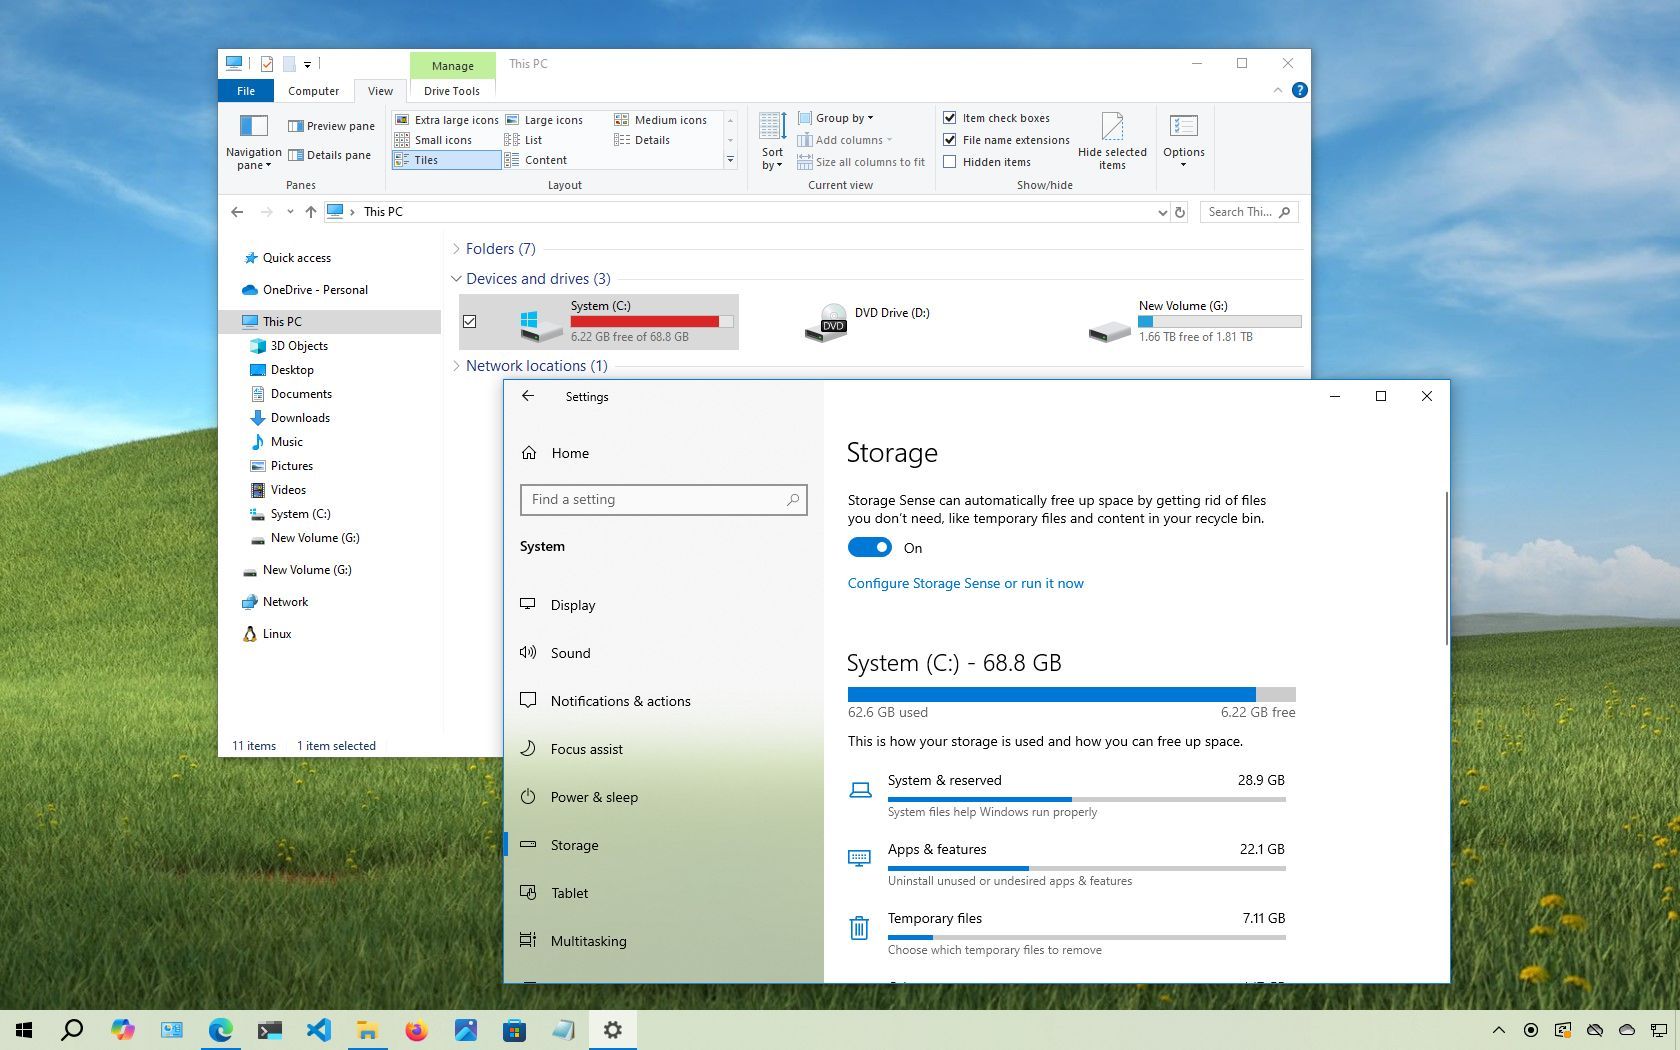
To check the total disk space left on your Windows 11 device, select File Explorer from the taskbar, and then select This PC on the left. The available space on your drive will appear under Devices and drives.

Note: If you follow the steps below and continue to have trouble updating Windows because of low disk space, resetting or reinstalling Windows might help. For more info, see Reinstall Windows.
If you used Cleanup recommendations to free up space on your device and then see a Low Disk Space error, it’s possible that your Temp folder is quickly filling up with application (.appx) files that are used by Microsoft Store. To fix this problem, you’ll need to reset the Store, clear the Store cache, and run the Windows Update troubleshooter:
-
To reset Microsoft Store, select Start > Settings > System > Troubleshoot > Other troubleshooters , then next to Windows Store Apps , select Run.
-
To clear the Microsoft Store cache, press the Windows Logo Key + R to open the Run dialog box, then type wsreset.exe and select OK. A blank Command Prompt window will open, and after about ten seconds the window will close and the Store will open automatically.
-
To reset Windows Update, select Start > Settings > System > Troubleshoot > Other troubleshooters , then next to Windows Update , select Run.
-
Restart your computer and see if you are still experiencing the issue.
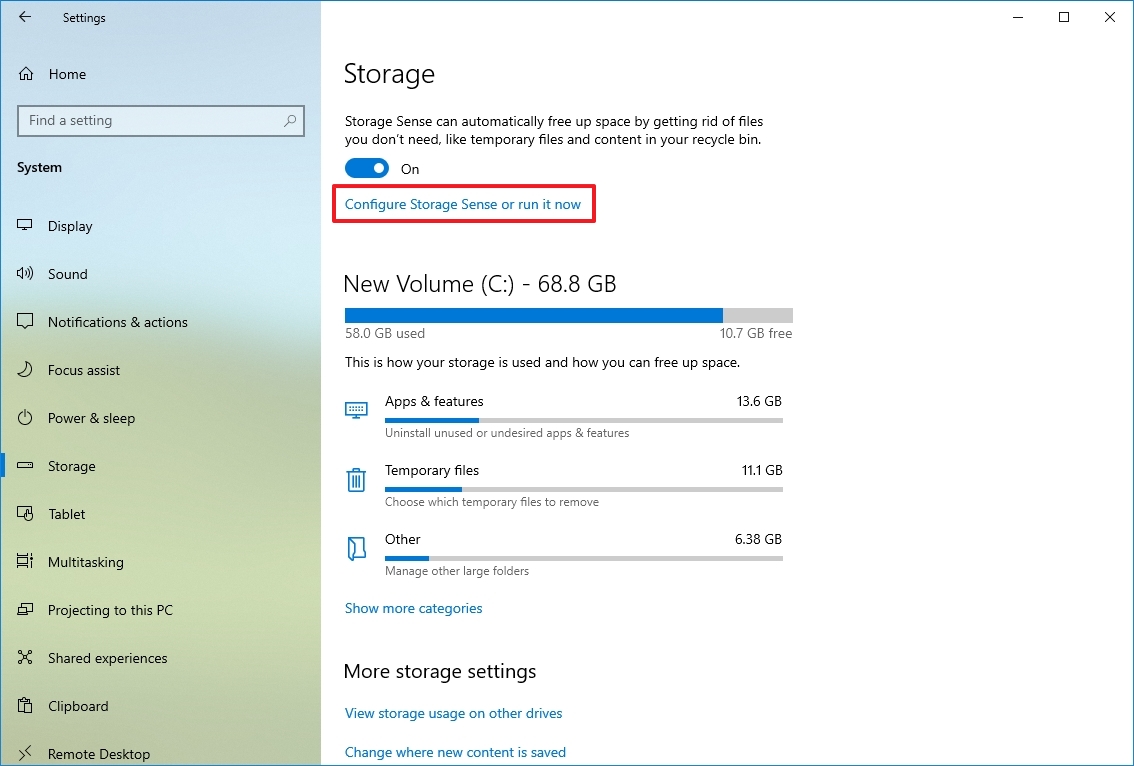
Storage Sense can automatically free up drive space for you by getting rid of items that you don’t need, like temporary files and items in your Recycle Bin.
For more info, see Manage drive space with Storage Sense.
If you don’t want to use Storage Sense, Cleanup recommendations can help you identify and clean up temporary files and system files from your device.
-
Select Start > Settings > System > Storage > Cleanup recommendations.
-
Review each of the categories, including Temporary files, Large or unused files, Files synced to the cloud, and Unused apps, and select the items you’d like to remove. Windows will suggest files for you and show the amount of space you’ll save when you remove those items.
-
After you’ve selected items to remove, select the Clean up button for each section.
Note: If it’s been fewer than 10 days since you upgraded Windows, your previous version of Windows will be listed as a system file you can delete. If you need to free up drive space, you can delete it, but keep in mind that you’ll be deleting your Windows.old folder, which contains files that give you the option to go back to your previous version of Windows. If you delete your previous version of Windows, this can’t be undone, and you won’t be able to go back to your previous version of Windows.
Windows may indicate that it needs more space to get the latest Windows feature update. You can use an external storage device to help you complete the update.
To learn more, see Get more space with external storage.
Personal files such as videos, music, photos, and documents can take up a lot of space on your device. To see which files are using the most space:
-
Select File Explorer from the taskbar and find the files you want to move.
-
Under This PC in the menu on the left, select a folder to see what files are saved in it. The Videos, Music, Pictures, and Downloads folders usually contain the largest files that you’ve saved to your device.
-
To see the size of the files in a folder, select View from the taskbar, then select Details. Right-click in the open space (or select and hold), then select Sort by > Size to show the largest files at the top of the list.
-
If there are files you no longer need on your device, you can either delete them or move them to an external storage device like a USB drive or an SD card.
Note: If you delete any files, remember to empty the Recycle Bin to completely remove them from your device and free up space.
To move photos, music, videos, or other files that you want to keep but don’t use very often, consider saving them to an external storage device like a USB drive or an SD card. You’ll still be able to use them when the drive is connected, but they won’t take up space on your PC.
-
Connect an external storage device like a USB drive or SD card to your PC.
-
Select File Explorer from the taskbar and go to the folder that contains the files you want to move.
-
Select the files, then select Cut on the ribbon. Navigate to the location of the external storage device you connected, then select Paste .
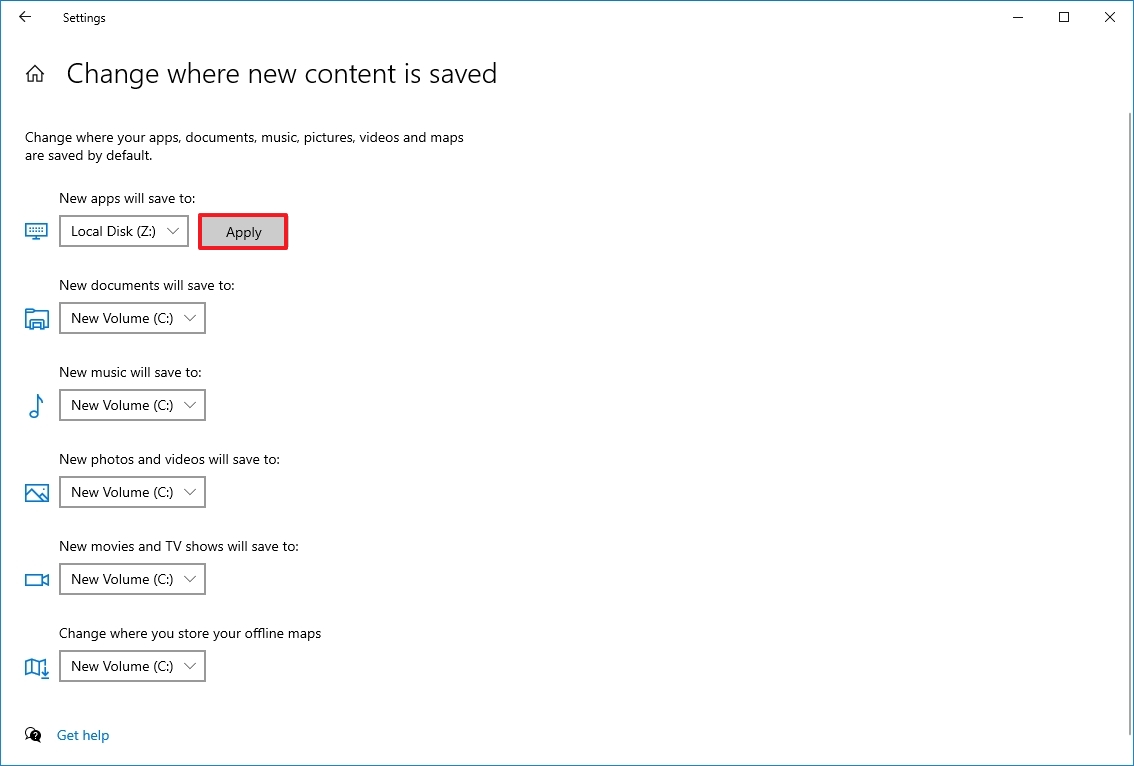
Saving new files to another drive will help prevent low space problems on that drive in the future, so you won’t have to move your files to another drive repeatedly. Instead of saving all your new files to the default drive, you can save some of them to a different drive that has more free space.
-
Select Start > Settings > System > Storage > Advanced storage settings > Where new content is saved.Open Storage settings
-
For each content type, select a drive from the drop-down menu. If the drive you want to use isn’t listed there, make sure it’s connected to your PC.
You can save space by turning on OneDrive Files On-Demand, which stores a smaller placeholder file on your hard drive instead of the full-size file that’s stored in your OneDrive account in the cloud. You’ll be able to get to your OneDrive files from your PC without having to use up hard-drive space downloading full-size versions of them all.
For more info, see Save disk space with OneDrive Files On-Demand for Windows.
Sometimes a virus or other malware can consume significant hard-drive space by corrupting your system files. If you suspect your PC is infected with malware, use an antivirus program like Windows Security to run a virus scan and cleanup.
Need more help?
Want more options?
Explore subscription benefits, browse training courses, learn how to secure your device, and more.
(Image credit: Mauro Huculak)
On Windows 10, even with modern laptops and desktops featuring drives with multiple terabytes of storage, it’s still easy to run out of space. Over time, documents, pictures, videos, apps, and games accumulate, slowing down your computer, causing errors when saving files, and even preventing system updates from installing correctly.
If your computer is running low on space, Windows 10 includes several built-in tools to help you reclaim valuable storage and restore system performance. Features like Storage Sense, OneDrive Files On-Demand, Compact OS, and NTFS compression allow you to automatically delete temporary files, reduce system footprint, and offload rarely used content to the cloud.
In this how-to guide, I’ll outline the best ways to free up storage space on Windows 10, allowing you to store more files and install feature updates without issues.
Recent updates
These instructions has been updated to ensure accuracy and reflect changes to the process in the operating system.
1. Free up space clearing Recycle Bin on Windows 10
Windows 10 doesn’t erase files from the drive when you delete them. Instead, they are placed into the Recycle Bin and marked for deletion. However, since the Recycle Bin can grow large over time, emptying its contents is a good first step to free up space on your computer.
To empty the Recycle Bin to regain storage space on Windows 10, use these steps:
- Open Start.
- Search for Recycle Bin and click the top result to open the app.
- Quick tip: If the app does not appear in the result, you can open File Explorer (Windows key + E), type Recycle Bin, and press Enter in the address bar.
- Click the «Recycle Bin Tools» tab.
- Click the «Empty Recycle Bin» button.
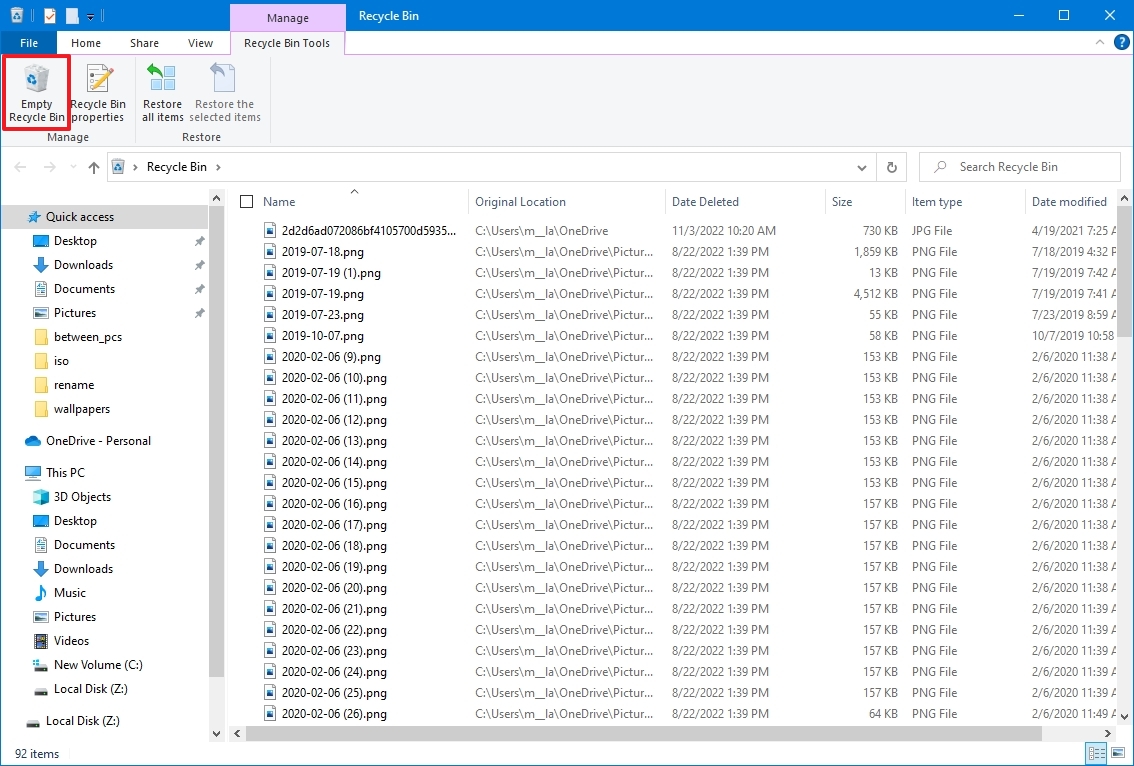
- Click the Yes button.
Once you complete the steps, the system will free up around ten percent of the drive capacity (assuming the bin was full).
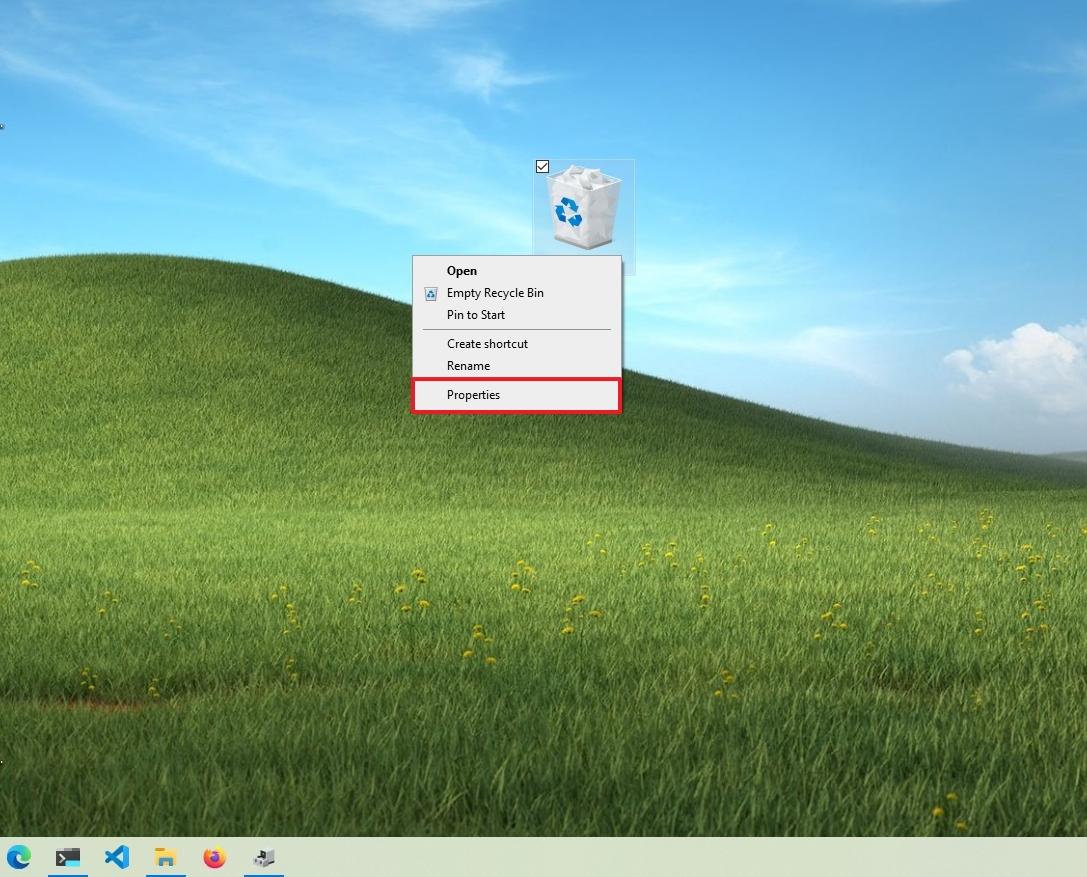
Change Recycle Bin settings
Windows 10 reserves ten percent of the available space for deleted files. Once the threshold is reached, the system will automatically delete files from the oldest to the newest. You can always adjust how much space the system should use for the Recycle Bin.
All the latest news, reviews, and guides for Windows and Xbox diehards.
To reduce the space usage for the Recycle Bin, use these steps:
- Invoke the «Windows key + D» keyboard shortcut to view the desktop.
- Right-click the Recycle Bin icon and click the Properties option.
- Select the Recycle Bin location you want to configure if you have multiple partitions. For example, Local Disk (C:) is the drive where Windows 10 is installed.
- Select the Custom size option under the «Settings for selected location» section.
- Specify the maximum hard drive space in megabytes that the Recycle Bin can use on the particular partition in the «Maximum size (MB)» setting.
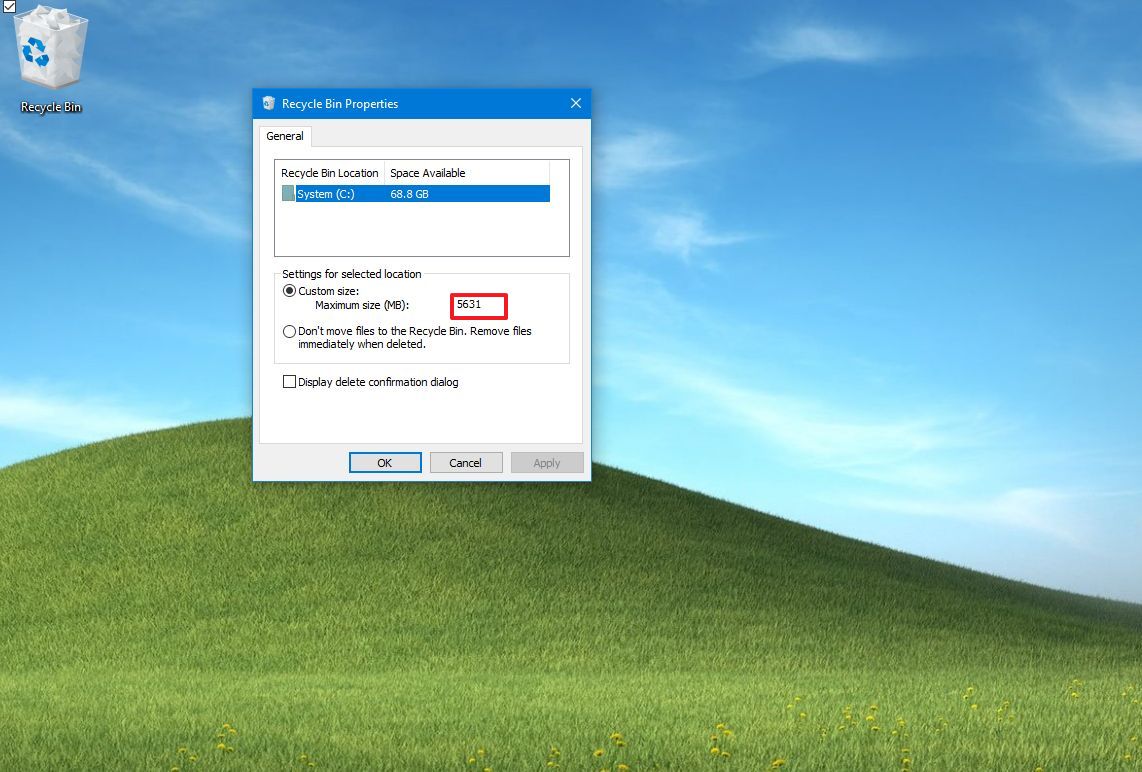
- (Optional) Check the «Don’t move files to the Recycle Bin. Remove files immediately when deleted» option if you want to delete the files from the drive skipping the Recycle Bin to minimize storage usage.
- Click the Apply button.
- Click the OK Button.
After you complete the steps, the Recycle Bin will be able to keep more or fewer files from a particular location, depending on your configuration.
2. Free up space removing junk files with Storage Sense on Windows 10
Storage Sense is a feature that allows the deletion of different types of junk files (including previous installation files after an upgrade and temporary files) to free up space on all the drives to make room to store other files and improve drive efficiency.
Enable Storage Sense
Although you can use Storage Sense manually, you can also enable the feature to run maintenance automatically.
To enable Storage Sense on Windows 10, use these steps:
- Open Settings.
- Click on System.
- Click on Storage.
- Click the «Configure Storage Sense or run it now» option under the «Storage» section.
- Turn on the Storage Sense toggle switch.
- Use the «Run Storage Sense» drop-down menu and select the best option for your situation:
- Every day.
- Every week.
- Every month.
- During low free disk space (recommended).
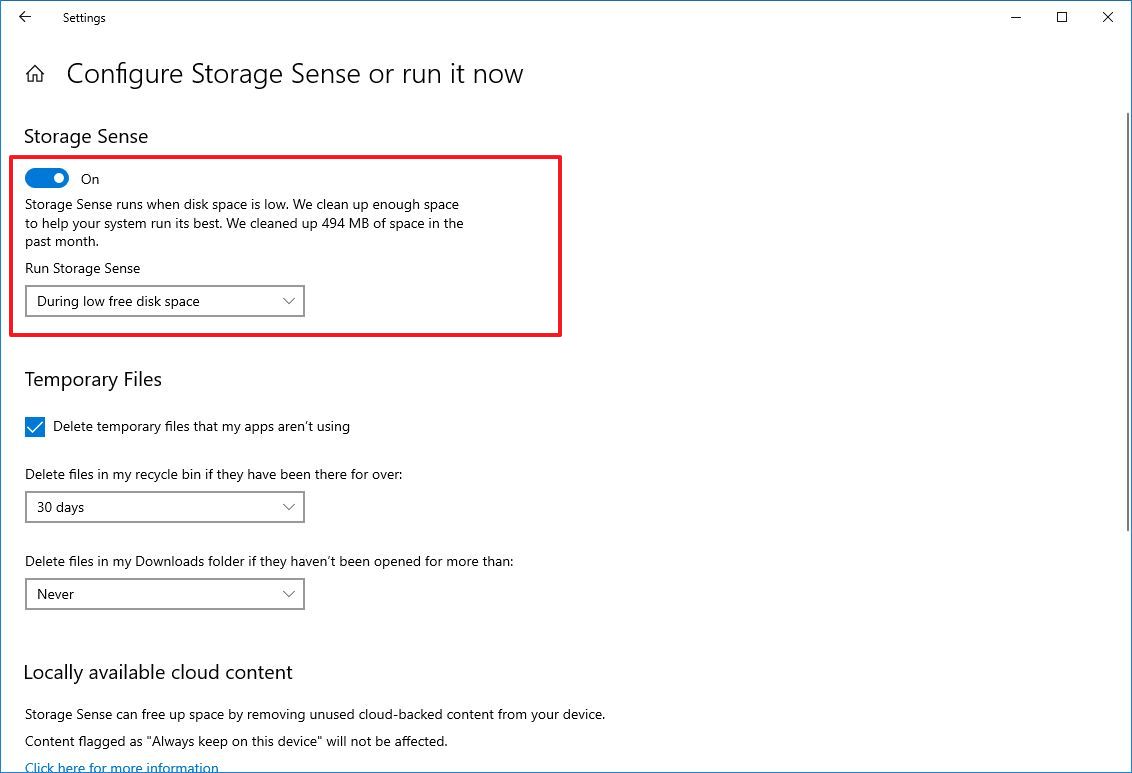
Once you complete the steps, Storage Sense will run automatically at your specified schedule to free up space and improve storage performance on Windows 10.
The option to enable the feature is also available through the «Storage» page. However, it only activates the default settings. Using the «Storage Sense» settings page, you can configure how the feature removes unnecessary content from your computer.
Delete unnecessary files with Storage Sense
To free up space using Storage Sense on Windows 10, use these steps:
- Open Settings.
- Click on System.
- Click on Storage.
- Click the «Configure Storage Sense or run it now» option under the «Storage» section.
- Check the «Delete temporary files that my apps aren’t using» option under the «Temporary Files» section.
- Use the Recycle Bin setting to specify how to delete files that you no longer need, even after they have been deleted.
- Use the Downloads setting to specify how to clean up downloaded files.
- Quick tip: If you need to delete a lot of files, use the «1 day» option. The «Downloads» folder may contain valuable files you’ve downloaded from the internet, so it’s recommended to back up those files manually before running the feature.
- Use the drop-down menu to specify how long OneDrive content synced to the device becomes online-only under the «Locally available cloud content» section.
- Quick note: This option is part of OneDrive Files On-Demand that allows you to access your documents, pictures, videos, and other files using File Explorer without needing to sync them to reduce the space usage. When the device is running low on space, you can use it to make files only available in the cloud. You will still see your files, but their content will only download when you need them.
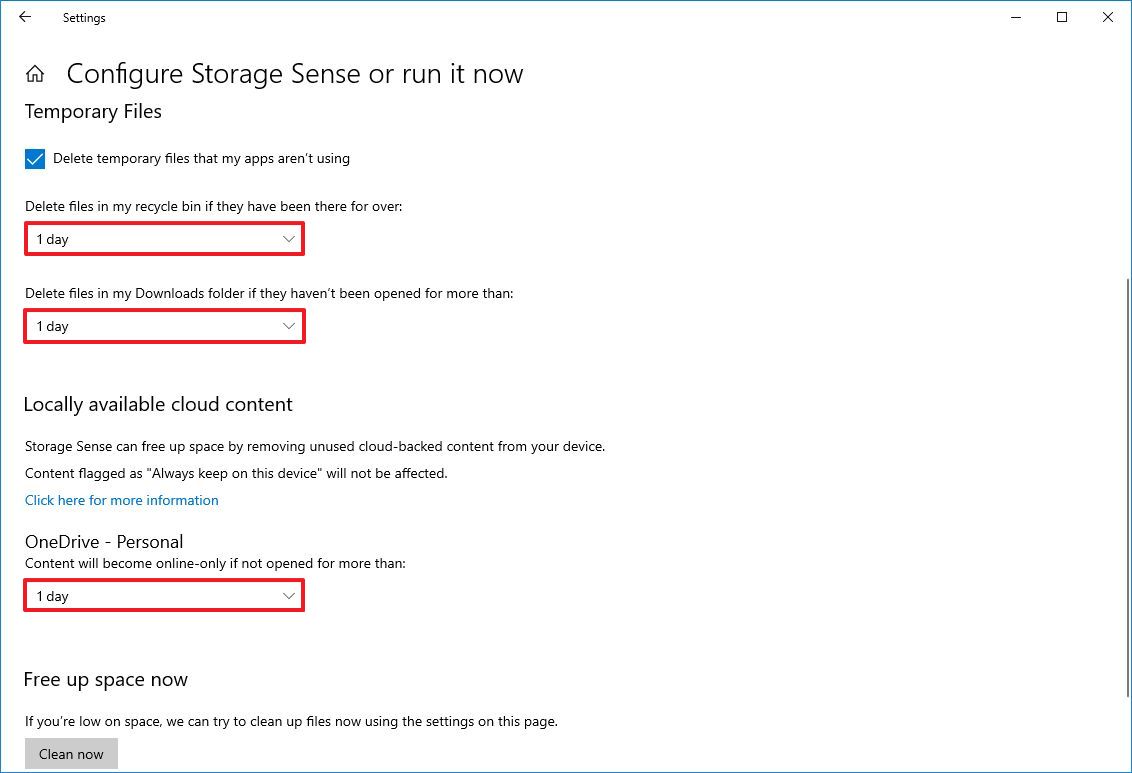
- Check the «Delete previous versions of Windows» option under the «Free up space now» section (if applicable).
- Click the Clean now button.
- Quick note: This option can free up close to 20GB of space, but the storage will vary from system to system.
Storage Sense will run and delete unnecessary files from the computer to reclaim more space after completing the steps.
Delete temporary files with Storage Sense
Storage Sense also deletes temporary system and app files, which can help reclaim several gigabytes of space on your computer.
To delete temporary files from the computer, use these steps:
- Open Settings.
- Click on System.
- Click on Storage.
- Click the «Temporary files» item under the «Local Disk (C:)» section. (If the item is unavailable, click the «Show more categories» option.)
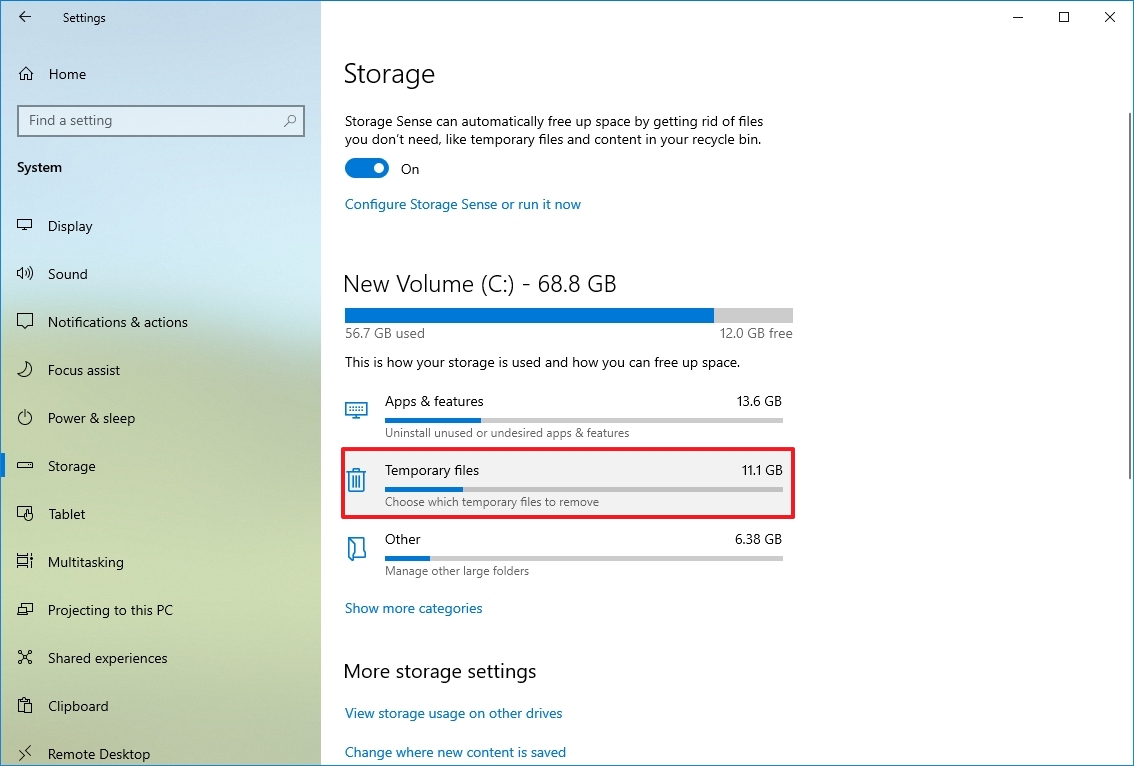
- Check all the items you want to remove to optimize the space. For example:
- Downloads.
- Windows Update Cleanup.
- Recycle Bin.
- Delivery Optimization Files.
- Thumbnails.
- Microsoft Defender Antivirus.
- Temporary Internet Files.
- Temporary files.
- Windows error reports and feedback diagnostics.
- DirectX Shader Cache.
- Previous Windows installation(s).
- Temporary Windows installation files.
- Quick tip: The available items may differ on your installation. If you want to select the «Downloads» item, before clearing these files, make sure to understand that this option will erase everything in that folder.
- Click the Remove files button.
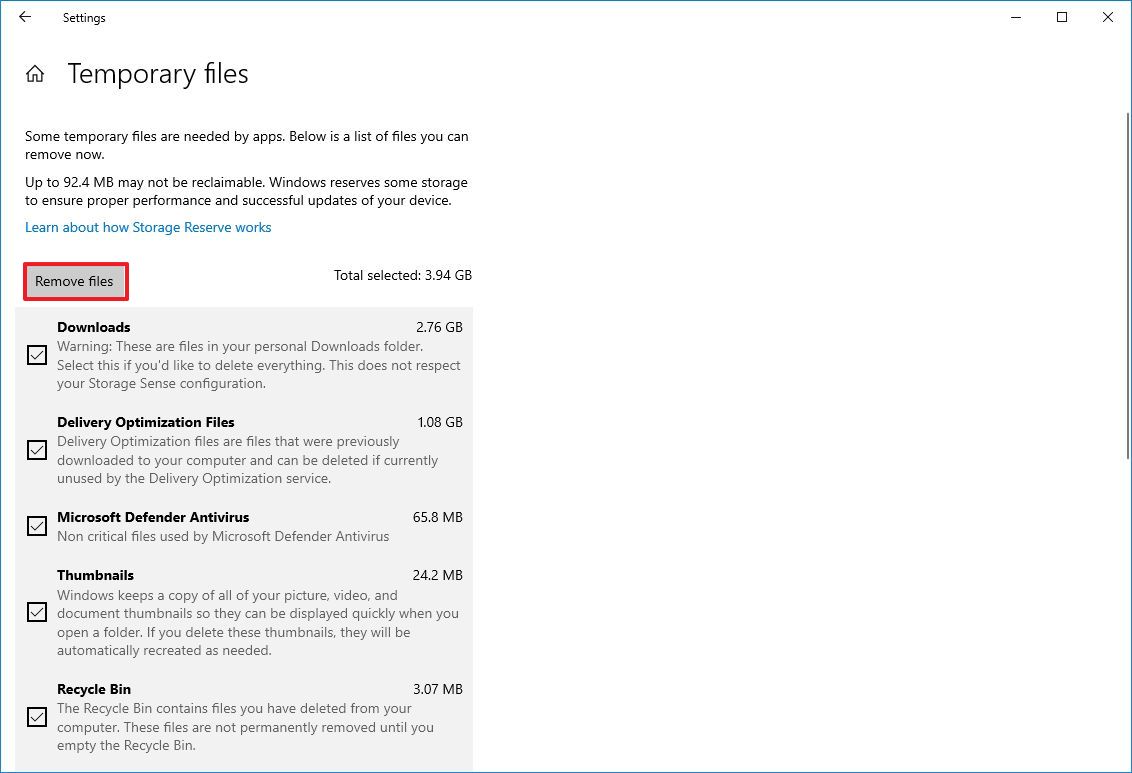
After you complete the steps, the selected files will be deleted permanently, freeing up space for more important files.
View storage usage
On Windows 10, Storage Sense is also a great tool to help you understand which files use the most space and determine the files you can clean up.
To view the storage usage on Windows 10, use these steps:
- Open Settings.
- Click on System.
- Click on Storage.
- Click the «Show more categories» option under the «Local Disk C:» section,.
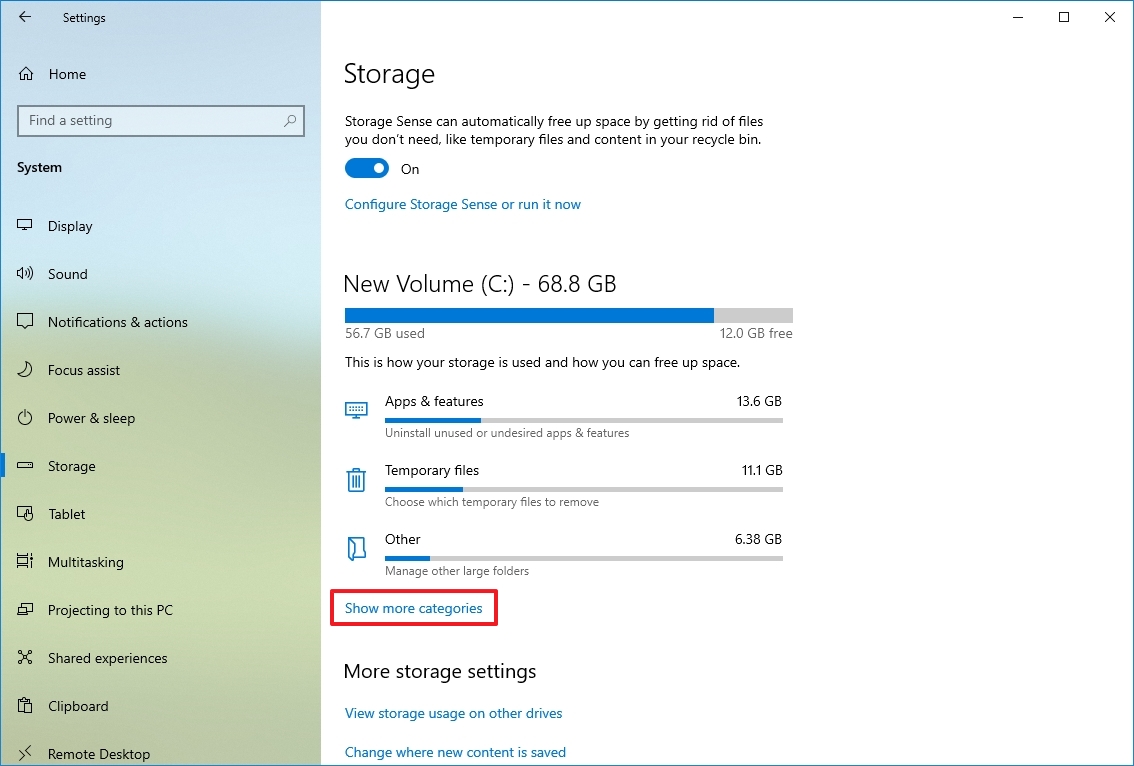
- Confirm storage usage on Windows 10.
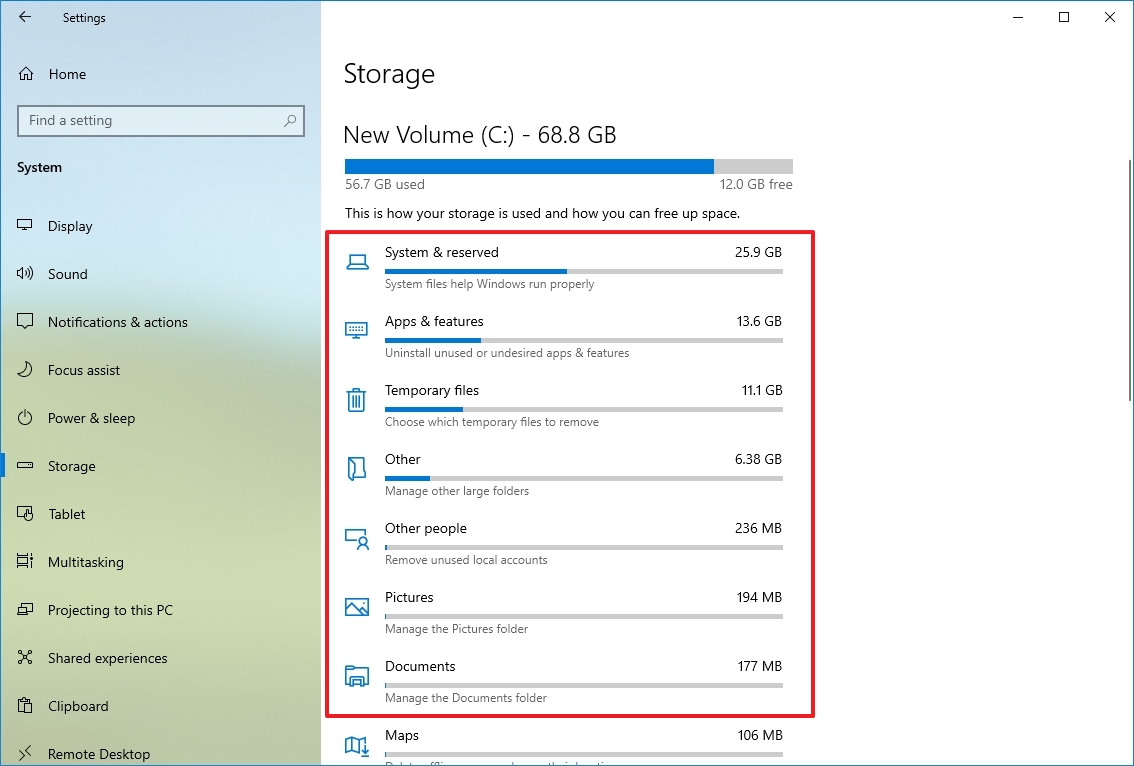
- Select each category to see even more details and actions you can take to free up space on Windows 10.
Once you complete the steps, you can determine the storage usage to focus on the locations to free up space. For example, inside the «System & reserved» category, you can see how much space the installation, virtual memory, hibernation files, and system restore are using, as well as how much space the system is reserving for updates.
If you have multiple drives, in the «More storage settings» section, click the «View storage usage on other drives» option to open a page that lists all the drives on your device.
3. Free up space deleting temporary files using Disk Cleanup on Windows 10
You can still use the legacy Disk Cleanup tool to clear unnecessary files on Windows 10.
Remove temporary files with Disk Cleanup
To use Disk Cleanup to delete temporary files on Windows 10, use these steps:
- Open Start.
- Search for Disk Cleanup and select the top result to open the app.
- Use the «Drives» drop-down menu and select the (C:) drive (if applicable).
- Click the OK button.
- Click the «Clean up system files» button.
- Use the «Drives» drop-down menu and select the (C:) drive.
- Click the OK button.
- Check all the contents to delete.
- Windows Update Cleanup.
- Microsoft Defender Antivirus.
- Downloaded Program Files.
- Temporary Internet Files.
- Windows error reports and feedback diagnostics.
- DirectX Shader Cache.
- Delivery Optimization Files.
- Device driver packages.
- Language Resource Files.
- Previous Windows installation(s).
- Recycle Bin.
- Temporary files.
- Thumbnails.
- Click the OK button.
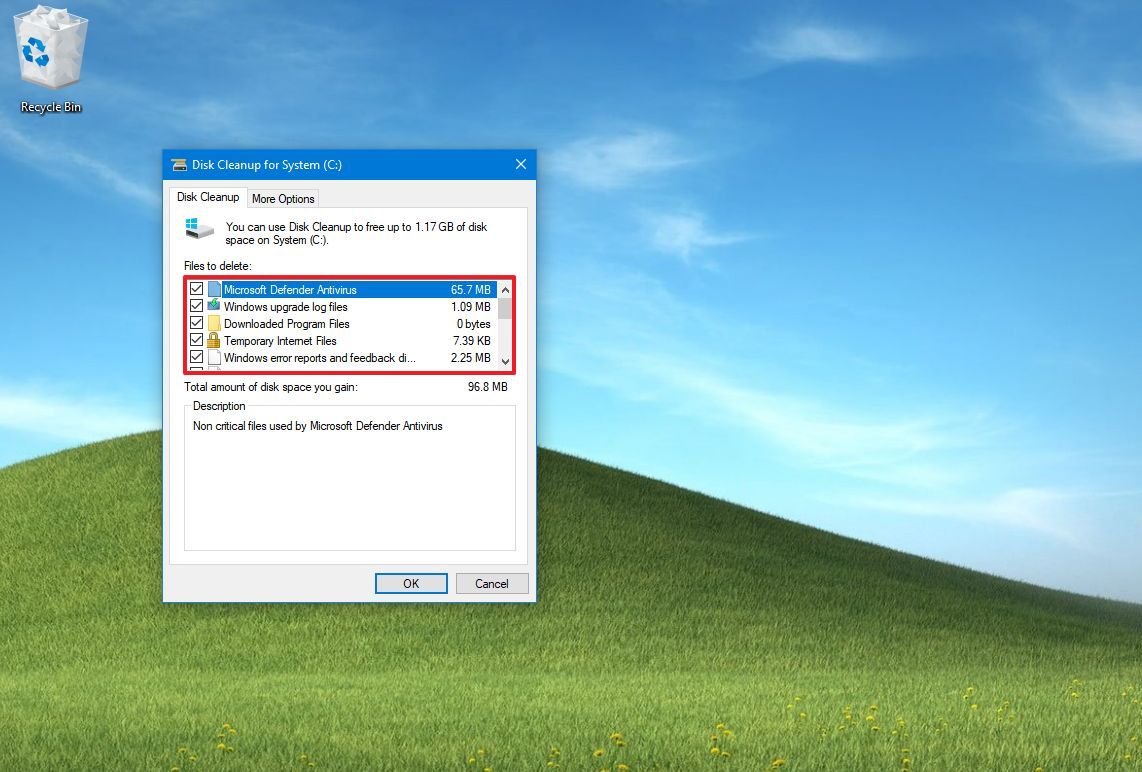
- Click the Delete Files button.
After you complete the steps, those unnecessary files will be deleted from the device, freeing up hard drive space.
Delete System Restore and Shadow Copies using Disk Cleanup
Using System Restore and the Shadow Copies features, you can delete older files to reclaim additional space on Windows 10.
To delete old system restore points on Windows 10, use these steps:
- Open Start.
- Search for Disk Cleanup and select the top result to open the app.
- Use the «Drives» drop-down menu and select the (C:) drive (if applicable).
- Click the OK button.
- Click the «Clean up system files» button.
- Click the More Options tab.
- Click the Clean up button under the «System Restore and Shadow Copies» section.
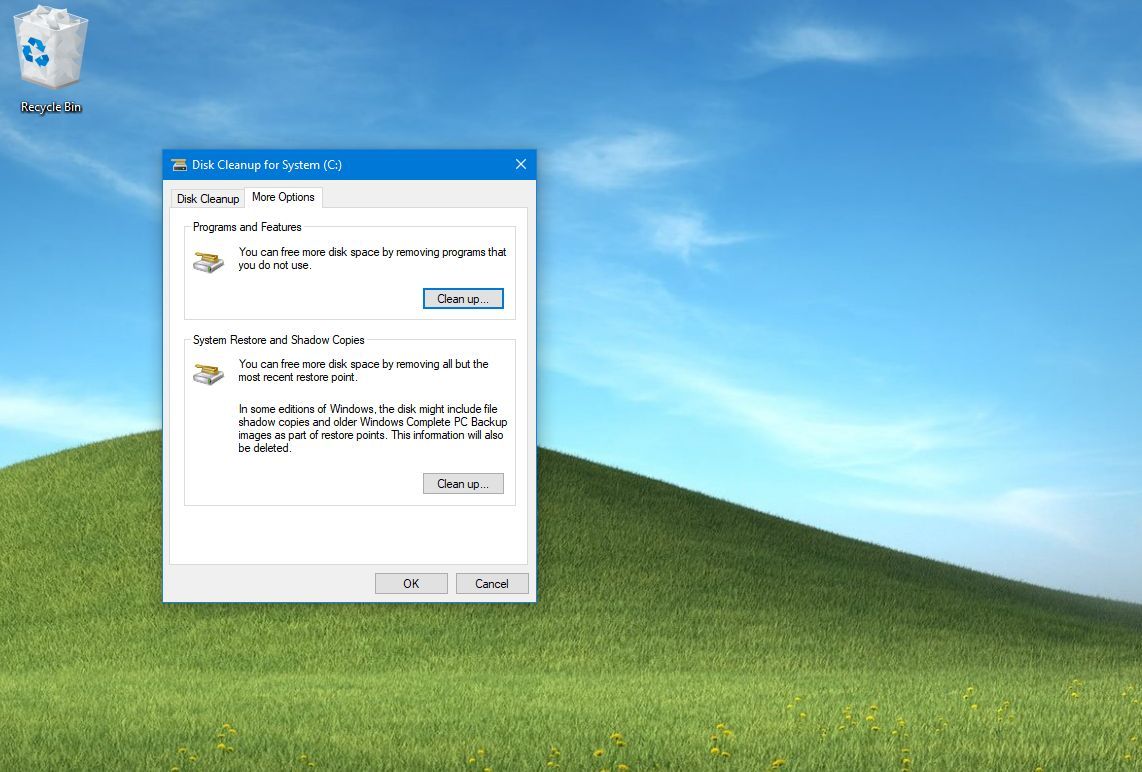
- Click the Delete button.
After completing the steps, you will reclaim additional space to store more important content.
4. Free up space using OneDrive files on-demand on Windows 10
You can also use the OneDrive Files On-Demand feature to manually make files available online to regain some space on your computer.
Enable OneDrive Files On-Demand
On Windows 10, the Files On-Demand feature should already be enabled in OneDrive, but if it is not, use these steps:
- Click the OneDrive icon in the bottom-right corner of the taskbar.
- Click the Help & settings (gear) button on the top-right.
- Click the Settings option.
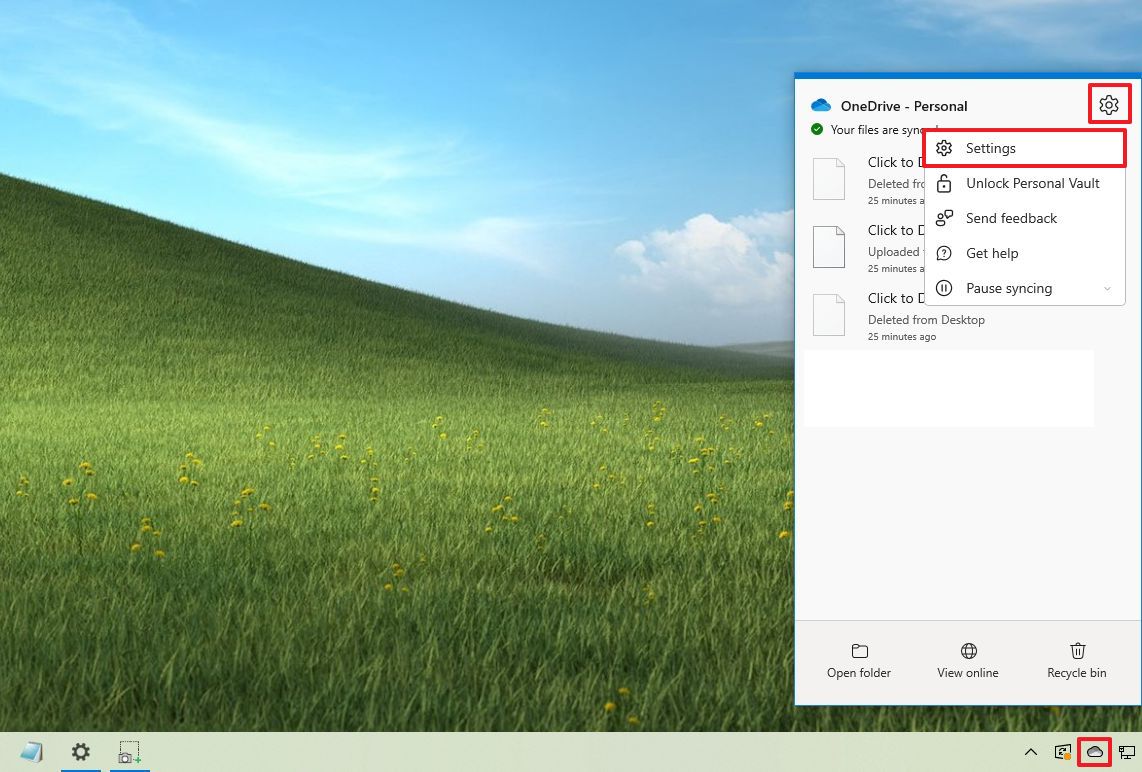
- Click the Settings tab.
- Click on Sync and backup.
- Click the Advanced settings item.
- Click the «Free up disk space» button under the «Files On-Demand» section.
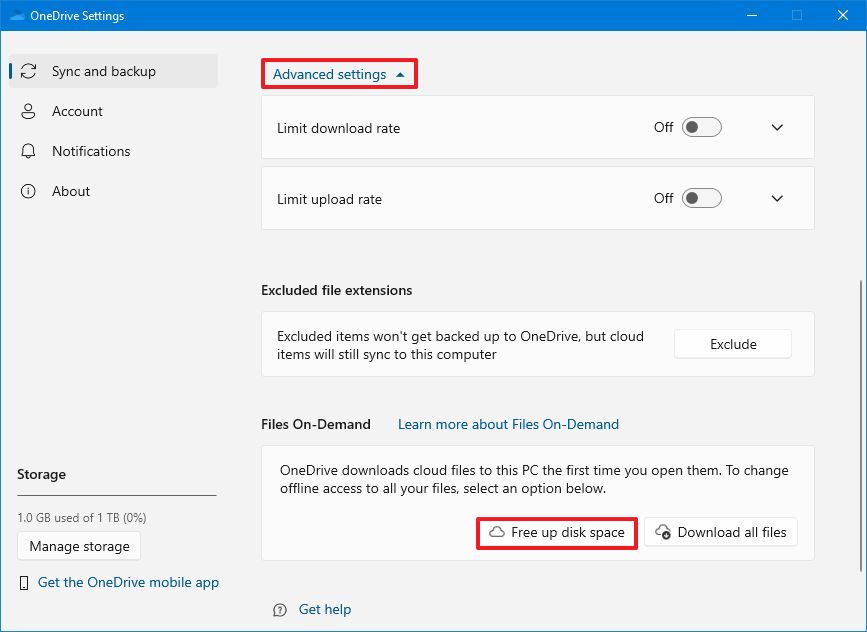
- Click the Continue button.
Once you complete the steps, you can move files to the OneDrive folder and make them available only online to free up space (see steps below).
Make files available online-only
To make local files available online-only with OneDrive, use these steps:
- Open File Explorer.
- Select the OneDrive folder from the left pane.
- Select the files and folders taking up the most space.
- Quick tip: You can select all files using the «Ctrl + A» keyboard shortcut by selecting the first file, holding down the «Shift» key, selecting the last files, or holding down the «Ctrl» key and selecting each file individually.
- Right-click the selection and choose the «Free up space» option.
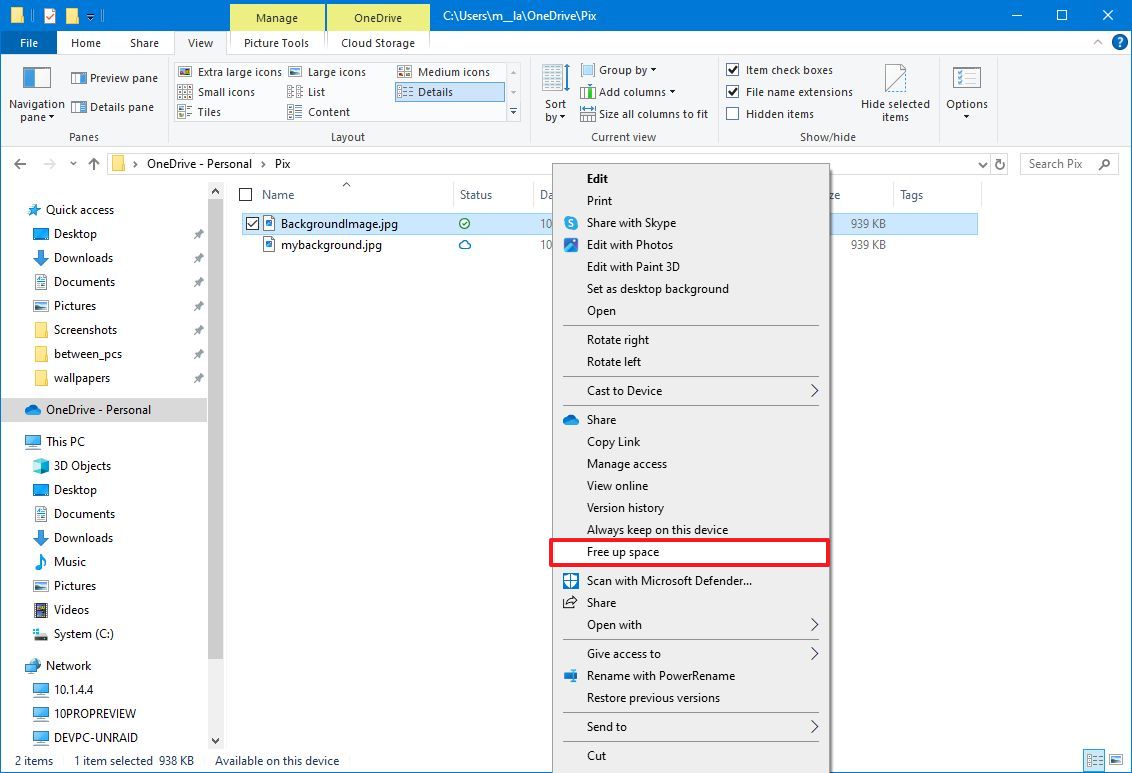
After you complete the steps, you will be able to access all of your content using File Explorer, but you will only be able to open it with an internet connection. In addition to making synced files available only with an internet connection, you can free up even more space by moving other files to the OneDrive folder and using the above steps to make them available on demand.
The free version of OneDrive allows you to store up to 5GB of data. However, you can always get a Microsoft 365 subscription to lift the limit to 1TB. In addition to 1TB of storage, the subscription also gives you access to all Office apps and services.
5. Free up space removing non-essential apps and games
You can also reclaim space by uninstalling apps you don’t need or rarely use. Games also take up a lot of space, which means keeping your catalog to a minimum can significantly reduce space usage and improve gaming performance on Windows 10.
To uninstall apps and games on Windows 10, use these steps:
- Open Settings.
- Click on Apps.
- Click on Apps & features.
- Use the «Sort by» filter and select the Size view to quickly identify the apps and games wasting the most space.
- Select the item to remove.
- Click the Uninstall button.
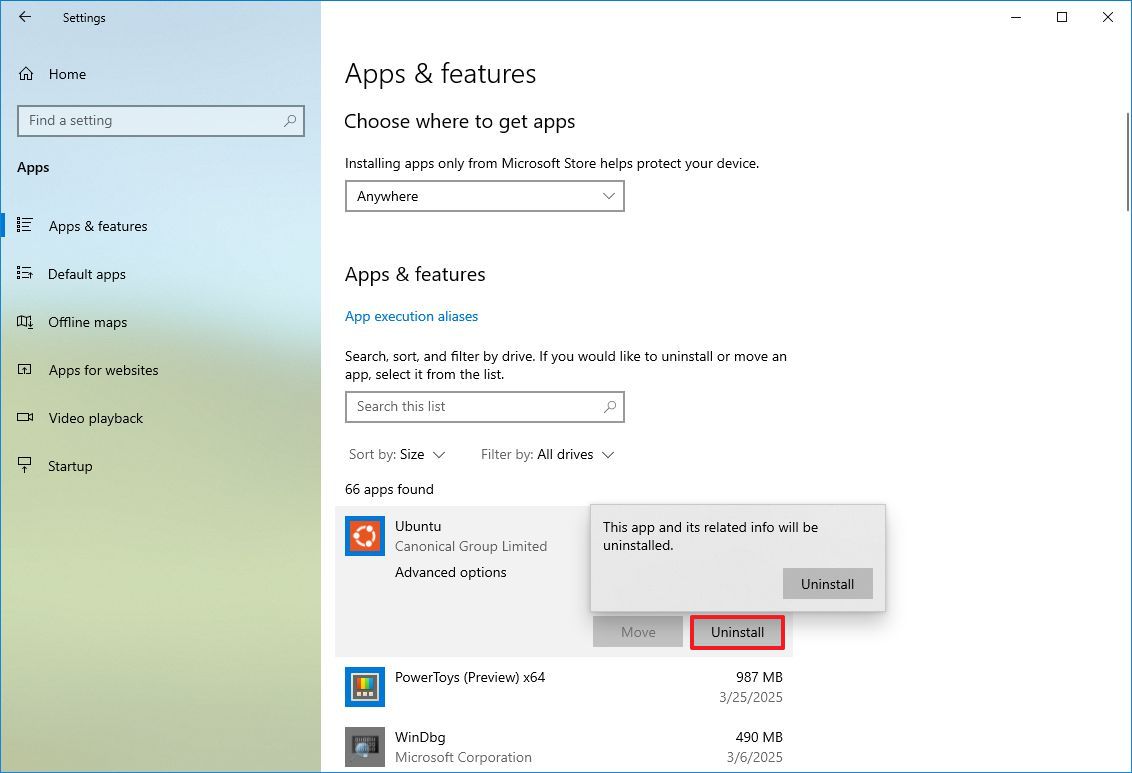
- Click the Uninstall button again.
- Continue with the on-screen directions (if applicable).
Once you complete the steps, repeat the instructions to remove additional apps and games from the computer.
If you previously enabled the Windows Subsystem for Linux (WSL), you may also have one or multiple distros installed on your computer. You can always uninstall them to free up space on your device.
Delete unused languages
Secondary languages installed on your computer can also use some available storage. If you rarely use the other languages, remove them to make more room for additional files.
To uninstall languages on Windows 10, use these steps:
- Open Settings.
- Click on Time & Language.
- Click on Language.
- Select the language to remove.
- Click the Remove button.
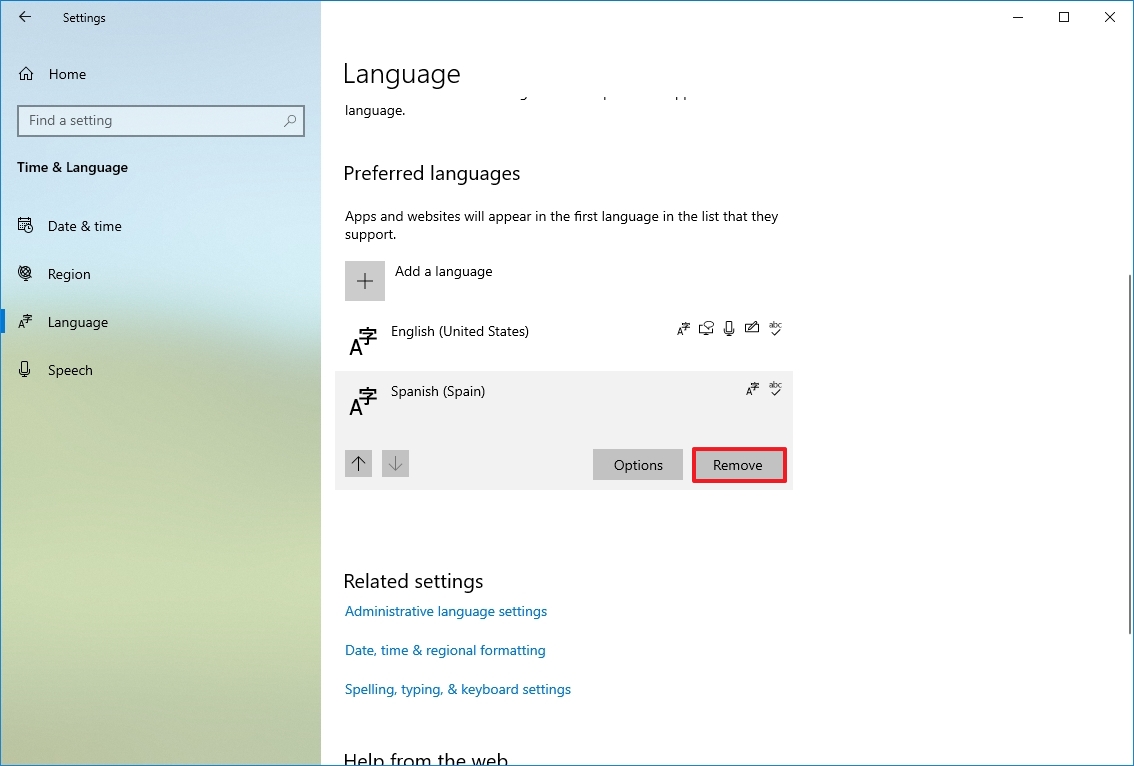
After you complete the steps, you may need to repeat the instructions to delete additional languages as necessary.
Delete maps
If you use the maps feature on Windows 10, you can remove the offline maps to clear up some additional space on the computer.
To delete existing maps from your computer, use these steps:
- Open Settings.
- Click on Apps.
- Click on Offline maps.
- Click the Delete all maps button.
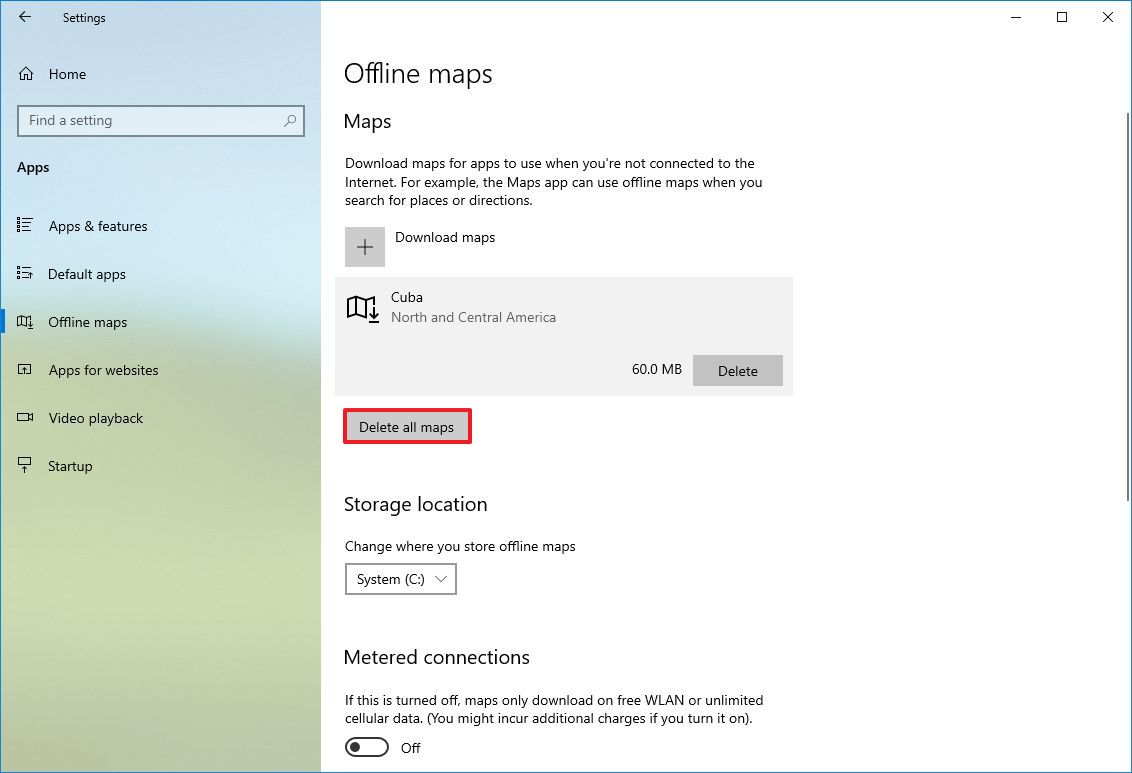
- Click the «Delete all maps» button.
Once you complete the steps, the offline maps will be removed from your computer to reclaim additional storage space.
Uninstall optional features
Optional features (such as Windows Media Player, Windows Hello Face, Math Recognizer, Windows Fax and Scan, and others) also take up some storage, and you can remove them to regain some extra space on Windows 10.
To remove optional features on Windows 10, use these steps:
- Open Settings.
- Click on System.
- Click on «Optional features.»
- Click the «Sort by» menu and select the «Total Size» option to determine the feature that uses the most space.
- Select the feature to remove.
- Click the Remove button.
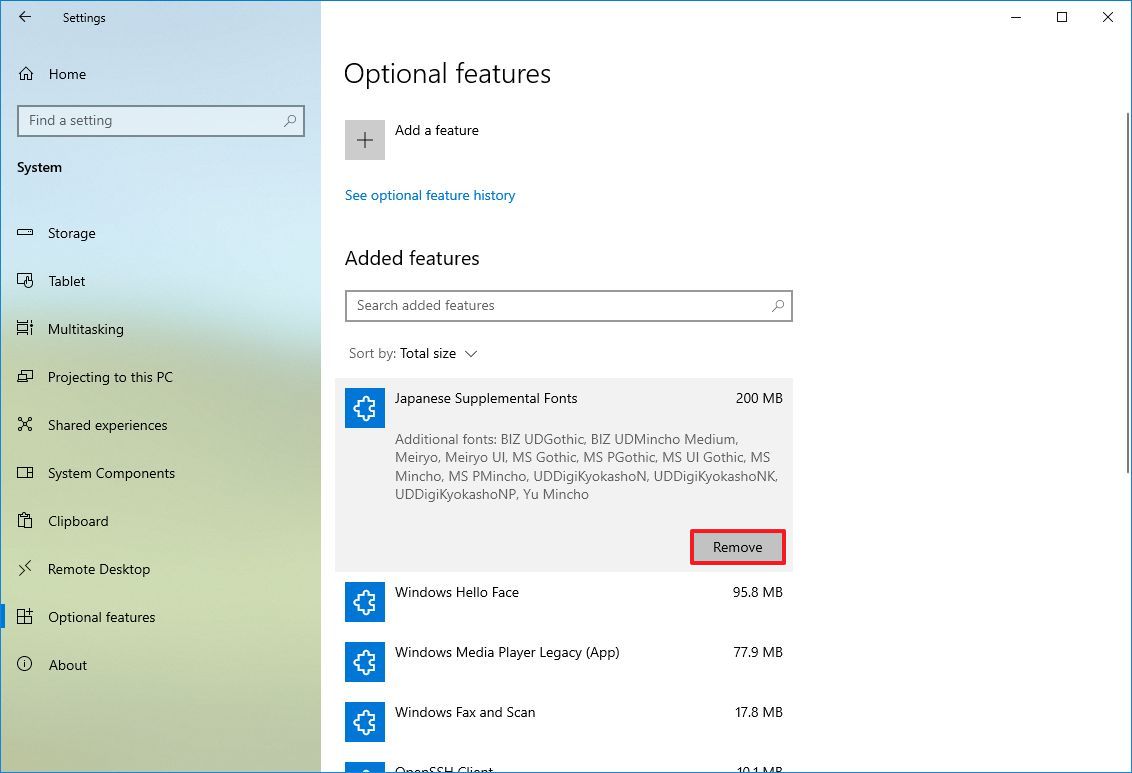
After you complete the steps, you may need to repeat the instructions to remove other features you may no longer need.
6. Free up space transferring files to external drive
If you cannot clear enough space, you can connect an external drive to move files to the new location. You can even configure the system to make the external storage the default location to save files.
Relocate files to external drive
To transfer existing files to an external storage, connect the drive you will dedicate to the computer, and then use these steps:
- Open File Explorer.
- Browse to the folder with the content taking the most space.
- Select the items to move.
- Click the Move to button from the «Home» tab.
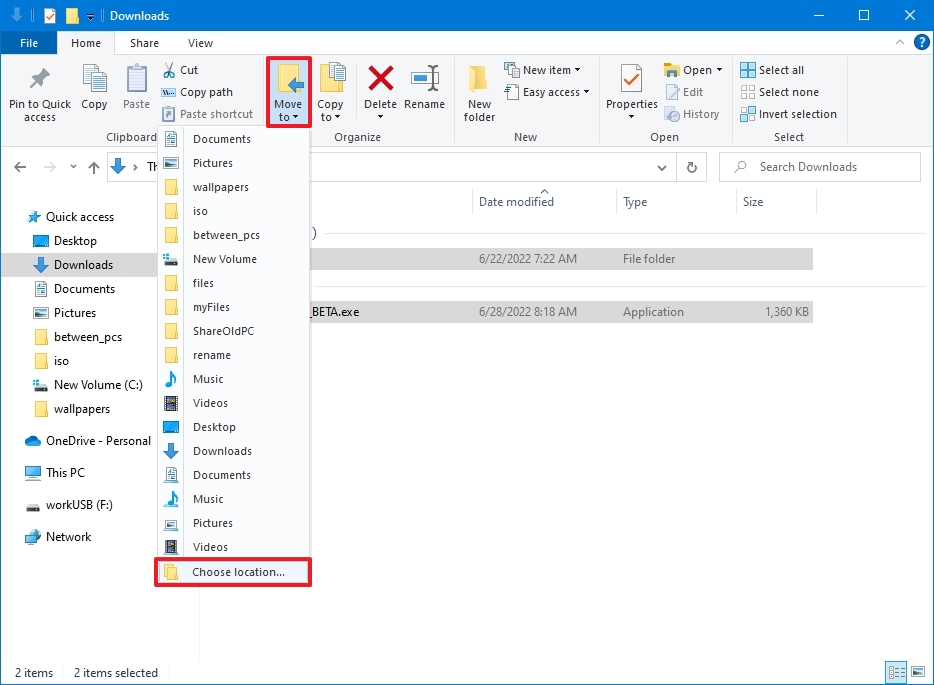
- Select the Choose location option.
- Select the external storage as the new destination.
- Quick tip: If you want to keep files organized, you can use the available option to create a new folder to store the files in the new location.
- Click the Move button.
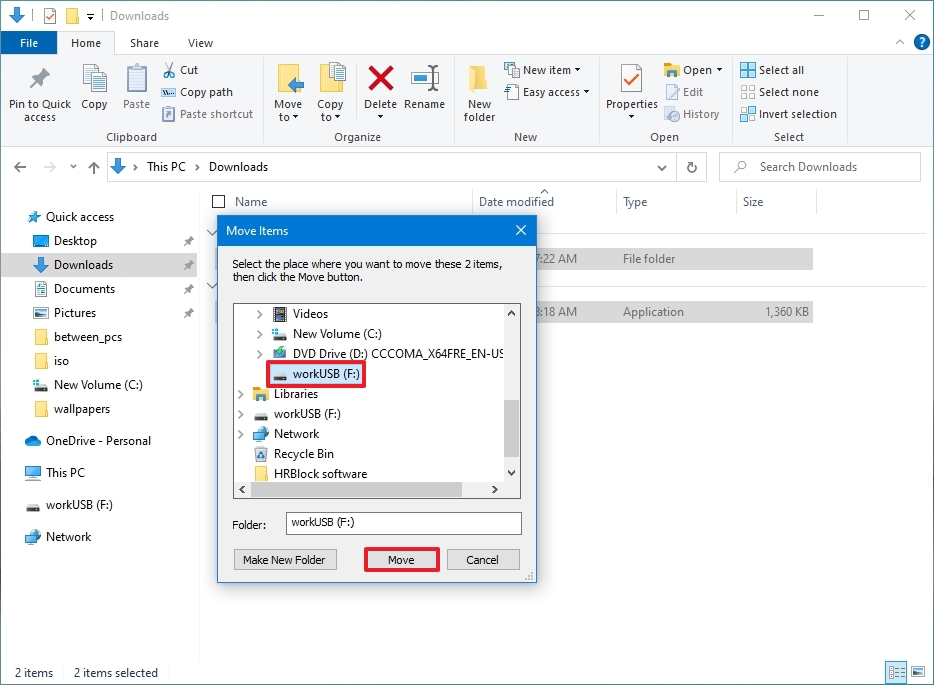
After completing the steps, you may need to repeat the instructions to move additional files and folders to a new location, which will help prevent the drive from running out of space.
Configure external drive as new save location
To allow the system to save files and install apps on an external drive automatically, use these steps:
- Open Settings.
- Click on System.
- Click on Storage.
- Click the «Change where new content is saved» option under the «More storage settings» section.
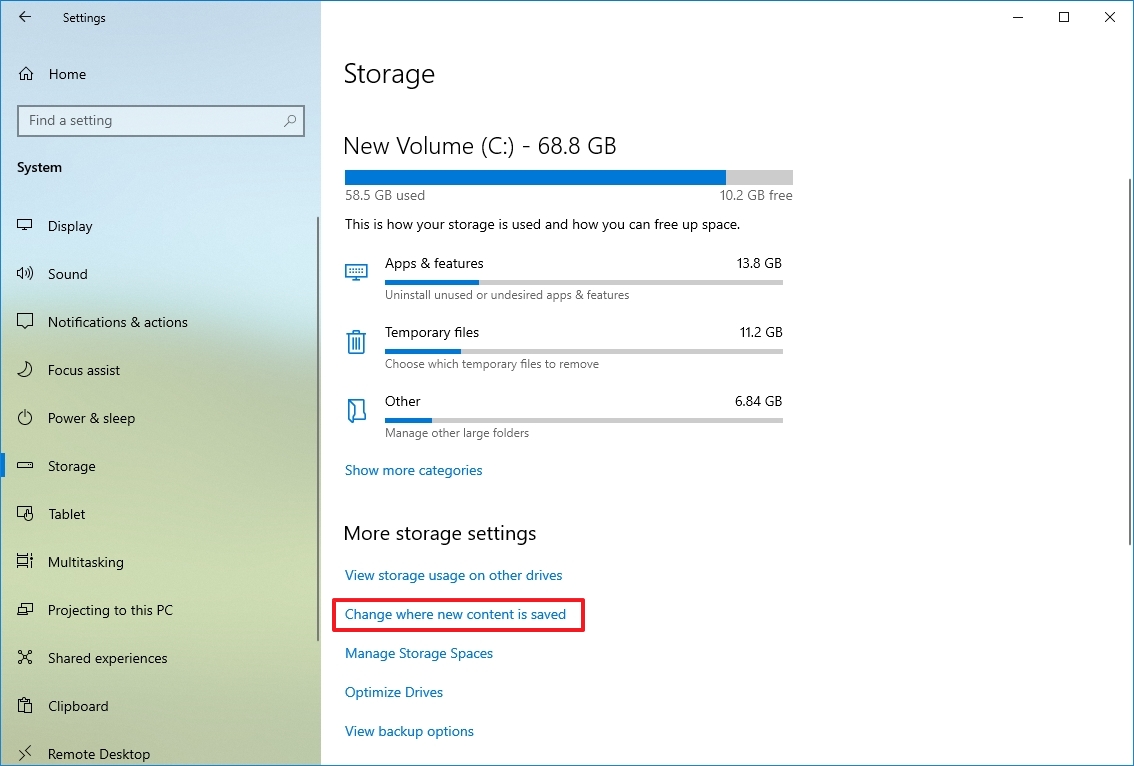
- Use the drop-down menus and select the new location to save files automatically for each content type.
- Use the «New apps will save to» setting to select the drive where you want to install future apps by default.
- Click the Apply button for each setting.
Once you complete the steps, files, and apps from the Microsoft Store will save in the new location you specified.
Relocate apps and games to new drive
You can also move most Microsoft Store apps and games to an external drive, which can help reduce storage usage.
To transfer existing apps and games to another drive on Windows 10, connect the external storage to the computer, and then use these steps:
- Open Settings.
- Click on Apps.
- Click on Apps & features.
- Use the «Sort by» filter and select the Size view to quickly identify the apps and games using the most space.
- Select the item to relocate.
- Click the Move button. (If the option is not available, the transfer feature is not available for that particular item.)
- Use the drop-down menu to select the new location.
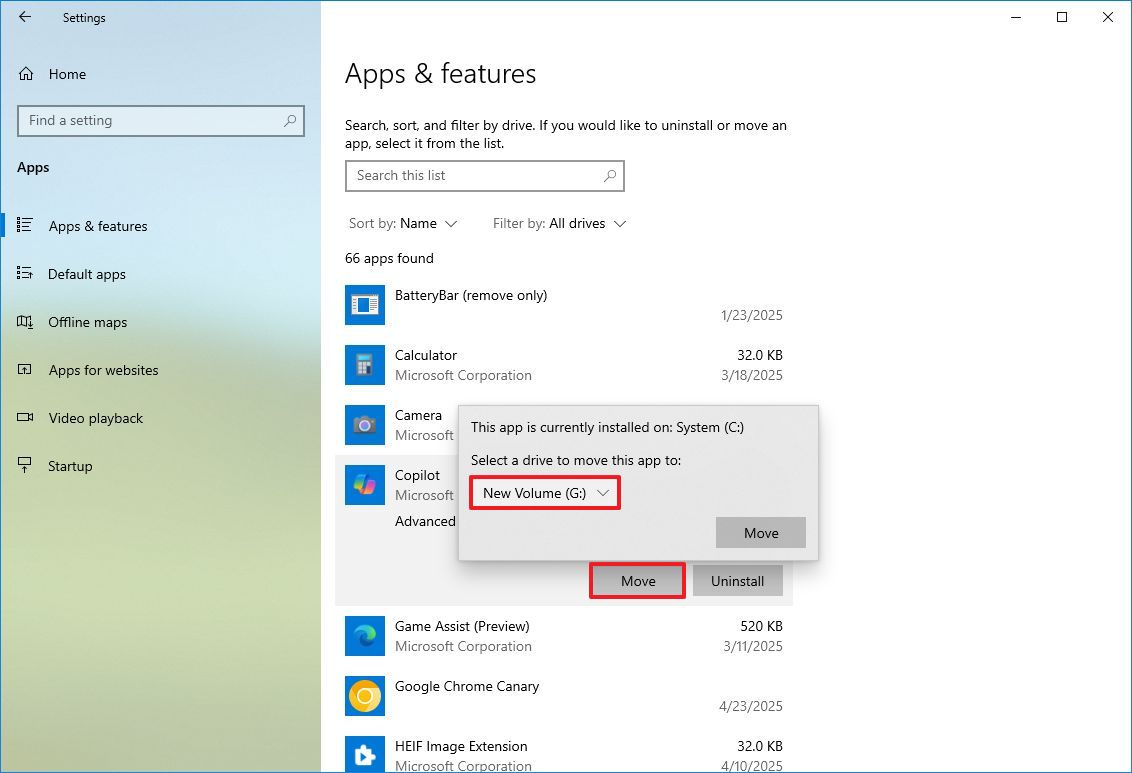
- Click the Move button again.
After you complete the steps, you may need to repeat the same instructions to move additional apps or games to the new location.
The external drive must be connected to the device at all times when using this feature. Otherwise, you won’t be able to launch them or play those games that you moved to the new storage.
7. Free up space using NTFS compression
Windows 10 also includes a compression feature part of the NT File System (NTFS) to reduce the storage usage of current files, maintaining normal access without the need to zip any content. The feature can compress files, folders, or the entire drive.
Important: Data compression can negatively impact system performance as it has to compress and decompress data on the fly. You should use this option only if you do not have another option and have capable hardware.
Enable folder compression
To enable Windows 10 NTFS compression for a folder, use these steps:
- Open File Explorer.
- Browse to the folder to compress.
- Right-click the folder and select the Properties option.
- Click the Advanced button.
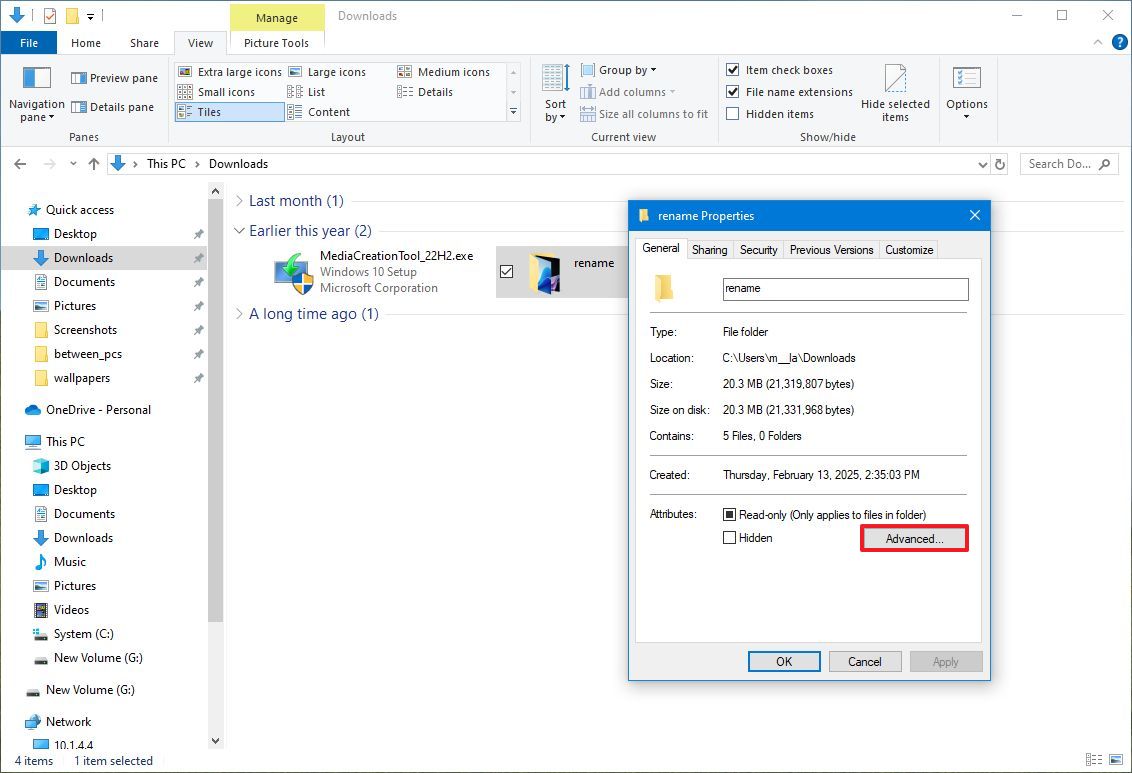
- Check the «Compress contents to save disk space» option under the «Compress or Encrypt attributes» section.
- Click the OK button.
- Click the Apply button.
- Select the «Apply changes to this folder, subfolders and files» option.
- Quick note: If the folder already contains files, the initial compression can take time.
- Click the OK button.
- Click the OK button again.
After you complete the steps, the file compression feature will enable you to reduce the size of existing and future files. (The above steps focus on folders, but the same instructions apply to compress files individually.)
If you no longer want to use file compression, you can revert the changes using the same instructions, but in step 5, make sure to clear the «Compress contents to save disk space» option.
Enable drive compression
To enable NTFS compression for the entire drive, use these steps:
- Open File Explorer.
- Click on This PC from the left pane.
- Under the «Devices and drives» section, right-click the drive to compress and select the Properties option.
- Check the «Compress this drive to save disk space» option.
- Quick tip: Since compressing the installation drive can negatively affect performance, try using this feature only on a secondary drive or partition.
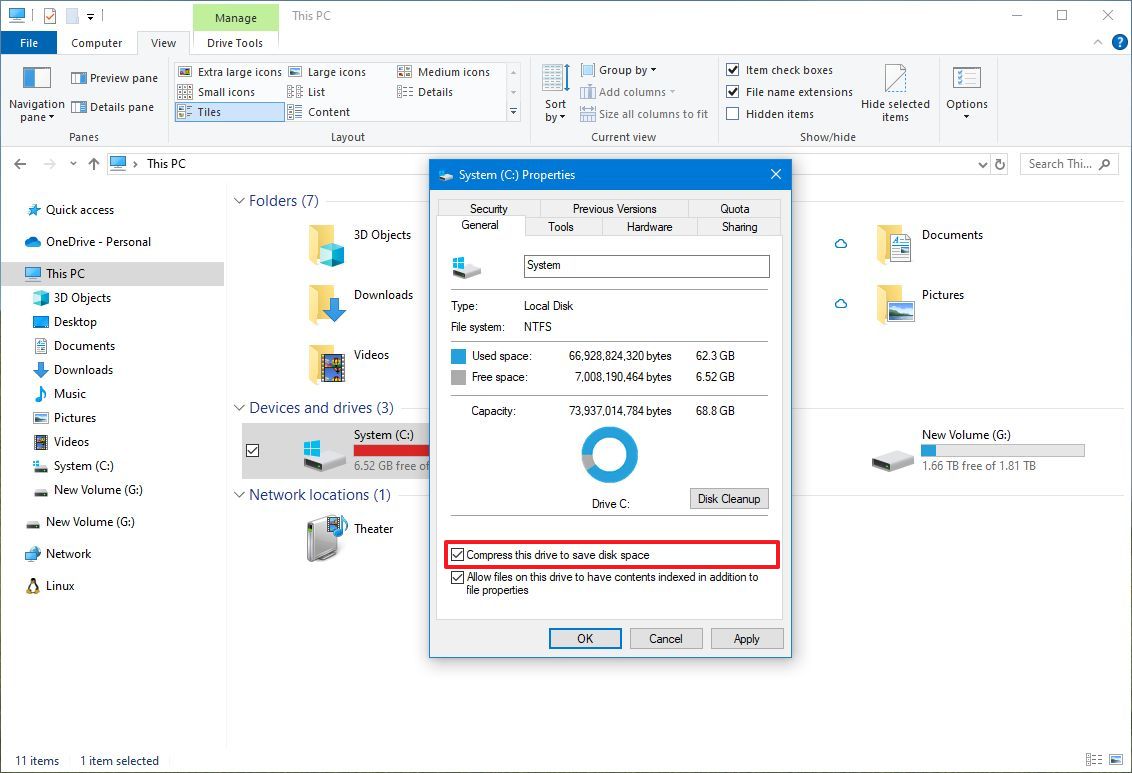
- Click the Apply button.
- Select the «Apply changes to drive (drive letter), subfolders, and files» option.
- Click the OK button.
- Click the OK button again.
Once you complete the steps, Windows 10 will compress the drive and any content already on the storage without reformatting.
When the feature is no longer needed, you can use the same instructions to disable compression, but in step 4, make sure to clear the «Compress this drive to save disk space» option.
8. Free up space disabling Hibernation on Windows 10
On Windows 10, Hibernation is a nifty feature that saves data in memory to the system drive before shutting down, preserving the current session upon resuming. Then you can pick up where you left off when the device resumes online.
Although it is a convenient feature, it requires gigabytes of space to save the memory information into the hiberfil.sys file. If the device is running out of space, disabling Hibernation can help free up space for more critical files.
To disable Hibernation on Windows 10 to free up space, use these steps:
- Open Start.
- Search for Command Prompt, right-click the top result, and select the Run as administrator option.
- Type the following command to disable Hibernation on Windows 10 and press Enter: powercfg /hibernate off
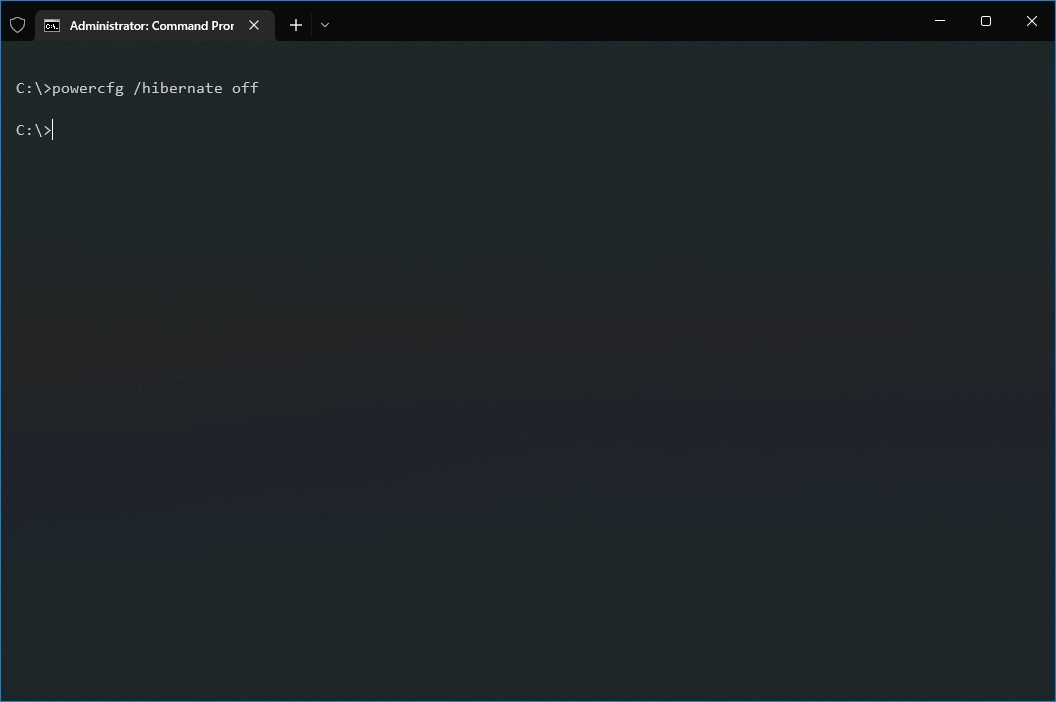
Once you complete the steps, Hibernation will no longer be available, but you will have more space for other files.
In the future, you can always re-enable the feature with the same instructions, but in step 3, make sure to use the powercfg /hibernate on command.
9. Free up space compressing installation footprint of Windows 10
Compact OS is a tool that compresses the footprint of the operating system and apps. The feature is designed for devices with limited storage, but you can use the tool to quickly reclaim a few gigabytes of space when you don’t have an external hard drive.
Warning: This is a friendly reminder that modifying system files is risky and can cause irreversible damage to your installation if done incorrectly. Before proceeding, it’s recommended to make a temporary full backup of your computer.
To shrink the size of the Windows 10 installation and apps with Compact OS, use these steps:
- Open Start.
- Search for Command Prompt, right-click the top result, and select the Run as administrator option.
- Type the following command to enable Compress OS and press Enter: compact.exe /compactOS:always
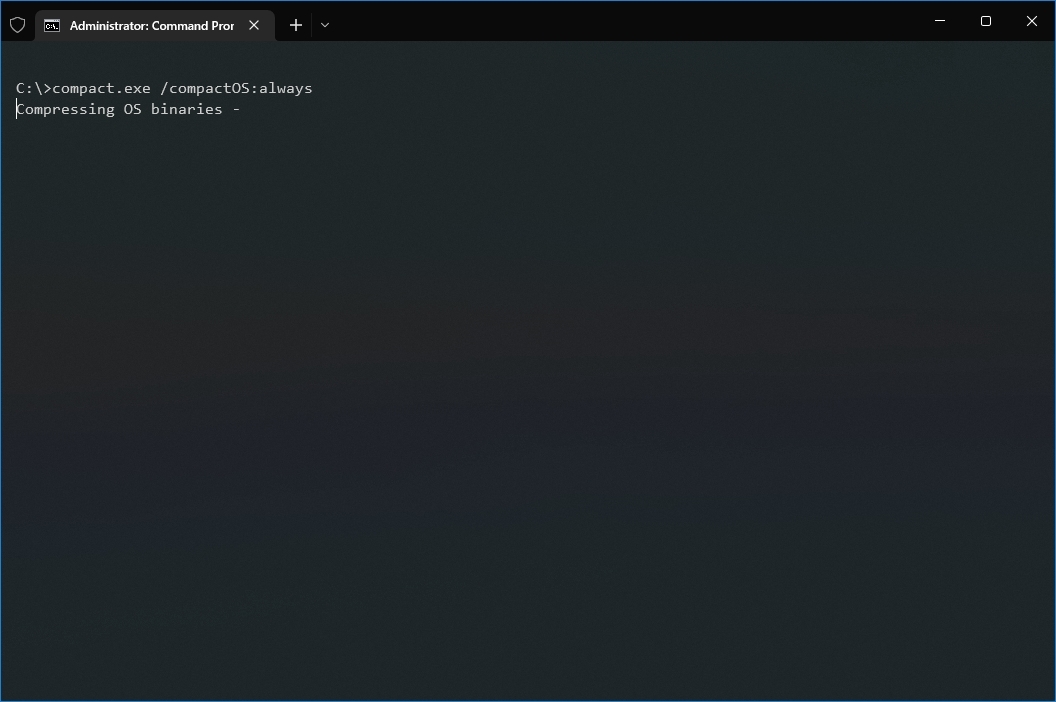
After you complete the steps, the process will reclaim around 2GB of storage, slightly improving performance.
When the feature is no longer needed, you can always revert the changes using the same instructions, but in step 3, make sure to use the compact.exe /compactOS:never command.
10. Free up space rebuilding search indexer on Windows 10
The Windows Search database can sometimes grow very large due to the amount of content that needs to be indexed or indexing issues, which can be the reason the system drive is running out of space. If this is the case, clearing and rebuilding the database, as well as modifying the index items, can significantly reduce storage usage on Windows 10.
To rebuild the index of Windows 10 to free up space, use these steps:
- Open Settings.
- Click on Search.
- Click on Searching Windows.
- Click the «Advanced Search Indexer Settings» option under the «More Search Indexer Settings» section.
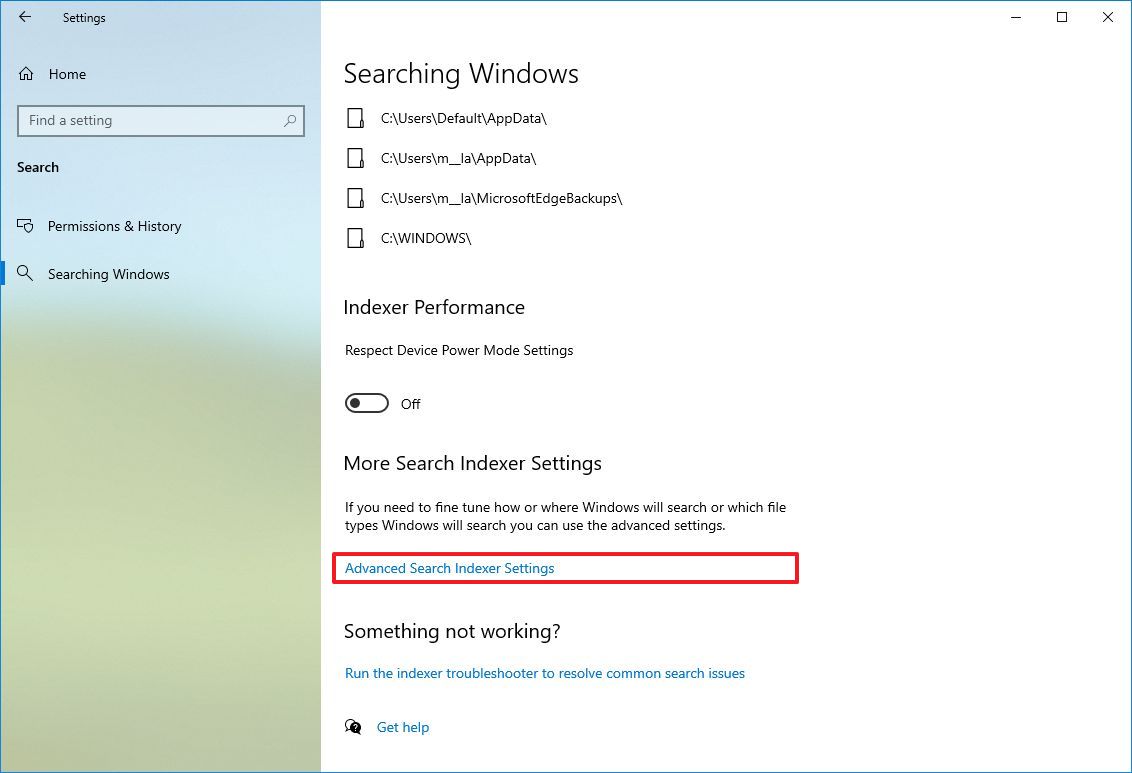
- Click the Advanced button.
- Click the Index Settings tab.
- Click the Rebuild button under the «Troubleshooting» section.
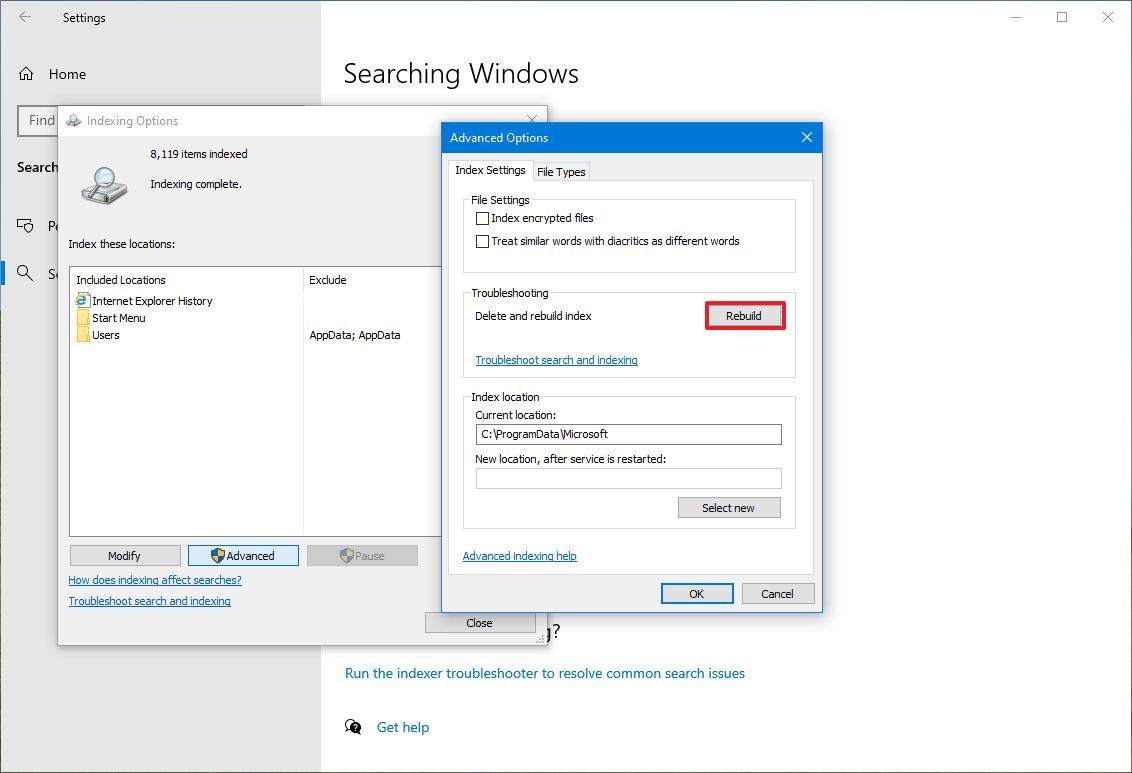
- Click the OK button.
Once you complete the steps, the system will clear and rebuild the Windows Search feature’s index database, which can reclaim a lot of space.
The only caveat with this process is that during the rebuild, searches using the Taskbar, File Explorer, and across Windows 10 might be incomplete until files are re-indexed.
Configure indexer
You can also minimize the space by preventing Windows Search from indexing specific locations.
To remove indexing folder locations from Windows Search, use these steps:
- Open Settings.
- Click on Search.
- Click on Searching Windows.
- Click the «Advanced Search Indexer Settings» option under the «More Search Indexer Settings» section.
- Click the Modify button.
- Click the Show all locations button.
- Clear the options for apps to exclude from the index database.
- Quick note: Generally speaking, you never want to index any kind of application.
- Expand the «C:» drive and clear the folder you do not wish to appear in search to reduce the database storage usage.
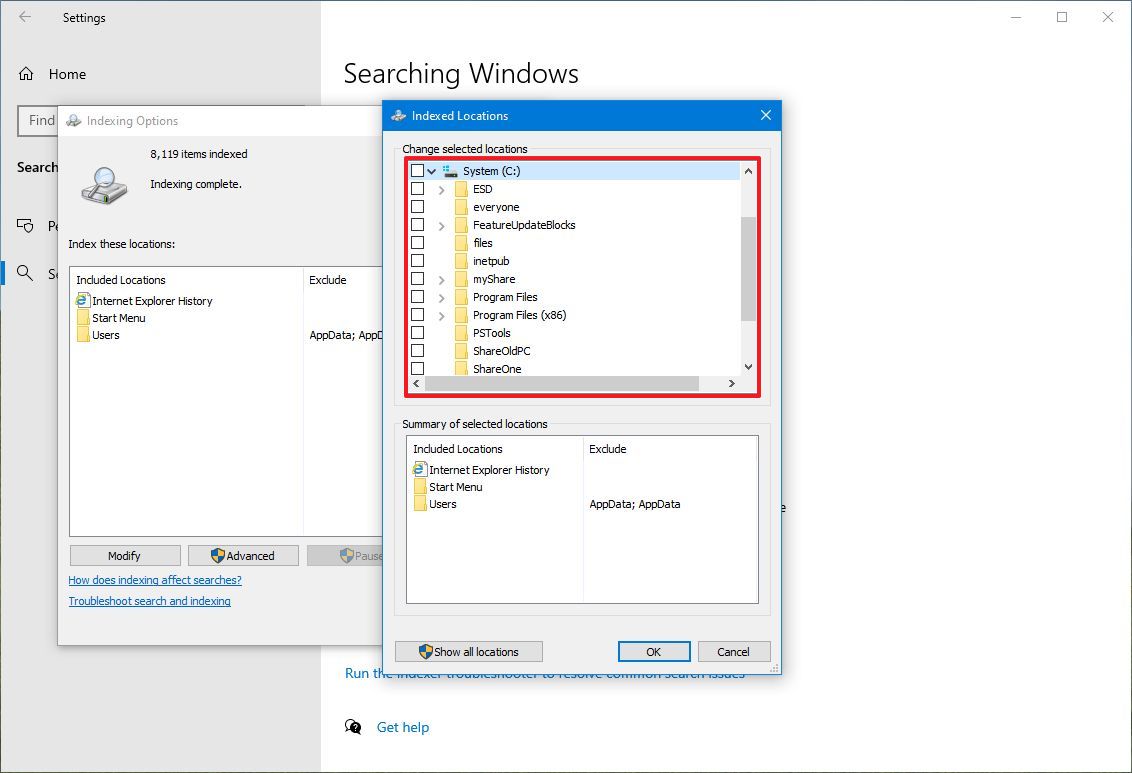
- Click the OK button.
- Click the Close button.
After completing the steps, Windows Search will update the database, hopefully reducing its footprint and making space for other files.
11. Free up space deleting users no longer sharing device
If you share the computer with others, it may be possible to free up space by deleting accounts that no one is using anymore.
To delete a user account and files on Windows 10, use these steps:
- Open Settings.
- Click on Accounts.
- Click on Family & other users.
- Select the account no longer in use.
- Click the Remove button.

- Click the «Delete account and data» button.
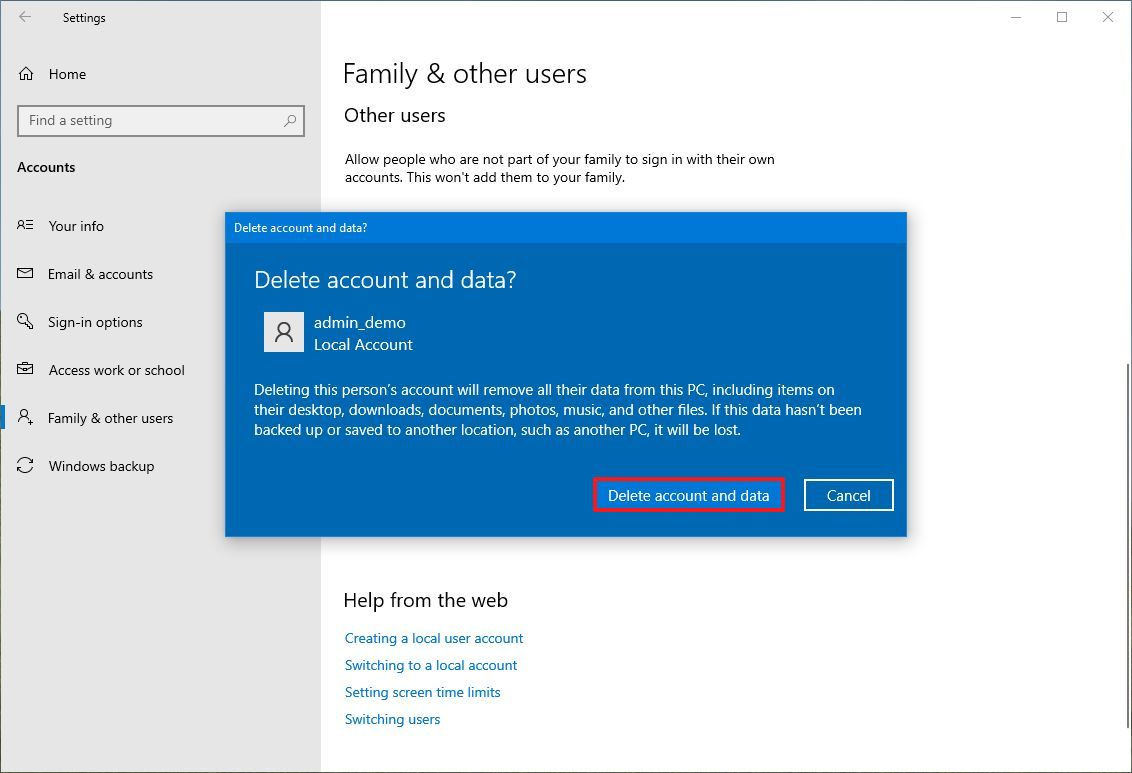
Once you complete the steps, the profile and data will be removed from the computer, regaining more space for other files. You may need to repeat the steps to delete other accounts on Windows 10.
12. Free up space disabling Reserved Storage on Windows 10
Reserved Storage on Windows 10 is a feature that sets apart several gigabytes of space for updates, system cache, and temporary files. When new updates are available, the system automatically cleans up the storage to minimize problems during other updates.
Although this is a great feature to minimize problems during updates and upgrades, it takes up space that could be used to store more documents, pictures, and videos. If you understand the feature and prefer not to use it, you can disable it to free up space. The only caveat with this method is that once you disable the feature, the changes will take effect during the next Windows feature update.
Important: Use these instructions only if you understand the feature. Otherwise, it is not recommended to disable Reserved Storage as it may cause issues during updates.
To disable Reserved Storage on Windows 10, use these steps:
- Open Start.
- Search for PowerShell, right-click the top result, and select the Run as administrator option.
- Type the following command to confirm whether the feature is enabled and press Enter: Get-WindowsReservedStorageState
- Type the following command to disable the feature and press Enter: Set-WindowsReservedStorageState -State disabled
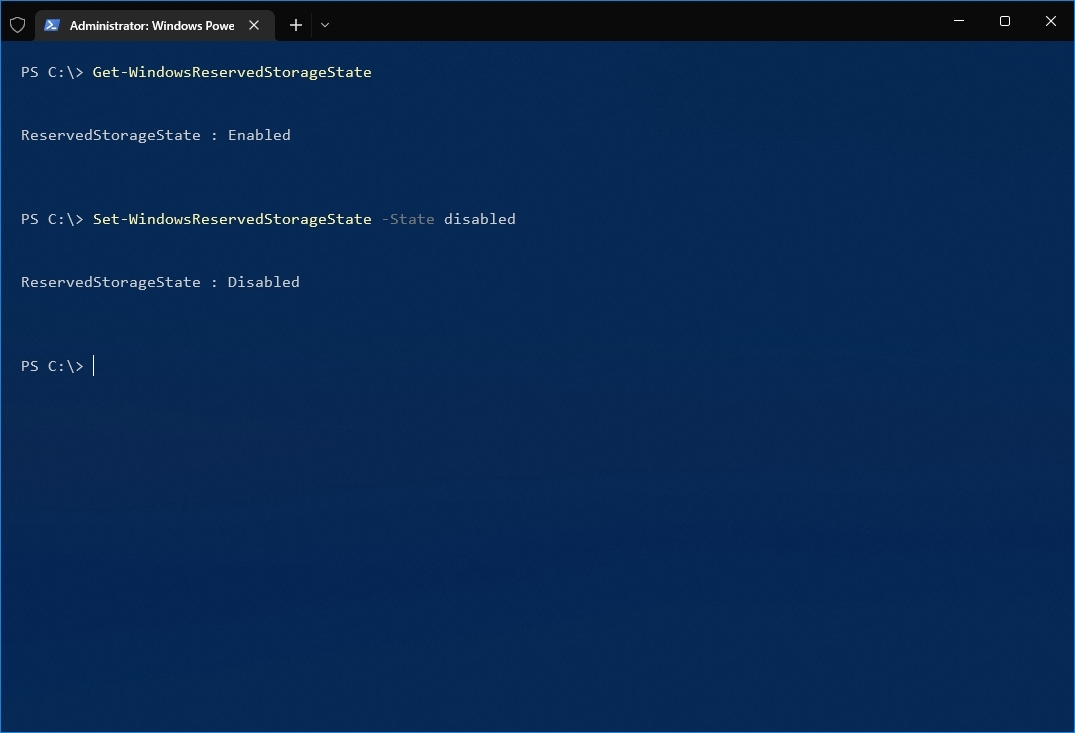
After completing the steps, the feature will be turned off on Windows 10, allowing you to reclaim around 7 GB of space after the next Windows 10 feature update.
In addition to all these different ways to free up drive space, sometimes malware can cause storage problems. If you notice strange behaviors and the hard drive is running low on space, a virus may be causing the problem. If this is the case, you can use these instructions to scan, detect, and remove any malware causing storage issues.
Lastly, it’s important to note that the end of support for Windows 10 will occur on October 14, 2025, and after this date, Microsoft will no longer release security or maintenance updates and will not provide any kind of support.
You can use these instructions to prepare your device and upgrade from Windows 10 to 11.
More resources
For more helpful articles, coverage, and answers to common questions about Windows 10 and Windows 11, visit the following resources:
- Windows 11 on Windows Central — All you need to know
- Windows 10 on Windows Central — All you need to know
Mauro Huculak has been a Windows How-To Expert contributor for WindowsCentral.com for nearly a decade and has over 15 years of experience writing comprehensive guides. He also has an IT background and has achieved different professional certifications from Microsoft, Cisco, VMware, and CompTIA. He has been recognized as a Microsoft MVP for many years.
Is your computer running slow? A full hard drive might be the problem. This blog will show you how to free up disk space on Windows 10. Let’s get started!
Check Your Current Disk Space

To check your disk space on Windows PC, open File Explorer and click on “This PC.” Here, you’ll see how much space is free on your C drive and other drives. It’s quick to see the percentage of space used.
Windows also offers a deeper look at what’s taking up room through Settings. Go to System, then Storage, to explore each drive’s usage details. You can find out which files or apps use the most disk space.
Space Cleanup
Cleaning up space on your Windows PC can make it run faster. You can delete apps and files you don’t need anymore to free up disk space.
Remove Unneeded Desktop Apps
Your PC might be slower than it used to be. Getting rid of apps you don’t use can free up a lot of space.
- Open the Control Panel. You find this by searching in the start menu.
- Click on “Programs and Features” or “Uninstall a program.”
- Browse through the list of installed apps.
- Look for apps you no longer need or use.
- Click on an app to highlight it, then choose “Uninstall.”
- Follow the on-screen instructions to remove the app.
- Some apps might ask for permission to uninstall. Say yes.
- After uninstalling, check if there are leftovers in the folder where the app was installed and delete them.
- Empty your Recycle Bin to permanently free up space.
Remove Unused Windows Store Apps
Windows Store apps can take up a lot of disk space on your computer. Removing ones you don’t use can free up a ton of space. Here’s how to do it:
- Open “Settings” by clicking on the Start menu.
- Go to “Apps.”
- Select “Apps & features” from the left-hand side.
- A list of all installed apps appears.
- Scroll through this list to find any apps you no longer need.
- Click on an app you want to get rid of.
- Press the “Uninstall” button that appears.
- Confirm by clicking “Uninstall” again in the pop-up window.
Delete Temporary And Old Files
After clearing out unused Windows Store apps, your next step is to clear cache and old files. These files pile up over time and eat a lot of disk space, as well as causing some connectivity issues like failed DNS Lookup.
- Open Disk Cleanup by searching for it in the start menu. This tool finds and gets rid of files you don’t need.
- Select “Temporary Internet Files” to clear web data stored on your PC.
- Look for “Downloaded Program Files.” These are outdated bits from web pages and can be removed.
- Empty the Recycle Bin. Items here still take up space until permanently deleted.
- Clear out “Thumbnails.” These small images preview content but aren’t always necessary.
- Delete old Windows Update files. Sometimes updates leave behind data that’s no longer needed.
- Get rid of temporary files used by programs or during installation processes.
- Clean up system error memory dump files and logs to free more space.
- Remove “Temporary Windows Installation Files” if you’re not planning another update soon.
You May Like: Not Enough Memory In Windows Photo Viewer? Here’s 8 Ways To Fix It
Reduce the Size of the WinSxS Folder
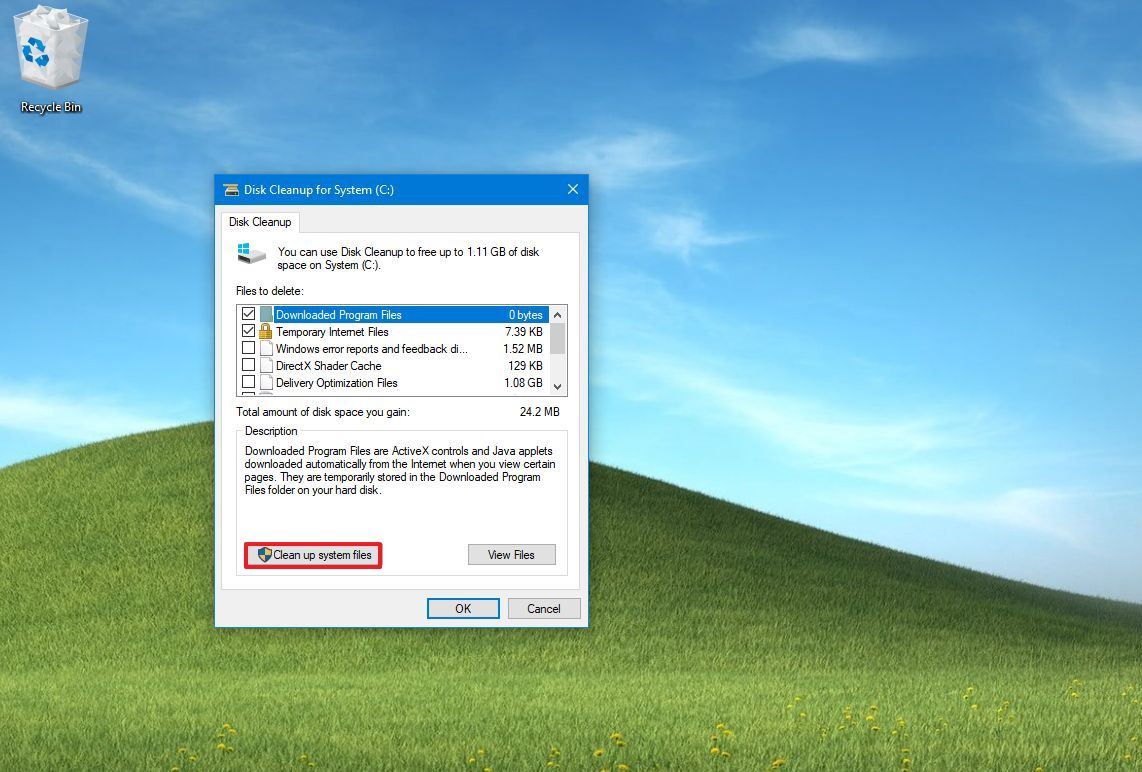
After cleaning out temporary and old files, take a look at the WinSxS folder. This folder is vital for Windows but can grow large. You don’t need to be a tech wizard to manage it. Use Disk Cleanup to trim it down without harming your computer.
Select “Clean up system files” in Disk Cleanup. Then, check the box for “Windows Update Cleanup.” This step might free several gigabytes of space on your hard drive.
Another way is through the Command Prompt with admin rights. Type “dism /online /cleanup-image /startcomponentcleanup” and press Enter. Your PC will get rid of stuff you don’t use while keeping Windows running right.
Use Windows Tools For Disk Managament
Windows has built-in tools to help manage disk space. These include Disk Cleanup and Storage Sense, which quickly find and remove unnecessary files from your system.
Disk Cleanup
Disk Cleanup helps free up disk space on your Windows computer. It removes files you no longer need.
- Select the drive you want to clean.
- Disk Cleanup searches for files to delete.
- Choose “Clean up system files” for more options.
- Pick files from categories like Temporary Internet Files or Recycle Bin.
- Check the box next to each type of file you want to delete.
- Look at the description to know what you’re deleting.
- Click “OK” to remove the selected files.
- Confirm by clicking “Delete Files.”
- Disk Cleanup starts clearing the space.
- Once finished, you have more free space on your drive.
Storage Sense
After cleaning up your disk with Disk Cleanup, Storage Sense is your next step to keep your disk space in check. Windows 10 and Windows 11 include this smart feature that automatically frees up drive space.
- Turn on Storage Sense from the Settings menu. This lets it run automatically.
- Choose how often Storage Sense runs. You can set it to clean up files every day, week, month, or when disk space gets low.
- Select what Storage Sense deletes. It can remove temporary files and items in your Recycle Bin that are over 30 days old.
- Use it to clear out the Downloads folder if you forget about the files you download.
- Set Storage Sense to move files you aren’t using to OneDrive cloud storage. This keeps them safe but off your local disk.
- Monitor how much space Storage Sense has freed on your computer through Settings.
Move Files to External Storage
Moving files to external storage clears space on your PC fast. It lets you keep large files safe without clogging up your system.
USB Drives
USB drives are a great way to move files and free up disk space on your computer. They’re small, portable, and can hold lots of data. You plug one into your USB port, drag files you want to save onto it, and then remove the drive to keep your files safe.
This helps you clear space on your hard drive without losing important documents or photos.
You can find USB drives in many sizes, from a few gigabytes (GB) to several terabytes (TB), so there’s always one that fits your needs. Using them is simple and they work with any PC that has a USB port.
External Hard Drives
After considering USB drives, think about external hard drives for more space. External hard drives give you lots of extra storage. They are perfect for keeping big files like videos and large apps.
You can connect them to your computer with a cable. External hard drives are also great for backups. You can save copies of all your important stuff on them. If something goes wrong with your PC, you have everything saved on the external drive.
These drives come in different sizes, so you can choose one that fits what you need to store.
Cloud Storage
Moving beyond physical hard drives, cloud storage offers a different way to manage your files. With services like Dropbox, Google Drive, and iCloud, you can store documents online.
This means you can access them from any device with an internet connection. Cloud storage is safe and lets you share files easily with others. Some services give you free space when you sign up.
If you need more, they have plans for that too. This helps keep your computer’s hard drive free for other important stuff.
Using cloud storage also makes your data secure in case something happens to your computer or external drives. You won’t lose everything if your hardware fails or gets lost because all of it is backed up online safely.
Plus, syncing files across devices becomes a breeze without the hassle of using cables or transfer tools.
Optimize OneDrive Storage
Make OneDrive files online-only to save space. Move other files to a removable drive for extra room.
Make Files Online-Only
You have lots of files on your PC, and they take up a lot of space. Making files online-only is a smart move to free disk space. Here’s how:
- Open OneDrive settings.
- Choose “Save space and download files as you use them“.
- Right-click on the file you want to make online-only.
- Select “Free up space”.
- The file’s icon changes to show it’s stored online only.
- To access it again, just click on the file.
Move Files to a Removable Drive
After making files online-only, the next step is moving files to a removable drive. This helps free up space on your computer.
- Choose what to move. Look at large files and folders that you don’t often use.
- Get a USB drive or an external hard drive. These can hold lots of data.
- Connect the drive to your PC via a USB port.
- Open File Explorer on Windows 10.
- Find the files or folders you decided to move.
- Right-click on them and choose “Cut.”
- Go to the removable drive’s folder in File Explorer.
- Right-click in the folder and choose “Paste.”
- Wait for the transfer to finish before unplugging the drive.
- Once done, check that all files are moved correctly.
- Consider making backups of important files in another location too.
Additional Tips for Managing Disk Space
Turn on system restore only for essential drives. System restore uses space to save versions of files that might get deleted or changed over time. Not all drives need this feature, especially if you don’t store important files there.
Keep your PC lean and mean by checking what you download.
Also, think about turning off hibernation mode if you rarely use it. Hibernation saves your in-use files and programs to the hard drive so that you can pick up where you left off. This process eats up a good chunk of disk space.
To turn it off, use the Command Prompt with admin rights and run `powercfg.exe /hibernate off`. This simple action can free up valuable storage space on your computer’s drive to save more important things.
What to Know
- Checking free space on a drive is helpful if you suspect it’s filling up or you’re getting random error messages.
- Open This PC, Computer, or My Computer (depending on your OS), right-click the drive, choose Properties.
- Follow the same steps for hard drives as well as network drives and external drives like flash drives.
You can’t just add stuff to a drive forever, be it your main hard drive, the little flash drive in your pocket, or the giant external hard drive on your desk.
Even an arguably humongous 16 TB hard disk has a limit: 16 TB! As crazy as it sounds, it, too, can fill up. True, it’ll take two million high-quality photos to do it, but «only» about 150 feature-length 4K movies.
How to Check Free Hard Drive Space in Windows
It takes only a minute or two to check how much storage you have on any of your drives, and it’s especially easy to do when you use File Explorer.
Maddy Price / Lifewire
These steps work for Windows 11, Windows 10, Windows 8, Windows 7, Windows Vista, and Windows XP.
-
In Windows 11 or Windows 10, select the Start button, followed by File Explorer (the small folder icon). If you don’t see it, check under the All apps or Windows System folder, or type file explorer into the search box.
In Windows 8 or Windows 10, search for and then select This PC.
In Windows 7 or Windows Vista, select the Start button, followed by Computer.
In Windows XP, go to Start and then My Computer.
-
On the left-hand side of the window that’s now open, make sure This PC, Computer, or My Computer is selected (the name depends on your version of Windows).
Windows 10 This PC.
If you don’t see anything on the left side of this screen, open the View menu and enable the Navigation pane. In older versions of Windows, go instead to Organize > Layout > Navigation Pane (7 and Vista), or View > Explorer Bar > Folders (XP).
-
On the right-hand side, find the drive on which you want to know how much free space is left.
In Windows 11/10/8, all storage devices are listed in the Devices and drives area. In Windows 7/Vista/XP, Hard Disk Drives and Devices with Removable Storage are listed separately.
-
In newer versions of Windows, you can see right under the drive listing how much free space is left on it, as well as the total size of the drive, in a format like this:
Local Disk (C:)[storage space indicator]611 GB free of 931 GBIf that’s all you need to know then you’re done! However, there is a bit more information about your drive’s capacity buried just a bit deeper:
-
To see more, right-click or tap-and-hold the drive in question, and then choose Properties.
-
In the General tab, you’ll see all the important details about the storage device you’re looking at, reported in bytes as well as rounded GB.
- Used space is the sum total of every piece of data on this device.
- Free space is the difference in the total formatted capacity of the device and the sum total of every piece of data being stored on it. This number indicates how much more storage you’re allowed to fill.
- Capacity is the total formatted capacity of the drive.
- The pie graph shows used vs free space on the drive, helpful for visualizing how much space you’re using on this device.
You should now know exactly how much hard drive space is available on your computer. If you’re running low, delete files you don’t need or move them to a different hard drive that has more free space.
How to Check Free Hard Drive Space Using Command Prompt
Another way to check free space is with Command Prompt. The results aren’t as easy to read because the values are represented in bytes instead of gigabytes, but it’s still possible with this command:
wmic logicaldisk get size,freespace,caption
Performance Suffers on a Full Hard Drive
You may need to check the free space on a drive from time to time, especially if it starts to slow down or act funny, which is very often the not-so-clear consequence of too much stuff in a single place.
If unaddressed, extremely low disk space can result in strange behavior, cryptic error messages, or serious problems like a Blue Screen of Death (BSOD).
How Much Free Space Do You Need?
Microsoft has historically recommended that to avoid problems, you should leave at least 100 MB of free space on whatever drive you have Windows installed on. However, I’ve seen issues at levels higher than 100 MB, so I always recommended 10 percent free space instead.
Of course, in some cases, you might need far more free storage than that. For example, if you’re copying a bunch of home movies to your computer or downloading a huge video game. In these situations, check how much storage those items are using before you put them on your computer to know how much space you need.
How to Disable Low Disk Space Checks in Windows
Calculate 10 Percent Free Space on Windows PC
To calculate 10 percent free space, just take the number next to Capacity from Step 6 and move the decimal to the left one space. For example, if the hard drive you’re viewing has a total capacity of 250.0 GB, moving the decimal one space to the left makes it 25.0 GB, meaning that you shouldn’t let the free space drop below that for that particular device.
Examine Types of Files Taking Up Storage Space
In Windows 11 & 10, much more detail about what sorts of files are using up your drive’s capacity can be found in Settings > System > Storage. Just choose a drive you’re interested in and Windows will analyze it, breaking it down into categories like System & reserved, Temporary files, Pictures, and more. These versions of Windows also support Storage Sense, a feature that can automatically free up space.
There are also several free disk space analyzer tools that’ll show you which files and folders are occupying the most space.
In any version of Windows, choosing Disk Cleanup from the drive’s properties (Step 6 above) will start the Disk Cleanup utility, a one-stop-shop for removing files that are no longer needed by Windows.
FAQ
-
Clear out extraneous files and apps by deleting downloads you no longer need in the Downloads folder. Another option is to search for %temp% and delete the temporary files that appear. Or, if you need to clear out a lot of space, wiping the hard drive will work but is a more extreme approach.
-
If you’re installing the 64-bit version of Windows 8.1, you’ll need a minimum of 3,850 MB (about 4 GB) of free hard drive space.
-
Open the Apple menu and select About This Mac > Storage. In macOS 13 Ventura, open the Apple menu and select System Settings > General > About and scroll down to Storage.
Thanks for letting us know!
Get the Latest Tech News Delivered Every Day
Subscribe
Все способы:
- Шаг 1: Базовая очистка компьютера
- Шаг 2: Удаление временных файлов
- Шаг 3: Отключение/изменение размера файла гибернации
- Шаг 4: Отключение/уменьшение файла подкачки
- Шаг 5: Удаление точек восстановления/отключение восстановления
- Шаг 6: Удаление папки Windows.old
- Шаг 7: Очистка кэша обновлений Windows
- Шаг 8: Отключение облачной синхронизации
- Шаг 9: Анализ дисков
- Шаг 10: Проверка на вирусы
- Шаг 11: Проверка жесткого диска на ошибки
- Шаг 12: Включение Compact OS
- Дополнительная информация
- Заключение
- Вопросы и ответы: 5
Системный раздел Windows очень подвержен засорению, и если время от времени не проводить грамотную очистку, доступное место попросту закончится. Этот процесс для диска C в Виндовс 10 состоит из нескольких этапов, и далее мы разберем каждый из них. Во внимание будет взят комплексный подход к решению поставленной задачи, подразумевающий выполнение как ручных действий, так и автоматизированных, через различные инструменты.
Если хотите максимально сэкономить время на освобождении места, советуем обратить внимание на JWIZARD Cleaner — программу, которая поможет вам быстро очистить весь мусор и оптимизировать работу ПК.
Шаг 1: Базовая очистка компьютера
Под базовой очисткой подразумевается все то, что для поддержания производительности своего компьютера должен делать каждый пользователь.
Очистка папки «Загрузки»
По умолчанию все файлы, которые вы скачиваете через браузеры и файловые менеджеры, попадают в папку «Загрузки», что находится в разделе С. Просмотрите, что там сейчас находится, — как правило, это установщики разных программ и прочие, ставшие неактуальными, файлы. Перенесите то, что необходимо, в другие папки, а остальное — удалите. Если все загрузки попадают на Рабочий стол или в другую папку, выполните то же самое там.
Очистка корзины
Все файлы, помещаемые в Корзину, хранятся в определенном разделе диска С до тех пор, пока вы их не удалите. Когда вы уверены, что восстанавливать оттуда нечего, нажмите правой кнопкой мыши по ярлыку «Корзина» и очистите ее.
Кстати, зайдя в «Свойства» через это же контекстное меню, вы сможете настроить ее расположение и параметры удаления.
Очистка кэша браузеров
Кэш в браузерах — довольно полезная вещь, позволяющая быстро загружать страницы интернета. Однако со временем он становится довольно объемным, а при использовании 2 и более веб-обозревателей спустя какое-то время размеры нескольких кэшей могут быть 1 ГБ и больше. Учитывая то, что многие сайты, на которые мы заходили, больше не зайдем, хранящийся кэш для них не нужен.

Удаление приложений
Многие постоянно устанавливают разные программы на компьютер, о которых впоследствии забывают. Некоторые могут весить пару мегабайт, а некоторые — по несколько сотен. Кроме того, из-за невнимательной инсталляции одних программ вполне возможна незаметная установка рекламных приложений, например, браузеров, антивирусов и пр. В связи с этим рекомендуется регулярно просматривать список установленного ПО, при необходимости удаляя ненужные позиции. Дополнительно можете избавиться от предустановленных Windows-приложений типа Xbox, если не пользуетесь ими. Никакого вреда системе это не нанесет.
Читайте также: Способы удаления программ в Windows 10
Шаг 2: Удаление временных файлов
За время работы в Windows неизбежно накапливается множество временных файлов из разных источников. Это могут быть файлы интернета или программ, а также самой операционной системы. После их использования такие файлы практически всегда оказываются не нужны, но ОС не удаляет их, оставляя храниться в специальной папке до момента, когда вручную это сделает сам юзер. Несмотря на то что в большинстве случаев они не занимают много пространства, общее их количество, накопленное за месяцы, а то и годы, может существенно уменьшить доступное место на накопителе.
Пака, ответственная за временные файлы, называется «Temp». Каждый пользователь может довольно быстро очистить ее не боясь того, что при удалении будет стерто что-то важное. Даже если какие-то актуальные файлы удалятся, система или приложение создадут их заново.
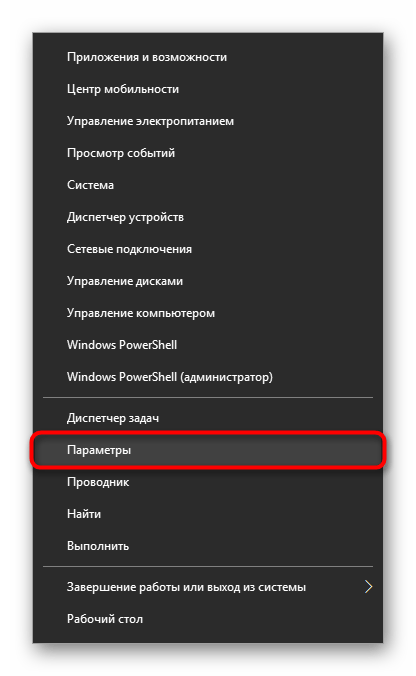
- Откройте «Параметры».
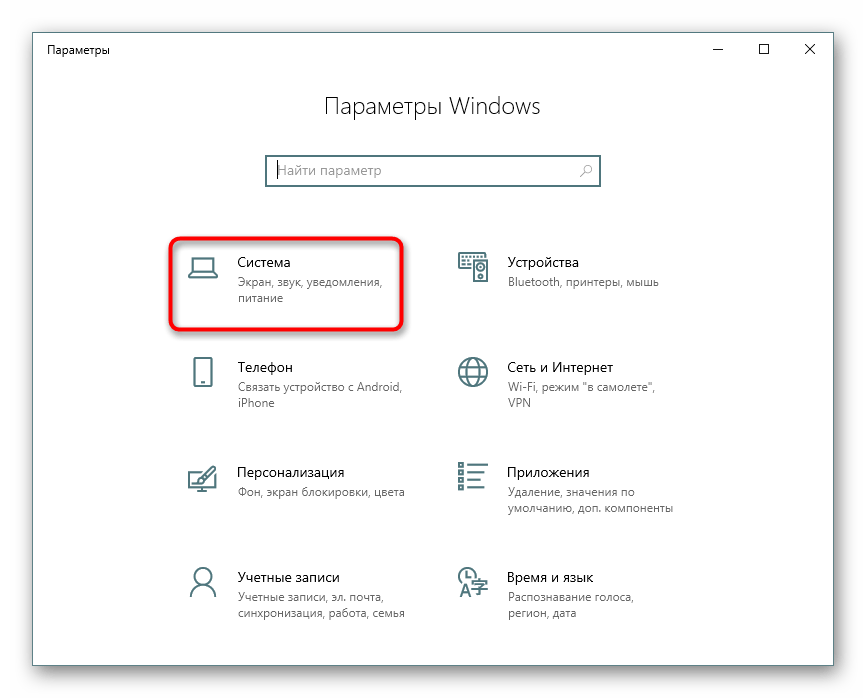
- Перейдите в раздел «Система».
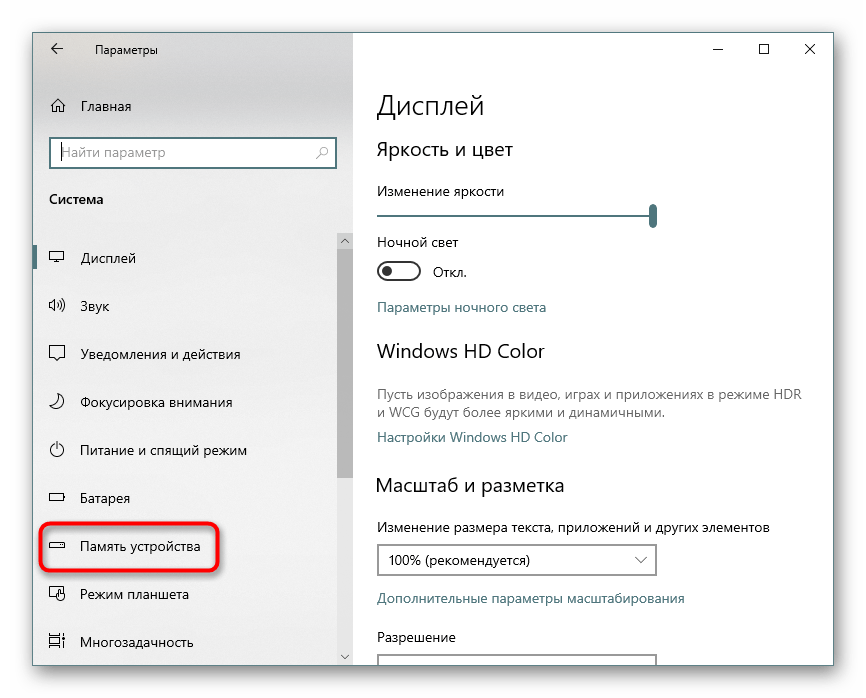
- Через панель слева найдите и выберите вкладку «Память устройства».
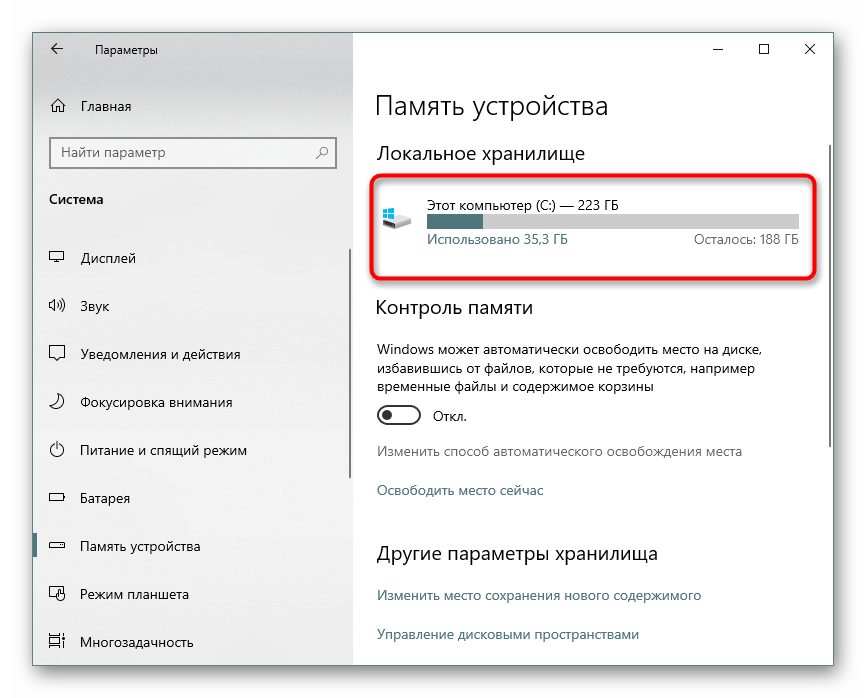
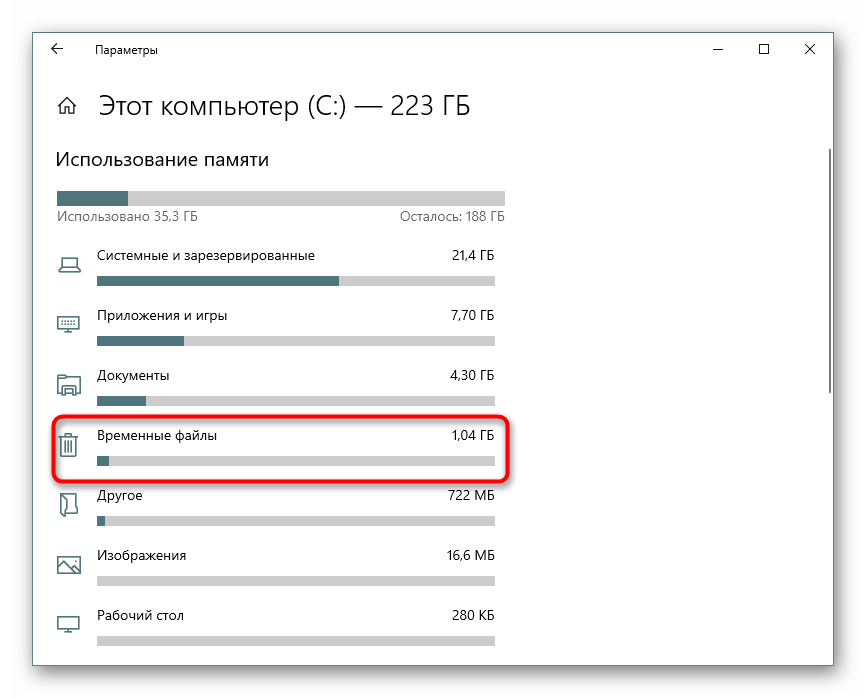
- Из списка логических дисков выберите системный.
- Отобразится количество занятой памяти по категориям, из которых выберите «Временные файлы».
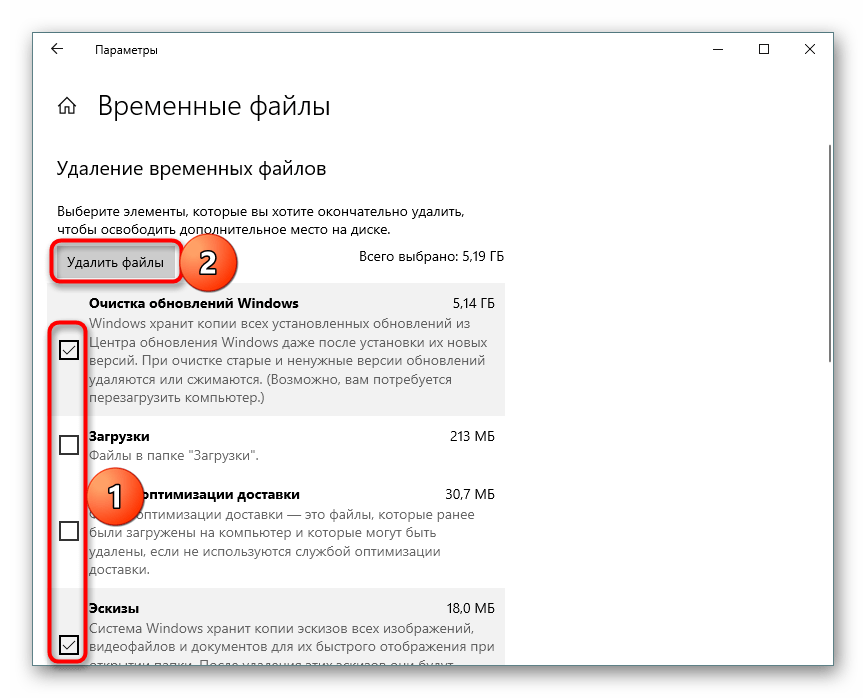
- Здесь уже отмечены галочками подходящие параметры, но вам доступно включение в очистку и других источников, те же «Загрузки» и «Корзину» вместо Шага 1. Затем кликните «Удалить файлы».
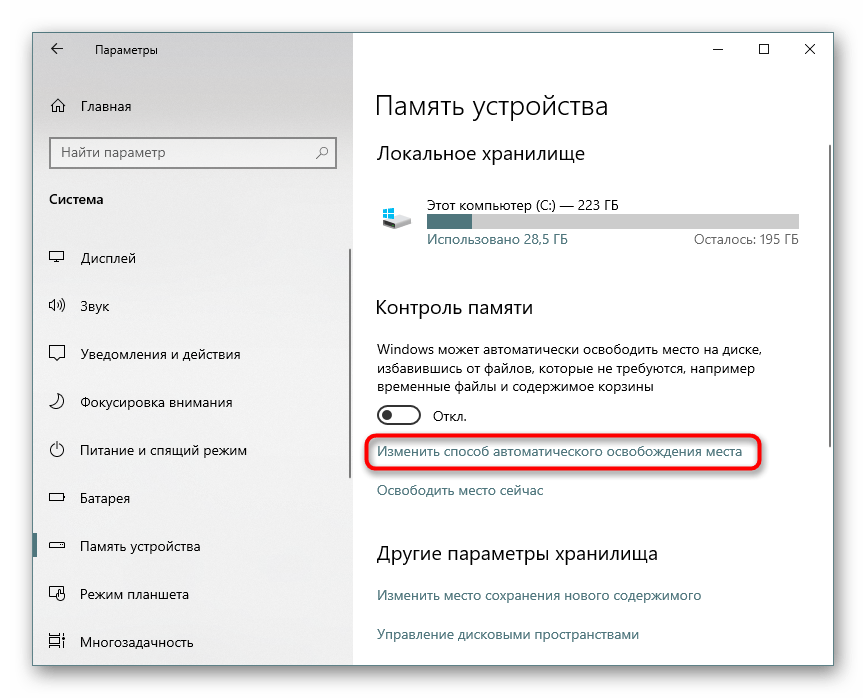
Приложения в Виндовс создают свои временные файлы, которые в дальнейшем остаются висеть мертвым грузом какое-то время. Пользователю доступна активация этой функции и мгновенная очистка кэша всех приложений.
- Откройте «Параметры».
- Перейдите в «Система».
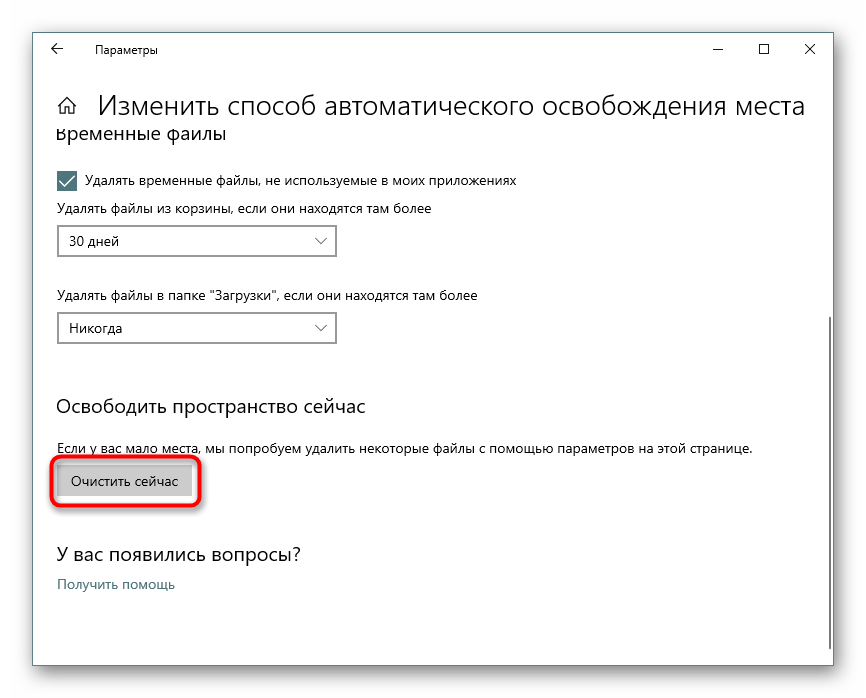
- Выберите пункт «Память устройства» через левую панель.
- Отыщите ссылку «Изменить способ автоматического освобождения места» и перейдите по ней.
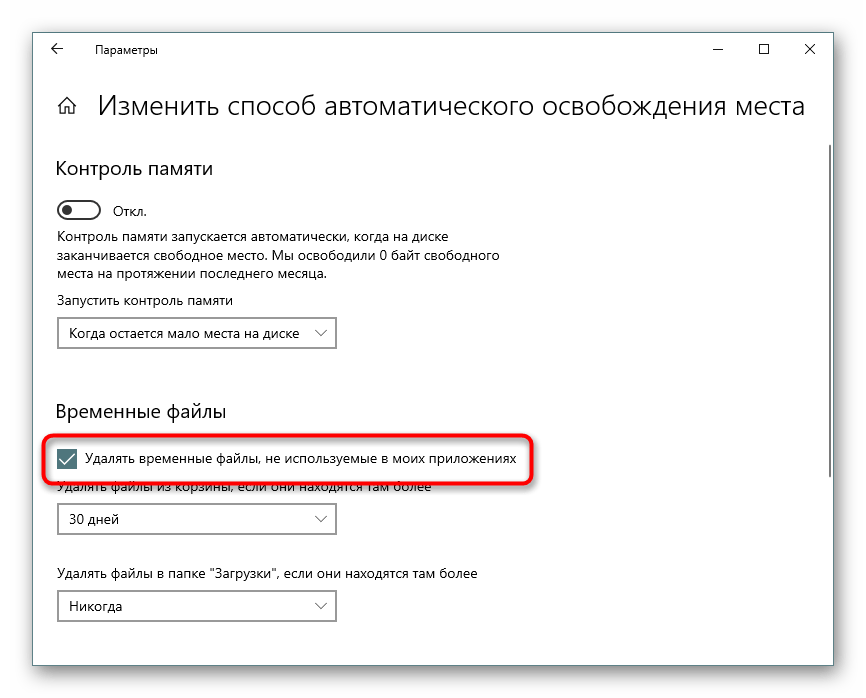
- Рядом с параметром «Удалять временные файлы, не используемые в моих приложениях» должна стоять галочка. Если ее там нет — установите.
- Чтобы сразу же провести удаление неиспользуемых данных приложениями, нажмите «Очистить сейчас». После непродолжительного процесса отобразится информация с цифрой освобожденного места.
Шаг 3: Отключение/изменение размера файла гибернации
Функцией гибернации пользуется далеко не каждый юзер, предпочитая ему спящий режим, непрерывную работу ПК или полное отключение устройства. В этой ситуации, учитывая специфику работы этого режима, разумнее будет отключить ее в целях экономии свободного места. Гибернация помещает последний сеанс не в оперативную память, как спящий режим, а на жесткий диск, что так же позволяет компьютеру быстро выйти из режима сниженного энергопотребления. При этом Виндовс заранее резервирует файл с определенным количеством гигабайт. Сам файл находится в корневой папке диска C и называется «hiberbil.sys». В другой нашей статье мы подробно рассмотрели способ отключения этого режима в «десятке».
Подробнее: Отключение режима гибернации на компьютере с Windows 10
А если же вы ранее пользовались гибернацией, но готовы перейти на спящий режим в целях экономии дискового пространства, советуем ознакомиться с этой статьей.
Подробнее: Настройка и включение спящего режима в Windows 10
Некоторым пользователям необходима гибернация для использования или же просто для возможности осуществлять «Быстрый запуск».
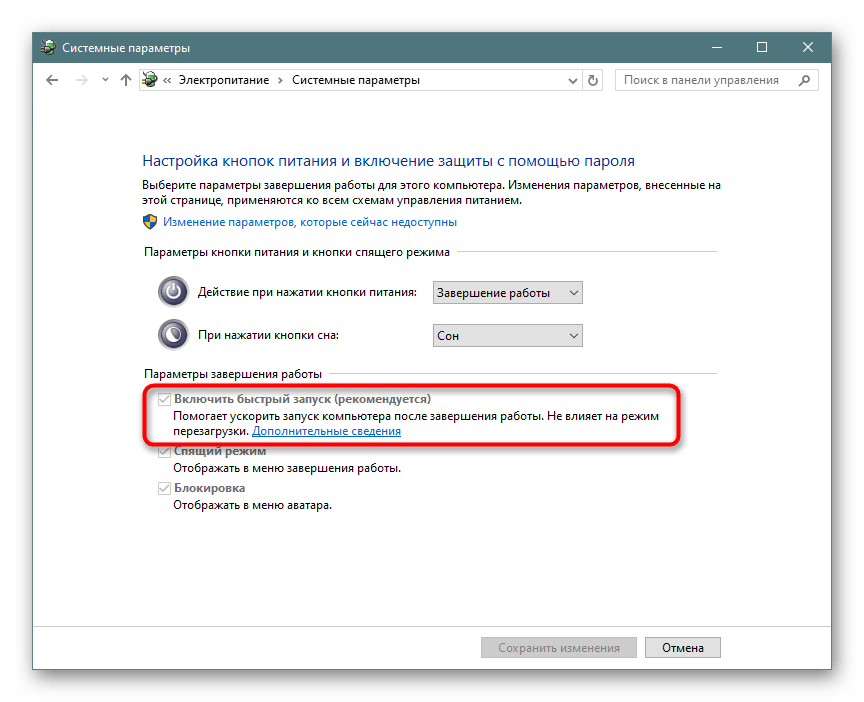
В этой ситуации его размер можно уменьшить, открыв командную строку либо PowerShell от имени администратора и написав там команду powercfg /h /type reduced. Чтобы вернуть размер по умолчанию, замените слово «reduced» на «full».
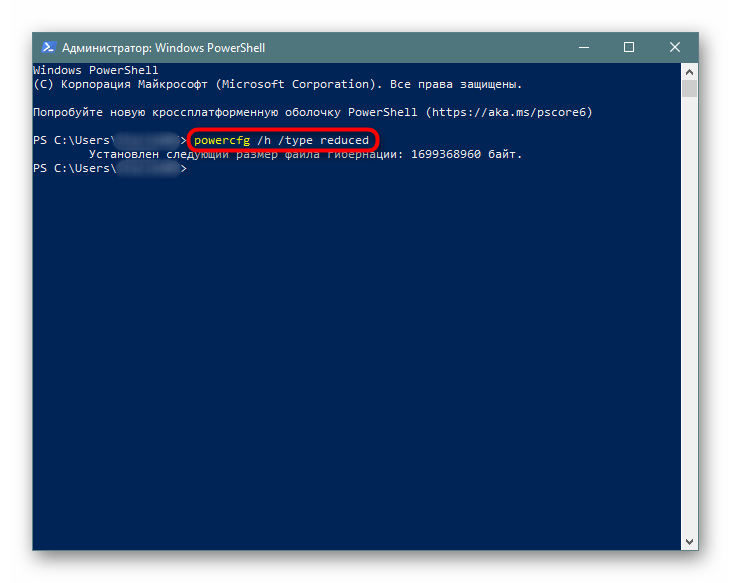
При возникновении ошибки о том, что параметр задан неверно, можно слегка видоизменить написание команды: powercfg -h -type reduced.
Иногда и этот совет не помогает, в связи с чем нужно использовать небольшой обход. Сперва пишем powercfg /h size 0, а затем powercfg /h type reduced. Так файл станет легче в 2 раза.

Шаг 4: Отключение/уменьшение файла подкачки
Этот вариант рекомендуется только тем пользователям, у кого достаточно собственной оперативной памяти в компьютере! Файл подкачки «добавляет» к установленной в ПК оперативной памяти несколько гигабайт, занимая их у жесткого диска. По аналогии с прошлым шагом здесь также создается отдельный зарезервированный файл, куда при нехватке места в ОЗУ добавляются запущенные программы, позволяя таким образом открыть больше приложений одновременно.
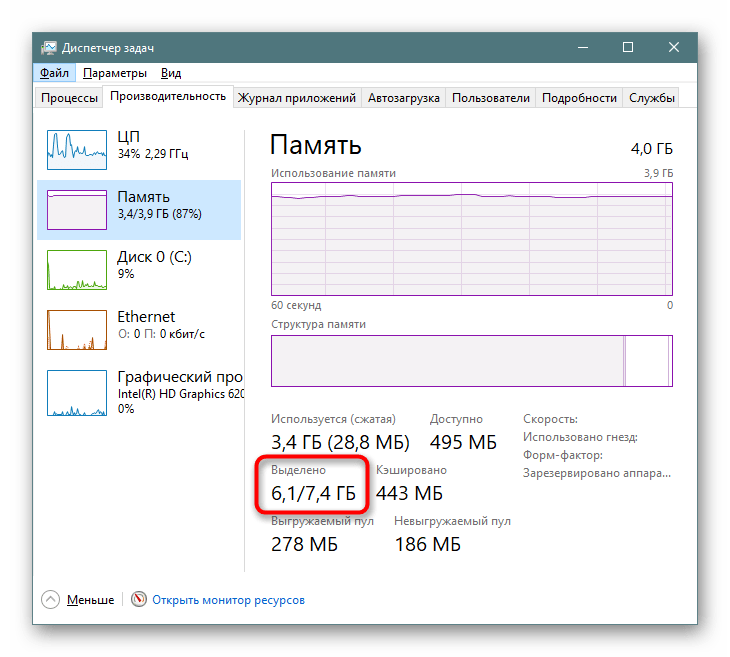
- Как правило, минимальный достаточный для комфортного использования ПК объем ОЗУ составляет 8 ГБ. Если вы знаете, что не расходуете больше, отключите подкачку — это позволит получить в среднем 1-2 ГБ или больше. Вместо этого ее объем можно уменьшить до оптимального значения. Узнать, сколько всего установлено памяти в устройстве, и сколько вы используете, легко, зайдя в «Диспетчер задач» клавишами Ctrl + Shift + Esc.
- Переключитесь на вкладку «Производительность» > «Память».
- Вверху справа отображается общее количество памяти — на нашем примере это 4 ГБ. Ниже под графиком расположена информация о том, сколько занято на текущий момент, а сколько свободно. На основании этих данных сделайте вывод, стоит ли отключать файл подкачки. Еще ниже, в пункте «Выделено» находится общий объем памяти с включенным файлом подкачки. На нашем примере добавлено 4 ГБ, если у вас эта цифра совпадает с той, что вверху справа, значит подкачка выключена и этот шаг придется пропустить. В ином случае либо уменьшите уровень выделенного места с жесткого диска, либо вовсе отключите подкачку. С этим поможет следующая статья.

Подробнее: Определяем подходящий размер файла подкачки в Windows 10
Шаг 5: Удаление точек восстановления/отключение восстановления
При активированной функции восстановления системы Виндовс и пользователь совместно создают точки, к которым при возникновении неполадок можно откатиться. Со временем их накапливается достаточное количество, из-за чего от системного раздела будет отнято значительное число гигабайт. При нормальной работе достаточно будет удалить все старые и уже неактуальные архивы, создав одну новую точку.
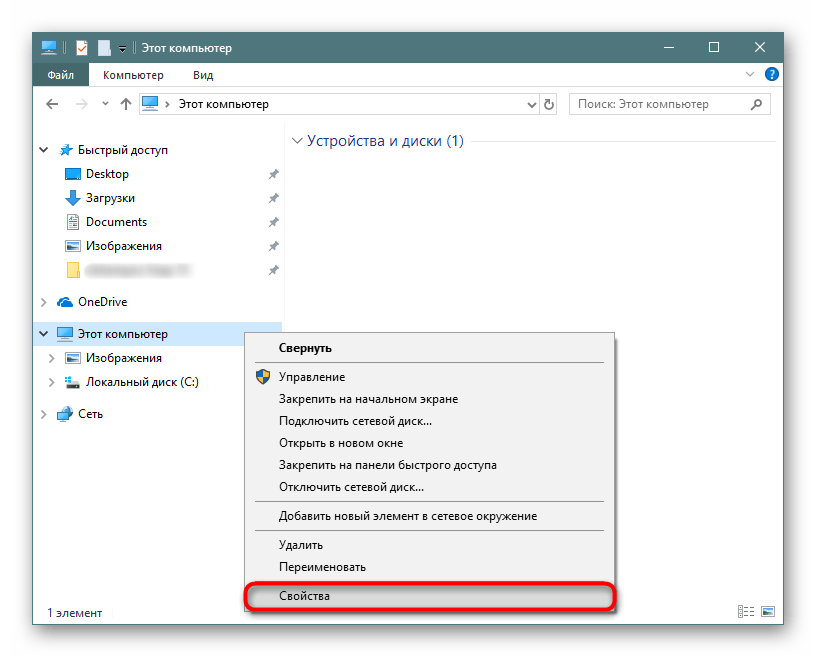
- Щелкните по «Этот компьютер» правой кнопкой мыши и выберите пункт «Свойства».
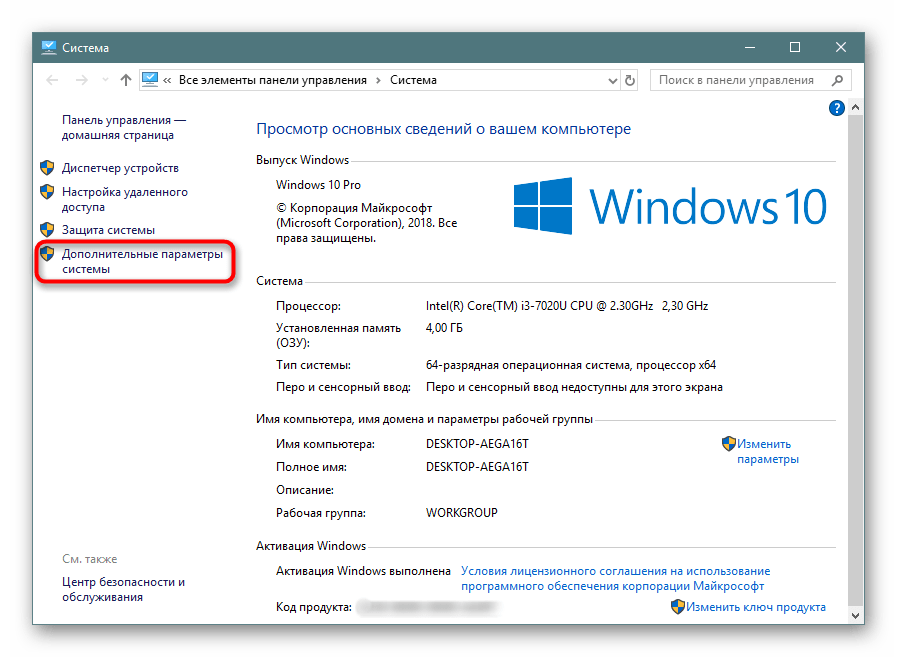
- Через панель слева перейдите в «Дополнительные параметры системы».
- Переключитесь на вкладку «Защита системы», проверьте, чтобы в списке дисков был выделен нужный (подписан как «Система») и нажмите «Настроить». Обратите внимание, если рядом с диском состояние системы «Выключено», значит сама опция восстановления отключена и доступных точек нет.

Обязательно обратите внимание, не включено ли восстановление системы для диска D и других логических дисков! В некоторых ноутбуках эта функция бывает активирована по умолчанию, отнимая до 100 ГБ пространства с системного раздела. Если напротив какого-то из дисков, восстановление которых вам не нужно, состояние «Включено», выделите его левой кнопкой мыши и воспользуйтесь следующим пунктом этой инструкции для отключения функции.
- В новом окне найдите «Удаление всех точек восстановления для этого диска» и щелкните по соответствующей кнопке. Здесь же вы можете настроить объем места на системном диске, выделяемого под хранение точек и вовсе отключить защиту системы, если вы не пользуетесь данной возможностью.
- Если решили отключить восстановление, подтвердите свое действие.

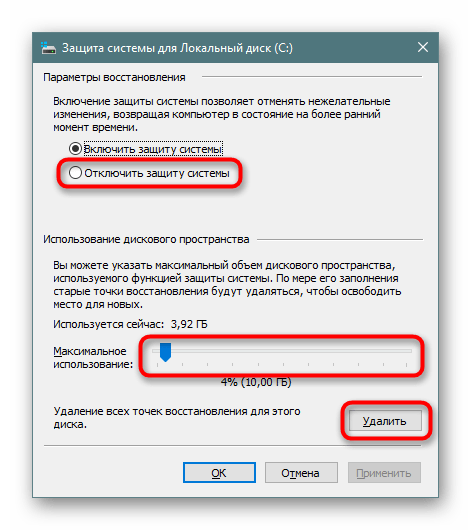

После удаления достаточно будет закрыть окно и, снова находясь на вкладке «Защита системы», нажать «Создать» для генерации свежей, актуальной точки восстановления. Если вы отключили функцию создания точек восстановления, пропустите этот шаг.
Шаг 6: Удаление папки Windows.old
После перехода с предыдущих версий Windows, а также вследствие переустановки системы с сохранением данных в корне диска С обязательно будет располагаться папка «Windows.old». В ней содержатся все те файлы, которые были перенесены из предыдущей Виндовс. Вся иерархия основных папок здесь соблюдена, поэтому юзер не составит труда просмотреть используемые адреса и восстановить нужную информацию. Все остальное можно удалить, если вы уверены, что нынешняя «десятка» работает стабильно и откатываться обратно нет необходимости. Однако Виндовс.олд нельзя удалить без предоставления на то прав. О том, как это сделать, мы уже рассказывали в другом материале.
Подробнее: Удаление Windows.old в Windows 10
Шаг 7: Очистка кэша обновлений Windows
Виндовс 10 активно обновляется, и некоторые из этих установочных файлов кэшируются в отдельную папку. Она часто занимает несколько сотен мегабайт или больше, но при этом сами файлы, как правило, не нужны, особенно если обновления устанавливаются без проблем. В связи с этим папку можно без проблем очистить.
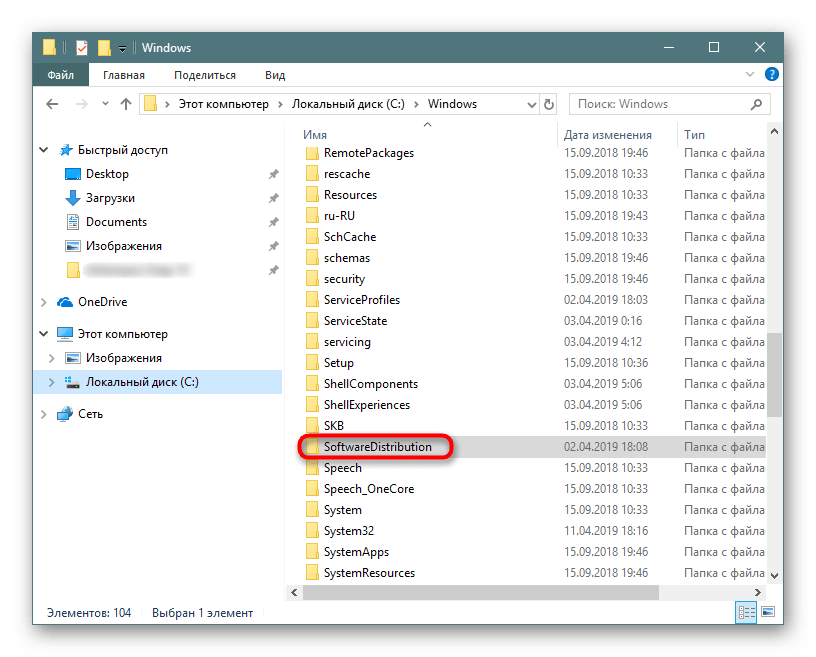
- Откройте «Проводник», перейдите в «Локальный диск (С:)» и выберите папку «Windows».
- Здесь отыщите папку «SoftwareDistribution» и зайдите туда.
- Теперь — в «Download».
- Здесь выделите все файлы через Ctrl + A и удалите, нажав Delete на клавиатуре либо через ПКМ вызвав контекстное меню и выбрав «Удалить».
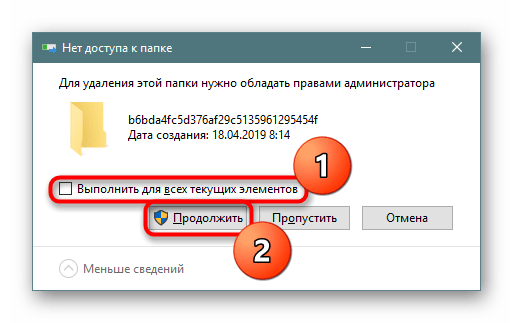
- Поскольку чтобы их стереть, необходимы полномочия администратора, подтвердите свое действие кнопкой «Продолжить», предварительно установив галочку рядом с пунктом, подтверждающим применение удаления не к одному файлу, а ко всем.
- Если в каких-то ситуациях не получается очистить папку, сперва отключите службу обновлений Виндовс, а после окончания удаления включите ее снова. О том, как это сделать, написано в Способе 3 статьи по ссылке ниже.


Подробнее: Отключение обновлений в ОС Windows 10
Не забывайте, что все файлы попадают в Корзину, которую тоже нужно очищать после удаления всех мусорных файлов.
Кроме того, стоит проверить объем папки «WinSxS», которая хранит себе копии оригинальных файлов после установки системных обновлений. Она, как и «SoftwareDistribution», расположена по адресу C:\Windows и со временем может занимать несколько десятков ГБ. Очищать ее таким же методом (просто удалив все), нельзя. О грамотной очистке мы уже рассказывали ранее, предлагаем прочитать эту статью, щелкнув по ссылке ниже.
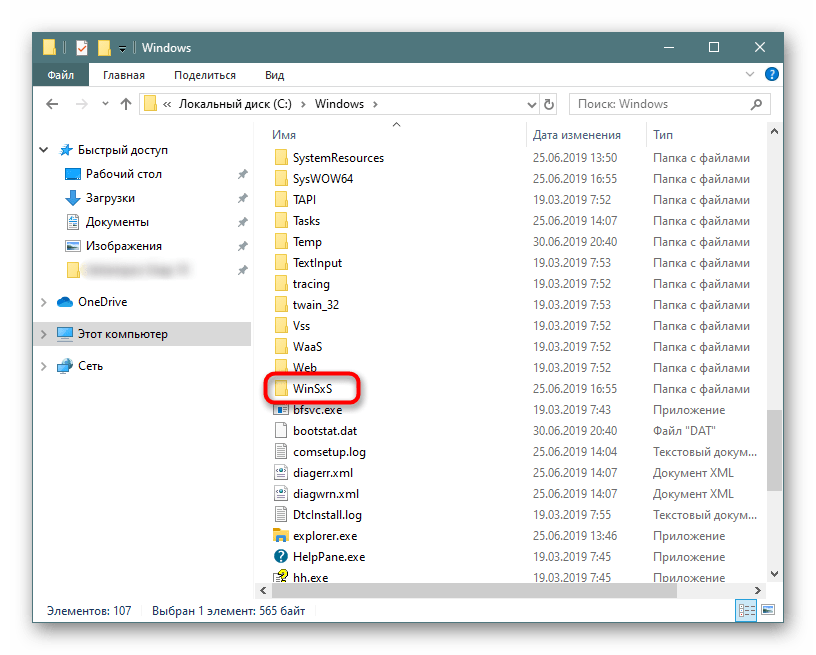
Подробнее: Способы очистки папки WinSxS в Windows 10
Шаг 8: Отключение облачной синхронизации
Поскольку сейчас очень популярны облачные хранилища, многие люди пользуются ими, дополнительно устанавливая десктопный клиент на компьютер. У обладателей Windows 10 по умолчанию уже присутствует OneDrive, дополнительно доступны для установки Яндекс.Диск, Google Drive, Dropbox и другие клиенты. Обязательно проверьте эти папки — если в них есть синхронизированная информация, которая вам нужна только в облаке, а не на ПК, произведите выборочное отключение их синхронизации с ПК.
Шаг 9: Анализ дисков
Бывает и так, что все приведенные выше рекомендации не дали ощутимого результата — некоторое количество гигабайт все же удалось восстановить, но определенное количество все равно чем-то занято или утеряно. Занимать ценное пространство могут как системные файлы, зачастую оказывающиеся ненужными, так и то, что вы сами когда-то скачали или сохранили и спустя время забыли про это.
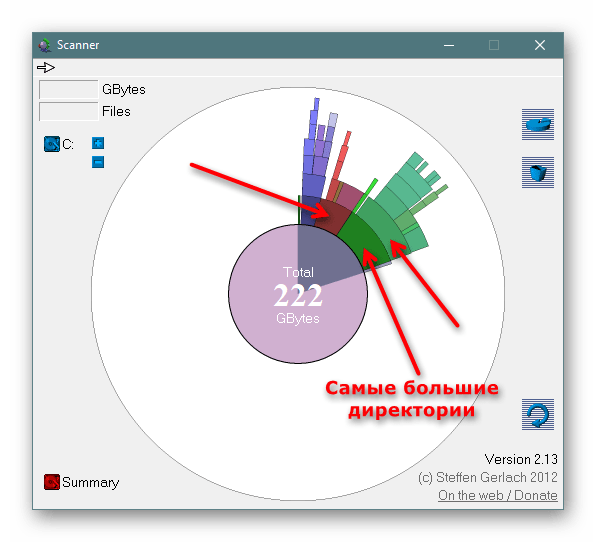
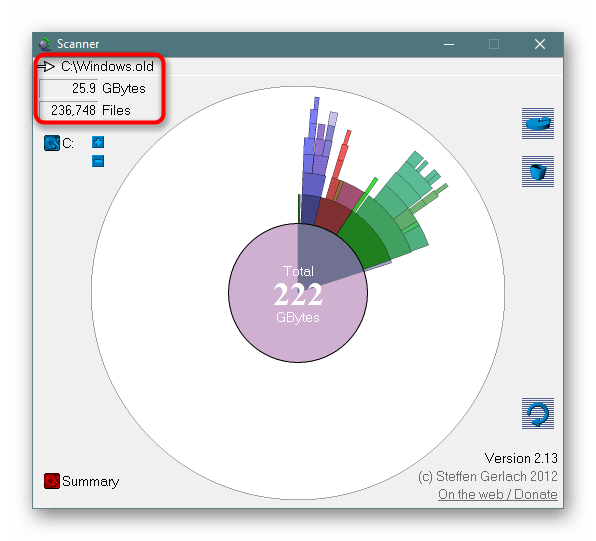
Сперва воспользуемся специальными утилитами, которые помогают наглядно посмотреть, куда же распределились гигабайты пространства более наглядно, чем Проводник Windows. Воспользуйтесь утилитой Scanner или JWIZARD, каждая из которых поможет в этом деле.
Запускайте эти программы с повышенными правами (правый клик мышки по ярлыку — «Запуск от имени администратора»)!
JWIZARD Cleaner
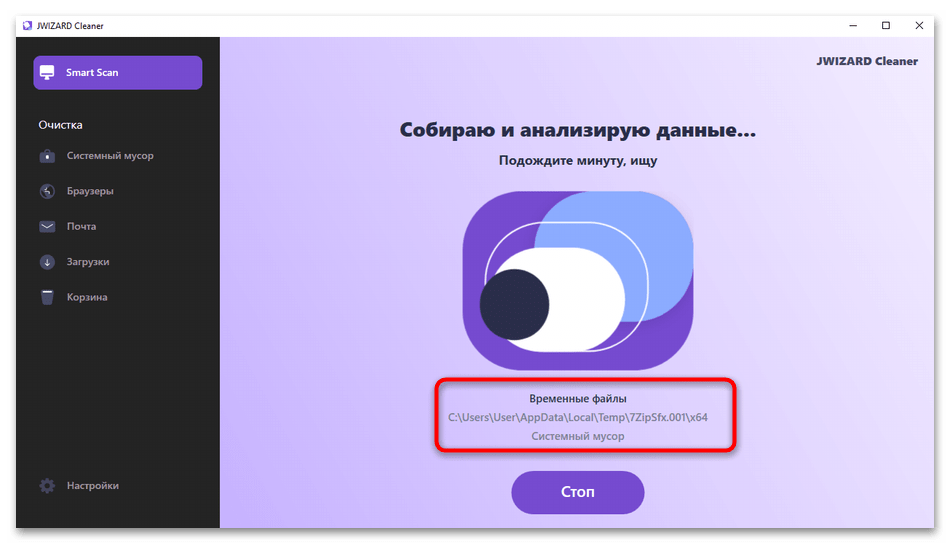
Известные программы по типу CleanMyMax и CCleaner сейчас могут быть недоступны пользователям из России, из-за чего приходится искать альтернативы. В этот раз предлагаем обратиться к программе JWIZARD Cleaner — эффективному решению для очистки ПК от мусора. Она удаляет ненужные файлы, при этом защищая вашу пользовательскую информацию и не трогая ничего лишнего. Весь процесс осуществляется в один клик благодаря функции «Smart Scan», но для всех желающих есть и продвинутые режимы работы.
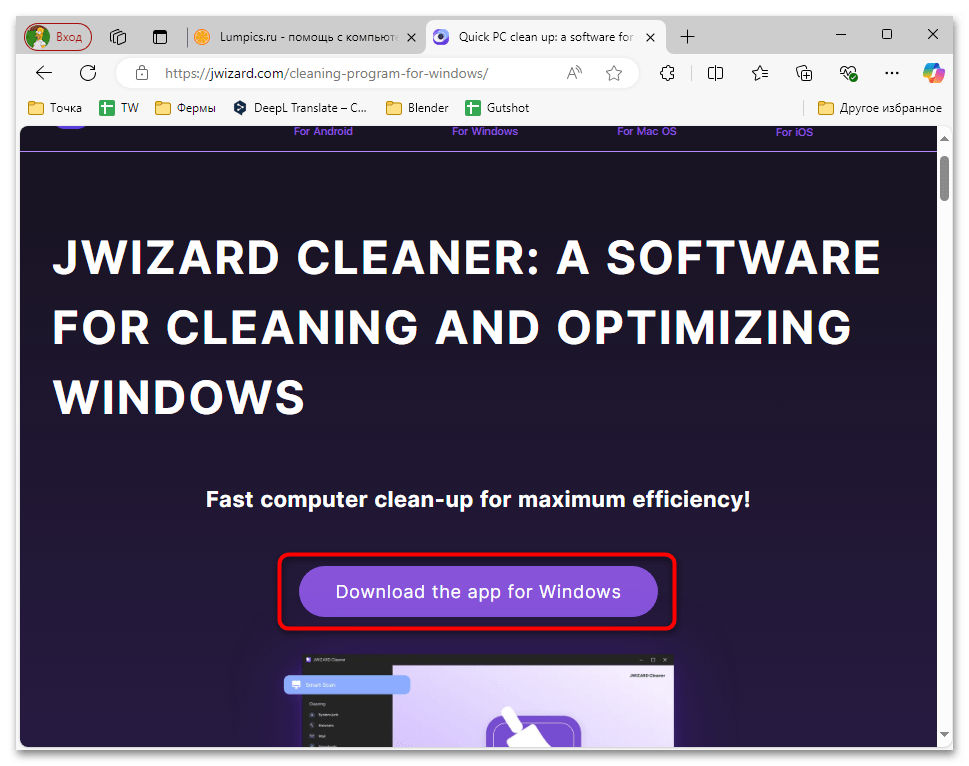
Скачать JWIZARD Cleaner с официального сайта
- Программу можно скачать с официального сайта, затем инсталлировать через полученный EXE-файл. Интерфейс автоматически будет переведен на русский язык, поэтому с пониманием в дальнейшем управлении софтом не должно возникнуть никаких проблем.
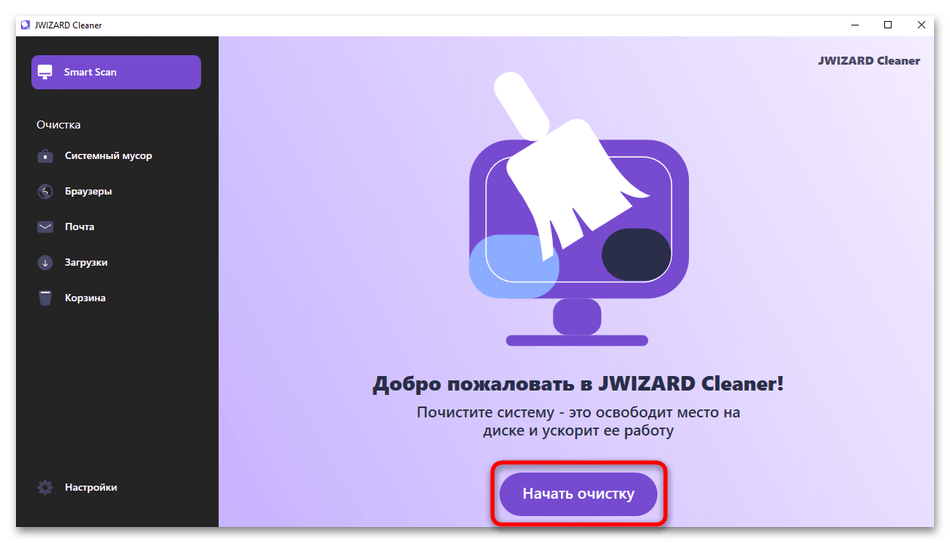
- Как уже было сказано выше, через JWIZARD Cleaner вы можете почистить ПК от мусора и освободить диск C в один клик. Для этого нажмите кнопку «Начать очистку».
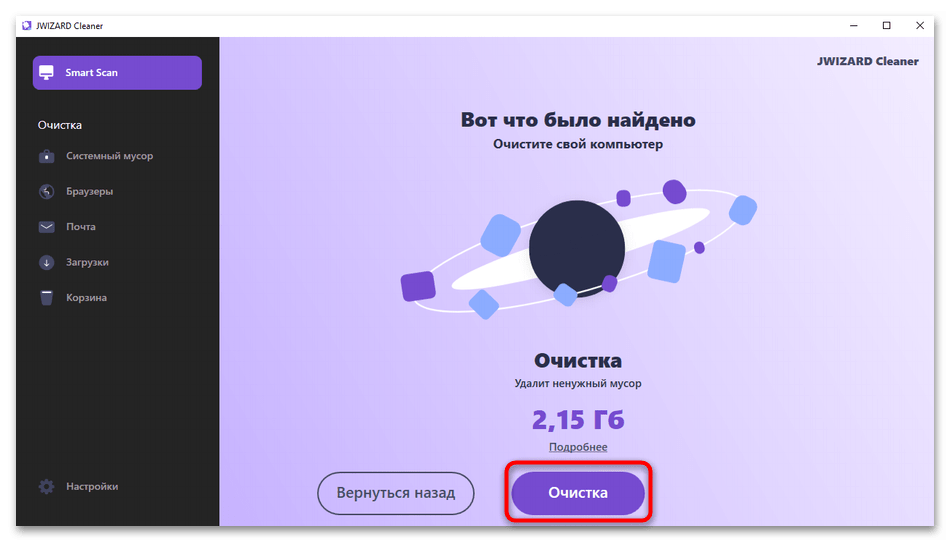
- Программа выявит ненужные файлы и различный системный мусор. Весь процесс сканирования не займет больше минуты.
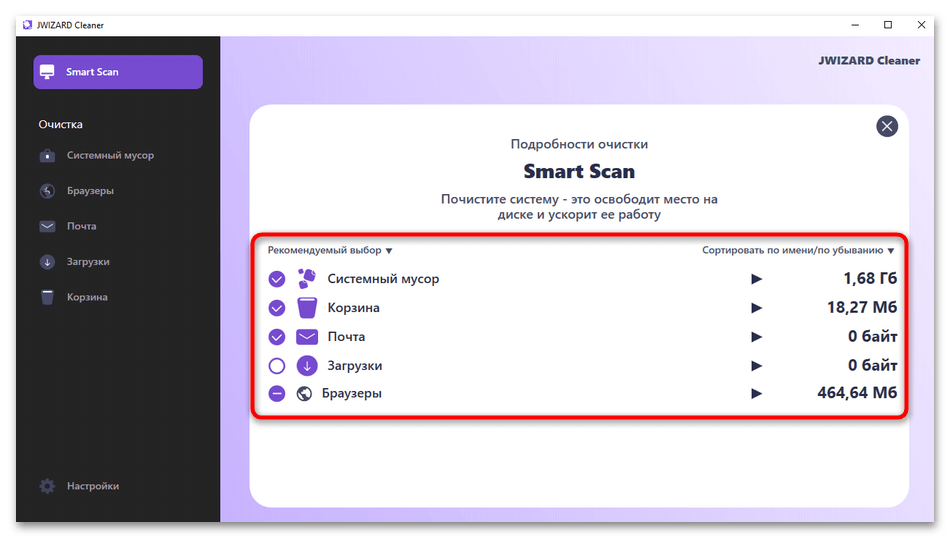
- Вы можете сразу удалить ненужные файлы, не беспокоясь о том, что вместе с ними будут удалены какие-то важные данные, либо же нажмите «Подробнее», чтобы узнать, сколько разного мусора удалось обнаружить JWIZARD Cleaner.
- Вы видите, что софт проверяет хранилища во временных файлах Windows, очищает корзину, кеш почты, папку с загрузками и ненужные данные используемых браузеров.
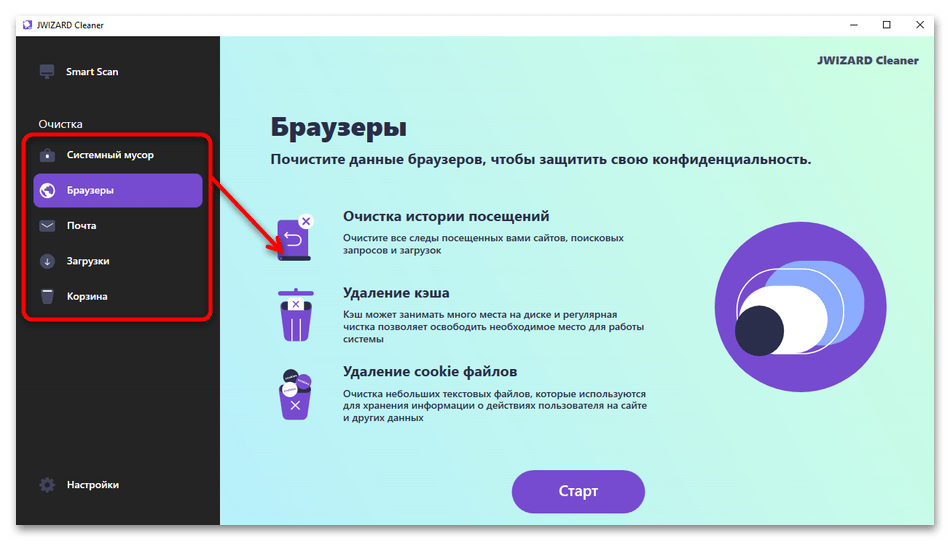
- Все это можно удалить и вручную, если вы заинтересованы в гибком управлении. Для этого выберите один из разделов в «Очистка», ознакомьтесь с принципами работы инструмента и нажмите «Старт», чтобы начать анализ.
Scanner
Эта небольшая программа заточена именно под анализ накопителей, и делает это довольно качественно.
Скачать Scanner с официального сайта
- После непродолжительного сканирования вы увидите визуальное распределение пространства. Чем больше выглядит конкретный блок, тем больше он занимает пространства на диске С.
- Наводя курсором мышки на любой такой блок, слева вверху вы сможете увидеть путь к папке, количество занимаемых ей гигабайт и число файлов, которые в ней содержатся.
- Исследуя области таким способом, вы сможете дойти до самого большого файла и узнать, что именно занимает ценные гигабайты. В качестве альтернативы можете воспользоваться SpaceSniffer либо WinDirStat, не забывая о запуске от имени администратора.
Шаг 10: Проверка на вирусы
Банальный донельзя совет, который при этом может оказаться кому-то действительно эффективным. Нередко вирусы действуют таким способом, что попадая в компьютер, начинают бесконтрольно создавать копии определенных файлов, например, изображений. Их количество может переходить границу в тысячи копий, что неизбежно становится заметным при проверке свободного пространства.
Даже если вы не ощущаете внешне никаких признаков наличия вируса, обязательно просканируйте свой компьютер встроенным или сторонним защитником. Другой наш автор подготовил статью, как можно отыскать в своей системе опасность. Не забывайте, что всегда лучше проверить компьютер как минимум двумя разными программами, потому что нередки случаи, когда одна утилита находит проблему там, где вторая ее не видит.
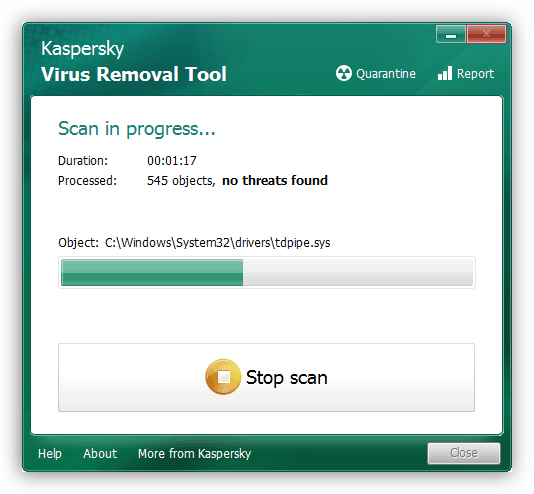
Подробнее: Борьба с компьютерными вирусами
Важно понимать, что даже после удаления вируса следы его деятельности могут остаться на ПК. Папки с размноженным контентом могут обнаружиться в совершенно случайном месте среди системных файлов. Поэтому не лишним будет пройтись по основным папкам диска C, а также воспользоваться Шагом 9, который поможет понять, чего именно в системе очень много. CCleaner упростит поиск по категориям (так, вы сможете быстрее найти картинки/видео/аудио, которые вирусы размножают в огромных количествах), а Scanner просто будет показывать большие папки, что также поможет добраться до истины. Однако не забывайте, что вы можете увидеть только результаты деятельности вируса, а сами же вредоносные программы, такие как руткиты, не удастся обнаружить ни такими программами, ни файловыми менеджерами!
Дополнительно можете проверить системный раздел на наличие пользовательских файлов-дубликатов, например, программой Duplicate File Detector или любым его аналогом.
Шаг 11: Проверка жесткого диска на ошибки
Из-за ошибок в файловой системе может происходить некорректный подсчет свободного пространства, поэтому при отсутствии результата от выполненных рекомендаций выше попробуйте осуществить проверку накопителя с исправлением найденных ошибок. В другой нашей статье этот процесс был подробно рассмотрен. Советуем обратить внимание на утилиту CHKDSK, о которой было рассказано в отдельном подзаголовке Способа 2.
Подробнее: Выполнение диагностики жесткого диска в Windows 10
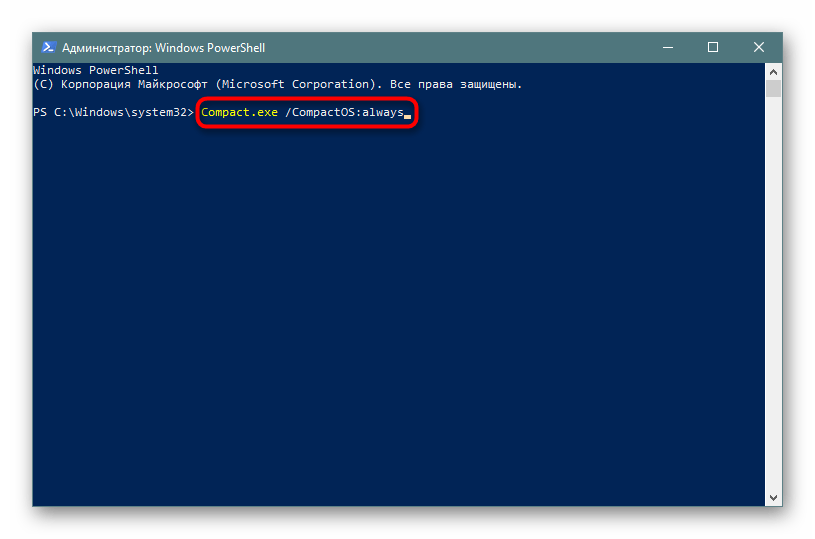
Шаг 12: Включение Compact OS
Этот вариант рекомендуется лишь для ограниченного количества пользователей — преимущественно для тех, кто пользуется твердотельными накопителями с малым объемом (например, eMMC-память или SSD с минимальным количеством ГБ). Хотя предустановленная Win 10 обычно уже имеет включенный режим Компакт ОС, он вполне может понадобиться и там, где объем был изначально приемлемым, но сильно сократился после установки объемных программ.
Инструмент Compact OS, встроенный в «десятку», сжимает системные файлы, разжимая их каждый раз, когда к ним происходит обращение. Обычно это отрицательно сказывается на малопроизводительных устройствах, поскольку увеличится нагрузка на процессор и ОЗУ. Вы всегда можете отключить этот режим, предварительно освободив место, так как после сжатия будет освобождено от 2 и более гигабайт пространства.
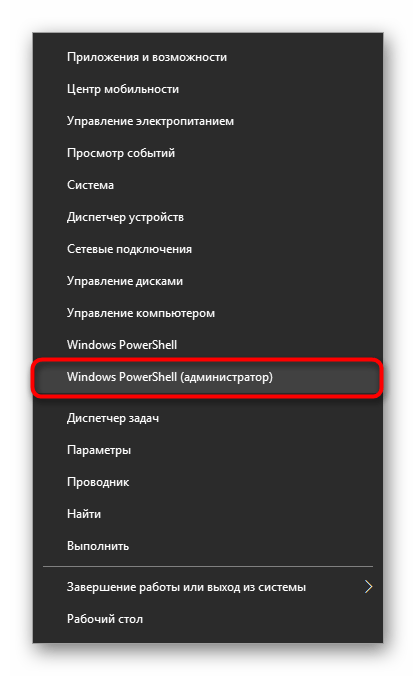
- Откройте «Командную строку» или «PowerShell» с правами администратора. Это делается кликом правой кнопкой мыши по «Пуск».
- Впишите строчку
Compact.exe /CompactOS:alwaysи нажмите Enter. - Процедура сжатия продлится 10-20 минут, по окончании чего будет выведен объем в байтах, на который была сжата система.
- Если вы вдруг чувствуете, что производительность ПК ощутимо снизилась, снова откройте консоль и введите туда
Compact.exe /CompactOS:never. Компьютер в обоих случаях перезагружать не нужно.
Дополнительная информация
Некоторые юзеры замечают несоответствие между занятым местом в показателях Windows. Если зайти в корень диска C, выделить все папки и файлы (пусть даже включая скрытые) и вызвать их «Свойства» через ПКМ, а затем также кликнуть по «Локальному диску (C:)» правой кнопкой мыши и зайти в его «Свойства», видно, что количество всех файлов, хранимых на диске C, уступает тому объему, что показано в свойствах локального диска.

Наглядный пример такого расхождения вы видите ниже.

На самом деле, это нормальное явление, поскольку такой подсчет и сравнение в целом не являются правильными. В системе довольно много папок, к которым Проводник, запускаемый от имени обычного пользователя не дает доступа.
Ввиду этого не удается даже просто подсчитать объем информации, которая в них хранится, так как через «Свойства» отображается пустая папка.
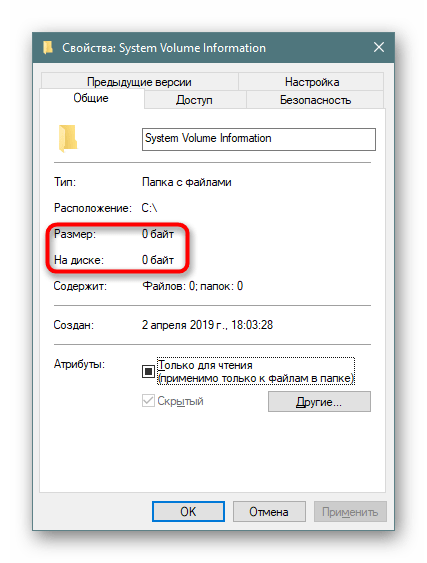
Альтернативные файловые менеджеры типа Total Commander могут показать реальный объем данных папок, поэтому если вам необходимо узнать их действительный размер, используйте данное ПО для анализа.
Читайте также:
Total Commander: включение видимости скрытых файлов
Лучшие бесплатные аналоги файлового менеджера Total Commander
Заключение
Несмотря на объем статьи, мы рассмотрели лишь общие принципы освобождения пространства на диске C, поскольку во многих случаях исчезновение свободного пространства носит частный характер, который каждому пользователю необходимо искать самостоятельно, опираясь на наши советы, собственную логику и внимательность.
Дополнительно рекомендуем пользоваться облачными хранилищами, куда можно помещать в среднем по 10 ГБ бесплатно. В интегрированном в Windows 10 хранилище OneDrive от Microsoft также есть функция «Файлы по запросу», скачивающая выбранные пользовательские файлы тогда, когда это необходимо. Однако не забывайте об их правильной настройке (подробнее об этом написано в Шаге 8).
Пользователям, испробовавшим все, предлагаем попытаться разобраться с консольной утилитой fsutil, используя справочные средства интернета или переустановить Windows.
Наша группа в TelegramПолезные советы и помощь