
При проверке жесткого диска или SSD на ошибки в свойствах диска, возможны два основных исхода: «Диск успешно проверен. Ошибки не обнаружены» и «Восстановить этот диск. Система Windows обнаружила на этом диске ошибки, которые необходимо исправить. Закройте это диалоговое окно и восстановите диск».
Во втором случае начинающие пользователи могут не знать, что именно следует сделать, чтобы восстановить диск при обнаруженных ошибках. В этой инструкции — подробно об этом.
Восстановление диска после проверки на вкладке «Сервис» в свойствах диска
При использовании свойств диска в Windows для проверки его состояния в случае, если дело касается системного диска, автоматическое исправление ошибок не производится, вам лишь сообщают о них: «Система Windows обнаружила на этом диске ошибки».
Предполагается, что вы вручную исправите эти ошибки и «восстановите» диск. Учитывайте, что в случае неисправности диска или проблем с питанием, описанные далее действия, особенно 5-й шаг, могут усугубить ситуацию.
Исправление ошибок можно выполнить в командной строке:
- Запустите командную строку, Windows PowerShell или Терминал Windows от имени администратора. В Windows 11 и 10 это можно сделать в меню по правому клику на кнопке «Пуск».
- Введите команду (при необходимости заменив букву диска C на нужную)
chkdsk C: /f
и нажмите Enter.
- Если речь идёт о диске с данными, проверка начнётся сразу же, для системного диска вам будет предложено выполнить проверку после перезагрузки. Введите Y и нажмите Enter, после чего перезагрузите компьютер.

- После перезагрузки вам будет предложено нажать любую клавишу, чтобы прервать проверку (не нажимайте), после чего начнётся проверка диска, а затем загрузится Windows. Обычно этих действий хватает, чтобы исправить ошибку.

- Если ошибка сохранилась, тем же способом используйте команду
chkdsk C: /r
но учитывайте, что её выполнение займёт много времени, в случае ноутбука — подключите его к источнику питания.


В некоторых случаях проверка диска после перезагрузки не начинается, а Windows 11/10 запускается как обычно. В такой ситуации вы можете:
- Используя меню завершения работы, удерживая клавишу Shift, нажать кнопку «Перезагрузка».
- В результате вы попадёте в среду восстановления Windows. Перейдите в раздел «Поиск и устранение неисправностей» — «Дополнительные параметры» — «Командная строка».

- Используйте команды
chkdsk C: /f
и, если потребуется,
chkdsk C: /r
для проверки диска.

В ситуации, когда после исправления ошибок они появляются вновь, либо исправление выполнить не удаётся, есть вероятность что причиной является износ диска (можно попробовать проверить состояние в CrystalDiskInfo), проблемы с его подключением (проверить подключение кабелей для SATA дисков, заменить кабели) или питанием.
Также на эту тему могут быть полезными статьи: Программы для проверки жесткого диска на ошибки, Как проверить SSD на ошибки.
Readers help support Windows Report. We may get a commission if you buy through our links.
Read our disclosure page to find out how can you help Windows Report sustain the editorial team. Read more
Hard drives are susceptible to occasional failures, some leading to a total hard disk crash and, subsequently, costly data losses. One prominent issue is the Windows found errors on this drive that need to be repaired warning message.
And just like the fatal error external hard drive problem, it’s essential to act before the disk suffers severe damage. So, to help you get past the error, we have prepared the solutions to help you solve this issue in this guide.
Why does Windows found errors on this drive message appear?
A series of factors can cause the Windows found errors on this drive warning message. Below are some of the prevalent causes:
- Presence of corrupt files: Sometimes, you might we found errors on a drive to repair these errors and prevent loss of data prompt on your PC because of corrupt files. You need to eliminate these files to solve the issue.
- Corrupt disk sectors: In some cases, this issue can be caused by bad disk sectors. The solution is to repair the corrupt sectors using the Check Disk utility.
How do I fix the Windows found errors on this drive that need to be repaired?
1. Run the CHKDSK utility
- Press the Windows key, type cmd, and click Run as administrator under Command Prompt.

- Type the command (replace c with your drive letter) below and hit Enter to run it:
chkdsk c: /f /r
- Finally, press Y when prompted and restart your PC to start the process.


The bad disk sector is the most prominent cause of this issue. Thankfully, the built-in CHKDSK utility on Windows PCs can fix this.
2. Use PowerShell
- Press the Windows key + X and select Windows PowerShell (Admin).
- Type the command (replace C with your drive letter) below and hit Enter to run it:
Repair-Volume C –Scan
- If any error is detected, run the command below:
Repair-Volume C –OfflineScanAndFix
- Finally, restart the PC and check if the problem has been fixed.


Another built-in tool you can use when you get the Windows found errors on this drive warning message is the repair feature. Running the command, as shown above, should fix the issue.
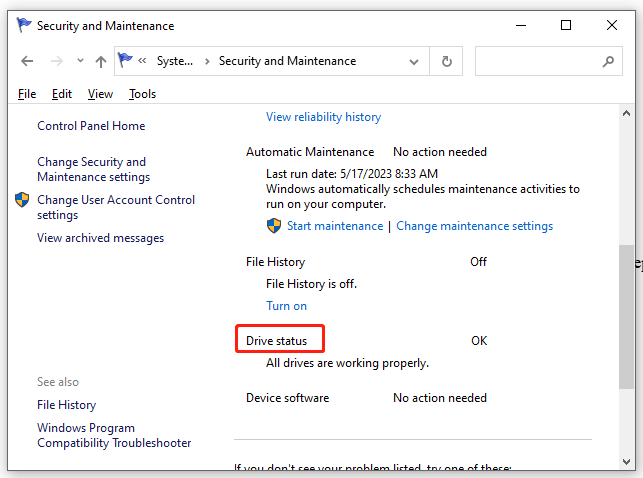
3. Security and Maintenance Check
- Press the Windows key, type control, and select Control Panel.
- Choose System and Security.

- Now, select the Security and Maintenance option.
- Click to expand the Maintenance.
- Finally, select the Drive status option and check if any hard drive issues are reported.


The Windows 10 Security and Maintenance section keeps you updated on issues affecting your computer’s general health.
It can thus help you identify problems with the hard drive hardware and software as long as your PC is booting. In addition, this helps detect the potential causes of the Windows found errors on this drive error message.
- How to Fix Errors Related to the LibGLESv2.dll File
- Omen Gaming Hub Crashing PC: 6 Ways to Fix it
- ERROR_CARDBUS_NOT_SUPPORTED: 6 Easy Ways to Fix This BSoD
4. Using your installation disk
- Create and insert a Windows 10 installation disc/USB flash drive
- Boot your PC from the bootable drive. If your PC does not boot from the drive, you must enter BIOS to change the order.
- Now, select your Language and other information and click Next.

- Select Repair your computer in the bottom left corner.

- Choose the Troubleshoot option under Choose an option.

- Next, click Advanced Options.

- Now, select the Command Prompt option.

- Finally, type the command below and hit Enter to run it:
chkdsk c: /f /r


If you cannot boot into your PC because of the Windows found errors on this drive warning message, the easiest way to fix it is to use an installation media. This will allow you to boot from it and repair your PC.
For hard drive errors, once repaired, you can revert to previous versions to and restore but if you get the there are no previous versions available, we know how to get your backup.
With this, we can conclude this detailed guide. All you have to do now is follow the instructions carefully, and the issue should be fixed.
If you need a list of the best hard drive repair tools, check our guide for the top options. Keep in mind that some errors, such as Unable to determine volume version and state are indicators of a failing drive, and they need to be fixed immediately.
Have you had problems with Word not going to the next page? The highlighted guide will help you fix that.
Let us know the solution that helped you fix this issue in the comments below.
Madalina Dinita
Networking & Security Specialist
Madalina has been a Windows fan ever since she got her hands on her first Windows XP computer.
She is interested in all things technology, especially emerging technologies — AI and DNA computing in particular.
Prior to joining the WindowsReport team, she worked in the corporate world for a number of years.
-
Home
-
News
- How to Fix Windows Found Errors on This Drive?
By Aurelie | Follow |
Last Updated
Windows 10 found errors on this drive appears when there are some bad sectors or corrupted system files on your computer. Therefore, it is essential to take some measures before the disk suffers from severe damage. With the help of solutions on MiniTool Website, you can fix this issue easily.
We Found Errors on This Drive
If are prompted by the Windows found errors on this drive error message, it might due to the bad sectors and faulty system files. The complete error message is:
Windows found errors on this drive that need to be repaired. Close this dialog box and then repair the drive.
Even occasional hard disk failures can trigger severe damage or costly data loss. Therefore, you must follow these guidelines carefully and back up your crucial data in advance.
Suggestion: Back up the Data on the Drive Before Proceeding
As mentioned earlier, you need to back up your important data beforehand. However, what should you choose among multiple backup software in the market? Here, a reliable backup software – MiniTool ShadowMaker is more favorable by most Windows users.
This tool offers a variety of backup services for you to choose from, including backing up files, folders, systems, disks, and partitions. Here’s how to create a file backup with this tool:
Step 1. Run this freeware and click on Keep Trial.
MiniTool ShadowMaker TrialClick to Download100%Clean & Safe
Step 2. In the Backup functional page, go to SOURCE > Folders and Files to select the important files on the disk that you are dealing with. In DESTINATION, you can choose an external hard drive or USB flash drive as a destination path for the backup task.
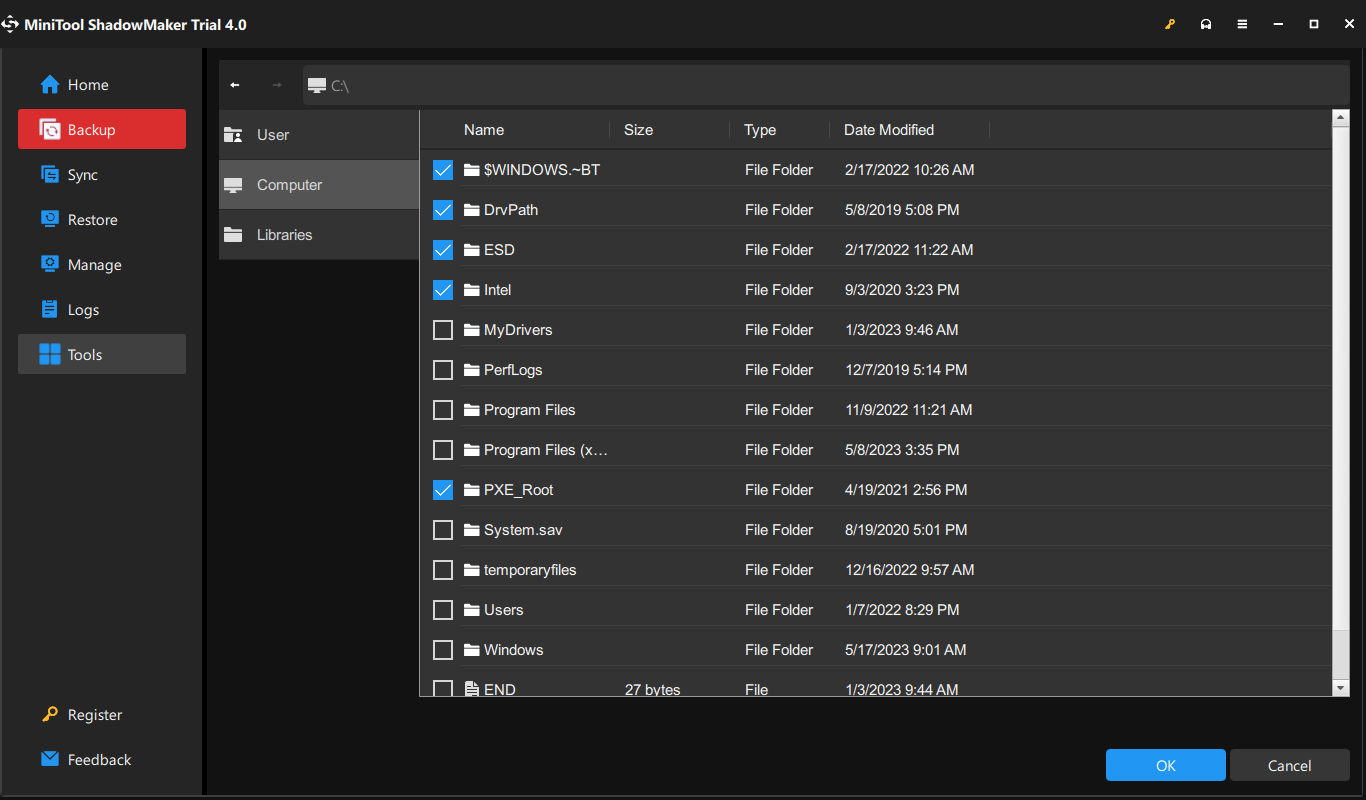
Step 3. Click on Back Up Now to start the process right now.
How to Fix Windows Found Errors on This Drive?
Fix 1: Run CHKDSK
To check and fix bad sectors on your PC, you can use the inbuilt utility – CHKDSK.
Step 1. Run Command Prompt with administrative rights.
Step 2. Type the following command in the command window and hit Enter. Replace c with your target drive letter.
chkdsk c: /f /r
Step 3. After the process is done, reboot your system.
Fix 2: Check Security and Maintenance
You can check your computer’s healthy in the Security and Maintenance screen. As long as you computer is booting, it can help you to identify issues with the hardware and software.
Step 1. Type control panel in the search bar and hit Enter.
Step 2. Go to System and Security > Security and Maintenance > expand Maintenance to check Drive status.
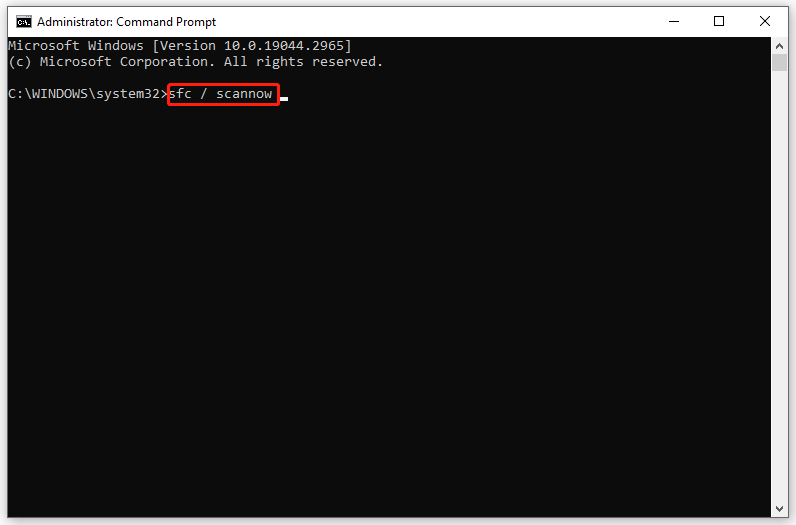
Fix 3: Run SFC & DISM
The presence of corrupted system files can also be a possible culprit of repair this drive Windows found errors Windows 10. Follow these steps to repair them:
Step 1. Run Command Prompt as an administrator,
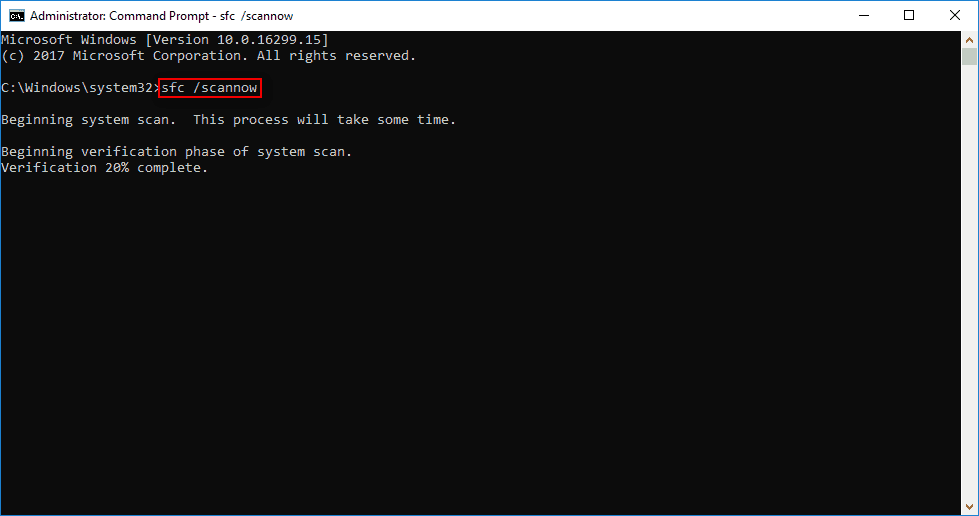
Step 2. In the command window, type sfc / scannow and hit Enter.
Step 3. After the process is complete, restart your system, launch an elevated Command Prompt and then run the following command one by one:
DISM.exe /Online /cleanup-image /scanhealth
DISM.exe /Online /cleanup-image /restorehealth
DISM /Online /cleanup-Image /startcomponentcleanup
Step 4. Restart your PC.
Fix 4: Use PowerShell
When encountering the Windows found errors on this drive warning message, you can use the repair feature in Windows PowerShell.
Step 1. Press Win + X to open the Quick menu and select Windows PowerShell (Admin).
Step 2. Type Repair-Volume C –Scan and hit Enter. Replace C with your drive letter.

Step 3. If an error is detected, run this command: Repair-Volume C –OfflineScanAndFix.
Step 4. Restart your computer to see if Windows found errors on this drive is fixed.
About The Author
Position: Columnist
Aurelie is a passionate soul who always enjoys researching & writing articles and solutions to help others. Her posts mainly cover topics related to games, data backup & recovery, file sync and so on. Apart from writing, her primary interests include reading novels and poems, travelling and listening to country music.
Are you getting error “Restart To Repair Drive Errors” on your Windows 10? Don’t worry this tutorial will give you all possible solutions to fix the error without losing your data. And the method to back up your data before rebooting.
When running into some problems on the computer, users tend to try to fix it by restarting the PC. Similarly, when any problems are found by the error checking tool (whose main function is scanning and repairing drive), the system will suggest you to restart to repair drive errors.
As you can see from the above picture, the Restart to repair drive errors (Click to restart your PC) message will appear in the action centre on a Windows 10 computer. What does this error mean exactly? To be precise, this error indicates the following things:
Windows found errors on this drive that need to be repaired.
You need to restart your PC to repair drive errors found by the built-in Windows checking tool.
You are not able to access your data until you restart PC after repairing the drive.
The Restart Repair Error Is Annoying
If you do click to reboot your computer, you may get the following result:
The problem has been fixed automatically by the system after reboot.
The problem persists; you are still asked to do a restart for fixing the drive errors.
The second result may drive you crazy (see above picture), right? Undeniably, the Windows disk errors are quite a common thing; that’s why there’s a disk diagnostic tool built in all the Windows systems to scan and fix disk errors (check the integrity of your hard disk and fix various errors like file system error). Yet, it becomes annoying and equally devastating when the problems can’t be fixed after you have done what Windows suggests you do – restart your computer.
Taking a look at the error again, you’ll find that your data on the target drive may get lost since Windows says To prevent data loss, repair this drive now. On this occasion, I advise you to recover data from the drive that needs to be repaired after you have tried a reboot and failed. Then, you may try the feasible methods that’ll be mentioned later in this article to fix the reboot to repair drive error.
How to Recover Data When Windows Asks You to Repair This Drive
Since Windows won’t allow you to access the drive until the repair this drive error has been fixed, you can’t copy files from it to keep data safe. In this case, you should recover data from the inaccessible drive with reliable data recovery software. Another way to ensure data security is to make a data backup with powerful backup software.
In the following content, I’ll mainly focus on telling you how to recover data with the amazing recovery tool of MiniTool power data recovery.
Our readers get a special 20% discount coupon code for MiniTool power data recovery. Just visit our MiniTool discount coupon page for the coupon code.
Data Recovery Steps
Step one: Get the setup program of a reliable tool – download it properly. Then, click on the setup application to run the installation process and follow the instructions to complete installing the tool.
Step two: run the recovery tool and you’ll be brought to its main window after a quick disk loading process.
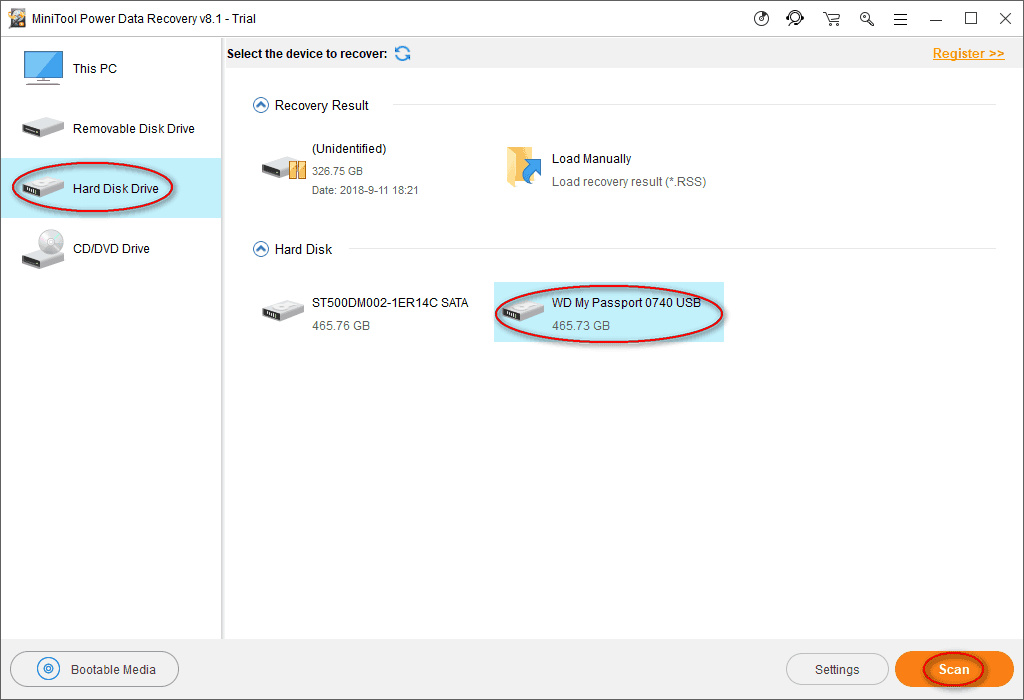
Step three: you’ll see four options located on the left side of the software main window: This PC, Removable Disk Drive, Hard Disk Drive, and CD/DVD Drive. Please select the drive that is most suitable for your case.
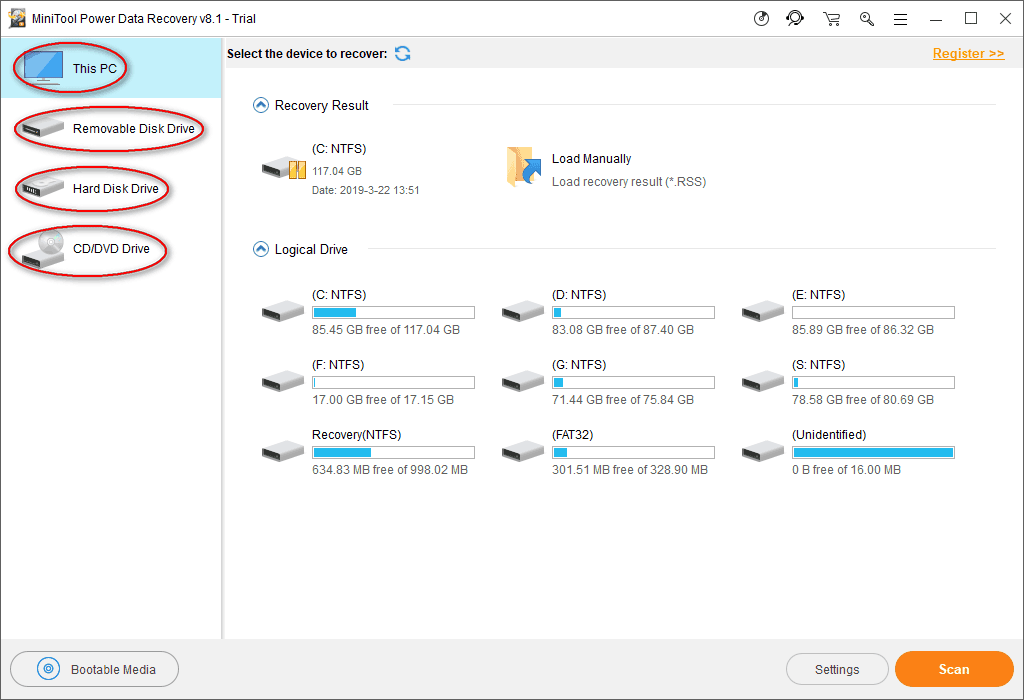
Step four: find the drive on which the restart to repair drive error appears. Then, double click on it or single click on the Scan button to start the drive scanning process (it will be initialized immediately after clicking).
Step five: you’ll see a progress bar now which indicates the progress of the scan.
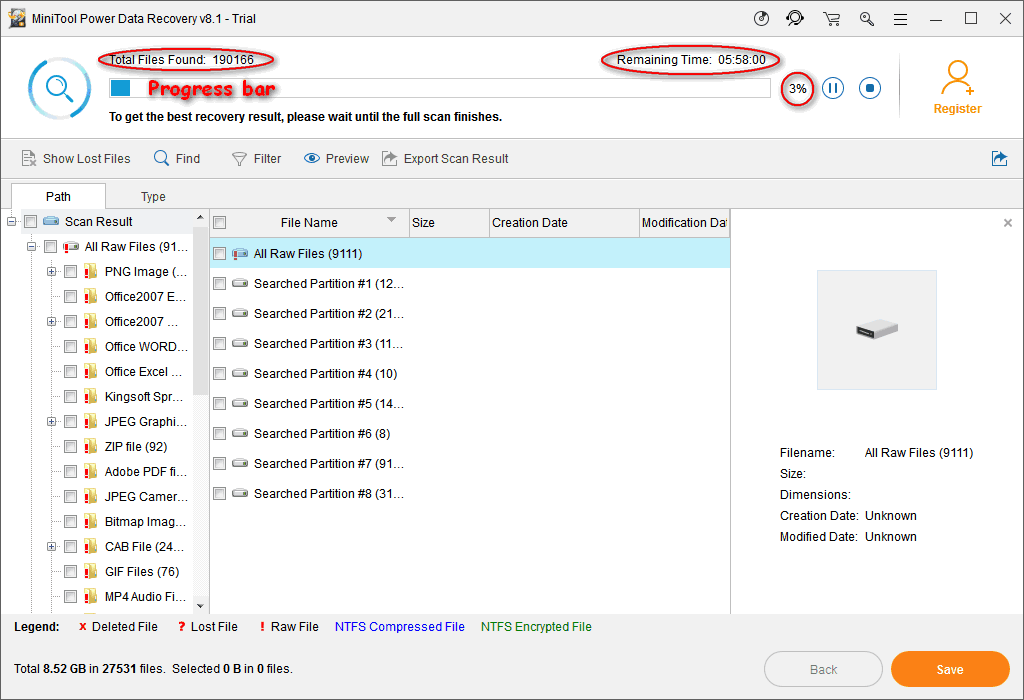
Step six: now, you can expand the found partitions and folders to see whether your needed files are contained.
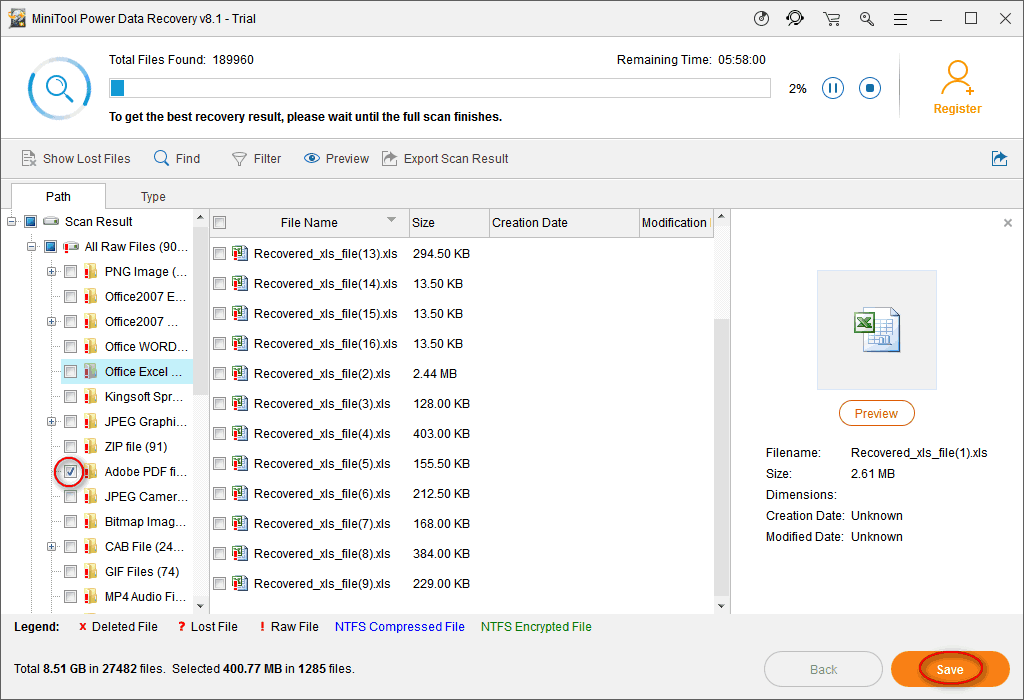
- If all the important data you need on the problematic drive have been found, you should end the scan and check them to recover by clicking on the Save button.
- If there are still some files not found yet, you should wait for the scan and check all the items you need to recover when they have been finally found.
- Related: How to Create a Windows 10 Image Backup with Ease?
- 5 Best Windows file recovery Softwares (Free & Professional)
The restart to repair drive errors on Windows 10 are talked frequently in 2018. Many methods have been put forward by different people to try to fix the error. Here, I summarize 5 methods to help you settle down the repair this drive problem easily.
Method One: Run SFC – System File Checker Tool
- Click on the Cortana icon on the left side of the taskbar and type cmd to find command prompt.
- Right click on Command Prompt under the Best match and choose Run as administrator.
- Select Yes in the prompt window to allow the app to make changes to your device.
- Type sfc /scannow into the command prompt panel and then press Enter key to run the System File Checker.
- Then, the system scan will be started immediately and the prompt command tool will tell you that the process will take some time, so you need to wait patiently.
- Once the scan process has been completed, this tool will fix all problems it has found; you just need to wait for the completion.
Method 2: Run Check Disk to fix Restart To Repair Drive Errors on Windows 10
- Repeat step 1 to step 3 mentioned in method one.
- Type chkdsk *: /f into the command prompt tool and hit Enter in the keyboard.
- Wait for the disk checking process, which consists of mainly three stages (examining basic file system structure, examining file name linkage, and examining security descriptions).
- Any problems found by this command will be fixed automatically at the end of the scan.

Method 3: Run DISM to Fix Restart To Repair Drive Errors
The Deployment Image Servicing and Management (DISM) is actually a command-line tool embedded in Windows systems to do a lot of things, such as manage .wim files, update Windows features, and fix corrupt system files.
- Open the Start Menu.
- Scroll down to find Window Systems folder.
- Expand it and right click on Command Prompt inside.
- Choose More from the pop-up menu and choose Run as administrator from the submenu.
- Select Yes in the prompt window.
- Type exe /Online /Cleanup-image /Restorehealth and press Enter.
- Wait please when the tool is obtaining the system files online in order to restore back with the corrupt files.

Please note: sometimes, the DISM may fail to get the files. At this time, you may turn to the USB or DVD for help.
- Connect the USB or DVD to computer.
- Type DISM.exe /Online /Cleanup-Image /RestoreHealth /Source:* /LimitAccess (* stands for the path of your USB/DVD).
- Then, press Enter and wait.
Method Four: Automatic Repair or Startup Repair
In this method, the Windows bootable installation CD/DVD is necessary, you need to find it and make it ready for use.
- Connect the Windows bootable installation CD/DVD to the computer properly.
- Restart your Windows PC.
- When prompted to continue, you need to press any key in order to boot from this CD/DVD.
- Choose the language you like from language preferences and click on the Next button.
- Click on the Repair your computer option, located in the bottom-left corner.
- Select Troubleshoot in the Choose an option screen.
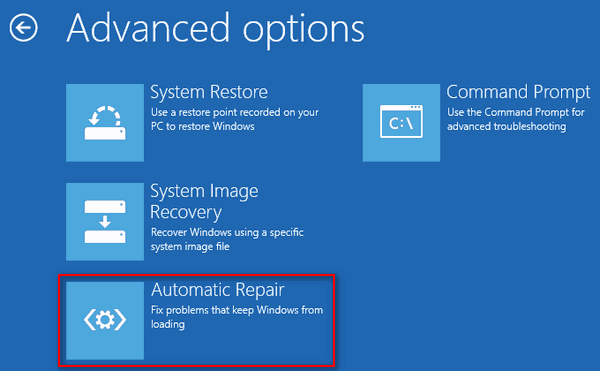
- Select Advanced options then to see the following window.
- Click on the Automatic Repair (Fix problems that keep Windows from loading) option (you can also select Startup Repair).
- Wait for the completion of Automatic Repair or Startup Repair.
- Restart your computer when it finishes and then boot into the Windows PC.
Method Five: Execute System Restore in Safe Mode
With the help of System Restore, you can bring your computer back to a point before the restart your PC to repair drive errors appear (you can recover files after System Restore if any important data are lost).
How to run system restore in safe mode:
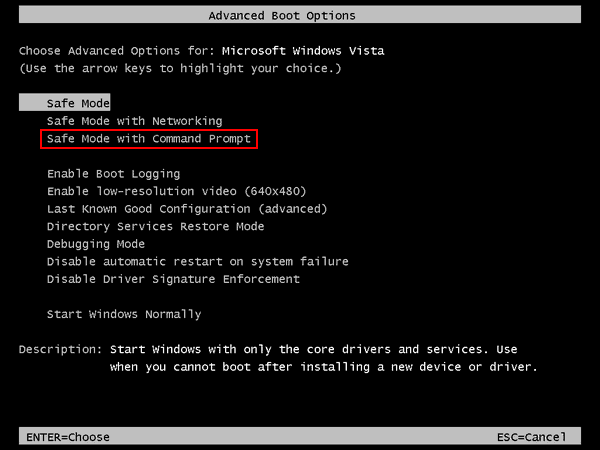
- Shut down your computer properly and then power it on.
- Press F8 or another key (varies from computer to computer) before the Windows logo appears.
- Select Safe Mode with Command Prompt and press Enter under Advanced Boot Options.
- Type exe and press Enter.
- Type system restore into the textbox and press Enter.
- Follow the System Restore instructions to choose an available restore point from the list so as to restore your computer.
- Wait for the end of the restore, and then reboot your PC.
That’s all I want to talk about how to repair drive errors on Windows 10. If you have other good suggestions, please leave a message below to help more people.
- You Might Like: 3 Ways To Repair/ Fix Hard Drive Become Unallocated Issue
- What is Dynamic Disk Invalid Issue? and 2 Ways to Fix it
In the end, I provide you with five practical ways to fix the error you have met. These methods are said to have helped many people get out of the Restart To Repair Drive Errors On Windows 10. Hope they also work well in your case! If you like this tutorial please share it and follow whatvwant on Facebook, Twitter, and YouTube.
Download Windows Speedup Tool to fix errors and make PC run faster
Users of Windows 11/10/8 may have noticed that Disk Error Checking is a bit different from the earlier versions of Windows. Checking your hard disk, every once in a while for errors – usually caused due to improper or sudden shutdowns, corrupted software, metadata corruption, etc., – in Windows 7 and earlier is always a good practice as this can help solve some computer problems and improve the performance of your Windows computer.
Disk Error Checking in Windows 11/10
Microsoft has redesigned chkdsk utility – the tool for detecting and fixing disk corruption. Microsoft introduced a file system called ReFS, which does not require an offline chkdsk to repair corruptions – as it follows a different model for resiliency and hence does not need to run the traditional chkdsk utility.
The disk is periodically checked for file system errors, bad sectors, lost clusters, etc., during Automatic Maintenance and you now no longer need to really go and run it. In fact, Windows now even exposes the state of the file system and disk via the Action Center or under the Drive properties in File Explorer. If potential errors are found, you will be informed about it. You can continue to use the computer while the scan is carried out in the background. If errors are found, you may be prompted via a notification to restart your computer.
Read: How to cancel ChkDsk in Windows.
Windows found errors on this drive that need to be repaired
You may sometimes see a message – Windows found errors on this drive that need to be repaired. If you see it, you may want to run a scan manually. Earlier, you had to schedule Disk Error Checking for the system drive and for drives that had files or processes or folders opened. In Windows 11/10, error checking starts right away, even on the system drive – and it no longer needs to be scheduled at start-up. Only if some errors are found will you have to restart to let Windows 11/10 fix the errors.
To begin the scan, right-click on the Drive which you wish to check and select Properties. Next, click on Tools tab and under Error-checking, click on the Check button. This option will check the drive for file system errors.

If the system detects that there are errors, you will be asked to check the disk. If no errors are found, you will see a message – You don’t need to scan this drive. You can, nevertheless, choose to check the drive. Click on Scan drive to do so.

The scanning starts. I found that the process ran quite fast and the scanning was over in less than 5 minutes.

On completion, Windows will display a message. If no errors are found it will say so.

If errors are found, you will see the following message:
Restart your computer to repair the file system. You can restart right away or schedule the error fixing on the next restart.
When I clicked on Show Details, the Event Viewer sprang to life, showing me the relevant log.

In Windows 11/10, Microsoft has made the Disk Error detection and correction of file system errors less intrusive so that users can carry on working on their computers without worrying about such error.
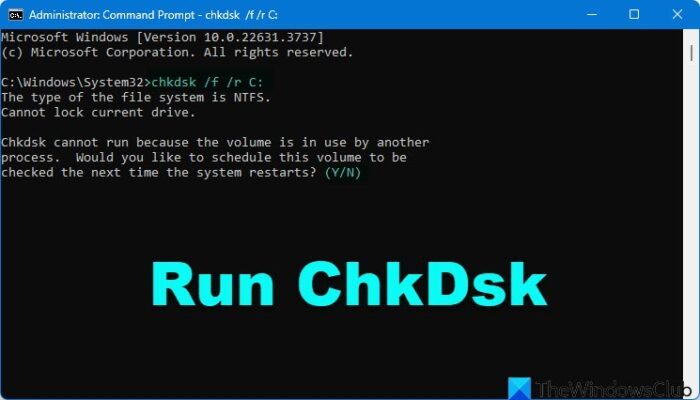
To run Check Disk on your System Drive (C), using the command line, type the following and hit Enter:
chkdsk /r C:
If required, restart your computer.
Note:
- ChkDsk /f scans for and attempts to repair errors in the file system.
- ChkDsk /r includes /f, but it also scans the entire disk surface for physical errors and attempts to repair them as well.
Read next: Command Line ChkDsk Options, Switches, Parameters in Windows
Will chkdsk fix corrupt files?
No, CHKDSK will not fix corrupt or damaged files. It only checks if the file system is in good condition and that the data on the disk is in a consistent and safe state. If files are damaged, the CHKDSK attempts to separate the damaged files and save the remnants in .chk file format.
These links may also interest you:
- CHKDSK is not available for RAW drives
- ChkDsk or Check Disk runs at every startup in Windows
- Windows detected a hard disk problem
- How to reduce ChkDsk countdown time
- CHKDSK alternatives to repair and fix bad sectors on Hard Drive.
Anand Khanse is the Admin of TheWindowsClub.com, a 10-year Microsoft MVP (2006-16) & a Windows Insider MVP (2016-2022). Please read the entire post & the comments first, create a System Restore Point before making any changes to your system & be careful about any 3rd-party offers while installing freeware.