
Last Updated :
25 Mar, 2025
Windows Forms (WinForms) is a GUI class library for building Windows desktop applications. Originally part of the .NET Framework, it is now supported in .NET Core, .NET 5+, .NET 8 (LTS), and .NET 9. Its main purpose is to provide an easier interface to develop applications for desktops, tablets, and PCs. It is also termed as the WinForms.
The applications developed using Windows Forms or WinForms are known as the Windows Forms Applications that run on the desktop computer. WinForms can be used only to develop Windows Forms Applications.
Creating First Windows Form
Let’s create the first Windows form here we are using Visual Studio Community 2022. Refer to this article which has a complete process on how to download Visual Studio.
Firstly we create a simple form that has a button and when we click on that button it shows a message let’s create it. These are the important steps to create a Windows form follow these steps as mentioned below:
Note: At the time of writing, Visual Studio Community 2022 is the latest stable version. However, check for newer versions like Visual Studio 2025 for updated features.
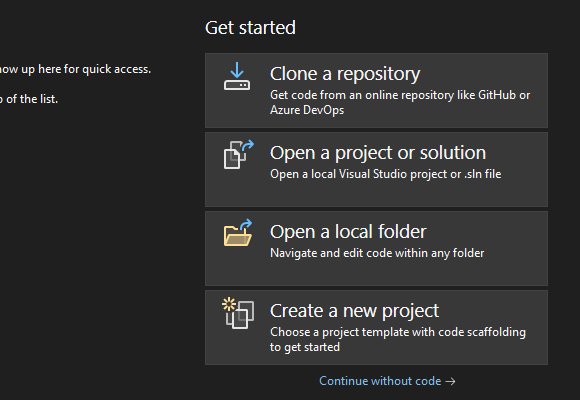
Step 1: Now open Visual Studio and different options are available there as of now.
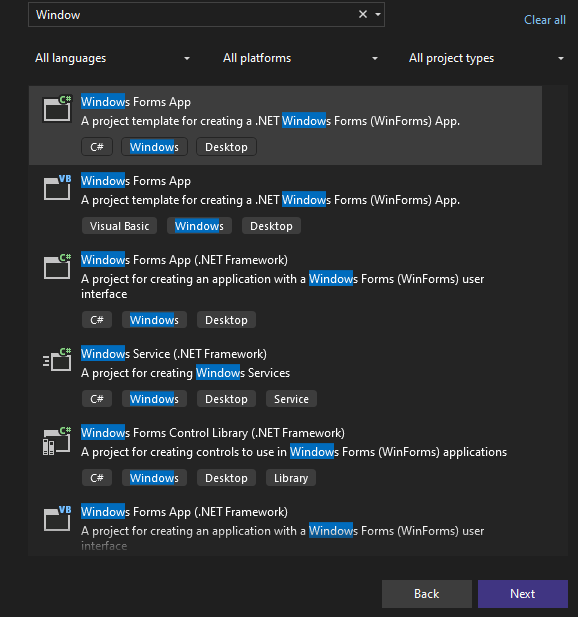
Step 2: Now choose the Windows Forms App with C# and click on the next button.
Step 3: Now locate the project with the name here we are using the default name which is Form1 and it will open a form in the editor which we can further modify.
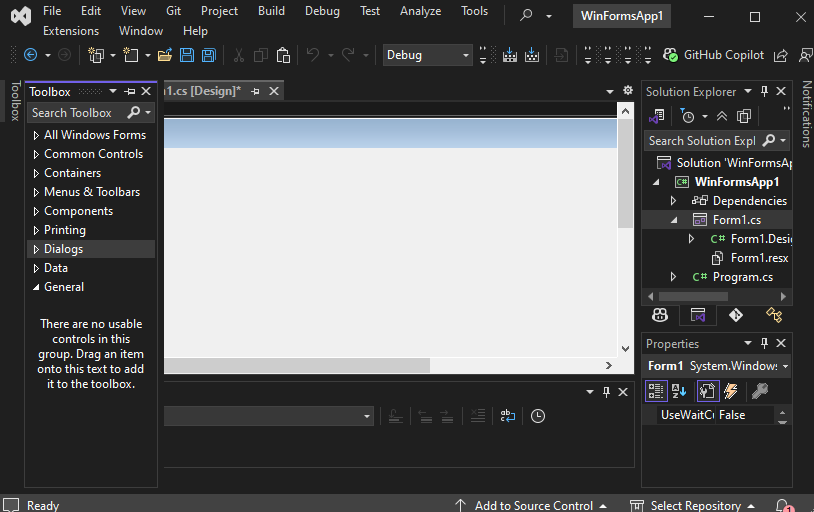
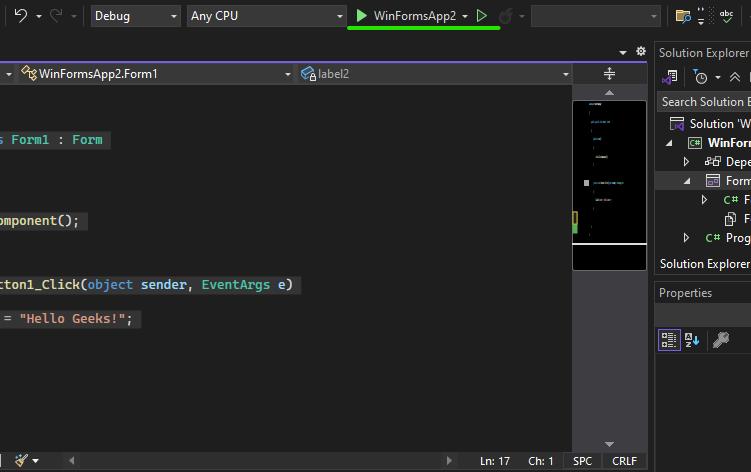
Let’s understand the interface of Visual Studio Community 2022 for Windows forms
- Editor Window (Main Window): Here, We will work with forms and code editing. Notice the layout of the form which is now blank. If we double-click the form then it will open the code for that.
- Solution Explorer: A file manager for your project where you can navigate between forms, resources, and settings. For example, if we will select a file from this window then particular information will be displayed in the property window.
- Properties Window: Allows you to modify UI elements such as colors, text alignment, and visibility. Also, we can change the properties of components or controls that will add to the forms.
In the image, we have two files that are open one Design and there is Form1.cs these two play a major role. We use the Form 1.cs file for the custom logic.
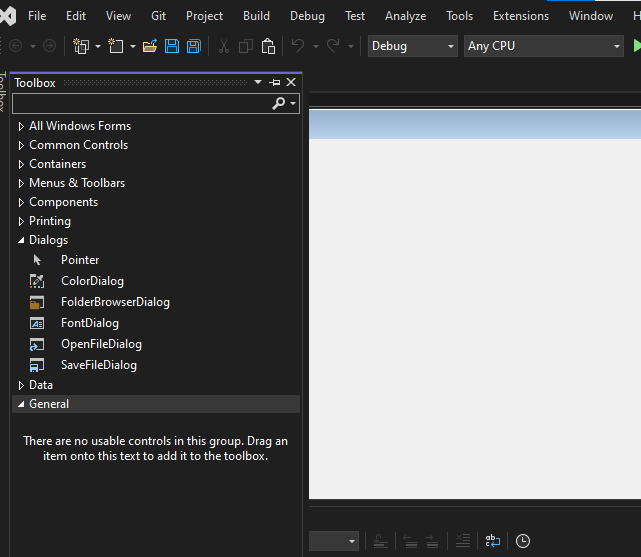
Step 4: Now open a Toolbox go to the view > Toolbox or ctrl + alt + x.
Toolbox: Provides drag-and-drop controls like buttons, text boxes, and labels to design the UI.
Step 5. Now open the common controls and drag and drop the button on the form where we want it to be placed.
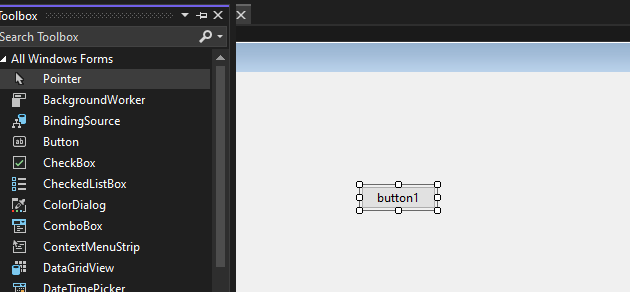
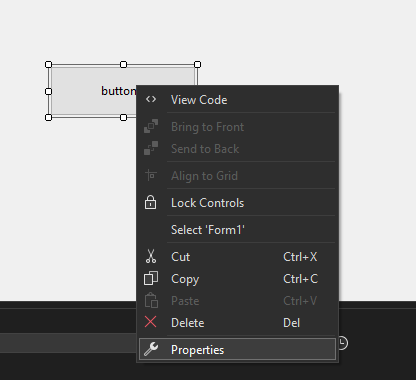
Step 6. Now open the properties of the button press right-click on the button and it will open the properties solution explorer now we can change the button name to Click here.
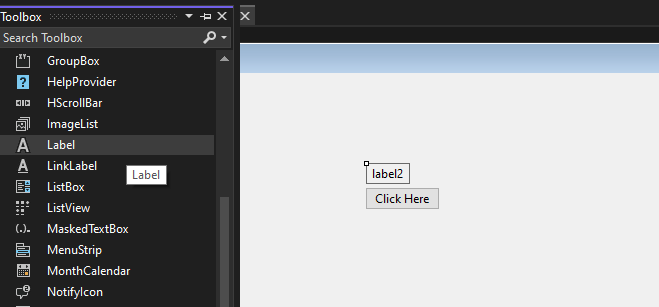
Step 7: Now again open the Toolbox and then click on the label and place where we want to show the message.
Note: The Form1.Designer.cs file automatically generates UI code for Windows Forms. You should not manually edit this file, as changes may be lost. Instead, add event-handling logic in Form1.cs
Note: To handle user interactions, double-click a button to generate a Click event in Form1.cs. Here, you can define actions when the button is clicked.
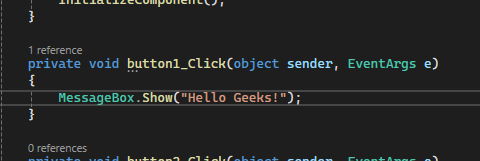
Step 8. Now again double click on the button and it will open Form1.cs file and add the text when the button1 click action is triggered.
Form1.cs file:
C#
namespace WinFormsApp2
{
    public partial class Form1 : Form
    {
        public Form1()
        {
            InitializeComponent();
        }

        private void button1_Click(object sender, EventArgs e)
        {
            label1.Text = "Hello Geeks!";
        }

    }
}
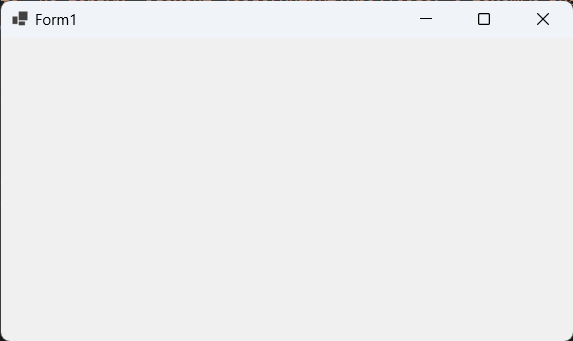
Step 9: Now click on the start button or press F5 to execute the program.
It will open a Windows form now to interact with the program.
Advantages
- Comprehensive Controls: It comes up with a rich set of customizable controls (buttons, text boxes labels etc.) that makes it easier to use and allows more control through properties and event handling
- Visual Designer: It comes up with the visual design helps to see the changes of form design and comes up with features like drag-and-drop for easy UI design.
- Code Integration: A specially designed code editor for forms design helps to write application logic, handling events and data validation.
- Use-cases: It is used in a variety of applications including the data entry tools, management system and business purposes.
- Easy and optimal: Always become a first choice to make a lightweight desktop application for rapid development and come up with .NET support.
Первое приложение с .NET CLI
Последнее обновление: 25.11.2023
Для создания графических интерфейсов с помощью платформы .NET применяются разные технологии — Window Forms, WPF, UWP.
Однако наиболее простой и удобной платформой до сих пор остается Window Forms или сокращенно WinForms. Данное руководство ставит своей целью дать понимание принципов создания графических интерфейсов с помощью технологии WinForms
и работы основных элементов управления.
Создадим первое приложение на C# и Windows Forms. Что нам для этого потребуется? Прежде всего необходим текстовый редактор для написания кода программы.
Можно взять любой понравившийся текстовый редактор, например, Visual Studio Code
Также для компиляции и запуска программы нам потребуется .NET SDK. Для его установки перейдем на официальный сайт по ссылке
.NET SDK
После установки .NET SDK для первого проекта определим какую-нибудь папку. Например, в моем случае это будет папка C:\dotnet\winforms\helloapp.
Откроем терминал/командную строку и перейдем к созданной папке проекта с помощью команды cd
cd C:\dotnet\winforms\helloapp
В данном случае мы для создания и запуска проекта мы будем использовать встроенную инфраструктуру .NET CLI, которая устанавливается вместе с .NET SDK.
Для создания проекта в .NET CLI применяется команда dotnet new, после которой указывается тип проWindows Formsекта. Для создания проекта
Windows Forms применяется шаблон — winforms. Поэтому введем в терминале команду dotnet new winforms
C:\Users\eugen>cd C:\dotnet\winforms\helloapp

C:\dotnet\winforms\helloapp>dotnet new winforms
Шаблон "Приложение Windows Forms" успешно создан.

Идет обработка действий после создания...
Восстановление C:\dotnet\winforms\helloapp\helloapp.csproj:
  Определение проектов для восстановления...
  Восстановлен C:\dotnet\winforms\helloapp\helloapp.csproj (за 1,04 sec).
Восстановление выполнено.


C:\dotnet\winforms\helloapp>
После выполнения этой команды у нас будет создан следующий проект:
Структура проекта Windows Forms
Рассмотрим базовую структуру простейшего стандартного проекта Windows Forms:
-
helloapp.csproj: стандартный файл проекта C#, который соответствует назанию проекта (по умолчанию названию каталога) и описывает все его настройки.
-
helloapp.csproj.user: дополнительный файл проекта C#, который хранит специфичные для текущего пользователя настройки.
-
Form1.cs: содержит класс формы, которая по умолчанию запускается при старте приложения
-
Form1.Designer.cs: он содержит определение компонентов формы, добавленных
на форму в графическом дизайнере (графический дизайнер Windows Forms на данный момент официально доступен только в Visual Studio) -
Program.cs: определяет класс Program, который запускается при старте приложения и запускает форму Form1
Например, посмотрим на содержимое файла helloapp.csproj
<Project Sdk="Microsoft.NET.Sdk">

  <PropertyGroup>
    <OutputType>WinExe</OutputType>
    <TargetFramework>net8.0-windows</TargetFramework>
    <Nullable>enable</Nullable>
    <UseWindowsForms>true</UseWindowsForms>
    <ImplicitUsings>enable</ImplicitUsings>
  </PropertyGroup>

</Project>
Для компиляции приложения Windows Forms указаны следующие настройки:
-
OutputType: определяет выходной тип проекта. Должен иметь значение WinExe — то есть выполняемое приложение с
расширением exe под Windows -
TargetFramework: определяет применяемую для компиляции версию фреймворка .NET. Поскольку при создании проекта
была выбрана версия .NET 8, а сам проект зависит от компонентов Windows, то здесь должно быть значение net7.0-windows -
Nullable: подключает в проект функционалность ссылочных nullable-типов
-
UseWindowsForms: указывает, будет ли проект использовать Windows Forms (для этого устанавливается значение
true) -
ImplicitUsings: подключает в проект функциональность неявно подключаемых глобальных пространств имен
Запуск проекта
Проект по умолчанию не представляет какой-то грандиозной функциональности, тем не менее этот проект мы уже можем запустить. Итак, запустим проект. Для этого выполним команду
dotnet run
C:\dotnet\winforms\helloapp>dotnet run
При запуске запускается графическая форма, код которой определяет класс Form1:
Запуск приложения
Файл Program.cs определяет точку входа в приложение:
namespace helloapp;

static class Program
{
    [STAThread]
    static void Main()
    {
        ApplicationConfiguration.Initialize();
        Application.Run(new Form1());
    }
}
Метод Main снабжен атрибутом [STAThread]. Этот атрибут, грубого говоря,
необходим для корректной работы компонентов Windows. В самом методе сначала вызывается метод
ApplicationConfiguration.Initialize()
который устанавливает некоторую базовую конфигурацию приложения
Затем вызывается метод
Application.Run(new Form1());
в который передается объект отображаемой по умолчанию на экране формы.
То есть, когда мы запустим приложение, сработает метод Main, в котором будет вызван метод Application.Run(new Form1()),
благодаря чему мы увидим форму Form1 на экране.
Определение формы
Теперь посмотрим на определение формы и немного изменим его. Для этого откроем файл Form1.cs в текстовом редакторе. По умолчанию он выглядит следующим образом:
namespace helloapp;

public partial class Form1 : Form
{
    public Form1()
    {
        InitializeComponent();
    }
}
Класс формы — Form1 представляет графическую форму — фактически то окно, которое мы увидим на экране при запуске проекта.
Этот класс определяется как частичный (с модификатором partial) и наследуется от встроенного класса Form,
который содержит базовую функциональность форм.
В самом классе Form1 определен по умолчанию только конструктор, где вызывается метод InitializeComponent(), который выполняет инициализацию компонентов формы из файла дизайнера
Form1.Designer.cs. По сути именно код этого файла передается выше через вызов InitializeComponent()
Теперь изменим его код следующим образом:
namespace helloapp;

public partial class Form1 : Form
{
    public Form1()
    {
        InitializeComponent();
        // определяем кнопку
        Button button = new Button();
        // текст кнопки
        button.Text ="Click";
        // положение кнопки
        button.Location = new Point(50, 50);
        // размер кнопки
        button.Size = new Size { Width = 80, Height = 30 };
        // обработчик нажатия кнопки
        button.Click += (o, e) => MessageBox.Show("Hello METANIT.COM!");
        // добавление кнопки на форму
        this.Controls.Add(button);
    }
}
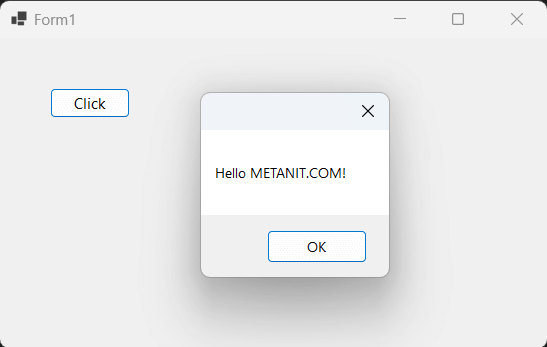
В данном случае на форму добавляется кнопка, и у нее настраиваются различные свойства, как текст, положение на форме, размер, а также обработчик нажатия.
Заново запустим проект, и нам отобразится та же форма, которая теперь будет содержать кнопку. И по нажатию на кнопку появится маленькое окно с сообщением.
Введение
Разработка оконных приложений – это создание программ с графическим интерфейсом пользователя (GUI), которые запускаются на операционной системе Windows. C# (произносится как «си-шарп») — мощный, типобезопасный объектно-ориентированный язык программирования, разработанный Microsoft, который отлично подходит для создания разнообразных приложений, включая настольные.
Выбор инструментария
Для разработки настольных приложений в C# обычно используются:
- Windows Forms (WinForms): Подходит для традиционных настольных приложений с богатым пользовательским интерфейсом. Легко осваивается новичками.
- Windows Presentation Foundation (WPF): Предлагает более современный подход к созданию GUI с развитыми возможностями по работе с графикой, анимацией и стилями.
Основы Windows Forms
Windows Forms — это библиотека классов в .NET Framework, предназначенная для быстрой разработки приложений с графическим интерфейсом. Она предлагает большое количество готовых элементов управления (кнопки, текстовые поля, метки и т.д.), что упрощает создание классических настольных приложений.
Создание проекта WinForms
- Установка Visual Studio: Сначала установите Visual Studio. Выберите рабочую нагрузку “.NET desktop development”.
- Создание нового проекта: Откройте Visual Studio и выберите “Создать новый проект”. Выберите “Windows Forms App (.NET Framework)” и нажмите “Далее”.
- Настройка проекта: Введите имя и расположение проекта. Нажмите “Создать”.
Работа с формой
После создания проекта перед вами откроется главная форма приложения (Form1). Это основное окно вашего приложения.
public partial class Form1 : Form
{
    public Form1()
    {
        InitializeComponent();
    }
}
Добавление элементов управления
- Инструменты: На боковой панели “Инструменты” найдите элементы, такие как Button, Label, TextBox и перетащите их на форму.
- Настройка свойств: Выберите элемент на форме и настройте его свойства в окне “Свойства”. Например, измените текст кнопки или метки.
Пример: Создание простого приложения
Давайте создадим приложение, которое содержит одну кнопку и метку. При нажатии на кнопку текст метки изменится.
- Добавление элементов: Добавьте на форму
ButtonиLabel. - Изменение свойств: Измените свойство
Textкнопки на “Нажми меня” и метки на “Привет, мир!”. - Добавление события: Дважды кликните по кнопке в дизайнере. Это создаст событие
clickдля кнопки.
private void button1_Click(object sender, EventArgs e)
{
    label1.Text = "Привет, C#!";
}
В этом примере, когда пользователь нажимает на кнопку, метод button1_Click вызывается, и текст метки меняется.
Компиляция и запуск
Чтобы запустить приложение, нажмите кнопку “Запуск” (зеленый треугольник) на панели инструментов. Окно вашего приложения отобразится, и вы сможете взаимодействовать с элементами управления.
Windows Presentation Foundation (WPF)
Введение в WPF
WPF — это современная система для создания настольных приложений Windows с расширенной поддержкой графики, связывания данных и многих других функций. WPF использует XAML (eXtensible Application Markup Language) для определения интерфейса, что обеспечивает разделение логики приложения и его визуальной части.
Создание проекта WPF
- Создание проекта: Аналогично WinForms, выберите “Создать новый проект”, но на этот раз выберите “WPF App (.NET Framework)”.
- Работа с XAML: В основном окне проекта (обычно
MainWindow.xaml) вы увидите XAML-код. Это язык разметки, используемый для создания интерфейса в WPF.
<Window x:Class="WpfApp.MainWindow"
        xmlns="http://schemas.microsoft.com/winfx/2006/xaml/presentation"
        xmlns:x="http://schemas.microsoft.com/winfx/2006/xaml"
        Title="MainWindow" Height="350" Width="525">
    <Grid>
        <!-- Элементы интерфейса -->
    </Grid>
</Window>
Основные компоненты интерфейса в WPF
В XAML элементы интерфейса организуются в древовидной структуре. Вы можете добавлять кнопки, метки, текстовые поля и другие элементы управления, а также устанавливать их свойства прямо в XAML.
Пример: Создание интерактивного интерфейса в WPF
Создадим простое приложение с кнопкой и текстовым полем, где текст будет изменяться
при нажатии на кнопку.
- Добавление элементов в XAML:
<Grid> <Button x:Name="myButton" Content="Нажми меня" Click="myButton_Click" /> <TextBlock x:Name="myTextBlock" Text="Привет, мир!" /> </Grid> - Обработка событий:
В коде C# (например, в файлеMainWindow.xaml.cs) добавьте обработчик события для кнопки.
private void myButton_Click(object sender, RoutedEventArgs e)
{
    myTextBlock.Text = "Привет, WPF!";
}
Здесь, при нажатии на кнопку, метод myButton_Click вызывается, и текст в TextBlock изменяется.
Стилизация и макет
WPF предоставляет обширные возможности для стилизации и компоновки элементов интерфейса, позволяя создавать визуально привлекательные и функционально богатые приложения.
Продвинутые техники в WPF
Привязка данных (Data Binding)
Привязка данных — ключевая особенность WPF, позволяющая устанавливать соединения между элементами UI и логикой приложения (например, классами данных).
Основы привязки данных
В XAML привязка данных осуществляется с помощью синтаксиса {Binding}. Например, если у вас есть класс Person с свойством Name, вы можете привязать это свойство к TextBox таким образом:
<TextBox Text="{Binding Name}" />
Для работы привязки необходимо задать контекст данных (DataContext) — обычно это делается в коде C#:
public partial class MainWindow : Window
{
    public MainWindow()
    {
        InitializeComponent();
        this.DataContext = new Person() { Name = "Алиса" };
    }
}

public class Person
{
    public string Name { get; set; }
}
Использование Ресурсов и Стилей
Ресурсы в WPF — это определения объектов, которые можно использовать в нескольких местах приложения. Стили в WPF позволяют определять внешний вид и поведение элементов управления.
Пример стиля
<Window.Resources>
    <Style x:Key="MyButtonStyle" TargetType="Button">
        <Setter Property="Background" Value="Navy"/>
        <Setter Property="Foreground" Value="White"/>
        <Setter Property="Padding" Value="10"/>
        <Setter Property="Margin" Value="5"/>
    </Style>
</Window.Resources>
<Button Style="{StaticResource MyButtonStyle}">Кнопка</Button>
Архитектура MVVM
MVVM (Model-View-ViewModel) — это шаблон проектирования, идеально подходящий для WPF. Он разделяет приложение на три основные части:
- Модель (Model): Классы данных и логики приложения.
- Представление (View): XAML-код интерфейса.
- ViewModel: Посредник между View и Model, обрабатывает логику интерфейса и привязку данных.
Пример использования MVVM
- ViewModel: Создайте класс ViewModel с необходимыми свойствами и командами.
public class MainViewModel : INotifyPropertyChanged { private string _name; public string Name { get => _name; set { _name = value; OnPropertyChanged(nameof(Name)); } } // Реализация INotifyPropertyChanged... } - Привязка в XAML:
<Window.DataContext>
    <local:MainViewModel/>
</Window.DataContext>
<Grid>
    <TextBox Text="{Binding Name}" />
</Grid>
Интеграция с другими технологиями
Разработка оконных приложений на C# не ограничивается только созданием интерфейса. Часто требуется интеграция с базами данных, веб-сервисами, файловыми системами и другими приложениями.
Работа с базами данных
- Entity Framework: Популярный ORM (Object-Relational Mapping) фреймворк для интеграции с базами данных.
- ADO.NET: Более низкоуровневый способ работы с базами данных для тех случаев, когда требуется больше контроля над процессом.
Сетевое взаимодействие
- HttpClient: Для выполнения HTTP-запросов к веб-сервисам.
- SignalR: Для реализации веб-сокетов и двустороннего общения между клиентом и сервером.
Заключение
Разработка оконных приложений в C# — это глубокая и многогранная область, включающая в себя различные подходы и технологии. От WinForms, идеально подходящих для простых и традиционных приложений, до WPF с его расширенными возможностями по созданию динамичных и визуально привлекательных интерфейсов. Понимание архитектуры MVVM, привязки данных и стилей поможет вам в создании мощных и легко поддерживаемых приложений. Интеграция с базами данных, веб-сервисами и использование различных библиотек и фреймворков откроют перед вами практически неограниченные возможности для создания качественных настольных приложений.
C# и его экосистема постоянно развиваются, поэтому всегда есть новые вещи, которые можно изучить и применить в своих проектах. Счастливого кодирования!
Prerequisites
- Visual Studio 2022
- TX Text Control .NET for Windows Forms
Step 1: Create a New Project
- Open Visual Studio 2022.
- Click on «Create a new project».
- From the options, select C# under Languages, Windows under Platform, and Desktop under Project Type.
- Scroll to find the Windows Forms App template.
- Select it and click Next.

Step 2: Name Your Project and Choose the Framework
- Enter a project name and click Next.
- Select your Framework version as .NET 6 (Long-term support) and click Create.

Step 3: Install the Required NuGet Package
- Right-click the project in Solution Explorer.
- Select Manage NuGet Packages from the context menu.
- Choose Text Control Offline Packages as the package source, then click Browse.
- Find TXTextControl.TextControl.WinForms.SDK and click Install.

Step 4: Add the Text Control to Your Form
- In Solution Explorer, open Form1.
- In the Toolbox, find the TX Text Control 32.0 tab.
- Select the TextControl icon and draw it onto the Windows form.

Step 5: Customize the Text Control
- Click the Smart Tag in the upper right corner of TextControl.
- In the Wizards group, click on:
- Add a Button Bar
- Add a Status Bar
- Add a Ruler
- Add a Vertical Ruler
- Finally, click Arrange Controls Automatically.

The controls will now be connected and docked to fill the container.

Step 6: Build and Compile
- Click the Start button to build and compile the project.
- The application will start and the Text Control will be displayed on the form.
Conclusion
In this tutorial, you learned how to create a new Windows Forms application in Visual Studio 2022 and how to add a Text Control to the form. You also learned how to customize the Text Control by adding a Button Bar, Status Bar, Ruler, and Vertical Ruler. Finally, you built and compiled the project to see the Text Control in action.
Windows Forms
Text Control combines the power of a reporting tool and an easy-to-use WYSIWYG word processor — fully programmable and embeddable in your Windows Forms application. TX Text Control .NET for Windows Forms is a royalty-free, fully programmable rich edit control that offers developers a broad range of word processing features in a reusable component for Visual Studio.
See Windows Forms products
Related Posts
Getting Started with Windows Forms (.NET Framework)
by Bjoern Meyer| September 1, 2022
This article shows how to use the TX Text Control .NET for Windows Forms TextControl class within a .NET Framework (4.8) application in Visual Studio 2022.
Getting Started with Windows Forms (.NET 5 and better)
by Bjoern Meyer| September 1, 2022
This article shows how to use the TX Text Control .NET for Windows Forms TextControl class within a .NET 6 application in Visual Studio 2022.
New Getting Started Article Hub Launched
by Bjoern Meyer| July 11, 2022
We just launched a new getting started article hub that helps to find articles, samples, and tutorials by filtering by types, technologies and Text Control components.
Creating Your First Windows Forms Application with C#
by Bjoern Meyer| January 1, 2020
This Windows Forms tutorial shows how to create your first desktop application with C# using TX Text Control .NET for Windows Forms.
From Wikibooks, open books for an open world
To create a Windows desktop application we use the library represented by System.Windows.Forms namespace. Some commonly used classes in this namespace include:
- Control — generic class from which other useful classes, like
Form,TextBoxand others listed below are derived - Form — this is the base class for the program window. All other controls are placed directly onto a
Formor indirectly on another container (likeTabPageorTabControl) that ultimately resides on theForm. When automatically created in Visual Studio, it is usually subclassed asForm1. - Button — a clickable button
- TextBox — a singleline or multiline textbox that can be used for displaying or inputting text
- RichTextBox — an extended
TextBoxthat can display styled text, e.g. with parts of the text colored or with a specified font. RichTextBox can also display generalized RTF document, including embedded images. - Label — simple control allowing display of a single line of unstyled text, often used for various captions and titles
- ListBox — control displaying multiple items (lines of text) with ability to select an item and to scroll through it
- ComboBox — similar to
ListBox, but resembling a dropdown menu - TabControl and TabPage — used to group controls in a tabbed interface (much like tabbed interface in Visual Studio or Mozilla Firefox). A
TabControlcontains a collection ofTabPageobjects. - DataGrid — data grid/table view
The Form class (System.Windows.Forms.Form) is a particularly important part of that namespace because the form is the key graphical building block of Windows applications. It provides the visual frame that holds buttons, menus, icons, and title bars together. Integrated development environments (IDEs) like Visual C# and SharpDevelop can help create graphical applications, but it is important to know how to do so manually:
using System.Windows.Forms;

public class ExampleForm : Form    // inherits from System.Windows.Forms.Form
{
    public static void Main()
    {
        ExampleForm wikibooksForm = new ExampleForm();

        wikibooksForm.Text = "I Love Wikibooks";  // specify title of the form
        wikibooksForm.Width = 400;                // width of the window in pixels
        wikibooksForm.Height = 300;               // height in pixels
        Application.Run(wikibooksForm);           // display the form
    }
}
The example above creates a simple Window with the text «I Love Wikibooks» in the title bar. Custom form classes like the example above inherit from the System.Windows.Forms.Form class. Setting any of the properties Text, Width, and Height is optional. Your program will compile and run successfully, if you comment these lines out, but they allow us to add extra control to our form.
|
|
This section is a stub. You can help Wikibooks by expanding it. |
An event is an action being taken by the program when a user or the computer makes an action (for example, a button is clicked, a mouse rolls over an image, etc.). An event handler is an object that determines what action should be taken when an event is triggered.
using System.Windows.Forms;
using System.Drawing;

public class ExampleForm : Form    // inherits from System.Windows.Forms.Form
{
    public ExampleForm()
    {
        this.Text = "I Love Wikibooks";           // specify title of the form
        this.Width = 300;                         // width of the window in pixels
        this.Height = 300;                        // height in pixels

        Button HelloButton = new Button();
        HelloButton.Location = new Point(20, 20); // the location of button in pixels
        HelloButton.Size = new Size(100, 30);     // the size of button in pixels
        HelloButton.Text = "Click me!";           // the text of button

        // When clicking the button, this event fires
        HelloButton.Click += new System.EventHandler(WhenHelloButtonClick);

        this.Controls.Add(HelloButton);
    }

    void WhenHelloButtonClick(object sender, System.EventArgs e)
    {
        MessageBox.Show("You clicked! Press OK to exit this message");
    }

    public static void Main()
    {
        Application.Run(new ExampleForm());       // display the form
    }
}
|
|
This section is a stub. You can help Wikibooks by expanding it. |
The Windows Forms namespace has a lot of very interesting classes. One of the simplest and important is the Form class. A form is the key building block of any Windows application. It provides the visual frame that holds buttons, menus, icons and title bars together. Forms can be modal and modalless, owners and owned, parents and children. While forms could be created with a notepad, using a form editor like VS.NET, C# Builder or Sharp Develop makes development much faster. In this lesson, we will not be using an IDE. Instead, save the code below into a text file and compile with command line compiler.
using System.Windows.Forms;
using System.Drawing;

public class ExampleForm : Form    // inherits from System.Windows.Forms.Form
{
    public ExampleForm()
    {
        this.Text = "I Love Wikibooks";         // specify title of the form
        this.BackColor = Color.White;
        this.Width = 300;                       // width of the window in pixels
        this.Height = 300;                      // height in pixels

        // A Label
        Label TextLabel = new Label();
        TextLabel.Text = "One Label here!";
        TextLabel.Location = new Point(20, 20);
        TextLabel.Size = new Size(150, 30);
        TextLabel.Font = new Font("Arial", 12); // See! we can modify the font of text
        this.Controls.Add(TextLabel);           // adding the control to the form

        // A input text field
        TextBox Box = new TextBox();            // inherits from Control
        Box.Location = new Point(20, 60);       // then, it have Size and Location properties
        Box.Size = new Size(100, 30);
        this.Controls.Add(Box);                 // all class that inherit from Control can be added in a form
    }

    public static void Main()
    {
        Application.EnableVisualStyles();
        Application.Run(new ExampleForm());     // display the form
    }
}