
Visual Studio позволяет быстро и удобно писать программы, которые могут общаться с скетчами Arduino через последовательный порт.
Консоль
Создайте консольное приложение и напишите код. За общение с последовательным портом отвечает пространство имён System.IO.Ports.
using System;
using System.IO.Ports;
using System.Threading;

namespace ConsoleApp1
{
    class Program
    {
        static SerialPort serialPort;

        static void Main(string[] args)
        {
            serialPort = new SerialPort();
            serialPort.PortName = "COM4";
            serialPort.BaudRate = 9600;
            serialPort.Open();
            while (true)
            {
                string msg = serialPort.ReadExisting();
                Console.WriteLine(msg);
                Thread.Sleep(200);
            }
        }
    }
}
В приложении явно прописан номер порта, измените его в случае необходимости. В цикле while ждём поступление данных от Arduino.
Напишем скетч.
void setup() {
  Serial.begin(9600);
}

void loop() {
  Serial.print('1');
  delay(200);
}
Прошиваем плату. Она начинает посылать единицы в порт. Запускаем консольное приложение. В окне консоли должны отобразиться принятые единицы. Базовый пример показывает, как просто взаимодействуют приложения на C# с Arduino.
WinForms
Напишем приложение со свистелками и перделками, т.е. GUI-приложение. Создадим новый проект Desktop-типа. Добавим на форму кнопки, выпадающий список. На панели инструментов найдите элемент управления SerialPort и добавьте его на рабочую панель. Все настройки оставляем без изменений. Кстати, можно было получить доступ к SerialPort программным путём, но я решил показать простой привычный способ.
Файл Form1.Designers.cs получился следующим. Первая кнопка получает доступные порты и добавляет их в выпадающий список. Вторая кнопка соединяется по указанному порту. Третья и четвёртая кнопки посылают символы ‘1’ и ‘0’ соответственно, чтобы включить или выключить светодиод.
Показать код (щёлкните мышкой)
namespace DesktopApp1
{
    partial class Form1
    {
        ///
        /// Required designer variable.
        ///
        private System.ComponentModel.IContainer components = null;

        ///
        /// Clean up any resources being used.
        ///
        /// true if managed resources should be disposed; otherwise, false.
        protected override void Dispose(bool disposing)
        {
            if (disposing && (components != null))
            {
                components.Dispose();
            }
            base.Dispose(disposing);
        }

        #region Windows Form Designer generated code

        ///
        /// Required method for Designer support - do not modify
        /// the contents of this method with the code editor.
        ///
        private void InitializeComponent()
        {
            this.components = new System.ComponentModel.Container();
            this.arduinoButton = new System.Windows.Forms.Button();
            this.serialPort = new System.IO.Ports.SerialPort(this.components);
            this.comboBox = new System.Windows.Forms.ComboBox();
            this.connectButton = new System.Windows.Forms.Button();
            this.turnOnButton = new System.Windows.Forms.Button();
            this.turnOffButton = new System.Windows.Forms.Button();
            this.SuspendLayout();
            //
            // arduinoButton
            //
            this.arduinoButton.Location = new System.Drawing.Point(81, 35);
            this.arduinoButton.Name = "arduinoButton";
            this.arduinoButton.Size = new System.Drawing.Size(121, 23);
            this.arduinoButton.TabIndex = 0;
            this.arduinoButton.Text = "Get COM-port";
            this.arduinoButton.UseVisualStyleBackColor = true;
            this.arduinoButton.Click += new System.EventHandler(this.arduinoButton_Click);
            //
            // comboBox
            //
            this.comboBox.FormattingEnabled = true;
            this.comboBox.Location = new System.Drawing.Point(81, 64);
            this.comboBox.Name = "comboBox";
            this.comboBox.Size = new System.Drawing.Size(121, 21);
            this.comboBox.TabIndex = 4;
            //
            // connectButton
            //
            this.connectButton.Location = new System.Drawing.Point(81, 91);
            this.connectButton.Name = "connectButton";
            this.connectButton.Size = new System.Drawing.Size(121, 23);
            this.connectButton.TabIndex = 5;
            this.connectButton.Text = "Connect";
            this.connectButton.UseVisualStyleBackColor = true;
            this.connectButton.Click += new System.EventHandler(this.connectButton_Click);
            //
            // turnOnButton
            //
            this.turnOnButton.Location = new System.Drawing.Point(104, 178);
            this.turnOnButton.Name = "turnOnButton";
            this.turnOnButton.Size = new System.Drawing.Size(75, 23);
            this.turnOnButton.TabIndex = 6;
            this.turnOnButton.Text = "On";
            this.turnOnButton.UseVisualStyleBackColor = true;
            this.turnOnButton.Click += new System.EventHandler(this.button3_Click);
            //
            // turnOffButton
            //
            this.turnOffButton.Location = new System.Drawing.Point(104, 219);
            this.turnOffButton.Name = "turnOffButton";
            this.turnOffButton.Size = new System.Drawing.Size(75, 23);
            this.turnOffButton.TabIndex = 7;
            this.turnOffButton.Text = "Off";
            this.turnOffButton.UseVisualStyleBackColor = true;
            this.turnOffButton.Click += new System.EventHandler(this.button4_Click);
            //
            // Form1
            //
            this.ClientSize = new System.Drawing.Size(284, 261);
            this.Controls.Add(this.turnOffButton);
            this.Controls.Add(this.turnOnButton);
            this.Controls.Add(this.connectButton);
            this.Controls.Add(this.comboBox);
            this.Controls.Add(this.arduinoButton);
            this.Name = "Form1";
            this.Load += new System.EventHandler(this.Form1_Load_1);
            this.ResumeLayout(false);

        }

        #endregion

        private System.Windows.Forms.Button arduinoButton;
        private System.IO.Ports.SerialPort serialPort;
        private System.Windows.Forms.ComboBox comboBox;
        private System.Windows.Forms.Button connectButton;
        private System.Windows.Forms.Button turnOnButton;
        private System.Windows.Forms.Button turnOffButton;
    }
}
Сам код для коммуникации.
using System;
using System.Windows.Forms;
using System.IO.Ports;

// This is the code for your desktop app.
// Press Ctrl+F5 (or go to Debug > Start Without Debugging) to run your app.

namespace DesktopApp1
{
    public partial class Form1 : Form
    {
        bool isConnected = false;

        public Form1()
        {
            InitializeComponent();
        }

        private void Form1_Load(object sender, EventArgs e)
        {

        }

        private void arduinoButton_Click(object sender, EventArgs e)
        {
            comboBox.Items.Clear();
            // Получаем список COM портов доступных в системе
            string[] portnames = SerialPort.GetPortNames();
            // Проверяем есть ли доступные
            if (portnames.Length == 0)
            {
                MessageBox.Show("COM PORT not found");
            }
            foreach (string portName in portnames)
            {
                //добавляем доступные COM порты в список
                comboBox.Items.Add(portName);
                Console.WriteLine(portnames.Length);
                if(portnames[0] != null)
                {
                    comboBox.SelectedItem = portnames[0];
                }
            }
        }

        private void connectToArduino()
        {
            isConnected = true;
            string selectedPort = comboBox.GetItemText(comboBox.SelectedItem);
            serialPort.PortName = selectedPort;
            serialPort.Open();
            connectButton.Text = "Disconnect";
        }

        private void disconnectFromArduino()
        {
            isConnected = false;
            serialPort.Close();
            connectButton.Text = "Connect";
        }

        private void Form1_FormClosing(object sender, FormClosingEventArgs e)
        {
            // При закрытии программы, закрываем порт
            if (serialPort.IsOpen) serialPort.Close();
        }

        private void button3_Click(object sender, EventArgs e)
        {
           if(isConnected)
            {
                serialPort.Write("1");
            }
        }

        private void button4_Click(object sender, EventArgs e)
        {
            serialPort.Write("0");
        }

        private void connectButton_Click(object sender, EventArgs e)
        {
            if (!isConnected)
            {
                connectToArduino();
            }
            else
            {
                disconnectFromArduino();
            }
        }

        private void Form1_Load_1(object sender, EventArgs e)
        {

        }
    }
}
Скетч для приёма сообщений.
char commandValue; // данные, поступаемые с последовательного порта
int ledPin = 13; // встроенный светодиод

void setup() {
  pinMode(ledPin, OUTPUT); // режим на вывод данных
  Serial.begin(9600);
}

void loop() {
  if (Serial.available()) {
    commandValue = Serial.read();
  }

  if (commandValue == '1') {
    digitalWrite(ledPin, HIGH); // включаем светодиод
  }
  else {
    digitalWrite(ledPin, LOW); // в противном случае выключаем
  }
  delay(10); // задержка перед следующим чтением данных
}
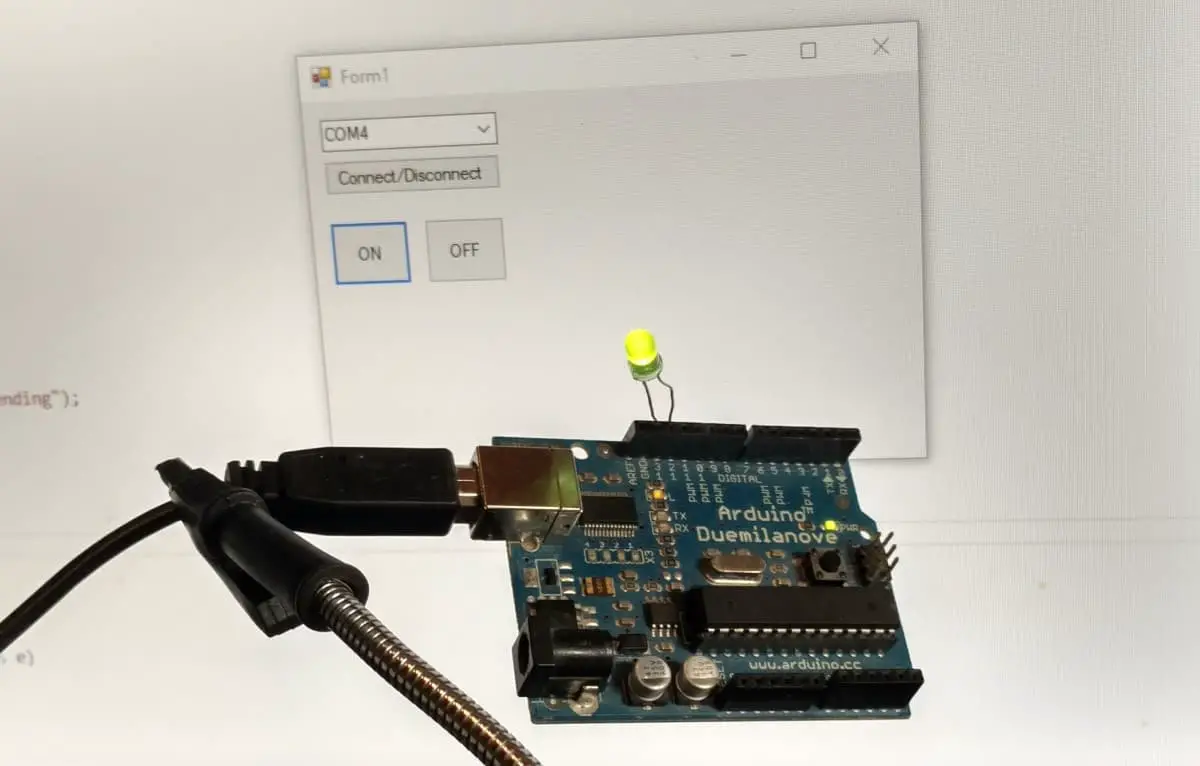
Запускаем приложение на C#, соединяется с платой и посылаем либо «1» (третья кнопка), либо «0» (четвёртая кнопка). В зависимости от нажатой кнопки на плате светодиод будет загораться или гаснуть.
Реклама
Introduction
Serial port data can be read in many ways and many devices communicate via the serial port. In my project I had the need to implement serial port communication
for a RFID reader. This is a sample example to read data from the serial port and display on the
Windows Forms TextBox control.
Using the code
To begin, let’s create a C# Windows Forms application in Visual Studio 2008 (hope it will work in VS 2005/2010 also, though not tested by myself).
Add a textbox, a button control and a SerialPort control on to the form.
Declare a string variable as private:
private string DispString; //used to store the values read
In the form Load event , write the code as shown below:
private void Form1_Load(object sender, EventArgs e)
{
    //Port name can be identified by checking the ports
    // section in Device Manager after connecting your device
    serialPort1.PortName = "COM5";
    //Provide the name of port to which device is connected

    //default values of hardware[check with device specification document]
    serialPort1.BaudRate = 9600;
    serialPort1.Parity = Parity.None;
    serialPort1.StopBits = StopBits.One;
    serialPort1.Handshake = Handshake.None;

    serialPort1.Open(); //opens the port
    serialPort1.ReadTimeout = 200;
    if (serialPort1.IsOpen)
    {
        DispString = "";
        txtCardKeyDeactivate.Text = "";
    }
    serialPort1.DataReceived += new SerialDataReceivedEventHandler(serialPort1_DataReceived);
}
Although the code is self explanatory, I will explain little.
When the application starts, the serial port is opened to read the received data,you need to set up an event.
serialPort1.DataReceived += new SerialDataReceivedEventHandler(serialPort1_DataReceived);
It is always better to set up the event before the serial port is opened.
Now lets declare an event handler to handle the event. The code to manipulate the read data can be specified here.
private void serialPort1_DataReceived(object sender, System.IO.Ports.SerialDataReceivedEventArgs e)
{
    if (textBox1.Text.Length >= 12)
    {
        serialPort1.Close(); //call your own method to perform some operation
    }
    else
    {
        DispString = serialPort1.ReadExisting();
        this.Invoke(new EventHandler(DisplayText));
    }
}
In my example the RFID tag had 12 letters value and only one card need to be read till a particular operation is completed.
So, I have set a condition to close the port if string variable has length of 12. Actually RFID readers can read more than 100 tags per minute.
Then you can store the values in some array and according to your need you can manipulate them. But if your tags have the same count like 878BGFFJJJHG, 78766HGGBVVV
and you have to make sure that each tag is read then you can specify some condition like the above code.
You can use threading also but if you don’t like to use threading then you can use a condition.
DispString = serialPort1.ReadExisting();
I insist that you should use condition as the above code for a tag [78766HGGBVVV] may return values of one letter at a time and it will be very fast.
So to make sure that a tag has been read completely find the length and use the condition to do some operation or read another tag.
Now, you can’t assign the value read directly to a textbox in the same event handler as it will throw some exception. You have to use the Invoke method
to call your method, which can do the appending work in case of my program or
manipulation work in your problem etc.
this.Invoke(new EventHandler(DisplayText));
The below DisplayText method is called by the invoke method.
private void DisplayText(object sender, EventArgs e)
{
    textBox1.AppendText(DispString);
}
After the read operation is completed make sure you close the serial port.
if (serialPort1.IsOpen)
serialPort1.Close();
Points of Interest
There are many ways to read data from serial port.
About
In this tutorial, we will be using Visual Studio to make a C# Windows Forms Application. The app will communicate with the Arduino over a serial port. The Arduino will be programmed to turn on or off an LED based on what it receives from the App.
Hardware Used
- #adAmazon LinkArduino
Windows App
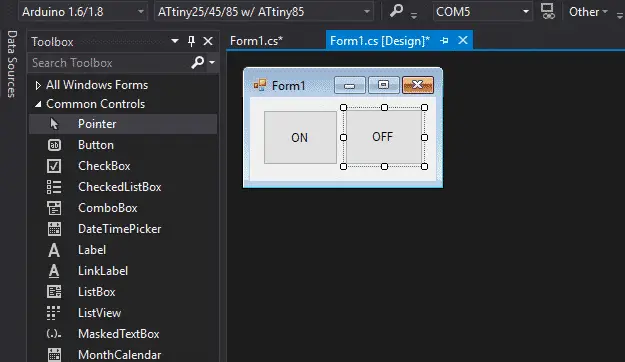
Open up visual studio and create a new wfa(windows frorms application) project.
Add two buttons, set the text of one to ON and the other to OFF.
Add two buttons, set the text of one to ON and the other to OFF. In the properties window find the name property and rename the on button to onButton. Do the same thing for the off button(writing off instead of on of course).

Next, double click on the on button to make an event handler for it. Do the same for the off button. Whenever the button gets clicked the code inside the event handler will get executed.
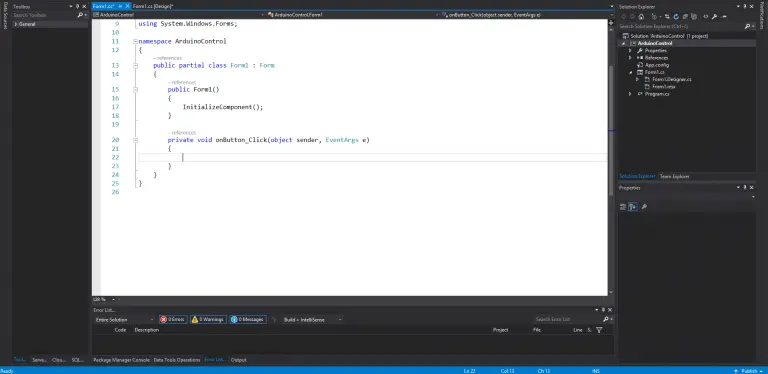
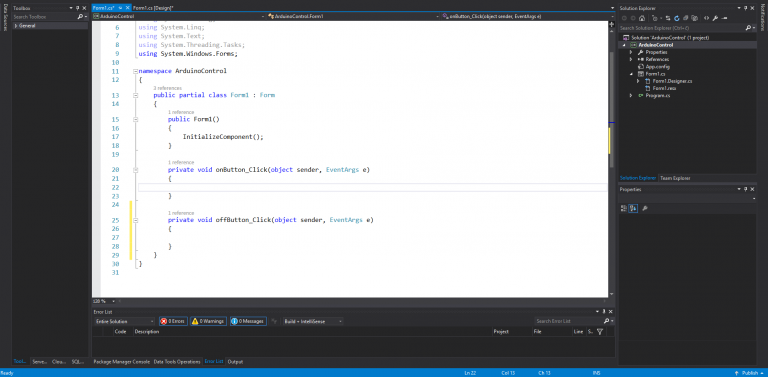
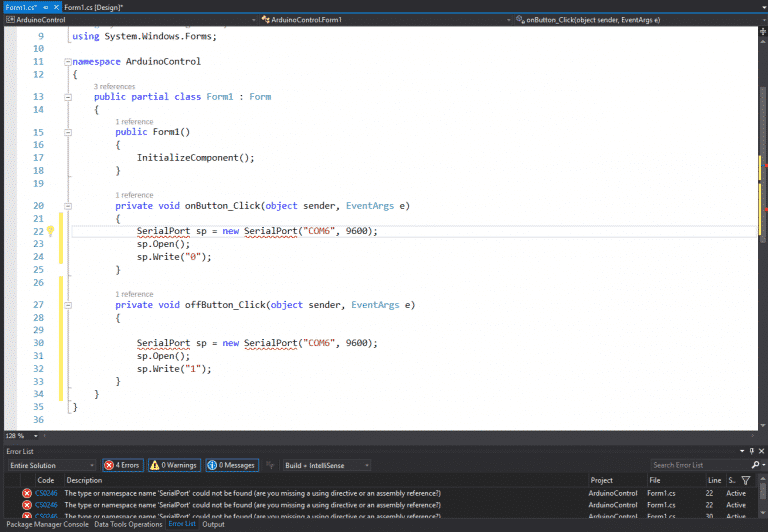
Insert this code into the event handlers(for the off button change the Write() parameter from “1” to “0”):
//Setup port by providing the port name and baud rate.
SerialPort sp = new SerialPort("COM6", 9600);
//Open port.
sp.Open();
//Write to port.
sp.Write("1");
//Close port.
sp.Close();
As of right now just replace the “COM6” with the name of whatever port your Arduino is currently connected to. Later on, we’ll implement a dropdown to choose a port from.
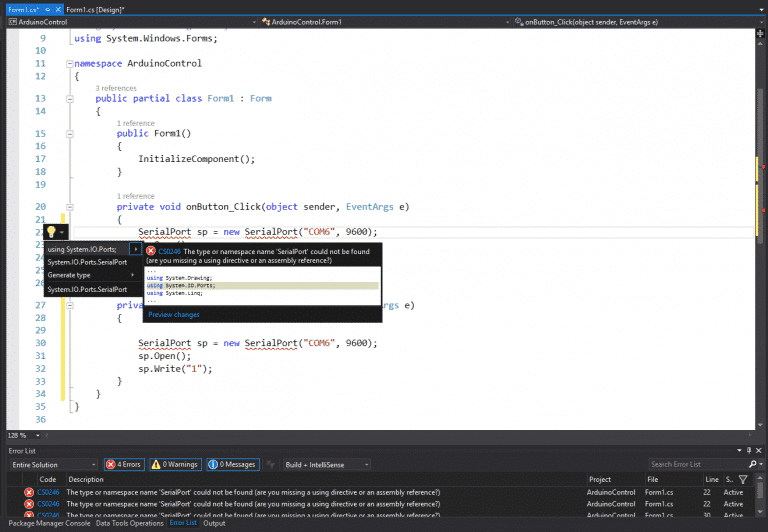
There will be an error saying that SerialPort couldn’t be found. To fix it include the serial port namespace. Just press Ctrl + . and select using System.IO.Ports. This using System.IO.Ports; line will be added to the top of your file and all the errors should be gone.
This should all work but it’s a really good idea to implement exception handling when dealing with serial ports. For example, if the port isn’t available or doesn’t exist our application will throw an exception. If left unhandled the exception will crash the app, to prevent this we need to handle the exception and give the user a message saying we couldn’t connect to the port.
using System;
using System.Collections.Generic;
using System.ComponentModel;
using System.Data;
using System.Drawing;
using System.IO.Ports;
using System.Linq;
using System.Text;
using System.Threading.Tasks;
using System.Windows.Forms;

namespace ArduinoControl
{
    public partial class Form1 : Form
    {
        public Form1()
        {
            InitializeComponent();
        }

        private void onButton_Click(object sender, EventArgs e)
        {
            try
            {
                SerialPort sp = new SerialPort("COM6", 9600);
                sp.Open();
                sp.Write("1");
                sp.Close();
            }
            catch (Exception ex)
            {
                MessageBox.Show(ex.Message);
            }

        }

        private void offButton_Click(object sender, EventArgs e)
        {
            try
            {
                SerialPort sp = new SerialPort("COM6", 9600);
                sp.Open();
                sp.Write("0");
                sp.Close();
            }
            catch (Exception ex)
            {
                MessageBox.Show(ex.Message);
            }
        }
    }
}
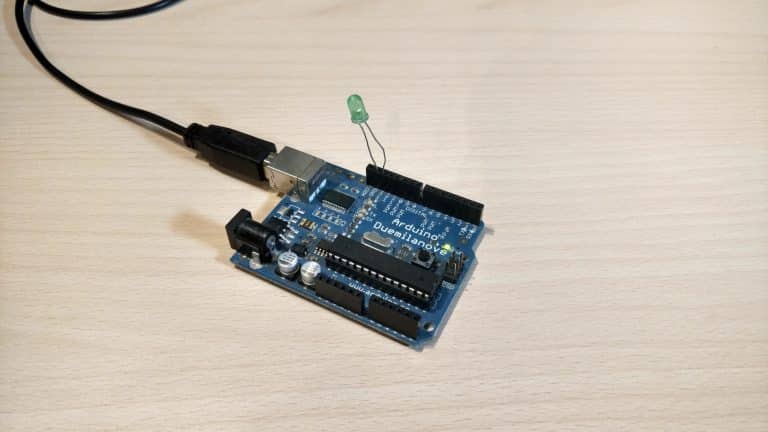
The Arduino Part
Hardware
Connect the LED from PIN 13 to GND.
Software
The Arduino code is very simple. First, we declare pin 13 as an output and begin serial communication at a baud rate of 9600. In the loop, we read the serial data and check whether a 1 or a 0 was received. If one is received the output gets turned on else it gets turned off.
int ledPin = 13;

void setup()
{
	pinMode(ledPin, OUTPUT);
	Serial.begin(9600);
}

void loop()
{
  char ch;
  while(Serial.available() > 0)
  {
    ch = Serial.read();

  	if (ch == '1')
  	{
  		digitalWrite(ledPin, HIGH);
  	}
  	else if (ch == '0')
  	{
  		digitalWrite(ledPin, LOW);
  	}
  }
}
Result
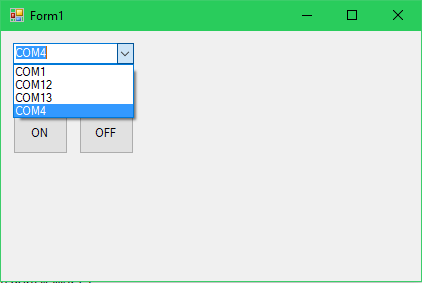
Improvements
Right now the COM port is hardcoded so it has to be changed in the code every time. I did this for demonstration purposes as it’s the simplest way(and not the best way) to make a connection. Instead, we should be able to get all the available ports in a dropdown menu and select the one we want to connect to.
Update the GUI by adding a connect/disconnect button and adding a dropdown menu/combo box.

And update the code like so.
using System;
using System.Collections.Generic;
using System.ComponentModel;
using System.Data;
using System.Drawing;
using System.IO.Ports;
using System.Linq;
using System.Text;
using System.Threading.Tasks;
using System.Windows.Forms;

namespace ArduinoControl
{
    public partial class Form1 : Form
    {
        bool connected = false;
        SerialPort sp;
        public Form1()
        {
            InitializeComponent();
            var ports = SerialPort.GetPortNames();
            portComboBox.DataSource = ports;
        }

        private void onButton_Click(object sender, EventArgs e)
        {
            try
            {
                if (connected)
                {
                    sp.Write("1");
                }
                else
                {
                    MessageBox.Show("Connect to a port before sending");
                }
            }
            catch (Exception ex)
            {
                MessageBox.Show(ex.Message);
            }

        }

        private void offButton_Click(object sender, EventArgs e)
        {
            try
            {
                if (connected)
                {
                    sp.Write("0");
                }
                else
                {
                    MessageBox.Show("Connect to a port before sending");
                }

            }
            catch (Exception ex)
            {
                MessageBox.Show(ex.Message);
            }
        }

        private void connectButton_Click(object sender, EventArgs e)
        {
            try
            {

                sp = new SerialPort(portComboBox.SelectedItem.ToString(), 9600);

                if (!connected)
                {
                    sp.Open();
                    connected = true;

                    MessageBox.Show("Serial port connected.");
                }
                else
                {
                    sp.Close();
                    sp.Dispose();

                    connected = false;

                    MessageBox.Show("Serial port disconnected.");
                }

            }
            catch (Exception ex)
            {
                MessageBox.Show(ex.Message);
            }
        }
    }
}
Related Posts:
Leave a Reply
Чем асинхронная логика (схемотехника) лучше тактируемой, как я думаю, что помимо энергоэффективности — ещё и безопасность.
Hrethgir 14.05.2025
Помимо огромного плюса в энергоэффективности, асинхронная логика — тотальный контроль над каждым совершённым тактом, а значит — безусловная безопасность, где безконтрольно не совершится ни одного. . .
Многопоточные приложения на C++
bytestream 14.05.2025
C++ всегда был языком, тесно работающим с железом, и потому особеннно эффективным для многопоточного программирования. Стандарт C++11 произвёл революцию, добавив в язык нативную поддержку потоков,. . .
Stack, Queue и Hashtable в C#
UnmanagedCoder 14.05.2025
Каждый опытный разработчик наверняка сталкивался с ситуацией, когда невинный на первый взгляд List<T> превращался в узкое горлышко всего приложения. Причина проста: универсальность – это прекрасно,. . .
Как использовать OAuth2 со Spring Security в Java
Javaican 14.05.2025
Протокол OAuth2 часто путают с механизмами аутентификации, хотя по сути это протокол авторизации. Представьте, что вместо передачи ключей от всего дома вашему другу, который пришёл полить цветы, вы. . .
Анализ текста на Python с NLTK и Spacy
AI_Generated 14.05.2025
NLTK, старожил в мире обработки естественного языка на Python, содержит богатейшую коллекцию алгоритмов и готовых моделей. Эта библиотека отлично подходит для образовательных целей и. . .
Реализация DI в PHP
Jason-Webb 13.05.2025
Когда я начинал писать свой первый крупный PHP-проект, моя архитектура напоминала запутаный клубок спагетти. Классы создавали другие классы внутри себя, зависимости жостко прописывались в коде, а о. . .
Обработка изображений в реальном времени на C# с OpenCV
stackOverflow 13.05.2025
Объединение библиотеки компьютерного зрения OpenCV с современным языком программирования C# создаёт симбиоз, который открывает доступ к впечатляющему набору возможностей. Ключевое преимущество этого. . .
POCO, ACE, Loki и другие продвинутые C++ библиотеки
NullReferenced 13.05.2025
В C++ разработки существует такое обилие библиотек, что порой кажется, будто ты заблудился в дремучем лесу. И среди этого многообразия POCO (Portable Components) – как маяк для тех, кто ищет. . .
Паттерны проектирования GoF на C#
UnmanagedCoder 13.05.2025
Вы наверняка сталкивались с ситуациями, когда код разрастается до неприличных размеров, а его поддержка становится настоящим испытанием. Именно в такие моменты на помощь приходят паттерны Gang of. . .
Создаем CLI приложение на Python с Prompt Toolkit
py-thonny 13.05.2025
Современные командные интерфейсы давно перестали быть черно-белыми текстовыми программами, которые многие помнят по старым операционным системам. CLI сегодня – это мощные, интуитивные и даже. . .
There are mainly three key points used in the serialPort1 control:
1. Configure the serial port number
2. Configure the data receiving event
3. Open the serial port
The key code is as follows:
        private void Form1_Load(object sender, EventArgs e)
        {
            serialPort1.PortName = "COM1";
            serialPort1.DataReceived += SerialPort1_DataReceived;
            serialPort1.Open();
        }

        private void SerialPort1_DataReceived(object sender, System.IO.Ports.SerialDataReceivedEventArgs e)
        {
            try
            {
                int len = serialPort1.BytesToRead;
                Byte[] buf = new byte[len];
                int length = serialPort1.Read(buf, 0, len);
                string result = System.Text.Encoding.ASCII.GetString(buf);
                UpdateTextBox(result);
            }
            catch (Exception ex)
            {
                UpdateTextBox(ex.Message);
            }

        }
Test tools used in this use case:
Serial Port
pwd: 3gkk