
Последнее обновление: 31.10.2015
PictureBox предназначен для показа изображений. Он позволяет отобразить файлы в формате bmp, jpg, gif, а также метафайлы ищображений
и иконки. Для установки изображения в PictureBox можно использовать ряд свойств:
-
Image: устанавливает объект типа Image
-
ImageLocation: устанавливает путь к изображению на диске или в интернете
-
InitialImage: некоторое начальное изображение, которое будет отображаться во время загрузки главного изображения,
которое хранится в свойстве Image -
ErrorImage: изображение, которое отображается, если основное изображение не удалось загрузить в PictureBox
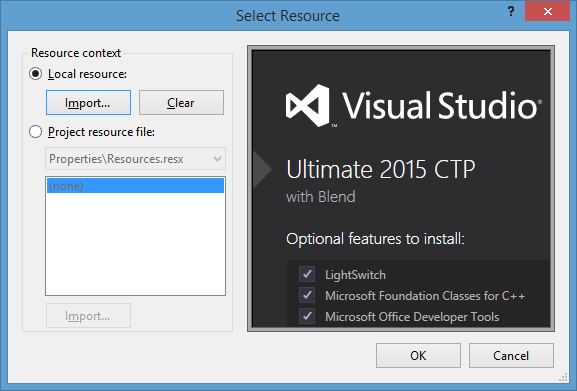
Чтобы установить изображение в Visual Studio, надо в панели Свойств PictureBox выбрать свойство Image. В этом случае нам откроется окно импорта изображения
в проект, где мы собственно и сможем выбрать нужное изображение на компьютере и установить его для PictureBox:
И затем мы сможем увидеть данное изображение в PictureBox:
Либо можно загрузить изображение в коде:
pictureBox1.Image = Image.FromFile("C:\Users\Eugene\Pictures\12.jpg");
Размер изображения
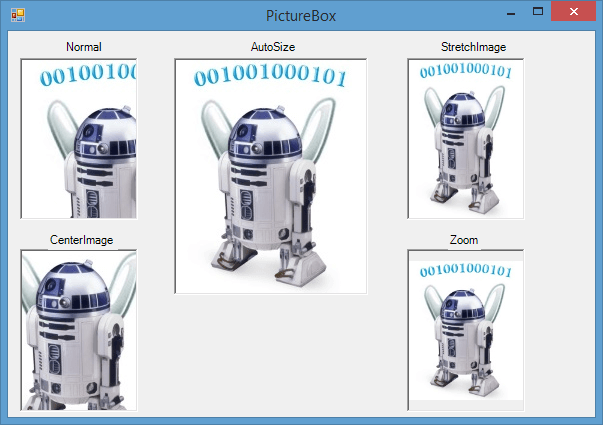
Для установки изображения в PictureBox используется свойство SizeMode, которое принимает следующие значения:
-
Normal: изображение позиционируется в левом верхнем углу PictureBox, и размер изображения не изменяется. Если
PictureBox больше размеров изображения, то по справа и снизу появляются пустоты, если меньше — то изображение обрезается -
StretchImage: изображение растягивается или сжимается таким обраом, чобы вместиться по всей ширине и высоте элемента PictureBox -
AutoSize: элемент PictureBox автоматически растягивается, подстраиваясь под размеры изображения -
CenterImage: если PictureBox меньше изображения, то изображение обрезается по краям и выводится только его центральная часть.
Если же PictureBox больше изображения, то оно позиционируется по центру. -
Zoom: изоражение подстраивается под размеры PictureBox, сохраняя при этом пропорции
Элемент PictureBox в C# Windows Forms предоставляет удобный способ отображения изображений в графическом интерфейсе пользователя. Он позволяет загружать, отображать и манипулировать изображениями, что делает его незаменимым инструментом для разработки приложений, где требуется работа с графикой. В этой статье мы рассмотрим основные аспекты использования PictureBox, включая загрузку изображений, их отображение и базовые манипуляции.
Основные возможности PictureBox
PictureBox предоставляет следующие основные возможности:
- Отображение изображений: Загрузка и отображение изображений из файлов или ресурсов.
- Масштабирование: Изменение размера изображения для подгонки под размеры PictureBox.
- Рисование на изображении: Использование графических методов для рисования поверх изображения.
- События: Обработка событий, таких как щелчки мыши на изображении.
Загрузка и отображение изображений
Чтобы отобразить изображение в PictureBox, вы можете загрузить его из файла или ресурса. Вот пример загрузки изображения из файла:
public Form1()

{

    InitializeComponent();
// Загрузка изображения из файла
pictureBox1.Image = Image.FromFile("path_to_image.jpg");
// Масштабирование изображения
pictureBox1.SizeMode = PictureBoxSizeMode.StretchImage;
}
Масштабирование изображений
PictureBox поддерживает несколько режимов масштабирования изображений, которые определяют, как изображение будет отображаться внутри элемента:
- Normal: Изображение отображается в своем оригинальном размере.
- StretchImage: Изображение растягивается, чтобы заполнить весь
PictureBox. - AutoSize: PictureBox автоматически изменяет свой размер в соответствии с размером изображения.
- CenterImage: Изображение центрируется внутри PictureBox.
- Zoom: Изображение масштабируется с сохранением пропорций, чтобы поместиться в
PictureBox.
Пример использования масштабирования:
pictureBox1.SizeMode = PictureBoxSizeMode.Zoom;
Рисование на изображении
Вы можете использовать класс Graphics для рисования поверх изображения в PictureBox. Это полезно для добавления текста, линий или других графических элементов:
private void DrawOnImage()

{

    using (Graphics g = Graphics.FromImage(pictureBox1.Image))

    {

        // Рисование текста на изображении

        g.DrawString("Hello, PictureBox!", new Font("Arial", 20), Brushes.Red, 10, 10);

    }
// Обновление PictureBox для отображения изменений
pictureBox1.Refresh();
}
Обработка событий
PictureBox поддерживает различные события, такие как Click, MouseEnter, MouseLeave и другие. Вы можете использовать эти события для добавления интерактивности:
private void pictureBox1_Click(object sender, EventArgs e)

{

    MessageBox.Show("Изображение было нажато!");

}
Заключение
Элемент PictureBox в C# Windows Forms предоставляет мощные и гибкие возможности для работы с изображениями в графическом интерфейсе. С его помощью можно легко загружать, отображать и манипулировать изображениями, а также добавлять интерактивные элементы. Это делает PictureBox незаменимым инструментом для разработчиков, работающих с графикой в приложениях на платформе .NET.
Для большего понимания, рекомендую видеокурс Программирование на C# с Нуля до Гуру, в котором подробнее рассказано о C#
-
Создано 27.03.2025 09:33:12
-
Михаил Русаков
Копирование материалов разрешается только с указанием автора (Михаил Русаков) и индексируемой прямой ссылкой на сайт (http://myrusakov.ru)!
Добавляйтесь ко мне в друзья ВКонтакте: http://vk.com/myrusakov.
Если Вы хотите дать оценку мне и моей работе, то напишите её в моей группе: http://vk.com/rusakovmy.
Если Вы не хотите пропустить новые материалы на сайте,
то Вы можете подписаться на обновления: Подписаться на обновления
Если у Вас остались какие-либо вопросы, либо у Вас есть желание высказаться по поводу этой статьи, то Вы можете оставить свой комментарий внизу страницы.
Если Вам понравился сайт, то разместите ссылку на него (у себя на сайте, на форуме, в контакте):
-
Кнопка:
Она выглядит вот так:
-
Текстовая ссылка:
Она выглядит вот так: Как создать свой сайт
- BB-код ссылки для форумов (например, можете поставить её в подписи):
Sign in to your MUO account

Windows Forms is a framework that lets you build desktop applications. You can click and drag components like buttons onto a visual user interface. It also helps you manually create various shapes within your code.
This article will show you how to add lines, shapes, and images to your application. This tutorial uses the Visual Studio 2019 Community Edition to show examples.
What Are the Built-In Classes Used for Drawing Graphics?
Windows Forms uses the C# programming language. Its built-in classes and methods allow you to draw various shapes onto a Windows Form canvas. These include the Graphics, Pen, Color, and Brush classes.
|
Class |
Description |
|---|---|
|
Graphics |
The Graphics class allows you to draw shapes and lines onto the canvas. It includes methods such as:
|
|
Pen |
The Pen class allows you to specify the properties of a ‘pen’ tip which you can use to draw your shapes. You can specify properties such as color, thickness, or dash style. Methods include:
|
|
Color |
A color object made up of R (red), G (green), and B (blue) values. You will need a color object for many of the built-in methods that create shapes. |
|
SolidBrush, HatchBrush, TextureBrush |
These brush classes derive from the «Brush» interface. These classes allow you to color in blank spaces on the canvas. You can also choose to fill the spaces using different patterns or textures. You can specify properties such as the color. |
|
Rectangle, Line, Polygon, Ellipse |
You can create objects based on these shapes, and use them when calling methods such as DrawRectangle(). Instead of passing the x, y, width, and height as arguments, you can choose to pass an existing Rectangle object instead. |
To view the source code for a running example of the above tutorial, visit the GitHub repository. You can try out the following examples once you’ve created a Winforms application.
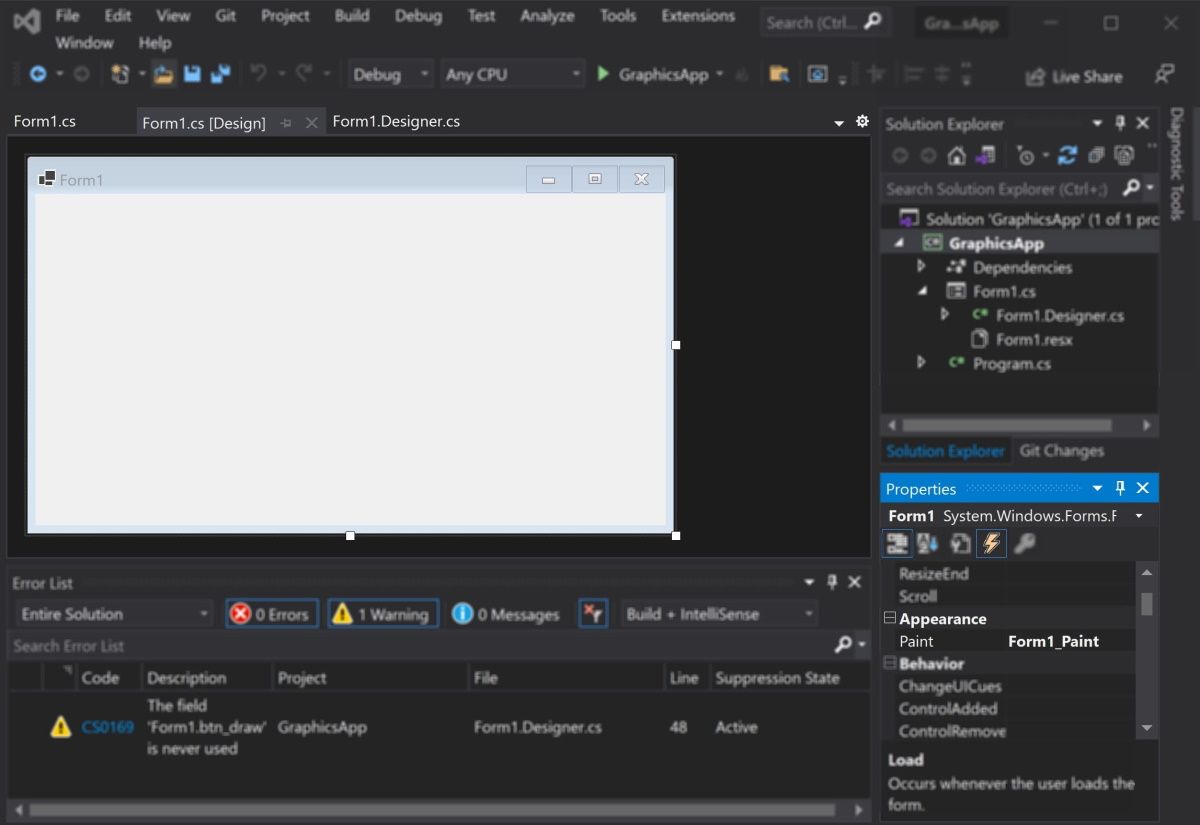
How to Add a Paint on Form Load Event Handler
First, add an event handler to draw shapes when the canvas loads.
-
Add a Paint function for the form.
        private void Form1_Paint(object sender, PaintEventArgs e)
{
    // Code goes here
} - Go into the Design View Tab.
- In the Properties window, select the lightning icon to open the «Events» tab.
-
In «Paint», under «Appearance», select the Form1_Paint function. This will execute the function when you run the application.

How to Draw Lines Onto a Windows Form Canvas
You can use a Color, Pen, and the DrawLine() method to draw lines on a canvas.
-
Inside the Form1_Paint() function, create a Color object with the color you want the line to be. Then, create a Pen object to draw the line with.
        Color black = Color.FromArgb(255, 0, 0, 0);
Pen blackPen = new Pen(black); -
The DrawLine() method from the Graphics class will draw a line using the pen. This will start drawing a line from an x, y position to another x, y position.
e.Graphics.DrawLine(blackPen, 300, 200, 800, 200); -
You can modify the properties for the pen object to change its width, dash style, and start or end cap.
        blackPen.Width = 20;
blackPen.DashStyle = System.Drawing.Drawing2D.DashStyle.Dash;
blackPen.StartCap = System.Drawing.Drawing2D.LineCap.ArrowAnchor;
e.Graphics.DrawLine(blackPen, 300, 200, 800, 200); -
Press the green play button at the top of Visual Studio to see the changes.


How to Draw Shapes Such as Rectangles and Circles
You can use the shapes classes for different shapes, or draw shapes manually onto the canvas.
-
Create a Color and Pen object as shown in the previous steps. Then, use the DrawRectangle() method to create the rectangle. The arguments are the x and y coordinates for the top-left of the rectangle, along with its width and height.
        Color red = Color.FromArgb(255, 255, 0, 0);
Pen redPen = new Pen(red);
redPen.Width = 5;
e.Graphics.DrawRectangle(redPen, 100, 100, 500, 200); -
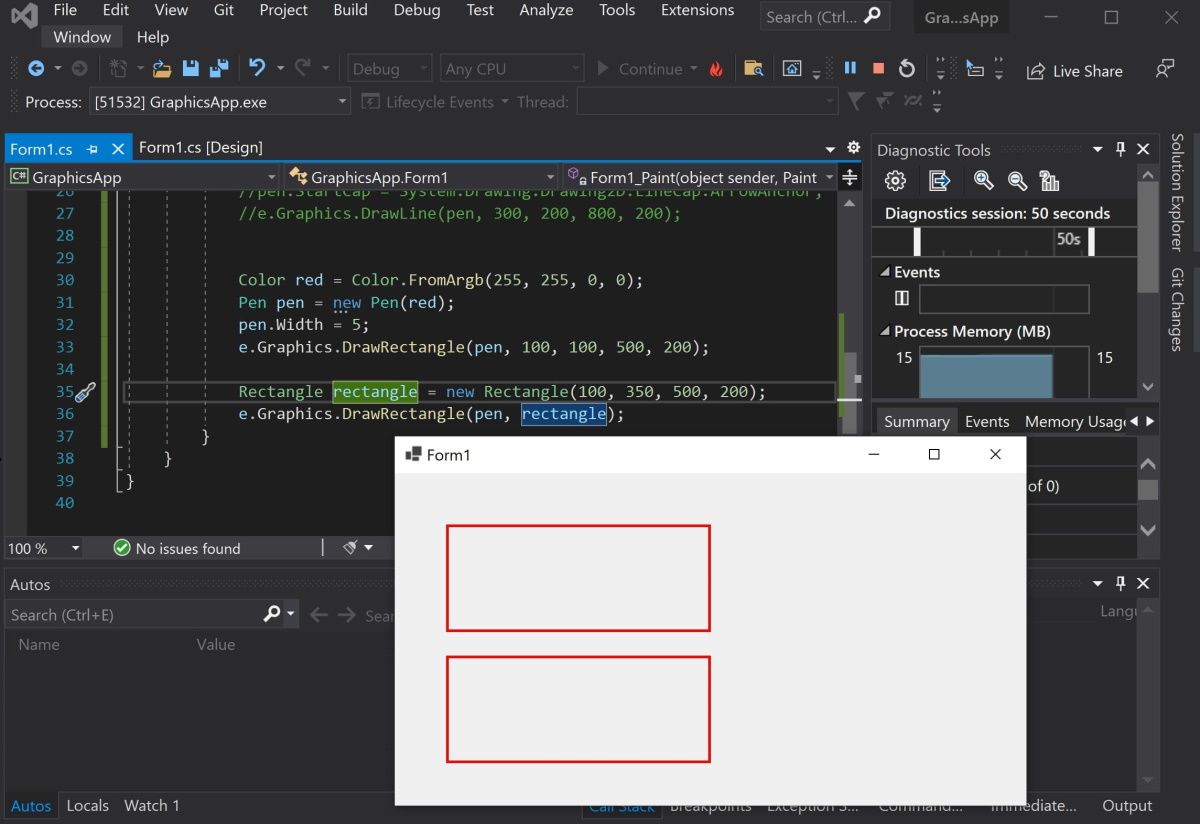
You can also create a rectangle using the Rectangle Class. First, create a Rectangle object. The arguments are also the x and y coordinates for the top-left corner, width, and height.
Rectangle rectangle = new Rectangle(100, 350, 500, 200); -
Use the DrawRectangle() function to draw the rectangle. Instead of passing the x, y, width, and height like before, you can use the Rectangle object instead.
e.Graphics.DrawRectangle(redPen, rectangle); -
Press the green play button at the top of Visual Studio to see the changes.

-
Go back to the code to draw other shapes. Use the DrawEllipse() function to draw a circle.
        Color green = Color.FromArgb(255, 0, 255, 0);
Pen greenPen = new Pen(green);
greenPen.Width = 5;
e.Graphics.DrawEllipse(greenPen, 400, 150, 400, 400);
When you draw a circle, the x and y coordinates (x=400, y=150) refer to the top-left corner of the circle, not the center of the circle.

-
To draw other shapes such as triangles or hexagons, use the DrawPolygon() method. Here you can specify a list of coordinates to represent the points of the shape.
        Color blue = Color.FromArgb(255, 0, 0, 255);
Pen bluePen = new Pen(blue);
bluePen.Width = 5;PointF[] coordinatesForTriangle = new PointF[] {
    new PointF(400, 150),
    new PointF(300, 300),
    new PointF(500, 300)
};e.Graphics.DrawPolygon(bluePen, coordinatesForTriangle);
The DrawPolygon() method will draw lines between the points specified.


How to Use the Brush Class to Fill In Shapes With Color
You can use the FillRectangle(), FillEllipses() or FillTriangle() methods to create shapes with a solid color.
-
First, create a brush object.
        Color purple = Color.FromArgb(255, 128, 0, 0);
SolidBrush solidBrush = new SolidBrush(purple); -
Use the FillRectangle(), FillEllipses() or FillTriangle() methods. They work the same way as the draw functions above, except instead of a Pen, they use a Brush object.
        e.Graphics.FillRectangle(solidBrush, 50, 50, 200, 250);
e.Graphics.FillEllipse(solidBrush, 300, 50, 200, 200);
e.Graphics.FillPolygon(solidBrush, new PointF[] { new PointF(700, 150), new PointF(600, 300), new PointF(800, 300) });
-
You can also input a shape object directly instead of providing coordinates.
        Rectangle rectangle = new Rectangle(100, 350, 500, 200);
e.Graphics.FillRectangle(solidBrush, rectangle); -
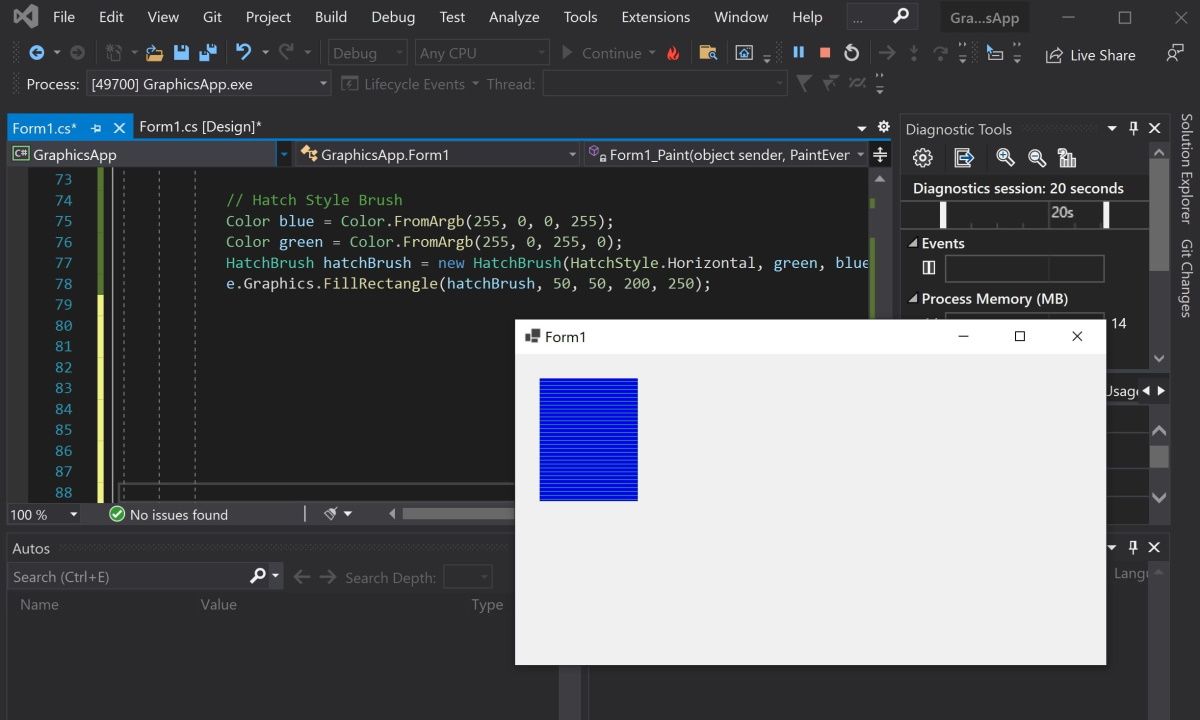
Use the HatchBrush to fill the shape using a different fill style, such as a horizontal or vertical pattern.
        Color blue = Color.FromArgb(255, 0, 0, 255);
Color green = Color.FromArgb(255, 0, 255, 0);
HatchBrush hatchBrush = new HatchBrush(HatchStyle.Horizontal, green, blue);
e.Graphics.FillRectangle(hatchBrush, 50, 50, 200, 250);
-
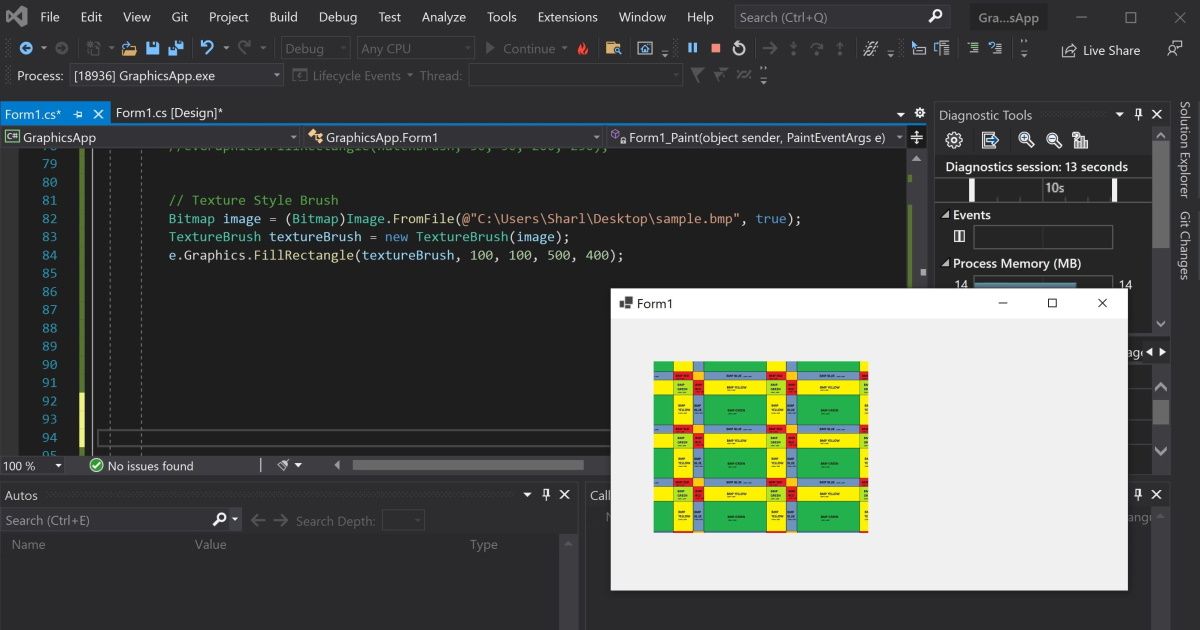
You can use the TextureBrush to fill a shape using an image. Here, create a bitmap by pointing to an image file. Instead of creating a brush using a color, create it using the image.
        Bitmap image = (Bitmap)Image.FromFile(@"C:\Users\Sharl\Desktop\flag.bmp", true);
TextureBrush textureBrush = new TextureBrush(image);
e.Graphics.FillRectangle(textureBrush, 100, 100, 500, 400);

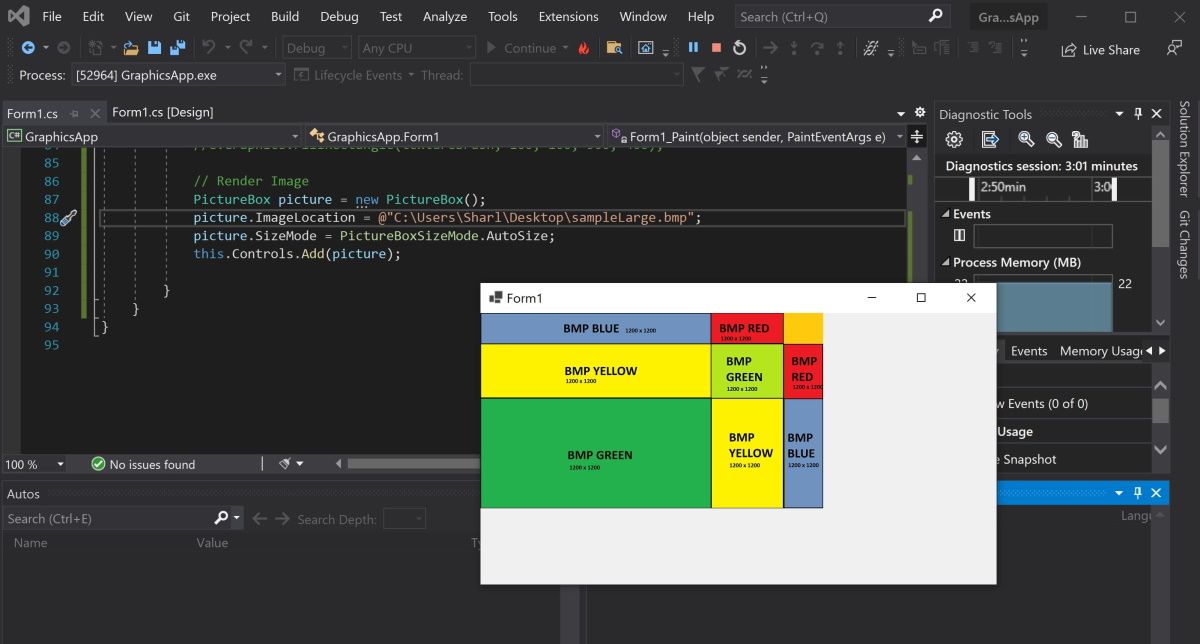
How to Render Images Onto the Form
To render an image, create a PictureBox control object and add it to the form.
-
Create a PictureBox control object using an image file.
        PictureBox picture = new PictureBox();
picture.ImageLocation = @"C:\Users\Sharl\Desktop\flagLarge.bmp"; -
Set the size of the image and add it onto the form so it renders.
        picture.SizeMode = PictureBoxSizeMode.AutoSize;
this.Controls.Add(picture); -
Press the green start button at the top to view the image.

Adding More Shapes to Your Windows Form
You should now understand how to add lines, shapes, and images to your Windows form. You can combine shapes to create new shapes. You can also play around with the built-in functions to create more complex shapes.
Introduction
Browsing and displaying an image in a picture box tool using Windows Forms application is a very simple task. In this application, we use the following classes/controls:
- OpenFileDialog
- PictureBox
- TextBox
- Button
Main Functions
This functions simply perform the following steps,
- Open a file dialog box so that a user can select an image from his/her machine
- Browse the image
- Display selected image in a picture box on a Form
- Display image file path in text box
Here is the code,
// open file dialog
OpenFileDialog open = new OpenFileDialog();
// image filters
open.Filter = "Image Files(*.jpg; *.jpeg; *.gif; *.bmp)|*.jpg; *.jpeg; *.gif; *.bmp";
if (open.ShowDialog() == DialogResult.OK) {
    // display image in picture box
    pictureBox1.Image = new Bitmap(open.FileName);
    // image file path
    textBox1.Text = open.FileName;
}
What is an image filter?
Image filter is basically a filter that restricts the user to select only the valid image file. You can remove the image filter.
Покажем, как загрузить картинку в PictureBox из файла, используя язык программирования C#.
Для того чтобы загрузить картинку в PictureBox из файла, воспользуйтесь следующим кодом:
|
1 2 3 4 5 6 7 8 9 10 11 12 13 14 15 16 17 18 19 20 |
Bitmap image; //Bitmap для открываемого изображения OpenFileDialog open_dialog = new OpenFileDialog(); //создание диалогового окна для выбора файла open_dialog.Filter = «Image Files(*.BMP;*.JPG;*.GIF;*.PNG)|*.BMP;*.JPG;*.GIF;*.PNG|All files (*.*)|*.*»; //формат загружаемого файла if (open_dialog.ShowDialog() == DialogResult.OK) //если в окне была нажата кнопка «ОК» { try { image = new Bitmap(open_dialog.FileName); //вместо pictureBox1 укажите pictureBox, в который нужно загрузить изображение this.pictureBox1.Size = image.Size; pictureBox1.Image = image; pictureBox1.Invalidate(); } catch { DialogResult rezult = MessageBox.Show(«Невозможно открыть выбранный файл», «Ошибка», MessageBoxButtons.OK, MessageBoxIcon.Error); } } |
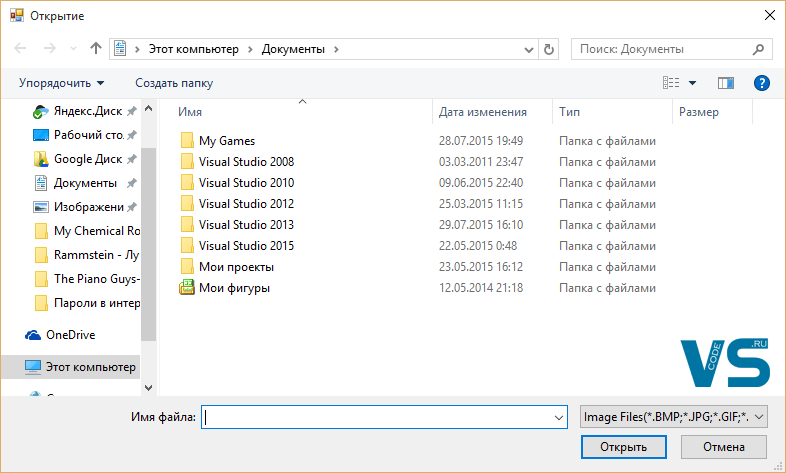
Диалоговое окно выбора файла
В случае ошибки открытия файла будет выведен MessageBox с соответствующим предупреждением.
Также в видео ниже подробно демонстрируется написание кода открытия изображения в PictureBox:
Скачать листинг
О том, как сохранить изображение из PictureBox можно прочитать вот здесь.