
Sign in to your MUO account
If you are creating a new desktop application, you may be following your own branding and design. This might include a custom color palette, UI design, or the icon that displays when a user opens your app.
When using Windows Forms to create your app, Visual Studio adds a default icon in the top-left corner of your application’s window. You can change this to an icon of your choice by modifying the form’s properties.
How to Change the Application’s Icon
You can change the default icon by accessing the form’s properties and uploading a new icon image.
- Create a new Windows Forms application or open up an existing one.
-
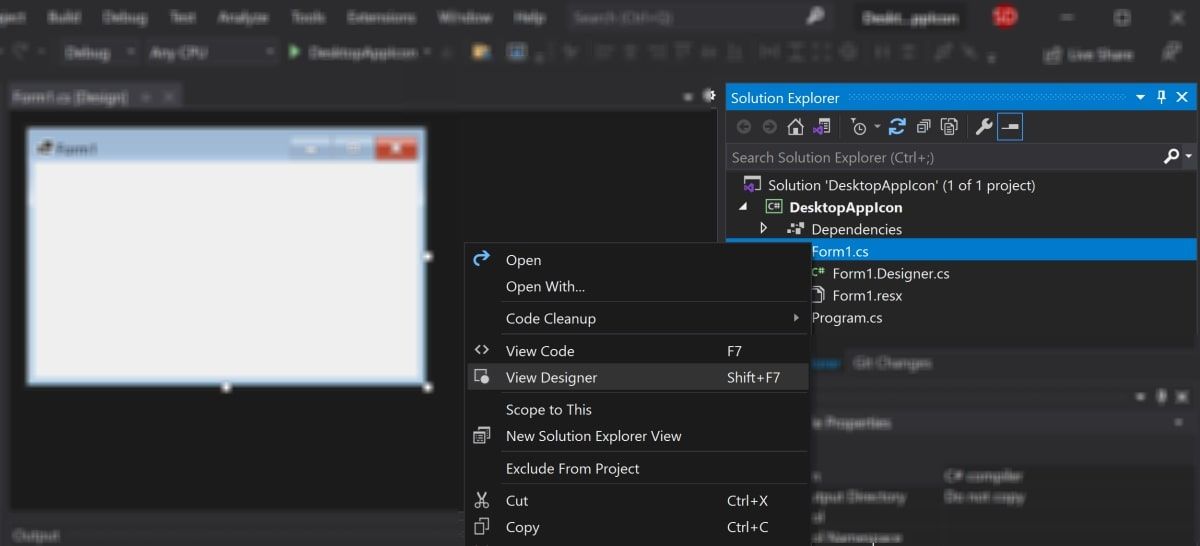
By default, the designer view should be open. If not, right-click on the Form in the Solution Explorer window and click on View Designer.

-
The designer view acts as a canvas that you can use to add and modify UI elements. It also reflects what your application will look like at runtime. The current icon for your application shows in the top-left corner of the form. If you do not have an icon, Visual Studio will use a default icon.

-
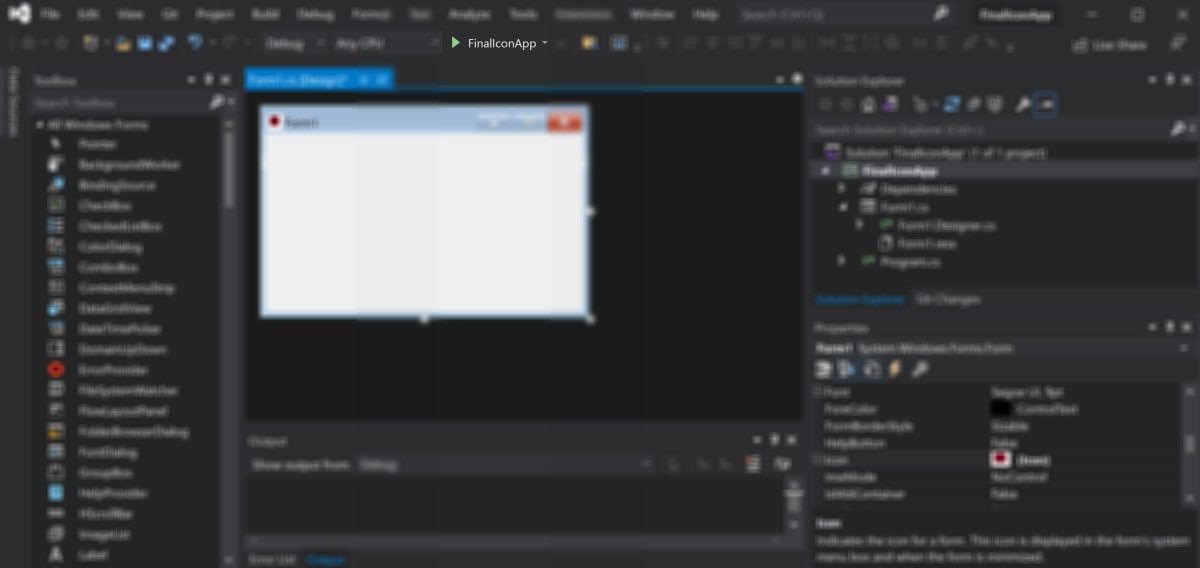
Highlight the form by selecting it, and navigate to the Properties pane. This is usually located in the lower right-hand corner of the Visual Studio window.

- Click on the three dots (…) next to the Icon field.
- In the new file explorer window pop-up, select your new icon. Upload a photo that uses an icon format such as an .ico file. If you are having trouble finding or creating icons, you can create a custom icon using Rainmeter.
-
In the file explorer window, click on open to save the file. This will update the canvas with the new icon.


How to Run the Application and View Your Icon
You can view what your new icon looks like at runtime by launching the application.
-
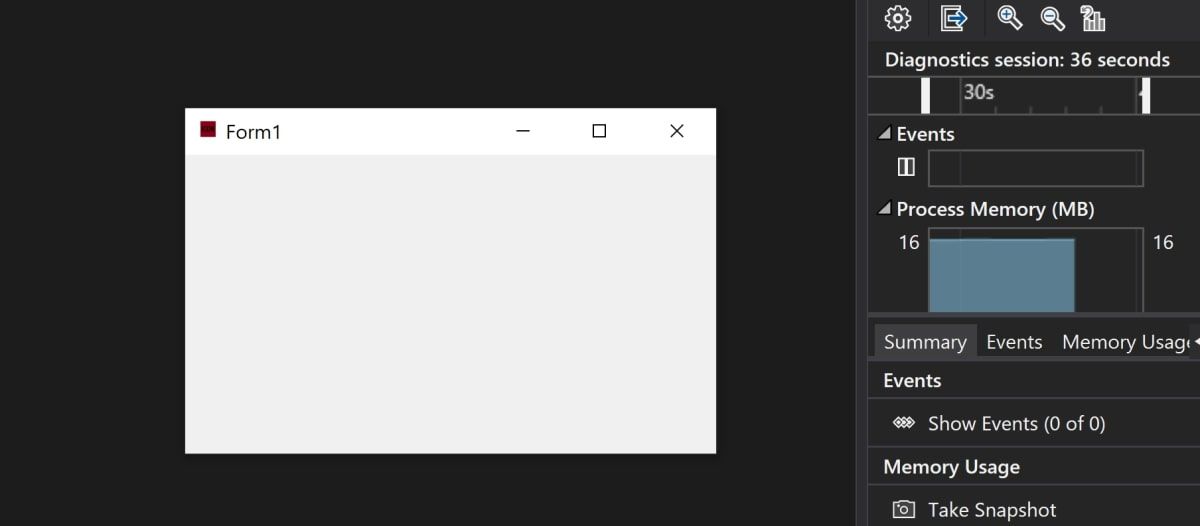
Click on the green play button at the top of the Visual Studio window.
-
Wait for the application to compile. Once completed, the application window will launch showing the new icon in the top-left corner.

Creating Desktop Applications Using Windows Forms
If you are developing an application using Windows Forms, there is a chance you may want to change the icon to match your design.
You can change the icon in Visual Studio by opening the properties window for the form. You can then upload a new icon image to the icon field.
You may also want to add other UI elements or images to your app. If so, you can learn more about how to add graphics to a Windows Form application.
The icons you are seeing on desktop is not a icon file. They are either executable files .exe or shortcuts of any application .lnk. So can only set icon which have .ico extension.
Go to Project Menu -> Your_Project_Name Properties ->
Application TAB -> Resources -> Icon
browse for your Icon, remember it must have .ico extension
You can make your icon in Visual Studio
Go to Project Menu -> Add New Item ->
Icon File
Tired of That Boring Default Icon? Let’s Fix It!
Okay, so you’ve built a Windows Forms application (WinForm). That’s awesome! But let’s be honest, that default icon… it’s kinda blah, right? It’s like wearing the same gray t-shirt every day. You need some flair! People often overlook this small detail, but a good icon makes your application look professional and polished. It’s the first visual cue users have, so it’s worth getting right. Plus, it just looks cooler.
Adding a custom icon to your WinForm application is actually pretty simple, and it can make a big difference in how people perceive your software. It’s like giving your app a little personality. We’re gonna cover a few different ways to do it, so you can pick the method that works best for you. Don’t worry; it’s not rocket science. I promise!
In this guide, I’m going to walk you through the steps to add a custom icon to your WinForm application. We’ll cover how to set it in Visual Studio, how to change it dynamically at runtime, and even how to make sure it looks good on different screen resolutions. So, grab your favorite beverage, fire up Visual Studio, and let’s get started!
By the end of this little tutorial, you’ll know how to:
- Set a static icon for your application in Visual Studio.
- Dynamically change the application icon at runtime.
- Make sure your icon looks crisp and clear, no matter the screen resolution.
So, what are we waiting for? Let’s jump in!
Let’s Get That Icon Changed!
There are a couple of ways to get this done. The easiest is using Visual Studio itself. But, if you want to get fancy, you can change the icon while the app is running. Let’s start with the simple way first.
Setting the Icon in Visual Studio (The Easy Way)
This is the most straightforward method, and it’s perfect if you just want to set a single, static icon for your application. Here’s how you do it:
- Open your project in Visual Studio. Duh, right?
- In the Solution Explorer, right-click on your project and select Properties. This opens the project’s property pages.
- In the Properties window, click on the Application tab. You should see a bunch of settings related to your application.
- Look for the Icon dropdown. It’s usually near the top of the Application tab.
- Click the Browse button and select your icon file (.ico). If you don’t have an icon file yet, you can create one using an online icon generator or a graphics editor like GIMP or Photoshop. There are tons of free icon makers online, so don’t stress about it.
That’s it! Visual Studio will automatically use the selected icon for your application. When you build and run your application, you should see your new icon in the taskbar, window title bar, and in File Explorer.
Important Note: Make sure your icon file is in the correct format (.ico). Windows uses a special icon format that can contain multiple resolutions of the same icon. This ensures that your icon looks good on different screen sizes and DPI settings.
I remember back when I first started making apps, I didn’t realize the importance of having multiple resolutions in my icon file. My icons looked all blurry on some screens, and I couldn’t figure out why. Turns out, Windows was trying to scale up a small icon to fit a larger display. Lesson learned!
What if the Icon Selection is Grayed Out?
Sometimes, you might find that the Icon selection in the Application tab is grayed out. This usually happens if you have a Resources folder in your project and you’re managing resources in a specific way. If that’s the case, you’ll need to adjust your project settings slightly. Here’s how:
- In the Solution Explorer, expand the Properties node of your project.
- Double-click on the Resources.resx file. This opens the Resource Designer.
- In the Resource Designer, click the Add Resource dropdown and select Add Existing File.
- Select your icon file (.ico) and click Open. This adds the icon to your project’s resources.
- Now, go back to the Application tab in the project properties. The Icon dropdown should now be enabled, and you can select your icon from the dropdown list.
Basically, you’re telling Visual Studio to use the icon from your project’s resources instead of trying to manage it directly. It’s a little more involved, but it’s necessary if you’re using a Resources folder.
Changing the Icon Dynamically at Runtime (For the Advanced Users)
Okay, so setting a static icon is cool and all, but what if you want to change the icon while your application is running? Maybe you want to change the icon to indicate a certain status, like a notification or an error. Or maybe you just want to be fancy! This is where things get a little more interesting. You’ll need to use some C# code to accomplish this.
Here’s the basic idea: You’ll need to use the Icon class to load your icon file, and then assign it to the Icon property of your form. Here’s some sample code:
using System.Drawing;
using System.Windows.Forms;

public partial class MainForm : Form
{
 public MainForm()
 {
 InitializeComponent();
 }

 private void ChangeIconButton_Click(object sender, EventArgs e)
 {
 // Load the new icon from a file.
 Icon newIcon = new Icon("path/to/your/new_icon.ico");

 // Set the form's icon to the new icon.
 this.Icon = newIcon;

 // Optional: Dispose of the old icon to free up resources.
 //if (oldIcon != null)
 //{
 // oldIcon.Dispose();
 //}

 // Optionally, store the new icon so you can dispose of it later.
 //oldIcon = newIcon;
 }

 // Optionally, store the old icon so you can dispose of it later.
 //private Icon oldIcon = null;

}
In this example, we’re loading the icon from a file named «new_icon.ico». Make sure to replace «path/to/your/new_icon.ico» with the actual path to your icon file. Also, you’ll probably want to put some error handling in there, in case the file doesn’t exist or is corrupted. You don’t want your app crashing because it can’t find an icon!
Important: When you change the icon dynamically, you’re responsible for managing the resources associated with the old icon. In other words, you need to dispose of the old icon to free up memory. The code above shows how to do this. If you don’t dispose of the old icon, you could end up with a memory leak, which can cause your application to slow down or crash over time. Nobody wants that!
Now, I know what you’re thinking: «That’s a lot of code!» And you’re right, it is. But it’s also very powerful. With this code, you can change your application’s icon to anything you want, at any time. The possibilities are endless!
Handling Different Screen Resolutions (Making Your Icon Look Good Everywhere)
One of the biggest challenges when working with icons is making sure they look good on different screen resolutions and DPI settings. What looks crisp and clear on one screen might look blurry or pixelated on another. This is because Windows scales icons up or down to fit the current display settings.
To avoid this problem, you need to make sure your icon file contains multiple resolutions of the same icon. Windows will then automatically select the best resolution for the current display settings. Here’s how to do it:
- Create your icon in multiple resolutions. The most common resolutions are 16×16, 32×32, 48×48, and 256×256. You can use a graphics editor like GIMP or Photoshop to create these different resolutions.
- Save all the resolutions in a single .ico file. Most icon editors will allow you to save multiple resolutions in a single file. When you save the file, make sure to select the option to include all the resolutions.
- Use the .ico file in your application. When you set the icon in Visual Studio or change it dynamically at runtime, use the .ico file that contains all the resolutions.
By following these steps, you can ensure that your icon looks good on any screen, regardless of the resolution or DPI settings. It’s a little extra work, but it’s worth it to make your application look professional.
I’ve seen so many applications with blurry or pixelated icons, and it always makes me cringe. It’s such a simple thing to fix, and it can make a huge difference in the overall impression of your software. Don’t let your application be one of those!
A Quick Tip About Icon Design
While we’re talking about icons, I wanted to share a quick tip about icon design. When you’re creating your icon, try to keep it simple and recognizable. Avoid using too much detail or text, as this can make the icon look cluttered and hard to see. A good icon should be easy to identify at a glance, even at small sizes.
Think about the icons you see every day on your phone or computer. Most of them are very simple and straightforward. They use basic shapes and colors to convey their meaning. That’s because simple icons are more effective at communicating their purpose. So, when you’re designing your icon, try to keep it simple and focused.
Also, think about your target audience. What kind of icon would appeal to them? If you’re creating a business application, you might want to use a more professional-looking icon. If you’re creating a game, you might want to use a more playful or whimsical icon. The key is to create an icon that reflects the purpose and style of your application.
You know, I’m not an artist or anything, but I’ve learned a lot about icon design just by paying attention to the icons I see every day. It’s amazing how much information can be conveyed with a simple image. So, take some time to study the icons around you, and see what you can learn from them. You might be surprised at what you discover.
What About Using Images Other Than .ICO Files?
Good question! While Windows Forms primarily uses .ICO files for application icons, you might be wondering if you can use other image formats like .PNG, .JPG, or .GIF. The short answer is: not directly. The Icon property of a form expects an Icon object, which is specifically designed to hold .ICO data.
However, there’s a workaround! You can convert other image formats to .ICO format programmatically. There are several libraries available that can help you with this, or you can even write your own conversion routine. But honestly, it’s usually easier to just use an image editor to convert your image to .ICO format before you use it in your application.
Plus, .ICO files are specifically designed to store multiple resolutions of the same icon, which is important for handling different screen resolutions. So, even if you could use other image formats directly, you’d still be better off using .ICO files for the best results.
Troubleshooting Common Icon Problems
Sometimes, things don’t go quite as planned. You might encounter some problems when adding an icon to your WinForm application. Here are some common problems and how to fix them:
- The icon doesn’t appear at all. Make sure you’ve set the icon correctly in Visual Studio or in your code. Double-check the path to the icon file to make sure it’s correct. Also, make sure the icon file is actually in the location you specified.
- The icon is blurry or pixelated. Make sure your icon file contains multiple resolutions of the same icon. This will ensure that Windows can select the best resolution for the current display settings.
- The icon is the wrong size. Windows might be scaling the icon up or down to fit the current display settings. Try creating icons in different sizes to see if that fixes the problem.
- The icon doesn’t update after I change it in Visual Studio. Sometimes, Visual Studio can get a little confused. Try cleaning and rebuilding your project. This will force Visual Studio to update the icon.
- The icon doesn’t change when I change it dynamically at runtime. Make sure you’re disposing of the old icon to free up resources. Also, make sure you’re calling the
Refresh()method on your form to force it to redraw.
If you’re still having problems, try searching online for solutions. There are tons of forums and websites that discuss WinForm development, and you’re likely to find someone who has encountered the same problem as you. Don’t be afraid to ask for help! The WinForm community is generally very friendly and helpful.
Using Icon Libraries and Resources
If you’re not an artist, or if you just don’t have the time to create your own icons, don’t worry! There are tons of icon libraries and resources available online. Many of these libraries offer free icons that you can use in your applications. Just make sure to check the license agreement before you use any icons, to make sure you’re allowed to use them for your specific purpose.
Here are a few popular icon libraries and resources:
- Font Awesome: A popular icon font that includes a wide variety of icons. You can use Font Awesome icons in your WinForm applications by using a third-party library.
- Material Design Icons: A collection of icons based on the Material Design guidelines. These icons are clean, simple, and modern.
- The Noun Project: A website that offers a huge collection of icons created by designers from around the world. You can find icons for just about anything on The Noun Project.
- Iconfinder: A search engine for icons. You can use Iconfinder to find icons that match your specific needs.
Using icon libraries can save you a lot of time and effort. Plus, you can be sure that the icons you’re using are high-quality and professional-looking. So, if you’re not comfortable creating your own icons, don’t hesitate to use an icon library.
A Few Extra Tips and Tricks
Alright, before we wrap things up, I wanted to share a few extra tips and tricks that might be helpful:
- Use a consistent icon style throughout your application. This will help to create a cohesive and professional look.
- Test your icon on different screen resolutions and DPI settings. This will ensure that it looks good on all devices.
- Consider using a transparent background for your icon. This will allow the icon to blend in better with different backgrounds.
- Don’t be afraid to experiment! Try different icons and see what looks best.
Adding an icon to your WinForm application is a small detail, but it can make a big difference in the overall impression of your software. So, take the time to do it right, and you’ll be rewarded with a more professional and polished application.
One time I was working on a project, and I spent hours tweaking the code and adding features. But I completely forgot about the icon! When I finally showed the application to a friend, the first thing they said was, «That icon is terrible!» I was so embarrassed. I quickly changed the icon, and it made a huge difference. Lesson learned: Don’t neglect the icon!
Wrapping it Up: Your App Deserves a Great Icon
So, there you have it! Everything you need to know about adding an icon to your WinForm application. It’s a simple process, but it can make a big difference in how people perceive your software. A well-designed icon can make your application look more professional, polished, and appealing. Plus, it just looks cooler!
Don’t be afraid to experiment with different icons and see what works best for you. And remember, if you’re not an artist, there are tons of icon libraries and resources available online. So, go forth and create some awesome icons! Your applications will thank you for it.
Remember, it’s the little things that often make the biggest difference. And a great icon is definitely one of those little things.
FAQ
Q: How do I create an .ico file if I only have a .png or .jpg image?
A: You can use online icon converters or image editing software like GIMP or Adobe Photoshop. Just upload your image and select the .ico format for conversion. Make sure the converter supports multiple resolutions within the .ico file for optimal display.
Q: Why does my icon look blurry on some monitors?
A: This usually happens when the .ico file doesn’t contain multiple resolutions. Windows scales the icon to fit the screen, causing blurriness. Include 16×16, 32×32, 48×48, and 256×256 resolutions in your .ico file to ensure it looks crisp on different displays, as mentioned earlier.
Q: Can I change the application icon after it’s been installed?
A: Changing the icon after installation is a bit tricky. It usually involves modifying the shortcut icon on the user’s desktop or start menu. This requires some advanced techniques and might not always work reliably, depending on the user’s system configuration. It’s generally best to set the correct icon during development.
Q: My icon selection is grayed out in Visual Studio. How do I fix that?
A: As mentioned earlier, this typically happens when you’re using a Resources folder. You need to add the icon to your project’s resources and then select it from the dropdown in the Application tab of the project properties. This tells Visual Studio to use the icon from your project’s resources instead of managing it directly. It’s a little more involved, but it’s necessary if you’re using a Resources folder, you know?
Q: How can I dynamically change the icon in my WinForms application based on certain events or states? Can you provide a more detailed example?
A: To dynamically change the icon, you’ll need to use C# code to load the new icon and assign it to the Icon property of your form. Here’s a more detailed example:
using System;
using System.Drawing;
using System.Windows.Forms;

namespace DynamicIconExample
{
 public partial class MainForm : Form
 {
 private Icon defaultIcon;
 private Icon notificationIcon;

 public MainForm()
 {
 InitializeComponent();

 // Load the default and notification icons.
 defaultIcon = new Icon("path/to/your/default_icon.ico");
 notificationIcon = new Icon("path/to/your/notification_icon.ico");

 // Set the default icon when the form loads.
 this.Icon = defaultIcon;
 }

 private void ShowNotification()
 {
 // Change the icon to the notification icon.
 this.Icon = notificationIcon;

 // Display a notification message.
 MessageBox.Show("You have a new notification!");

 // After a few seconds, revert back to the default icon.
 Timer timer = new Timer();
 timer.Interval = 3000; // 3 seconds
 timer.Tick += (sender, e) =>
 {
 this.Icon = defaultIcon;
 timer.Stop();
 timer.Dispose();
 };
 timer.Start();
 }

 private void NotificationButton_Click(object sender, EventArgs e)
 {
 ShowNotification();
 }

 protected override void Dispose(bool disposing)
 {
 if (disposing && (components != null))
 {
 components.Dispose();

 // Dispose of the icons to free up resources.
 if (defaultIcon != null)
 {
 defaultIcon.Dispose();
 }
 if (notificationIcon != null)
 {
 notificationIcon.Dispose();
 }
 }
 base.Dispose(disposing);
 }
 }
}
This example demonstrates how to load two different icons (a default icon and a notification icon) and switch between them based on an event (clicking a button). It also shows how to use a timer to revert back to the default icon after a certain period. Remember to replace «path/to/your/default_icon.ico» and «path/to/your/notification_icon.ico» with the actual paths to your icon files. Also, make sure to dispose of the icons when the form is disposed to prevent memory leaks. I think it’s pretty cool, right?
Dear All,
I am new programming in c#, the first programs I am developing are not too big and I am developing them by hand, it means I am not using the VS wizzards. I compile the applications (console or winapp) from the command line. My problem is that I don’t know how to change the default Icon of a Form and including it in the exe file. I mean I know that I have to use :
this.Icon = new Icon(«myicon.ico»);
to assign the Icon. The application works if I have the file myicon.ico in the same directory as the application but if I try to execute the application in another directory it crashes because it doesn’t find the icon file, it produces a portability problem, I have already try with other code like:
Icon icon1 = (System.Drawing.Icon)this.FormResources.GetObject(«myicon.ico»);
or
Stream strm = (Stream) Assembly.GetExecutingAssembly().GetManifestResourceStream(«myicon.ico»);
this.Icon = new Icon(strm); <— this didn’t work I found the example in internet but I don’t know if the type stream is correct to define an Icon.
and always I get the same problem or a worse one.
what ever, now I am lost in a cycle and I ask for your help may be the solution is not so complicated, but I would appreciate the replies and if someone help me to solve the problem.
thank you very much in advance
desperate Oriana
Answers (3)
Is your feature request related to a problem? Please describe
Currently the only way to set the default icon is via reflection. This is risky as it is looking at the internals of the object. It would be best to expose an API to set it.
Example of a way to set the icon currently:
typeof(Form).GetField("defaultIcon", BindingFlags.NonPublic | BindingFlags.Static).SetValue(null, SystemIcons.Shield);
Describe the solution you’d like and alternatives you’ve considered
namespace System.Windows.Forms;

public class Form
{
    /// <summary>
    ///  Gets / sets the default icon used for a <see cref="System.Windows.Forms.Form"/>.
    /// </summary>
    /// <exception cref="System.ArgumentNullException">value is null.</exception>
    public static System.Drawing.Icon DefaultIcon { get; set; }
}
Will this feature affect UI controls?
Designer should not have to change for this.
It should not impact accessibility.
It should not need to be localized.