
Привязка данных позволяет связать два свойства разных объектов таким образом, что
изменения свойства одного объекта автоматически приводили к изменению свойства другого объекта. Привязка данных состоит из двух компонентов:
источник привязки (source) — кто привязывается
цель привязки (target) — к кому идет привязка
Привязка осуществляется от свойства источника к свойству цели. И когда происходит изменение источника,
механизм привязки автоматически обновляет также и цель.
Для установки привязки в Windows Forms у класса Control, который является базовым для всех элементов управления в Windows Forms, определено свойство
DataBindings. Это свойство представляет коллекцию ControlBindingsCollection, которая содержит все привязки.
Каждая отдельная привязка представляет класс Binding. Для создания привязки класс Binding предоставляет ряд конструкторов. Рассмотрим самый простейший:
Binding (string propertyName, object dataSource, string dataMember);
Параметры
-
propertyName: представляет свойство текущего объекта в виде строки -
dataSource: объект, к которому идет привязка -
dataMember: представляет свойство объекта из параметра dataSource, к которому идет привязка
Рассмотрим простейший пример. Пусть у нас создается следующая форма:
namespace MetanitApp;

public partial class Form1 : Form
{
    public Form1()
    {
        InitializeComponent();

        TextBox textBox1 = new TextBox();
        textBox1.Location = new Point(12, 12);
        textBox1.Size = new Size(250, 27);
        Controls.Add(textBox1);

        Label label1 = new Label();
        label1.Location = new Point(12, 60);
        label1.AutoSize = true;
        Controls.Add(label1);

        label1.DataBindings.Add(new Binding("Text", textBox1, "Text"));
    }
}
Здесь создаются и добавляются на форму два элемента управления — текстовое поле TextBox и метка Label. Причем текст метки привязан к тексту текстового поля:
label1.DataBindings.Add(new Binding("Text", textBox1, "Text"));
Здесь первый параметр конструктора Binding — «Text» представляет свойство Text текущего элемента label1, поскольку мы хотим привязать текст метки.
Второй параметр — textBox1 — объект, к которому привязываемся, то есть текстовое поле.
И третий параметр — «Text» — к какому именно свойству привязываемся. То есть привязка идет к свойству Text элемента textBox1
В итоге при вводе текста в текстовое поле он сразу будет отображаться в метке.
Форматирование значений привязки
Событие Format позволяет форматировать значение привязки. Это событие представляет делегат
void ConvertEventHandler (object? sender, ConvertEventArgs e)
Второй параметр — объект ConvertEventArgs предоставляет два свойства для отслеживания привязки:
-
DesiredType: тип данных -
Value: значение, полученное от источника привязки
Обрабатывая это событие мы можем выполнить форматирование:
namespace MetanitApp;

public partial class Form1 : Form
{
    public Form1()
    {
        InitializeComponent();

        TextBox textBox1 = new TextBox();
        textBox1.Location = new Point(12, 12);
        textBox1.Size = new Size(250, 27);
        Controls.Add(textBox1);

        Label label1 = new Label();
        label1.Location = new Point(12, 60);
        label1.AutoSize = true;
        Controls.Add(label1);

        Binding binding = new Binding("Text", textBox1, "Text");
        binding.Format += (sender, e) => e.Value = $"Content: {e.Value}";

        label1.DataBindings.Add(binding);
    }
}
В данном случае мы изменяем полученное значение и новую строку присваиваем свойству e.Value
Установка строки форматирования
Если привязка идет к свойствам, которые представляют числа, даты и время, TimeSpan, перечисления, то класс Binding позволяет задать строку форматирования с помощью
свойства FormatString. Например, пусть у нас метка привязана к элементу выбора даты и времени:
namespace MetanitApp;

public partial class Form1 : Form
{
    public Form1()
    {
        InitializeComponent();

        DateTimePicker dateTimePicker1 = new DateTimePicker();
        dateTimePicker1.Location = new Point(12, 12);
        dateTimePicker1.Size = new Size(250, 27);
        Controls.Add(dateTimePicker1);

        Label label1 = new Label();
        label1.Location = new Point(12, 60);
        label1.AutoSize = true;
        Controls.Add(label1);

        Binding binding = new Binding("Text", dateTimePicker1, "Value");
        label1.DataBindings.Add(binding);
    }
}
Здесь свойство Text метки привязано к свойству «Value» объекта dateTimePicker1. На данный момент никакого форматирования нет,
поэтому метка отобразит полную дату и время:
Теперь применим форматирование:
namespace MetanitApp;

public partial class Form1 : Form
{
    public Form1()
    {
        InitializeComponent();

        DateTimePicker dateTimePicker1 = new DateTimePicker();
        dateTimePicker1.Location = new Point(12, 12);
        dateTimePicker1.Size = new Size(250, 27);
        Controls.Add(dateTimePicker1);

        Label label1 = new Label();
        label1.Location = new Point(12, 60);
        label1.AutoSize = true;
        Controls.Add(label1);

        // создаем объект привязки
        Binding binding = new Binding("Text", dateTimePicker1, "Value");
        // делаем доступным форматирование
        binding.FormattingEnabled= true;
        // строка форматирования
        binding.FormatString = "dd.MM.yyyy";

        label1.DataBindings.Add(binding);
    }
}
В качестве строки форматирования выступает «dd.MM.yyyy», которая предписывает вывести дату в формате «день.месяц.год»
binding.FormatString = "dd.MM.yyyy";
Но чтобы разрешить форматирование, свойству FormattingEnabled надо присвоить значение true (по умолчанию оно равно false)
binding.FormattingEnabled= true;
Результат форматирования:
Provide feedback
Saved searches
Use saved searches to filter your results more quickly
Sign up
В Windows Forms можно выполнить привязку не только к традиционным источникам данных, но и к практически к любой структуре, содержащий данные. Можно выполнить привязку к массиву значений, который рассчитывается во время выполнения, считывается из файла или является производным от значений других элементов управления.
Кроме того, любое свойство любого элемента можно привязать к источнику данных. При традиционной привязке данных пользователь обычно привязывает отображаемое свойство, например свойство Text элемента управления TextBox, к источнику данных. В .NET Framework имеется возможность задавать другие свойства посредством привязки. Привязку можно использовать для выполнения следующих задач.
-
Задание рисунка для элемента управления изображения.
-
Задание цвета фона для одного или нескольких элементов управления.
-
Задание размера элементов управления.
По существу, привязка данных является автоматическим способом задания любого доступного во время выполнения свойства любого элемента управления в форме.
Типы привязки данных
Windows Forms можно использовать преимущества двух типов привязки данных: простой и сложной. Каждая имеет собственные преимущества.
| Тип привязки данных | Описание |
|---|---|
| Простая привязка данных | Возможность привязки элемента управления к одному элементу данных, например к значению в столбце таблицы набора данных. Это тип привязки характерен для элементов управления, таких как TextBox или Label, которые обычно отображают одно значение. По сути, любое свойство в элементе управления можно привязать к полю в базе данных. Имеется широкая поддержка этой возможности в Visual Studio.
Дополнительные сведения: — Интерфейсы, относящиеся к привязке данных |
| Сложная привязка данных | Возможность привязки элемента управления к нескольким элементам данных, обычно к нескольким записям в базе данных. Сложная привязка также называется привязкой на основе списка. Примеры элементов управления, которые поддерживают сложную привязку, — DataGridView, ListBox и ComboBox. Пример сложной привязки данных, см. в разделе как: Привязка к данным Windows Forms ComboBox или ListBox-элемент управления. |
Компонент BindingSource
Чтобы упростить привязку данных, Windows Forms позволяет привязать источник данных к компоненту BindingSource, а затем привязать элементы управления к BindingSource. Компонент BindingSource можно использовать в сценариях простой или сложной привязки. В любом случае компонент BindingSource действует как посредник между источником данных и связанными элементами управления, предоставляющий возможности управления уведомлениями об изменениях и другие функции.
Типичные сценарии, в которых используется привязка данных
Практически каждое коммерческое приложение использует сведения, полученные из источников данных разных типов. Обычно это осуществляется через привязку данных. В следующем списке приведено несколько наиболее распространенных сценариев, в которых привязка данных используется в качестве метода представления данных и управления ими.
| Сценарий | Описание |
|---|---|
| Отчеты | Отчеты — это гибкий инструмент отображения и сводного представления данных в печатном документе. Широко распространено создание отчетов, которые выводят выбранное содержимого источника данных на экран или на принтер. Традиционные формы отчетов — списки, счета и сводки. Элементы обычно представлены в виде столбцов списка, у каждой позиции списка существуют вложенные элементы, однако необходимо выбирать макеты, которые лучше всего подходят для организации данных. |
| Запись данных | Распространенным способом ввода больших объемов связанных данных или отправки пользователям запросов на предоставление сведений является использование формы для ввода данных. Пользователи могут вводить сведения или выбирать варианты, используя текстовые поля, переключатели, флажки и раскрывающиеся списки. Затем данные отправляются на хранение в базу данных, структура которой основана на введенных данных. |
| Отношение «Основной/подробности» | Приложение «Основной/подробности» — это еще один способ просмотра связанных данных. В частности, существует две таблицы данных со связывающими их отношением: в классическом деловом примере — это таблица «Клиенты» и таблица «Заказы» с отношением, связывающим клиентов с их соответствующими заказами. Дополнительные сведения о создании приложения «основной/подробности» с двумя формами Windows DataGridView элементов управления, см. в разделе как: Создание формы «основной/подробности» с помощью двух элементов управления DataGridView Windows Forms |
| Таблица подстановки | Другим распространенным сценарием представления данных и работы с ними является использование таблицы подстановок. Являясь частью крупной структуры представления данных, элемент управления ComboBox применяется для отображения данных и управления ими. Смысл заключается в том, что данные, отображаемые в элементе управления ComboBox, отличаются от данных, которые записываются в базу данных. Например, если есть элемент управления ComboBox, отображающий позиции товара в продуктовом магазине, возможно, вы захотите увидеть названия товаров (хлеб, молоко, яйца). Однако чтобы упростить получение сведений из базы данных и нормализовать базу данных, вы, вероятно, сохраните данные по конкретным позициям для определенного заказа виде кодов (501, 603 и т. д.). Таким образом, между понятным именем товара из продуктового магазина в элементе управления ComboBox в форме и соответствующим кодом товара, указанным в заказе, присутствует неявная связь. В этом заключается сущность таблицы подстановок. Дополнительные сведения см. в разделе Как Создание таблицы подстановок с помощью компонента BindingSource в Windows Forms. |
См. также
- Binding
- Привязка данных Windows Forms
- Практическое руководство. Привязка элемента управления DataGrid в Windows Forms к источнику данных
- Компонент BindingSource
Data binding in WinForms—it’s a concept that’s been around for ages, yet it remains as relevant as ever. Whether you’re a seasoned developer or just dipping your toes into the world of Windows Forms, understanding how to effectively bind data can make or break your application’s performance and user experience. In this article, we’re going to dive deep into WinForms data binding, exploring its core concepts, best practices, and some practical examples to get you started. By the end, you’ll have a solid grasp of how to implement data binding in your WinForms applications efficiently.
Introduction to WinForms Data Binding
WinForms data binding is all about connecting your UI elements to data sources. This could be anything from a simple list of strings to complex databases. The idea is to create a seamless link between your data and your UI, so that changes in one are automatically reflected in the other. It’s a powerful feature that can save you a lot of time and effort, especially when dealing with large datasets or dynamic data.
But let’s be real, data binding can also be a bit tricky. There are different types of data binding, various data sources to consider, and a bunch of best practices to keep in mind. So, let’s break it down step by step.
Types of Data Binding in WinForms
First things first, you need to understand the different types of data binding available in WinForms. There are primarily two types:
- Simple Binding: This is used to bind a single property of a control to a data source. For example, binding a TextBox’s Text property to a string value.
- Complex Binding: This is used to bind a control that displays a list of items to a data source. For example, binding a DataGridView to a list of objects.
Each type has its own use cases and methods, so let’s dive into them.
Simple Binding
Simple binding is, well, simple. It’s perfect for scenarios where you just need to bind a single property to a data source. Here’s a quick example to illustrate:
// Assume we have a TextBox control named textBox1 and a string property named MyStringProperty TextBox textBox1 = new TextBox(); string myStringProperty = "Hello, World!"; textBox1.DataBindings.Add("Text", this, "MyStringProperty");In this example, we’re binding the Text property of a TextBox to a string property named MyStringProperty. Any changes to MyStringProperty will automatically update the TextBox.
Complex Binding
Complex binding, on the other hand, is used for controls that display lists of items. This is where things get a bit more complicated. You typically use complex binding with controls like DataGridView, ListBox, and ComboBox.
Here’s an example of binding a DataGridView to a list of objects:
// Assume we have a DataGridView control named dataGridView1 and a list of objects List<MyObject> myList = new List<MyObject>(); // Populate the list with some data myList.Add(new MyObject { Property1 = "Value1", Property2 = "Value2" }); myList.Add(new MyObject { Property1 = "Value3", Property2 = "Value4" }); dataGridView1.DataSource = myList;In this example, we’re binding a DataGridView to a list of MyObject objects. The DataGridView will automatically generate columns for each property of MyObject and display the data.
Data Sources in WinForms Data Binding
Now that we understand the types of data binding, let’s talk about data sources. In WinForms, you can bind to a variety of data sources, including:
- Arrays and collections
- DataTables and DataSets
- Custom objects
- Database queries
Each data source has its own characteristics and use cases. For example, if you’re working with relational data, you might use a DataTable or DataSet. If you’re working with a list of custom objects, you might use a collection.
Let’s go through each type of data source with some examples.
Arrays and Collections
Arrays and collections are probably the simplest data sources to work with. Here’s an example of binding a ListBox to an array of strings:
// Assume we have a ListBox control named listBox1 string[] myArray = { "Item1", "Item2", "Item3" }; listBox1.DataSource = myArray;In this example, we’re binding a ListBox to an array of strings. The ListBox will display each string as an item.
DataTables and DataSets
DataTables and DataSets are more complex data sources, typically used for working with relational data. Here’s an example of binding a DataGridView to a DataTable:
// Assume we have a DataGridView control named dataGridView1 DataTable dataTable = new DataTable(); // Populate the DataTable with some data dataTable.Columns.Add("Column1", typeof(string)); dataTable.Columns.Add("Column2", typeof(int)); dataTable.Rows.Add("Value1", 1); dataTable.Rows.Add("Value2", 2); dataGridView1.DataSource = dataTable;In this example, we’re binding a DataGridView to a DataTable. The DataGridView will display the data in a tabular format.
Custom Objects
Custom objects are a flexible way to work with data in WinForms. You can define your own classes and bind to lists of these objects. Here’s an example:
// Define a custom class public class MyObject { public string Property1 { get; set; } public int Property2 { get; set; } } // Assume we have a DataGridView control named dataGridView1 List<MyObject> myList = new List<MyObject>(); // Populate the list with some data myList.Add(new MyObject { Property1 = "Value1", Property2 = 1 }); myList.Add(new MyObject { Property1 = "Value2", Property2 = 2 }); dataGridView1.DataSource = myList;In this example, we’re binding a DataGridView to a list of MyObject objects. The DataGridView will display the properties of MyObject in separate columns.
Database Queries
Binding directly to database queries is a bit more involved, but it’s a powerful way to work with dynamic data. Here’s a rough idea of how you might do it:
// Assume we have a DataGridView control named dataGridView1 string connectionString = "your_connection_string"; string query = "SELECT * FROM YourTable"; using (SqlConnection connection = new SqlConnection(connectionString)) { SqlDataAdapter adapter = new SqlDataAdapter(query, connection); DataTable dataTable = new DataTable(); adapter.Fill(dataTable); dataGridView1.DataSource = dataTable; }In this example, we’re binding a DataGridView to the results of a database query. The DataGridView will display the query results in a tabular format.
Binding to User Controls
Sometimes, you might need to bind data to custom user controls. This can be a bit trickier, but it’s definitely doable. The key is to expose properties on your user control that can be bound to data sources.
Here’s a simple example:
// Define a custom user control public partial class MyUserControl : UserControl { public string MyProperty { get; set; } public MyUserControl() { InitializeComponent(); // Assume we have a Label control named label1 label1.DataBindings.Add("Text", this, "MyProperty"); } } // Assume we have an instance of MyUserControl named myUserControl1 myUserControl1.DataBindings.Add("MyProperty", this, "MyDataProperty");In this example, we’re defining a custom user control with a property named MyProperty. We then bind this property to a data source.
Best Practices for WinForms Data Binding
Data binding is a powerful feature, but it can also be a bit tricky to get right. Here are some best practices to keep in mind:
- Use Strongly-Typed Data Sources: Whenever possible, use strongly-typed data sources. This makes your code more robust and easier to maintain.
- Handle Exceptions Gracefully: Data binding can fail for a variety of reasons, such as null values or invalid data. Make sure to handle exceptions gracefully to avoid crashing your application.
- Optimize Performance: Data binding can be a performance bottleneck, especially with large datasets. Consider using techniques like paging or virtualization to improve performance.
- Keep Your UI Responsive: Data binding operations can be time-consuming. Make sure to perform them on a background thread to keep your UI responsive.
Following these best practices will help you create more robust and efficient WinForms applications.
Advanced Techniques for WinForms Data Binding
Once you’ve mastered the basics of data binding, you might want to explore some advanced techniques. Here are a few ideas to get you started:
Two-Way Data Binding
Two-way data binding allows changes in the UI to be reflected back in the data source. This is useful for scenarios where you need to edit data directly in the UI. Here’s an example:
// Assume we have a TextBox control named textBox1 and a string property named MyStringProperty TextBox textBox1 = new TextBox(); string myStringProperty = "Hello, World!"; textBox1.DataBindings.Add("Text", this, "MyStringProperty", false, DataSourceUpdateMode.OnPropertyChanged);In this example, we’re setting up two-way data binding between a TextBox and a string property. Changes to the TextBox will automatically update the property.
Custom Binding Expressions
Sometimes, you might need to use custom binding expressions to transform data before displaying it. Here’s an example:
// Assume we have a Label control named label1 and an int property named MyIntProperty Label label1 = new Label(); int myIntProperty = 42; label1.DataBindings.Add("Text", this, "MyIntProperty", false, DataSourceUpdateMode.Never, "0.00");In this example, we’re binding a Label to an int property, but we’re using a custom binding expression to format the value as a currency string.
Binding to Nested Properties
Binding to nested properties can be a bit tricky, but it’s definitely doable. Here’s an example:
// Assume we have a TextBox control named textBox1 and a nested property named MyNestedProperty.MyStringProperty TextBox textBox1 = new TextBox(); MyNestedProperty myNestedProperty = new MyNestedProperty { MyStringProperty = "Hello, World!" }; textBox1.DataBindings.Add("Text", myNestedProperty, "MyStringProperty");In this example, we’re binding a TextBox to a nested property. The TextBox will display the value of MyStringProperty.
Common Pitfalls and How to Avoid Them
Data binding can be a bit finicky, and there are a few common pitfalls to watch out for. Here are some tips to help you avoid them:
- Null Values: Null values can cause data binding to fail. Make sure to handle null values gracefully in your data sources.
- Incorrect Property Names: Typos in property names can cause data binding to fail. Double-check your property names to make sure they match exactly.
- Performance Issues: Data binding can be a performance bottleneck, especially with large datasets. Consider using techniques like paging or virtualization to improve performance.
- Thread Safety: Data binding operations should be performed on the UI thread. Make sure to use techniques like Invoke or BeginInvoke to ensure thread safety.
By keeping these pitfalls in mind, you can avoid common mistakes and create more robust data binding implementations.
Real-World Examples of WinForms Data Binding
To give you a better idea of how data binding works in practice, let’s look at a few real-world examples. These examples will show you how to apply data binding techniques to solve common problems.
Example 1: Binding a ListBox to a Collection
Let’s say you have a collection of customer objects, and you want to display their names in a ListBox. Here’s how you might do it:
// Define a custom class public class Customer { public string Name { get; set; } public string Email { get; set; } } // Assume we have a ListBox control named listBox1 List<Customer> customers = new List<Customer>(); // Populate the list with some data customers.Add(new Customer { Name = "John Doe", Email = "[email protected]" }); customers.Add(new Customer { Name = "Jane Smith", Email = "[email protected]" }); listBox1.DisplayMember = "Name"; listBox1.ValueMember = "Email"; listBox1.DataSource = customers;In this example, we’re binding a ListBox to a collection of Customer objects. The ListBox will display the names of the customers.
Example 2: Binding a DataGridView to a DataTable
Let’s say you have a DataTable containing sales data, and you want to display it in a DataGridView. Here’s how you might do it:
// Assume we have a DataGridView control named dataGridView1 DataTable salesData = new DataTable(); // Populate the DataTable with some data salesData.Columns.Add("Product", typeof(string)); salesData.Columns.Add("Quantity", typeof(int)); salesData.Columns.Add("Price", typeof(decimal)); salesData.Rows.Add("Widget", 10, 19.99m); salesData.Rows.Add("Gadget", 5, 29.99m); dataGridView1.DataSource = salesData;In this example, we’re binding a DataGridView to a DataTable containing sales data. The DataGridView will display the data in a tabular format.
Example 3: Binding a ComboBox to an Enum
Let’s say you have an enum representing different status values, and you want to display these values in a ComboBox. Here’s how you might do it:
// Define an enum public enum Status { Active, Inactive, Pending } // Assume we have a ComboBox control named comboBox1 comboBox1.DataSource = Enum.GetValues(typeof(Status));In this example, we’re binding a ComboBox to an enum representing different status values. The ComboBox will display the enum values as items.
Conclusion
WinForms data binding is a powerful feature that can save you a lot of time and effort. By understanding the different types of data binding, the various data sources you can work with, and some best practices, you can create more robust and efficient WinForms applications. Don’t be afraid to experiment with different techniques and see what works best for your specific use case.
Remember, data binding can be a bit tricky, so don’t get discouraged if you run into issues. Keep practicing, and you’ll get the hang of it in no time. Happy coding!
FAQ
What is data binding in WinForms?
Data binding in WinForms is the process of connecting UI elements to data sources, so that changes in one are automatically reflected in the other. It’s a powerful feature that can save you a lot of time and effort, especially when dealing with large datasets or dynamic data.
What are the types of data binding in WinForms?
There are primarily two types of data binding in WinForms: simple binding and complex binding. Simple binding is used to bind a single property of a control to a data source, while complex binding is used to bind a control that displays a list of items to a data source.
What are some common data sources in WinForms data binding?
Common data sources in WinForms data binding include arrays and collections, DataTables and DataSets, custom objects, and database queries.
What are some best practices for WinForms data binding?
Some best practices for WinForms data binding include using strongly-typed data sources, handling exceptions gracefully, optimizing performance, and keeping your UI responsive.
This article was originally published in VSJ, which is now part of Developer Fusion.
Developers who are used to working with ASP.NET often complain about the level of manual work required to connect Windows Forms controls to data. In fact, Windows Forms developers have had access to a data binding mechanism since .NET 2.0 was introduced in 2005, but it is still little used. Why is that? The answer is that for many of us the roll-out of .NET 2.0 across the corporate network has only happened relatively recently, and we have yet to take full advantage of it. This article provides an introduction to Data Binding in Windows Forms, using as an example a connection settings dialog from an application.
Binding Architecture
The implementation of Windows Forms in .NET 2.0 is required to be backwards compatible with .NET 1.0 and 1.1, and therefore support for binding had to overlay an existing object and event model. This is in contrast to ASP.NET, where data binding was a part of the architecture from the very beginning. As a result, there are a number of key differences between ASP.NET and Windows Forms that are relevant to data binding, as shown in Table 1.
| Table 1: ASP.NET vs. Windows Forms | |
| ASP.NET | Windows Forms |
| Page implementation object always instantiated by framework | Form implementation object instantiated by user code |
| Framework controls object lifecycle | User code controls object lifecycle |
| Events (usually post-backs) are already expensive due to the round trip to server | Events are very low cost thanks to the underlying messaging architecture |
| User actions are typically executed only when the form is posted back to the server | User actions are typically processed immediately |
| Immediate feedback to the user is handled in client side javascript, not the page implementation object | Immediate user feedback is handled by the form implementation object |
The result of all these differences is that there is a big structural difference in the way that binding is implemented.
ASP.NET supports binding at the page level, so data can be bound to almost any page element. Controls representing collections bind directly to a data source, whether that is a dataset, array, object, or whatever. In Windows Forms all binding takes place through an intermediary object called BindingSource. This object provides the data access and management functions required by Windows Forms controls. It ensures that all updates to control state are reflected in the data, and vice versa.
The connection between the BindingSource and the data source is made by setting the DataSource property. This can be set to point to almost anything, from a DataSet object to a simple custom business object. If the connected object contains more than one list or table, the DataMember property can be used to specify which one should be bound.
BindingSource provides an IList interface (through the List property) which can be used to access the data it wraps. There is also a Current property to access the currently selected member of the list. A summary of many of the other properties and methods of BindingSource is shown in Table 2 to give you an impression of just how many aspects of binding are managed through this object.
| Table 2: BindingSource properties and methods | ||
| Category | Properties | Methods |
| Data Source | DataMember, DataSource | |
| Data Source Properties | IsFixedSize, IsReadOnly | |
| Data Access | List, Count, Item | Add, AddNew, Clear, Contains, IndexOf, Insert, Remove, RemoveAt, RemoveCurrent |
| Binding State | IsBindingSuspended | ResetBindings, ResetCurrentItem, ResetItem, ResumeBinding, SuspendBinding |
| Currency | CurrencyManager, Current, Position | MoveFirst, MoveLast, MoveNext, MovePrevious |
| Sorting | IsSorted, Sort, SortDirection, SupportsAdvancedSorting, SupportsSorting | ApplySort, RemoveSort |
| Searching | SupportsSearching | Find |
| Filtering | Filter, SupportsFiltering | RemoveFilter |
| Allowed Operations | AllowEdit, AllowNew, AllowRemove | ResetAllowNew |
| Editing | CancelEdit, EndEdit |
Any BindingSource is inherently capable of hosting a list structure. If a single object is assigned to the DataSource property, then the Current property will return that object, and the List property will return a list with that single object in it. A BindingSource object is a .NET Component and is therefore usually created as part of the component model:
bs = new BindingSource( Container );
	((System.ComponentModel.
		ISupportInitialize)bs).
		BeginInit();
// Other Initialisation Code
((System.ComponentModel.
	ISupportInitialize)bs).EndInit();
Note that the BeginInit and EndInit calls are part of the ISupportInitialise interface which is implemented as explicit by BindingSource. Explicit interfaces can only be accessed by using a strongly typed reference, in this case obtained by casting the object.
We can then connect the BindingSource to data object or collection by setting the DataSource:
bs.DataSource = data;
The connection between a control property and a BindingSource is made by adding a Binding object to the DataBindings collection of the control. This object links the property name to the DataSource and a string representing the data member. In practice however, Binding and BindingSource objects are usually created in the forms editor and the component model code is generated automatically. In order to explore this we’re going to use an example.
Entering a network address
Figure 1 shows a dialog used in a number of places in an application I developed recently to allow the user to input information about a server connection and thus populate a Server object (see Figure 1).
Figure 1: Entering a network address
Any time we build a dialog like this we need to build a mapping between the business object containing the data and the controls on the form. In .NET 1 the only way to do this was to write code that looked like:
public class Server
{
	private string _Host;
	private int _Port;
	private string _User;
	private string _Password;
	private bool _RequireSSL;

	public Server() {}

	public Server( Server s )
	{
		_Host = s._Host;
		_Port = s._Port;
		_User = s._User;
		_Password = s._Password;
		_RequireSSL = s._RequireSSL;
	}

	public Server( string Host,
		int Port )
	{
		_Host = Host;
		_Port = Port;
		_User = “”;
		_Password = “”;
		_RequireSSL = false;
	}
	public string Host
	{
		get { return _Host; }
		set { _Host = value; }
	}

	public int Port
	{
		get { return _Port; }
		set { _Port = value; }
	}

	public string User
	{
		get { return _User; }
		set { _User = value; }
	}

	public string Password
	{
		get { return _Password; }
		set { _Password = value; }
	}

	public bool RequireSSL
	{
		get { return _RequireSSL; }
		set { _RequireSSL = value; }
	}
}
To illustrate the point I have chosen to set the control objects to be public and place the code outside the dialog class – of course you can achieve better encapsulation by moving that code inside the dialog class, but similar code will still exist.
The main problem with this sort of code is that the mapping between controls and data is hidden in the code-behind file, while the controls themselves have been created and are edited in the forms editor. Furthermore these two have to be kept in sync and are linked only by the names assigned to the controls.
Getting in a Bind
The Forms Designer in Visual Studio takes most of the hard work out of setting up a binding for a dialog like this. Looking at the properties for the address control in the above dialog there is a section called Data that did not appear prior to Visual Studio 2005. Opening the DataBindings entry shows the properties of the control that are common targets for data binding. I wanted to use the Text property. Clicking the dropdown button on the property value displays a list of the data sources available in my project, with an option to add a new one (see Figure 2).
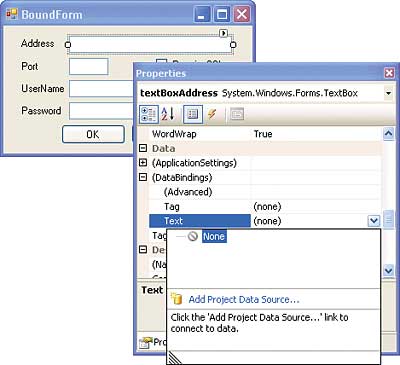
Figure 2: Binding the address
As I do not yet have a data source in the project, I will select this Add.. option. The data source wizard is now displayed, and since I want to use the Server object I make the following selections:
- Data Source Type: Object
- Object You Wish to Bind to (drill down class view to…):
- Project NetworkDialog
- Namespace: NetworkDialog
- Class: Server
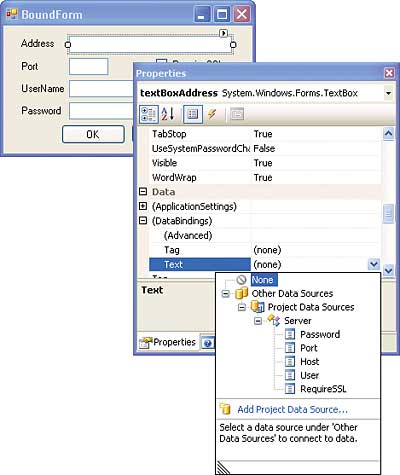
Figure 3: Binding the Address again
After doing this, the properties of Server object appear in the list as shown in Figure 3. As in the mapping in the code:
UnboundForm ubf = new UnboundForm();
ubf.textBoxAddress.Text = server.Host;
ubf.textBoxPort.Text = server.Port.ToString();
ubf.checkBoxSSL.Checked = server.RequireSSL;
ubf.textBoxUserName.Text = server.User;
ubf.textBoxPassword.Text = server.Password;

if ( ubf.ShowDialog() == DialogResult.OK )
{
	server.Host = ubf.textBoxAddress.Text;
	server.Port = int.Parse(ubf.textBoxPort.Text);
	server.RequireSSL = ubf.checkBoxSSL.Checked;
	server.User = ubf.textBoxUserName.Text;
	server.Password = ubf.textBoxPassword.Text;
}
…I will connect the Text property of textBoxAddress control to the Host property of the Server object.
You may now be wondering how I appear to have completed the binding process with no mention of creating a BindingSource object. The answer is that Visual Studio has looked after this for me in the background, and automatically created and configured a BindingSource object called serverBindingSource (see Figure 4).
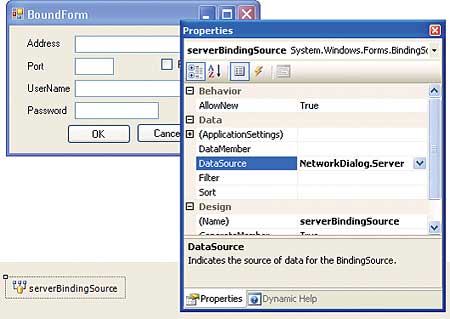
Figure 4: Automatically created BindingSource
The rest of the controls can be bound in the same way, this time selecting the existing serverBindingSource from the DataSource property window, at which point the code below is all that is needed to display the dialog:
BoundForm bf = new BoundForm();
Server oldValue = new Server( server );
bf.bindingSource1.Add( server );
if ( bf.ShowDialog() != DialogResult.OK )
{
	server = oldValue;
}
Taking control
The first time I used this process, I found it a little alarming just how much Visual Studio had done for me in the context of editing one control, and I wanted to look at how I could achieve the same thing by carrying out each step myself. This gives me the confidence that I understand what Visual Studio is doing and why! It turns out that actually each individual step is quite straightforward:
- Create the data source manually either by selecting Add New Data Source… from the Data menu in Visual Studio, or by using the icon on the Data Sources window (Show Data Sources from the Data menu or Shift-Alt-D).
- Add a BindingSource to the form by dragging it onto the canvas from the Data section of the toolbox.
- Connect the BindingSource to the data source using its DataSource property.
- Connect the control data bindings to the BindingSource.
Other than object creation and component model code (which is all boilerplate) the only code generated by the example above is:
serverBindingSource.DataSource =
	typeof( NetworkDialog.Server );
textBoxAddress.DataBindings.Add(
	new Binding( “Text” ,
	serverBindingSource ,
	“Host” , true ) );
This assigns a type object to the DataSource member of the BindingSource object as a placeholder so that the GUI can treat the BindingSource as if it was strongly typed, and display the correct members.
I have demonstrated binding to a custom object as this is the sort of binding I use most often in Windows Forms, but the data source wizard also allows you to connect to a database or a web service.
If you go back and look at Figure 2 you will notice that the Text and Tag properties of the control are available for binding directly in the properties editor. This is because these properties are decorated with the BindableAttribute attribute. However, you can bind to any property of a control by using the advanced binding dialog. This is opened by selecting Advanced in the binding section of the properties editor, and clicking the … button that appears. If you do this for the textBoxAddress control you will see the full list of bind-able properties (see Figure 5).
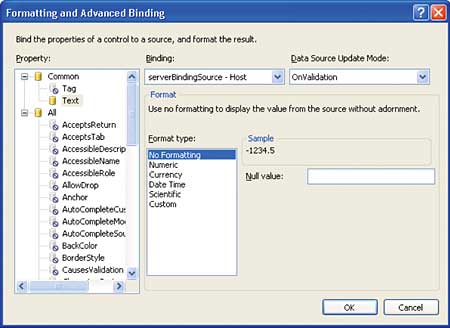
Figure 5: The Advanced Binding dialog
This includes all of the appearance properties for the control, so you could in principle use this as a mechanism for changing the appearance of your application on the fly, or for enabling and disabling groups of controls. Each binding can have a separate BindingSource, so your application could have an object containing colour settings that was bound to the appropriate properties of each control.
You will also see that for each property binding there are a number of additional parameters to control binding. These include a format specification for string types, and defining the value that will represent NULL values in the data.
Binding lists
I’m going to reuse the Server object we have already been working with to demonstrate binding to lists. If you wish to create the BindingSource in the forms editor then the process is identical. This is because even though we only used a single object in the previous example, internally the BindingSource object was still treating it as a list with one entry! The list in this case will be of type List<Server>, and it will be connected to the BindingSource exactly as before.
Server[] initial =
	{
	new Server(“my.host.com”,1111) ,
	new Server(
		“host.interesting.com”,2222) ,
	new Server(
		“service.vsj.co.uk”,3333)
};
List<Server> list =
	new List<Server>( initial );
bindingSourceServer.DataSource = list;
The simplest control used in binding lists is the ListBox, and it can be bound to show the Host member of each Server by setting the DataSource and DataMember properties:
listBox1.DataSource =
	this.bindingSourceServer;
listBox1.DisplayMember = “Host”;
These properties were not the present on single value controls we were binding to before, but the DataSource property is available on all controls that work with lists, and the DataMember property is widely used to select a specific member property for display. My simple dialog built using this code is shown in Figure 6.
Figure 6: Simple Bound List
Master/Details Views
There is a second level of binding that is often carried out when displaying a Master list and that is displaying the Details for the currently selected item. We have the Master list, but how do we bind to the Details for the current selection?
It turns out that the solution is straightforward. In the previous example when we were binding simple controls to the BindingSource, what we were actually doing was binding to the currently selected entry in the list in the BindingSource. This is exactly what we want to do here – bind Details controls to the currently selected item.
So to make the port number for the currently selected item visible as a Label control, we make a binding on the Text property in the forms editor to the BindingSource we are using for the list, resulting in code like this:
label1.DataBindings.Add(
	new System.Windows.Forms.Binding(
	“Text”, bindingSourceServer,
	“Port”, true ) );
We can use the Master / Details view to edit items in the list too, by binding to the currently selected item to edit controls such as TextBox rather than static controls like Label.
textBox1.DataBindings.Add(
	new System.Windows.Forms.Binding(
	“Text”, bindingSourceServer,
	“Port”, true ) );
In addition to editing records, it is often a requirement that the user can add or remove records too. These operations should be handled through the BindingSource using the AddNew and RemoveCurrent methods, for example:
	private void buttonAdd_Click(
		object sender , EventArgs e )
	{
		bindingSourceServer.AddNew();
	}

	private void buttonRemove_Click(
		object sender , EventArgs e )
	{
bindingSourceServer.RemoveCurrent();
	}
If you wish have edit controls for multiple fields in a DataSet or multiple properties of a custom object, Visual Studio provides a shortcut for doing this. Open the Data Sources panel (“Show Data Sources” from the “Data” menu or Shift-Alt-D) and you will see the Server object appears there. The dropdown next to it allows you to define the type of control(s) that are generated if you drag it onto a form – by default the options will be a configured DataGridView or “Details”. If you select “Details” then when you drag the Server object and drop it on a form, controls will automatically be created for each data member – in fact you will end up with a dialog looking very much like that in Figure 1!
Navigating in Details View
Navigation, inserting and removing records are all standard operations, and BindingSource expresses through its properties which operations are valid. As a result, it is possible to use a standard piece of UI in the form of the BindingNavigator control for these operations. This can be used with a details only form, or with a form that has controls displaying the whole collection. To add a BindingNavigator, just drag the control from the toolbox onto your form, and set its BindingSource property to point to the relevant BindingSource object. The result is shown in Figure 7.
Figure 7: Adding a BindingNavigator
Internal Logic
The reason for using a custom object rather than a DataSet is usually to allow the custom object to encapsulate some piece of business logic. Very often, this logic causes the value of a number of properties to be linked. If setting one property (or even some completely external event like a file changing or a task completing) causes the value of the object properties to change in a way that the BindingSource could not reasonably anticipate, then we need to inform the BindingSource of these changes so it can update the UI.
The way we usually do this is by implementing INotifyPropertyChanged on the custom object. This interface has a single Event called PropertyChanged which should be fired (with the name of the changed property) whenever a property change occurs, even if it results directly from a set operation.
If multiple properties change, then the event should fire once for each property. The BindingSource object will make use of the INotifyPropertyChange interface automatically if it is present, and will use the events to ensure that the UI is kept up to date.
Sorting, filtering and searching
Often an application needs to search a list, display a sorted list, or filter a list in some way to limit the quantity of data. The BindingSource object has properties and methods that support these operations. However, it does not implement them itself – it requires support from the data source. Searching and limited sorting functionality is available for data sources that implement IBindingList, and uses the Find method and the Sort property:
int index = bindingSourceAddress.Find(
	“Company” , “VSJ” );
bindingSourceAddress.Sort=”Name ASC”;
Filtering and multi-column sorting are available for data sources that implement IBindingListView (which inherits from IBindingList):
bindingSourceAddress.Filter=
	“Country=’UK’”
bindingSourceAddress.Sort=
	“LastName ASC, FirstName ASC”;
Not all IBindingList and IBindingListView implementations support all of these features, so it is best to check the corresponding BindingSource.SupportsXxxxx property so you can avoid exceptions at runtime.
If you are using ADO.NET, the DataView class implements IBindingListView and therefore you will usually have access to full sorting, filtering and searching capabilities.
The collections in System.Collections such as the List<T> collection we used with our custom objects do not provide either of the interfaces required for searching, sorting or filtering. Nor are these particularly simple interfaces to implement. The framework does have a BindingList<T> generic, which implements IBindingList, but it doesn’t have any sorting or searching capability either, although inheriting from it would be a good way of providing a custom collection with these features. It should in principle be possible to provide generic filtering, sorting and searching of custom objects, perhaps using the Predicate delegate and the IComparer interface which are already used elsewhere. This would have been a useful addition to the framework and seems like a missed opportunity. Ultimately it will probably be easier to transfer data from a custom object into a DataTable than to implement IBindingList for most applications.
Conclusion
Although many will see the future of UI development lying with WPF, it will be a long time before WPF is widely deployed. In the meantime we should embrace anything that can make forms programming easier and less error prone. Data binding definitely falls into this category.
Ian Stevenson has been developing Windows software professionally for ten years, in areas ranging from WDM device drivers through to rapid-prototyping of enterprise systems. Ian currently works as a consultant in the software industry, and can be contacted at [email protected].