Всем привет, друзья.
В сегодняшней статье мы посмотрим на один из возможных вариантов работы с горизонтальной и вертикальной полосой прокрутки на форме в приложении C# для Windows Forms. Полосу прокрутки также часто называют скроллбаром.
В этой статье будет представлен вариант размещения горизонтальной и вертикальной полосы прокрутки непосредственно на главной форме приложения, без использования каких-либо других дочерних элементов, расположенных на форме.
Для демонстрации работы скроллбаров мы напишем простое приложение, которое будет рисовать на главной форме 4000 квадратных клеток, каждая из которых будет пронумерована для удобства. В конце этой статьи я также дам ссылку на готовый архив с примером.
Максимальное количество клеток по горизонтали будет 80, по вертикали — 50 штук. При желании вы сможете потом настроить количество клеток по горизонтали/вертикали по своему вкусу, но общая задумка рассматриваемого в статье примера в том, чтобы все нарисованные на форме клетки не могли все сразу поместиться на главной форме приложения. То есть, мы будем использовать горизонтальный и вертикальный скроллбары на главной форме для того, чтобы переместиться в любую область нарисованных клеток и иметь возможность увидеть все клетки.
Концепция этого простого примера может быть полезна в тех случаях, когда вместо обычных пронумерованных клеток вам потребуется производить отрисовку каких-либо других объектов в ваших программах на C#, и количество этих объектов не будет сразу помещаться в текущую область видимости формы.
Давайте сразу посмотрим на тот результат, который у нас получится на выходе из данной статьи.
При запуске нашей тестовой программы главная форма приложения будет выглядеть так:
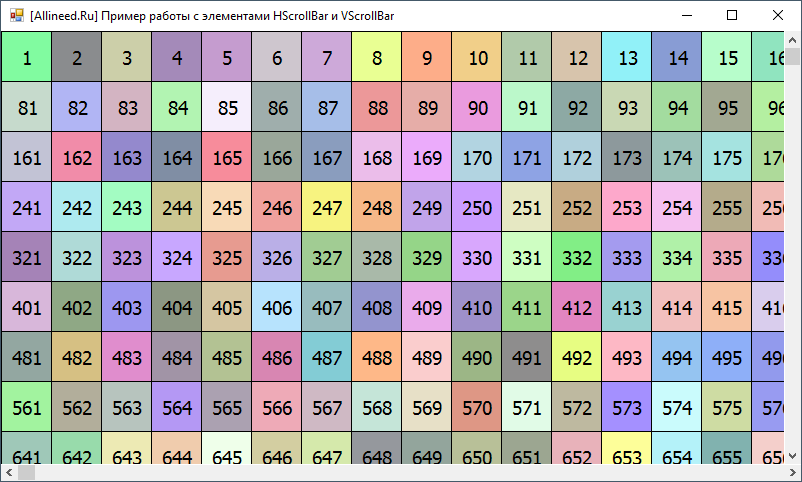
Как видим, слева-вверху номер самой первой клетки равен 1, затем нумерация клеток идёт по горизонтали и вниз. Также можно видеть, что при первом запуске формы оба скроллбара — горизонтальный и вертикальный — видны, и их позиция равна 0, т.е. они находятся в своём начальном положении.
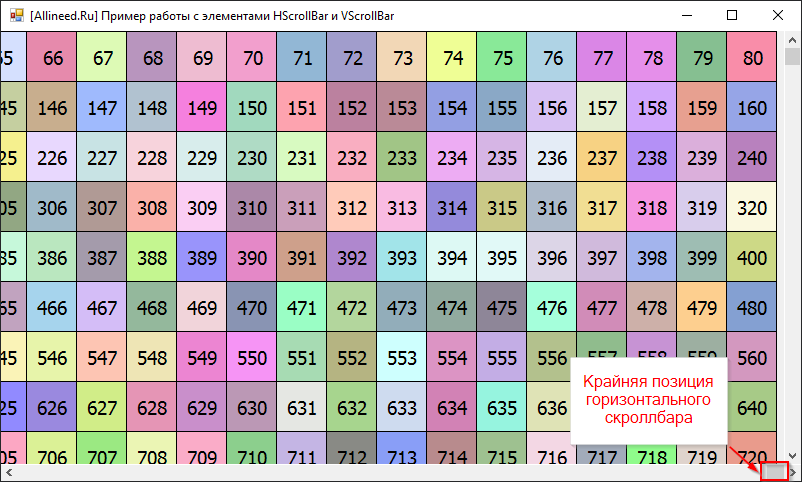
Если мы передвинем бегунок горизонтального скроллбара в крайнее правое положение, то форма преобразится следующим образом:
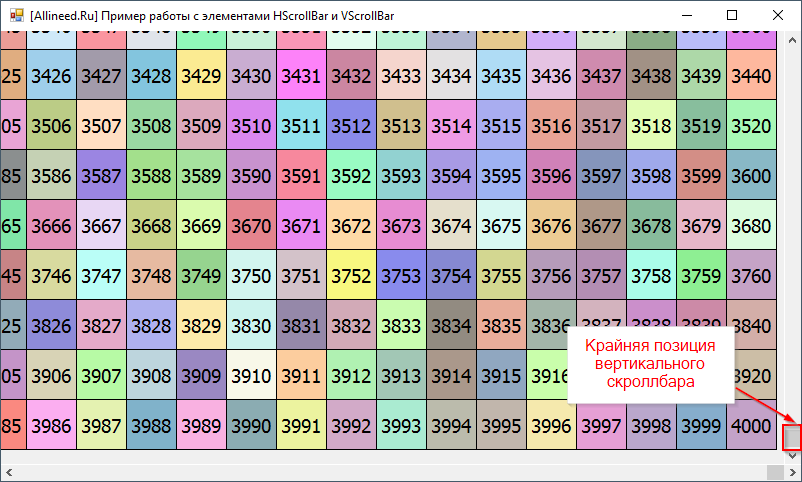
Аналогичным образом, если мы сдвинем бегунок вертикального скроллбара вниз до крайней позиции, то мы увидим самую последнюю клетку нашего «поля», номер которой равен 4000 (вспомним, что общее количество клеток у нас 50 x 80 = 4000):
Итак, приступим к написанию самой тестовой программы.
Создание нового проекта в среде Microsoft Visual Studio
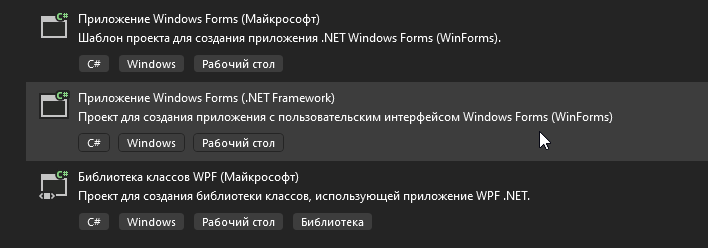
Откройте среду разработки Microsoft Visual Studio и создайте новый проект с типом Приложение Windows Forms (.NET Framework), как показано ниже:
В качестве имени нового проекта задайте ScrollbarExample и выберите местоположение, куда будут сохранены файлы нового проекта (здесь я обычно оставляю все настройки по умолчанию и рекомендую сделать то же самое, просто запомните каталог, указанный в поле «Расположение», чтобы затем открывать его в Проводнике).
После создания проекта будет создана главная форма по умолчанию с именем Form1 и соответствующий ей класс Form1.cs.
Выберите в окне «Обозреватель решений» эту форму и в окне «Свойства» измените название класса для формы на FrmScrollbarExample.cs.
В диалоговом окне, запрашивающем подтверждение переименования класса формы и связанных с ней файлов, нужно согласиться.
В итоге должно получиться следующее — в окне «Обозреватель решений» форма и зависящие от неё файлы будут переименованы:
Изменяем свойства главной формы
Теперь в окне «Обозреватель решений» дважды кликнем на файл для формы FrmScrollbarExample.cs. В результате главная форма приложения будет выбрана в визуальном конструкторе, а справа-внизу появится список всех свойств формы.
Установим для формы следующие значения свойств:
- Text — [Allineed.Ru] Пример работы с элементами HScrollBar и VScrollBar
- StartPosition — CenterScreen
- Size — 816; 489
- Name — FrmScrollbarExample
Добавляем горизонтальный и вертикальный скроллбары на главную форму
Теперь нам нужно по очереди добавить горизонтальный скроллбар и вертикальный скроллбар на нашу форму.
Для этого слева в окне «Панель элементов» нужно найти нужные элементы, представляющие собой полосы прокрутки.
Выглядят они следующим образом:
Горизонтальный скроллбар представлен элементом управления HScrollBar:
Вертикальный скроллбар представлен элементом управления VScrollBar:
По очереди перетащим каждый из них на форму и установим следующие свойства:
Для горизонтального скроллбара:
- Dock — Bottom
- Name — hScrollBar1
Для вертикального скроллбара:
- Dock — Right
- Name — vScrollBar1
Теперь мы готовы к тому, чтобы написать код для нашей главной формы.
Пишем код для главной формы приложения
Дважды кликнем по главной форме из представления визуального конструктора. Откроется редактор кода для класса главной формы, в начало класса добавим константы, задающие количество клеток по горизонтали и вертикали, а также словарь colorMap, который будет содержать номера клеток в качестве ключей и конкретный цвет клетки в качестве значения для указанного ключа:
using System;
using System.Collections.Generic;
using System.Drawing;
using System.Windows.Forms;

namespace ScrollbarExample {
    public partial class FrmScrollbarExample : Form {
        /// <summary>
        /// Количество клеток по горизонтали
        /// </summary>
        const int MAX_CELLS_HORIZONTAL = 80;

        /// <summary>
        /// Количество клеток по вертикали
        /// </summary>
        const int MAX_CELLS_VERTICAL = 50;

        private Dictionary<int, Color> colorMap = new Dictionary<int, Color>();

        /// ... остальной код формы
}
Теперь напишем следующий код для события загрузки главной формы (метод FrmScrollbarExample_Load уже должен существовать в редакторе после двойного клика на форме, поэтому в него нужно добавить лишь три строки кода):
        /// <summary>
        /// Загрузка главной формы приложения
        /// </summary>
        /// <param name="sender">объект главной формы, сгенерировавший событие</param>
        /// <param name="e">параметры события</param>
        private void FrmScrollbarExample_Load(object sender, EventArgs e) {
            DoubleBuffered = true;
            hScrollBar1.Maximum = MAX_CELLS_HORIZONTAL * 50 - this.Width + 50;
            vScrollBar1.Maximum = MAX_CELLS_VERTICAL * 50 - this.Height + 80;
        }
Разберём три строки, что добавили в метод загрузки формы: DoubleBuffered = true устанавливает в значение true свойство DoubleBuffered для главной формы — это позволяет главной форме использовать двойную буферизацию, за счёт чего отрисовка всех клеток на форме не будет мерцать, а будет плавной. В двух других строках мы устанавливаем свойство Maximum для горизонтальной и вертикальной полос прокрутки, вычисляя их как произведение максимального числа клеток по горизонтали/вертикали на размер клетки в пикселях (50), затем вычитаем ширину/высоту самой формы и прибавляем числа 50 и 80 для горизонтального и вертикального скроллбара, соответственно. Числа 50 и 80 были подобраны экспериментально, они позволяют увидеть целиком ряд последних клеток по горизонтали и вертикали, когда позиция бегунка скроллбара будет максимальной. При желании вы можете увеличить эти числа и посмотреть на результат — вы просто будете видеть больше серого фона самой формы.
Теперь добавим в код формы следующий метод GetCellColor:
        /// <summary>
        /// Получает цвет для очередной клетки
        /// </summary>
        /// <param name="cellNumber">текущий номер клетки</param>
        /// <param name="random"></param>
        /// <returns>Возвращает цвет для клетки поля с заданным номером</returns>
        private Color GetCellColor(int cellNumber, Random random) {
            Color cellColor;
            if (colorMap.ContainsKey(cellNumber)) {
                cellColor = colorMap[cellNumber];
            } else {
                int red = random.Next(128, 256);
                int green = random.Next(128, 256);
                int blue = random.Next(128, 256);

                cellColor = Color.FromArgb(red, green, blue);
                colorMap.Add(cellNumber, cellColor);
            }
            return cellColor;
        }
Метод будет получать цвет конкретной клетки поля по её номеру. В качестве второго аргумента для метода мы будем впоследствии передавать заранее созданный экземпляр класса Random, который умеет генерировать случайные числа в заданном диапазоне.
Логика метода довольно проста: сначала мы проверяем, есть ли уже в словаре colorMap ключ с номером клетки cellNumber. Если да, то просто возвращаем заранее сохранённый в словаре цвет клетки по ключу. Если же в словаре ещё нет ключа с номером клетки cellNumber, то с помощью переданного в метод экземпляра random мы сгенерируем значение для красного, зелёного и синего цветов в диапазоне от 128 до 255 (граничное значение 256 не включено в диапазон генерируемых значений). Далее мы генерируем цвет для клетки поля и сохраняем его в словаре.
Метод всегда возвращает цвет клетки с заданным номером — независимо от того, был ли он уже сохранён в словаре или только что был добавлен в словарь.
Далее нам нужно будет написать метод с именем GetFontXDelta, который вычислит смещение шрифта внутри клетки при отрисовке номера клетки внутри её границ:
        /// <summary>
        /// Получить смещения шрифта по оси X. В зависимости от величины номера клетки
        /// нужно добавлять дополнительное смещение для центрирования текста с её номером внутри самой клетки
        /// </summary>
        /// <param name="figureNumber">номер клетки, для которого вычислить смещение шрифта по оси </param>
        /// <returns>значение смещения по оси X для шрифта с заданным номером клетки</returns>
        private int GetFontXDelta(int figureNumber) {
            if (figureNumber >= 1 && figureNumber < 10) {
                return 18;
            } else if (figureNumber >= 10 && figureNumber < 100) {
                return 14;
            } else if (figureNumber >= 100 && figureNumber < 1000) {
                return 8;
            } else {
                return 2;
            }
        }
Добавим его в код главной формы, его мы будем вызывать чуть позже — при отрисовке клеток на форме и обработке события Paint формы.
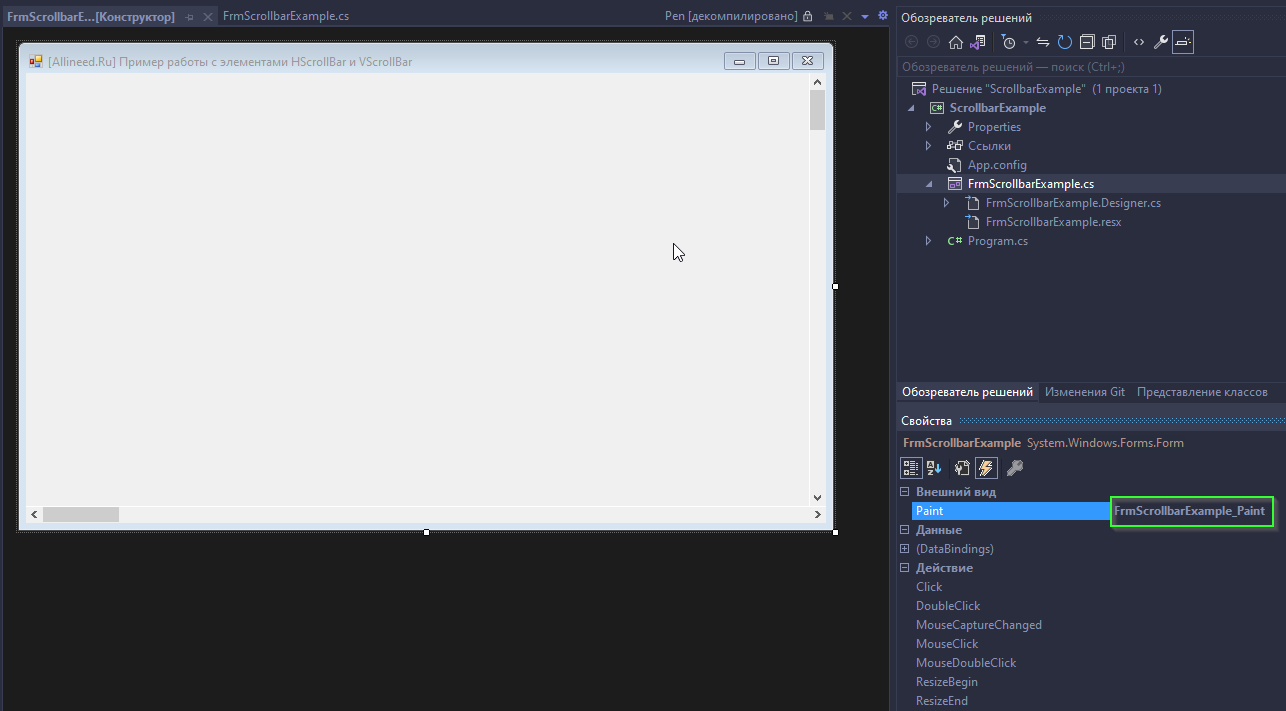
Теперь нам нужно сгенерировать два метода-обработчика для событий Paint и SizeChanged главной формы. Для этого вернёмся к визуальному конструктору формы и выделим саму форму. В нижнем правом окне «Свойства» нажмём на иконку молнии для просмотра всех событий формы и напротив событий Paint и SizeChanged сделаем двойной клик. Ниже показан пример, как это делается для событий Paint, для события SizeChanged всё делается аналогичным образом:
Теперь напишем следующий код для сгенерированных обработчиков:
        /// <summary>
        /// Отрисовка главной формы
        /// </summary>
        /// <param name="sender">объект главной формы, сгенерировавший событие</param>
        /// <param name="e">параметры события</param>
        private void FrmScrollbarExample_Paint(object sender, PaintEventArgs e) {
            Graphics g = e.Graphics;

            Font font = new Font("Tahoma", 14, FontStyle.Regular, GraphicsUnit.Point);
            Random random = new Random();

            Brush blackBrush = new SolidBrush(Color.Black);
            Pen blackPen = new Pen(blackBrush, 1);

            int cellNumber = 1;
            for (int nofFiguresVert = 1; nofFiguresVert <= MAX_CELLS_VERTICAL; nofFiguresVert++) {
                for (int nofFiguresHoriz = 1; nofFiguresHoriz <= MAX_CELLS_HORIZONTAL; nofFiguresHoriz++) {
                    Color cellColor = GetCellColor(cellNumber, random);
                    Brush fillBrush = new SolidBrush(cellColor);

                    int x = hScrollBar1.Visible ? (nofFiguresHoriz - 1) * 50 - hScrollBar1.Value : (nofFiguresHoriz - 1) * 50;
                    int y = vScrollBar1.Visible ? (nofFiguresVert - 1) * 50 - vScrollBar1.Value : (nofFiguresVert - 1) * 50;

                    Rectangle rect = new Rectangle(x, y, 50, 50);
                    Rectangle fillRect = new Rectangle(x + 1, y + 1, 49, 49);

                    g.DrawRectangle(blackPen, rect);
                    g.FillRectangle(fillBrush, fillRect);

                    Point pFont = new Point(x + GetFontXDelta(cellNumber), y + 15);

                    g.DrawString(cellNumber.ToString(), font, blackBrush, pFont);
                    cellNumber++;

                    fillBrush.Dispose();
                }
            }

            blackPen.Dispose();
            blackBrush.Dispose();
        }

        /// <summary>
        /// Обработка события изменения размера главной формы
        /// </summary>
        /// <param name="sender">объект главной формы, сгенерировавший событие</param>
        /// <param name="e">параметры события</param>
        private void FrmScrollbarExample_SizeChanged(object sender, EventArgs e) {
            int width = MAX_CELLS_HORIZONTAL * 50 - this.Width + 50;
            int height = MAX_CELLS_VERTICAL * 50 - this.Height + 80;

            if (width < 0) {
                hScrollBar1.Visible = false;
            } else {
                hScrollBar1.Visible = true;
                hScrollBar1.Maximum = width;
                hScrollBar1.Minimum = 0;
            }

            if (height < 0) {
                vScrollBar1.Visible = false;
            } else {
                vScrollBar1.Visible = true;
                vScrollBar1.Maximum = height;
                vScrollBar1.Value = 0;
            }

            Invalidate();
        }
Далее идут два раздела с описанием кода в этих методах-обработчиках. Читатели, которым код понятен и без пояснений, могут пропустить их.
Разбор метода-обработчика FrmScrollbarExample_Paint
В первой строке метода мы получаем в переменную g ссылку на объект класса Graphics, который уже присутствует в переменной e, представляющей собой параметры события Paint:
Graphics g = e.Graphics;Это сделано просто для удобства, чтобы потом каждый раз для обращения к объекту класса Graphics нам не приходилось писать e.Graphics.
Далее мы создаём объект шрифта, которым будем «писать» внутри нарисованной клетки:
Font font = new Font("Tahoma", 14, FontStyle.Regular, GraphicsUnit.Point);Следующей строкой создаём экземпляр класса Random, который мы будем использовать для генерации случайного цвета очередной клетки:
Random random = new Random();Далее мы создаём сначала экземпляр класса SolidBrush и сохраняем его в переменную blackBrush. Он представляет собой сплошную «кисть» для рисования границ наших клеток, в аргументе для конструктора указываем, что цвет кисти — чёрный. Также создаём объект Pen (представляет собой «ручку») с заданными параметрами кисти и толщины штриха в 1 пиксель:
Brush blackBrush = new SolidBrush(Color.Black);
Pen blackPen = new Pen(blackBrush, 1);
Рисование границ клетки будет осуществляться с помощью экземпляра blackPen, объект кисти, как видим, нужен лишь для создания объекта класса Pen.
Далее, перед входом в циклы рисования поля из клеток мы инициализируем текущий номер клетки единицей:
int cellNumber = 1;Затем мы организуем два цикла: внешний для отрисовки клеток по вертикали и вложенный в него цикл для отрисовки клеток по горизонтали:
for (int nofFiguresVert = 1; nofFiguresVert <= MAX_CELLS_VERTICAL; nofFiguresVert++) {
	for (int nofFiguresHoriz = 1; nofFiguresHoriz <= MAX_CELLS_HORIZONTAL; nofFiguresHoriz++) {
		// ... код внутри цикла ...

	}
}
Для каждой итерации вложенного цикла мы будем рисовать очередную клетку поля.
Разберём, что происходит во вложенном цикле.
Сначала мы получаем цвет клетки по её номеру — через вызов ранее созданного метода GetCellColor. И создаём кисть с полученным цветом для окрашивания содержимого клетки:
Color cellColor = GetCellColor(cellNumber, random);
Brush fillBrush = new SolidBrush(cellColor);
Теперь мы должны вычислить координаты для левого верхнего угла рисуемой нами клетки:
int x = hScrollBar1.Visible ? (nofFiguresHoriz - 1) * 50 - hScrollBar1.Value : (nofFiguresHoriz - 1) * 50;
int y = vScrollBar1.Visible ? (nofFiguresVert - 1) * 50 - vScrollBar1.Value : (nofFiguresVert - 1) * 50;
В случае, когда горизонтальный скроллбар видим, то мы учитываем текущую позицию его бегунка hScrollBar1.Value. Если же горизонтальный скроллбар скрыт, то мы считаем, что горизонтальные клетки полностью поместились на форме, поэтому просто используем формулу (nofFiguresHoriz — 1) * 50 для вычисления координаты x левого верхнего угла клетки. Почему именно эта формула? Потому что размерность наших клеток — 50×50 пикселей, и для переменной внешнего цикла nofFiguresHoriz, равной 1, мы получим (1 — 1) * 50, т.е. 0, значит самая первая клетка будет рисоваться в самом первом пикселе формы с индексом 0 по горизонтали.
То же самое мы делаем и для координаты y, которая показывает текущее смещение по вертикали для левого верхнего угла рисуемой клетки.
Далее идёт код, который рисует внешнюю границу клетки, используя прямоугольник rect и осуществляет заполнение прямоугольной области fillRect клетки заданным цветом:
Rectangle rect = new Rectangle(x, y, 50, 50);
Rectangle fillRect = new Rectangle(x + 1, y + 1, 49, 49);

g.DrawRectangle(blackPen, rect);
g.FillRectangle(fillBrush, fillRect);
Наконец, вложенный цикл заканчивается следующими строками кода:
Point pFont = new Point(x + GetFontXDelta(cellNumber), y + 15);

g.DrawString(cellNumber.ToString(), font, blackBrush, pFont);
cellNumber++;

fillBrush.Dispose();
Здесь мы в переменную pFont сохраняем координаты той точки, в которой должен быть отрисован текст, содержащий номер самой клетки. По оси X нам требуется дополнительное смещение, поскольку числа от 0 до 9 имеют одну «ширину», числа от 10 до 99 — другую ширину и так далее. Для того, чтобы номер клетки всегда был отрисован по центру клетки нам и нужен метод GetFontXDelta, который вернёт нужную нам величину смещения шрифта, которую мы прибавляем к координате x.
Для рисования текста используется доступный метод DrawString в классе Graphics. Как видно, в него передаётся сама строка с номером клетки, шрифт, которым необходимо нарисовать надпись в клетке, объект кисти и, наконец, точку pFont для левого верхнего угла области отрисовки текста.
После отрисовки надписи с номером клетки мы увеличиваем номер текущей клетки на единицу и освобождаем ресурсы, занимаемые кистью fillBrush, поскольку её мы создаём каждый раз во вложенном цикле.
Метод завершается двумя строками, освобождающими ресурсы, выделенные под объекты классов SolidBrush и Pen, созданные до входа в циклы:
blackPen.Dispose();
blackBrush.Dispose();
Разбор метода-обработчика FrmScrollbarExample_SizeChanged
Метод-обработчик вызывается при изменениях размера главной формы. Его предназначение в том, чтобы отрегулировать состояние наших полос прокрутки в зависимости от текущих размеров формы.
Поэтому сначала мы вычисляем ширину (width) и высоту (height), которые затем должны стать максимальным значением горизонтального и вертикального скроллбара — но в том случае, если они неотрицательны. Ведь может случиться и так, что ширина/высота формы (к примеру, в развёрнутом виде) превысит произведения MAX_CELLS_HORIZONTAL * 50 и MAX_CELLS_VERTICAL * 50.
int width = MAX_CELLS_HORIZONTAL * 50 - this.Width + 50;
int height = MAX_CELLS_VERTICAL * 50 - this.Height + 80;
Следующим шагом мы проверяем — отрицательны или нет получившиеся значения. Если отрицательны, то мы скрываем конкретный скроллбар (признак того, что все клетки поля видимы). Если неотрицательны — устанавливаем свойства Maximum и Minimum для конкретного скроллбара и делаем его видимым:
if (width < 0) {
	hScrollBar1.Visible = false;
} else {
	hScrollBar1.Visible = true;
	hScrollBar1.Maximum = width;
	hScrollBar1.Minimum = 0;
}

if (height < 0) {
	vScrollBar1.Visible = false;
} else {
	vScrollBar1.Visible = true;
	vScrollBar1.Maximum = height;
	vScrollBar1.Value = 0;
}
Последней строкой метода мы вызываем метод Invalidate() — для того, чтобы принудительно сделать недействительной всю поверхность главной формы и вызвать её перерисовку:
Invalidate();Заключительная часть — программируем реакцию скроллбаров на изменение позиции бегунка
Наше приложение почти полностью готово. Всё, что нам осталось сделать — это вернуться на главную форму и для каждого из скроллбаров сгенерировать их методы-обработчики для события Scroll. Это событие отвечает за «скроллинг», т.е. прокрутку бегунка для конкретного скроллбара. Сгенерировать методы можно также через двойной клик напротив имени события, как мы уже делали выше для Paint и SizeChanged. После генерации методов-обработчиков просто вызываем Invalidate() из каждого из них, это заставит главную форму перерисоваться в момент «скроллинга»:
        /// <summary>
        /// Изменение позиции бегунка для горизонтального скроллбара
        /// </summary>
        /// <param name="sender">объект горизонтального скроллбара, сгенерировавший событие</param>
        /// <param name="e">параметры события</param>
        private void hScrollBar1_Scroll(object sender, ScrollEventArgs e) {
            Invalidate();
        }

        /// <summary>
        /// Изменение позиции бегунка для вертикального скроллбара
        /// </summary>
        /// <param name="sender">объект вертикального скроллбара, сгенерировавший событие</param>
        /// <param name="e">параметры события</param>
        private void vScrollBar1_Scroll(object sender, ScrollEventArgs e) {
            Invalidate();
        }
На этом всё, приложение готово, и вы можете запустить его и протестировать самостоятельно работу горизонтальной и вертикальной полос прокрутки, а также посмотреть на реакцию формы на события прокрутки бегунков для скроллбаров.
Пишите свои вопросы и комментарии под статьей, буду рад обратной связи.
Ссылка на готовый пример для среды разработки Microsoft Visual Studio, рассмотренный в этой статье:
https://allineed.ru/our-products/download/4-allineed-ru-examples/17-csharp-demo-working-with-scrollbars
ScrollBars implementation with Windows Forms because the AutoScroll didn’t fit my needs
- Download source code — 299.4 KB

Introduction
Scrollbars play a crucial role in providing users with the ability to navigate content that extends beyond the visible boundaries of a window.
While their purpose is evident, the complexities arise when the need for seamless and automatic scrollbar adjustments emerges—especially when users interact with the window, such as typing within it.
Regarding my approach, I started to test and make it work correctly, firstly, the mobile window with the scrollbars. And then, I tested when the window is resized. At this stage, the challenge is great because I did not understand how the scrollbars work. So I tested and pondered scrollbars for a while, then the solution appeared. Since it now worked correctly, I tested how to make the scrollbars move automatically as long as the user is typing on their keyboard. Thus, the window advances throughout its writing.
Understanding Scrollbars
The primary purpose of a scrollbar is to allow the user to move the point of view of its document when this document exceeds the size of its window.
There exist two kind of scrollbars: horizontal and vertical.
A scrollbar is first and foremost a bar. And you can scroll this bar. As you scroll the bar, the viewpoint of your document moves simultaneously. The top (or left) of the document is where the scroll bar starts. And the bottom (or the right) of the document corresponds to the end of the scroll bar. So you can’t go any further than the top or bottom of the document.
The Need for a Custom Scrollbar Implementation
Scrollbars (horizontal and vertical) are a common user interface. In Windows Forms, you can activate both scrollbars by set the AutoScroll Boolean value to true on any window. And, when your content is larger than the window, scrollbars are visible and then you can scroll along. But, you can only make moving yourself the scrollbars. Suppose now, you have a scenario as you need that it moves automatically, you cannot have an access to properties or functions to modify the default behaviour. So, you are invited to make your own implementation to make that the document moves at the point of view that you implicitly define when you are typing in the document.
Anatomy of a Scrollbar
At the top (or left) and bottom (or right) of a vertical (or horizontal) scroll bar, there is a button on which a small arrow is usually drawn. And between these limits, there is a thumb or a bar that can be refined along a track.
Buttons move the scroll bar like a small step in the document. So you can move the viewpoint very slowly. And the thumb can move the document view faster. You can also click on the track to take a big step. These properties are represented by a percentage of the displacement amount. For example, the default values for LargeChange are 20 and SmallChange is 10.
When designing your window, you can drag a horizontal or vertical scrollbar from the toolbox to your window and position the scrollbars generally on the right edge of the window for the vertical scrollbar and on the lower edge.
When you use a scrollbar, you set a value, a minimum, and a maximum to point to the document. The simple action is just to set the minimum to zero and the maximum to your document size. But usually the minimum and maximum are zero and 100 respectively. So it is a percentage and not a maximum length. But if you set the maximum to 100, the value should be within those limits. The Value property of a scrollbar is simply a position in the scrollbar. And, when you move the scrollbar, you now only have to set the point of view of your document when you customize the scrollbars yourself. If you set the AutoScroll boolean to true, the program does all of these things for you.
Coordinating Scrollbars and Content
When you customize the scrollbars, you can set the minimum and maximum to any numeric values you want. But the value cannot exceed these limits. If so, the program throws an error exception.
For the scroll bar to move automatically, you need to set a value on the scroll bar and this value should not exceed the minimum and maximum. This value corresponds to the position of the coordinates of the document.
Now if you move your scrollbar, the value should change accordingly with the scrollbar and you should move your document’s viewpoint. To do this, you just have to change the Left and Top properties of your document to negative values. It’s just the window clipping that doesn’t show the top corners of the document. This is actually the simple method to coordinate scrollbars and content.
Using the Code
I wrote a specific class UsingScrollbars. This class encapsulates the layout process of the two scrollbars:
- The initialization of the scrollbars
- A delegate function is added to each scrollbar to capture the
Valueand move the document - A specific function that you can call to position automatically the point of view
- Two specific functions that you can call if the document is resized and if the window is resized
With a scrollbar, you have five parameters:
- a
Valuerepresenting the scrollbar position - a
LargeChange, representing the big step - a
width(or aheight) of the inner control (the document) - a
width(or aheight) of the panel content (the window) - the
Left(or theTop) corner of the inner control (the document)
In five parameters, you handle all the functionalities of a scrollbar.
I also write a specific class UsingScrollbarsConverter. This class provides a few functions:
ConvertFromValue: converts theValueto the coordinate for the upper corner of the documentConvertToValue: converts the upper corner of the document into aValueVerifyIfNotViewed: saystrueorfalseif the position is not viewed
This class simplifies the conversion logic because you have to recall these functions each time in the code. So, this class provides function to just call when needed.
There are two event handlers. One for the horizontal scrollbar and the other for the vertical scrollbar. These event handlers are initialized with the delegate functions, HorizontalScrollBarMethod and VerticalScrollBarMethod respectively. And then, these event handlers are called when you move the scroll bar and then your goal is to move the top corners of the document to change the viewpoint of the document in the window.
private void HorizontalScrollBarMethod(object? sender, ScrollEventArgs e)
{
    Debug.WriteLine("Horizontal new value : " + e.NewValue);
    int convertedValue = -UsingScrollBarsConverter.ConvertFromValue
                         (_panel.Width - _vScrollBar.Width,
                          _innerControl.Width, e.NewValue, _hScrollBar.LargeChange);
    Debug.WriteLine("Horizontal converted value : " + convertedValue);
    _innerControl.Left = convertedValue;
}

private void VerticalScrollBarMethod(object? sender, ScrollEventArgs e)
{
    Debug.WriteLine("Vertical new value : " + e.NewValue);
    int convertedValue = -UsingScrollBarsConverter.ConvertFromValue
                         (_panel.Height - _hScrollBar.Height,
                          _innerControl.Height, e.NewValue, _vScrollBar.LargeChange);
    Debug.WriteLine("Vertical converted value : " + convertedValue);
    _innerControl.Top = convertedValue;
}
Note the negative operator towards the function UsingScrollBarsConverter.ConvertFromValue.
I set the minimum to 0 and the maximum to 100. So, when I get a Value, I need to convert this Value into the point of view of the document. The conversion method is just a proportional division.
public static int ConvertFromValue(int panelContent, int innerControl,
                                   int newValue, int LargeChange)
{
    // multiply
    float multiply = newValue * (innerControl - panelContent) /
                                (float)(100 - LargeChange);
    return (int)multiply;
}
Generally, we just set the top corner by calculating the difference between the old value and the new value of the scrollbar. Here, we don’t do that, but calculate the position without going past the bottom corner of the document. If the function is not calculating exactly the upper corner of the document, you should go further in the document.
As the maximum is 100, the LargeChange is 20, you can go up to 80% document viewing. This means that 20% should be equivalent to the size of your container (the panel). Below, the picture shows a vertical scrollbar and explains what is exactly the LargeChange value. So, in the function ConvertFromValue, we divide by 100 - LargeChange and not by 100.

The LargeChange is set as a value that makes the Value to obtain the number until 80 exactly and not almost or too many. These values are initially equal to:
_vScrollBar.LargeChange = 20;
_hScrollBar.LargeChange = 20;
_vScrollBar.SmallChange = 10;
_vScrollBar.SmallChange = 10;
But, for this to work when the window is resized, you need to set these values proportional to the document and the panel. If the panel is larger than the document, the scroll bar is disabled.
// horizontal scrollbar
float horizontalProportion = GetInnerControlEffectiveSize
                             (innerControl, panel, vScrollBar, hScrollBar).Width
                             / (float)GetPanelContentEffectiveSize
                             (panel, vScrollBar, hScrollBar).Width;
if (horizontalProportion >= 1)
{
    hScrollBar.Enabled = true;
    SetHScrollBarSmallAndLargeChange(horizontalProportion, hScrollBar);
    hScrollBar.Value = 0;
    innerControl.Left = 0;
}
else
{
    hScrollBar.LargeChange = 100;
    hScrollBar.SmallChange = 100;
    hScrollBar.Enabled = false;
    hScrollBar.Value = 0;
    innerControl.Left = 0;
}
Debug.WriteLine("HScrollBar Enabled : " + hScrollBar.Enabled);
Debug.WriteLine("HScrollBar LargeChange :" + hScrollBar.LargeChange);
Debug.WriteLine("HScrollBar SmallChange :" + hScrollBar.SmallChange);

// vertical scrollbar
float verticalProportion = GetInnerControlEffectiveSize
                           (innerControl, panel, vScrollBar, hScrollBar).Height
                           / (float)GetPanelContentEffectiveSize
                           (panel, vScrollBar, hScrollBar).Height;
if (verticalProportion >= 1)
{
    vScrollBar.Enabled = true;
    SetVScrollBarSmallAndLargeChange(verticalProportion, vScrollBar);
    vScrollBar.Value = 0;
    innerControl.Top = 0;
}
else
{
    vScrollBar.LargeChange = 100;
    vScrollBar.SmallChange = 100;
    vScrollBar.Enabled = false;
    vScrollBar.Value = 0;
    innerControl.Top = 0;
}
Debug.WriteLine("VScrollBar Enabled : " + vScrollBar.Enabled);
Debug.WriteLine("VScrollBar LargeChange :" + vScrollBar.LargeChange);
Debug.WriteLine("VScrollBar SmallChange :" + vScrollBar.SmallChange);
When the Coordinates Change
When the coordinates change, you are moving the insertion point in the document. If you go further than the viewport, you will never see the insertion point. Then the scrollbar should move automatically to display the insertion point.
To do this, I have a function to transform a position into a value. This function is named ConvertToValue. It converts a position (the upper corner of the document) to a value as a proportional operation.
/// <summary>
/// Converts a position to a scrollbar value
/// </summary>
/// <param name="coordinate">position (x or y)</param>
/// <param name="maximale">maximale position</param>
/// <returns>the value by percent</returns>
public static int ConvertToValue(int panelContent,
              int innerControl, int coordinate, int LargeChange, int nTurn = 1)
{
    return (int)(coordinate / (nTurn * (float)(innerControl - panelContent)) *
                              (float)(100 - LargeChange));
}
The function WhenCoordinatesChanged is the function that hosts the layout and logic operations to move the scrollbar only if you exceeds the visible boundaries of the window. So, we verify first that the insertion point is viewed or not. We have a function named VerifyIfNotViewed.
public static bool VerifyIfNotViewed(int innerControl,
                   int panelContent, int view, int coordinate)
{
    Debug.WriteLine("View : " + view + ", PanelContent : " +
                     panelContent + ", Coordinate : " + coordinate + ",
                     NotViewed : " + ((coordinate - view) > panelContent ||
                     coordinate < view));
    return (coordinate - view) > panelContent || coordinate < view;
}
Below, I show the idea of moving the window to a position in the document and how to calculate the new top corner of the document. At number 1 shown in this image, this position is further down the document. To calculate the Value, I simply call the ConvertToValue function and set the Value of the scrollbar (vertical or horizontal) to that result. At number 2, the position is before the window. And I just call the ConvertToValue function and set the value to that result. But, to know if the position is viewed or not, the 1 answers true to VerifyIfNotViewed because of the comparison (coordinate - view) > panelContent and the 2 answers true because of the comparison coordinate < view.

To debug, I use the function:
Debug.WriteLine(string? s);
The debug output is the only solution to read values and not the debugger because it is raised continuously and also, the focus event occurred each time I switched between the debugger and the window.
Conclusion
This was an implementation of the ScrollBars in C# for Windows Forms to view a document that exceeds the boundaries of the window.
There are three advantages to use this implementation:
-
Automatic Document Navigation: Seamlessly adjust the document’s view as you type, eliminating the need for manual scrollbar manipulation during interaction.
-
Efficient and Encapsulated Design: By encapsulating layout and logic processes within two classes, the implementation offers a streamlined way to import and integrate this functionality into your application, sparing you from extensive debugging efforts. This streamlined integration can save you valuable development time, potentially half an hour or more.
-
Flexible Adaptation: The code’s organizational structure facilitates modifications to both logic and layout, allowing easy adaptation for documents with padding or other variations.
By engaging my problem-solving skills, I employed a comprehensive approach to dissect and understand the intricacies of scrollbar behaviour, ensuring a robust and effective solution.
History
- 25th August, 2023: Initial version
Panel Scrollbar in CWinForms
Panels are a versatile user interface element that can be used to organize and display content in a variety of ways. In WinForms, panels can be scrolled horizontally or vertically using a scrollbar. This can be useful for displaying large amounts of content or for allowing users to navigate through a long list of items.
In this article, we will show you how to add a scrollbar to a panel in CWinForms. We will also discuss the different properties that you can use to customize the appearance and behavior of the scrollbar.
By the end of this article, you will be able to add scrollbars to your panels and use them to scroll through content in your WinForms applications.
| Column 1 | Column 2 | Column 3 |
|---|---|---|
| Panel | A control that displays a rectangular area of content | System.Windows.Forms.Panel |
| Scrollbar | A control that allows the user to scroll through the content of a panel | System.Windows.Forms.ScrollBar |
| C | A programming language that is used to develop applications for the .NET Framework | https://docs.microsoft.com/en-us/dotnet/csharp/ |
| Winforms | A framework that is used to develop graphical user interfaces (GUIs) for Windows applications | https://docs.microsoft.com/en-us/dotnet/desktop/winforms/ |
A panel scrollbar is a control that allows users to scroll through the contents of a panel. It can be used to display a large amount of data in a small space, or to allow users to view different parts of a panel without having to scroll the entire window.
Panel scrollbars are commonly used in applications that display large amounts of data, such as spreadsheets, databases, and image galleries. They can also be used to improve the usability of applications by making it easier for users to find the information they are looking for.
In this tutorial, we will show you how to create a panel scrollbar in CWinforms. We will start by creating a new Windows Forms project and adding a panel control to the form. Then, we will add a scrollbar control to the form and set its Dock property to Right. Finally, we will set the ScrollToControl property of the scrollbar control to the panel control.
Creating a Panel Scrollbar
To create a panel scrollbar, you can use the following steps:
1. Create a new Windows Forms project.
2. Add a panel control to the form.
3. Set the Dock property of the panel control to Fill.
4. Add a scrollbar control to the form.
5. Set the Dock property of the scrollbar control to Right.
6. Set the ScrollToControl property of the scrollbar control to the panel control.
Once you have completed these steps, you will have created a panel scrollbar that allows users to scroll through the contents of the panel.
Example Code
The following code shows an example of how to create a panel scrollbar in CWinforms:
c
// Create a new Windows Forms project.
// Add a panel control to the form.
Panel panel = new Panel();
panel.Dock = DockStyle.Fill;
this.Controls.Add(panel);
// Add a scrollbar control to the form.
Scrollbar scrollbar = new Scrollbar();
scrollbar.Dock = DockStyle.Right;
this.Controls.Add(scrollbar);
// Set the ScrollToControl property of the scrollbar control to the panel control.
scrollbar.ScrollToControl = panel;
In this tutorial, we showed you how to create a panel scrollbar in CWinforms. We started by creating a new Windows Forms project and adding a panel control to the form. Then, we added a scrollbar control to the form and set its Dock property to Right. Finally, we set the ScrollToControl property of the scrollbar control to the panel control.
We hope that this tutorial has been helpful. If you have any questions, please feel free to leave a comment below.
3. How to use a panel scrollbar in CWinforms?
A panel scrollbar is a control that allows users to scroll through the contents of a panel. To use a panel scrollbar, you can use the following methods:
- To scroll the panel, you can use the `ScrollBar.Value` property. This property represents the current position of the scrollbar, and you can set it to a value between `0` and `1`. A value of `0` represents the top of the panel, and a value of `1` represents the bottom of the panel.
- To get the current position of the panel, you can use the `ScrollBar.Value` property.
- To set the maximum and minimum values of the scrollbar, you can use the `ScrollBar.Maximum` and `ScrollBar.Minimum` properties. The maximum value represents the bottom of the panel, and the minimum value represents the top of the panel.
Here is an example of how to use a panel scrollbar in CWinforms:
c
// Create a panel.
Panel panel = new Panel();
// Add a scrollbar to the panel.
ScrollBar scrollbar = new ScrollBar();
panel.Controls.Add(scrollbar);
// Set the scrollbar’s properties.
scrollbar.Minimum = 0;
scrollbar.Maximum = 100;
scrollbar.Value = 50;
// Add some content to the panel.
for (int i = 0; i < 100; i++) {
panel.Controls.Add(new Label(i.ToString()));
}
// Display the panel.
this.Controls.Add(panel);
When the user scrolls the scrollbar, the contents of the panel will scroll accordingly.
4. Common problems with panel scrollbars in CWinforms
There are a few common problems that can occur with panel scrollbars in CWinforms. These problems include:
- The scrollbars are difficult to use. This can be because the scrollbars are small or because they are not located in a convenient place.
- The scrollbars can cause the panel to scroll unintentionally. This can happen if the user clicks on the scrollbar by mistake.
- The scrollbars can interfere with the user’s ability to interact with other controls on the panel. This can happen if the scrollbars are too large or if they are located in a way that makes it difficult to click on other controls.
To avoid these problems, you should make sure that the scrollbars are:
- Large enough to be easily used.
- Located in a convenient place.
- Not interfering with other controls on the panel.
You can also add some code to the panel’s `MouseDown` event handler to prevent the panel from scrolling unintentionally. This code can check to see if the user clicked on the scrollbar, and if not, it can prevent the panel from scrolling.
Panel scrollbars can be a useful way to allow users to scroll through the contents of a panel. However, there are a few common problems that can occur with panel scrollbars in CWinforms. By following the tips in this article, you can avoid these problems and create panel scrollbars that are easy to use and effective.
Q: How do I add a scrollbar to a panel in CWinForms?
A: To add a scrollbar to a panel in CWinForms, you can use the following steps:
1. In your Ccode, create a new instance of the `ScrollBar` class.
2. Set the `ScrollBar`’s `Parent` property to the panel that you want to add it to.
3. Set the `ScrollBar`’s `Orientation` property to either `Horizontal` or `Vertical`.
4. Set the `ScrollBar`’s `Minimum` and `Maximum` properties to the minimum and maximum values that the scrollbar should allow.
5. Set the `ScrollBar`’s `Value` property to the current value of the scrollbar.
6. Call the `AutoSize` method on the `ScrollBar` to make it the same size as its contents.
Here is an example of how to add a vertical scrollbar to a panel in CWinForms:
c
// Create a new instance of the ScrollBar class.
ScrollBar scrollBar = new ScrollBar();
// Set the ScrollBar’s Parent property to the panel that you want to add it to.
scrollBar.Parent = panel;
// Set the ScrollBar’s Orientation property to Vertical.
scrollBar.Orientation = Orientation.Vertical;
// Set the ScrollBar’s Minimum and Maximum properties to the minimum and maximum values that the scrollbar should allow.
scrollBar.Minimum = 0;
scrollBar.Maximum = 100;
// Set the ScrollBar’s Value property to the current value of the scrollbar.
scrollBar.Value = 50;
// Call the AutoSize method on the ScrollBar to make it the same size as its contents.
scrollBar.AutoSize();
Q: How do I make a scrollbar automatically scroll a panel?
A: To make a scrollbar automatically scroll a panel, you can use the following steps:
1. In your Ccode, add a `Binding` between the scrollbar’s `Value` property and the panel’s `ScrollPosition` property.
2. In the `Binding`’s `UpdateSourceTrigger` property, set the value to `PropertyChanged`.
3. In the `Binding`’s `Mode` property, set the value to `TwoWay`.
Here is an example of how to make a vertical scrollbar automatically scroll a panel in CWinForms:
c
// Create a new instance of the ScrollBar class.
ScrollBar scrollBar = new ScrollBar();
// Set the ScrollBar’s Parent property to the panel that you want to add it to.
scrollBar.Parent = panel;
// Set the ScrollBar’s Orientation property to Vertical.
scrollBar.Orientation = Orientation.Vertical;
// Set the ScrollBar’s Minimum and Maximum properties to the minimum and maximum values that the scrollbar should allow.
scrollBar.Minimum = 0;
scrollBar.Maximum = 100;
// Set the ScrollBar’s Value property to the current value of the scrollbar.
scrollBar.Value = 50;
// Create a new Binding between the scrollbar’s Value property and the panel’s ScrollPosition property.
Binding binding = new Binding();
binding.Source = scrollBar.Value;
binding.Target = panel.ScrollPosition;
binding.UpdateSourceTrigger = UpdateSourceTrigger.PropertyChanged;
binding.Mode = BindingMode.TwoWay;
// Add the Binding to the panel.
panel.Bindings.Add(binding);
Q: How do I disable a scrollbar in CWinForms?
A: To disable a scrollbar in CWinForms, you can use the following steps:
1. In your Ccode, set the scrollbar’s `Enabled` property to `false`.
Here is an example of how to disable a vertical scrollbar in CWinForms:
c
// Create a new instance of the ScrollBar class.
ScrollBar scrollBar = new ScrollBar();
// Set the ScrollBar’s Parent property to the panel that you want to add it to.
scrollBar.Parent = panel;
// Set the ScrollBar’s Orientation property to Vertical.
scrollBar.Orientation = Orientation.Vertical;
// Set the ScrollBar’s Minimum and Maximum properties to the minimum and maximum values that the scrollbar should allow.
scrollBar.Minimum = 0;
scrollBar.Maximum = 100;
// Set the Scroll
In this blog post, we have discussed how to add a scrollbar to a panel in CWinForms. We have covered the following topics:
- The different types of scrollbars
- How to add a scrollbar to a panel
- How to set the scrollbar properties
- How to handle scrollbar events
We hope that this blog post has been helpful and that you have learned how to add a scrollbar to a panel in CWinForms. If you have any questions, please feel free to leave a comment below.
Author Profile
-
Hatch, established in 2011 by Marcus Greenwood, has evolved significantly over the years. Marcus, a seasoned developer, brought a rich background in developing both B2B and consumer software for a diverse range of organizations, including hedge funds and web agencies.
Originally, Hatch was designed to seamlessly merge content management with social networking. We observed that social functionalities were often an afterthought in CMS-driven websites and set out to change that. Hatch was built to be inherently social, ensuring a fully integrated experience for users.
Now, Hatch embarks on a new chapter. While our past was rooted in bridging technical gaps and fostering open-source collaboration, our present and future are focused on unraveling mysteries and answering a myriad of questions. We have expanded our horizons to cover an extensive array of topics and inquiries, delving into the unknown and the unexplored.
Latest entries
Last Updated :
20 Apr, 2023
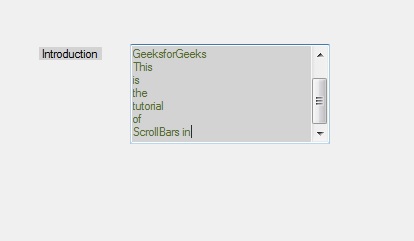
In Windows forms, TextBox plays an important role. With the help of TextBox, the user can enter data in the application, it can be of a single line or of multiple lines. In TextBox, you are allowed to set scrollbars when you are working with multiline TextBox with the help of ScrollBars property of the TextBox. The default value of this property is in Windows form, you can set this property in two different ways: 1. Design-Time: It is the simplest way to set the ScrollBars property of the TextBox as shown in the following steps:
Note: Please remember the horizontal scroll bars will not be shown if the WordWrap property is set to true, regardless of the value of the ScrollBars property. 2. Run-Time: It is a little bit trickier than the above method. In this method, you can set the ScrollBars property of the TextBox programmatically with the help of given syntax:
public System.Windows.Forms.ScrollBars ScrollBars { get; set; }
Here, the ScrollBars represent the ScrollBars enumeration values that indicate whether a multiline TextBox control appears with no scroll bars, a horizontal scroll bar, a vertical scroll bar, or both. And it will throw an InvalidEnumArgumentException if the value that is assigned to the property is not within the range of valid values for the enumeration. Following steps are used to set the ScrollBars property of the TextBox:
- Step 1 : Create a textbox using the TextBox() constructor provided by the TextBox class.
// Creating textbox
TextBox Mytextbox = new TextBox();
- Step 2 : After creating TextBox, set the ScrollBars property of the TextBox provided by the TextBox class.
// Set ScrollBars property
Mytextbox.ScrollBars = ScrollBars.Vertical;
- Step 3 : And last add this textbox control to form using Add() method.
// Add this textbox to form
this.Controls.Add(Mytextbox);
- Example:
CSharp
using System;
using System.Collections.Generic;
using System.ComponentModel;
using System.Data;
using System.Drawing;
using System.Linq;
using System.Text;
using System.Threading.Tasks;
using System.Windows.Forms;
namespace my {
public partial class Form1 : Form {
public Form1()
{
InitializeComponent();
}
private void Form1_Load(object sender, EventArgs e)
{
Label Mylablel = new Label();
Mylablel.Location = new Point(96, 54);
Mylablel.Text = "Introduction";
Mylablel.AutoSize = true;
Mylablel.BackColor = Color.LightGray;
this.Controls.Add(Mylablel);
TextBox Mytextbox = new TextBox();
Mytextbox.Location = new Point(187, 51);
Mytextbox.BackColor = Color.LightGray;
Mytextbox.ForeColor = Color.DarkOliveGreen;
Mytextbox.Height = 100;
Mytextbox.Width = 200;
Mytextbox.Name = "text_box1";
Mytextbox.Multiline = true;
Mytextbox.ScrollBars = ScrollBars.Vertical;
this.Controls.Add(Mytextbox);
}
}
}
- Output: