
SAMPLE PROJECT
This article has a sample project for you to play around with for free, download it @ https://github.com/Scribbio/Column-binding-in-WinForms-ListView-).
Introduction

In this tutorial, we will look at binding a form control such as a label and checkbox to a ListView column in .NET (4.7) WinForms (Window Forms).
Its features will include:
- Updating the content/CheckState of the bound control where there is a selection change on the ListView
- Using a button to modify the column’s item with the value contained in the bound control
- Create and add a new item to the listview according to values present in the bound controls
What is data binding?
The concept of data binding is generally about separating an app’s layout from it’s data. In practice, that means binding a UI component like a textbox or label with a code behind-object, ie. a string. Any changes made to the variable will automatically update the UI component and vice versa.
Data binding promotes a healthy separation of concerns, whereby the UI can focus on displaying data and not modifying it. It also removes the requirement for auxiliary functions in your form or backend code like «field.setText(val)» _
The Plan
When you construct a WinForms ListView using code (and not via the designer), to add columns you typically make instances of ColumnHeader to add to the ListViews column collection. For example:
// Create a ListView instance:
ListView lv1 = new ListView();

// Make column header
ColumnHeader columnHeader = new ColumnHeader();
columnHeader.Text = "Column Title";
columnHeader.Width = 40;

// Add column header to ListView
lv1.Columns.Add(columnHeader);
We will use inheritance to create our own custom column headers and leverage the power of polymorphism to add it to a ListView in the same way that you would with the standard ColumnHeader.
Inheritance
In c #, Inheritance is one of the key principles of object-oriented programming (OOP) and is used to inherit the properties one class (base) to another (child) class. Inheritance allows us to create a new class to reuse, extend and modify the behaviour of the parent class. Inheritance is also one way to achieve polymorphism which allows us to treat objects of different types in a similar manner. For example: Student and Teacher both inherit from type Person, and Person can Move. If you have an instance of a Person then you can call Move() without knowing or caring what type of Person it is. This is the strategy we’re going to apply to the ColumnHeader.
Putting the plan into action
1. Create a new class and name it MyColumnHeader.cs
2. Add the following code
using System.ComponentModel;
using System.Windows.Forms;
using System.Linq;

public class MyColumnHeader : ColumnHeader
{
    [DefaultValue(typeof(Control), null)]
    public Control Control { get; set; }

    [DefaultValue("")]
    public string SelectValues { get; set; } = "";

    public string GetTextFromDispatching()
    {
        // if no control is linked to the column return Nothing
        string text = null;

        if (Control != null)
        {
            if (Control.GetType().GetProperty("CheckState") != null)
            {
                text = this.GetCheckValue();
            }
            else
            {
                text = Control.Text;
            }
        }

        return text;
    }

    /*
    * returns "Y" or "N" depending on whether a bound checkbox is checked or not
    * if CheckBox has three check states (ThreeState = true) return "N/A"
    */
    public string GetCheckValue()
    {
        string checkValue = "";
        if (Control != null && Control.GetType().GetProperty("CheckState") != null)
        {
            CheckState StateValue;
            StateValue = (CheckState)Control.GetType().GetProperty("CheckState").GetValue(Control);
            var valeurs = SelectValues.Split('|');
            if (StateValue == CheckState.Checked)
            {
                if (!string.IsNullOrEmpty(SelectValues))
                    checkValue = valeurs.Length > 0 ? valeurs[0] : "";
                else
                    checkValue = "Y";
            }
            else if (StateValue == CheckState.Unchecked)
            {
                if (!string.IsNullOrEmpty(SelectValues))
                    checkValue = valeurs.Length > 1 ? valeurs[1] : "";
                else
                    checkValue = "N";
            }
            else if (StateValue == CheckState.Indeterminate)
            {
                if (!string.IsNullOrEmpty(SelectValues))
                    checkValue = valeurs.Length > 2 ? valeurs[2] : "N/A";
                else
                    checkValue = "N/A";
            }
        }

        return checkValue;
    }

    /* updates the checkbox checkstate according to the value contained in the selected ListView row
    * "Y", "Yes", "T", "True" will "check" the bound checkbox
    * "N", "No", "F", "False" will "uncheck" the checkbox
    * other values will produce an "indeterminate" state
    */
    public CheckState GetCheckState(string valueChecked)
    {
        CheckState checkState;
        string[] vals = { "Y", "Yes", "T", "True" };

        if (!string.IsNullOrEmpty(SelectValues))
        {
            var valeurs = SelectValues.Split('|');
            if (valueChecked.Equals(valeurs.Length > 0 ? valeurs[0] : ""))
                checkState = CheckState.Checked;
            else if (valueChecked.Equals(valeurs.Length > 1 ? valeurs[1] : ""))
                checkState = CheckState.Unchecked;
            else
                checkState = CheckState.Indeterminate;
        }
        else if (vals.Any(x => x.Contains(valueChecked)))
            checkState = CheckState.Checked;
        else if (new[] { "N", "No", "F", "False" }.Contains(valueChecked))
            checkState = CheckState.Unchecked;
        else
            checkState = CheckState.Indeterminate;
        return checkState;
    }
}
Explaining the code
-
Firstly, we are adding a property of type control to store the control we want to link to the column.
-
Our second important property is SelectValues. In the case where the linked control is a CheckBox, this allows to store which values we want to appear in our ListView depending on whether or not the bound CheckBox is checked, unchecked or «inbetween». This is achieved by passing a string containing a pipe character in order to differentiate between the two values when we instantiate a MyColumnHeader, for example, «Y|N».
-
The GetTextFromDispatching() method retrieves the textual content from the attached control.
The two methods, GetCheckValue() and GetCheckState() are for handling bound CheckBox controls.
-
GetCheckValue()
GetCheckValue() is for updating a value contained in the ListView from a bound CheckBox. As mentioned above, this method will split the defined values in SelectValues depending on whether a bound CheckBox is checked and return an associated textual value. In our example, «Y» (yes) is when the control is checked and «N» (no) for when it is unchecked. If your CheckBox has three possible check states (When the CheckBox.ThreeState = true), the example code returns «N/A» -
GetCheckState()
Contrary to GetCheckValue(), this method updates the bound CheckBox CheckState according to the value contained in the selected ListView row,. In our example, the values «Y», «Yes», «T», «True» will check the bound CheckBox and «N», «No», «F», «False» will uncheck the CheckBox, other values will produce an «indeterminate» state.
3. Add MyColumnHeader to your ListView
Thanks to polymorphism, you can add the MyColumnHeader to your ListViews in the same way that you would with the standard ColumnHeader.
Note, you cannot add these columns directly in the designer with this bare-bones approach.
Label/Text box example:
<ListView>.Columns.Add(new MyColumnHeader() { Text = "Header", Name = "Header1", Width = 40, TextAlign = HorizontalAlignment.Left, Control = textBox1 });
Check box example:
<ListView>.Columns.Add(new MyColumnHeader() { Text = "Enrolled", Name = "Header2", Width = 60, TextAlign = HorizontalAlignment.Left, Control = checkBox1, SelectValues = "Y|N|N/A" });
4. Add the binding methods
These methods will be linked to events in your form. Such as clicking on a button or changing the selected index in the ListView.
- ModifyItem() –
This function will modify the value of the selected item with the values of the bound controls.
public ListViewItem ModifyItem()
{
    ListViewItem item = null;
    if (lv1.SelectedItems.Count == 1)
    {
        item = lv1.SelectedItems[0];
        foreach (MyColumnHeader column in lv1.Columns)
        {
            string text = column.GetTextFromDispatching();
            if (text != null)
            {
                item.SubItems[column.Index].Text = text;
            }
        }
    }
        return item;
    }
- AddItem() –
This function uses the values of the bounded controls to create and add a new item to the listview.
public ListViewItem AddItem(int itemIndex = -1)
{
    ListViewItem AddItemRet = default(ListViewItem);
    var subitems = new string[lv1.Columns.Count - 1 + 1];
    foreach (MyColumnHeader column in lv1.Columns)
    {
        string text = column.GetTextFromDispatching();
        if (text != null)
            subitems[column.Index] = text;
        else
            subitems[column.Index] = "";
    }
    var item = new ListViewItem(subitems);
    if (itemIndex >= 0)
        AddItemRet = lv1.Items.Insert(itemIndex, item);
    else
    {
        AddItemRet = lv1.Items.Add(item);
        item.EnsureVisible();
    }
    return AddItemRet;
}
- Dispatching() –
This function transfers the values of the selected row to their bounded controls.
private void Dispatching()
        {
            if (lv1.SelectedItems.Count == 1)
            {
                foreach (ColumnHeader column in lv1.Columns)
                {
                    if (column.GetType().Equals(typeof(MyColumnHeader)))
                    {
                        var uColumn = (MyColumnHeader)column;
                        Control controler = uColumn.Control;
                        if (controler != null)
                        {
                            ListViewItem item = lv1.SelectedItems[0];
                            if (controler.GetType().GetProperty("CheckState") != null)
                            {
                                controler.GetType().GetProperty("CheckState").SetValue(controler, uColumn.GetCheckState(item.SubItems[column.Index].Text));
                            }
                            else {
                                controler.Text = item.SubItems[column.Index].Text;
                            }
                        }
                    }
                }
            }
        }
5. Add the events
You need to associate the above binding methods with with events on your form. Here are the examples from the sample project. You can set these in the designer.
// when the ListViewItem index is changed
private void lg_ItemSelectionChanged(object sender, ListViewItemSelectionChangedEventArgs e)
{
    Dispatching();
 }

// when the Add button is clicked
  private void buttonAddNew_Click(object sender, EventArgs e)
  {

      AddItem();
  }

// when the edit button is clicked
  private void buttonEdit_Click(object sender, EventArgs e)
  {
      ModifyItem();
  }
Note, the sample project contains an additional event to handle a contextual menu.
Oh and don’t forget to put your handlers in your form’s load event.
// Add handling for the RightClick Event for contextual menu
<ListView>.MouseClick += new MouseEventHandler(lg_MouseClick);
// Add handling for the ListViewItem change Event
<ListView>.ItemSelectionChanged += new ListViewItemSelectionChangedEventHandler(lg_ItemSelectionChanged);
Summary
Long gone are the days worrying about updating various controls on your form.
Use binding and focus on what matters, the underlying data.
Replicate the same format across your forms for both faster development time.
Provide feedback
Saved searches
Use saved searches to filter your results more quickly
Sign up
A ListBox control
in a C# windows forms, can display only one column of data, but there are
instances when we want to display multiple columns of data. One option is to
use the DataGrid
control, but we can also use the ListView control
to display multiple column data.
The ListView can be
used to display static information, which the user will not be changing, in
this post we shall see on how to use the ListView control
to display multiple columns of data in a C# Windows Form. We shall bind the
data from the list view from the code behind file.
1. Create a new / open an existing C# Windows application
2. Open and existing / Add a new Windows Form to the Project
3. Drag a ListView control into the form.
4. Open the Properties window of the ListView.
5. Open the Columns (Collection) Property of the ListView and add
the Columns Required.
6.
Now switch to the code behind and add the following code to populate the
ListView. ListViewItem listViewItem;
//
listViewItem = new ListViewItem(«<= 18.5»);
listViewItem.SubItems.Add(«Underweight»);
listView1.Items.Add(listViewItem);
//
listViewItem = new ListViewItem(«18.5 to 25»);
listViewItem.SubItems.Add(«Normal Weight»);
listView1.Items.Add(listViewItem);
//
listViewItem = new ListViewItem(«25.1 to 30»);
listViewItem.SubItems.Add(«Overweight»);
listView1.Items.Add(listViewItem);
//
listViewItem = new ListViewItem(«> 30»);
listViewItem.SubItems.Add(«Obese»);
listView1.Items.Add(listViewItem);
7. The Final ListView looks as
follows.
C# ListView
C# ListView control provides an interface to display a list of items using different views including text, small images, and large images. In this tutorial, we will learn how to create and use a ListView control in C#. We will also see how to create multiple views of ListView items. This article also covers most of the common properties and methods of the ListView control.
Creating a C# ListView
There are two approaches to create a ListView control in Windows Forms. Either we can use the Forms designer to create a control at design-time or we can use the ListView class to create a control at run-time.
ListView at Design-time
In our first approach, we are going to create a ListView control at design-time using the Forms designer.
To create a ListView control at design-time, we simply drag and drop a ListView control from the Toolbox onto a Form in Visual Studio. After you drag and drop a ListView onto a Form, the ListView looks like Figure 1. Once a ListView is on the Form, you can move it around and resize it using the mouse and set its properties and events.

Figure 1
ListView at Run-time
The ListView class represents a ListView control in Windows Forms. To create a ListView control at run-time, we create an instance of the ListView class, set its properties and add a ListView object to the Form controls.
The first step to create a dynamic ListView is to create an instance of the ListView class. The following code snippet creates a ListView control object:
ListView ListView1 = new ListView(); In the next step, you may set the properties of the ListView control. The following code snippet sets the location, width, height, background color, foreground color, Text, Name, and Font properties of a ListView:
ListView1.Location = new System.Drawing.Point(12, 12);
ListView1.Name = "ListView1";
ListView1.Size = new System.Drawing.Size(245, 200);
ListView1.BackColor = System.Drawing.Color.Orange;
ListView1.ForeColor = System.Drawing.Color.Black;
Once the ListView control is ready with its properties, the next step is to add the ListView to a Form. To do so, we use the Form.Controls.Add method that adds a ListView control to the Form controls and displays it on the Form based on the location and size of the control. The following code snippet adds a ListView control to the current Form:
Controls.Add(ListView1); Setting ListView Properties
The easiest way to set properties is from the Properties Window. You can open the Properties window by pressing F4 or right-clicking on a control and selecting the «Properties» menu item. The Properties window looks as in Figure 2.
Figure 2
Set Name of Listview
The Name property represents a unique name of a ListView control. It is used to access the control in the code. The following code snippet sets and gets the name and text of a ListView control:
ListView1.Name = "ListView1"; Location, Height, Width and Size of ListView
The Location property takes a Point that specifies the starting position of the ListView on a Form. You may also use Left and Top properties to specify the location of a control from the left top corner of the Form. The Size property specifies the size of the control. We can also use the Width and Height properties instead of the Size property. The following code snippet sets the Location, Width, and Height properties of a ListView control:
ListView1.Location = new System.Drawing.Point(12, 12);
ListView1.Size = new System.Drawing.Size(245, 200);
Change ListView Font
The Font property represents the font of the text in a ListView control. If you click on the Font property in the Properties window, you will see the Font name, size and other font options. The following code snippet sets the Font property at run-time:
ListView1.Font = new Font("Georgia", 16); Change Background and Foreground of ListView
The BackColor and ForeColor properties are used to set the background and foreground color of a ListView, respectively. If you click on these properties in the Properties window, then the Color Dialog pops up.
Alternatively, you can set background and foreground colors at run-time. The following code snippet sets the BackColor and ForeColor properties:
ListView1.BackColor = System.Drawing.Color.Orange;
ListView1.ForeColor = System.Drawing.Color.Black;
The new ListView with background and foreground looks as in Figure 3.
Figure 3
You can also set borders style of a ListView by using the BorderStyle property. The BorderStyle property is represented by a BorderStyle enumeration that has three values; FixedSingle, Fixed3D, and None. The default value of the border style is Fixed3D. The following code snippet sets the border style of a ListView to FixedSingle:
ListView1.BorderStyle = BorderStyle.FixedSingle;Get and Set ListView Items
The Items property is used to add and work with items in a ListView. We can add items to a ListView at design-time from the Properties Window by clicking on the Items Collection as you can see in Figure 4.
Figure 4
When you click on the Collections, the ListView Collection Editor window will pop-up where you can type strings. Each line added to this collection will become a ListView item. I add four items as you can see in Figure 5.
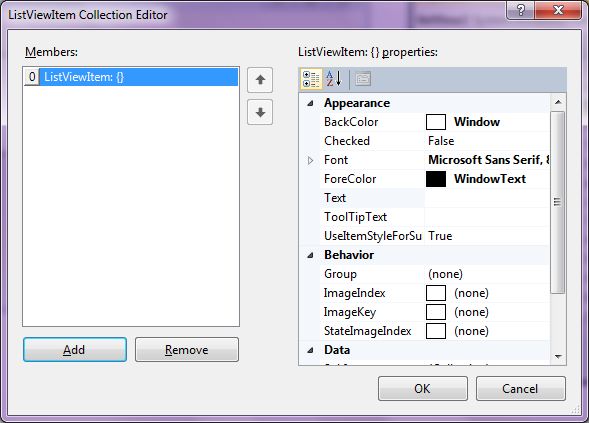
Figure 5
The ListView looks as in Figure 6.
Figure 6
You can add some items at run-time by using the following code snippet:
ListView1.Items.Add("Mahesh Chand");
ListView1.Items.Add("Mike Gold");
ListView1.Items.Add("Praveen Kumar");
ListView1.Items.Add("Raj Beniwal");
Getting All ListView Items
To get all items, we use the Items property and loop through it to read all the items. The following code snippet loops through all items and adds item contents to a StringBuilder and displays them in a MessageBox.
private void GetItemsButton_Click(object sender, EventArgs e)
{
    System.Text.StringBuilder sb = new System.Text.StringBuilder();
    foreach (object item in ListView1.Items)
    {
        sb.Append(item.ToString());
        sb.Append(" ");
    }
    MessageBox.Show(sb.ToString());
}
Get ListView Selected Text and Selected Item
The Text property is used to set and get text of a ListView. The following code snippet sets and gets the current text of a ListView:
MessageBox.Show(ListView1.Text);We can also get text associated with the currently selected item by using the Items property, as in:
string selectedItem = ListView1.Items[ListView1.SelectedIndex].ToString(); Why is the value of ListView.SelectedText Empty?
The SelectedText property gets and sets the selected text in a ListView only when a ListView has focus on it. If the focus moves away from a ListView, then the value of SelectedText will be an empty string. To get the current text in a ListView when it does not have the focus, use the Text property.
Selection Mode and Selecting Items in ListView
The SelectionMode property defines how items are selected in a ListView. The SelectionMode value can be one of the following four SelectionMode enumeration values:
- None: No item can be selected.
- One: Only one item can be selected.
- MultiSimple: Multiple items can be selected.
- MultiExtended: Multiple items can be selected, and the user can use the SHIFT, CTRL, and arrow keys to make selections.
To select an item in a ListView, we can use the SetSelect method that takes an item index and a true or false value where the true value represents the item to be selected.
The following code snippet sets a ListView to allow multiple selections and selects the second and third items in the list:
ListView1.SelectionMode = SelectionMode.MultiSimple;
ListView1.SetSelected(1, true);
ListView1.SetSelected(2, true);
We can clear all selected items by calling the ClearSelected method, as in:
ListView1.ClearSelected();How to disable item selection in a ListView?
Just set SelectionMode property to None.
Sorting Items of a ListView
If the Sorted property is set to true, then the ListView items are sorted. The following code snippet sorts the ListView items:
ListView1.Sorted = true; Find Items in ListView
The FindString method is used to find a string or substring in a ListView. The following code snippet finds a string in a ListView and selects it if found:
private void FindItemButton_Click(object sender, EventArgs e)
{
    ListView1.ClearSelected();
    int index = ListView1.FindString(textBox1.Text);
    if (index < 0)
    {
        MessageBox.Show("Item not found.");
        textBox1.Text = String.Empty;
    }
    else
   {
        ListView1.SelectedIndex = index;
    }
}
ListView SelectedIndexChanged Event Hander
The SelectedIndexChanged event is fired when the item selection is changed in a ListView. You can add the event handler using the Properties Widow and selecting the Event icon and double-clicking on SelectedIndexChanged as you can see in Figure 7.
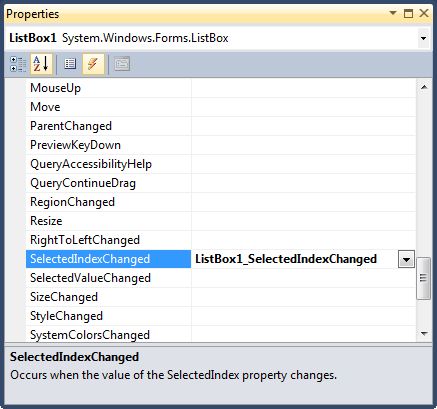
Figure 7
The following code snippet defines and implements these events and their respective event handlers. You can use this same code to implement an event at run-time.
ListView1.SelectedIndexChanged += new EventHandler(ListView1_SelectedIndexChanged);
private void ListView1_SelectedIndexChanged(object sender, System.EventArgs e)
{
    MessageBox.Show(ListView1.SelectedItem.ToString());
}
Now every time you change the selection in the ListView, you will see the selected item displayed in a MessageBox.
Data Binding
The DataSource property is used to bind a collection of items to a ListView. The following code snippet is a simple data binding example where an ArrayList is bound to a ListView.
private void DataBindingButton_Click(object sender, EventArgs e)
{
    ArrayList authors = new ArrayList();
    authors.Add("Mahesh Chand");
    authors.Add("Mike Gold");
    authors.Add("Raj Kumar");
    authors.Add("Praveen Kumar");
    ListView1.Items.Clear();
    ListView1.Items = authors;
}
If you are binding an object with multiple properites, you must specify which property you are displaying by using the DisplayMember property, as in:
ListView1.DataSource = GetData();
ListView1.DisplayMember = "Name";
Summary
In this article, we discussed how to create a ListView control in Windows Forms. After that, we saw how to use various properties and methods. I am planning to extend this article to add more topics including multiple columns, multiple views, header with images and so on.
Further Readings
Here are some more articles and tutorials about ListView that you may want to read:
- Transferring data from one ListBox to another in WPF
- Owner Draw ListView Control with Images
- Editable ListView in C#
- Databinding in ListView from XML file
- Using ListView in C#
- Adding & Retrieving items from ListView and check list box
- Owner Draw ListView Control in Windows Forms and C#
- Editable ListView Control
- Adding Items to a ListBox
- Checked ListBox Control In C#
- Editable ListView Control

Although Microsoft documentation for the ListView class is well written along with many code snippets on the Internet there are no well-rounded code samples to follow for populating a ListView control from start to finish reading from a data source.
The following C# code samples provide guidance to populate a ListView from both SQL-Server database table and Json files. Focus is on working with ListView control in Details view, ListView Groups and checked rows.
Framework used
This article is a port from a Microsoft TechNet article written by back when .NET Framework was current so all accept one project is .NET Framework 4.7.2.
One project was ported by first creating a NET8 Windows forms project. BasicListViewGroupsExample was ported to BasicListViewGroupsExampleCore.
Open the designer of a form in the old project, copied code to a form in the new project, deleted event handlers. Reloaded the new project and the forms match those of the old project.
Even those the old backend code to read from a database would work, the code was rewritten using Dapper. Had to add two column aliases in SQL SELECT statements and everything worked.
So if one of the older projects needs to be ported to NET Core either use the steps above or use Microsoft upgrade assistant.
Source code
Clone the following GitHub repository.
Basic setting: ListView control at design time
With a Window form selected and the Toolbox visible double click on a ListView, resize the ListView to accommodate data intended to populate the ListView. On the top right-hand corner of the ListView single click the chevron. From the view dropdown select Details. Click “Edit columns”. For each item .e.g. first name, last name click the “Add” button, name the column e.g. FirstNameColumn, set the Text property e.g. First Name, when done press OK. Don’t be concerned with column width at this time, this will be done later.
Basic detail view: Contacts Example
Create a class which represents data read from a database table. In the following example customer contacts of type owner will be the target for the first example. This class is a partial representation of several joined tables.
public class Contact
{
    public int CustomerIdentifier { get; set; }
    public string CompanyName { get; set; }
    public string FirstName { get; set; }
    public string LastName { get; set; }
    public string PhoneTypeDescription { get; set; }
    public string PhoneNumber { get; set; }
    public string CountryName { get; set; }
    public string[] ItemArray => new[]
    {
        CompanyName,
        FirstName,
        LastName,
        PhoneNumber,
        CountryName
    };
}
Enter fullscreen mode
Exit fullscreen mode
The ItemArray property will be used to add items to the ListView as the Add method accepts an array of items. The follow method is in a class solely responsible for reading data from a SQL-Server database.
Note
that the WHERE condition is hard coded, this could be rigged up to accept a int parameter to represent the contact type.
public List<Contact> GetOwnerContacts()
{
    mHasException = false;
    var ownerContacts = new List<Contact>();


    var selectStatement =
        @"
        SELECT   Cust.CustomerIdentifier ,
                 Cust.CompanyName ,
                 cont.FirstName ,
                 cont.LastName ,
                 PT.PhoneTypeDescription ,
                 CCD.PhoneNumber ,
                 Countries.CountryName
        FROM     Customers AS Cust
                 INNER JOIN dbo.Contact AS cont ON Cust.ContactIdentifier =
                    cont.ContactIdentifier
                 INNER JOIN dbo.ContactContactDevices AS CCD ON cont.ContactIdentifier =
                    CCD.ContactIdentifier
                 INNER JOIN dbo.PhoneType AS PT ON CCD.PhoneTypeIdenitfier =
                    PT.PhoneTypeIdenitfier
                 INNER JOIN dbo.Countries ON Cust.CountryIdentfier = Countries.id
        WHERE    ( Cust.ContactTypeIdentifier = 7 )
        ORDER BY Cust.CompanyName;";


    using (var cn = new SqlConnection() { ConnectionString = ConnectionString })
    {
        using (var cmd = new SqlCommand() { Connection = cn })
        {
            try
            {
                cn.Open();

                cmd.CommandText = selectStatement;

                var reader = cmd.ExecuteReader();
                while (reader.Read())
                {
                    ownerContacts.Add(new Contact()
                    {
                        CustomerIdentifier = reader.GetInt32(0),
                        CompanyName = reader.GetString(1),
                        FirstName = reader.GetString(2),
                        LastName = reader.GetString(3),
                        PhoneTypeDescription = reader.GetString(4),
                        PhoneNumber = reader.GetString(5),
                        CountryName = reader.GetString(6)
                    }) ;
                }

            }
            catch (Exception e)
            {
                mHasException = true;
                mLastException = e;
            }
        }
    }

    return ownerContacts;
}
Enter fullscreen mode
Exit fullscreen mode
In the form with the ListView, in form shown event a new instance of the data class is created followed by call the method above. To ensure that any screen updates are not shown (from adding and resizing columns) BeginUpdate is invoked before adding items to the ListView. If there is a chance of a runtime exception the code between BeginUpDate and the line above EndUpdate may be wrapped in a try-finally statement so that the ListView is partly populated is in working order although the ListView may be unstable so better to prevent any other operations to proceed as seen fit.
private void Form1_Shown(object sender, EventArgs e)
{
    var dataOperations = new SqlInformation();
    var contacts = dataOperations.GetOwnerContacts();

    ownerContactListView.BeginUpdate();
    foreach (var contact in contacts)
    {

        ownerContactListView.Items.Add(
            new ListViewItem(contact.ItemArray)
            {
                Tag = contact.CustomerIdentifier
            });

    }

    ownerContactListView.AutoResizeColumns(ColumnHeaderAutoResizeStyle.HeaderSize);
    ownerContactListView.EndUpdate();

    ownerContactListView.FocusedItem = ownerContactListView.Items[0];
    ownerContactListView.Items[0].Selected = true;
    ActiveControl = ownerContactListView;

}
Enter fullscreen mode
Exit fullscreen mode
During the iteration of contacts a new row is added to the ListView using an overload which accepts an object array which is possible using the Contact ItemArray method. Rather then create an instance of a ListViewItem as a variable and then passing the variable to the Add method it’s more efficient to simple add the item directly in the add method. The Tag property is set to the primary key of the contact which is available later to get more information from the database tables. In the following code sample the Tag property for the current item is cast to a integer which can be used to reference back to the table customers.
var id = Convert.ToInt32(ownerContactListView.SelectedItems[0]
    .Tag
    .ToString());
Enter fullscreen mode
Exit fullscreen mode
Sizing of columns is performed using the following line which sizes per data which has been added to the ListView.
ownerContactListView.AutoResizeColumns(ColumnHeaderAutoResizeStyle.HeaderSize);
Enter fullscreen mode
Exit fullscreen mode
To get details for the current ListView Item, in this case the ListView MouseDoubleClick event. The contact and phone will be displayed in a message dialog.
private void ListView1_MouseDoubleClick(object sender, MouseEventArgs e)
{
    MessageBox.Show(
        $"Call {ownerContactListView.SelectedItems[0].Text} at " +
        $"{ownerContactListView.SelectedItems[0].SubItems[3].Text}");
}
Enter fullscreen mode
Exit fullscreen mode

Basic Detail view with grouping: Products/Category example
In a conventional view for selecting products a DataGridView is used with a filtering mechanism to show one category at a time while an alternate approach would be to group products by category which a standard DataGridView is not capable of without a fair amount of custom coding or a third party grid control. A ListView is the perfect fit when multiple groups (or in this case categories) need to be displayed together.
Step 1: Obtain items which represent groups
This demonstration groups products by categories. The following class is used to create a list for working with groups.
public class Category
{
    public int CategoryId { get; set; }
    public string Name { get; set; }
    public override string ToString()
    {
        return Name;
    }
}
Enter fullscreen mode
Exit fullscreen mode
In the form shown event the data class is created and a call is made to obtain categories.
var dataOperations = new SqlInformation();
var categories = dataOperations.Categories();
Enter fullscreen mode
Exit fullscreen mode
Code to obtain categories from a database table.
public List<Category> Categories()
{
    mHasException = false;

    var categoryList = new List<Category>();
    var selectStatement = "SELECT CategoryID,CategoryName FROM dbo.Categories";

    using (var cn = new SqlConnection() {ConnectionString = ConnectionString})
    {
        using (var cmd = new SqlCommand() {Connection = cn})
        {
            cmd.CommandText = selectStatement;
            try
            {
                cn.Open();
                var reader = cmd.ExecuteReader();
                while (reader.Read())
                {
                    categoryList.Add(new Category()
                    {
                        CategoryId = reader.GetInt32(0),
                        Name = reader.GetString(1)
                    });
                }
            }
            catch (Exception e)
            {
                mHasException = true;
                mLastException = e;
            }
        }
    }

    return categoryList;
}
Enter fullscreen mode
Exit fullscreen mode
Step 2: Populate ListView
For each category products for the current category are read from the database tables using the following method in the data class.
public List<Product> Products(int pIdentifier)
{
    mHasException = false;

    var productList = new List<Product>();

    var selectStatement =
        @"
        SELECT   P.ProductID ,
                 P.ProductName ,
                 P.SupplierID ,
                 S.CompanyName AS Supplier ,
                 S.Phone ,
                 P.CategoryID ,
                 P.UnitPrice ,
                 P.UnitsInStock
        FROM     dbo.Products AS P
                 INNER JOIN dbo.Suppliers AS S ON P.SupplierID = S.SupplierID
        WHERE    P.CategoryID = @CategoryIdentifier
        ORDER BY P.ProductName;";

    using (var cn = new SqlConnection() {ConnectionString = ConnectionString})
    {
        using (var cmd = new SqlCommand() {Connection = cn})
        {
            cmd.CommandText = selectStatement;
            cmd.Parameters.AddWithValue("@CategoryIdentifier", pIdentifier);

            try
            {
                cn.Open();
                var reader = cmd.ExecuteReader();
                while (reader.Read())
                {

                    productList.Add(new Product()
                    {
                        ProductId = reader.GetInt32(0),
                        ProductName = reader.GetString(1),
                        SupplierId = reader.GetInt32(2),
                        Supplier = reader.GetString(3),
                        Phone = reader.GetString(4),
                        CategoryId = reader.GetInt32(5),
                        UnitPrice = reader.GetDecimal(6),
                        UnitsInStock = reader.GetInt16(7)
                    });

                }
            }
            catch (Exception e)
            {
                mHasException = true;
                mLastException = e;
            }
        }
    }

    return productList;
}
Enter fullscreen mode
Exit fullscreen mode
Definition of the Product class.
public class Product
{
    public int ProductId { get; set; }
    public string ProductName { get; set; }
    public int SupplierId { get; set; }
    public string Supplier { get; set; }
    public string Phone { get; set; }
    public int CategoryId { get; set; }
    public decimal? UnitPrice { get; set; }
    public int UnitsInStock { get; set; }
    /// <summary>
    /// Container for ListView item to store primary keys
    /// </summary>
    public ProductTag IdentifiersTag => new ProductTag()
    {
        CategoryId = CategoryId,
        SupplierId = SupplierId,
        ProductId = ProductId
    };

    public override string ToString()
    {
        return $"{ProductName}";
    }
}
Enter fullscreen mode
Exit fullscreen mode
Note IdentifiersTag property contains primary and foreign keys for use later if needed to query for more information of fields not obtained in the read operation above or for when edits are needed.
public class ProductTag
{
    public int ProductId { get; set; }
    public int SupplierId { get; set; }
    public int CategoryId { get; set; }
}
Enter fullscreen mode
Exit fullscreen mode
Once products have been returned from the database a name is composed for the current group which becomes the name of the group (ListViewGroup) along with a indexer to keep group names unique. Unlike the first example which used an array to populate a list item this example sets each sub-item directly in the constructor for adding a new item along with assigning the group and within the Tag property keys for referencing back to the tables in the database.
For some simple formatting if a product has nothing in stock the units in stock has a foreground color of bold red. Finally the list item is added to the ListView.
private void Form1_Shown(object sender, EventArgs e)
{
    var dataOperations = new SqlInformation();
    var categories = dataOperations.Categories();

    var categoryIndex = 1;

    // ReSharper disable once TooWideLocalVariableScope
    var groupName = "";

    foreach (var category in categories)
    {
        var products = dataOperations.Products(category.CategoryId);

        /*
         * Some category names have unwanted characters and/or whitespace, remove these chars.
         */
        groupName = category.Name.Replace("/", "").Replace(" ", "");

        var currentGroup = new ListViewGroup(category.Name, HorizontalAlignment.Left)
        {
            Header = category.Name,
            Name = $"{groupName}Group{categoryIndex}"
        };

        categoryIndex += 1;

        ProductListView.Groups.Add(currentGroup);

        foreach (var product in products)
        {
            var listViewProductItem = new ListViewItem(new[]
            {
                product.ProductName,
                product.Supplier,
                product.Phone,
                product.UnitPrice.ToString(),
                product.UnitsInStock.ToString()
            }, -1)
            {
                Group = currentGroup,
                /*
                 * Contains primary and foreign keys for current product
                 */
                Tag = product.IdentifiersTag,
                /*
                 * Required to change font and ForeColor below
                 */
                UseItemStyleForSubItems = false
            };


            /*
             * Alter user that the product is not available.
             * Could have excluded the product, that would be dependent
             * on business requirements. Also reorder information could
             * be presented.
             */
            if (product.UnitsInStock == 0)
            {
                listViewProductItem.SubItems[4].ForeColor = Color.Red;

                listViewProductItem.SubItems[4].Font = new Font(
                    listViewProductItem.SubItems[4].Font.FontFamily,
                    listViewProductItem.SubItems[4].Font.Size, FontStyle.Bold);

            }

            ProductListView.Items.Add(listViewProductItem);
        }
    }

    ProductListView.FocusedItem = ProductListView.Items[0];
    ProductListView.Items[0].Selected = true;

    ActiveControl = ProductListView;

    ProductListView.ItemSelectionChanged += ProductListView_ItemSelectionChanged;
    ProductListView.ItemCheck += ProductListView_ItemCheck;

    GroupsComboBox.DataSource = ProductListView.Groups.Cast<ListViewGroup>().Select(lvg => lvg.Name).ToList();
}
Enter fullscreen mode
Exit fullscreen mode
Once all items have been added the first item is focused.
Screenshot
Checked rows
To add check boxes, select the ListView, select properties, find CheckBoxes and set to true.
Iterate checked rows
For this example the code is in a button click which writes results to the IDE output window while in a production all there would be a list to pass to business logic for processing.
/// <summary>
/// Demonstration for iterating a single ListViewGroup
/// by group name in ComboBox
/// </summary>
/// <param name="sender"></param>
/// <param name="e"></param>
private void GetGroupProductsButton_Click(object sender, EventArgs e)
{
    var specificGroup = ProductListView.Groups.Cast<ListViewGroup>()
        .FirstOrDefault(lvg => lvg.Name == GroupsComboBox.Text);

    for (int index = 0; index < specificGroup.Items.Count; index++)
    {
        var productTag = specificGroup.Items[index].ProductTag();
        Console.WriteLine($"Id: {productTag.ProductId} Product: {specificGroup.Items[index].Text}");
    }
}
Enter fullscreen mode
Exit fullscreen mode
Take note on var productTag = specificGroup.Items[index].ProductTag(); where ProductTag is a language extension method within the current project. This keeps the cast process out of sight for cleaner code in the form.
using System.Windows.Forms;
using SqlServerOperations.Classes;

namespace BasicListViewGroupsExample.LanguageExtensions
{
    /// <summary>
    /// Contains project specific extension methods
    /// </summary>
    public static class ListViewExtensions
    {
        /// <summary>
        /// Get primary and foreign keys for a product
        /// within a ListView
        /// </summary>
        /// <param name="sender"></param>
        /// <returns></returns>
        public static ProductTag ProductTag(this ListViewItem sender)
        {
            return (ProductTag) sender.Tag;
        }
    }
}
Enter fullscreen mode
Exit fullscreen mode
Another place the extension method is useful for is when traversing rows in the ListView, here other details may be obtained using the keys stored in the current item tag property. Here keys are simply displayed in labels.
private void ProductListView_ItemSelectionChanged(object sender, ListViewItemSelectionChangedEventArgs e)
{
    if (e.IsSelected)
    {
        var primaryKeys = e.Item.ProductTag();
        SelectionChangedLabel.Text =
            $"product: {primaryKeys.ProductId} " +
            $"{ProductListView.Items[e.ItemIndex].Text}";
    }
}
Enter fullscreen mode
Exit fullscreen mode
The following code shows how to collect checked row items into a child form.
private void SelectedProductsButton_Click(object sender, EventArgs e)
{
    var checkedItems = ProductListView.CheckedItems;

    if (checkedItems.Count > 0)
    {
        var sb = new StringBuilder();

        for (int index = 0; index < checkedItems.Count; index++)
        {
            var keys = checkedItems[index].ProductTag();

            sb.AppendLine(
                $"{keys.CategoryId}," +
                $"{checkedItems[index].Group.Header}," +
                $"{keys.ProductId}," +
                $"{checkedItems[index].Text}," +
                $"{keys.SupplierId}," +
                $"{checkedItems[index].SubItems[0].Text}");
        }

        /*
         * Show selected products, in a real application this data
         * would be sent to a method to process the products
         */

        var f = new SelectedProductsForm(sb.ToString());

        try
        {
            f.ShowDialog();
        }
        finally
        {
            f.Dispose();
        }
    }
    else
    {
        MessageBox.Show("No product(s) selected");
    }
}
Enter fullscreen mode
Exit fullscreen mode
Other examples
SQL-Server table columns and related tables
In the following example which follows the same code paths as the examples shown above a ListView is setup for displaying table column definitions and related tables.

The following class is responsible for table information.
public class ServerTableItem
{
    public string Table { get; set; }
    public string Field { get; set; }
    public Int16? FieldOrder { get; set; }
    public string DataType { get; set; }
    public Int16? Length { get; set; }
    public string Precision { get; set; }
    public Int32 Scale { get; set; }
    public string AllowNulls { get; set; }
    public string Identity { get; set; } = String.Empty;
    public string PrimaryKey { get; set; }
    public string ForeignKey { get; set; } = String.Empty;
    public string RelatedTable { get; set; }
    public string Description { get; set; }
    public override string ToString()
    {
        return Field;
    }
}
Enter fullscreen mode
Exit fullscreen mode
Warning for novice coders: Reading information is rather complicated!!!
- Using the SQL statement below, data is read into a DataTable
- Using Lambda group statement tables columns are grouped together by table name into an anonymous type.
- The result set above is iterated over and items are placed into a Dictionary of Dictionary<string, List<ServerTableItem>>
Method which returns table information explained above.
public Dictionary<string, List<ServerTableItem>> TableDependencies()
{
    mHasException = false;

    var informationTable = new DataTable();

    var selectStatement = @"
        SELECT  syso.name [Table],
                sysc.name [Field],
                sysc.colorder [FieldOrder],
                syst.name [DataType],
                sysc.[length] [Length],
                CASE WHEN sysc.prec IS NULL THEN 'NULL' ELSE CAST(sysc.prec AS VARCHAR) END [Precision],
        CASE WHEN sysc.scale IS null THEN '-' ELSE sysc.scale END [Scale],
        CASE WHEN sysc.isnullable = 1 THEN 'True' ELSE 'False' END [AllowNulls],
        CASE WHEN sysc.[status] = 128 THEN 'True' ELSE 'False' END [Identity],
        CASE WHEN sysc.colstat = 1 THEN 'True' ELSE 'False' END [PrimaryKey],
        CASE WHEN fkc.parent_object_id is NULL THEN 'False' ELSE 'True' END [ForeignKey],
        CASE WHEN fkc.parent_object_id is null THEN '(none)' ELSE obj.name  END [RelatedTable],
        CASE WHEN ep.value is NULL THEN '(none)' ELSE CAST(ep.value as NVARCHAR(500)) END [Description]
        FROM [sys].[sysobjects] AS syso
        JOIN [sys].[syscolumns] AS sysc on syso.id = sysc.id
        LEFT JOIN [sys].[systypes] AS syst ON sysc.xtype = syst.xtype and syst.name != 'sysname'
        LEFT JOIN [sys].[foreign_key_columns] AS fkc on syso.id = fkc.parent_object_id and
            sysc.colid = fkc.parent_column_id
        LEFT JOIN [sys].[objects] AS obj ON fkc.referenced_object_id = obj.[object_id]
        LEFT JOIN [sys].[extended_properties] AS ep ON syso.id = ep.major_id and sysc.colid =
            ep.minor_id and ep.name = 'MS_Description'
        WHERE syso.type = 'U' AND  syso.name != 'sysdiagrams'
        ORDER BY [Table], FieldOrder, Field;";

    using (var cn = new SqlConnection() {ConnectionString = ConnectionString})
    {
        using (var cmd = new SqlCommand() {Connection = cn})
        {
            cmd.CommandText = selectStatement;

            try
            {

                cn.Open();

                informationTable.Load(cmd.ExecuteReader());
            }
            catch (Exception e)
            {
                mHasException = true;
                mLastException = e;
            }

        }
    }

    var result = from row in informationTable.AsEnumerable()
        group row by row.Field<string>("Table") into grp
        select new
        {
            TableName = grp.Key,
            Rows = grp,
            Count = grp.Count()
        };

    var tableDictionary = new Dictionary<string, List<ServerTableItem>>();

    foreach (var topItem in result)
    {

        if (!tableDictionary.ContainsKey(topItem.TableName))
        {
            tableDictionary[topItem.TableName] = new List<ServerTableItem>();
        }

        foreach (var row in topItem.Rows)
        {
            tableDictionary[topItem.TableName].Add(new ServerTableItem()
            {
                Table = topItem.TableName,
                Field = row.Field<string>("Field"),
                FieldOrder = row.Field<short>("FieldOrder"),
                DataType = row.Field<string>("DataType"),
                Length = row.Field<short>("Length"),
                Precision = row.Field<string>("Precision"),
                Scale = row.Field<int>("Scale"),
                AllowNulls = row.Field<string>("AllowNulls"),
                Identity = row.Field<string>("Identity"),
                PrimaryKey = row.Field<string>("PrimaryKey"),
                ForeignKey = row.Field<string>("ForeignKey"),
                RelatedTable = row.Field<string>("RelatedTable"),
                Description = row.Field<string>("Description")
            });
        }
    }

    return tableDictionary;
}
Enter fullscreen mode
Exit fullscreen mode
The Dictionary returned above is set to a ComboBox data source where a BindingSource is required as a ComboBox.DataSource does not handle dictionaries.
private void Form1_Shown(object sender, EventArgs e)
{
    var items = _tableInformation.TableDependencies();
    tableInformationComboBox.DataSource = new BindingSource(items, null);
    tableInformationComboBox.DisplayMember = "Key";
}
Enter fullscreen mode
Exit fullscreen mode
When a selection is made from the ComboBox, clicking the associated button populates the ListView using a more drawn out method by adding SubItems rather than using an array to setup a ListViewItem.
Once the load process has completed the first item is selected followed by painting alternate rows in a light grey.
private void GetInformationButton_Click(object sender, EventArgs e)
{
    listView1.Items.Clear();

    var detailItems = ((KeyValuePair<string, List<ServerTableItem> >)
        tableInformationComboBox.SelectedItem);

    foreach (var serverTableItem in detailItems.Value)
    {
        var item = listView1.Items.Add(serverTableItem.FieldOrder.ToString());
        item.SubItems.Add(serverTableItem.Field);
        item.SubItems.Add(serverTableItem.DataType);
        item.SubItems.Add(serverTableItem.Length.ToString());
        item.SubItems.Add(serverTableItem.Precision);
        item.SubItems.Add(serverTableItem.Scale.ToString());
        item.SubItems.Add(serverTableItem.AllowNulls);
        item.SubItems.Add(serverTableItem.Identity);
        item.SubItems.Add(serverTableItem.PrimaryKey);
        item.SubItems.Add(serverTableItem.ForeignKey);
        item.SubItems.Add(serverTableItem.RelatedTable);

        item.Tag = serverTableItem.Description;
    }

    listView1.AutoResizeColumns(ColumnHeaderAutoResizeStyle.HeaderSize);
    listView1.FocusedItem = listView1.Items[0];
    listView1.Items[0].Selected = true;
    ActiveControl = listView1;

    /*
     * Shade alternate rows
     */
    var index = 0;
    var shadedBackgroundColor = Color.FromArgb(240, 240, 240);

    foreach (ListViewItem item in listView1.Items)
    {
        if (index++ % 2 != 1) continue;
        item.BackColor = shadedBackgroundColor;
        item.UseItemStyleForSubItems = true;
    }
}
Enter fullscreen mode
Exit fullscreen mode
Working with moving rows up/down
DEV article Windows form move items up/down in ListView and more
Summary
This article has presented the basics for adding items to a ListView from database tables and Json for detail view using groups and check boxes for learning how to do this in Windows Forms projects.
All projects were written with Framework 4.7 and to show how well code was written the author of this article duplicated BasicListViewGroupsExample project and ported to BasicListViewGroupsExampleCore.
Steps
- Open each form one by one in BasicListViewGroupsExample, copied designer code.
- Commented out event handlers when pasting code into BasicListViewGroupsExampleCore forms.
- Took SQL from the old project, placed them into the new projects
- Replaced connection and command objects with Dapper
- All code worked in the forms but made minor changes to enhance your learning expereince.