
Are you looking to format your USB drive for MBR? If so, you’ve come to the right place! In this blog post, we’ll show you how to do just that. But before we get started, let’s first answer some common questions about MBR.
Table of Contents
How to format your USB drive for MBR
If you want to format your USB drive for MBR, you’ll need to use a disk management tool to create a partition on the drive. Once you’ve done that, you can format the partition using the NTFS or FAT32 file system.
To format your USB drive for MBR:
- Plug the USB drive into your computer and open a disk management tool.
- In the disk management tool, right-click on the USB drive and select “Create Partition.”
- Select the “MBR” option when prompted.
- Choose the NTFS or FAT32 file system and give your partition a label.
- Click “OK” to format the partition.
Read More Articles:
How to Troublshoot USB WiFi Diconnecting
How to recover deleted files from USB Flash drive with Disk Drill?
Why you should format your USB drive for MBR
There are a few reasons why you might want to format your USB drive for MBR. One reason is that MBR is a more compatible format for older computers. Another reason is that MBR drives can be used as bootable drives, which can be useful if you need to install an operating system on a computer. Finally, MBR drives can be more easily partitioned than drives formatted for other file systems.
The benefits of formatting your USB drive for MBR
One of the benefits of formatting your USB drive for MBR is that it helps to ensure compatibility with a wide range of devices. MBR is the standard partitioning scheme used on Windows PCs, so by formatting your USB drive for MBR, you can be sure that it will work with the vast majority of computers and laptops.
Another benefit of formatting your USB drive for MBR is that it helps to keep your data safe and secure. When you format your drive for MBR, all of your data is stored in a single partition, which makes it much more difficult for malicious software to access or delete.
Finally, formatting your USB drive for MBR can help improve its performance. When you format your drive for MBR, each file is stored in its own distinct location on the drive, which can help improve overall speed and efficiency.
How to ensure your USB drive is formatted for MBR
There are two ways to ensure your USB drive is formatted for MBR. The first is to simply format the drive using the MBR format. This can be done in Windows by right-clicking on the drive in My Computer and selecting Format. In the Format dialog box, select the option to format the drive for MBR.
The second way to ensure your USB drive is formatted for MBR is to use a tool like Rufus, which is a free tool that will allow you to create a bootable USB drive with an MBR partition. Simply download Rufus and follow the instructions on how to create a bootable USB drive.
The difference between MBR and GPT drives
Most PCs today come with a hard drive that uses the Master Boot Record (MBR) file system. This system dates back to the early days of personal computing, and it’s what most people are still using today. But there’s a new file system in town, and it’s called GUID Partition Table (GPT). So what’s the difference between MBR and GPT drives?
The main difference is that MBR drives can only support up to 2TB of data, while GPT drives can handle much more. That’s because MBR drives use a 32-bit addressing scheme, while GPT drives use a 64-bit addressing scheme. The other big difference is that GPT drives can have more than one partition table, while MBR drives can only have one.
So which should you use? If you have a PC with a drive that’s larger than 2TB, then you’ll need to use GPT. Otherwise, you can stick with MBR.
How to convert your USB drive from MBR to GPT
You can convert a USB drive from MBR to GPT partition style without data loss, but you need to use a third-party partition manager software, such as EaseUS Partition Master Free, to do this.
To convert USB drive from MBR to GPT:
- Connect the USB drive to your PC and launch EaseUS Partition Master Free.
- Right-click the USB drive and select “Convert to GPT”.
- Click “OK” on the pop-up warning window and select the unallocated space or a partition on the USB drive as destination location for saving new partition(s).
- Click “Apply” at the top left corner of the main window to apply all changes.
The pros and cons of MBR and GPT drives
There are two main ways to format a USB drive: MBR and GPT. MBR is the more traditional and compatible option, while GPT is newer and offers some advantages in terms of speed and addressable space. Here’s a rundown of the pros and cons of each option:
MBR:
- More compatible with older operating systems
- Can only address 2TB of space
- Slower than GPT
GPT:
- More modern, with faster data throughput
- Can address drives larger than 2TB
- May not be compatible with older operating systems
How to choose the right format for your USB drive
When it comes to formatting USB drives, there are a few different options to choose from. In order to figure out which one is best for you, it’s important to understand the difference between each format.
The most common format for USB drives is FAT32. This system is compatible with both Windows and MacOS, and can be read by most devices. The big downside to FAT32 is that it has a 4GB file size limit. This means that you won’t be able to store files larger than 4GB on your drive. If you plan on storing movies or large files, then you’ll need to use a different format.
NTFS is another popular format, but it’s only compatible with Windows. MacOS can read NTFS drives, but it can’t write to them. If you only plan on using your USB drive with Windows computers, then NTFS is a good option. Just keep in mind that not all devices can read NTFS drives, so you may have compatibility issues.
exFAT is a newer format that doesn’t have the 4GB file size limit of FAT32. It’s also compatible with both Windows and MacOS. The big downside of exFAT is that it’s not as widely supported as FAT32 or NTFS. Some devices, like TVs and Blu-ray players, don’t have exFAT support built-in. If you need maximum compatibility, then FAT32 is still the best option.
The best format for your USB drive depends on your needs. If you need maximum compatibility, then FAT32 is the way to go. If you need to store large files, then exFAT is the best option. And if you only plan on using your drive with Windows computers, then NTFS is the right choice.
Diskpart to Format USB Flash Drive Memory Card and Hard Disk Partition FAT32/NTFS/EXFAT/GPT
Once upon a time, a friend came to us with his flash drive raw in file system and asked whether there was a guide for using diskpart to format the drive. Here are some contents focusing on using diskpart to format drives.
Better and easier than diskpart? Why not free usb or disk format tools? [8 free]
Content Navi
- How to Open Diskpart
- Diskpart to Format Disk/USB/SD/ External HDD (fat32/ntfs/exfat) — video included
- FAQ — No volume selected? no volume lable? should I use clean, create primary partition?
- Diskpart Format Disk GPT
- Diskpart Unable to Format — Write Protected
- Diskpart Format Failed
- Data Recovery after Diskpart Format or Clean
How to Open Diskpart in Windows?
Diskpart command utility is able to work in Windows 2000, XP, Vista, 7, 8, 10. The methods to open Diskpart command vary, depending on different Windows platform.
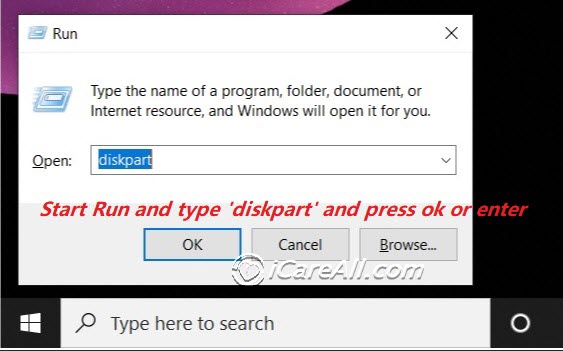
1. Access Diskpart in Windows XP
Click «Start» button > «Run» > type «diskpart.exe» and press «Enter» button
Or you can click «Start» button on > «Run» > type «cmd» and press «OK» button > type «diskpart» and press «Enter»
2. Open Diskpart in Windows Vista/7/8.1/10
Click «Start» button > type «cmd» in the search bar > right click «cmd.exe» and choose «Run as administrator» > type «Diskpart» and press «Enter»
Or you may press Windows + X keys at the same time > select Command Prompt (Admin) > type type «diskpart» and press «Enter»
Diskpart to Format Hard Disk Partition or usb/SD
It does not matter which Windows operating system is running on your computer, you can follow the steps below to format an internal hard disk partition on Windows PC after running diskpart command:
Video — diskpart to format a drive
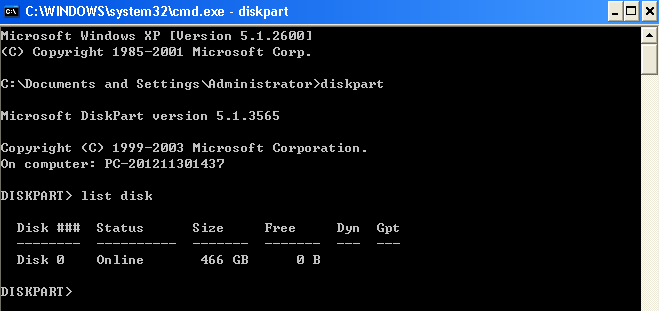
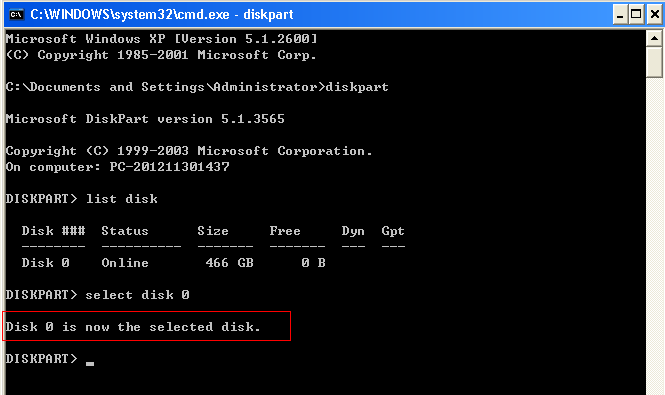
Step1. Type list disk and press Enter
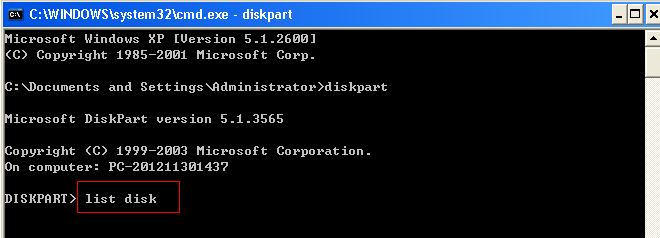
Now, you will see a list of disk which shows all disks on your computer.
Step2. Select a disk that you want to format by type select disk 0 (e.g. you want to format disk 0) and press Enter.
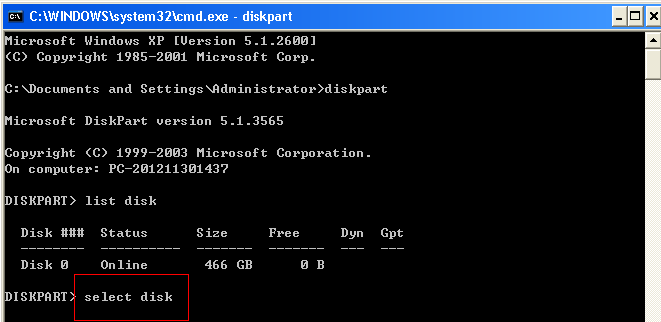
Now, it will show a message saying disk 0 is now the selected disk.
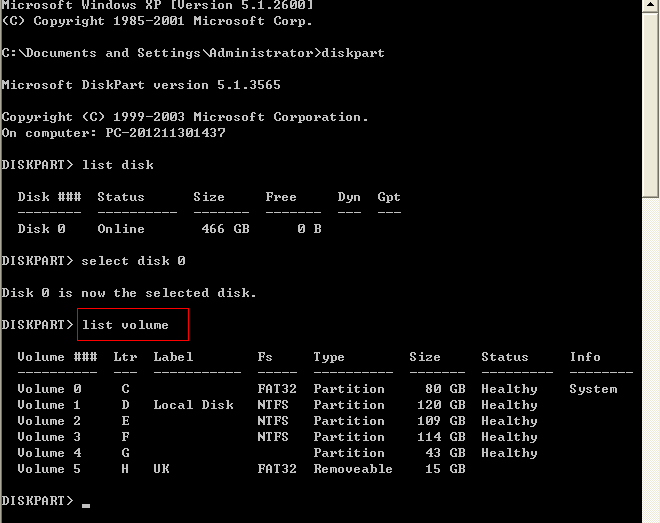
Step3. Type list volume and press Enter button to show all volumes
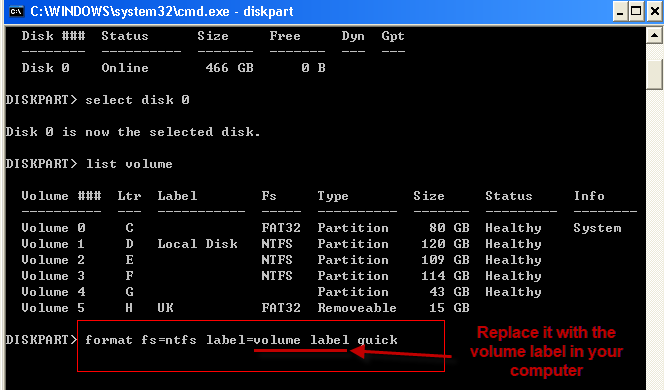
Step4. Type format fs=ntfs label=volume label quick and press Enter to execute the format. (eg, ‘format fs=ntfs lable=Local Disk quick’)
Diskpart to format sd/usb/hdd fat32/exfat/ntfs? If you want to format the volume to FAT32 file system, you can type format fs=fat32 label=volume label quick (This shows diskpart to format volume fat32/ntfs/exfat). Here are options that you may use for different file systems.
- format D:/ fs=ntfs quick
- format D:/ fs=fat32 quick
- format D:/ fs=exfat quick
Or if you have already selected a volume at previous step, you may directly try:
- format fs=ntfs quick; or format fs=ntfs
- format fs=fat32 quick; or format fs=fat32
- format fs=exfat quick; or format fs=exfat
Pay attention: Volume label refers to the label of the drive that you want to format, such as the image showing below. The volume label of the partition is «My Documents».
No label for volume? => you may try «format D: / fs=ntfs quick» when d is the drive you want to format; or you may simply use ‘format fs=ntfs quick’ when you have selected a volume at the previous steps.
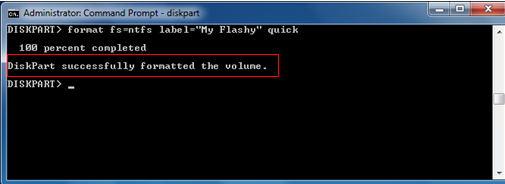
When the format is completed, you will see message showing «Diskpart successfully formatted the volume«
Or you may open your drive in Windows explorer and right click your drive, -> format
Also read: format fs=ntfs quick; format fs=fat32 quick;
FAQs
Question: Shall I use list volume after list disk?
Answer: If there are more than 1 partition on your disk, we would recommend you add the step ‘list volume’ in the diskpart format command proccess. Usually it comes in order: list disk, list volume, select volume. And then your targeted drive or usb or sd would be selected for further operations.
Question: format fs=ntfs lable=volume lable? quick, what if there is no volume lable?
Answer: You may directly use «format fs=ntfs quick» without lable information when you have volume selected at the previous steps.
Question: Shall I use clean, create partition primary?
Answer: You may directly try ‘format fs=ntfs quick’ to see whether it work; if it failed, then you need to add the steps: clean, create partition primary in the steps.
Diskpart to Format GPT (in Windows or While Installing OS in Bios)
How to format disk gpt using cmd diskpart? Here are two parts, one to format disk from mbr to gpt using diskpart cmd in Windows 11/10/8/7; the other one is to format disk gpt from mbr in Bios while installing Windows. Be free to follow the following steps.
Diskpart format disk gpt using cmd
Video 1 — how to format disk from mbr to gpt using cmd diskpart
Video 2 — how to format disk mbr to gpt in bios during Windows installation
Diskpart Is Unable to Format — Write Protected
Diskpart may report it is unable to complete the format due to device write protected with readonly mode. Sometimes it could be caused by the end of life span of your device. You may try the following ways to see whether it may work, or your device is dying.
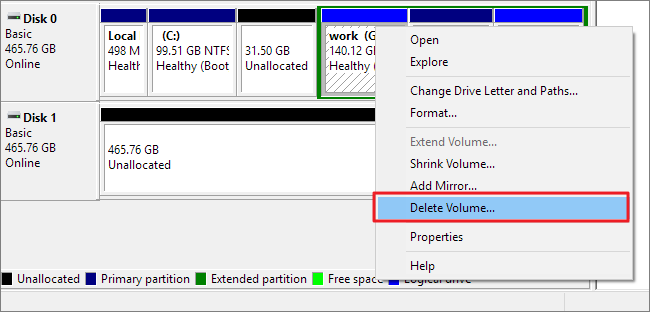
- Delete the device under disk management, and then reinsert it to computer -> Reinitialize it, and format it; If it did not work, try number 2

- Format usb/sd/hd with 9 free tools (low level format included)
- Repair damaged sd/usb with 7 free ways
- Try it on another computer
Pay attention: If none of the above method work for your device, it still reported write protected, then mostly your device is coming to the end of lifespan.
Diskpart Cannot Format Digital Device
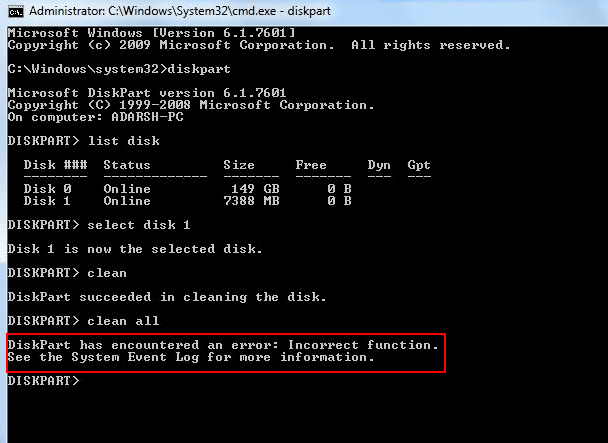
PC failed to complete the format when you run Diskpart to perform formatting? This problem might result from any reasons. Below are some common messages you may receive when Diskpart failed to format a digital device:
1. Diskpart has encountered an error: Incorrect function. See the System Event Log for more information.
2. Diskpart has encountered an error: The device does not recognize the command. See the System Event Log for more information.
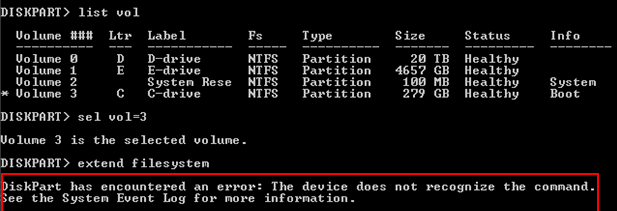
When you get the similar error messages above, probably the Windows system does not has the ability to format the device with the Diskpart command line. You can open System Event Log to check the detailed issue and fix the problem.
3. It shows «There are no fixed disks to show«
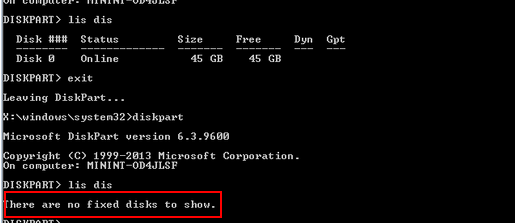
Usually, you may see this error message when you type list disk under Diskpart command. If you get this error message, probably the disk you want to format is corrupted and cannot be recognized by system.
==>> Diskpart failed to complete the format? please refer to: How to fix unable to format problem
Data Recovery after Diskpart Format or Clean
If you realize that you lose some important data after using Diskpart after cleaning or formatting USB drive, pen drive, external HDD, memory card or any device, you may use iCare Data Recovery to recover data after formatting.
Also read: file recovery from diskpart format
Last updated on March 26, 2025
Related Articles
- SD card needs to be formatted — Data recovery from sd memory card that requires formatting.
- diskpart format usb
- format fs=ntfs quick
- format fs=fat32 quick
- diskpart format sd
- diskpart format disk
- diskpart format raw ntfs
- diskpart create partition
- diskpart delete partition
- undo quick format
Hot Articles
- How to convert a raw partition to ntfs
- SD card shows blank asking to format
- How to fix raw drive without format
External Resource
- Diskpart by Microsoft
Updated on Apr 28, 2025
Almost everyone knows that formatting hard drives is not a difficult job and can be easily done with the built-in Disk Management tool in Windows. However, formatting a hard disk could be complex when your operating system cannot boot properly or your disk fails to work normally. That’s when you need to create a bootable USB to format your hard drive.
You can format the hard drive from USB by using a bootable USB drive created by a third-party HDD format tool or a Windows installation disk. Both are effective bootable USB hard drive format utilities. Read on and carry out the method best suited to your needs.
Method 1: Format the Hard Drive from Boota able USB
The simplest way to format your HDD from USB is to use the professional partition management software — EaseUS Partition Master Professional. With the assistance of this tool, you can create a bootable format tool that enables you to run the software on the problematic computer and then format the hard drive from USB without the operating system. To get things done, you need to create a bootable USB drive with a computer that is fully functional (Part 1), then apply it to format a hard drive on the computer without OS (Part 2).
EaseUS Partition Master is my personal favorite of the bunch. It won’t hot-image your drives or align them, but since it’s coupled with a partition manager, it allows you to perform a lot of tasks at once, instead of just cloning drives. — lifehacker.com
Part 1: Create a Bootable USB Drive
Please refer to this page: create a bootable drive with EaseUS Partition Master.
After creating a bootable USB drive with the format tool, you can format your hard drive on the problematic computer from USB. Connect the USB to your computer and then open EaseUS Partition Master from the USB. Then follow the steps below.
Part 2: Format Hard Drive from USB
- Notice:
- If you want to format all the partitions on your hard drive, you can either format the hard drive partitions one by one or choose to delete all the partitions on the HDD (right-click the hard drive and select Delete all partitions), then create new ones.
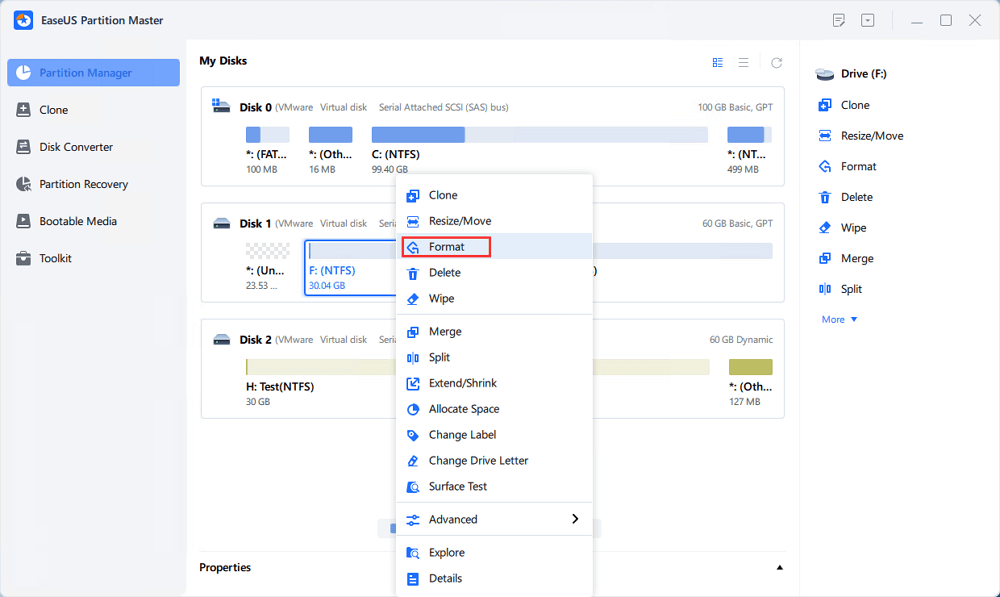
Step 1. Run EaseUS Partition Master, right-click the hard drive partition you intend to format and choose «Format».
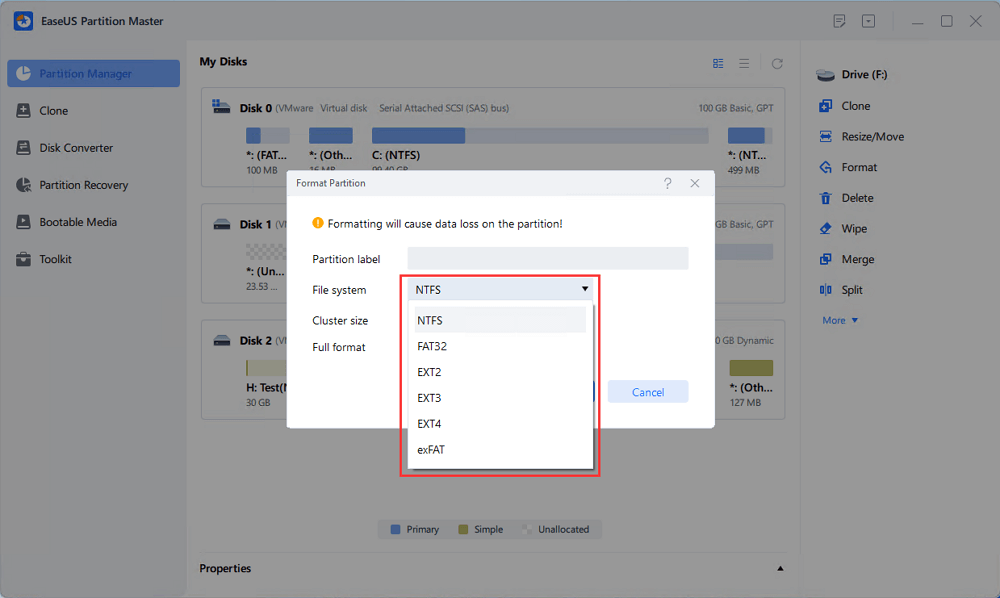
Step 2. In the new window, set the Partition label, File system (NTFS/FAT32/EXT2/EXT3/EXT4/exFAT), and Cluster size for the partition to be formatted, then click «OK».
Step 3. Then you will see a warning window, click «Yes» in it to continue.

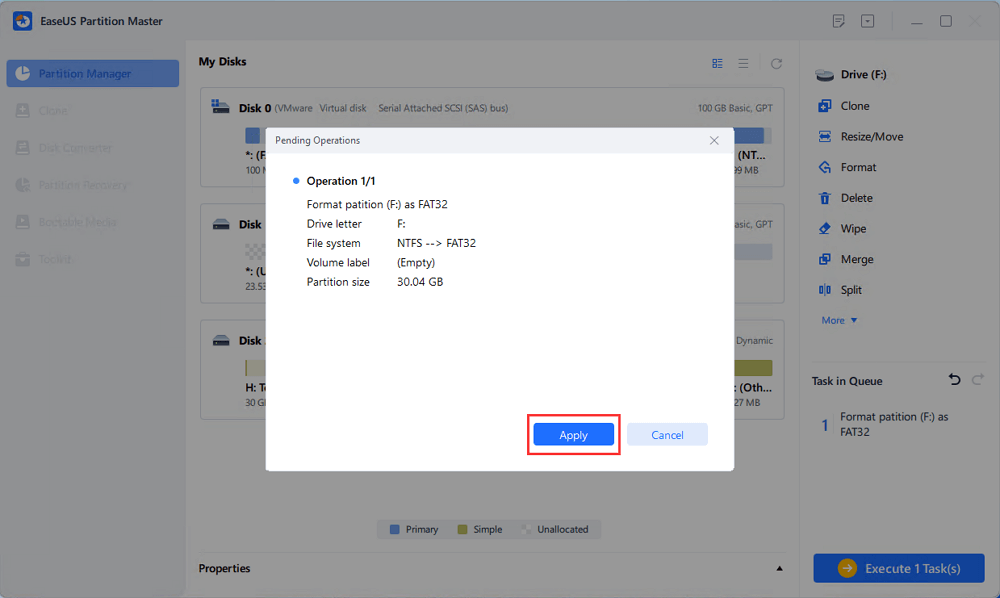
Step 4. Click the «Execute 1 Task(s)» button to review the changes, then click «Apply» to start formatting the partition on your hard drive.
If you follow the guide above, you will use the bootable USB to format your hard drive successfully. Don’t miss this partition tool that can perfectly fulfill your needs.
Method 2: Format HDD from USB using Command Prompt
Other than using the third-party tool, you can also format your hard drive from USB with the help of Windows Installation disk, which, as you will know, is relatively more complicated than using a bootable format tool as shown in Method 1.
Step 1: Create a Windows installation disk and boot your PC from it.
Step 2: Navigate Repair Your Computer —> Command Prompt.
Step 3: In the Command Prompt window, type diskpart and press «enter».
Step 4: Type list disk and press «Enter» to list all the disk drives.
Step 5: Type select disk + disk number, here you can find the number of the target disk by referring to the listed disk information.
Step 6: Type clean to wipe all files and folders on the selected disk.
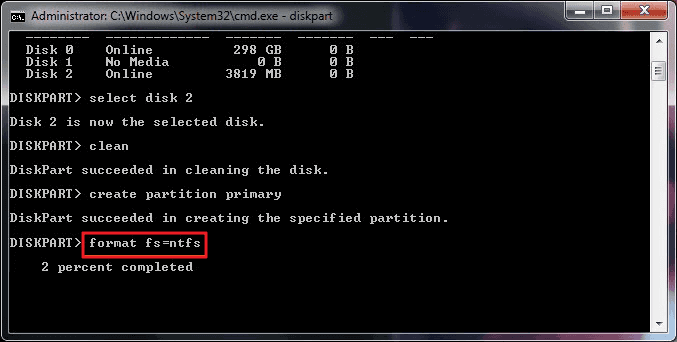
Step 7: Type create partition primary and press «Enter».
Step 8: After diskpart successfully created the specified partition, type format fs=ntfs (or format fs=exfat) and press Enter. You’re telling diskpart to format the drive with a file system, let it be NTFS, exFAT, etc.
Step 9: At last, assign a drive letter to the newly created partition by typing assign.
The above guide shows you all the steps to partition and format a hard drive from USB using the diskpart command prompt. As you can see, It is a little bit tedious and time-consuming. If you want an easier way, a third-party bootable USB format tool will help.
Here is a tutorial video that may be more intuitive for beginners:
Bonus Tip: Format Hard Drive from BIOS with USB
Other than following the bootable USB methods to format a hard drive, you can also try to format a hard drive from BIOS. It works in the same scenarios when something goes wrong with the bootable partition or when you want to format C drive in Windows.
To format the hard drive from BIOS settings, you have two options.
Option 1. Boot into BIOS and Format in Windows
Step 1: While booting up your computer, consecutively press F1, F2, F8 or Del key to enter BIOS settings.
Step 2: Select the «Advanced BIOS Features» by pressing the arrow keys on the keyboard of your computer and then set the first boot device as the USB drive or CD, or DVD.
Step 3: After changing the BIOS settings, you can exit the screen and reboot your computer. Insert the bootable USB or CD/DVD, and your computer will boot from USB or CD, DVD.
Step 4: After booting the computer, you can go ahead to format the hard drive in Windows Explorer or Windows Disk Management.
Option 2. Boot into BIOS and Format Using CMD
Step 1: While booting up your computer, consecutively press F1, F2, F8, or Del key to enter BIOS settings.
Step 2: Change the boot order to boot from USB/CD/DVD.
Step 3: Reboot your computer from the bootable disk. When your disk is loaded, click «Use this recovery tools that can help fix problems starting Windows» and navigate to Windows installation > Command Prompt.
Step 4: In the Command Prompt window, type format c: /fs: ntfs and hit Enter.
If you want to know the complete guide to formatting the hard drive from BIOS, click the link below:
How to Format Hard Drive from BIOS Windows 10
This guide will provide three complete guides to formatting the hard drives from BIOS Windows 10, including format via EaseUS Partition Master, Command Prompt, and formatting the drive during Windows installation.
Final Verdict
Based on situations when you cannot normally start a computer, the boot partition fails to boot, or try to reinstall an operating system, it’s necessary to format a hard drive in a bootable environment. In conclusion, from what we presented in the article, you can start to format HDD freely from USB and format HDD from BIOS settings.
No matter whether you choose to format the hard drive from USB or BIOS settings, you must create a bootable USB or disc to boot into Windows. In comparison, EaseUS USB bootable format software is the easiest to create, and disk formatting is usually done in a few simple clicks. Whereas the Windows recovery disk is rather difficult to get, and the format hard drive using CMD is higher-leveled. We don’t recommend average computer users to attempt for the first time.
1. Can I Wipe My Hard Drive from a Bootable USB?
Yes, you can wipe your hard drive using a bootable USB. Tools like EaseUS Partition Master and DBAN (Darik’s Boot and Nuke) allow you to create a bootable USB drive to securely erase data from hard drives. The first option provides a user-friendly interface for creating a bootable USB to wipe hard drives.
2. How Do I Format A Hard Drive with A Flash Drive?
Refer to method one in this post to create a bootable USB flash drive and follow the tutorial:
Step 1. Insert a USB into the computer.
Step 2. Open File Explorer, and click This PC from the left panel.
Step 3. Under the «Device and drives» section, right-click the USB and choose the «Format» option.
3. Can You Format the Hard Drive from BIOS?
You cannot directly format a hard drive from the BIOS settings. However, you can boot from a bootable USB drive, such as Windows installation media or a tool like MiniTool Partition Wizard, to format the hard drive.
Как сделать флешку обычной из загрузочной
В последнее время в комментариях часто получаю вопрос: как сделать обычную флешку из загрузочной, например, после того как была создана загрузочная USB флешка Windows 10. И если раньше был простой ответ: отформатировать её средствами системы, сегодня это не всегда правильно.
В этой инструкции подробно о методах вернуть флешку к обычному состоянию, после того как она использовалась как загрузочная и установочная и о нюансах, которые делают этот вопрос актуальным.
- Когда можно использовать простое форматирование
- Как сделать обычную флешку из загрузочной путем удаления разделов
Форматирование для возврата USB накопителя к исходному состоянию
Во многих случаях, когда речь идет о загрузочной флешке сравнительно небольшого объема со стандартными дистрибутивами Windows 10, 8.1 или Windows 7, для возврата её в обычное состояние достаточно выполнить простое форматирование. Но не всегда (о чем в следующей части инструкции), а потому, прежде чем использовать этот метод, рекомендую выполнить следующие шаги:
- Нажмите клавиши Win+R на клавиатуре, введите diskmgmt.msc в окно «Выполнить» и нажмите Enter (Win — клавиша с эмблемой Windows).
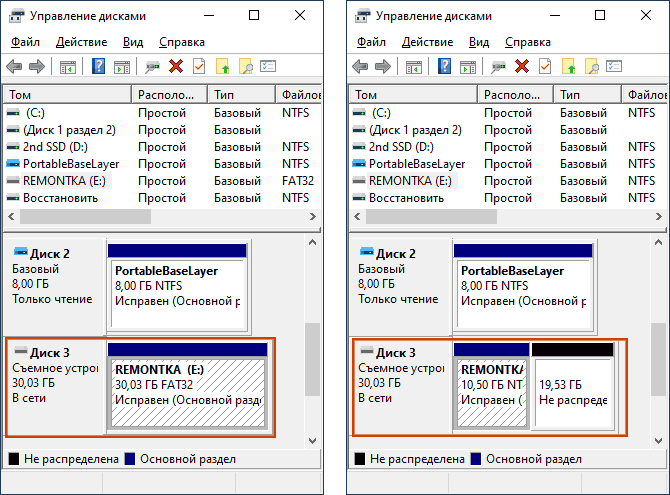
- В нижней части окна управления дисками найдите вашу флешку и посмотрите: содержит ли она один единственный раздел и никаких дополнительных разделов или незанятого пространства (скриншот слева) или более одного раздела, а также раздел и незанятое пространство (скриншот справа).

Если на флешке всего один раздел, можно смело её форматировать в нужную вам файловую систему в проводнике (правый клик по накопителю — форматировать) или прямо в «Управлении дисками», нажав правой кнопкой по разделу и выбрав пункт «Форматировать».
Всё что вам нужно будет сделать — выбрать файловую систему (тут может быть полезным: NTFS или FAT32 — что правильнее выбрать для флешки). После форматирования накопитель перестанет быть загрузочным и станет обычным съемным накопителем, как и раньше.
Если же на флешке присутствует более одного раздела, или раздел и незанятое пространство, переходим к следующей части инструкции.
Как сделать обычную флешку из загрузочной с удалением разделов
Вопрос о превращении USB накопителя в простой из загрузочного чаще всего задается по той причине, что при создании загрузочной (установочной) флешки из накопителя большого объема или с некоторыми необычными дистрибутивами, она «уменьшается» в объеме (например, до 32 Гб при использовании Windows Installation Media Creation Tool), либо начинает отображаться в системе как два отдельных съемных накопителя. И простое форматирование этого не решает.
Причина — не фактическое уменьшение размера накопителя, а создание на флешке разделов в процессе записи файлов установки операционной системы на неё. Причем не все системы умеют правильно работать со съемными накопителями, на которых несколько разделов (см. Как разбить флешку на разделы в Windows 10).
Чтобы флешка перестала быть загрузочной и вернула весь свой объем, нам достаточно удалить с неё разделы и отформатировать. Сделать это можно, используя следующие шаги:
- Запустите командную строку от имени администратора (способы запуска командной строки от Администратора), после чего по порядку используйте следующие команды.
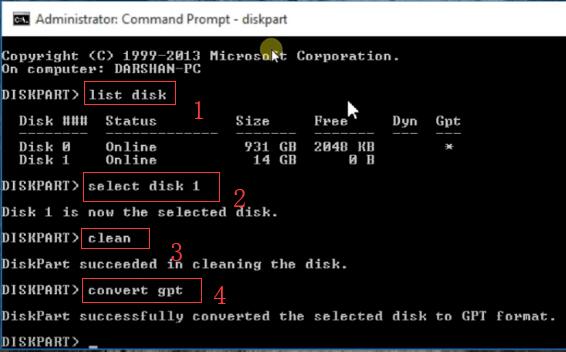
- diskpart
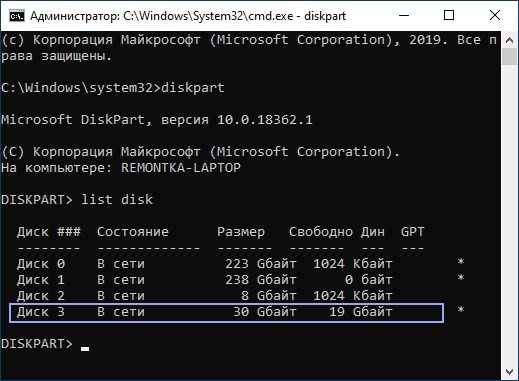
- list disk (в результате выполнения этой команды отобразится список дисков, вам понадобится номер диска, соответствующий вашей флешке, в моем случае — номер 3, ВАЖНО: в вашем случае используйте свой номер в следующей команде, если укажите не тот диск, данные с него исчезнут.
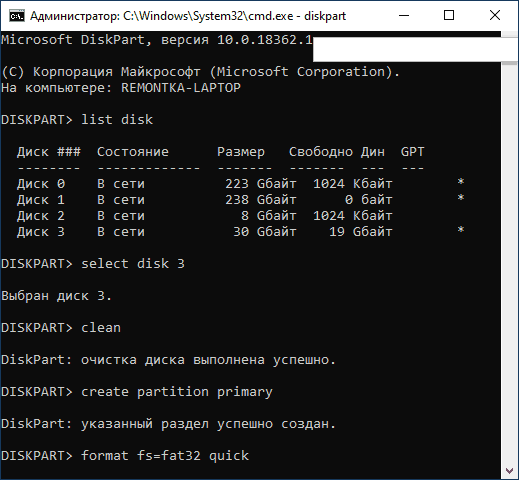
- select disk 3

- clean (после этой команды вам могут сообщить: вставьте диск в устройство, не обращайте внимания)
- create partition primary
- format fs=ntfs quick или format fs=fat32 quick (в зависимости от того, какую файловую систему нужно выбрать для флешки).

- exit
Более подробно на эту тему: Как удалить разделы на USB флешке. В результате у вас вновь будет обычная, не загрузочная, пустая USB флешка в нужной вам файловой системе.
Надеюсь, статья оказалась полезной. Если же что-то осталось не ясным или сработало не так, как ожидалось, сообщите детали в комментарии, я постараюсь подсказать решение.