
Time synchronization is a crucial aspect of computer operation, especially in modern networks where multiple devices rely on accurate time settings for various processes. In Windows 10, maintaining the correct system time is vital for file timestamps, logging, and scheduled tasks. Fortunately, Windows 10 offers several methods to force a time sync, including the command line. In this article, we will explore the intricacies of time synchronization and provide a comprehensive guide on how to force sync time using command-line tools.
Understanding Time Synchronization
Time synchronization refers to the process of aligning the clocks of computers and devices in a network to a common time reference. Accurate time settings are essential for many reasons, including:
- File Management: Correct timestamps ensure that file versions are properly managed, especially in collaborative environments.
- Security Protocols: Many security applications, such as Kerberos, rely on synchronized time to function properly.
- Log Management: Accurate timestamps on logs help in troubleshooting and system monitoring.
- Scheduled Tasks: Windows Task Scheduler and other dependent applications require precise timing for executing tasks.
Windows operating systems, including Windows 10, utilize the Windows Time service (W32Time) for time synchronization. This service can synchronize time with Internet time servers or within a local network.
Prerequisites
Before diving into the command-line methods for syncing time, ensure that the Windows Time service is running on your system:
- Open the Run dialog box by pressing
Win + R. - Type
services.mscand press Enter. - Locate Windows Time in the list of services.
- Ensure that the service is running and set to Automatic. If not, right-click on it and select Start or Properties to adjust the settings.
Synching Time via Command Line
Windows 10 allows users to synchronize time using the Command Prompt or PowerShell. Both tools can invoke the Windows Time service to force a synchronization. Here’s how you can do it:
Method 1: Using Command Prompt
-
Open Command Prompt as Administrator:
- Press
Win + Xand selectCommand Prompt (Admin)orWindows PowerShell (Admin).
- Press
-
Stop the Windows Time Service:
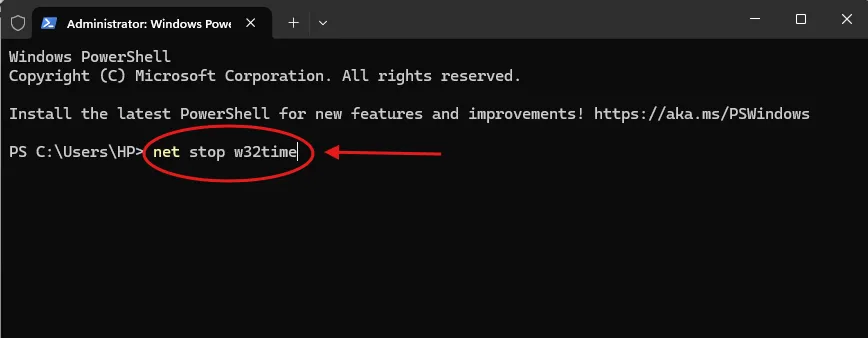
To force the time sync, it’s a good practice to stop the Windows Time service first. Type the following command and press Enter:net stop w32timeThis command will halt the Windows Time service to ensure a clean start for synchronization.
-
Start the Windows Time Service:
After stopping the service, restart it by typing:net start w32time -
Force Time Synchronization:
Now, you can force a time sync by entering:w32tm /resyncThis command tells your computer to synchronize time with the configured time source.
-
Verify Synchronization:
After executing the resync command, you can verify the synchronization status by running:w32tm /query /statusThis command will give you detailed information about the current time synchronization settings.
Method 2: Using PowerShell
Alternatively, you can perform the same steps using PowerShell.
-
Open PowerShell as Administrator:
- Press
Win + Xand selectWindows PowerShell (Admin).
- Press
-
Stop the Windows Time Service:
Execute the following command to stop the service:Stop-Service w32time -
Start the Windows Time Service:
Restart the service by entering:Start-Service w32time -
Force Time Synchronization:
To force the sync, run:w32tm /resync -
Check Sync Status:
Lastly, verify the synchronization status with:w32tm /query /status
Adjusting Time Server Configuration
If you find that your system is not syncing correctly, you may need to adjust your time server settings. By default, Windows 10 uses time.windows.com as a time server. However, you can specify a different Internet time server if necessary.
-
Open Command Prompt as Administrator.
-
To view the current configuration, run:
w32tm /query /source -
To change the time server, use the following command, replacing
time.nist.govwith your preferred time server:w32tm /config /manualpeerlist:"time.nist.gov" /syncfromflags:manual /rebootAfter executing this command, a reboot will apply the new settings effectively.
Troubleshooting Time Synchronization Issues
If the time synchronization process fails, consider the following troubleshooting steps:
1. Firewall Settings
Ensure that the Windows Firewall or any third-party firewall is not blocking NTP (Network Time Protocol) traffic. The default NTP port is UDP 123. Check your firewall settings and create exceptions for this port if necessary.
2. Check Windows Time Service
If the Windows Time service is not running or is malfunctioning, you may need to reset it. Use the following command in an elevated Command Prompt:
w32tm /unregister
w32tm /register
After un-registering and registering the service, restart the service again and attempt to synchronize time.
3. Verify System Clock Settings
Ensure your system clock is set to the correct time zone. To check this:
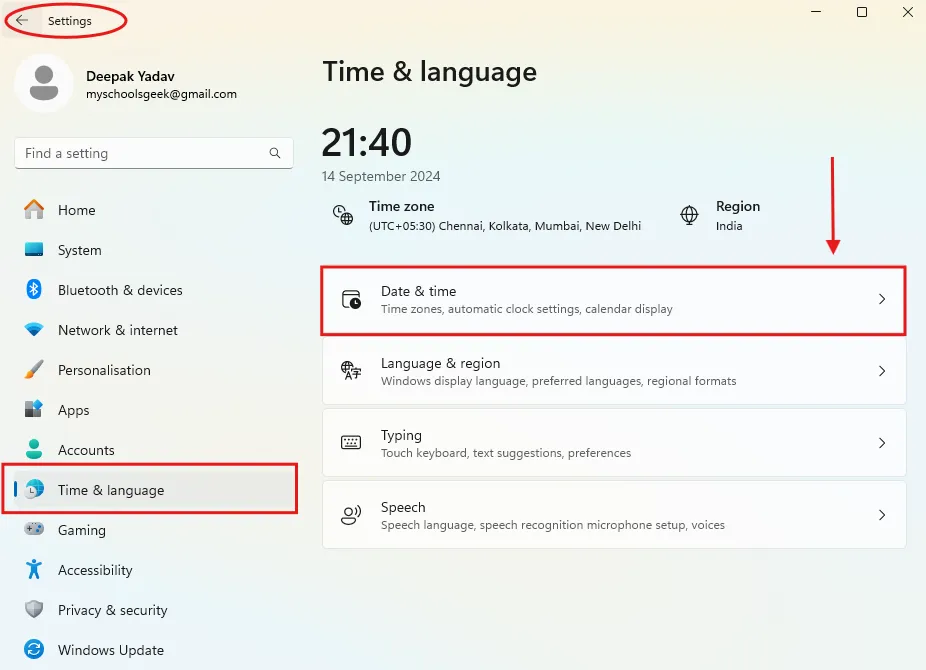
- Open Settings (
Win + I). - Navigate to Time & Language.
- Under the Date & time section, make sure your time zone is set correctly and that Set time automatically is enabled.
4. Manually Adjust System Time
If all else fails, you can manually set your system time by following these steps:
- Right-click on the clock in the taskbar and select Adjust date/time.
- Turn off Set time automatically.
- Click on Change under Set the date and time manually and enter the correct values.
Summary
Maintaining accurate time settings on your Windows 10 machine is vital for seamless operation and communication within both local and networked environments. Forcing a time sync using the command line is a straightforward process that allows you to manage your system time effectively.
Whether you choose to use Command Prompt or PowerShell, the steps are clear, and troubleshooting is accessible should you encounter issues. With these techniques, you can ensure that your system clock remains in sync with the correct time, thereby enhancing the reliability of your Windows 10 experience.
By understanding and utilizing the tools available, such as w32tm, you can take control of your system’s time settings and ensure that everything functions smoothly in your digital environment.
Sometimes, your computer’s clock might not match the actual time. This can create problems, especially if you rely on your PC for scheduling tasks or joining online meetings. To fix this, you can force your Windows 10 system to sync its time with an internet time server. By following a few simple steps, you can ensure that your computer’s clock is as accurate as possible. Here’s how you can do it.
Step 1: Open Control Panel
First, open the Control Panel by typing “Control Panel” in the search bar next to the Start menu and pressing Enter.
The Control Panel is a hub for most of the settings on your Windows 10 computer. By accessing it, you can make changes to the system’s configuration, including time settings.
Step 2: Access Date and Time Settings
Once in the Control Panel, find and click on “Clock and Region,” then select “Date and Time.”
Here, you can adjust the clock, set time zones, and manage other time-related settings. This section is where you will make sure your system gets the correct time from an online source.
Step 3: Open Internet Time Settings
In the “Date and Time” window, switch to the “Internet Time” tab and click on “Change settings.”
The Internet Time Settings allow you to synchronize your computer’s clock with a time server on the internet. This ensures that your system’s time remains accurate over the long haul.
Step 4: Synchronize with an Internet Time Server
Check the box that says “Synchronize with an Internet time server” and select a server from the dropdown menu, then click “Update now.”
Selecting a server like “time.windows.com” or “time.nist.gov” will help keep your computer’s clock accurate. Clicking “Update now” forces Windows 10 to sync its time immediately.
Step 5: Confirm and Close
After the time updates, click “OK” to confirm the changes, and close all windows.
By confirming the changes, you ensure that your settings are saved. Your computer will now periodically sync its time with the server you’ve chosen.
After following these steps, your Windows 10 computer’s clock will be synchronized with an online time server. This regular syncing helps maintain accurate time, which can prevent issues with scheduling and software that rely on precise timing.
Tips for Time Sync Windows 10
- Double-check your time zone: Make sure your time zone is set correctly before syncing.
- Use reliable servers: Popular servers like “time.windows.com” or “time.nist.gov” are generally trustworthy.
- Ensure internet connectivity: Your computer needs an active internet connection for the sync to work.
- Regular updates: Check periodically to ensure that the sync is still working correctly.
- Manual adjustments: If the sync fails, you can adjust the time manually as a temporary fix.
FAQs for Time Sync Windows 10
Why is my computer’s time incorrect?
Your computer’s time may drift due to system changes or lack of sync with an internet time server.
How often does Windows 10 sync time?
Windows 10 automatically syncs with the chosen server at least once a week.
Can I use a different time server?
Yes, you can enter any reliable time server in the Internet Time Settings.
What if the sync doesn’t work?
Check your internet connection and make sure the time server is available.
Is there a way to automate this process?
Yes, Windows 10 automatically schedules regular syncs, but manual updates are possible if needed.
Summary
- Open Control Panel.
- Access Date and Time settings.
- Open Internet Time Settings.
- Synchronize with an Internet Time Server.
- Confirm and close.
Conclusion
That’s all there is to it! Forcing a time sync on Windows 10 is a straightforward process that can solve many timing issues. Whether you’re a busy professional or a student, keeping your computer’s clock accurate is crucial. An accurate clock ensures that you won’t miss appointments or experience software glitches related to incorrect timing.
If you’ve noticed that your clock is off, don’t panic. Simply follow the steps outlined here, and you’ll have your Windows 10 computer back in sync in no time. And remember, technology isn’t perfect, so these little hiccups can happen now and then.
For more detailed guidance on related topics, consider exploring other Windows features. Ensuring your system is running smoothly can greatly enhance your productivity. So go ahead, take control of your system’s time, and keep everything ticking along smoothly!
Matt Jacobs has been working as an IT consultant for small businesses since receiving his Master’s degree in 2003. While he still does some consulting work, his primary focus now is on creating technology support content for SupportYourTech.com.
His work can be found on many websites and focuses on topics such as Microsoft Office, Apple devices, Android devices, Photoshop, and more.
Quick Tips
- In most cases, enabling the automatic date and time feature on Windows and syncing the clock manually should solve the problem.
- Ensure the Windows Time service is configured to run automatically at boot.
- Force Windows to sync time using PowerShell or replace the CMOS battery if nothing else works.
Fix 1: Sync Windows Clock Manually
One of the easiest ways to fix an out-of-sync Windows clock is via the Settings app. You can visit the “Date & time” section in the Settings app and sync your Windows clock manually. Here’s how:
Step 1: Press the Windows key + I to launch the Settings app Time & language > Date & time.

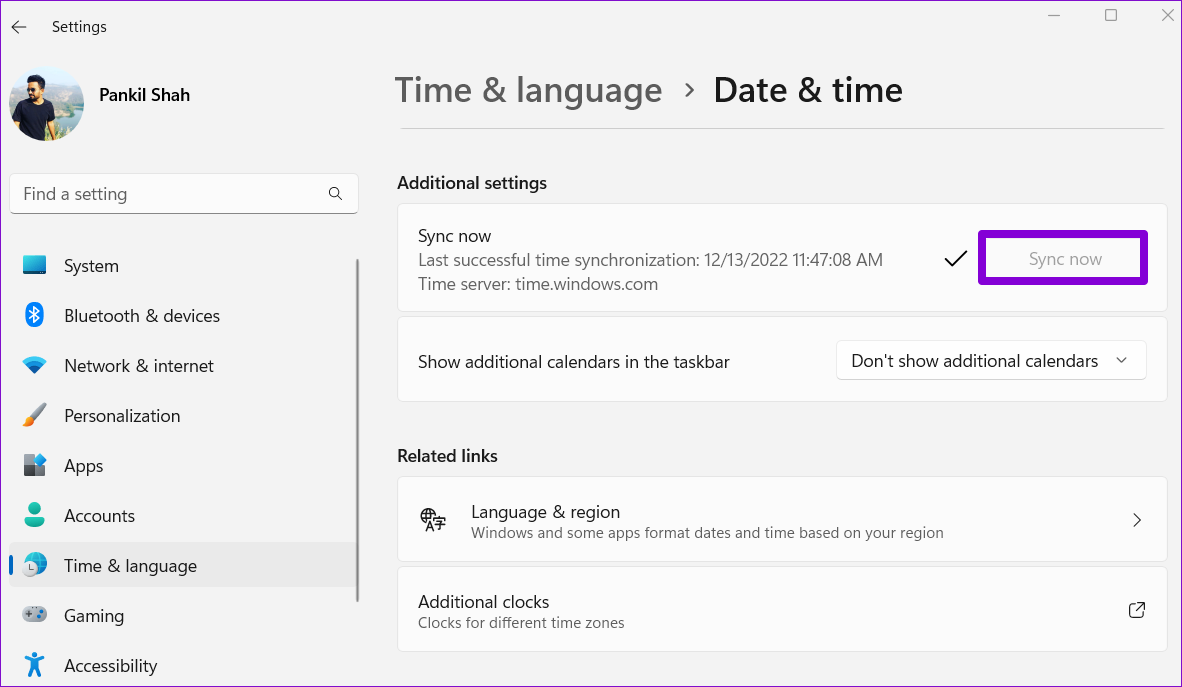
Step 2: Under Additional settings, click the Sync now button.
Fix 2: Enable Automatic Time in Windows Settings
If travel across countries or use VPN often, then the Windows clock may fall out of sync every few days. Thankfully, you can configure Windows to sync the time automatically. Here’s how to do it.
Step 1: Click the search icon on the taskbar, type date & time settings in the search box, and select the first result that appears.

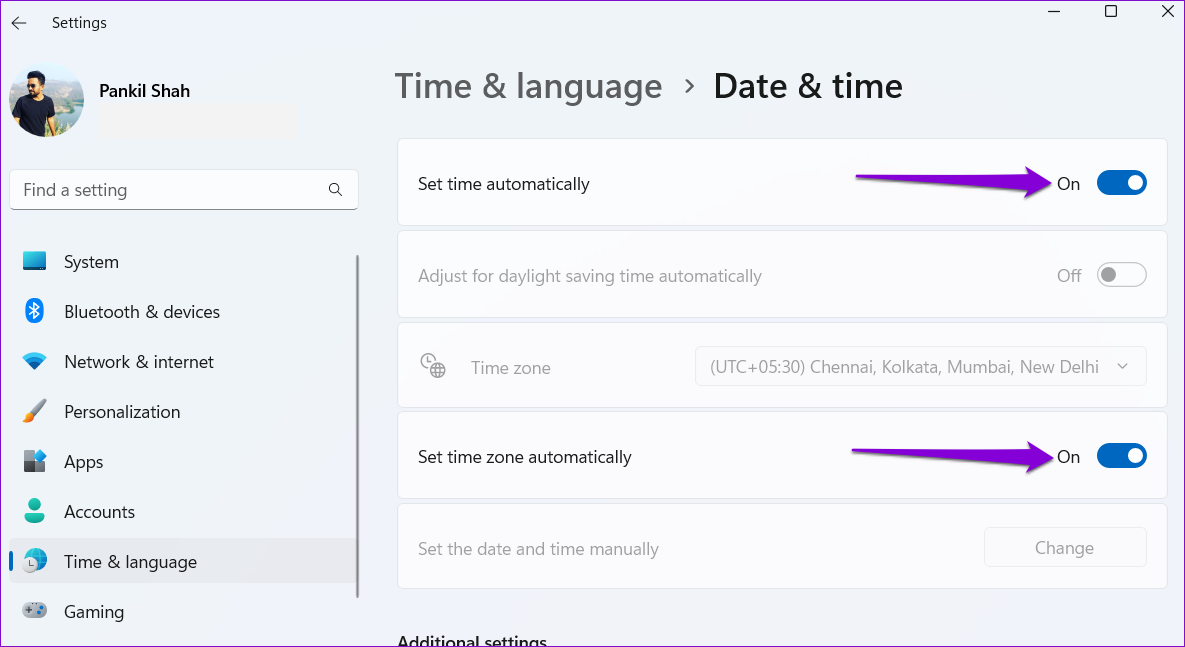
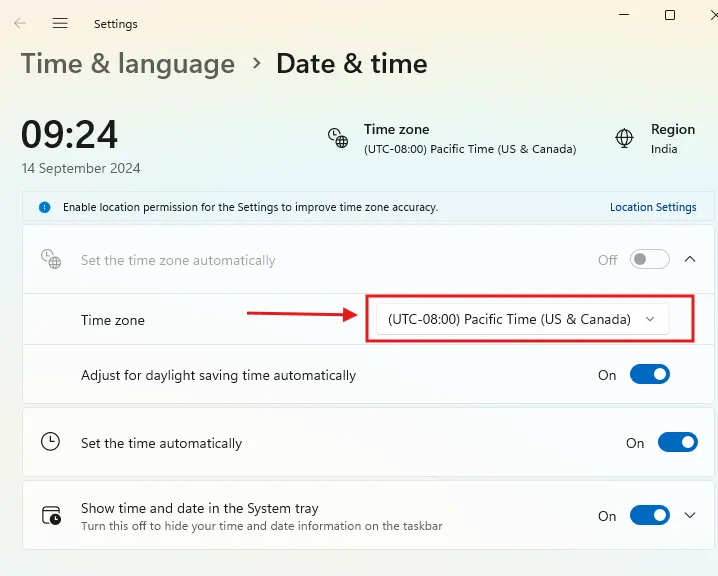
Step 2: In the Settings window that opens, enable the toggles for Set time automatically and Set time zone automatically.
Fix 3: Use Another Internet Time Server
Enabling the automatic time feature may not help much if there’s an issue with the internet time server that Windows uses. You can configure Windows to use a different internet time server and see if that helps.
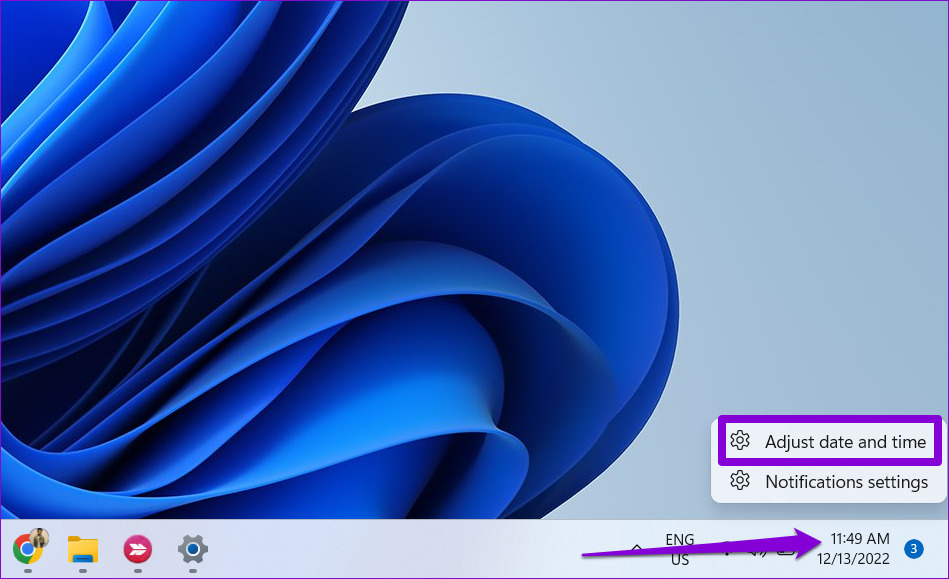
Step 1: Right-click on the taskbar clock and select Adjust date and time from the menu that appears.
Step 2: Scroll down to Related links and click on Additional clocks.

Step 3: In the Date and Time window, switch to the Internet Time tab. Then, click the Change settings button.

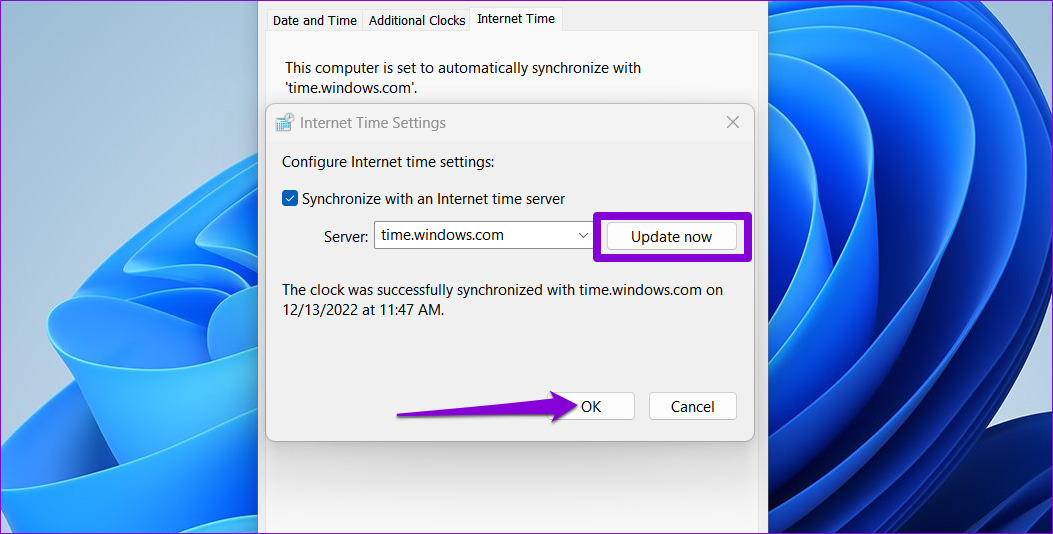
Step 4: Use the drop-down menu to select a different internet time server.

Step 5: Click the Update now button followed by OK.
Fix 4: Configure Windows Time Service
Windows Time service is a small program that syncs your computer’s clock with the correct global time. This service needs to be active all the time so that Windows can display the correct date and time. Here’s how to configure it.
Step 1: Press the Windows key + R to open the Run dialog box. Type services.msc in the box and press Enter.
Step 2: In the Services window that opens, scroll down to locate the Windows Time service. Right-click on it and select Properties.

Step 3: Change the startup type to Automatic and hit Apply followed by OK.

Fix 5: Force Windows to Sync Time Using PowerShell
Windows PowerShell is a useful command-line tool that allows you to perform complex tasks with a few text commands. If none of the above solutions work, you can use PowerShell to re-register the Windows Time service and force your computer to sync time. Here are the steps you can follow.
Step 1: Click the search icon on the taskbar, type in Windows PowerShell, and select Run as Administrator.

Step 2: In the console, type the following commands one by one and press Enter after each one.
Net stop w32time

w32tm /unregister

w32tm /register

Net start w32time

w32tm /resync

After running the above commands, restart your PC and see if the Windows clock displays the correct time.
Fix 6: Get the CMOS Battery Checked
A CMOS battery in your computer powers the Complementary Metal Oxide Semiconductor (CMOS) chip. This chip is responsible for maintaining system time and date along with other configurations. If the CMOS battery has a problem, the chip may fail to store any information, causing your Windows 11 clock to display an incorrect time.
Since replacing the CMOS battery requires technical know-how and your best option is to have the CMOS battery checked by a professional.
Was this helpful?
Thanks for your feedback!
The article above may contain affiliate links which help support Guiding Tech. The content remains unbiased and authentic and will never affect our editorial integrity.
From time to time, Windows might show the wrong time. This is especially true when you are dual booting or some program is changing the time without informing the admin. If that ever happens to you, you can force sync Windows time with a single command. Let me show you how.
To use the Windows time sync command, you need admin privileges. If you don’t have admin privileges, use the second alternative method.
To force sync time in Windows, you use the below command.
w32tm /resync
Steps to Force Sync Time with Command Line
- Open the Start menu,
- Search for “Command Prompt“.
- Right-click on the result and select “Run as administrator“.
- Type “w32tm /resync” and press Enter.
As soon as you press the Enter button, Windows will execute the time sync command. This will force Windows to show the correct time.
Detailed Step-by-Step Guide
First, open the start menu, search for “Command Prompt“, right-click on the result, and select the “Run as Administrator” option. Doing so will open the Command Prompt with admin rights.

In the Command Prompt window, execute the w32tm /resync command.
As soon as you execute the command, Windows will resync the time according to your current time zone. The time details are updated from the default time.windows.com server (Windows Internet Time Server).

Command to Sync Time with Domain Controller
If your Windows system is on a domain then use the w32tm /domain command.

When executing the command, sometimes you might see the “The computer did not resync because no time data was available” error. This is pretty common, especially in Windows 7 and 8. Just execute the command multiple times and it should work.
Use Custom Time Server to Sync Time
As I said before, Windows uses time.windows.com as the default time server. If that time server is not working for you or if you want to use some other custom time server, you can do that too.
Open the command prompt as admin and execute the following command.
w32tm /config /update /manualpeerlist:time.server.url.com
Don’t forget to replace time.server.url.com with the actual time server URL. You can use the NTP Pool Project to find the time server addresses of different countries and places.
As soon as you execute the command, Windows will access that time server, gets the time, and syncs it with your system.
Sync Time Using Settings App
As an alternative, you can also sync the time using the Settings app. In fact, compared to the command prompt or the control panel, the new options in the Settings app are far easier to access and use.
1. First, press “Windows Key + I” to open the Settings app.
2. Go to the “Time & Language → Date & Time” page. On the right panel, click the “Sync” button under the ‘Synchronize your clock’ section.

As soon as you click the button, the PC will sync the time with the default Windows time server.
The settings app won’t allow you to change the default time server. If you use a custom time server then you have to follow the Command Prompt method shown above.
Wrapping Up
I hope that helps. If you are stuck or need some help, comment below and I will try to help as much as possible. If you are dual-booting Windows with some Linus distro then Windows and Linux may show different times for other reasons. Follow the linked post to fix that issue.
Force Time Sync
-
Press Win + I (Open Settings)
-
Go to Time & Language > Date & Time
-
Turn off Set time automatically
-
Allow a short pause (Wait 30 Seconds)
-
Toggle On Automatic Time
-
Click Sync now under Additional settings
-
Check if the time updates correctly (Verify Time)


If it fails, repeat the process 2-3 times. Sometimes Windows needs a few attempts .
Verify Time Zone
-
Go to Settings > Time & Language > Date & Time
-
Ensure the Time zone matches your location
-
Click Get a recommended time zone
-
Turn on Set time zone automatically (Toggle Automatic Time Zone)
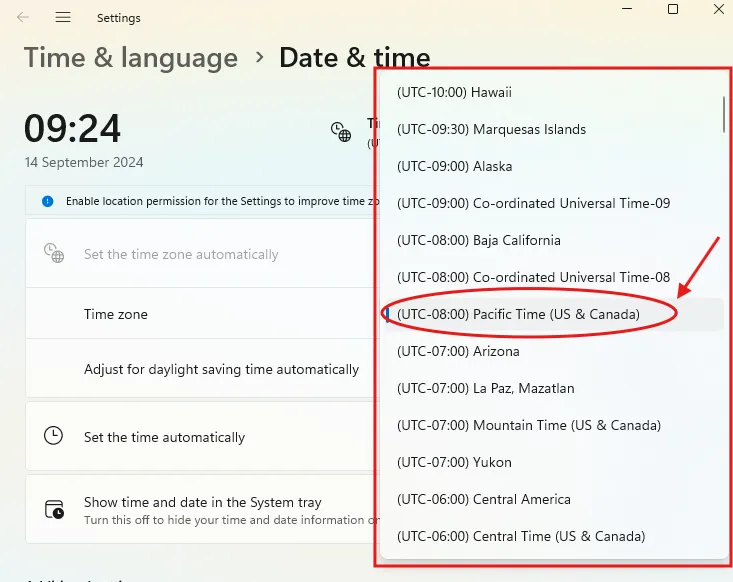

If you’re near a border, test neighboring time zones
Restart Windows Time Service
-
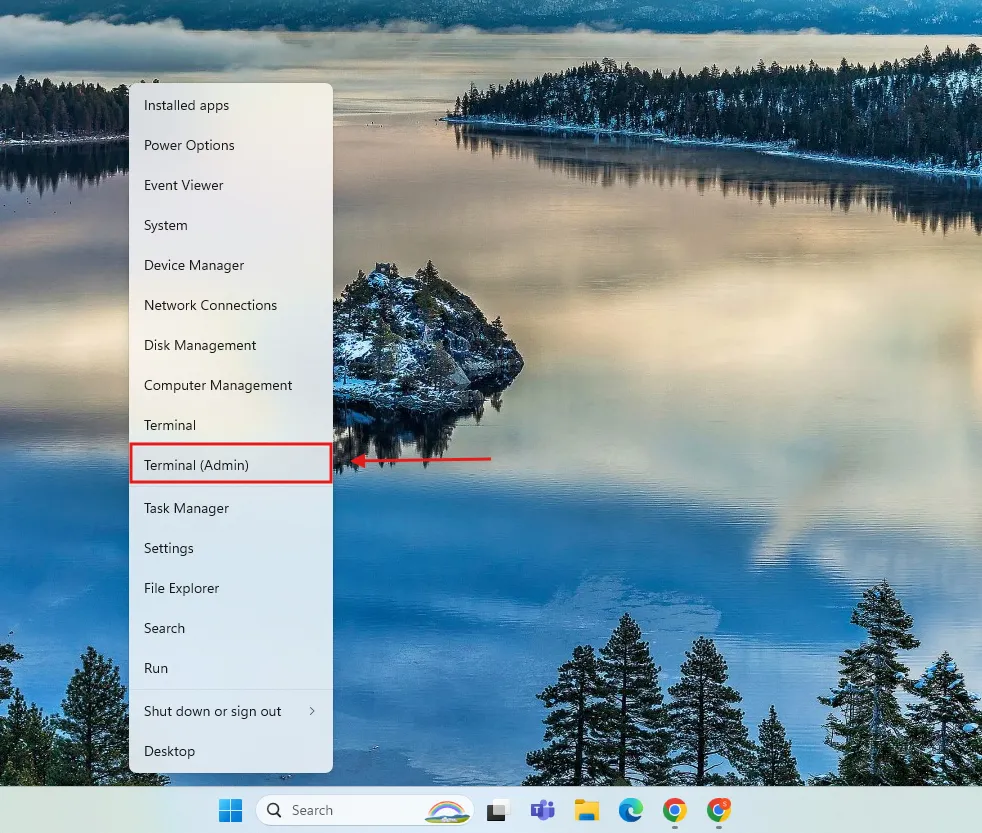
Press Win + X and select Windows Terminal (Admin) (Open Terminal)
-
Run net stop w32time (Stop Time Service)
-
Run net stop w32time (Stop Time Service)
-
Run net stop w32time (Stop Time Service)
-
Run net stop w32time (Stop Time Service)
-
Run net stop w32time (Stop Time Service)
If errors occur, restart your PC and try the commands again.
Update Time Server
-
Right-click the clock, select Adjust date and time (Adjust Date & Time)
-
Click Additional date, time, & regional settings > Set the time and date (Access Internet Time Settings)
-
Try servers: time.windows.com, time.nist.gov, pool.ntp.org (Select Server)
-
Click Update now (Update Time)
.webp)
If one server fails, try the others.
Check for Windows Updates
-
Go to Settings > Windows Update > Check for updates
-
Click Download & install
-
Restart after installation
-
Check if the time sync is resolved (Verify Time)

Keep Windows updated to prevent sync issues.