
Встроенный брандмауэр Windows в целях безопасности по умолчанию блокирует входящий ICMP трафик как в десктопных Windows 10/11, так и в Windows Server. Это означает, что вы не сможете удаленно проверить доступность компьютера с помощью стандартной команды
ping
, т.к. она будет отвечать о превышении интервала ожидания запроса (
Request timed out
) для ICMP Echo-Reply. Если вы хотите сделать возможной проверку доступности хостов Windows по протоколу ICMP из системы мониторинга или вручную из командной строки, можно разрешить ответы на ICMP эхо-запросы.
Чтобы разрешить отправку ответов на запросы по протоколу ICMP, нужно включить предустановленные правила в брандмауэре Windows.
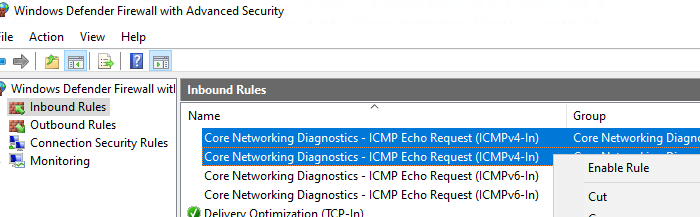
- Откройте оснастку управления Windows Defender Firewall with Advanced Security, выполнив команду
wf.msc - Перейдите в раздел Inbound Rules
- Найдите правило Core Network Diagnostics – ICMP Echo Request (ICMPv4-In) и включите его.
- В моем случае есть два правила с этим именем. Одно для частного и общедоступного сетевого профиля Windows, и второе для доменного. Я включил их оба. Можно также включить правило, разрешающее ICMP ответы для IPv6 протокола (если используется).

Есть также другое правило File and Printer Sharing (Echo Request – ICMPv4-In), которое также разрешает компьютеру отвечать на эхо-запросы
ping
.
Попробуйте пропиговать ваш компьютер и убедитесь, что теперь он отвечает на ICMP запросы.
Можно включить правила Windows Firewall, разрешающие ответы на эхо-запросы ICMP с помощью такой команды PowerShell:
Set-NetFirewallRule -Name CoreNet-Diag-ICMP4-EchoRequest-In -enabled True
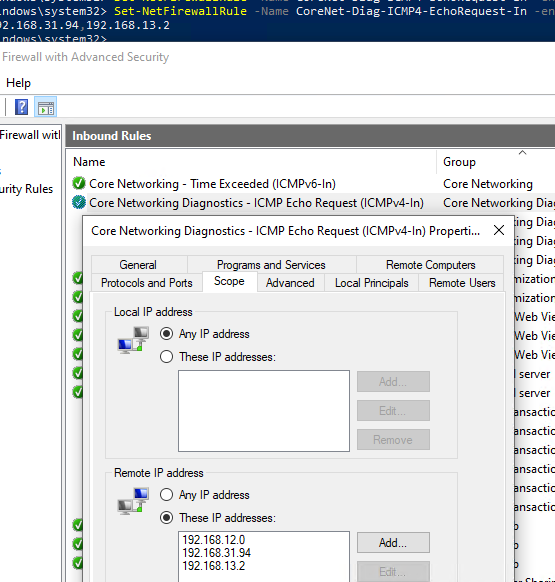
Если нужно ограничить список IP подсетей или хостов, которым разрешено отправлять ответы на ICMP запросы, выполните команду:
Set-NetFirewallRule -Name CoreNet-Diag-ICMP4-EchoRequest-In -enabled True -RemoteAddress 192.168.12.0,192.168.31.94
Откройте свойства правила в Windows Firewall и проверьте, что теперь правило разрешающие ICMP ответы будет работать только для указанных IP/подсетей.
Если в файрволе отсутствует (удалено) правило для входящих ICMP запросов, можно создать его из командной строки:
netsh advfirewall firewall add rule name="Allow_ICMPv4_Echo" protocol=icmpv4:8,any dir=in action=allow
Другой пример PowerShell команды, которое создаст правило файервола, разрешающего ping для всех хостов в локальной сети:
New-NetFirewallRule -DisplayName "Allow_ICMPv4_Echo" -Direction Inbound -Protocol ICMPv4 -IcmpType 8 -RemoteAddress localsubnet -Action Allow
Если нужно заблокировать ответы на ICMP эхо-запрос независимо от того, какие правила включены, создайте запрещающее правило, которое будет иметь более высокий приоритет:
New-NetFirewallRule -DisplayName "Block_ICMPv4_Echo" -Direction Inbound -Protocol ICMPv4 -IcmpType 8 -RemoteAddress localsubnet -Action Block
Чтобы разрешить ответы на ICMP ping на всех компьютерах в сети, можно включить правило Windows Firewall с помощью доменной групповой политики .
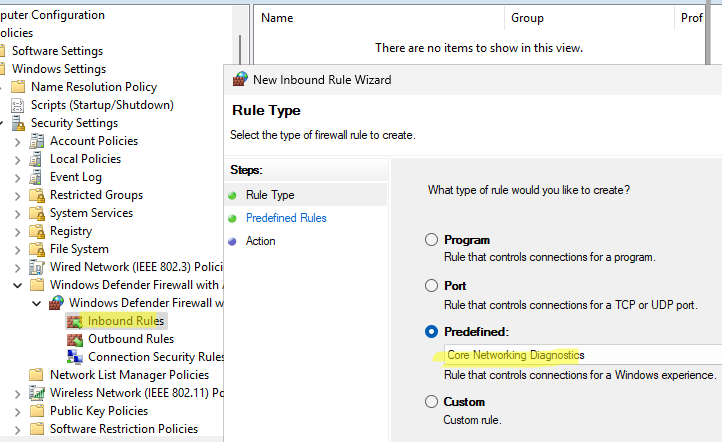
- Откройте редактор доменных GPO (
gpmc.msc
), создайте или отредактируйте имеющуюся GPO и назначьте ее на целевую OU или корень домена. - Перейдите в раздел Computer Configuration -> Windows Settings -> Security Settings -> Windows Firewall with Advanced Security -> Inbound rules
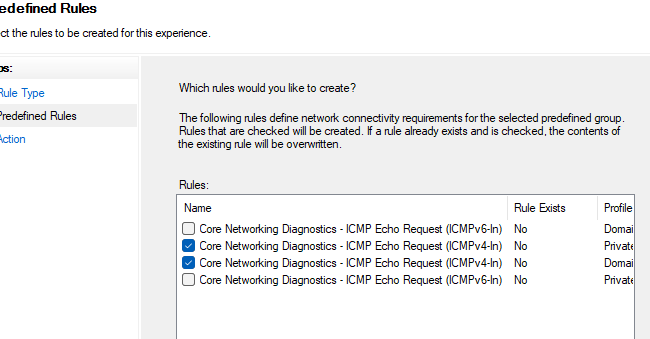
- Создайте новое правило, выберите Predefined rule типа Core Networking Diagnostics

- Укажите какие правила ICMP Echo request нужно включить.

- На следующем шаге вы берите Allow the connection.
В этом руководстве рассмотрим, как включить правило, чтобы сервер стал отвечать на ping используя графический интерфейс Windows Server 2019, а также включим разрешающее правило через PowerShell и netsh.
Обычно просто отключают Windows Firewall полностью, однако это не рекомендуется делать в производственной среде, так как брандмауэр Windows хорошо справляется с обеспечением базового уровня защиты системы. Разрешим только конкретное правило, необходимое для успешного выполнения команды ping.
Разрешить проверку связи через брандмауэр Windows
Сначала нам нужно открыть брандмауэр Windows, это можно сделать несколькими способами. Один из методов — просто нажать клавишу Windows, чтобы открыть меню «Start«, а затем начать вводить слово Firewall. Как показано ниже, брандмауэр Windows с расширенной безопасностью должен отображаться, выберите этот пункт.

Еще один быстрый способ: в PowerShell можно просто ввести «firewall» и нажать Enter. Откроется базовый интерфейс брандмауэра, а затем нажать кнопку «Advanced settings» в левой части. Откроется тот же интерфейс, что и через меню «Start«.
Следующий способ открыть Firewall — ввести в CMD такой текст: «firewall.cpl«
В Брандмауэре в расширенном режиме перейдите в Inboud Rules (Правила для входящих подключений).

В перечне правил в Inboud Rules, найдите «File and Printer Sharing (Echo Request — ICMPv4-In)» и активируйте его.
")
Еще один вариант. Активируем разрешающее правило командлетом Powershell
Set-NetFirewallRule -DisplayName "File and Printer Sharing (Echo Request - ICMPv4-In)" -enabled True
Полную справку со всеми параметрами можно получить, набрав команду в PowerShell
help New-NetFirewallRule
Вариант создания правила через netsh
netsh advfirewall firewall add rule name="ICMP Allow incoming V4 echo request" protocol=icmpv4:8,any dir=in action=allow
Примечание: Включение правила позволит получать ответы только на IPv4 запросы, если нужно получать ответы по IPv6, нужно разблокировать правило такое же правило, только с Echo Request — ICMPv6-In, перечисленное ниже. К тому же имеется несколько профилей: доменный, публичный, частный. Ненужные профили можно отключить в правиле, во вкладке Advanced.
После разблокировки правила сервер должен начать отвечать на запросы ping. С хоста виртуализации или другого пк в локальной сети протестируем ping’ом Windows Server 2019 по адресу 192.168.1.11 перед включением правила, а затем снова после его включения. Ниже видно, что время ожидания первых запросов истекло, так как входящие запросы ICMP были отключены по умолчанию в Windows Server 2019. После включения правила ICMP запросы ping успешно выполняются, что подтверждает ожидаемую работу.
Пример проверки связи:
Скачать видео.
Резюме
Стандартное правило брандмауэра — блокировать ICMP запросы, в итоге сервер не отвечает на ping. Включив это правило брандмауэра, мы включили команду ping в Windows Server 2019, которая поможет нам устранить неполадки в сети.
ICMP, также известный как PING, обычно используется системными администраторами для проверки работоспособности компьютеров (и других сетевых устройств).
Брандмауэр в Windows 10 по умолчанию блокирует ответы ICMP. Чтобы разрешить ICMP в Windows, нам нужно создать два правила брандмауэра. Один для IPv4 и один для IPV6.
Мы можем добиться этого с помощью графического интерфейса или командной строки.
Использование PowerShell для разрешения проверки связи
Самый простой способ — запустить следующие две команды в окне PowerShell:
netsh advfirewall firewall add rule name="Allow ICMPv4" protocol=icmpv4:8,any dir=in action=allow
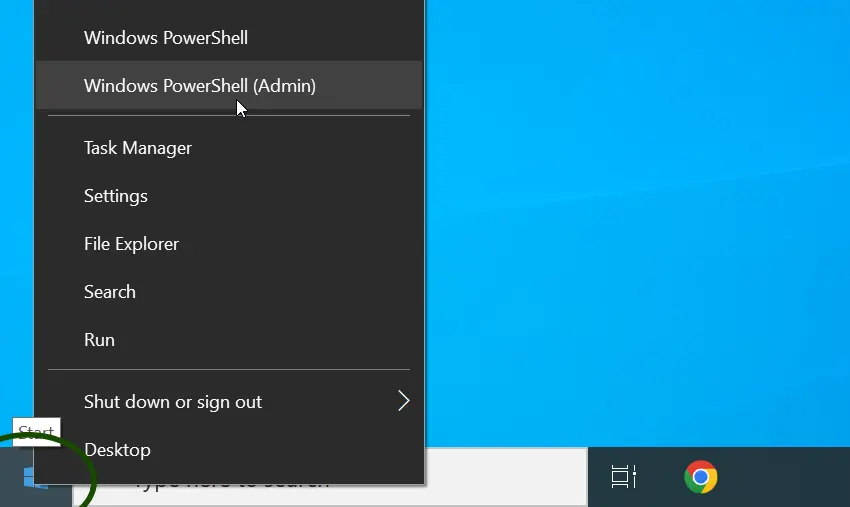
netsh advfirewall firewall add rule name="Allow ICMPv6" protocol=icmpv6:8,any dir=in action=allowЧтобы открыть окно PowerShell, щелкните правой кнопкой мыши кнопку «Пуск» и выберите в меню Windows PowerShell (Admin).
Когда откроется командное окно, запустите две команды, которые мы указали выше.

Ваш ПК/сервер с Windows теперь будет отвечать на запросы ping. Если вы хотите снова заблокировать ping, удалите эти два правила брандмауэра, используя следующие две команды:
netsh advfirewall firewall delete rule name="Allow ICMPv4"
netsh advfirewall firewall delete rule name="Allow ICMPv6"
Использование брандмауэра Защитника Windows
Если вам не нравится командная строка, используйте графический интерфейс, чтобы разрешить эхо-запросы через брандмауэр Windows.
Нажмите кнопку «Пуск» и введите брандмауэр. В результатах поиска выберите Брандмауэр Защитника окон в режиме повышенной безопасности. В приложении брандмауэра щелкните правой кнопкой мыши «Правила для входящих подключений» и выберите «Новое правило» в контекстном меню.
На первом экране выберите Пользовательский тип правила, нажмите Далее, а затем выберите Все программы. Нажмите «Далее» еще раз.
В раскрывающемся меню «Тип протокола» выберите ICMPv4 и нажмите «Далее».
На экране «Область» выберите «Любые IP-адреса», нажмите «Далее» и выберите «Разрешить подключение». На экране «Профиль» оставьте все три профиля брандмауэра отмеченными.
Наконец, дайте имя правилу брандмауэра и нажмите «Готово», чтобы завершить работу мастера.
Это правило разрешает трафик ICMPv4 через брандмауэр. Чтобы разрешить трафик ICMPv6, повторите ту же процедуру, но на экране «Протокол и порты» выберите ICMPv6.
И это все. Вы можете использовать описанные выше методы, чтобы разрешить проверку связи в любой операционной системе Windows, включая Windows 10, 11 и Server.
Просмотров: 15 797
By default, the Windows Firewall with Advanced Security blocks ICMP Echo Requests (Pings) from the network. In this post, we will show you how to allow Pings (ICMP Echo requests) through your Windows Firewall using Command Prompt or via the Windows Firewall with Advanced Security UI.
Should I enable ICMP?
For many network administrators, they consider the Internet Control Message Protocol (ICMP) a security risk, and therefore as a security measure, should have ICMP always be blocked at the firewall. In as much as ICMP is widely known to have some security issues associated with it, and for just that reason, ICMP should be blocked; it’s still no reason to block all ICMP traffic!
What ICMP types should I allow?
Apart from Type 3 and Type 4 – the only essential ICMP traffic you need to allow in and out of your firewall on your Windows 10/11 PC, everything else is either optional or should be blocked. Bear in mind that to send ping requests, you need to allow type 8 OUT and type 0 IN.
Generally, the way the ping command works amongst other network tools, is simply by sending special packets known as Internet Control Message Protocol (ICMP) Echo Requests to a target device, and then wait for that receiving device to respond and send back an ICMP Echo Reply packet. This action of pinging, apart from testing whether a network-connected device is active, it also measures the response time and outputs the result for you to review.
We can allow Pings (ICMP Echo requests) through your Firewall on Windows 10 or Windows 11 PC in either of two ways. We’ll explore this topic under the methods outlined below as follows.
Note: If you have a third-party security software with its own firewall installed on your system or just another type of dedicated third-party firewall program installed, you’ll need to open ports in that firewall instead of the in-built Windows Firewall.
1] Allow Pings (ICMP Echo requests) through Firewall on Windows PC via Windows Firewall with Advanced Security UI

To allow Pings (ICMP Echo requests) through Firewall on Windows PC via Windows Firewall with Advanced Security user interface, do the following:
- Click Start or press the Windows key on the keyboard.
- Type windows firewall, and then select Windows Defender Firewall from the top of the search result.
- Click the Advanced settings link on the left side of the Control Panel window that opens.
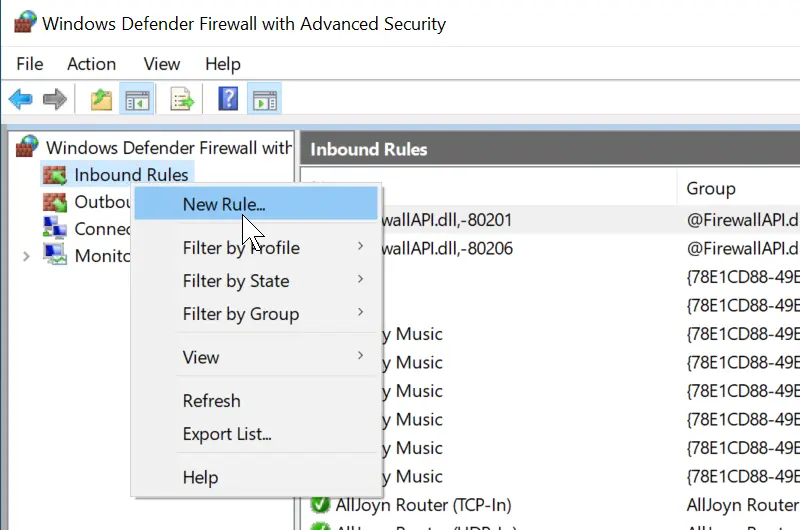
- In the left pane, right-click Inbound Rules and choose New Rule.
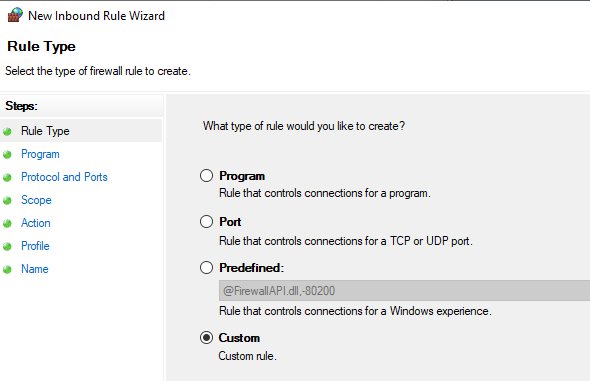
- In the New Inbound Rule window, select Custom.
- Click Next.
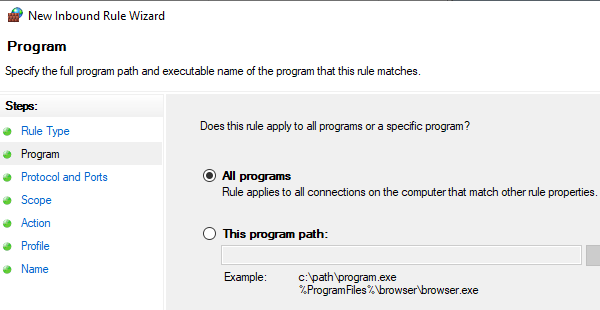
- On the Does this rule apply to all programs or specific programs? page, make sure the radio button is selected for All programs.
- Click Next.
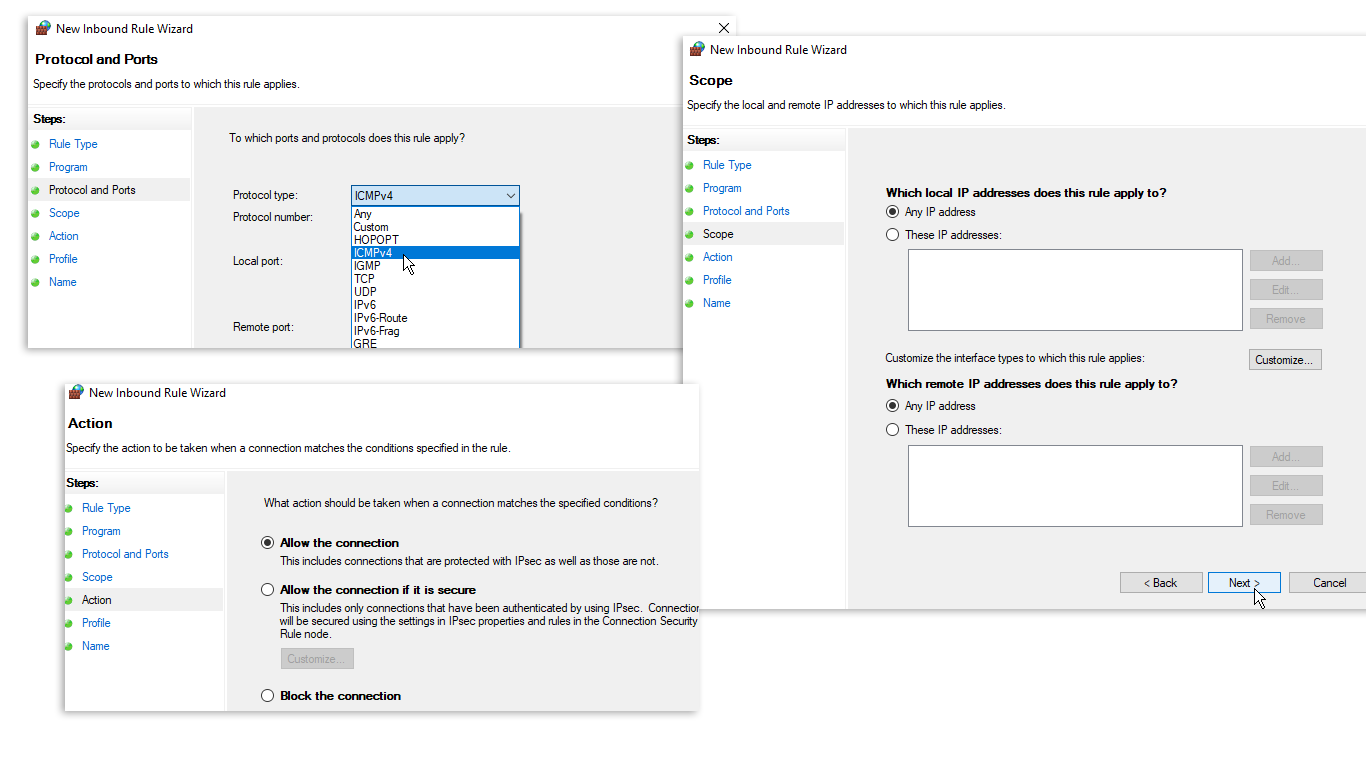
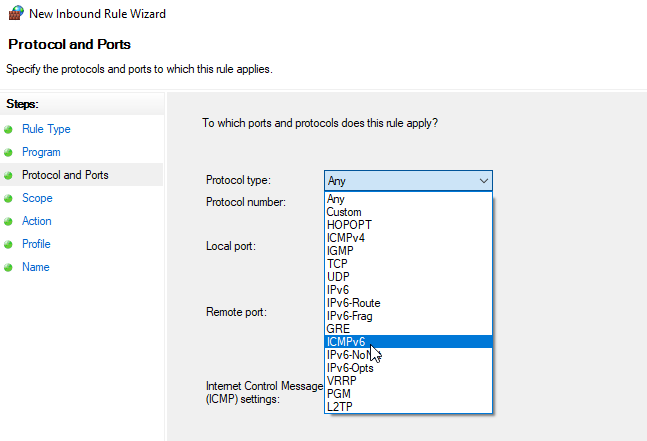
- On the To which ports and protocol does this rule apply? page, click the Protocol type drop-down, and select ICMPv4.
- Click the Customize button.
- In the Customize ICMP Settings window, select the Specific ICMP types option.
- In the list of ICMP types, enable Echo Request.
- Click OK.
- Back on the To which ports and protocol does this rule apply? page, click Next.
- On the page that appears, select the radio button for Any IP address option for under the Which local IP addresses does this rule apply to? and Which remote IP addresses does this rule apply to? sections.
If you want, you can configure specific IP addresses to which your PC will respond to a ping request. Other ping requests are ignored.
- On the What action should be taken when a connection matches the specified conditions? page, make sure the radio button is selected for Allow the connection option.
- Click Next.
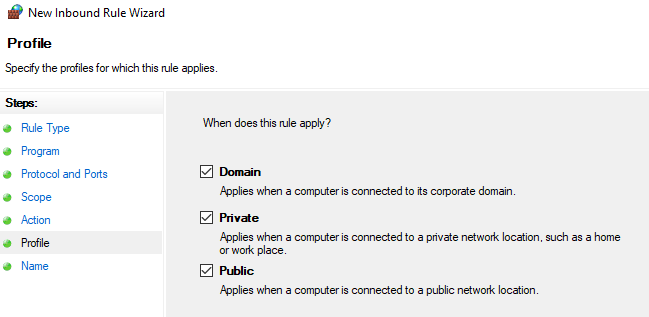
- On the When does this rule apply page, check/uncheck the available options per your requirement.
- Click Next.
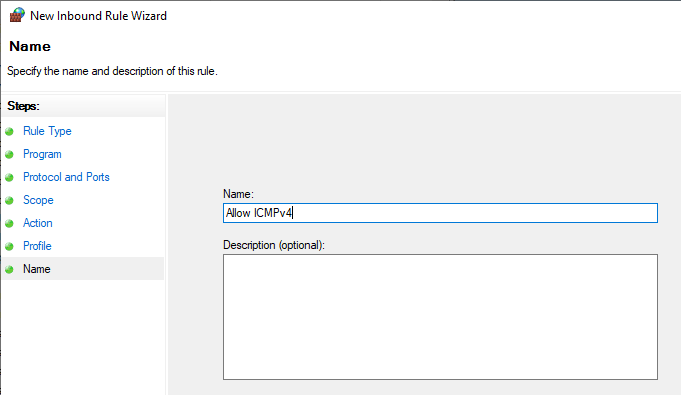
- At the final screen, you need to give your new rule a name, and optionally provide a description. It’s recommended to add ICMPv4 to the rule name to differentiate from the ICMPv6 rule that you will create also.
- Click the Finish button.
Now, you can go ahead and create the ICMPv6 rule by repeating the steps above, but this time at the To which ports and protocol does this rule apply? page, click the Protocol type drop-down, and select ICMPv6 instead.
- Exit Windows Defender Firewall when done.
If at anytime you want to disable the rule, open Windows Firewall with Advanced Security Control Panel, select Inbound Rules on the left, and locate the rules you created in the middle pane, right-click the rule and choose Disable. These rules can also be deleted – but it’s best just disabling the rules instead, so you can easily and quickly re-enable them without recreating them.
2] Allow Pings (ICMP Echo requests) through Firewall on Windows PC using Command Prompt
 through Firewall-Command Prompt")
This is the fastest way to create an exception for ping requests on Windows 11/10.
To allow Pings (ICMP Echo requests) through Firewall on Windows PC using Command Prompt, do the following:
- Press Windows key + R to invoke the Run dialog.
- In the Run dialog box, type cmd and then press CTRL + SHIFT + ENTER to open Command Prompt in admin/elevated mode.
- In the command prompt window, type or copy and paste the command below and hit Enter to create the ICMPv4 exception.
netsh advfirewall firewall add rule name="ICMP Allow incoming V4 echo request" protocol=icmpv4:8,any dir=in action=allow
- To create the ICMPv6 exception, run the command below:
netsh advfirewall firewall add rule name="ICMP Allow incoming V6 echo request" protocol=icmpv6:8,any dir=in action=allow
Changes takes effect immediately without system reboot.
- To disable ping requests for the ICMPv4 exception, run the command below:
netsh advfirewall firewall add rule name="ICMP Allow incoming V4 echo request" protocol=icmpv4:8,any dir=in action=block
- To disable ping requests for the ICMPv6 exception, run the command below:
netsh advfirewall firewall add rule name="ICMP Allow incoming V6 echo request" protocol=icmpv6:8,any dir=in action=block
If at anytime you want to disable a rule but have forgotten the name of the rule, you can run the command below to see a list of all rules:
netsh advfirewall firewall show rule name=all
That’s it on how to allow Pings (ICMP Echo requests) through Windows Firewall!
Read: Unable to Ping IP on Windows 11
What is ICMP attack?
An ICMP attack (also referred to as a Ping flood attack), is a common Denial-of-Service (DoS) attack in which a threat actor maliciously attempts to overwhelm a targeted device with ICMP echo-requests (pings).
,
Ping command requests that help administrators test connectivity between machines on the network are blocked by default from Windows Firewall on Windows servers and Windows 10/11 clients for security reasons.
However, although disallowing the PING command requests makes the system more secure by showing it as unavailable to any virus threats, it sometimes needs to be allowed to troubleshoot network problems. Especially if you are an administrator, using the PING command is quite useful if you want to know if a computer can communicate with others.
For example, if you ping a remote IP address on your network and it doesn’t reply(Request timed out), proceed to enable the ping replies on the remote machine to test its connectivity.

In this guide you’ll learn how to allow the Ping command requests in Windows Firewall.
How to Enable Ping Requests in Windows Firewall.
Method 1. Enable ‘File and Printer Sharing (Echo Request – ICMPv4-In)’ Rule.
The quickest way to allow ping requests is using the using the “Windows Defender Firewall with Advanced Security” app.
1. Type firewall in Search box and open the Windows Defender Firewall from the results.

2. Click Advanced Settings on the left.

3. Select Inbound Rules at the left, and at the right…
a. …scroll down and double-click to open any File and Printer Sharing (Echo Request – ICMPv4-In) rule which currently is disabled *
* Note: In the «Enabled» column it says «No».

b. Check the Enabled checkbox and click OK.
4. That’s it! With the above easy steps you can allow the Ping command requests on Windows. *
* Suggestion: After troubleshooting network connectivity, it is recommended to disable Ping requests, at least in the Public profile.

Method 2. Allow Ping Command Request for All Programs or only from Specific IP Addresses.
To allow the Ping command requests in Windows Firewall, for all programs or only from specific IP’s, proceed as follows:
1. See the steps 1 & 2 above to open the Windows Defender Firewall Advanced Settings.
2. Select Inbound Rules at the left, and at the right click New Rule.

3. Choose Custom and click Next.

4. Select All Programs and click Next.

5a. In ‘Protocol and Ports’ settings, choose at Protocol Type ICMPv4 and then click Customize.

5b. At ICMP settings, check the Echo Request and then click OK.

5c. Click Next.

6. At Scope options, choose Any IP address for both local and remote IP’s, if you want to allow the ping from all IP Addresses, or specify in «Which remote IP addresses» box, the remote IPs from which you allow only the ping requests.* When done, click Next.
* Example: If you want to allow the ping request only from the IP Address «192.168.1.201», select These IP addresses and then add the IP «192.168.1.201».

7. At Action screen, choose Allow the connection and click Next.

8. At Profile, leave checked all profiles and click Next.

9. Finally give a recognizable name for the new rule and click Finish.

10. That’s it. If you use the TCP/IP v6 Protocol, you can follow the above steps to create a second rule that will allow you to accept ICMPv6 ping requests. (In ‘Protocol and Ports’ settings, choose as Protocol Type: ICMPv6).
Method 3. Enable PING with Command Prompt.
Another way to allow ping in Windows Firewall is by using the Command Prompt. To do that:
1. Open command prompt as administrator. To do that:
1. Press the Windows + R keys to open the Run command box.
2. Type cmd or command prompt and press CTRL + SHIFT + ENTER.

2. In command prompt type the following command and press Enter to allow the ICMPv4 ping requests:
- netsh advfirewall firewall add rule name=»ICMPv4 Allow Ping Requests» protocol=icmpv4:8,any dir=in action=allow

3. If you want to allow also the ICMPv6 ping requests, give this command:
- netsh advfirewall firewall add rule name=»ICMPv6 Allow Ping Requests» protocol=icmpv6:8,any dir=in action=allow

4. You’re done. After executing the above commands the Ping requests will be allowed in the Windows Firewall. *
* Note: To block again the Ping requests in the Windows Firewall, give these commands:
- netsh advfirewall firewall add rule name=»ICMPv4 Allow Ping Requests» protocol=icmpv4:8,any dir=in action=block
- netsh advfirewall firewall add rule name=»ICMPv6 Allow Ping Requests» protocol=icmpv6:8,any dir=in action=block
Method 4. Allow or Disallow the Ping requests in Group Policy.*
If you own Windows 10/11 Professional or a Windows Server version, you can enable the ping requests, through Group Policy, as instructed below.
1. In the Run command box, type gpedit.msc and click OK to open the Local Group Policy Editor.

2. Navigate to the following path:*
-
Local Computer Policy > Computer Configuration > Windows Settings > Security Settings > Windows Defender Firewall with Advanced Security
* Note: If you want to allow the PING requests on a Domain environment, create a New GPO, then edit its settings and go to:
-
Policies -> Windows Settings -> Security Settings -> Windows Defender Firewall with Advanced Security
3. Right click at Inbound Rules and select New Rule.

4. At the next screen choose Custom and follow the steps 4-10 from Method-2 above to allow the Ping Requests.
That’s it! Which method worked for you?
Let me know if this guide has helped you by leaving your comment about your experience. Please like and share this guide to help others.
If this article was useful for you, please consider supporting us by making a donation. Even $1 can a make a huge difference for us in our effort to continue to help others while keeping this site free:
- Author
- Recent Posts
Konstantinos is the founder and administrator of Wintips.org. Since 1995 he works and provides IT support as a computer and network expert to individuals and large companies. He is specialized in solving problems related to Windows or other Microsoft products (Windows Server, Office, Microsoft 365, etc.).