
Adding a DHCP Firewall Rule
Note: This firewall rule will restrict your computer to only conduct DHCP exchange with a designated IP. If you move to another network and rely on DHCP, you will need to remove this rule for your DHCP to work properly
-
Open the Windows Security Center:
- Press the Windows key + I to open the Settings app.
- Navigate to «Privacy & Security» and then select «Windows Security».
-
Access the Firewall & network protection settings:
- In the Windows Security window, click on «Firewall & network protection».
- Under the «Firewall & network protection» section, click on «Domain network».
-
Create a new outbound rule for the DHCP server:
- In the «Domain network» settings, scroll down to the «Outbound rules» section.
- Click on «Add a new rule».
- In the «New Outbound Rule Wizard», select «Custom» and click «Next».
- Select «UDP» as the protocol type and enter the port number for your local DHCP server (usually port 67).
- In the «Remote IP address» section, select «These IP addresses» and enter the IP address of your local gateway.
- Choose «Allow the connection» and click «Next».
- Name the rule (e.g., «Allow DHCP from local gateway») and click «Finish».
-
Create a new inbound rule for the DHCP client:
- Repeat the previous steps, but this time, select «Inbound rule» instead of «Outbound rule».
- For the inbound rule, select «UDP» as the protocol type and enter the port number for your local DHCP client (usually port 68).
- In the «Remote IP address» section, select «These IP addresses» and enter the IP address of your local gateway (e.g. 192.168.1.1).
-
Disable all other DHCP-related firewall rules:
- In the «Firewall & network protection» section, click on «Advanced settings».
- In the «Windows Defender Firewall with Advanced Security» window, navigate to «Inbound Rules» and «Outbound Rules».
- Locate and disable any other DHCP-related rules that may be present.
Windows firewall dhcp server. Как настроить и защитить Windows-сеть
Windows firewall dhcp server — ключевой встроенный инструмент Windows, который позволяет создавать сервер DHCP. Например, это может быть полезно при создании беспроводной сети в офисе или дома. В этой статье мы рассмотрим, как настроить Windows firewall dhcp server и защитить свою сеть от возможных угроз.
Что такое DHCP-сервер?
DHCP (Dynamic Host Configuration Protocol) — это стандартный протокол, который позволяет компьютерам автоматически получать IP-адреса и другие настройки сетевого подключения от центрального сервера. Это может быть полезно, когда в сети находится большое количество устройств и необходимо автоматизировать процесс настройки.
Как правило, настроить DHCP-сервер можно на специальном оборудовании, таком как маршрутизатор. Однако, даже с помощью встроенных средств Windows, вы можете создать свой собственный DHCP-сервер.
Как настроить встроенный DHCP-сервер в Windows?

Чтобы настроить встроенный DHCP-сервер в Windows, необходимо выполнить следующие шаги:
- Откройте Windows Firewall с помощью поиска в меню Пуск.
- Выберите «Дополнительные настройки защиты Windows»
- Выберите «Настроить службы сети»
- Найдите «DHCP Server» в списке доступных служб и включите его.
После этого вы можете начать настраивать DHCP-сервер. Настройки DHCP-сервера находятся в групповой политике “DHCP-сервер”.
Как настроить защиту вашей сети с помощью Windows firewall?
Windows Firewall является встроенным инструментом, который позволяет защитить вашу сеть от возможных угроз. Для этого можно настроить Windows Firewall для блокировки попыток атак и неавторизованных подключений.

Для того, чтобы настроить защиту вашей сети с помощью Windows Firewall, следует выполнить следующие шаги:
- Откройте Windows Firewall с помощью поиска в меню Пуск.
- Выберите «Дополнительные настройки защиты Windows».
- Откройте вкладку «Домен» и выберите «Включить блокировку всех входящих соединений, кроме тех, которые разрешены правилами входящих соединений».
- Откройте вкладку «Частная» и выберите «Включить блокировку всех входящих соединений, кроме тех, которые разрешены правилами входящих соединений».
- Откройте вкладку «Общественная» и выберите «Включить блокировку всех входящих соединений, кроме тех, которые разрешены правилами входящих соединений».
- Нажмите «ОК», чтобы сохранить настройки.
Также можно создать специальные правила для блокировки входящих соединений на основе различных параметров, таких как порт, протокол и адрес источника. Для этого выберите соответствующую вкладку в главном окне Windows Firewall.
Итог
Windows firewall dhcp server — это удобный инструмент, который позволяет создавать DHCP-сервер на базе вашей Windows-системы. Он может быть полезен при создании беспроводной сети в офисе или дома. Однако, не забывайте о защите вашей сети от возможных угроз. Для этого можно использовать встроенный Windows Firewall, который позволяет настраивать блокировку попыток атак и неавторизованных подключений.
Надеемся, что данная статья помогла вам настроить Windows firewall dhcp server и защитить вашу сеть от возможных угроз.
Windows Firewall DHCP Server

Windows Firewall DHCP Server is a feature of the Windows operating system that allows users to configure their computer as a DHCP (Dynamic Host Configuration Protocol) server. DHCP is a protocol that allows computers to automatically obtain IP addresses and other network settings from a server.
Why Use Windows Firewall DHCP Server?

Windows Firewall DHCP Server can be useful in a variety of situations. Here are a few reasons why you might want to use it:
- You need to set up a small network of computers without purchasing additional hardware.
- You want to test network configurations without disrupting your main network.
- You need to temporarily provide network connectivity in a location without an existing DHCP server.
How to Set Up Windows Firewall DHCP Server
Setting up Windows Firewall DHCP Server is a relatively simple process. Here are the basic steps:
- Open the Control Panel and navigate to the «Network and Sharing Center.»
- Click on «Change adapter settings.»
- Right-click on the network adapter you want to use as the DHCP server and select «Properties.»
- Click on «Internet Protocol Version 4 (TCP/IPv4)» and select «Properties.»
- Click on «Use the following IP address» and enter an IP address for the network adapter.
- Enter the subnet mask and default gateway for the network.
- Click on «Use the following DNS server addresses» and enter the DNS server addresses for the network.
- Click on «Advanced» and select the «DNS» tab.
- Click on «Append these DNS suffixes (in order)» and enter the domain name for the network.
- Click on «OK» to save the changes.
- Open the Control Panel and navigate to «Windows Firewall.»
- Click on «Advanced settings.»
- Right-click on «Inbound Rules» and select «New Rule.»
- Follow the steps in the «New Inbound Rule Wizard» to create a rule allowing DHCP traffic.
- Restart the computer.
Windows Firewall DHCP Server Limitations
While Windows Firewall DHCP Server can be a useful tool, it does have some limitations. Here are a few things to keep in mind:
- Windows Firewall DHCP Server is not designed for use in large networks.
- It is not as stable or reliable as dedicated DHCP servers.
- Windows Firewall DHCP Server does not provide all of the advanced features of dedicated DHCP servers, such as reservations, lease times, and relay agents.
Conclusion
Windows Firewall DHCP Server can be a useful tool for setting up small networks, testing network configurations, and providing temporary network connectivity. However, it is important to keep in mind the limitations of this feature, particularly in larger or more complex network environments.
Windows Firewall DHCP Server
Windows Firewall DHCP Server is a built-in feature in the Windows operating system. It allows you to assign IP addresses to computers on your network automatically. This feature is often used in small business and home networks to ensure that each computer has a unique IP address that can communicate with other devices, such as printers and servers. In this article, we will explore the Windows Firewall DHCP Server, its features, and how to set it up.
How Does Windows Firewall DHCP Server Work?

When a computer is connected to a network that is using DHCP, it sends out a request to the DHCP server for an IP address. The DHCP server responds, assigning the requesting computer an IP address from a pool of available IP addresses. The DHCP server can also provide additional information, such as the subnet mask and gateway address, which the computer needs to connect to the network.
Setting Up the Windows Firewall DHCP Server
- Step 1: Open the Windows Firewall Control Panel
The first step to setting up the Windows Firewall DHCP Server is to open the Control Panel. You can do this by clicking the Start button and typing «Control Panel» in the search box. Click on the Control Panel icon to open it.
- Step 2: Open the Administrative Tools Folder
After you open the Control Panel, click on the «System and Security» link. Next, click on the «Administrative Tools» link. The Administrative Tools folder contains several useful tools that you can use to manage your Windows system.
- Step 3: Open the DHCP Manager Console
Inside the Administrative Tools folder, find the DHCP Manager console. This tool allows you to configure the DHCP server on your Windows server or PC.
- Step 4: Add a DHCP Scope
Once you have opened the DHCP Manager console, locate the «IPv4» folder and right-click on it. Select «New Scope» from the context menu. This will open the New Scope Wizard, which will guide you through the process of creating a new DHCP scope.
- Step 5: Configure the Scope

Follow the instructions in the New Scope Wizard to configure the scope. You will need to define the range of IP addresses that the scope will assign, as well as other options such as the subnet mask and default gateway. You will also need to set the lease duration, which determines how long a computer can use an assigned IP address before the DHCP server reassigns it to another device.

Conclusion
The Windows Firewall DHCP Server is a powerful tool that can simplify IP address management in small business and home networks. It allows you to assign IP addresses automatically, eliminating the need for manual configuration. With the steps outlined in this article, you can easily set up a DHCP server on your Windows PC or server.
When configuring a Windows Server 2019 DHCP environment in tandem with a Watchguard firewall, network administrators may find themselves juggling multiple design considerations—from setting up VLAN interfaces to deciding if an L3 switch fits into their network blueprint. Let’s take a deep dive into a practical implementation scenario along with some expert analysis on potential pitfalls and decision points.

Overview of VLAN and DHCP Configuration
The core concept behind the configuration is simple: separate your network into logically distinct segments (VLANs) while centralizing DHCP services, but not without careful planning. In one typical configuration example, two VLANs are set up:
• VLAN 10 – dubbed “Internal Wired” with a subnet such as 10.10.10.1/24
• VLAN 20 – referred to as “Internal WiFi” on a different subnet, for instance 10.10.20.1/24
The DHCP server, located on VLAN 10 with an IP address (say, 10.10.10.254), serves one subnet directly while relying on a DHCP relay for VLANs that reside on other subnets. This design keeps the DHCP service centralized, reducing overhead on multiple points.
Step-by-Step VLAN Configuration
The first essential step is to define your VLANs within the network configuration area of your Watchguard firewall. Follow these guidelines for a smooth setup:
- Open the Network Configuration Interface:
Access the VLAN configuration section. Here, you’ll define the VLAN IDs and assign them meaningful names. For our test configuration:
• Define VLAN 10 as “Internal Wired” with an interface IP of 10.10.10.1/24
• Define VLAN 20 as “Internal WiFi” with an interface IP of 10.10.20.1/24 - DHCP Server Setup:
Since the DHCP server is situated on VLAN 10 (10.10.10.254), no additional DHCP changes are required on that subnet. However, for VLAN 20 (or any other subnet that doesn’t host the DHCP service), you will need to configure a DHCP relay. This relay ensures that DHCP broadcast messages from that VLAN are forwarded to the server on VLAN 10. - Interface Assignment and VLAN Tagging:
Change the type of physical interfaces from “Trusted” to “VLAN”. This is done via the “Interfaces” tab, where you assign the appropriate VLANs to each physical interface. The firewall will then know exactly how to apply policies based on which VLAN the traffic originates from. - Policy Configuration:
When you select and edit a firewall policy, you notice consolidated options such as “Any-Trusted” (applicable across all trusted VLANs) and explicit options like “Internal Wired” and “Internal WiFi”. This selective granularity allows you to tailor security rules precisely for the traffic type (wired versus WiFi).
This step-by-step approach emphasizes precise segmentation—keeping traffic neatly partitioned while ensuring that critical resources like DHCP remain reachable via proper relay mechanisms.
Configuring the DHCP Relay and Server
A centralized DHCP server simplifies management, but when dealing with multiple VLANs, the DHCP relay agent becomes critical. Some points to consider:
• The DHCP relay is necessary on VLANs where the DHCP server isn’t directly present. For example, in our scenario, VLAN 20 requires a relay so that devices in its broadcast domain can still obtain IP addresses from the DHCP server in VLAN 10.
• Ensure that the relay settings are correctly configured within your firewall. Incorrect configurations can lead to devices not receiving IP addresses or facing conflicts that destabilize the network.
• Windows Server 2019 offers robust DHCP management, and when combined with a DHCP relay configuration on the Watchguard firewall, it makes the process of centralized IP management much more efficient. It’s important to verify that any relay agent configuration is secure and routinely tested to avoid issues in production environments.
By centralizing DHCP with a well-configured relay, administrators can minimize the need to run multiple DHCP services across different network segments.
Interfacing with the Watchguard Firewall
The Watchguard firewall is a powerful networking tool that supports flexible VLAN configuration. Here are some key insights:
• Interface Reclassification:
The ability to change interface types from Trusted to VLAN allows for straightforward physical setup. This means that administrators aren’t shackled by static physical allocations and can easily reassign interfaces based on evolving network requirements.
• Multiple VLANs on a Single Physical Interface:
Many modern firewalls, including Watchguard devices, let you assign multiple VLANs to one physical interface. This approach reduces hardware complexity but requires careful policy management. For instance, policies configured under “Any-Trusted” are broadly applied, while others like “Internal-Wired” or “Internal WiFi” are guaranteed to affect only the intended traffic.
• Rule-Based Security:
The duality of having broad policies alongside the option for granular control means that administrators have the flexibility to enforce different security postures depending on the segment’s needs. However, this flexibility relies on accurate VLAN tagging and robust DHCP/DHCP relay configuration.
With proper planning, firewall administrators can keep traffic segregated, while still providing centralized management of common services like DHCP.
Evaluating the Need for an L3 Switch
On one of the discussion threads, the question arose: Is it worth investing in an L3 switch? The expert opinions in the conversation reveal a nuanced approach:
• Model and Capability Considerations:
The decision heavily depends on the model of Watchguard firewall you’re using. For instance, inter-VLAN routing on lower-end models (like the T30) might not cater to the demands of larger networks. Lower-end models may struggle with processing power needed for routing extensive traffic between VLANs.
• Security Implications:
One view suggests that leveraging an L3 switch does not inherently weaken overall security; it merely shifts how and where traffic filtering is enforced. Instead of relying solely on the firewall for inter-VLAN security, the L3 switch’s Access Control Lists (ACLs) can help compartmentalize security rules, albeit at the cost of having to manage configurations in two separate locations. If an organization prefers centralized management, splitting configurations across the firewall and a dedicated switch might introduce complexity.
• Cost versus Benefit:
For organizations using VLANs strictly for logical segmentation (without sharply distinct security requirements), the incremental benefits of an L3 switch might not justify the additional cost. Conversely, if your network demands rigorous traffic filtering between segments, investing in an L3 switch could offer improved performance and more nuanced security control.
In summary, whether or not to invest in an L3 switch is highly contextual. Administrators must weigh the added control against the challenges of managing security rules across multiple devices.
Practical Considerations and Best Practices
When implementing these configurations, seasoned IT administrators keep a few best practices front and center:
• Comprehensive Documentation:
Always map out your VLAN and DHCP configurations. Document which VLANs are tagged to which interfaces, and note any DHCP relay configurations. This roadmap will save troubleshooting time when network issues arise.
• Consistent Monitoring and Testing:
Regularly verify that DHCP relays work as expected. Test the environment by connecting devices to each VLAN and ensuring they receive proper IP addresses via the relay agent. Monitoring tools on Windows Server 2019 can help you track DHCP request logs and identify any anomalies.
• Policy Review:
Firewall policies should be periodically reviewed. With the ability to assign security rules to broad groups like “Any-Trusted” and specific ones like “Internal-Wired,” administrators should ensure that policies do not inadvertently override one another, leading to either overly restrictive or too permissive access.
• Training and Skill Development:
Given that configurations spanning VLANs, DHCP, and firewall policies can become complex, ensuring that your IT staff is well-trained on both Windows Server 2019 and Watchguard firewall management is crucial. Regular internal workshops or refresher courses can prevent configuration mishaps.
Real-World Application and Further Analysis
Imagine a mid-sized company with both wired office setups and a wireless network designed for guest access. Using a centralized Windows Server 2019 DHCP configuration with a Watchguard firewall means that while both segments of the network are managed under one roof, each still gets the custom configuration it needs. The internal wired network might have different security and performance considerations than the guest WiFi. With VLAN tagging, administrators can easily apply certain policies (like restricted guest access) without affecting the internal network’s operations.
Similarly, if an organization experiences rapid growth, the discussion about whether to deploy an L3 switch becomes more than academic. It’s a real-world decision balancing network performance with security management. By carefully planning which devices enforce which layers of security (firewall vs. switch ACLs), companies can maintain performance without sacrificing the granularity of security enforcement.
Conclusion: Planning for a Secure and Scalable Network
Setting up Windows Server 2019 DHCP with a Watchguard VLAN configuration is an exercise in precision. It requires a solid understanding of both network segmentation and DHCP relay functionality. Crucially, it also demands flexibility in policy management—a realm where the Watchguard firewall excels, but which may sometimes prompt the question of whether an L3 switch could provide additional benefits.
In the end, the decision hinges on your network’s size, the specific Watchguard model in use, and the nature of your security requirements. For environments that need tight security rules across very different network segments, an L3 switch offers additional control at the cost of increased complexity. For simpler setups, sticking with carefully configured VLANs and a centralized DHCP system on Windows Server 2019 may be sufficient.
Administrators are encouraged to evaluate their network designs critically. As with many IT decisions, one size rarely fits all. Balancing centralized services with logical segmentation may well be the secret ingredient to both secure and scalable network architecture. For further topics on Windows server management and firewall configurations, consider exploring other expert discussions on WindowsForum.com—where real-world troubleshooting meets robust IT solutions.
Source: Spiceworks Community Windows Server 2019 DHCP for VLAN with Watchguard firewall questions
I have a Windows Home Server at home and I decided I wanted it to be responsible for handing out DHCP and DNS addresses in the house. All very good, but when I set up the services none of it worked because of the built in Windows Firewall. While I could have just turned off the Firewall I decided to learn how to put the holes into the firewall to make it work with the firewall, thus maintaining better security.
A quick search of the web showed me many settings, but it did not seem to cover the whole picture – then I came across the MS site Windows Firewall Settings which has things broken down into these four handy sections that shall for ever more be my guides to ports and firewalls in the Microsoft world. What is more, as you will see later, the tips in here as to how to get things working, getting over common hurdles is quite stunning too:
Windows Firewall Settings: Optional Components
Windows Firewall Settings: Remote Administration Tools
Windows Firewall Settings: Server Roles
Windows Firewall Settings: Services
The two key entries for me are below – DHCP and DNS. Note that the DHCP entry has a wonderful tip saying that you will need to ensure 0.0.0.0 is included in the scope of the acceptable ports – i.e. you can not just set the scope to local network only. This was my 1st mistake
Windows Firewall: DHCP server
Add UDP ports 67 and 2535 to the Windows Firewall exceptions list on the DHCP server.
Important:
When you create a Windows Firewall exception for the DHCP protocol on a DHCP server, you must set the scope for the exception to Any computer including those on the Internet. If you leave it set to My network (subnet) only, all inbound DHCP Discover packets from client computers are dropped because the IP address of the packet is 0.0.0.0, which is not recognized by the computer as being part of the local subnet. This causes the DHCP process to fail and clients do not receive IP addresses.
Windows Firewall: DHCP server
On the DNS entry the thing which grabbed me was the ports other than 53 that were needed:
Windows Firewall: DNS server
Add UDP port 53 and TCP ports 53, 139, and 445 to the Windows Firewall exceptions list.
Windows Firewall: DNS server
Invaluable information!
ttfn
David
Posted
Thu, Apr 10 2008 9:55 PM
by
David Overton
A DHCP Server is a protocol server for TCP/IP networks that supplies IP addresses to other computers. DHCP Server for Windows also supports TFTP, DNS and HTTP protocol which makes a nice package for easy and simple to install networks e.g. for remote boot and other purposes. DHCP server runs on all Win32 capable Windows operating systems starting from Windows 95 to Windows 11.
The following describes how to run the DHCP Server for Windows. Since V2.9.3.1 there is also a Raspberry PI OS Version available. Please see instructions on how to install and run here.
Installation
The DHCP Server is a portable application and runs from anywhere on your computer. Extract the content of the zip file wherever you like, e.g. D:\dhcpsrv. You will now find the following files in there:
- dhcpsrv.exe
- dhcpwiz.exe
- readme.txt
- wwwroot
- dhcpstyle.xsl
- dhcppkgstyle.xsl
- favicon.ico
- index.html
- RJ45_5.jpg
- RJ45_52.jpg
Configuration with dhcpwiz.exe
If you are a first time user of DHCP server then the dhcpwiz.exe program gives you a good head start in setting up the ini file needed to run the DHCP server. The dhcpwiz.exe program is a wizard style configuration program for the DHCP server. It will guide you in 6 easy steps through the basic configuration of the software.
1. Welcome to the DHCP configuration wizard
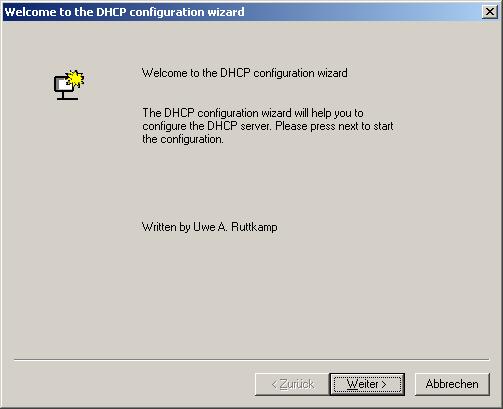
There is not much more to do than to hit the next button.
2. Network interface cards
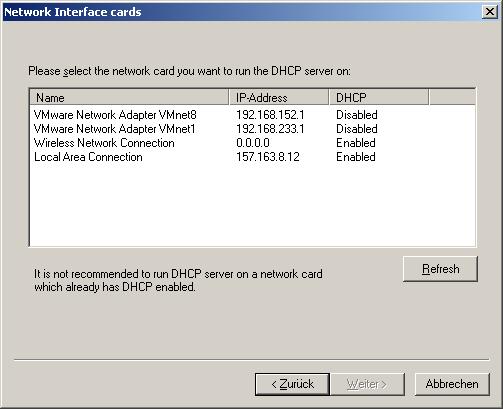
The DHCP configuration wizard lists all currently identified network interfaces on your computer. It is necessary to select one. This is going to be the interface that will be used by DHCP server. It is a good idea to choose a network interface with DHCP disabled that by itself is not getting it’s IP address from a DHCP server. This would probably cause conflicts. Hit next after interface has been selected.
3. Supported protocols
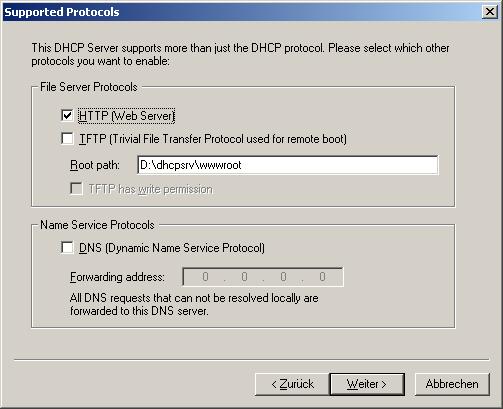
Now you can select which TCP/IP protocols should be activated. I’m suggesting to enable HTTP (Web Server) and hit next.
4. Configuring DHCP for interface
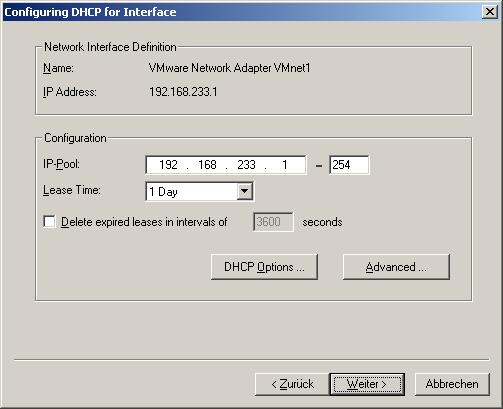
In this step you define the pool of IP addresses. A client will get an IP addresses assigned out of this pool. With the Advanced button, you get access to a dialog that allows you to define the subnet mask, the gateways and the DNS and WINS servers. DHCP wizard automatically takes the appropriate defaults based on the selected network interface card. The DHCP Options button opens a dialog that gives access to further DHCP options such as next (TFTP) server, bootfile, domain name and others including customized options. The default values should be good and lead you to the next step after hitting the next button.
5. Writing the INI file
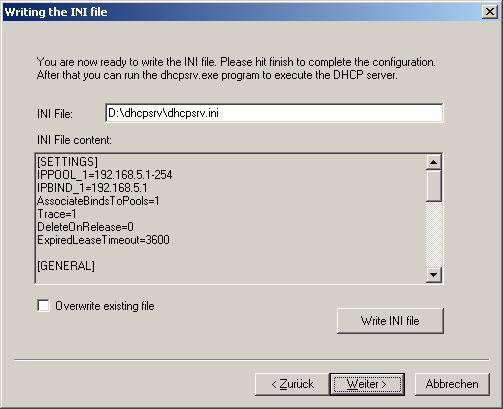
The final result of the DHCP configuration wizard is an INI file. This file will contain all the configuration options. The filename and path shown here should point to d:\dhcpsrv\dhcpsrv.ini, depending on where you’ve exctracted the zip file. It is important that the INI file is placed into the same folder as dhcpsrv.exe resides. If that is all ok, then hit the “Write INI file” button and then the next button to enter the final step of the configuration. Please note that DHCP wizard is not intended to reedit the INI file once it is written. Its purpose is the first time configuration. But of course nothing prevents you from using the wizard again. Just please make sure that you don’t overwrite your INI file unintended. That is the reason why the “Overwrite existing file” is by default unchecked.
6. DHCP configuration completed

The windows firewall is a great thing to have. But it can be a pain also to get communication server programs working. That is the reason why the wizard gives you at this stage the option to add the dhcp server program to the exception list of the windows firewall. Please hit the configure button and wait for the status to change from “Not configured” to “configured”. If you are not running the DHCP configuration wizard with administrator privileges, then you need to do that after you have elevated your rights accordingly by hitting the “Admin…” button.
It is now time to start the DHCP server program. The DHCP server can run as a service or as an application. If you want to run it as a service then you can install and start the service here also. Again, non-administrators can do that only after elevation (the “Admin…” button). The status needs to change from “Not installed” to “Running”. If you decide not to install DHCP server as a service but wants to run DHCP server as an application, then you can tick the “Run DHCP server immediately” check box and click finish.
Running dhcpsrv.exe
Once the INI file has been created by the DHCP configuration wizard, it is now time to start the actual DHCP server program. If you have done that already as part of the DHCP configuration wizard step 6, then you are done and don’t need to read the rest.
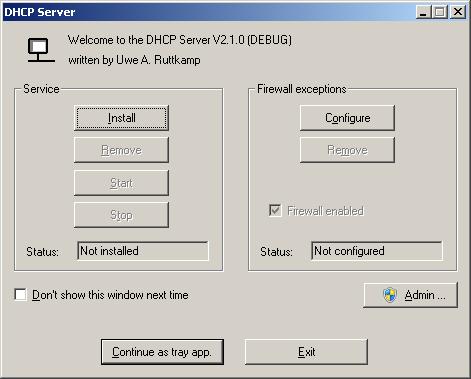
If you have not already done so, start the dhcpsrv.exe. If you are running Windows NT or Windows 2000/XP/VISTA/7/8/10/11 then the DHCP server will show you the following dialog box:
On all older operating systems (Windows 98, etc..) the DHCP server will go straight into the tray as a tray icon application.
If you are running the windows firewall, then DHCP server can enter itself into the exception list. Please hit the configure button and wait for the status to change from “Not configured” to “configured”. If you are not running the DHCP server with administrator privileges, then you need to do that after you have elevated your rights accordingly by hitting the “Admin…” button.
It is now time to really start the DHCP server program. The DHCP server can run as a service or as an application. If you want to run it as a service then you can install and start the service here. Again, non-administrators can do that only after elevation (the “Admin…” button). The status needs to change from “Not installed” to “Running”. If you decide not to install DHCP server as a service, then you hit the “Continue as a tray app” button. If you tick the “Don’t show this window next time”, then DHCP server will not bother you again with this dialog and goes straight into the tray. If you forgot to configure the firewall or you didn’t trust DHCP server to handle your firewall configuration correctly, then Windows will ask you for permission to let DHCP server communicate through the firewall. Say yes to everything that might come up and you will see a little tray icon showing that DHCP server is running.
Once the DHCP configuration has been performed and DHCP server is started, you probably want to know whether it actually works. If you have activated the HTTP support as part of step 3 during the DHCP configuration wizard, then you can use your internet browser to open the DHCP status web site: http://127.0.0.1/dhcpstatus.xml. Also easily accessible through the tray icon, right mouse, Open status. This should show the configured and operating connections and also all currently active clients. I assume there aren’t any yet. Once a DHCP client is assigned an IP address it will show up after reloading the page.
Since V1.7 command line options are supported to better integrate the DHCP server into setups or to quickly install and remove the service. The command line options are:
| -install | installs the DHCP Server as a service |
| -remove | removes the service |
| -start | starts the service |
| -stop | stops the service |
| -control | opens the above dialog box to control the service |
| -help | shows a help message dialog box |
| -runapp | runs the DHCP Server in application mode (regardless of service installs) |
| -ini filename | sets the pathname of the ini file to be used by the DHCP Server (default is dhcpsrv.ini). This works only in application mode |
| -configfirewall | Configures firewall exceptions for dhcpsrv.exe |
| -removefirewall | Removes firewall exceptions for dhcpsrv.exe |
Command line options are interpreted from left to right and can be given in any order. Example
dhcpsrv -install -start installs and starts the DHCP server service with one command
Please be aware that you need to have administrator privileges to install the DHCP Server as a service.