
General syntax
The following table summarizes what each advanced switch is used for.
|
Parameter / switch |
Description |
Supported mode(s) |
|---|---|---|
|
Source-drive: |
Specifies the storage device where the files were lost. Must be different from the destination-drive. |
All |
|
Destination-drive: |
Specifies the storage device and folder on which to put the recovered files. Must be different from the source-drive. |
All |
|
/regular |
Regular mode, the standard recovery option for non-corrupted NTFS drives |
Regular |
|
/extensive |
Extensive mode, a thorough recovery option suitable for all file systems |
Extensive |
|
/n<filter> |
Scans for a specific file by using a file name, file path, file type, or wildcards. For example:
|
All |
|
/? |
Summary of syntax and switches for general users. |
All |
|
/! |
Summary of syntax and switches for advanced users. |
All |
Advanced syntax
The following table summarizes what each advanced switch is used for.
|
Switch |
Description |
Supported modes |
|---|---|---|
|
/ntfs |
NTFS mode, a fast recovery option for healthy NTFS drives using the master file table |
NTFS |
|
/segment |
Segment mode, recovery option for NTFS drives using file record segments |
Segment |
|
/signature |
Signature mode, recovery option for all file system types using file headers |
Signature |
|
/y:<type(s)> |
Recover specific extension groups, comma separated |
Signature |
|
/# |
Signature mode extension groups and supported file types. |
Signature |
|
/p:<folder> |
Saves a log file of the recovery operation in a different location than the default location on the recovery drive (for example, D:\logfile). |
All |
|
/a |
Overrides user prompts, which is useful in a script file. |
All |
|
/u |
Recovers undeleted files, for example, from the Recycle Bin. |
NTFS |
|
/k |
Recovers system files. |
NTFS |
|
/o:<a|n|b> |
Specifies whether to always (a), never (n), orkeep both always(b) when choosing whether to overwrite a file. The default action is to prompt to overwrite. |
NTFS |
|
/g |
Recovers files without primary data streams. |
NTFS |
|
/e |
To keep your results manageable and focus on user files, some file types are filtered by default, but this switch removes that filter. For a complete list of these file types, see the information after this table. |
NTFS |
|
/e:<extension> |
Specifies which file types are filtered. For a complete list of these file types, see the information after this table. |
NTFS |
|
/s:<sectors> |
Specifies the number of sectors on the source device. To find sector information, use fsutil. |
Segment |
|
/b:<bytes> |
Specifies the cluster size (allocation unit) on the source device. |
Segment |
File extension filter list
The following file types are filtered from results by default. Use the /e switch to disable this filter or the /e:<extension> filter to specify file types not to filter.
_, adm, admx, appx, appx, ascx, asm, aspx, aux, ax, bin, browser, c, cab, cat cdf-ms, catalogItem, cdxm, cmake, cmd, coffee, config, cp, cpp, cs, cshtm, css, cur, dat, dll, et, evtx, exe, fon, gpd, h, hbakedcurve, htm, htm, ico, id, ildl, ilpdb, iltoc, iltocpdb, in, inf, inf_loc, ini, js, json, lib, lnk, log, man, manifest, map, metadata, mf, mof, msc, msi, mui, mui, mum, mun, nls, npmignore, nupkg, nuspec, obj, p7s, p7x, pak, pckdep, pdb, pf, pkgdef, plist, pnf, pp, pri, props, ps1, ps1xm, psd1, psm1, py, resjson, resw, resx, rl, rs, sha512, snippet, sq, sys, t4, targets, th, tlb, tmSnippet, toc, ts, tt, ttf, vb, vbhtm, vbs, vsdir, vsix, vsixlangpack, vsixmanifest, vstdir, vstemplate, vstman, winmd, xam, xbf, xm, xrm-ms, xs, xsd, ym

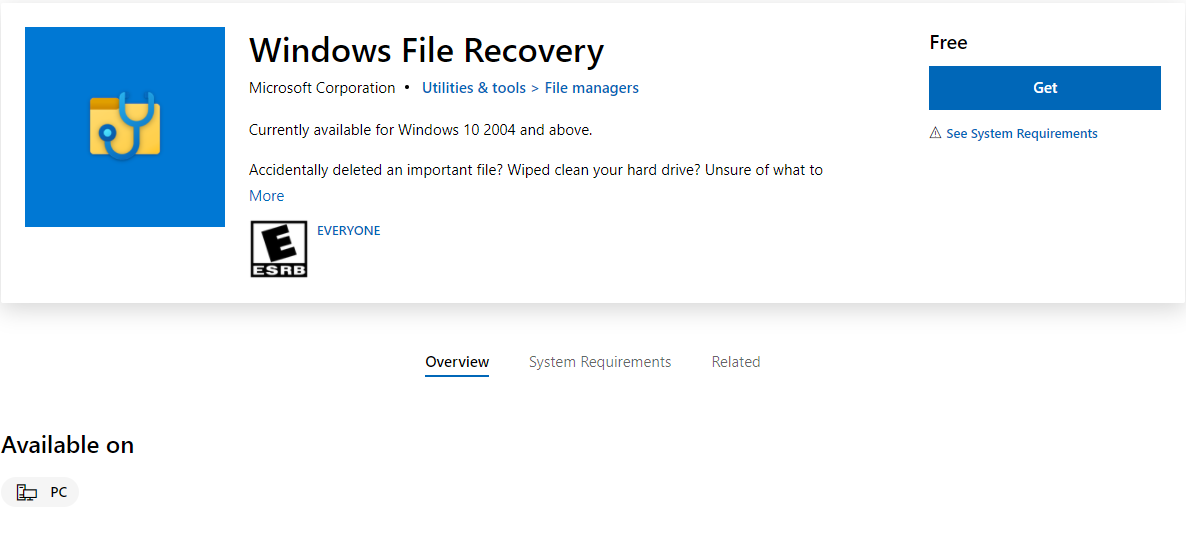
Windows 10 May 2020 update (i.e., Windows 10 version 2004 build 19041) introduced Windows users to the Windows File Recovery tool. The Microsoft Recovery Software is available on the Microsoft Store. However, if you’re running an older version of Windows, you won’t be able to install Windows File Recovery.
Also, note that the utility doesn’t have a graphical UI and can be used only through the Command Prompt or PowerShell. If you’re not comfortable working with command-line utilities or using an older version of Windows, consider using a robust third-party recovery tool.
Windows File Recovery software (also called WinFR) is a recovery tool created by Microsoft. It can help you scan your hard drive’s file system for lost files. The utility can scan storage devices like HDD, SDD, flash drives, and SD cards with file systems like NTFS, FAT, exFAT, and ReFS.
WinFR came with three recovery modes—Default, Segment, and Signature—when it was first introduced. However, the recovery options have since been boiled down to two: Regular and Extensive.
- Regular mode is a quick scan only for NTFS partitions. There are no limitations on the devices you can scan though. You can recover files from many devices including SSDs, external HDDs, or flash drives as long as they’re formatted as NTFS. Regular mode is best suited when you’re trying to recover files that were deleted only recently.
- Extensive mode performs a more thorough scan and supports NTFS, FAT, exFAT, and ReFS partitions. If you’re trying to recover files from a corrupted or formatted disk, or files that you deleted a while ago, you should use the Extensive mode.
Note: Microsoft recommends using the Extensive mode in most cases, except when you’re recovering recently deleted files from an NTFS partition.
How to Install and Start to Use Windows File Recovery
Windows File Recovery software isn’t similar to using other recovery tools because of one reason—it’s a command-line utility that doesn’t have a GUI. In this guide, we’ll walk you through how to use the Windows File Recovery app for recovering your files within a few minutes.
Installing and using Windows File Recovery software is quick and easy. Following are the steps involved in using Windows File Recovery for recovering deleted files.
Step 1:Download and Install Windows File Recovery
You can download and install the Windows File Recovery utility from Microsoft Store for free.
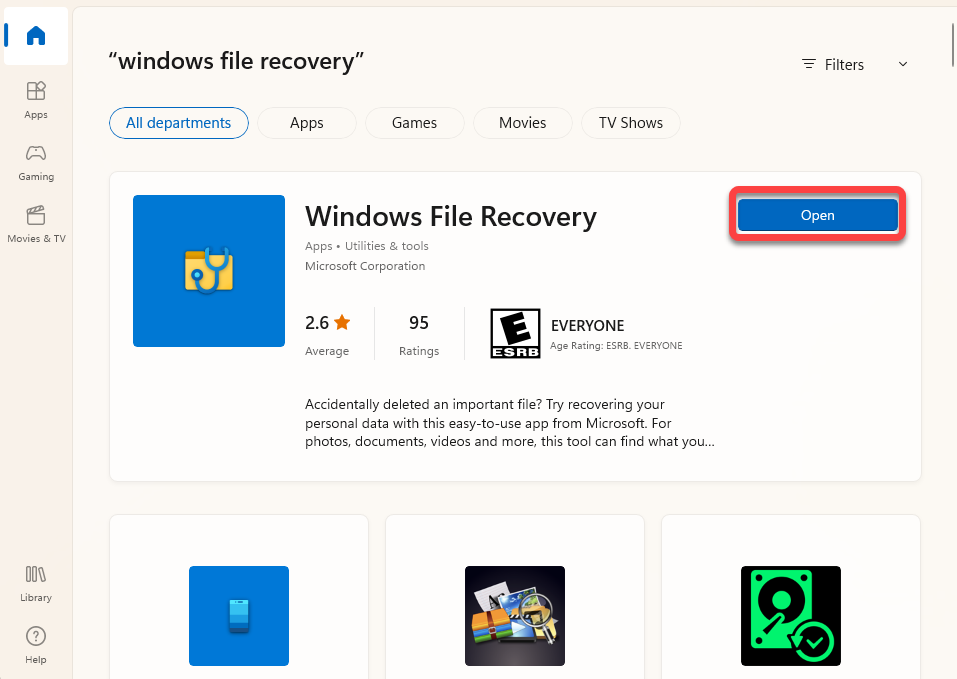
- Once you find the utility in the store, click on the Get button to start installing it.

- Once the download completes, click on the Open button.

You’ll see an elevated Command Prompt window pop up. You can also use the Windows Terminal or PowerShell if you prefer, but be sure to launch them with administrative privileges.
Step 2:Run Windows File Recovery Commands
At this point, you’ll need to execute Windows File Recovery commands to start recovering files on your Windows PC. Here’s the basic format to execute a Windows File Recovery command:
winfr source-drive: destination-drive: [/mode] [/switches]
In this syntax, “source-drive” corresponds to the drive you want to scan for deleted files. The “destination-drive” is where you want to put your recovered files, which should be a different drive from the source drive.
The “mode” refers to how Windows File Recovery should scan your device. You can choose between two basic recovery modes: Regular and Extensive modes.
- Use the /regular mode as a standard recovery option to scan a healthy NTFS system for recently deleted files.
- Use the /extensive mode for a more comprehensive scan and recovery process. Extensive mode is applicable for data loss due to corruption, formatting, and files deleted a long time ago, among other scenarios. This mode is applicable for NTFS, FAT, and exFAT file systems.
Remember that an Extensive scan will take longer than a regular scan. Both modes, however, will try to scan and recover all files in your source location, including hidden files.
The following is an example command for regular mode data recovery:
Winfr C: D: /regular /n \Users\<your_username>\Pictures\
The command above scans and recovers your Pictures folder from the C: drive and places it in the recovery folder on a D: drive. The last parameter, “\Users\<your_username>\Pictures\ “, is the specific location where Windows Recovery Tool would try to find any recoverable files.
But that’s not the only way to search and recover your files using Windows File Recovery. Here’s a table that summarizes the parameters you can use for file recovery:
| Parameter/Switches | Description |
| /n<filter> | Used to scan for specific file names, paths, and wildcards |
| /ntfs | Refers to the NTFS mode, the most optimized mode to scan healthy NTFS drives using the master file table |
| /segment | Refers to the Segment mode, which is used to scan NTFS drive using file record segments |
| /signature | Refers to the Signature mode, which is used to scan all file system types using file headers |
| /a | Used to override user prompts |
| /u | Used to recover undeleted files, for example, from the Recycle Bin. |
| /k | Used to recover system files. |
| /g | Used to recover files that do not have primary data streams |
| /e | Used to disable the default filtering of some file types in the scan results |
You can visit Microsoft’s Windows File Recovery manual to check out their notes for the current version of the app.
How to Look for Specifics
Windows File Recovery offers you a lot of flexibility to scan and recover specific files. Here are some of the templates for scanning your storage device according to your data recovery needs:
- Scan specific folders – If you know where the deleted file was stored, you can add a location filter in the command
Winfr C: E: /regular /n “\Program Files\”. Where the folder name Program Files is enclosed in quotation marks as a rule for names with spaces. - Search for a specific file – If you remember the exact name of the file you want to recover, you can follow this format to find it:
winfr D: E: /extensive /n “Projects\2022\Client ABC.pdf”. - Search for a specific file type – If you don’t remember the name of the file, you can search only for a certain file type. For instance, if you want to search only for MS Word documents, you can use the following command:
winfr D: E: /extensive /n “Projects\2022\*.docx”
If you want to recover more than just one file type, you can add as many of them as you wish. For instance, here’s how you can scan for both Word and PDF files:winfr D: E: /extensive /n "Projects\\2022\\* .docx" /n "Projects\\2022\\*.pdf"
- Search file with a specific text string – Say you remember only a part of the file name but want to narrow down your search to save time. For instance, you know that the file name has the word “client”. Regardless of where the text string is in the file name, you can do so using the following command:
winfr D: E: /extensive /n “Projects\2022\*Client*”.
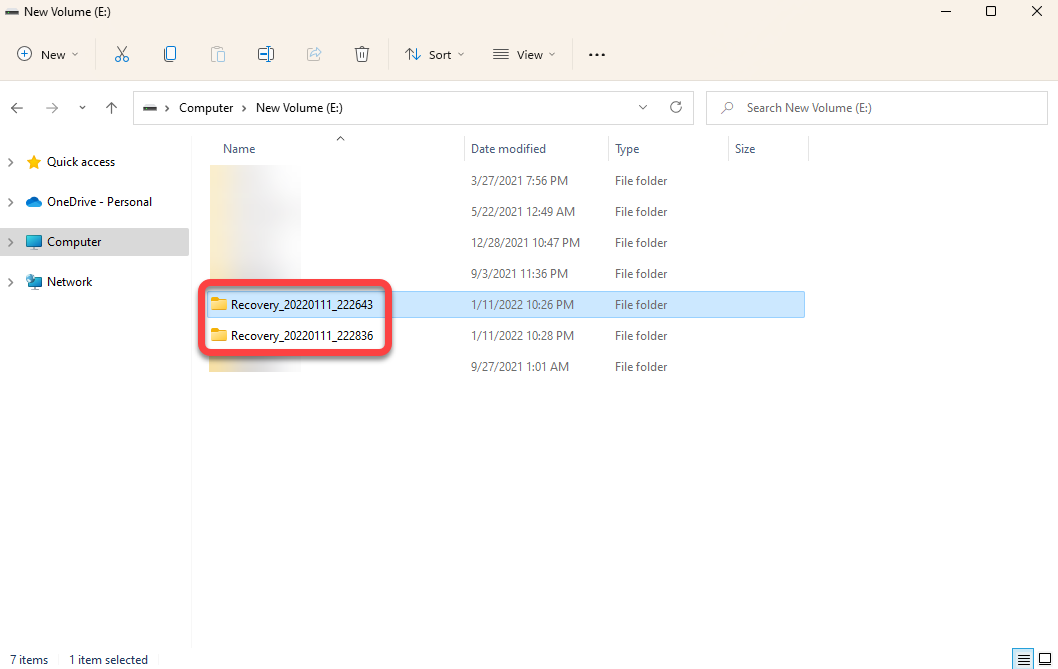
Step 3:Access recovered files
Once the scan completes, go to the destination folder path. You’ll find a folder with a name that starts with the word “Recovery” and that’s where you’ll find the recovered files.
An Alternative of Windows File Recovery
Windows File Recovery is a nifty tool. However, it requires some familiarity with using command-line utilities, which means it’s not all that user-friendly. It also comes with limitations like not being able to run a regular scan for file systems other than NTFS.
A smart recovery tool like Disk Drill can come in handy when you need an easy recovery solution. Plus, you shouldn’t have to search for appropriate commands online when you need to recover files quickly. Disk Drill has a user-friendly interface that can help you recover data. You can recover up to 500MB of data on the free version.
Following are the benefits of using a robust tool like Disk Drill:
- User-friendly GUI
- Supports a large number of file systems and file types
- Intelligent algorithm that scans your devices accurately
- Option to preview files before recovering them
- Built-in features for backup and data protection
Here’s a quick guide on how you can recover files with Disk Drill:
- Download Disk Drill. Once the download is complete, open the installer and follow the prompts to install the app.
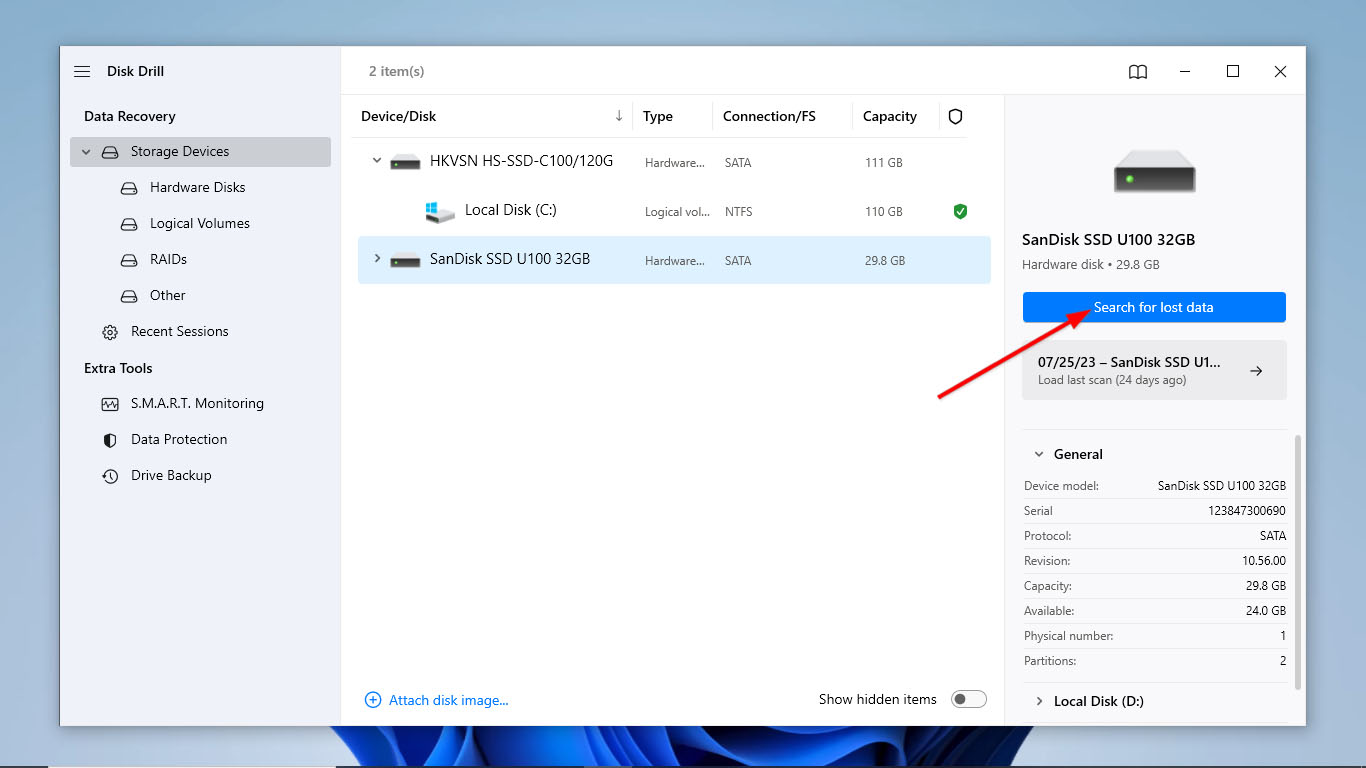
- Now, open the Disk Drill app. The main screen will show you the list of drives you can scan. Pick the drive you want to recover data from and hit the Search for lost data button to begin scanning your drive.

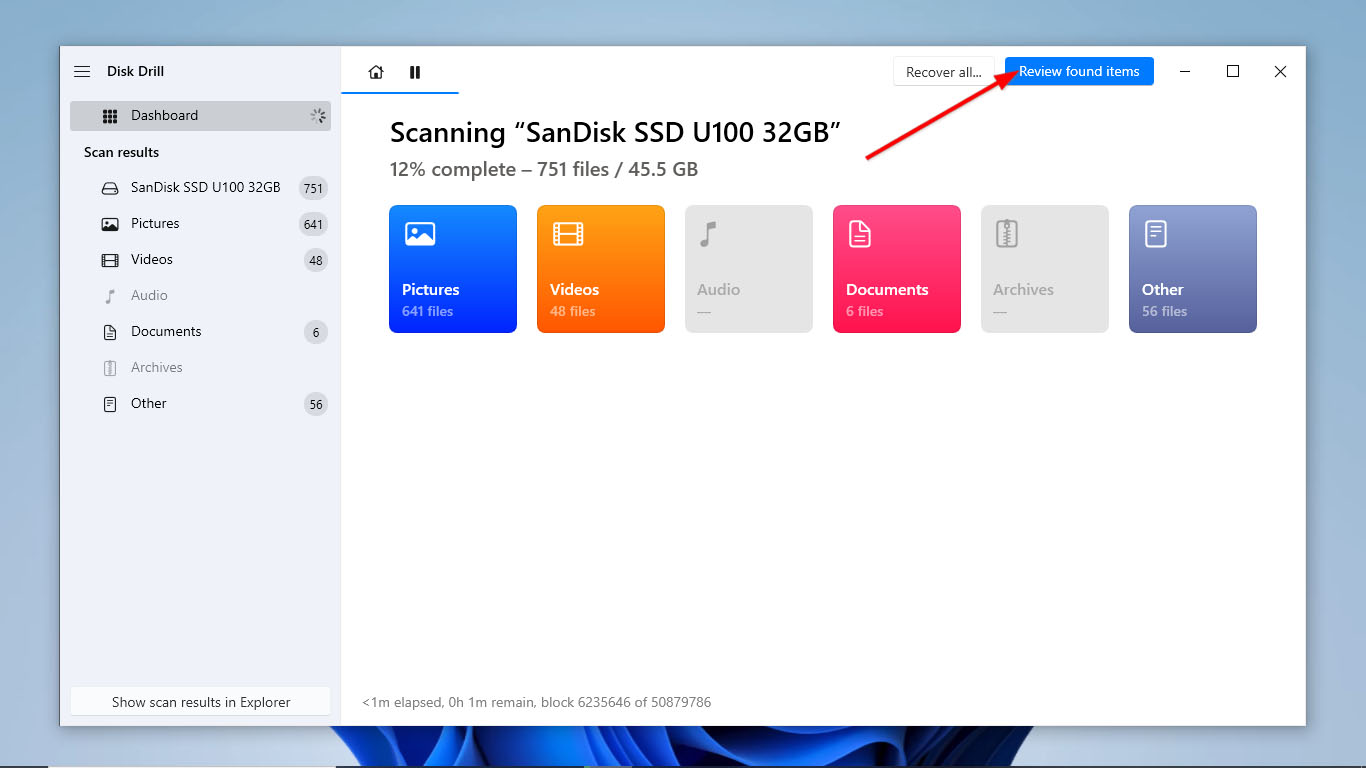
- If you want to see the files Disk Drill has found so far, click the Review found items button at the top-right corner. To let the scan finish first, skip this step and move on to the next one.
- Once the scan finishes, go ahead and click Review found items.
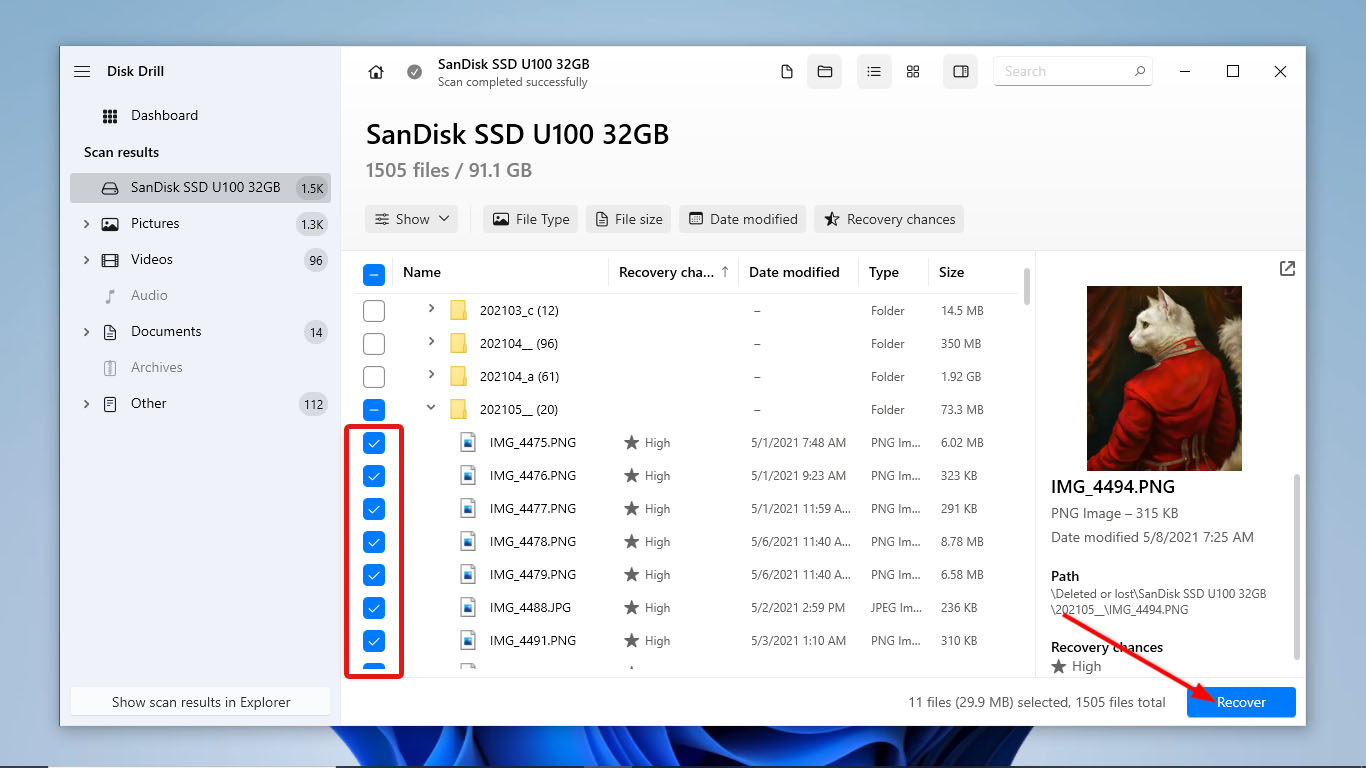
- After that, choose the files you want to recover by ticking the checkboxes beside their file names. Then, click Recover.
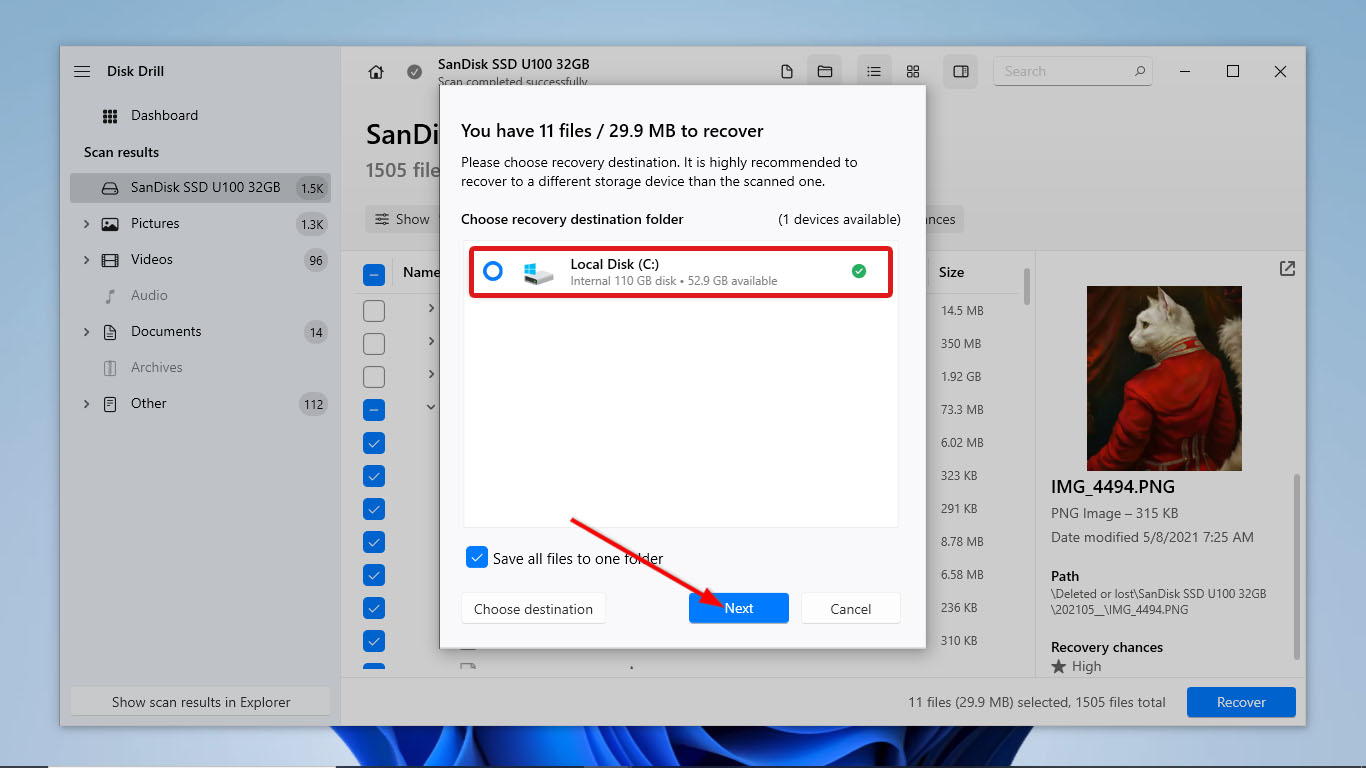
- Upon clicking, Disk Drill will now prompt where you want to place your recovered files. Ensure that your destination drive is different from the one you scanned. After that, click Next to start the recovery process.
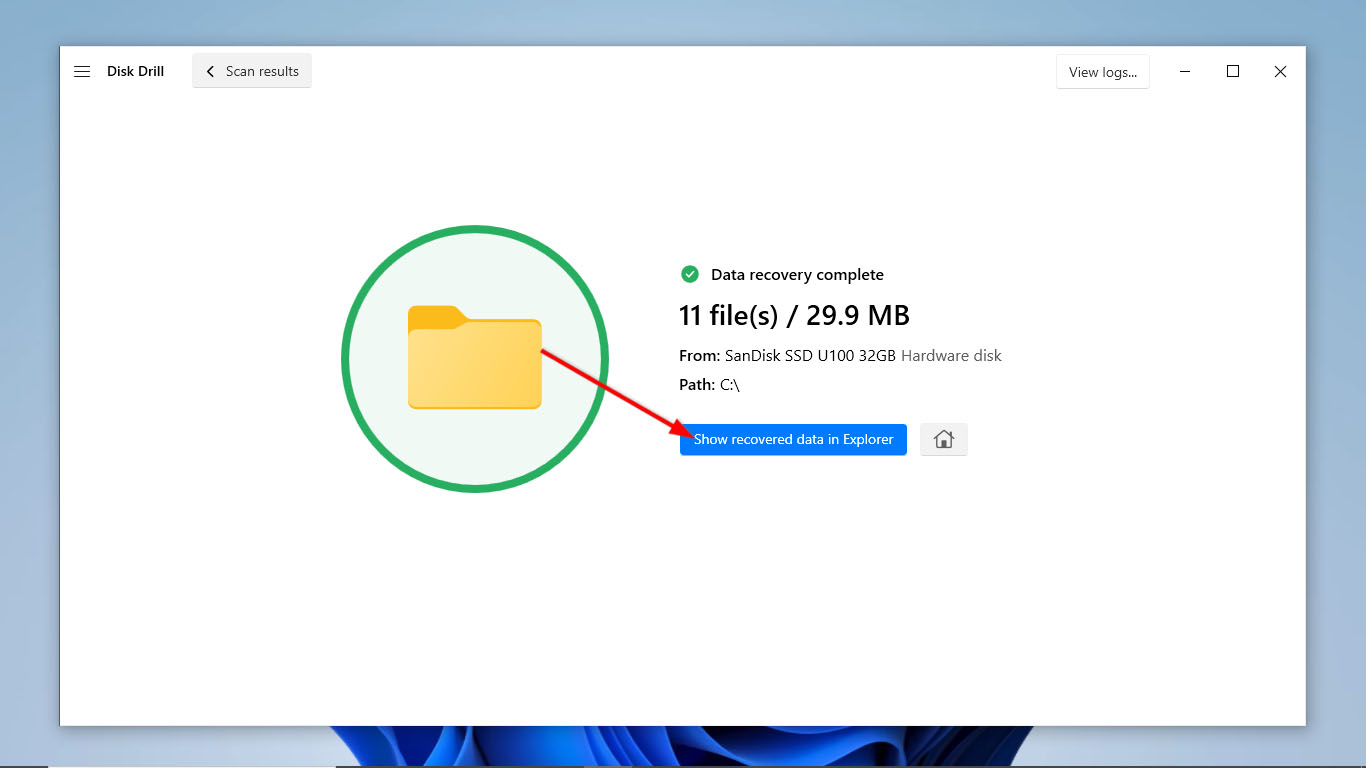
- Finally, Disk Drill will display the details of the retrieved files once the recovery process is complete. Click Show recovered data in Explorer to open your files in File Explorer.
Conclusion
Windows File Recovery Tool is a free tool made by Microsoft to restore deleted files. It runs on a command line interface and has powerful commands to recover everything from deleted documents to critical system files. By understanding what each of their parameters does, you can create a command that suits your specific data recovery needs.
But if you’re seeking a more user-friendly and versatile solution, alternatives like Disk Drill can serve as a great option. With its modern GUI, easy-to-follow recovery steps, and intelligent scanning algorithms, among other extra features, you can perform data recovery easily, even without being tech-savvy.
FAQ
Yes. Windows File Recovery tool is Microsoft’s command line tool that effectively recovers deleted or lost files without the need for third-party software.
Windows File Recovery tool is a fairly reliable tool for data recovery on Windows systems. It has different command and scanning options that you can play with to scan your device according to your needs. However, like any other data recovery tool, its effectiveness still depends on factors like the extent of data loss and the condition of your storage device.
To use Windows File Recovery in Windows 11, follow these steps:
- Open the Command Prompt as an Administrator.
- Type the following command: winfr source-drive: destination-drive: [/mode] [/switches]
Replace source-drive with the letter of the drive you want to scan.
Replace destination-drive with the letter of the drive where you want to save the recovered files.
Use /mode to specify the recovery mode (regular, extensive, etc. depending on your scanning preferences).
Utilize various /switches to customize the data recovery process - Press Enter to execute the command and start the recovery process.
Note that this information is based on Windows 11 at the time of writing. Updates and changes to parameters and functions may have been changed since.
В этой статье мы объясним, как использовать бесплатной утилитой Windows File Recovery в Windows 10, 11 для восстановления случайно удаленных файлов.

Содержание
- Что такое Windows File Recovery?
- Основные функции Windows File Recovery
- Как установить Windows File Recovery?
- Как использовать средство восстановления файлов Windows File Recovery?
- RS Partition Recovery — лучшая альтернатива сегодня.
- Основные преимущества RS Partition Recovery по сравнению с Windows File Recovery
Что такое Windows File Recovery?
Windows File Recovery – это бесплатная утилита от Microsoft для восстановления удаленных файлов с разных типов носителей. Утилита доступна в Windows, начиная с версии 10 2004, устанавливается через Microsoft Store и работает только в режиме командной строки консоли.
Утилита позволяет сканировать файловую систему и находить удаленные файлы. Поддерживается несколько режимов сканирования (таблицы MFT, сигнатуры известных типов файлов и режимов сегментов). Windows File Recovery поддерживает файловые системы NTFS, ReFS, FAT, exFAT и может восстанавливать удаленные файлы с локально подключенных устройств: USB-накопителей, жестких дисков и SSD.
Основные функции Windows File Recovery
Microsoft позиционирует Windows File Recovery в качестве консольного инструмента восстановления данных, который подходит для опытных пользователей. Среди основных функций программы можно выделить:
- Несколько режимов восстановления, таких как «По умолчанию», «Сегмент» и «Сигнатура». О том, какой режим использовать поговорим ниже;
- Поддержка нескольких файловых систем (NTFS, FAT, exFAT и ReFS);
- Поддерживает различные типы файлов для восстановления, такие как фотографии, документы, видео и т.д.;
- Поддержка различных типов жестких дисков: HDD, SSD (есть ограничения из-за использования TRIM), внешние USB-диски и карты памяти;
Как видите, список функций не слишком длинный по сравнению с конкурентными программами. Утилита работает только с Windows 10 версии 2004 (сборка 19041 или более поздней), у нее нет графического интерфейса, поэтому вам придется использовать командную строку.
О том, как установить и использовать Windows File Recovery, читайте ниже.
Как установить Windows File Recovery?
Чтобы установить программу Windows File Recovery, используйте Microsoft Store. Для этого:
- Нажмите значок поиска в левом нижнем углу экрана и в открывшемся окне введите «Microsoft Store«.
В результатах поиска вы увидите магазин приложений Microsoft. Нажмите «Enter», чтобы открыть его.
- В открытом Microsoft Store введите «Windows File Recovery» в строку поиска.
Выберите подходящую программу в результатах поиска и нажмите «Получить».

После этого начнется загрузка программы. Когда загрузка завершится, вы сможете найти программу Windows File Recovery в меню «Пуск».

Обычно новые программы отображаются в разделе «Недавно добавленные»
Как использовать средство восстановления файлов Windows File Recovery?
Как упоминалось выше, Windows File Recovery не имеет графического интерфейса, поэтому для работы с программой придется использовать командную строку.
Итак, как начать пользоваться программой:
- Нажмите правой кнопкой мыши кнопку «Пуск» и выберите «Windows PowerShell (администратор)»
- Шаг 2. В открывшемся окне введите команду «winfr» и нажмите «Enter», чтобы запустить восстановление файлов Windows.


Утилита winfr.exe имеет 3 режима работы:
- Стандартный режим – этот режим использует таблицу MFT для поиска файлов. Этот режим работает, если на диске все еще находятся сегменты записи файла (FRS — сегмент записи файла);
- Сегментированный режим – вместо поиска в таблице MFT выполняется поиск в разных сегментах NTFS на диске. Сегменты — различные атрибуты файла на диске: название, размер, тип, дата и т.д.;
- Режим сигнатур — утилита осуществляет поиск на диске по подписям разных типов файлов (у winfr есть несколько встроенных подписей-сигнатур для популярных типов файлов). Этот режим не подходит для небольших файлов. Это единственный режим, поддерживающий диски с файловыми системами, отличными от NTFS.
В общем, вам нужно ввести такую команду, чтобы восстановить данные с диска:
буква_диска winfr: путь_к_файлу_для_восстановления
Например:
winfr E: D:\Recovered
— в этом примере будет поиск всех утраченных файлов на диске E, и они будут восстановлены в папке D:\Recovered (вы не можете сохранить восстановленные файлы на том же диске, с которого они восстанавливаются).
Указанную папку необходимо создать заранее.
Существуют дополнительные параметры управления восстановлением, которые вы настраиваете сами:
- Параметр /x включает поиск на основе сигнатур и позволяет восстанавливать файлы не только из NTFS, но и из разделов FAT32/ExFAT/ReFS. Это может быть полезно, например, при восстановлении фотографий и других файлов с флешки или карты памяти. Пример команды:
winfr E: D:\Recovered /x
- Параметр /y позволяет установить типы файлов для поиска. Например, чтобы восстановить только JPG и PNG из флэш-памяти FAT32, мы можем использовать команду:
winfr E: D:\Recovered /x /y:JPEG,PNG
- Параметр /n позволяет восстанавливать файлы на основе шаблона в имени файла. Например, чтобы восстановить все файлы, название которых начинается с «re» и имеет расширение .docx или .doc только с диска NTFS, мы можем написать следующую команду:
winfr E: D:\Recovered /n re*.doc*
«Звездочка» может заменить любой символ или набор символов.
С этим же параметром можно восстанавливать файлы только из определенной папки, для этого используйте его так: /n \путь_к_папки\ (не нужно дополнительно указывать букву диска — используется диск, указанный в начале команды) .
Если, например, вы знаете точное название удаленного файла и каталог, где он находился, вы можете установить фильтр, чтобы приложение нашло только нужный файл и восстановило его. Команда восстановления файла будет выглядеть так:
winfr E: D:\Recovered /n \folder_path\filename.txt
Чтобы просмотреть справку о дополнительных параметрах утилиты Windows File Recovery, выполните команду
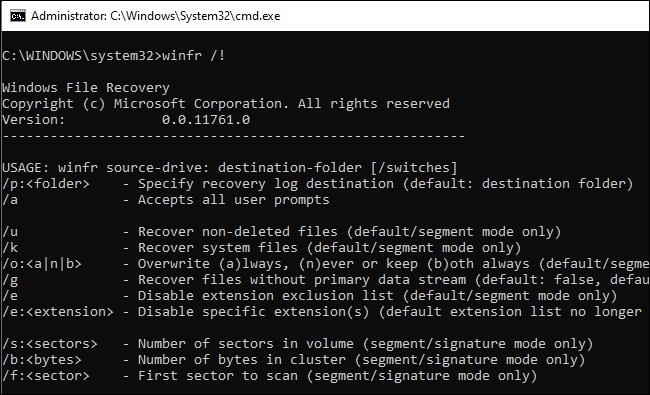
winfr/!

Windows также поддерживает дополнительные параметры, например — /k для восстановления системных файлов, но в текущей документации не указано, как работает этот параметр.
Подробные инструкции Microsoft по утилите восстановления данных доступны здесь: https://support.microsoft.com/en-us/help/4538642/windows-10-restore-lost-files
RS Partition Recovery — лучшая альтернатива сегодня.
Windows File Recovery — хороший продукт, но его можно улучшить. К примеру, пользоваться продуктом очень неудобно из-за отсутствия графического интерфейса. Вводить все команды вручную в Windows PowerShell очень долго и неудобно. Кроме того, вы можете совершить ошибку в командной строке, и команда не будет выполнена, о чем вы получите сообщение. Если это произойдет, вам придется либо искать ошибку в командной строке, либо попытаться ввести команду повторно. Словом, это долго и не всегда имеет смысла.
Посмотреть видео

Восстановление данных с жесткого диска, флешки или карты памяти
Поэтому лучше обратить внимание на сторонние программы восстановления данных. В принципе, их немного, но мы рекомендуем использовать только самые лучшие и проверенные приложения, поскольку это значительно повышает вероятность успешного восстановления файлов.
На сегодняшний день лучшей программой на рынке является RS Partition Recovery. Это объясняется тем, что программа использует расширенные алгоритмы восстановления данных, благодаря которым успешно восстанавливается в 99% случаев. Кроме того, программа проста в использовании и не требовательна к ресурсам компьютера, а наличие графического, интуитивно понятного интерфейса программы позволяет успешно восстанавливать данные даже тем людям, которые не очень разбираются в ПК.
RS Partition Recovery отлично подходит для восстановления файлов после случайного удаления, повреждения логической структуры диска, форматирования , повреждение файловой системы и т.д.
Основные преимущества RS Partition Recovery по сравнению с Windows File Recovery
Как мы сказали выше, RS Partition Recovery является лидером на рынке продуктов для восстановления утраченных данных, и ниже мы объясним почему.
RS Partition Recovery по сравнению с Windows File Recovery имеет следующие преимущества:
- Наличие графического интерфейса, что делает процесс восстановления данных очень быстрым и удобным за счет отсутствия необходимости ввода команд;
- Поддерживает больше файловых систем: exFAT / FAT / NTFS / ReFS / APFS / HFS / XFS / UFS / ReiserFS / Ext2/3/4 / BtrFS / Zfs;
- Поддерживает восстановление данных виртуальных машин;
- Поддерживает Глубокий анализ диска, позволяющий восстанавливать данные, уделенные несколько месяцев назад;
- Поддерживает возможность сохранения восстановленных файлов на FTP-сервер.
Чтобы не быть голословным, мы рассмотрим процесс восстановления утраченных файлов по сравнению с Windows File Recovery.
Шаг 1.
Установите и запустите программу
RS Partition Recovery.
Шаг 2.
Выберите диск или раздел, с которого вы хотите восстановить данные.

Шаг 3.
Выберите тип анализа.

Быстрое сканирование, которое следует использовать в случае недавней потери файла. Программа быстро просканирует диск и покажет файлы, доступные для восстановления.
Функция Полный анализ позволяет вам найти потерянные данные после форматирования, изменения размера диска или повреждения файловой структуры (RAW).
Шаг 4.
Предварительный просмотр и выбор файлов для восстановления.

Шаг 5.
Добавьте файлы, которые хотите сохранить, в «Список восстановления» или выберите весь раздел и нажмите Восстановить.

Следует отметить, что лучше сохранить восстановленный файл на внешний жесткий диск или USB-накопитель.
В Windows File Recovery, чтобы восстановить определенный файл, вам придется применить различные атрибуты, и все это делается из командной строки.
А на самом деле вы можете восстановить файл только несколькими щелчками мыши.
Часто задаваемые вопросы
К сожалению, Windows File Recovery распространяется только через Microsoft Store. Поэтому даже если вы найдете программу в другом месте, мы настоятельно рекомендуем вам не использовать ее, поскольку она может содержать вирусы или шпионское программное обеспечение.
Не обязательно вводить все команды вручную. Вы можете использовать функцию копирования/вставки. Вы также можете использовать комбинации клавиш Ctrl+C (копировать), Ctrl+V (вставить). Использование комбинаций клавиш значительно ускоряет процесс работы с Windows File Recovery.
К сожалению, Windows File Recovery пока не имеет графического интерфейса. Поэтому работать с программой можно только с помощью командной строчки.
Нет к сожалению. Windows File Recovery работает только с файловыми системами NTFS, ReFS, FAT, exFAT.
Да. Благодаря функции глубокого анализа диска RS Partition Recovery может восстановить даже файлы, которые были удалены несколько месяцев назад.
Quick Links
-
What is Windows File Recovery?
-
How to Install Windows File Recovery
-
How to Recover Deleted Files on Windows 10 and Windows 11
-
Which Recovery Mode Should You Use?
-
How to Recover a File in Default Mode
-
How to Recover a File in Segment Mode
-
How to Recover a File in Signature Mode
Ever accidentally deleted a file and then realized you needed it? Or had a drive experience some kind of corruption? Microsoft’s Windows File Recovery tool may be able to bring back your lost files — here’s how to use it.
What is Windows File Recovery?
Windows File Recovery is a program created by Microsoft designed to recover files that have been deleted. Windows File Recovery tool doesn’t have a graphical interface — it’s only a command-line utility. We’ll show you how to use it, but it’s a more hands-on process than you might expect from an official Microsoft utility available in the Microsoft Store.
This tool requires you’ve installed Windows 10’s May 2020 Update or newer, or any version of Windows 11. It doesn’t run on older versions of Windows.
Whether Microsoft’s tool can actually find and recover a file you’ve deleted depends on the drive. Deleted files aren’t removed from hard drives immediately, but they often are removed from solid-state drives immediately. If you’ve written a lot of data to a device like an SD card since you’ve deleted the file, it’s likely that the file’s data may have been overwritten.
Even if you manage to recover a file, you may only get some of the file’s data — the file may be corrupted. You can only get whatever data is still on the drive. There are no guarantees here, and that’s why backups are so important.
The utility also has multiple modes intended for different situations and file systems. We’ll explain which you should use and how to use them.
How to Install Windows File Recovery
To get started, install the Windows File Recovery tool from the Microsoft Store to get started. You can open the Store and search for «Windows File Recovery» or just click that link to open the Store.

Once it’s installed, open your Start menu and search for «File Recovery.» Launch the «Windows File Recovery» shortcut once and click «Yes» to the UAC prompt.
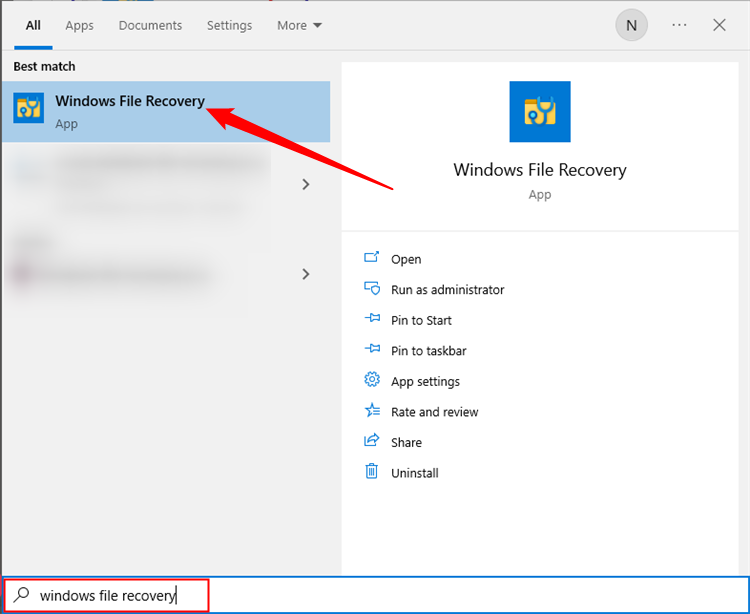
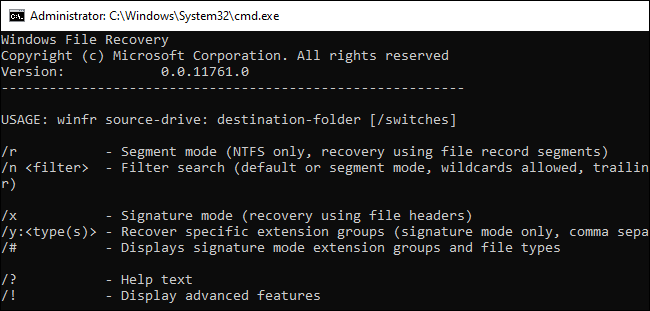
You’ll see a Command Prompt window with Administrator access. This is where you’ll run the File Recovery commands.
You can use other command-line environments like the Windows Terminal and PowerShell, but be sure to launch them with Administrator access. (In the Start menu, right-click the one you want to use and select «Run as Administrator.»)
How to Recover Deleted Files on Windows 10 and Windows 11
To use Windows File Recovery, you will run the winfr command, specifying the drive you want to search for the deleted file, the destination you want to save it to, and the various switches that control what the tool searches for and how it searches. You must save the deleted file to a different drive.
Here’s the basic format:
winfr source-drive: destination-drive: /switches
After running the command, the tool will automatically create a directory named «Recovery_[date and time]» on the destination drive you specify.
Which Recovery Mode Should You Use?
Before you continue, you should determine the «mode» you want to scan for the deleted file. There are three modes: Default, Segment, and Signature. Default is the fastest mode, while Segment is similar but slower and more thorough. Signature mode can search for files by type — it supports ASF, JPEG, MP3, MPEG, PDF, PNG, and ZIP files. (Searching for «ZIP» files will also find Office documents stored in formats like DOCX, XLSX, and PPTX.)
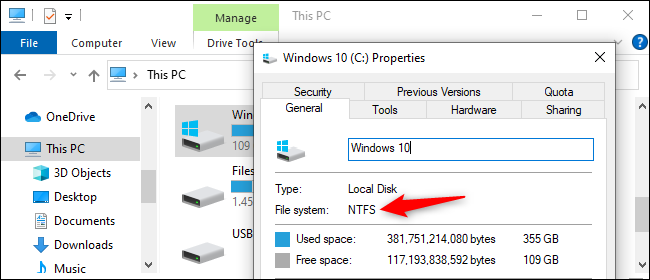
You’ll need to know what file system the drive you’ll be scanning is formatted with. To find this, open File Explorer, right-click the drive under This PC, and select «Properties.» You’ll see the file system displayed on the «General» tab.
Here’s when you should use the different modes:
- Are you trying to find a file you recently deleted on a drive formatted with NTFS, which is the default Windows 10 and 11 file system? Use Default mode.
- If you’re scanning an NTFS drive in another situation — for example, if you deleted the file a while ago, you formatted the drive, or you’re dealing with a corrupt drive — try Segment mode first and then try Signature mode afterward.
- Are you trying to find a file stored on a FAT, exFAT, or ReFS drive? Use Signature mode. The Default and Segment modes only work on NTFS file systems.
If you’re in doubt, just start with Default mode. You can then try Segment and then Signature if Default mode doesn’t work.
How to Recover a File in Default Mode
To use the default mode, you use /n followed by a search path:
-
To search for a file named document.docx, you’d use
/n document.docx. You can also specify a full path to the file, such as/n UsersBobDocumentsdocument.docx -
To search for all files that were in the Documents folder if your username is Bob, you’d use
/n UsersBobDocuments. -
To search with a wildcard, use a *. For example
/n UsersBobDocuments*.docxwill find all DOCX files there were in the Documents folder.
Let’s put that all together now. To search for all DOCX files on drive C: and copy them to drive D:, you’d run the following command:
winfr C: D: /n *.docx
You will have to type «y» to continue.
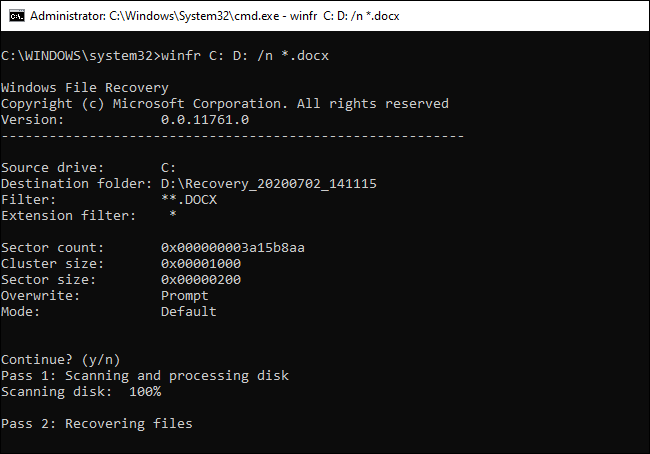
As we mentioned above, you’ll find the recovered files in a directory named «Recovery_[date and time]» on the destination drive you specified in the command line.
To find all files with a word in their name, use wildcards. So, to find all documents with «project» anywhere in their name, you’d run:
winfr C: D: /n *project*
You can specify multiple searches with multiple /n switches. So, to find all Word, Excel, and PowerPoint files, you’d run the following:
winfr C: D: /n *.docx /n *.xlsx /n *.pptx
To search for a specific file named important_document.pdf that was in the Users/Bob/Documents folder on drive C: — and then save it to drive D: —you’d use:
winfr C: D: /n Users/Bob/Documents/important_document.pdf
How to Recover a File in Segment Mode
Segment mode works almost exactly like Default mode. To use segment mode, which examines file record segments, you use /r in addition to /n .
In other words, you can construct Segment mode recovery commands in the same way you construct Default mode commands—just add the /r .
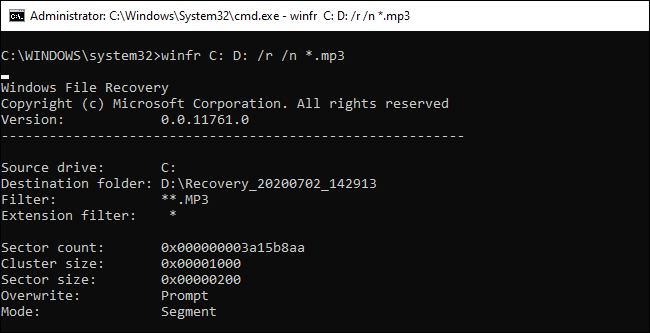
For example, to recover all deleted MP3 files from your C: drive and save them to your D: drive, you’d run:
winfr C: D: /r /n *.mp3
So, if a Default mode search doesn’t find what you’re looking for, add the /r and try again.
How to Recover a File in Signature Mode
Signature mode works a bit differently. It examines file types, so it can only find deleted files of certain file types. To use Signature mode, you use /x to specify Signature mode and /y: to list the file type groups you’d like to search for.
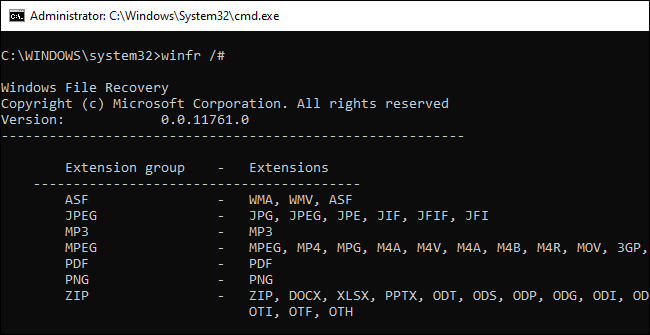
Here’s a list of supported file types and the groups they’re sorted into, taken from Microsoft’s documentation:
- ASF: wma, wmv, asf
- JPEG: jpg, jpeg, jpe, jif, jfif, jfi
- MP3: mp3
- MPEG: mpeg, mp4, mpg, m4a, m4v, m4b, m4r, mov, 3gp, qt
- PDF: pdf
- PNG: png
- ZIP: zip, docx, xlsx, pptx, odt, ods, odp, odg, odi, odf, odc, odm, ott, otg, otp, ots, otc, oti, otf, oth
Note that the «ZIP» group includes ZIP files in addition to Microsoft Office and OpenDocument documents.
You can pull up this list at any time by running the following command:
winfr /#
Let’s say you want to search drive E: for images in JPEG format and save them to drive D:. You’d run the following command:
winfr E: D: /x /y:JPEG
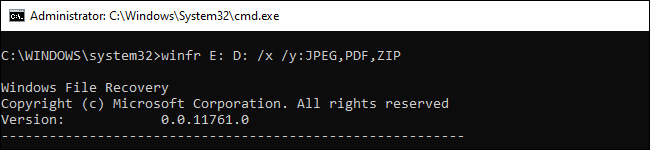
You can specify multiple file groups by separating them with a space. So, if you want to find JPEG files, PDFs, and Word documents, you’d run:
winfr E: D: /x /y:JPEG,PDF,ZIP
More Help With winfr
More information is available on Microsoft’s official winfr documentation page. You’ll find a detailed list of all winfr ‘s command-line options on that page, too.
For a refresher on the basics, just run winfr or winfr /? .
There are also additional advanced options you can see by running winfr /! .
If you’ve lost an important file or folder due to system failure, corrupted hardware, human error, or virus attack. Fret not, as we’re here to help you out! With the help of the right file recovery tool, you can instantly retrieve different types of files on your computer. If you have created a backup for your files, you needn’t worry, but what if you have no backup? Then, you need to get one of the best paid & free file recovery software for Windows 11/10.
How does file recovery software work?
In situations where you cannot use System restore or backup files, an advanced tool comes to the rescue. The data restoration software works on smart algorithms to find the principal structure of the storage disk. Later they locate and process the lost files. File recovery tools search for traces of deleted files on your computer and bring back your invaluable files.
Note: If you have lost your file, it is advised not to perform the copy, move and cut operations on the drive, as the deleted data could be overwritten and therefore becomes hard to recover.
Our Top 3 Choices – Must Try File Recovery Tools For Windows
Advanced File Recovery
|
Best Choice |
|
Advanced Disk Recovery
|
Best Choice |
|
Stellar Data Recovery Professional
|
Best Choice |
13 Best Free File Recovery Software for Windows 10 (2024)
We will review the best file recovery software for Windows 11, 10 & 8 OS with their features, price, pros, cons & more.
1. Advanced File Recovery

Advanced File Recovery is a powerful yet convenient tool to recover all types of files from formatted and unbootable drives. It supports several file formats for videos, photos, documents, audio, etc. It’s a reliable file/folder recovery tool for Windows to get back lost, missing, or deleted data in a couple of steps. It works flawlessly on hard drives, USB flash drives, SD cards, and other external storage devices.
HIGHLIGHTS: Advanced File Recovery
- Multiple modes for scanning different file types.
- Supports hundreds of videos, audio, image, document, and other file formats.
- Works on emergency data recovery due to virus attacks and system failures.
Pros
- Easy to navigate and user-friendly interface.
- Quick and Deep scan modes.
- Quick recovery options.
- Location selection is available.
- Preview files before recovery.
Cons
- This is limited to Windows OS only.
Price – Free trial, $69.95
File Size – 7.8 MB
Compatibility – Windows 11, 10, 8.1, 8 (32 & 64 bit)
2. Advanced Disk Recovery

Want to get back your permanently deleted files from your hard drive or removable drive, then your search is over. Advanced Disk Recovery is a recommended file recovery software that can swiftly recover your lost files. It offers a straightforward interface that makes it a reliable choice for both newbies & pro users. It also allows you to suspend a search (Deep Scan) for some time and save it. You can resume the session whenever you want. Read the Advanced Disk Recovery Review in detail.
HIGHLIGHTS: Advanced Disk Recovery
- A simple interface makes it easy for distressed users to get their files back.
- The tool can recover it all, be it a small text file or a video, a photo, or any other document.
- Comes with two types of scans: Quick and Deep Scan, for you to choose per your needs.
Pros
- Fastest scanning engine.
- Review before recovery.
- High compatibility with almost all types of file formats.
- Supports both Internal & External storage devices.
- Can recover files lost due to human error or corruption.
Cons
- Cannot be categorized as a con, but a limitation of being compatible with Windows OS only.
Price: Free/$39.95 Per Year (After Discount)
File Size: 4.4 MB
Compatibility: Windows 11, 10, 8.1, 8, 7, Vista, and XP (Both 32-bit and 64-bit)
3. Stellar Data Recovery Professional

One of the best file recovery software, Stellar Data Recovery Professional, enables you to recover your data from laptops, computers, external hard drives, and more effortlessly. This amazing tool allows you to create an image of an entire disk, logical partitions in the hard disk, or other removable drives, which helps a speedy recovery. To know more about this recovery tool, let us discuss the features in detail:
HIGHLIGHTS: Stellar Data Recovery Professional
- The tool recovers any type of file by using the file signature.
- After the Scan, it shows all the deleted files in a tree view to preview the files you want to recover.
- Retrieve files from corrupt, scratched, or partially burnt optical media along with the original name and folder structure.
Pros
- Deep & accurate scan to find lost/deleted files.
- Can recover files from Encrypted disks.
- The preview feature lets you know which files can be recovered.
- Option to Scan particular folders.
- A free version can recover up to 1 GB of data.
Cons
- The interface may seem overwhelming for novice users.
Price: Free/$89.99 Per Year
File Size: 4.7 MB
Compatibility: Windows 10, 8.1, 8
4. EaseUS Data Recovery Wizard Professional

Lost files after an update or upgrade or accidentally deleted files, don’t worry; EaseUS Data Recovery Wizard Professional can help you with that. This recovery tool for Windows 10 quickly brings back your deleted files. The software can restore your files from RAW or inaccessible/RAW partitions or disks. The tool will get your deleted files in just three simple steps. Let’s check out the features:
HIGHLIGHTS: EaseUS Data Recovery Wizard Professional
- Allows you to recover all types of files, be it office documents, videos, photos, emails, text files, and more.
- Retrieves deleted files from formatted, corrupted, crashed, or even infected hard drives.
- Recovers deleted files from emptied the Recycle Bin.
Pros
- Designed to deal with every data loss scenario.
- Easy-to-use & convenient interface.
- Fast & reliable performance to quickly retrieve lost files.
- Has a free trial with up to 2 GB of free data recovery.
- Compatible with both Windows & Mac.
Cons
- The plan seems expensive for some users.
Price: Free/$99.95 Per Year
File Size: 32 MB
Compatibility: Windows 10/8.1/8
5. MiniTool Power Data Recovery

MiniTool Power Data Recovery is an efficient tool that deeply scans hard drives, memory cards, SSDs, etc. to easily find and restore 100+ types of files. This includes photos, videos, documents, songs, emails, archives, and more. As soon as the scanning process gets complete, it’s possible to preview all types of files before restoring them on your PC. With the free version, you can recover up to 1 GB without hiccups!
HIGHLIGHTS: MiniTool Power Data Recovery
- Recovers file types of all kinds, including word docs, images, PDFs, notes, emails, XML, and more.
- Restores permanently deleted files from formatted or corrupted hard drives.
- Get back files lost even after an OS crash or virus invasion.
Pros
- Fast installation & lightweight data recovery tool.
- Can recover an unlimited amount of files in one go.
- Shows multiple attributes like file size, name, path & more.
- Super-fast scanning engine.
- Intuitive UI, suitable for novice users.
Cons
- Cluttered interface.
Price: Free/$89 Per Year
File Size: 2.5 MB
Compatibility: Windows 10, Windows 8, Windows 7
6. Recuva

Lost files or deleted them accidentally? Not to worry, Recuva will help you get your files back in no time. Be it your PC, digital camera, recycle bin, or an MP3 player, you can restore your files, provided they have not been overwritten. Recuva is a tool that keeps your files gone for good. It can be done with a secure overwrite feature that uses industry and military standard techniques to delete. Let’s take a look at the features of Recuva:
HIGHLIGHTS: Recuva
- Recovers pictures, documents, music, videos, and other file types from your hard disk or removable disk.
- Recovers files from damaged or recently formatted drives.
- With advanced deep mode, it searches your drives for traces of the deleted files
Pros
- Clear & straightforward interface.
- Useful Preview screen.
- Fast & effective scanning engine.
- Draws very little processing power.
- Selection of advanced tools like Secure Over writer, Formatted Drive Scanner, etc.
Cons
- Deep scanning can take a lot of time.
Price: Free/$19.95 Per Year
File Size: 4.2 MB
Compatibility: Windows 10, 8, 7, 2008
7. Wise Data Recovery

Wise Data Recovery is the best professional file recovery software that undeletes photos, documents, emails, videos, and more from your hard drive and removable drivers. It supports retrieving data from FAT, exFAT, and NTFS disk. This tool is light on resources and is available on all versions of Windows, from XP to Windows 10. Let’s know more about it.
HIGHLIGHTS: Wise Data Recovery
- Allows you to choose the file types you want to recover before starting the scanning process.
- The Scan for lost files also tells you the possibilities to undelete the lost files.
- The file recovery software comes in a portable version.
Pros
- Fast installation & lightweight data recovery tool.
- Can recover an unlimited amount of files in one go.
- Shows multiple attributes like file size, name, path & more.
- Super-fast scanning engine.
- Intuitive UI, suitable for novice users.
Cons
- Poor customer support.
- Data recovery is possible only on Windows OS.
Price: Free/$39.97 per Year
File Size: 9.44 MB
Compatibility: Windows XP, Vista, Win7/8/10 (both 32-bit and 64-bit
Download here
8. Freeundelete

Yet another deleted files recovery software, Freeundelete, successfully can restore files from your Windows system, including the recycle bin. Also, the recovered files are saved in a different location to ensure the deleted files are not overwritten. Freeundelete is available for free if you want this tool for personal use. You can download and install it on a removable drive and run it to get back your files. Let’s know more about FreeUndelete
HIGHLIGHTS: Freeundelete
- Restores files from NTFS, including file systems FAT32, FAT16, or FAT12.
- Both individual files & entire folders can be recovered.
- Set filters to detect files and folders accordingly.
Pros
- Simplistic user interface.
- Both individual files & entire folders can be recovered.
- Entirely free for Personal use.
- Ad-free data recovery tool.
- Easy to launch scans.
Cons
- No deep scan option.
Price: Free
File Size: Less than 1 MB
Compatibility: Windows 10, 8, 7, XP, 2000, NT 4 (SP2 or higher required), Windows 2003 Server, Windows 2008 Server
9. Disk Drill

Disk Drill is a professional file recovery software that allows you to undelete your files even from emptied Recycle Bin. You need to remember not to perform any operations on the drive from where you have deleted files. With the Recovery Vault data protection and restoration mechanism, the tool ensures you never lose an important file again. It keeps records of deleted files and marks & saves invisible copies of the files in case you want to recover files. Read the Disk Drill Data Recovery Review in detail.
HIGHLIGHTS: Disk Drill
- Be it recovering deleted documents such as word, pptx, excel, photos, gifs, audio or videos, and more, the tool can handle it.
- Supports file systems, including FAT, NTFS, HFS+, and ExFAT file systems.
- Comes with powerful Quick Scan and Deep Scan, lost partition search, catalog rebuild, and other file recovery algorithms.
Pros
- Successfully recovers data from a wide array of disk-based storage devices.
- Recovers data from formatted drives and disk partitions as well.
- Performs quick or deep scans depending on the particular data loss scenario.
- Supports more than 400 file formats.
- Available for both Windows & Mac.
Cons
- Allows you to recover up to 500 MB of data (only) for free.
Price: Free/$89 per Year (For Pro version), $499 (For Enterprise version)
File Size: 17 MB
Compatibility: Windows 10, Windows 8, Windows, Windows 7, Windows Server 2016
10. ADRC Recovery Tool

ADRC Recovery tool is an efficient file recovery software that supports various file systems and drives. The tool has a simple, intuitive interface, making it easy to use. This data recovery software for Windows 11/10 restores files from the disk even if there’s physical damage. Besides this, ARCR Recovery supports copying files from hard disk with bad sectors, perform disk cloning and easily edit and restore your boot parameters. Let’s know more about ADRC Recovery Tool:
HIGHLIGHTS: ADRC Recovery Tool
- Comes with recovery functions with minimum complexities so that people can quickly recover files.
- Gives full control over performing a disk image backup.
- Create and write disk image files to and from hard drives and removable drives.
Pros
- Wrapped in a simple interface.
- View the name, location, size, date of last modification, and integrity of each file.
- Has a module for copying files in a batch from one folder to another.
- Create and write disk image files to and from hard drives.
- Excellent support.
Cons
- Data recovery tool hasn’t received updates for a long time.
- Outdated dashboard.
Price: Free data recovery program
File Size: Less than 1 MB
Compatibility: Windows 10, 8, 7, Windows 95, Windows 2000, Windows XP
11. PC Inspector File Recovery

PC Inspector File Recovery is a data recovery software for PCs that supports file systems including FAT12, FAT16, FAT32, and NTFS. It can recover photos, videos, audio, and documents in a few clicks. What make it a good file recovery software for Windows 11/10 PC? Well, during our tests it didn’t visibly affect other programs or the performance of our computer in any way. Hence, indicates that it works silently in the background, without hampering your current tasks. Let’s take a look at the features of this software:
HIGHLIGHTS: PC Inspector File Recovery
- Retrieves files with original time and stamp.
- Locates partitions automatically, even when the boot sector of FAT is damaged or deleted.
- Recovers files, even if a header entry is not available.
Pros
- Finds lost partitions as well.
- Recovers files with the original time and date stamp.
- Supports almost all popular file formats.
- Free data recovery program.
- Easy to download & setup.
Cons
- Confusing interface and minimal documentation.
Price: Free file recovery software
File Size: 5.8 MB
Compatibility: Windows 10, Windows 8, Windows 7
12. SoftPerfect File Recovery

Another best recovery software for PC, SoftPerfect File Recovery, is a free and simple tool that can help you recover your lost files in no time. It is portable software and can retrieve your data from hard drives, flash drives, SD cards, floppy disks, and other storage devices. It supports the popular file systems such as FAT12, FAT16, FAT32, NTFS and NTFS5 with compression and encryption. Let’s know about this tool:
HIGHLIGHTS: SoftPerfect File Recovery
- Ability to locate damaged, lost or deleted files in a single scan.
- Easily recognises most storage media.
- Run filtered searches for specific files on a specific storage device.
Pros
- Lightweight & free data restoration utility.
- Supports compressed & encrypted volumes as well.
- Portable version is available.
- Works on all popular Windows OS versions.
Cons
- Outdated dashboard.
- No updates haven’t been received for a long time.
Price: Free data recovery utility
Files Size: Less than 1 MB
Compatibility: Windows 10, 8, 7
13. Glary Undelete

Glary Undelete is a recovery software for Windows 11/10 that can undelete files from hard disks, memory cards, SD cards, flash drives, and more. The application even supports features for partition recovery, retrieving unusual file formats, or even long-abandoned media. Glary Undelete even lets you filter the results by search phrase, size, date or recovery state. To know more about Glary Undelete, let’s check out its features:
HIGHLIGHTS: Glary Undelete
- Supports various file systems, including EFS, FAT, NTFS, and FAT, irrespective of being fragmented or encrypted.
- Allows you to filter results according to name, size, creation date, and more.
- The tool is free, powerful, and a simple to use solution.
Pros
- Supports both internal & external storage devices.
- Supports FAT, FAT16, FAT32, NTFS, NTFS5, NTFS + EFS file systems.
- Recovery possible from compressed, fragmented & encrypted files.
- Filter data based on the file name, date, size, etc.
- Can bring back files from an emptied Recycle Bin
Cons
- The current version has one flag on VirusTotal.
Price: Free file recovery utility
File Size: 6.04 MB
Compatibility: Windows 10, 8, 7, XP, Vista
Which is the best file recovery software?
Well, each of the mentioned file recovery tools is one of a kind. But when it comes to choosing the best for you, you must go for the Advanced File Recovery software to securely rescue all your deleted files in a single scan. It quickly undeletes files from laptops, computers, external hard drives, and removable devices, regardless of file type.
So, this is the list of best file recovery software for Windows. Choose any tools to recover files from computers, hard disks, or removable storage devices.
List of Best Data Recovery Software for Windows PC (Best of 2024)
| Product Name | Compatibility | File Size | Price |
| Advanced File Recovery | Windows 11/10/8.1/8/7 | 7.8 MB | Free, $69.95/Year |
| Advanced Disk Recovery | Windows 11/10/8.1/8/7/Vista and XP | 4.4 MB | Free, $39.95 Per Year |
| Stellar Data Recovery Professional | Windows 11, 10, 8 & 7 | 4.7 MB | Free, $89.99 Per Year |
| EaseUS Data Recovery Wizard Professional | Windows 11/10/8/7 | 32 MB | Free, $99.95 Per Year |
| MiniTool Power Data Recovery | Windows 11/10/8.1/8/7 | 2.5 MB | Free, $89 Per Year |
| Recuva | Windows 10, 8, 7, 2008, Vista, XP, 2003 Server | 4.2 MB | Free, $19.95 Per Year |
| Wise Data Recovery | Windows 11/10/8/7/Vista and XP | 9.44 MB | Free, $39.97 per Year |
| Freeundelete | Windows 7, 2000, XP, Vista, 2003 Server or 2008 Server | 1 MB | Free |
| Disk Drill | Windows 11, 10, 8, 7, Server 2016 | 17 MB | Free, $89 per Year |
| ADRC Recovery Tool | Windows 10, 8, 7, 95, 2000, XP | 44.4KB | Free |
| PC Inspector File Recovery | Windows 10, 8, 7 | 5.8 MB | Free |
Which file recovery software would you like to choose to undelete files? Please share your thoughts in the comments section below. Follow us on social media – Facebook, Instagram and YouTube.
Frequently Asked Questions-
Q1. Which Is The Best Free Software To Recover Deleted Files?
Ans: Well, all the choices listed above work amazingly when at their tasks to retrieve lost & deleted data without any hassles. But if you are looking for free software? Choose none-other than Recuva. It can recover files from hard drives, external drives, memory cards & other storage devices.
Q2. Can I Still Recover My Files From Formatted Device?
Ans: The chances are relatively thin, but you can rely on these Best File Recovery Tools for Windows PC to get your lost files back. If you ask us, we recommend trying Advanced Disk Recovery in such a scenario.
Q3. Is SD Data Recovery Possible?
Ans: Here’s a list of dedicated Paid & Free SD Card Recovery Software that can help you recover lost photos, videos, documents, archives & other data. Try these solutions and let us know your experience in the comments section below!