
Whether you are switching from a PC to Mac or just need to transfer some files between the two, there are several ways to go about it. There is a simple way of sharing files using the operating systems’ built-in tools, but some third-party solutions may come in handy. Read on to learn about several go-to methods for sharing files between Mac and Windows.
How to Share Mac Files With Windows Users Using Built-in Tools
Before explaining how to use the systems’ native tools to transfer files, please note this method is only possible if both computers are on the same local network. If this is not the case, feel free to head to the third-party solutions section below.
Set up File Sharing on Mac
For Windows users to access your Mac files, you need to turn on file sharing and enable SMB sharing. Here’s how to do it:
- Click the Apple icon in the upper-left corner of your Mac screen.

- Select “System Preferences.”

- In the “System Preferences” window, click “Sharing.”

- Enable the File Sharing checkbox in the left panel.

- Press the “Options” button.
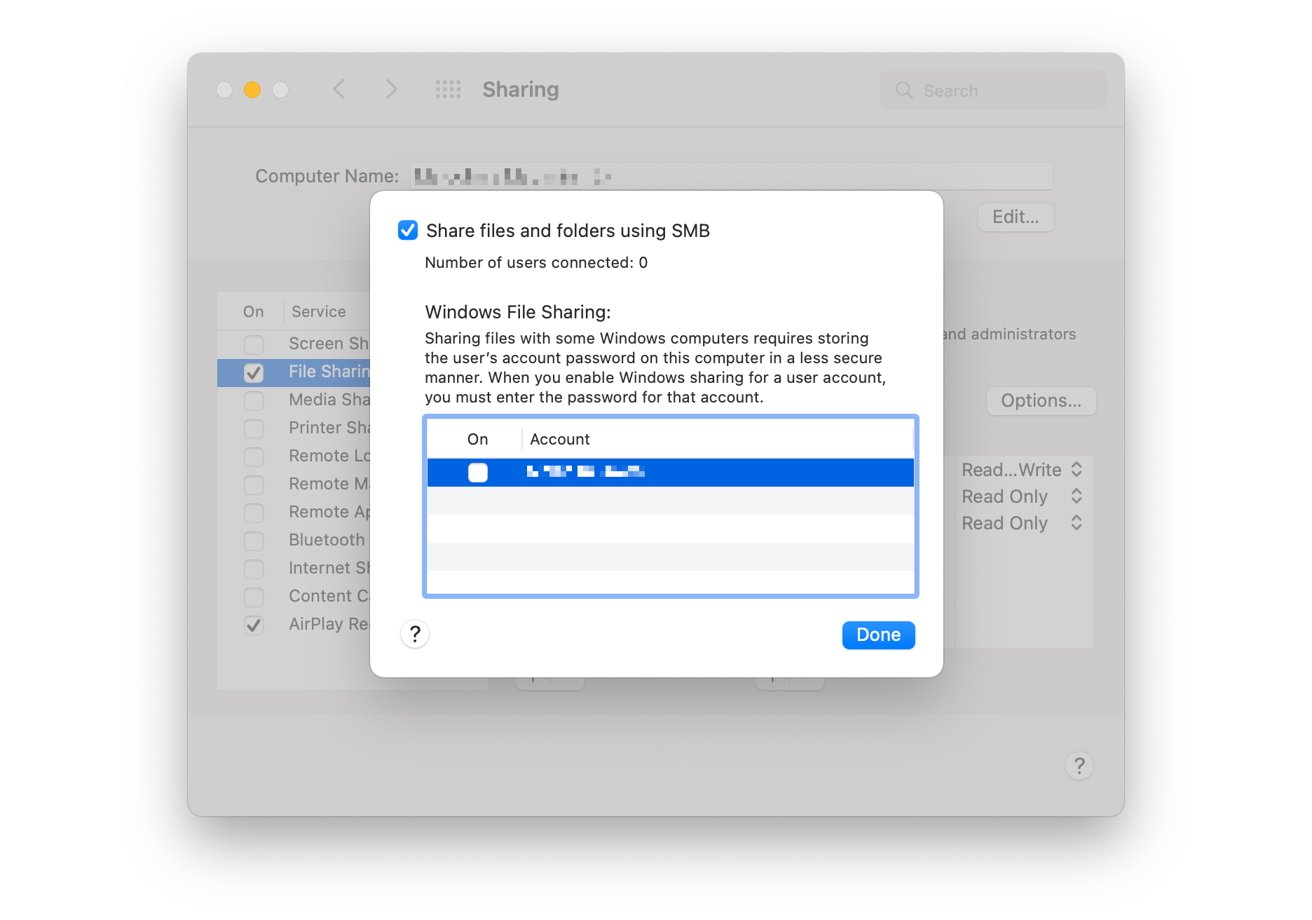
- Go to “Share files and folders using SMB.”

- Select the checkbox next to each user account you want to share files in the Windows File Sharing list.
- Enter the password for each user and click “OK.”

- After you have selected all the necessary users, click “Done.”


Enabling file sharing on Macs follows the same steps in macOS Monterey 12, macOS Big Sur 11.0, macOS Catalina 10.15, macOS Mojave 10.14, and macOS High Sierra 10.13.
Choose What to Share
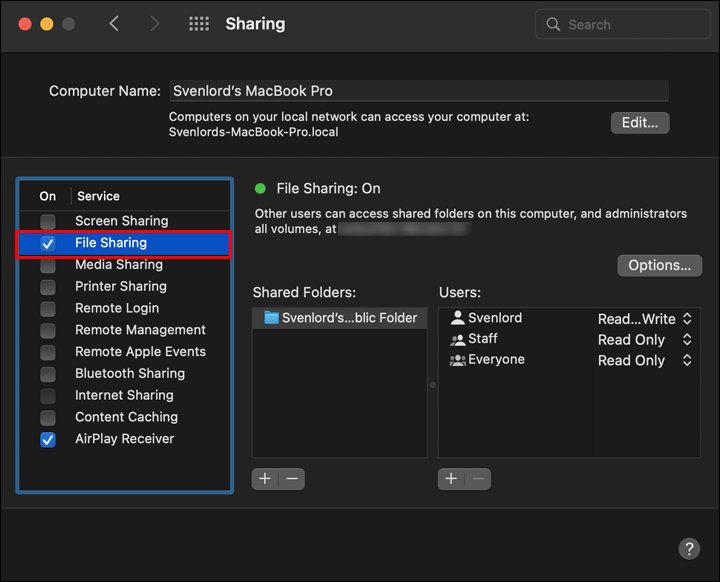
After the file-sharing set-up with the Windows user, you’ll be back on the Sharing window. Choose the folders and users you want to share with them:
- Under Shared Folders, click the “plus” button.

- Navigate to the folder you want to share, select it and click “Add.”

- Repeat steps one and two as necessary.
- Select the shared folder.

- Click the “plus” button under Users.
- Choose the user and click “Select.”


For removing folders or users, use the “minus” button.
Access Mac Files on Windows
Now it’s time to do the actual sharing. Head over to your Windows computer and follow the steps below to transfer files from Mac to Windows:
- Go to the Start Menu and select “Run” or press the “Window+R” shortcut.

- Type your Mac’s IP address and press “OK.”
- Enter your Mac’s username and password in the pop-up window, and click “OK.”

File Explorer will display a folder with files and users you’ve granted permission to access through Shared Folders and Shared Users.
This connecting process to Mac should be identical in Windows XP, Windows Vista, Windows 7, Windows 8, Windows 10, and the latest Windows 11.
Remember to deselect all the user accounts before turning off Windows sharing because the users’ passwords are not stored securely.
How to Share Windows Files with Mac Users using Built-In Tools
Read on if you want to go the other way around and share files from Windows to Mac. The steps are relatively simple and divided into three stages.
Set up File Sharing on Windows
The first stage entails setting up file sharing on your PC. Start with making sure that Network Discovery is turned on in Windows:
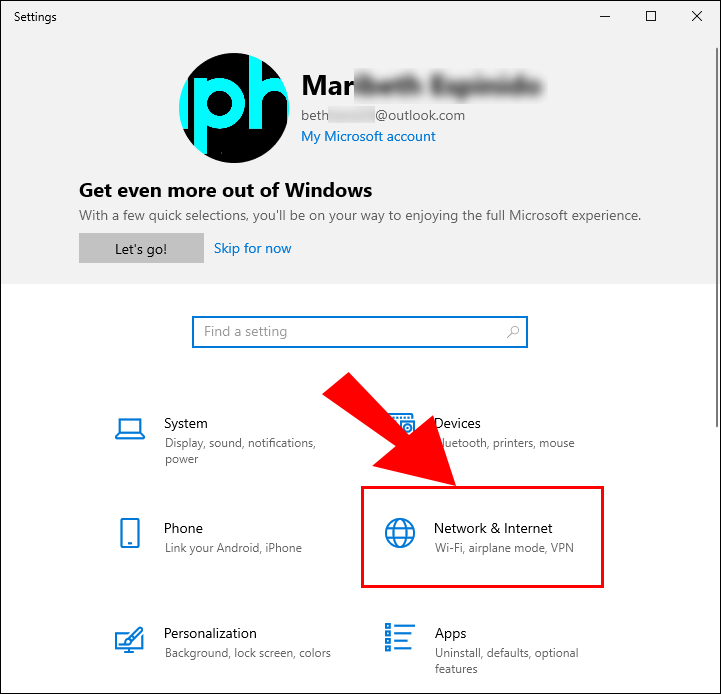
- Open the Settings app.

- Go to “Network and Internet.”

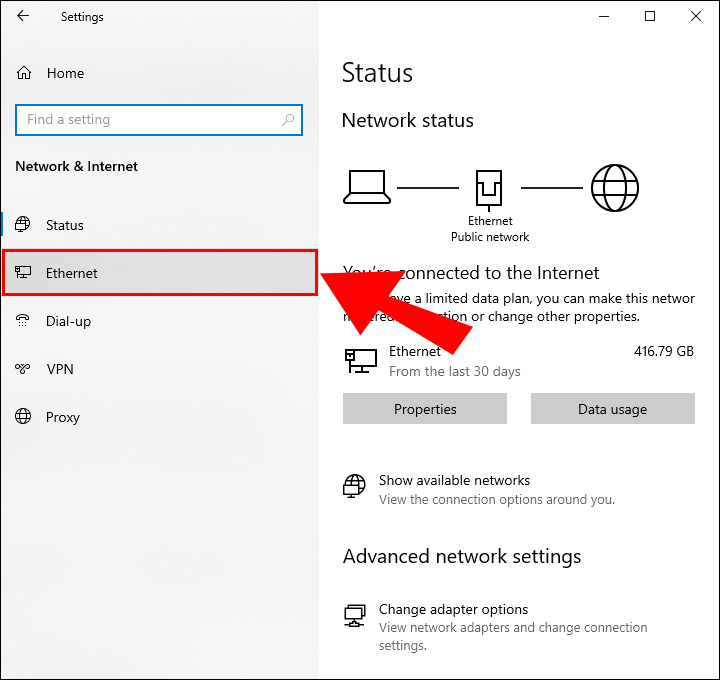
- Select “Ethernet” or “Wi-Fi” from the left panel.

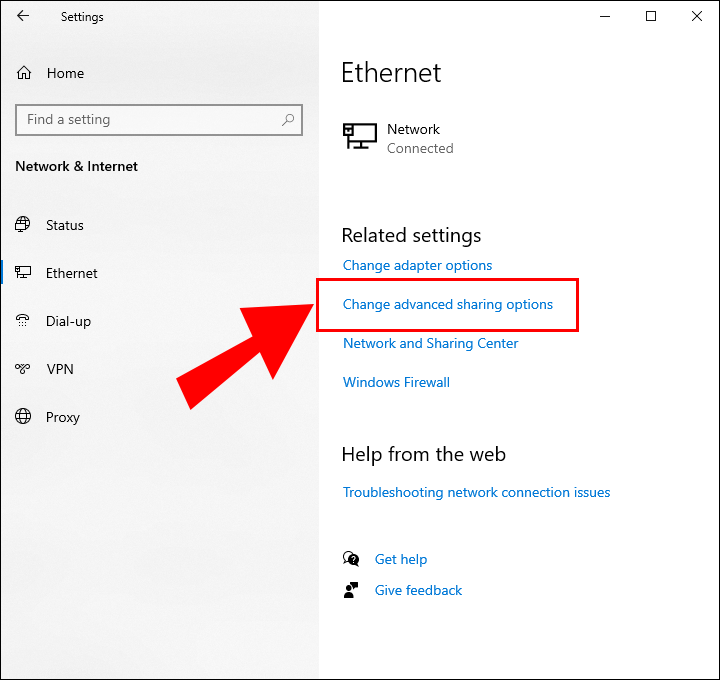
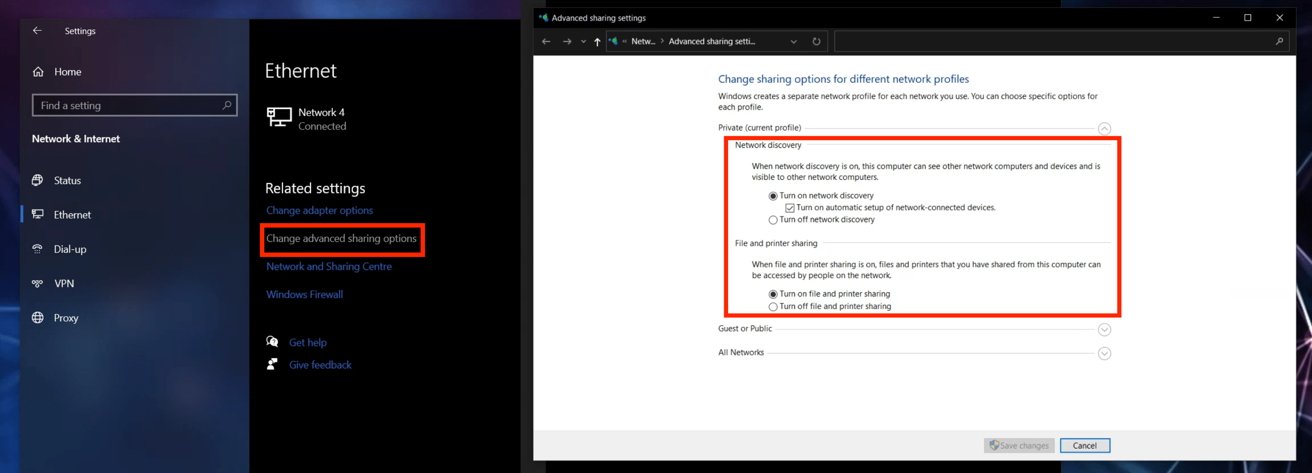
- Press “Change advanced sharing options” located on the right, under Related settings.
- Click on the arrow to expand the Private network menu.
- Tick the checkboxes next to “Turn on network discovery” and “Turn on file and printer sharing.”
- Click on “Save changes.”


Choose What to Share
Now that the PC has been given the green light to share files, choose the files and folders you want to share and follow the steps below for each one:
- Right-click the item and scroll down to “Properties.”

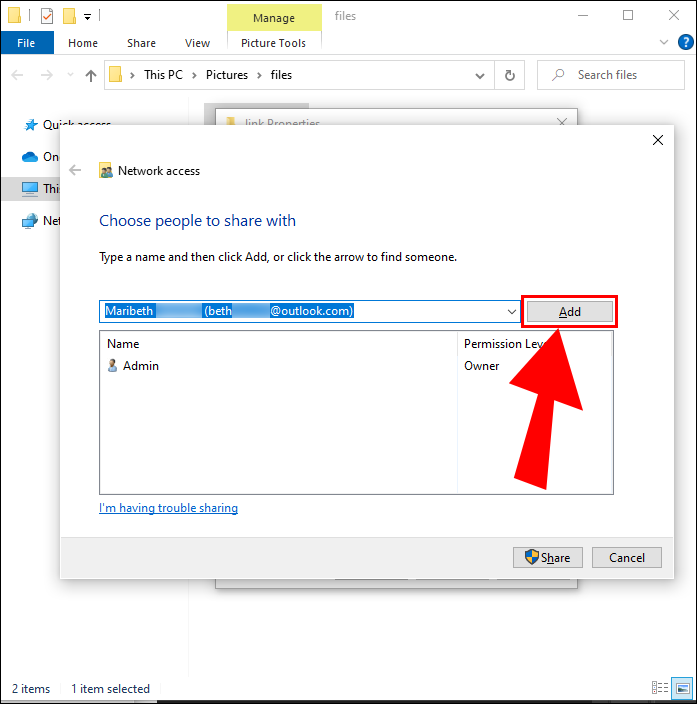
- Under the “Sharing” tab, tap the ”Share” button.
- Choose the user or the group to share the item using the drop-down menu.
- Click “Add.”
- Under the Permission Level, choose “Read” if you only want the user to view and open files. Choose “Read/Write” if you want them also to be able to modify and delete the items.
- Click “Share.”
- Copy the link to the shared folder on the File Sharing window.
- Select ”Done.”


Access Windows Files on Mac
Once you’re all done with choosing the files to share, it’s time to access those files from your Mac:
- Open the Finder app on your Mac.

- In the menu bar on the top of the screen, choose “Go” and scroll down to ”Connect to Server.”
- In the Server Address box, type the network address in either of these two formats:
smb://DNSname/sharename
orsmb://IPaddress/sharename
- Press “Enter.”

- Enter your PC’s username and password in the pop-up window and click “Connect.”


The content you shared from Windows will be available in the Shared section of Finder. To transfer files, just drag and drop them to your desired location.
Third-Party Solutions to Transfer Files Between Mac and Windows
As we’ve explained, it’s smooth sailing if the Mac and PC are on the same local network. If not, there are other ways to transfer your files listed below:
Share Files Using a Cloud Service
If you’re not particularly tech-savvy, this might be your best option.
Most cloud services like Dropbox or GoogleDrive have apps available for Windows and macOS. Plus, they are free and fairly easy to use. Simply install the apps in your system and either copy and paste or drag and drop the desired files onto the cloud drive. The systems will then sync up, and the files will show up on your second system.
Share Files Using a USB Flash Drive
A quick and straightforward way to transfer files between Mac and Windows is using a USB stick. You can move the files and folders onto the stick and plug them into your second system. Just make sure to choose the exFAT file format as it is compatible with both systems. This method works best if you only need to transfer a smaller number of files.
Share Files Using a Portable Hard Drive
If you need to transfer multiple files between Mac and Windows, this is the way to go. They offer different storage capacities, with the most popular being 1TB or 2TB. When using a portable hard drive, also format it to FAT32 to get access for both Mac and Windows OS systems.
Sharing Is Caring
Now that we’ve shared our go-to methods for transferring files between PC and Mac, the rest is up to you. Choose the best option for you and start sharing files to your heart’s content. If both computers share a network, you can keep it in the family and use their built-in tools for file sharing. If not, you can always use a cloud service, USB stick, or portable hard drive.
Have you ever had to share files between Mac and Windows? What method did you use? Let us know in the comment section below.
If you have to work on both a Windows PC and a Mac, you probably have to transfer files between the two. Here’s how to set up file sharing so you can view select folders on the other desktop over your network.
Mac users are unlikely to be sharing their network with just other Macs, and likewise for Windows PC users. In modern work environments and at home, you can generally expect there to be a need for the two to communicate in some way.
This is undoubtedly the case for power users who may have two desktops at home that they use for tasks. One could easily be a MacBook Pro for portable work while the other is a Windows desktop that stays at home.
Accessing the same files across different workspaces on a network has its benefits, including storage savings. Storing files elsewhere means you’re not consuming precious storage on your primary devices, which you could use for other data.
Though you could create a dedicated data store with a network-attached storage device, this could be expensive. A cheaper alternative is to use storage stored on another computer on the network.
This could be either an old computer used as if it’s a file server or if you use two or more computers in daily life, by setting up folders that can be shared and viewable by the other desktop.
Getting this set up can be a bit of a chore, but once done, it will become a valuable time and space-saver.
Regardless of whether you want the Mac or the PC to host the files, there are two phases to pass through. First, you set up the shared folders on the host, and then you set macOS or Windows on the other computer to view the files over the network.
Windows sharing to Mac
Of the two, it is a little harder to set up Windows file sharing to a Mac. Given our discussions with users, it’s also the likelier of the two scenarios you will run into.
Setting up Windows file sharing
First, ensure that Network Discovery is enabled on the Windows PC. To do this, click Start then Settings, followed by Network & Internet.
Click on Ethernet or Wi-Fi, depending on what is available, then Change Advanced Sharing Options.
Under the Private network section, ensure Network Discovery is turned on, with the «automatic setup of network-connected devices» also ticked. Under File and Printer Sharing, make sure that it is turned on, and click Save Changes.
Make sure file sharing is set up on Windows before trying to share files.
Reminder: This is for the Private network profile. Do not do this to the Guest or Public profile.
You can close these windows down.
Open File Explorer and navigate to the folder that you want to share. If you need to create a new folder, right-click within File Explorer in the directory you want it located, and select New then Folder before giving that folder a name.
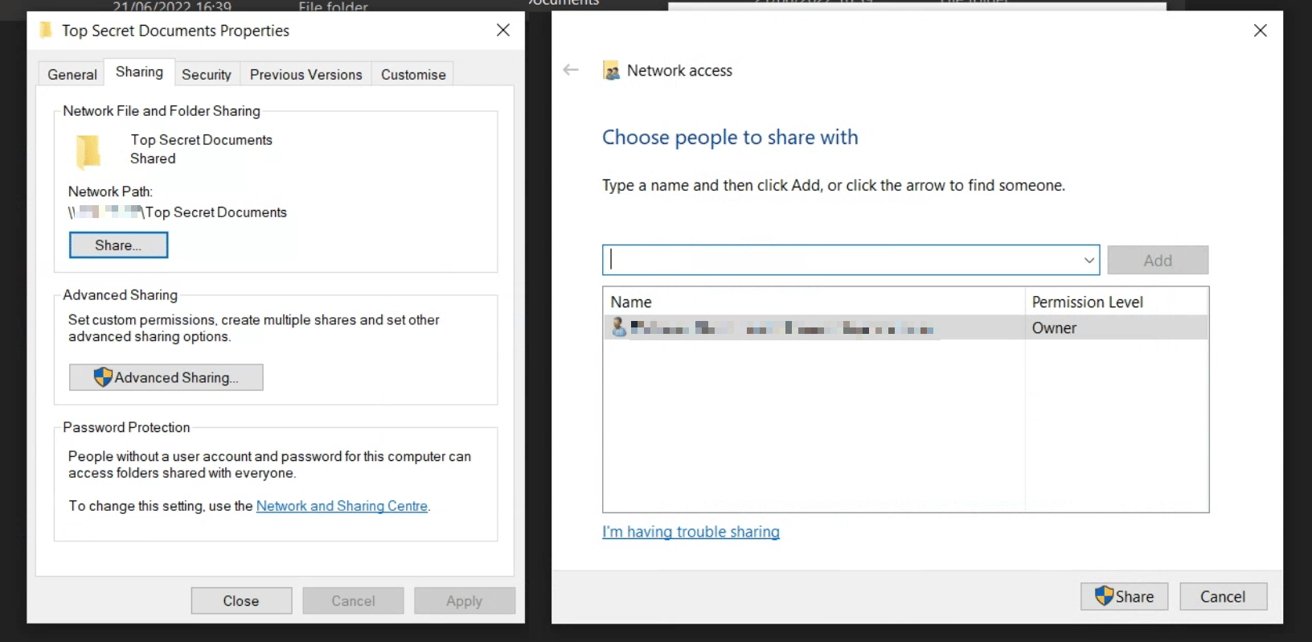
Right-click the folder and select Properties. Click Sharing, then under Network File and Folder Sharing, click Share.
Select user accounts for the Windows PC you want to share the folder with if required, then click Share and Done.
Setting up a folder in Windows to share to the Mac
You could use the Advanced Sharing options to make more advanced changes to the folder’s permissions, such as making it read-only for some users. If it’s just a share for your own usage, there’s no need to go into this section.
After getting the folders set up for sharing, the next bit is to get the other computer to access those folders over the network.
Accessing shared Windows folders in macOS
To open up the shared folders, you will need a few details from your PC first. This includes the IP address and Workgroup of the Windows PC, which can be found within the Network & Internet section of Settings.
You may also need your Windows account credentials.
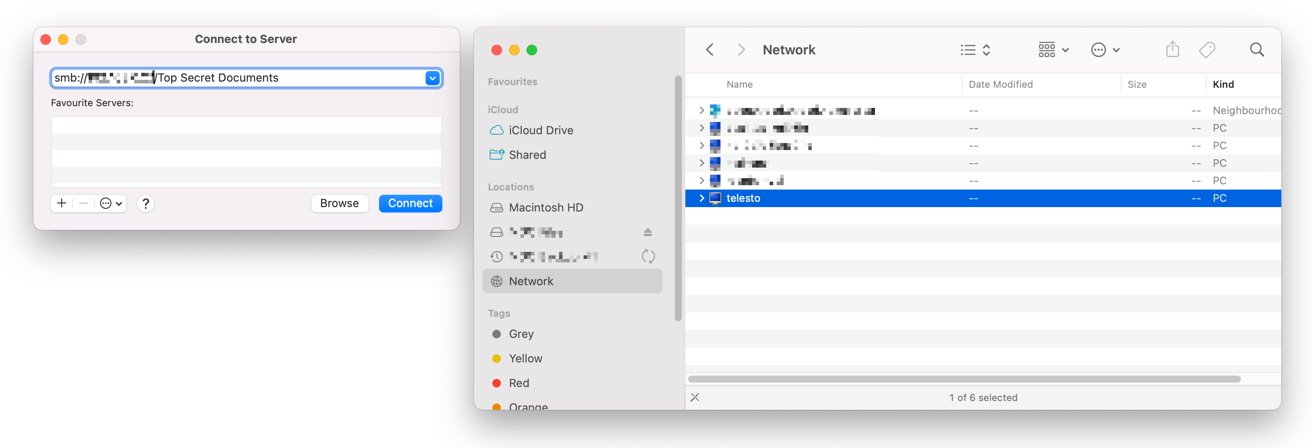
On the Mac, open up Finder, then in the menu, select Go, then Connect to Server.
Once you connect, you can see shared folders from the Windows PC on the Mac.
From the Connect to Server screen, you can first try to find the folder by clicking Browse to bring up the Network window, then selecting the Windows PC name from the list, followed by the shared folder.
Alternately, in the Connect to Server dropdown box, type in smb:// then the DNS name of the Windows PC, then / followed by folder (smb://DNSname/folder) or smb:// then the IP address then / followed by the folder name (smb://IPaddress/folder) into the box, then Connect.
You may be asked for your credentials for the Windows PC to be able to access the folder, including the Workgroup name the PC uses and the account you use to log in.
Once authenticated, you can access the files stored in the folders.
Mac sharing to Windows
This is a little easier to get going, as setting up file sharing on the Mac is a bit simpler overall. Accessing it on the PC is a tiny bit tougher.
Setting up Mac file sharing
In macOS, click the Apple logo in the menu, System Preferences, and Sharing.
Click the tickbox next to File Sharing to enable it, then Options. Tick Share files and folders using SMB.
Enabling SMB for users in macOS
Tick the box next to the user account sharing files to the Windows PC. You will be asked to confirm the user account password. Once accepted, click Done.
Note the information on this page detailing the SMB address you will need in Windows to connect.
Click back to System Preferences, then Network. Select your active network connection, then Advanced.
Under WINS, click Workgroup then the workgroup name for the Windows PC. This will typically be either WORKGROUP or MSHOME by default but can be different for advanced networking setups or at work.
Click OK, then Apply.
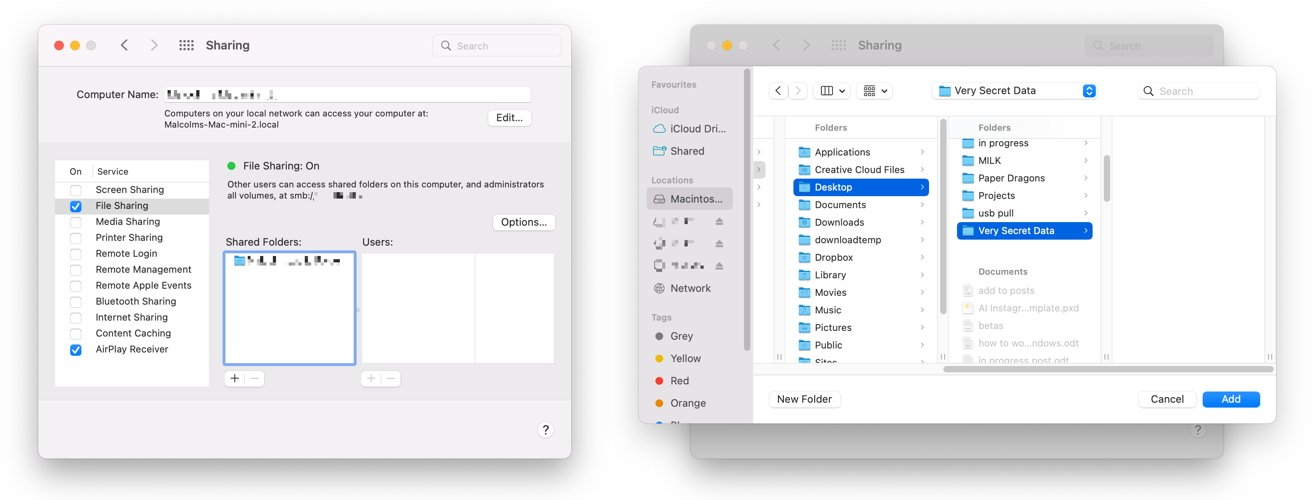
Setting up the shared folder in macOS
Head back to the Sharing menu and, under File Sharing, click the plus under Shared Folders. Navigate to the folder you want to share, then click Add.
You can change the settings for the folder under Users, including which users and groups can access the folder and what they can do with it. This includes reading and writing, read-only access, write-only access, and denying access.
Accessing shared macOS folders in Windows
Open File Explorer and select Network. The Mac should appear in that list. If so, click it and enter the Mac account name and password to access it.
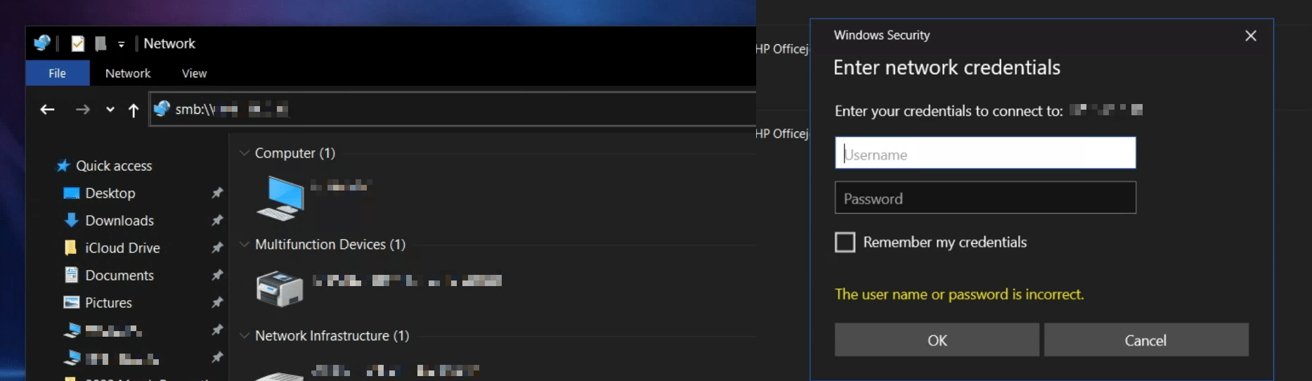
Accessing the shared Mac folder in Windows
If it doesn’t appear, click the address bar, type in \\ followed by the for the Mac, and press Enter. Be aware that you must use backslashes, not forward slashes, for this to work. Under Enter Network Credentials, type in your Mac account credentials and confirm.
Let’s say, you are using Windows PC and wanted to share a folder with your friend who is using Mac. Though emailing or using file transfer apps is an easy option, they have limitations of sharing limited file size. Similarly, using cloud storage services like OneDrive or iCloud also have limitations in size and syncing. The best option is to easily setup file sharing from Windows PC to Mac. This will allow sharing of files, folders, or the entire PC drive. The advantage is that you can quickly add additional folders for sharing or remove permissions instantly.
Here are the requirements for enabling file sharing from Windows and Mac.
- Correct username of your Windows PC
- Enable sharing for required folders in Windows
- Connecting Windows PC from Mac
- Accessing shared folders in Mac
Let us go through these steps in details so that you will not miss any detail. We will use Windows 11 and macOS 12.5 in this article. The process remains same if you are using Windows 10 or other macOS versions with some minor changes in the screen.
1. Getting Username in Windows 11
The first step is to find the username of your account in Windows PC.
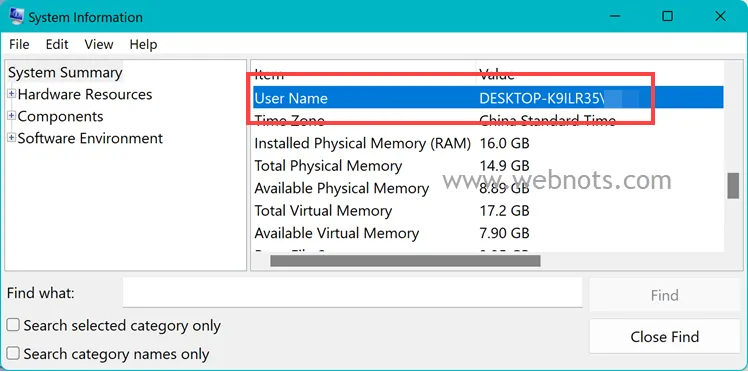
- Click on Windows Search icon in the taskbar and type “system information”.
- You will see System Information desktop app in the results and click on it to open the app.
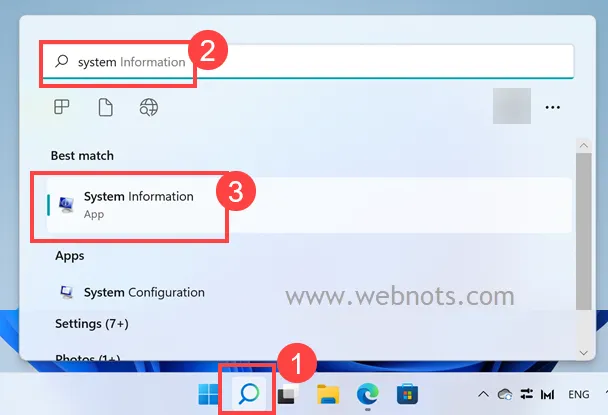
- Check the details on the right pane under “System Summary” section and find “User Name”.
- Alternatively, use the “Find what:” box to type “user name” and click on “Find” button. This will highlight the “User Name” item and note down the value.
2. Share Folders in Windows 11
Next step is to share the required folders on your Windows PC.
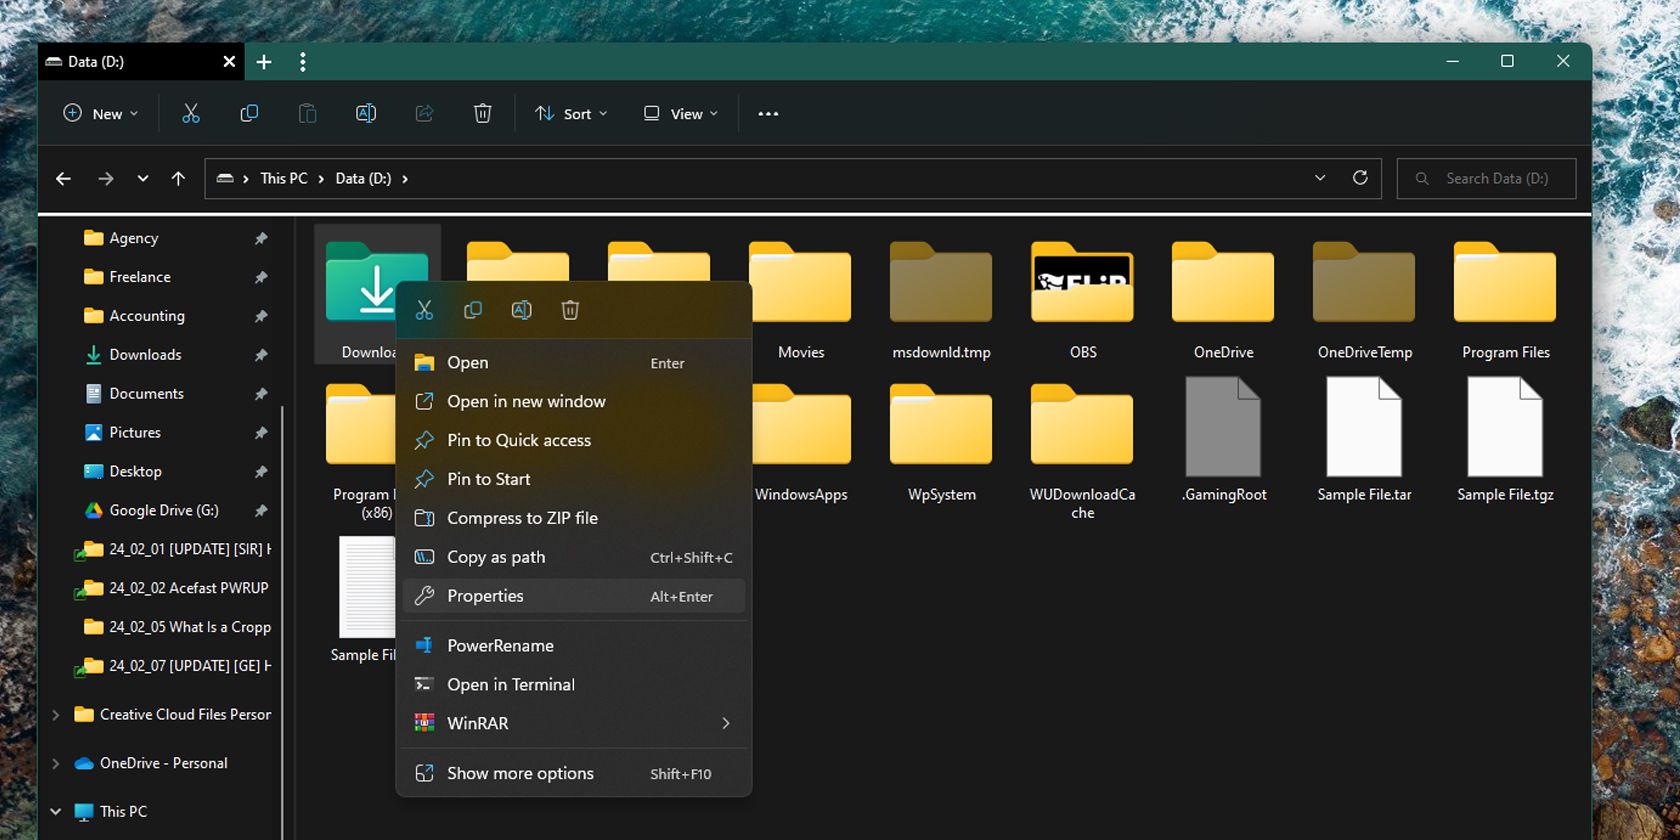
- Right-click on the folder that you want to share and select “Properties” option.
- Go to “Sharing” tab and click on “Share” button under “Network File and Folder Sharing” section.

- On the next screen, select the user account and change the permission level if required. if you set the permission to only “Read”, then you will not be able to edit the shared files on Mac. If you want to edit the shared files on Mac, make sure to select “Read/Write” permission or select “Owner” user for that folder. After selecting user and required permission level, click on “Share” button.

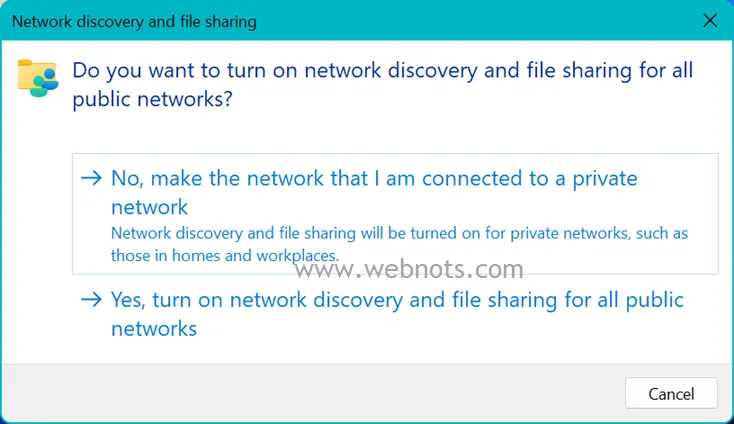
- If your computer’s network discovery turned off, then Windows will prompt you to enable it. Select the private network option to turn on file sharing option.
- You will see a success message “Your folder is shared” and the full path of the shared folder. Note down the full path which you need to use in different format on the Mac for connecting to this folder.

3. Connecting Windows Shared Folder from Mac
Now that you have a folder on Windows Pc, it’s time to access the folder from Mac.
- Go to your Mac and launch Finder app.
- Click on “Go” menu and then select “Connect to Server…” or press “Command + K” shortcut keys.

- Type the correct path of the Windows shared folder in the text box. Here you should type the path starting with smb: and use forward slash (or slash). This is different than the backslash used in Windows. Therefore, make sure to change the slashes and use correct format. Below is example of the paths of shared folder in Windows and Mac.
Windows Path - \\Windows_PC_Name\Users\Username\Desktop\Folder_Path
Mac Path - smb://Windows_PC_Name/Users/Username/Folder_Path
- After entering the correct folder path, click on “Connect” button. You will be prompted to enter the username and password of your Windows user account. Select “Registered User” option, enter the name/password, and click “Connect” button. Check “Remember this password in my keychain” option if you want the Mac to store password in iCloud. We recommend disabling this option unless you frequently connect Windows PC for file sharing.

- You will not see any success message, but Mac will connect the shared Windows folder in Finder app.
4. Access Shared Windows Folder in Mac
Check Finder app and you will see the name of Windows shared folder is mounted. Browse through the folder and copy the required files to Mac.

If you have setup read/write permissions, you can edit and save the files on the shared folder. However, we do not recommend edit Windows files on Mac as this may result in incompatibilities when you open the files again in Windows PC. It is also possible to add additional file in the shared folder from Mac with read/write permission. If you have only provided read permission, then you can neither edit nor add additional files to the shared folder. You will see permission error when trying to edit files.
Note: If you are connecting with Windows administrator account, it is possible to browse through entire PC from Mac though you share only one folder.

Other Sharing Options from Windows to Mac
As mentioned, there are few other options you can use to transfer files from Windows to Mac.
- Simply ZIP and send the folder through email if this is a one-time task.
- Install file transfer apps to send files.
- Use social apps like WeChat or WhatsApp for sending files. Apps like WeChat has a separate built-in File Transfer feature which you can use for sending file from Windows and them access on Mac or mobile.
- Use cloud storage options like OneDrive or iCloud for sharing files from Windows to Mac. For example, you can install OneDrive app on Mac and access synchronized file from all your devices. Similarly, you can use iCloud for Windows for sharing files across Windows and Mac computers.
If required, you can enable file sharing on Mac to share the folders from Mac to Windows PC.
Quick Links
-
Use File Sharing to Transfer Files From a Mac to a Windows PC
-
Use File Sharing to Transfer Files From a Windows PC to a Mac Using macOS
-
Other Ways to Share Files Between Mac and Windows
Summary
- You can transfer files between Mac and Windows using native tools if both devices are on the same network.
- Cloud storage services can sync files across devices over the internet, but may incur subscription fees.
- Consider using external drives or free apps like Resilio Sync for occasional file transfers between devices.
Sharing files between a Mac and Windows PC requires no additional software when they’re connected to the same network. In other cases, you may need to explore alternative options, like paying for a cloud storage service. We explore all the methods below.
Use File Sharing to Transfer Files From a Mac to a Windows PC
If your Windows PC and Mac are connected to the same network, it’s relatively easy to set up and start using file sharing on macOS. We’ll break the process into two sections, one for each OS.
Setting Up File Sharing on macOS
Before accessing Mac files from your Windows PC, you need to set up file sharing on your Mac:
-
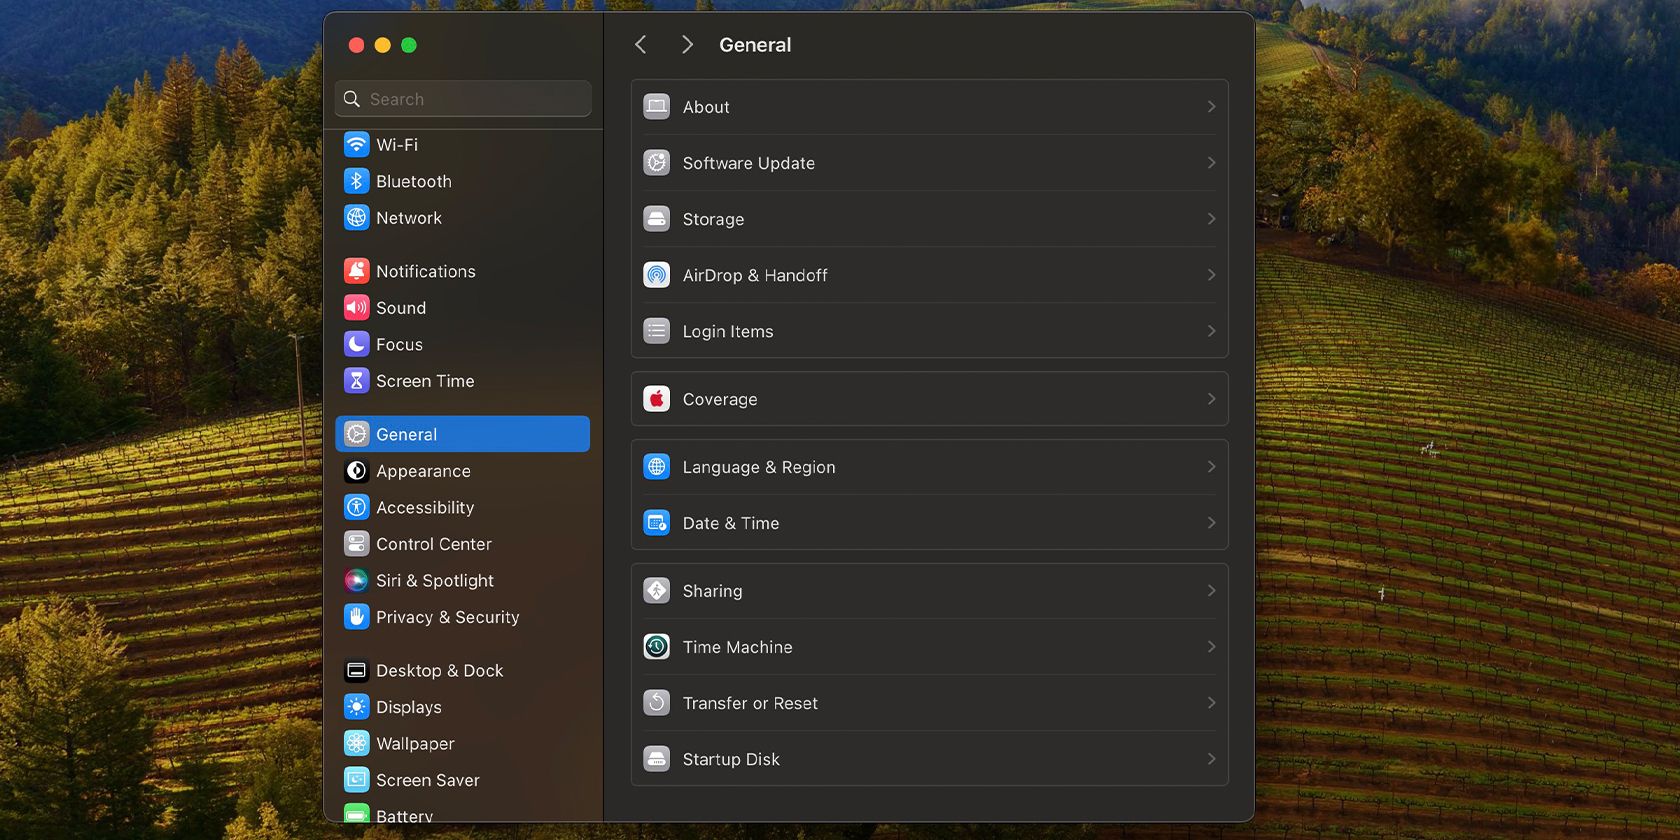
Open System Settings on your Mac and go to General > Sharing.

-
Toggle on File Sharing and click the Info (i) icon next to the File Sharing toggle.
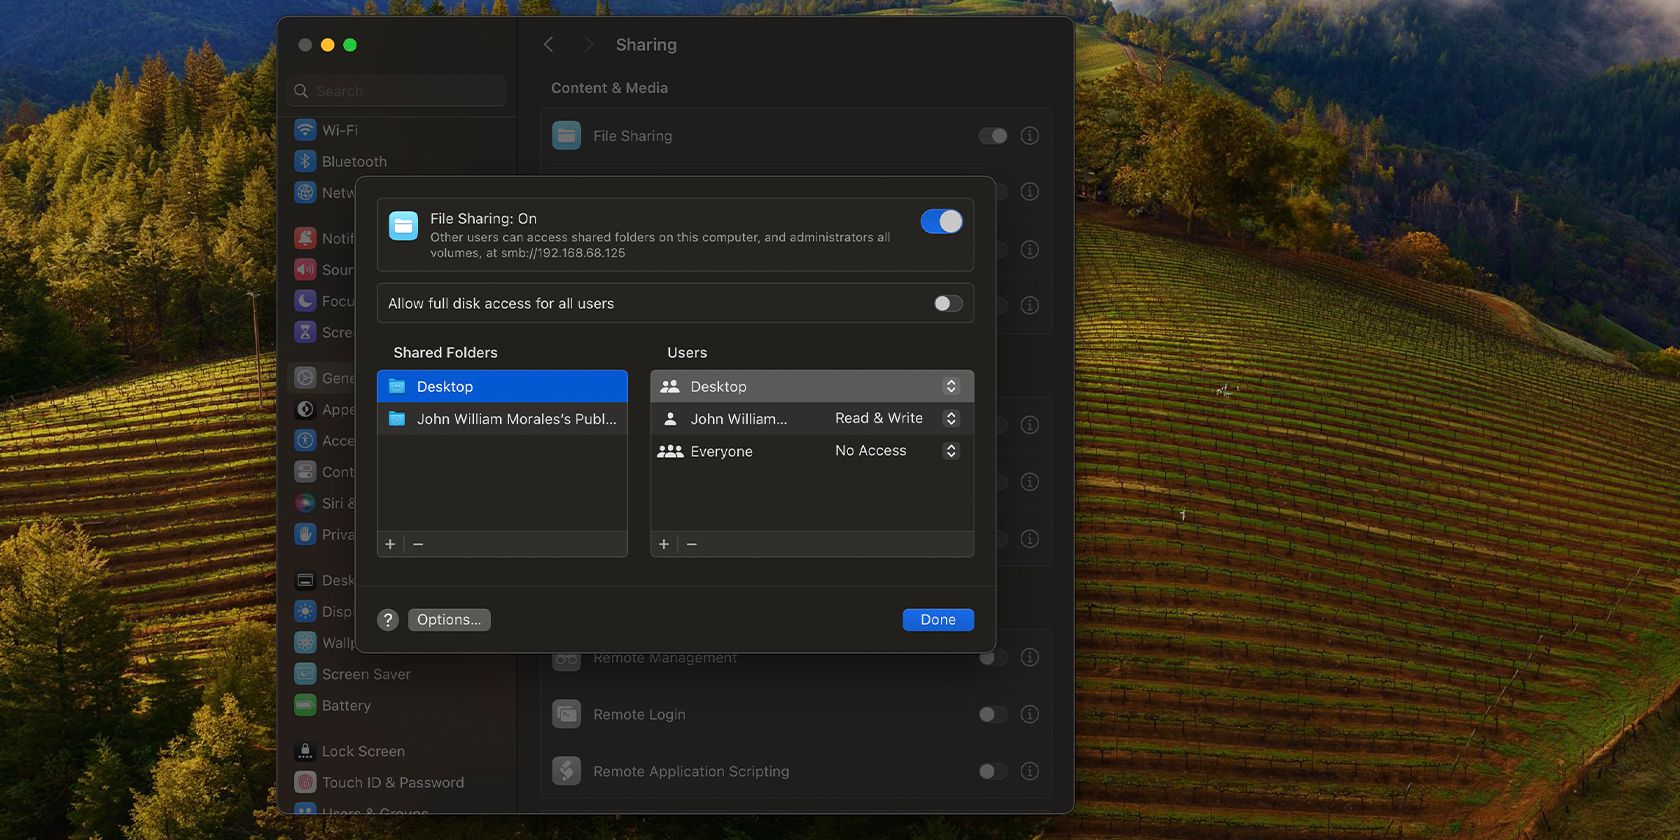
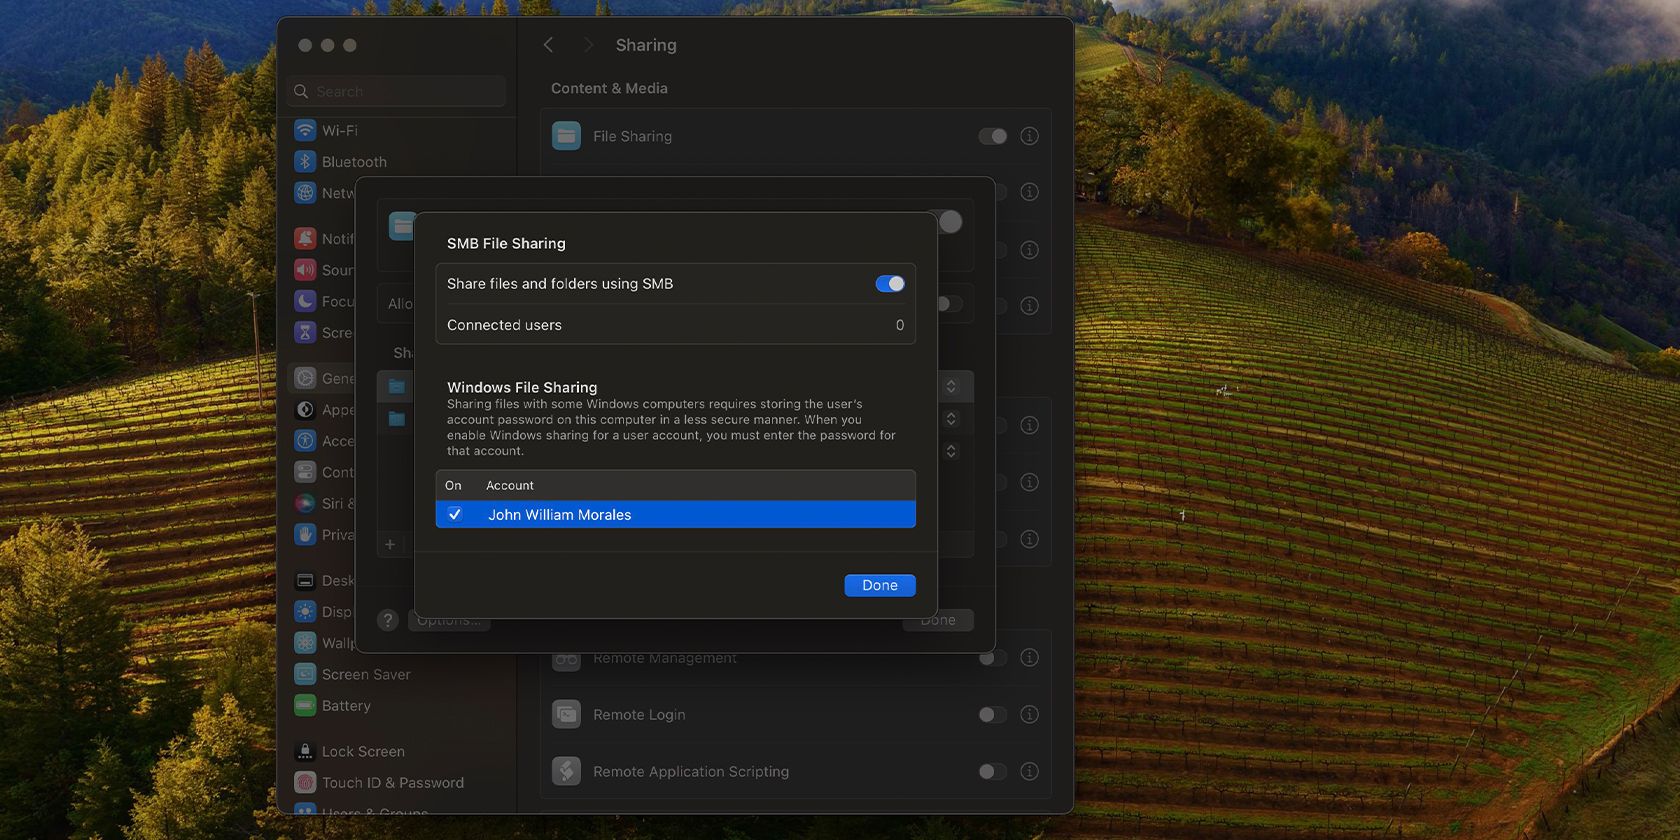
- Click Options to launch the SMB File Sharing window. Toggle on Share files and folders using SMB.
-
Under Windows File Sharing, check the box next to the account name whose files you’ll access on Windows. Enter the password for that user and click OK.
- Click Done in the SMB File Sharing window.
- Take note of the IP Address under the File Sharing: On status near the top of the window.
Once you’ve configured file sharing on your Mac, it’s time to jump on your Windows PC.
Accessing Mac Files and Copying Them to Your Windows PC
Follow these instructions to transfer files stored on your Mac to your Windows PC:
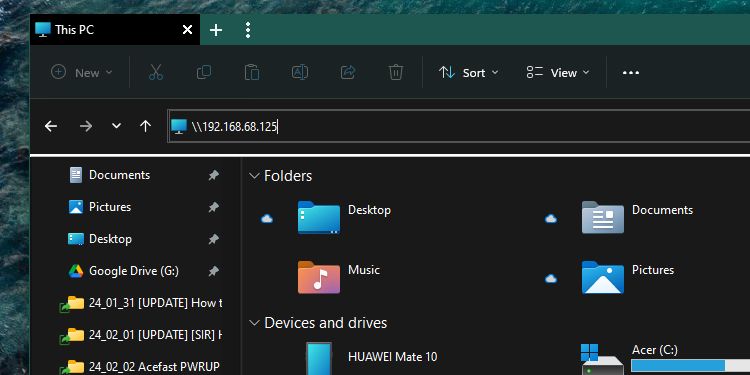
- Open File Explorer on your Windows PC.
-
Click inside the address bar and type the IP address from your Mac. Disregard the SMB prefix—the IP address should look like \\192.168.x.x.

- Windows will ask for the username and password for the Mac user’s files you’re accessing. Remember to input them exactly as you did on your Mac.
- You’ll now be able to access the shared folders on your Windows PC. Copy files as you would from any other Windows folder.
If you frequently access these files, you can map the folder as a network drive in Windows to make them easier to open.
Use File Sharing to Transfer Files From a Windows PC to a Mac Using macOS
To access your PC files on your Mac, you need to set up file sharing on Windows first. Again, we’ll split the process into two sections for clarity.
Setting Up File Sharing on Windows
Here’s what you need to do to enable file sharing on Windows:
-
Navigate to the folder you want to share, right-click it in File Explorer, and choose Properties.
- Head to the Sharing tab in the Properties window and click the Share… button.
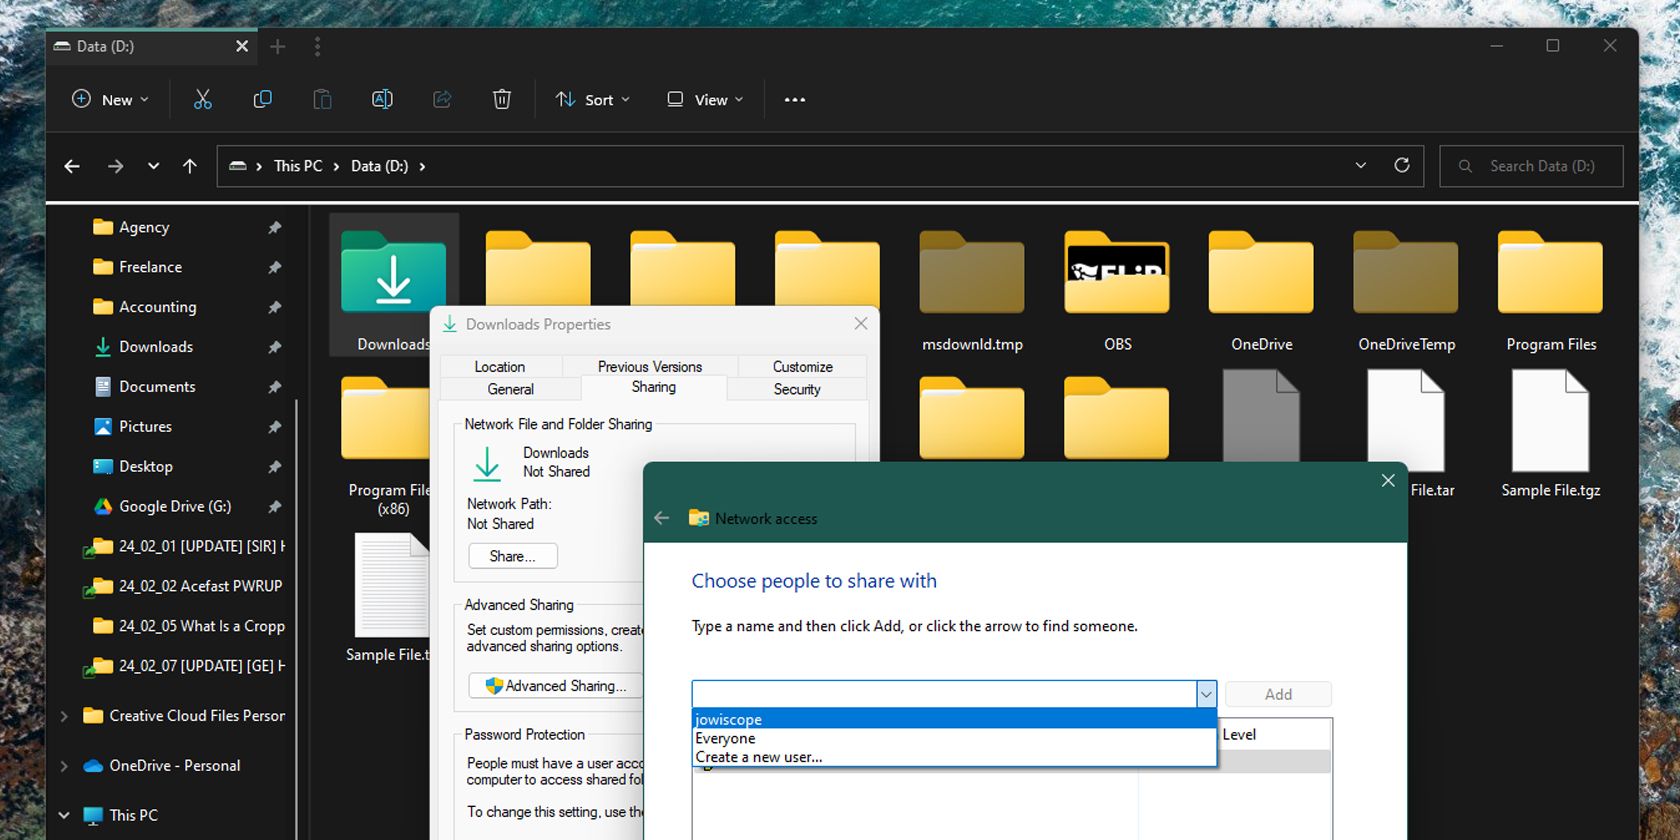
-
Click the dropdown menu in the new window and select the username you want to share the folder with. Then click Add.
-
Click Read under the Permission Level column beside the username to change between Read (access only) or Read/Write (access and make changes).
-
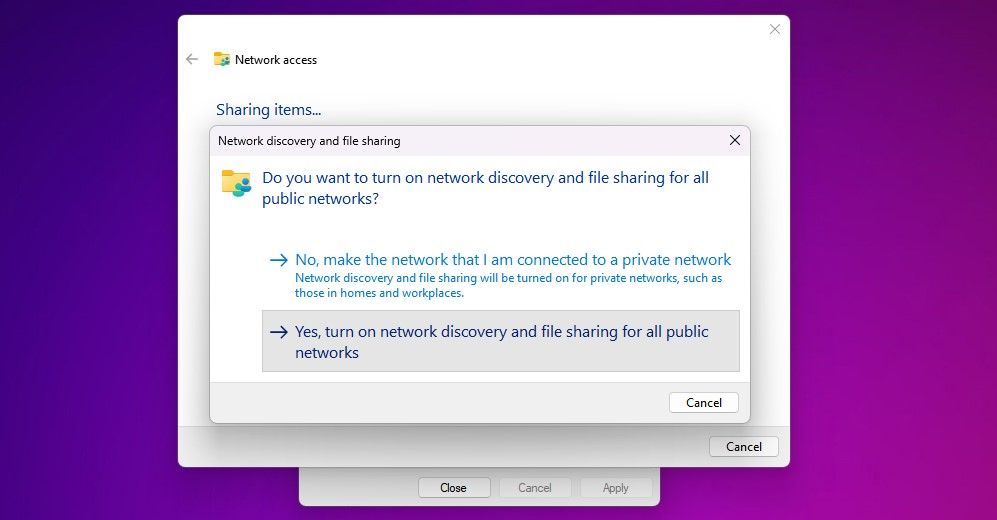
Click Share. Windows will prompt you to turn on network discovery and file sharing. Select Yes and wait for the process to finish.

- Now, open Command Prompt or PowerShell on Windows, type ipconfig, and hit Enter to find your Windows PC’s IP address and note it down. In most cases, this will be the IPv4 Address under Ethernet or Wireless LAN.

That’s all you need to do on your Windows PC.
Accessing Shared Windows Files on Your Mac
To access the files you just shared on your Windows PC using a Mac that’s connected to the same local network:
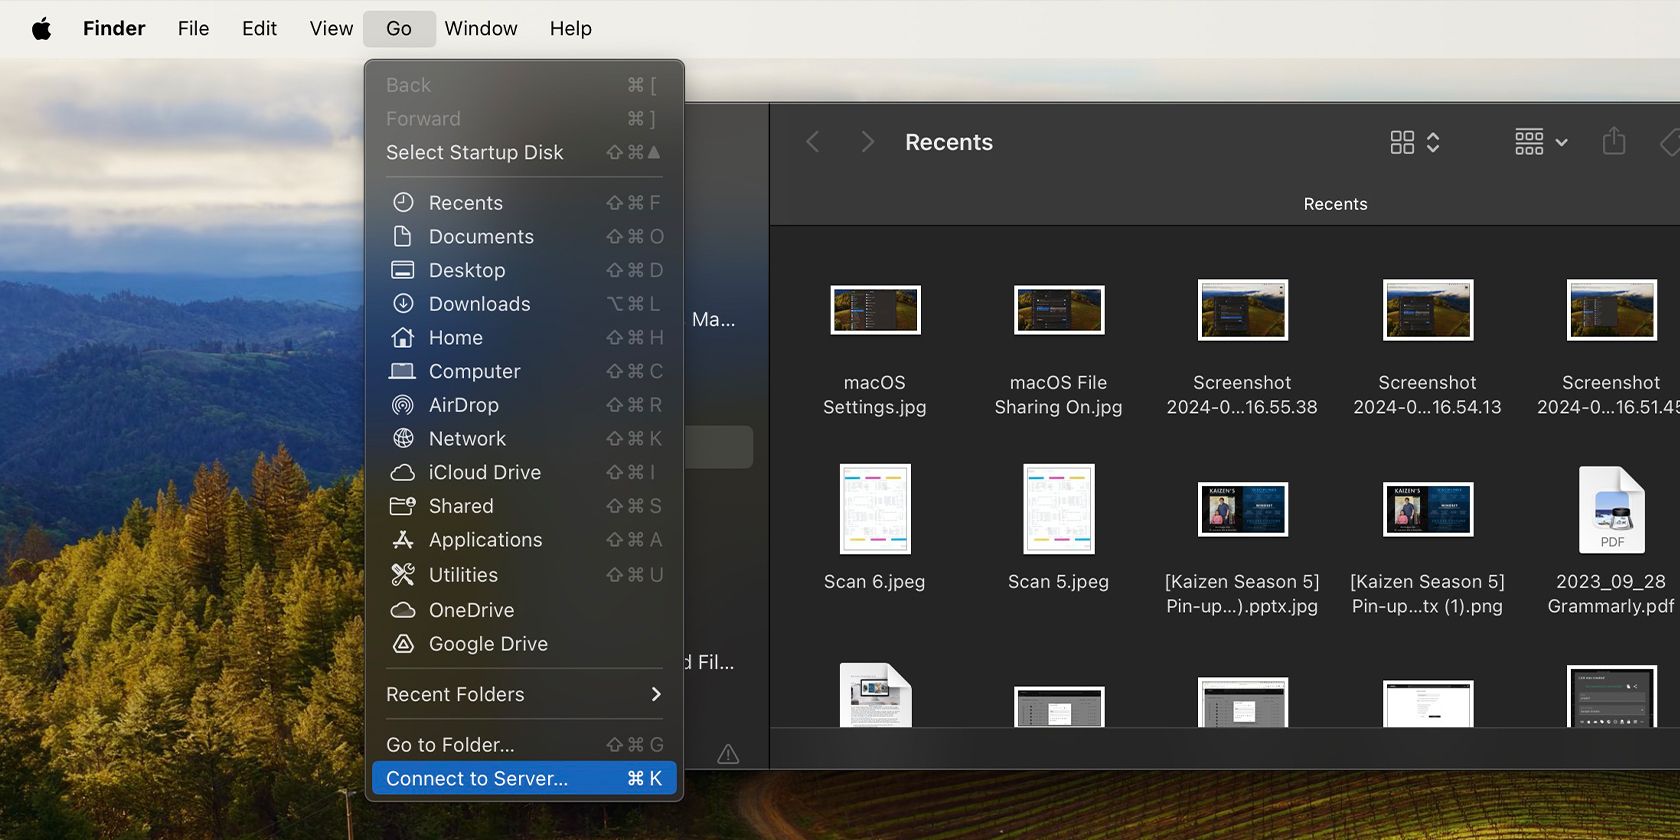
- Open a Finder window by clicking the Finder icon in the Dock.
-
Click Go > Connect to Server from the menu bar.
-
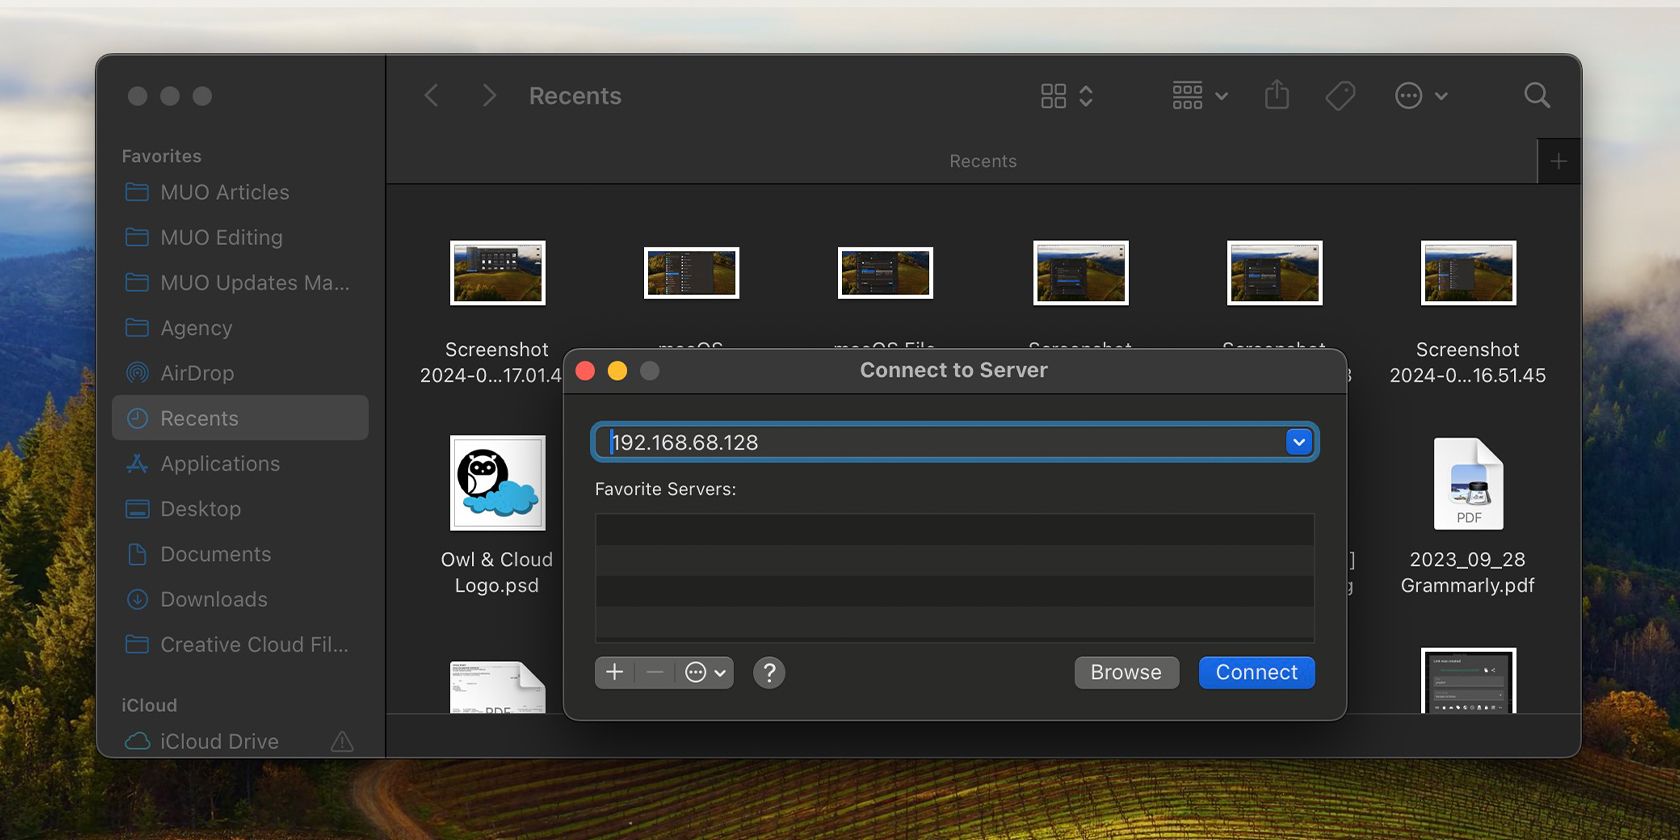
Type your Windows PC’s IP address in the Server Address field and hit Connect.
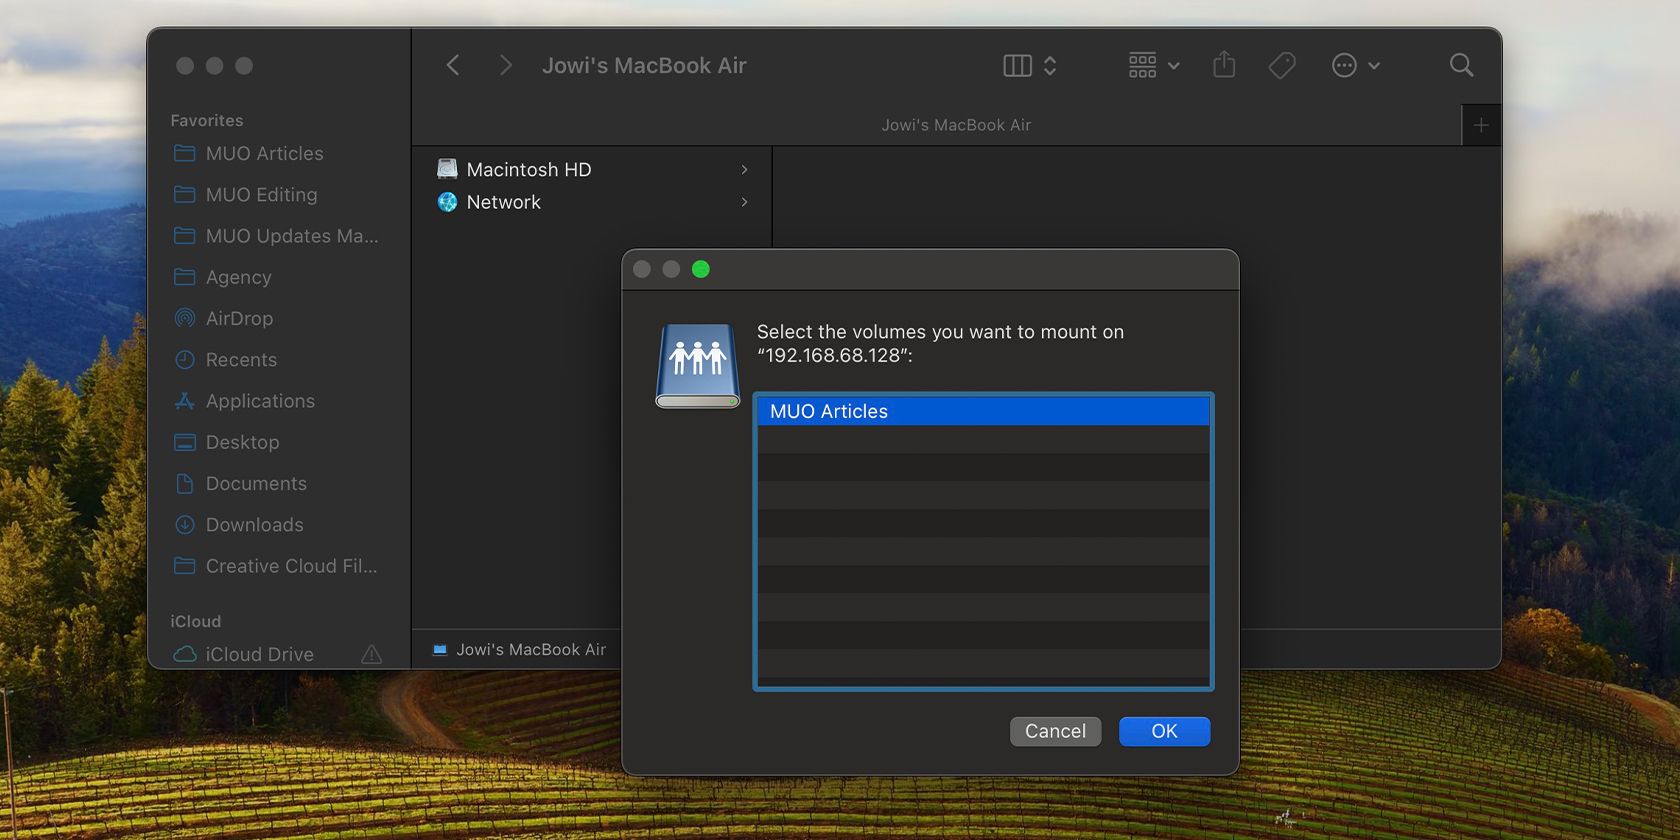
- Enter your Windows username and password, then hit the Return key.
-
Select the folder you want to mount on your Mac and click OK.
You’ll now see your Windows folders under the Locations section of the Finder sidebar. Now that you’ve connected your Mac and Windows PC, you can easily share more folders.
The methods we shared are great if your computers are connected to the same network. But if you want to access files remotely or skip the Windows and Mac setup process, you can use the following alternatives instead.
Use Cloud Storage Services
Cloud storage services like Google Drive and Dropbox store a copy of your files on their servers and let you access them anywhere. You just need to install and set them up on each of your computers so they automatically sync your files.
However, you need an active internet connection to ensure the files are updated. Furthermore, if you want more storage space than what’s offered on the free tiers, you’ll need to pay for a subscription. You also have to wait twice: once for the files to upload from the source machine, and again for them to download on the target PC.
Use a Removable USB Storage Device

This is often the simplest way to transfer files between a Windows PC and a Mac. All you need is an external hard drive or USB stick to copy files to and from your devices.
Remember to format your drive using the exFAT file system, as that’s compatible with Windows and macOS and can accommodate large file sizes. While this won’t let you sync your files in real-time, it’s much easier to use, especially as it’s plug-and-play.
Furthermore, it’s a one-time expense, unlike cloud services that require a subscription. If you plan to go this route, consider the important factors when buying an external drive for your Mac and PC.

If you don’t want to spend on cloud storage but still want to access your files remotely, you can try Resilio Sync or Syncthing. These free-to-use apps let you share files between Windows and macOS using an encrypted key.
This is great if you need to transfer large files between devices occasionally. However, you need to keep both devices turned on, and transferring files may take longer if you don’t have a fast and reliable internet connection.
Get a NAS Drive

A Network Attached Storage (NAS) drive is great for keeping files synced across several devices. Consider investing in one if you’re working with a large team or backing up and protecting several large files.
While it may be a bit complicated to set up, and has a high upfront hardware cost, this option is the gold standard for backing up terabytes of data.
Third-party options for copying data between Windows PCs and Macs are great if you need to work on files across devices frequently. But if you occasionally copy and paste files from your Windows PC to your Mac (and vice-versa), the built-in options on both operating systems are more than sufficient for your needs.
If you have a mixed network of Mac and Windows PC’s, chances are good that you’ll be wanting to move files between the two operating systems. The easiest way to share files from Mac OS X to Windows is to enable Samba support for a given user account on the Mac. This tutorial will how to share files between Mac and Windows PC this way.
Samba (SMB) may have a funny name but it’s essentially just Mac OS X to Windows file sharing support. Because it’s not required by all Mac users or for Mac-to-Mac sharing, it’s actually a separate unique sharing option within Mac OS X File Sharing panel, and enabling it allows a Windows PC to connect to the Mac without any additional software. Let’s cover exactly how to enable this feature, and then how to connect to a shared Mac from a networked Windows PC so that you can swap files back and forth with ease.
Enable Mac to Windows File Sharing in Mac OS X
First you need to enable the Windows to Mac file sharing functionality, this is a simple preference toggle in Mac OS system settings on the Mac:
- Launch “System Preferences” and click on “Sharing”
- Click the checkbox next to “File Sharing” to enable it
- Once File Sharing is turned on, select it and then click on the “Options…” button
- Click the check box next to “Share files and folders using SMB (Windows)”
- Now click on the checkbox next to the user accounts you want to share or access from Windows – when you click to enable SMB sharing on a user account, you will be asked for that users password
- Click on “Done”

With SMB enabled, we now can connect from the Windows PC to the Mac. If you already know the Macs IP address you can skip this first part of this and go directly to the Windows PC to access the shared users directory.
Connect to the Mac File Share from a Windows PC
With SMB and Windows File Sharing enabled, you can now connect to the Mac from any Windows PC. First you’ll get the Macs IP address that you need to connect to, then you’ll connect to that from Windows:
- Back at the ‘Sharing” system preference panel, take note of your Macs IP address as seen below, discard the afp:// portion and pay attention to the numbers in the format of x.x.x.x
- From the Windows PC connecting to the Mac:
- Go to the Start menu and choose “Run” or hit Control+R from the Windows desktop
- Enter the IP address of the Mac in the format of \\192.168.1.9\ and choose “OK”
- Enter the shared Mac OS X users login and password and click on “OK”

Access to the shared Mac directory and user files appear as any other folder within Windows. You’re free to copy or access individual files, or perform more substantial tasks like moving an iTunes library from a Windows PC to a Mac.
This process of connecting to the Mac should be identical from Windows XP, Windows Vista, Windows 7, Windows 10, and Windows 8 or RT, and enabling file sharing on the Mac is the same in MacOS Catalina 10.15, MacOS Mojave 10.14, macOS High Sierra 10.13, macOS Sierra 10.12, Mac OS X 10.6 Snow Leopard, 10.7 Lion, 10.8 Mountain Lion, and OS X Mavericks 10.9, and El Capitan 10.11, OS X Yosemite 10.10.x. SAMBA has been a supported Mac protocol for a very long time, so technically you will find that older Macs and OS X versions will also be supported by this.
Connecting to a Windows PC from a Mac
Going the other direction, you can connect to a Windows Shared PC very easily from a Mac running Mac OS X:
- From the Mac OS X Finder, hit Command+K to summon “Connect To Server”
- Choose the “Browse” button to browse the available network shares, double-clicking on the share to enter a login
- OR: In the “Server Address” field, simply enter the IP of the Windows share to connect to preceded by smb://

For example, to connect to a Windows share at 192.168.1.115, the smb address would be: smb://192.168.1.115
Note that an issue with some versions of Mac OS X Mavericks causes smb:// to use Samba2 rather than Samba1, which may cause connection errors with some servers. If you run into such a problem connecting to a NAS or SMB Windows share from OS X 10.9 Mavericks, you can forcibly use Samba1 with the cifs:// prefix like so: cifs://192.168.1.115 – this is not the case with Mac OS X Yosemite or other versions of MacOS and Mac OS X.
What about the .DS_Store files?
Depending on the Windows PC settings, you might see a bunch of .DS_Store files on the Mac file system. These are normal but if you’re peeved by them, you can disable .DS_Store files by entering the following defaults write command in Mac OS X’s Terminal:
defaults write com.apple.desktopservices DSDontWriteNetworkStores true
If you want them back, just switch that to ‘false’ at the end.